

So, while my bedroom makeover drags on and on at least I can share some insightful snippets of the journey thus far to (hopefully) keep you keen.
I know a lot of you have been hanging out to know how I was going to create a massive wall map on a budget – cause, dang, those things can be super expensive.
Well, it all started with this image…

Which got the cogs a-turning, and then evolved further when for $40 I scored this…

It was one of those, “Honey, stop the car!” moments when I spotted it outside our local charity store. You might think $40 isn’t all that cheap though this frame is MASSIVE – 150cm x 80cm (60 x 31 inches)!
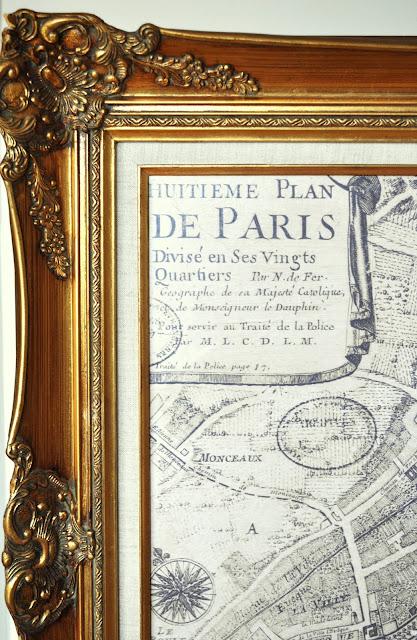
And finally, after some deliberation, I settled on this map…

So gorgeous. Who doesn’t love vintage cartography?
And now, after some further research and a little bit of work I have this…
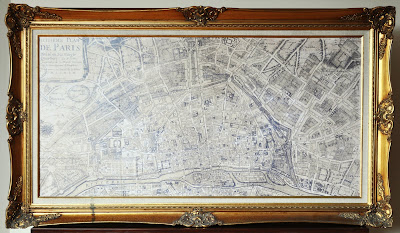
(Okay, still to actually be hung though you get the idea – BTW, that’s my TV bench it’s sitting on and overhanging…it’s biiig!).
And all for just $70 total (that’s $40 for the frame and only $30 for the massive map!).
So, here’s how I did it…
1. Find a high resolution, zoomable map somewhere on-line.
Map History is a great resource for this kinda thing. Just remember to make sure the map isn’t copyright protected and reproducing it is permissable.
2. Here’s where the ‘zoom’ feature is important. If you simply tried to copy and paste the whole map in one go the image resolution would be way too small to enlarge it without massive pixilation. So, starting in one corner, zoom in (as far as you need to depending on the size of the map you want to create) then copy that one section or save it as a picture file.

3. Once saved or copied, open up your map segment in an editing program like Photoshop (if you don’t currently have an editing program you can use this program which is free to download).
4. Still in your editing program, make the canvas size the same as that you want your finished poster to be (in my case 120cm x 60cm (47 x 23 inches) – which is the size of the opening in my frame) and assess, based on your initial map segment, if after you copied the entire map in comparable sections it would be large enough to cover your desired area.
5. Sound complicated? It may take some playing around though it is actually pretty straight forward. Trust me, I’m no computer buff (or maths expert) and I managed to work it out somehow :-)
6. Go back to your on-line map and move from segment to segment, copying and saving each section so it overlaps slightly, then pasting it all together, like a jigsaw puzzle, in your editing program to form one giant image (some sites will be more user-friendly than others when navigating from segment to segment).

To make up my completed image only took around 15 map segments and around 1 hour of copy-pasting so, while it sounds like a lot of effort, it’s actually pretty quick and easy.
7. Once you have completed your digital image, edit it as necessary (i.e. change the colour, add a border etc, etc, etc) then save it as a JPEG file. To double check that once printed-out you will have a good quality image, zoom in to relative size (use in-built rulers as a guide) and check for pixilation.
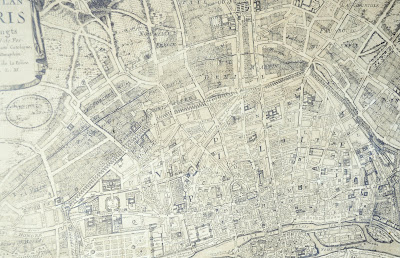
Very slight pixilation can only be seen in my map from as close as around two inches away which is really nothing to worry about.
8. Save your JPEG file to a USB and take it to your local budget printing store to be printed.
Depending on the size of you map you may also be able to print it at home in sections.
9. Do with it what you will!
I simply attached mine with Mod Podge to the existing oil reproduction print already in my frame then sealed it with a burnt umber glaze.
Seriously, this was waaaay easier than I made it sound though I was just trying to be thorough. I am now hooked and am making massive maps for everyone I know!


Krisitne,
Nicely done. Wanting to do a large wall map in my sons big boy room so I thanks for the how to!
Gorgeous – and affordable – and large. We all have challenges with too many little prints/accessories. We love it… My Design Guide.com
Really cool idea anyone can try. Thanks, I’d never seen it done like this before. I’m really excited about giving it a go now!
Kayla
I can’t wait to try it! Thanks for the detailed instructions :)
This is genius.
Very, very nice. Great work.
Stunning and looks very impressive – well done!
Kristine, This will look fabulous in your bedroom! I can’t wait to see it in the completed room. I love the frame too.
Hugs, Sherry
Beautiful! Love this idea! And I think you really scored on the frame. That same kind of frame in on my wish list. A friend found one at the thrift store for $5. I was SOOO jealous!
What a great project! What are you using for modpodge here in Australia? I haven’t been able to work out our substitute yet – pva?
I’m so delighted to have found your brilliant blog. I love how you’ve done that mapin aq frame.My mind is all of a whirr trying to think how I could do it!
Thank you. xx
Thanks for the comments ladies. Seriously, you have to try this. You can use this method to make maps up to 3 meters wide (maybe even bigger depending on zoom quality!).
Heather, you can get Mod Podge in Australia now. I’m not sure if it’s just a recent addition though I have seen it at Spotlight and in some craft stores.
Kris
xx
You could probably also do this with the “bird’s eye” view on Google or Bing Maps. I do like the vintage cartography print, but I’m equally fascinated by aerial photos of modern cities. And if your photo editing app is a more capable one (I’m a looong-time fan of Paint Shop Pro, which does virtually everything Photoshop does, but at -literally- a fraction of the price and learning curve) you might be able to layer on an antique filter for an interesting neo-vintage effect.
That is just the coolest way to get a big map. Where there’s a will-there’s a way…and your cost was probably about 1/10 of what it would be to buy one! Great job!!! Diana
That’s really impressive! Great job, thanks for the tutorial!!!
Thanks Kristine! I must go and get some if only just for curiositys sake as to what this magical ModPodge is!
that looks so grand! i love it!
and i think it mush have been blogger’s time of the month this past week… she sure was finicky.
Kristine, you are just the bees knees! That looks fabulous and you are just the most generous person to share all of your ‘how to’ tips! Thank you so much! Roll on bedroom reveal…
What a great way to do it. I wonder if I can do this with a map of the stars…I love the Andromeda galaxy and it would be cool on the wall in a huge size…
This is wonderful! My husband is a map buff and would love it, I’ve been wanting to surprise him but the prices of the ones I found always stopped me in my tracks! My idea is to hang in on the stair landing wall. Anyway, thanks for the tips, I’m going to bookmark your site and come back and figure out how to do this!
xo
Heidi – Heart and Home
Brilliant! I just love your map.
~ ~Ahrisha~ ~
Beautiful! Thank you! I have been struggling with what to do with a house that has way too many wall mirrors (and I mean entire walls covered with mirrors! Lots of walls covered entirely with mirrors!) My husband bought the house 10 years ago, hated the mirrors but never did anything about it.
We got married in March, and I looked into having the mirrors removed — very expensive, plus the walls underneath would have to be redone. So I wanted something interesting to do on some of the walls to break up the mirror-ness. Toyed with vintage maps, too, but the price was as you said very high.
You just solved my problem! Thank you! I will take and share before and afters with you! :-)
Thanks for this great idea – I’ve been thinking of looking for an vintage world map, but this might do the trick.
Hi! I’m visiting from Between Naps on the Porch. What a great idea! I linked up to a DIY wall art project as well… certainly not as fancy (my budget was just about $0) but still fun. Thanks for sharing!
I LOVE your home! And blog- I’m your newest follower!!
xo- M
What i fab idea, it looks really expensive, might give this ago thank you for sharing!
BTW ive popped over from “my backyard eden” :) x
I love this! I keep seeing these at Restoration Hardware and other places and can now see one in my future. TFS.
I love it! Very different.You are one creative lady!
This is awesome! I love it. I just made a huge piece of wall art too and it is hard to fill a big blank space without spending big bucks! Good job!
~ LOVE THIS!!! And the frame!!!
Soooo beautiful!!!
Thanks for sharing :))
~ Michella ~
What a fantastic makeover. You did a wonderful job!
Stop by and collect your clues. The largest giveaway in Decor To Adore history will be revealed next Friday.
This was a great tutorial. I have been wanting to do something with a map on a tabletop and this might just be the answer. Thank you for sharing!
The best kind of tutorial, and the best result!
you are not going to believe this! I picked up almost an identical frame at a garage sale this morning I ll have to post it soon. What’s the odds of that?
This is going to look fantastic in your room. Thanks for the directions on how to make it ourselves.
WOW! love this…come on over and link up to MMM :)
Wow! Amazing job! Thanks so much for stopping by and joining us for Anything Related!
{Rebekah}
Wow! This is a really cool idea!
Hugs,
Olivia
Love this! I featured your project on Fab Friday Favorites this week.
love the chunky frame and your inspiration picture is fantastic!
You are brilliant!! Thanks so much for all the info, I can’t wait to try it!
Ok, I’m really not computer literate and feeling like I’ll never be able to figure this out! Are you interested in selling your JPEG image you created? I think it may be easier to find a frame then to figure this out! ;)
Michelle
Hi Michelle. I have no way of contacting you other than via this post so I hope you see my reply. Please feel free to email me and we can discuss things further – thepaintedhive@gmail.com.
Kristine
xoxo
Oh! SO very clever! I will be trying this one this weekend! Had no idea it was a DIY project! Thanks so much for posting and for sending me the link!
Becca
i am doing something similar (putting up a vintage map as art, but framing it in pieces) – i bought my map on eBay for $25, and it was huge… just another idea that might help for people who want to keep cost down!
Amazing! I am now a follower
Hello Kristine!
I was wondering something. You took your saved jpeg to a copy center, where all they did was print out single sheets of your map. I expected you to say that you went to the copy center to have a poster made. Could you have done the same thing the copy center did, on your home copier, using good paper and ink? I might not be understanding. Thank you for sharing your technique. I had a more difficut one, that I’m now throwing away!
Juliawithag
The copy center did print out a poster of my map (not single sheets). It was so big they did have to print it in two parts though.
You could certainly print it at home in sections onto standard copier paper though it will use a lot of ink (which is expensive). For ease, and for a good quality result, I decided it was best to simply have it printed professionally. It only cost $30 (which I figure is pretty price comparable to doing it at home anyway).
Hope this helps.
Kristine
We spent our honeymoon in Savannah,Ga and Italy. I have several pictures of venice in our bedroom. I will have to look into a map of Savannah. Great idea!!!
Hi!
Just found your blog and I’m in love. That a given. :) Brilliant colour scheme for starters.
Anyways, I though I’d share this:
http://www.blockposters.com. Perhaps you’ve already found it, the post is from 2010 after all. But in case you have not, this is an online (free) tool for changing your A4 images into several printable pdf-s, you choose the number of pages you want to end up with for putting together like a puzzle.
Hi Dominika
Thanks for your comment :-) I have seen that website before (and some other similar ones too). It’s a good option for people who want to print their images at home. You do need a high resolution image to begin with though otherwise it will pixelate out quite a bit. Though many people like the artistic look of a blocky image anyway.
Please help me find that exact map you used?
Hi Sarah
Here you go:
http://gallica.bnf.fr/ark:/12148/btv1b77107008.r=.langEN
Have fun :-)