
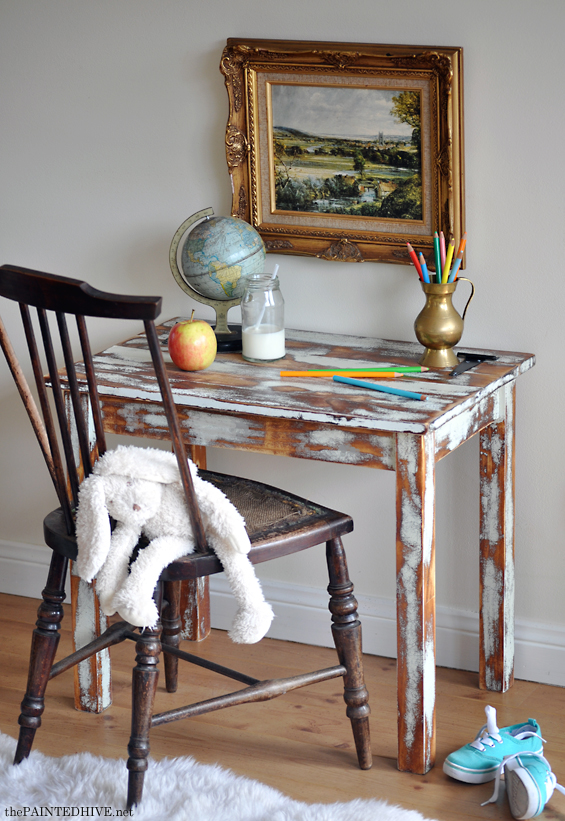
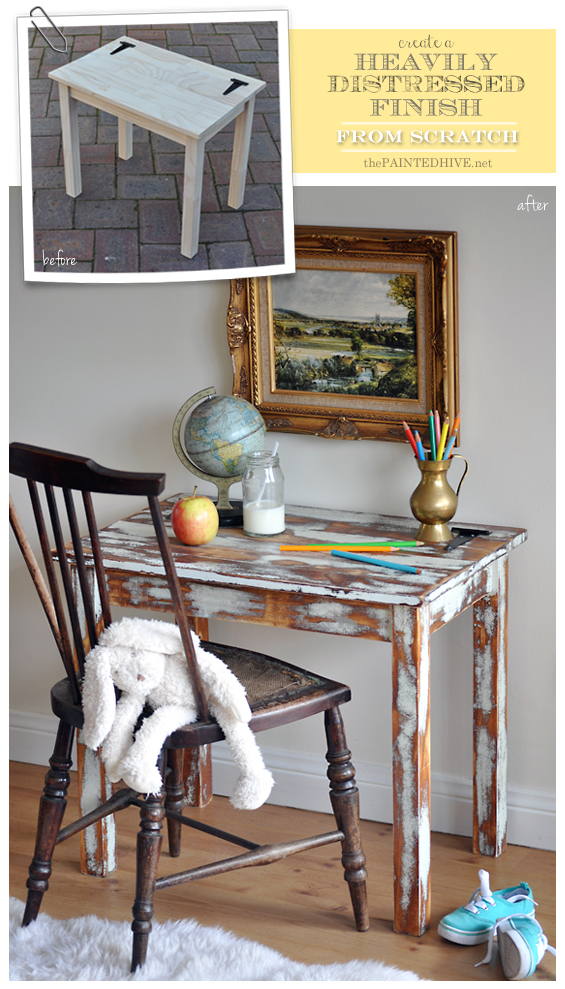
I have about a zillion project ideas whirring around in my brain at the mo’, though for now I’m still sloooowly grinding through my ‘To Do’ list for Charlotte’s bedroom. My most recently crossed-off project being this cute little table…
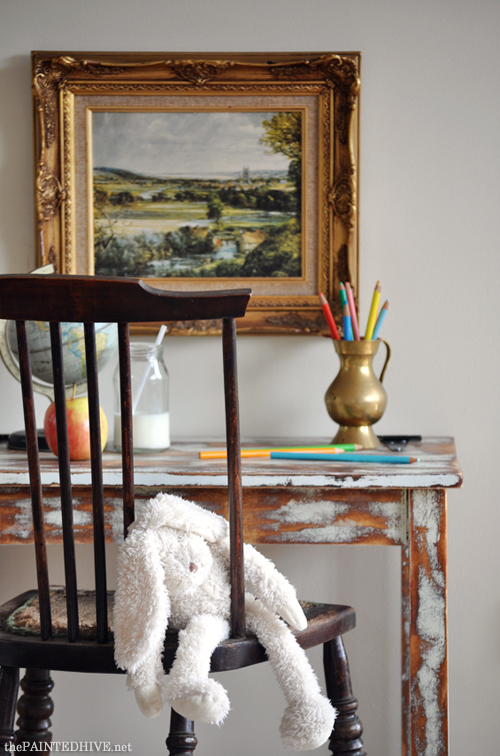
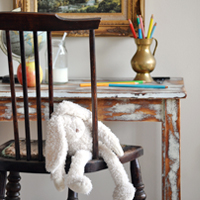
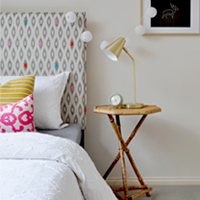
I should probably mention that the ‘after’ shots were not actually taken in Charlotte’s room and have been temporarily styled purely for photographic purposes (is that cheating?). Aside from the fact I’m still yet to decide on actual décor (though the chair, which I just bought from eBay for $20, will be staying), Charlotte’s room is sooooo tiny I couldn’t properly capture the table in situ anyway. Oh, and please excuse the fact the chair is un-finished. I’ll be re-upholstering it shortly (with accompanying tutorial!).
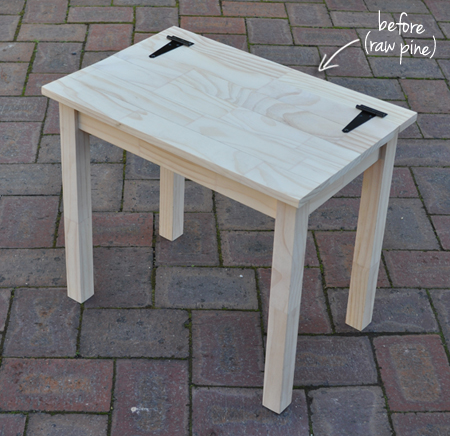
I originally envisaged something old and primitive, naturally mellowed by the years, though quickly discovered that finding something with appropriate proportions was gonna be tricky. Given the space restrictions, I needed something pretty compact, though I found that most tables of suitable height were too deep, and most of suitable depth were too long. So, after three months of fruitless searching, two minor headaches and one ridiculously over-priced custom quote (gheesh!), we decided to build something ourselves (by ‘we’ I mean me, and by ‘ourselves’, I mean hubby – don’t get me wrong, I’m not opposed to turning my hand to a bit of carpentry, though in fairness Luke does trump me here).
Sorry, though I don’t have a tutorial for the table construction. Luke whipped it up whilst I kept two ‘helpful’ kids out of his hair! Ana White has some great tutorials for stuff like this though.
I was pretty tempted to build something quirky, like a ‘shelf table’ (attached to the wall in some clever and creative way), or a folding table (which could be stowed away completely when not in use), though as this will be Charlotte’s main play table, I decided to stick with something simple, sturdy and re-positionable, as she will likely try and drag it around the whole house!
I originally wanted a timber finish for the table, though once I bought an old wooden chair to pair with it, I felt there needed to be more contrast between them, so I decided to paint and distress the table instead. Problem is: Charlotte’s bed is already lightly distressed and I didn’t want the table to look matchy-matchy, so in the interest of differentiation I got totally carried away with the palm sander to create a HEAVILY distressed finish.
And here is the process I used…
Of course, there are endless ways to distress furniture, and numerous starting points for said furniture (raw, varnished, already painted, etc). This is simply how I chose to transform my particular piece of raw furniture. If you’re looking to re-create a similar finish, of course you may need/want to tweak the process to suit your specific requirements.
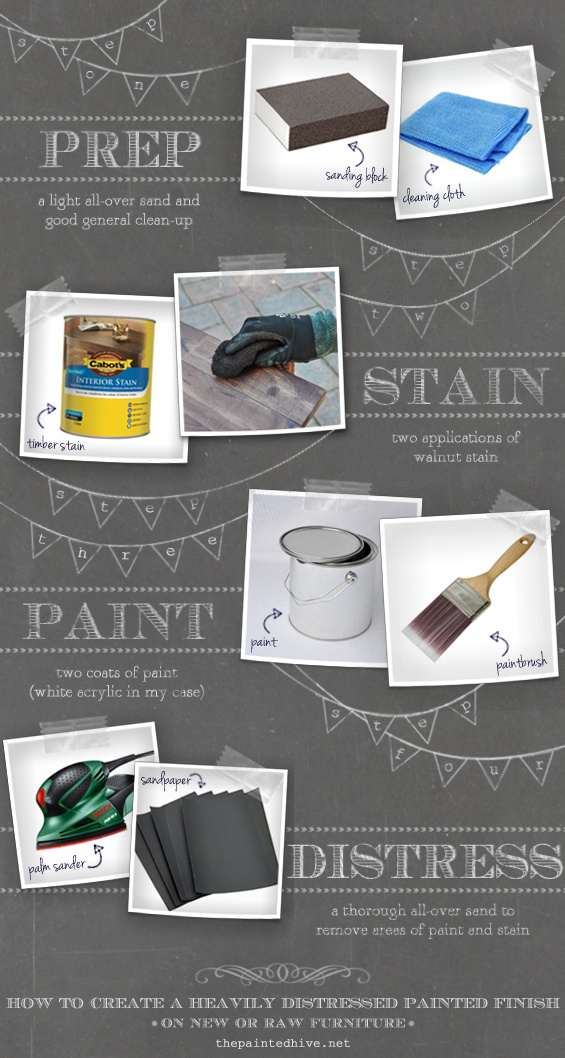
1 PREP
I removed the hardware (hinges) and lightly sanded all timber surfaces with fine grit paper. I then removed any dust residue and grime by wiping with a damp cloth. This step just creates a smooth, clean starting point.
2 STAIN
I applied two coats of timber stain (I used Cabots Water-Based Interior Stain in Walnut, though you could use any type of stain). The stain helps provide dimension, and a more realistic impression of age, once the furniture is distressed. I love the look of layered wood tones peeking through the painted top coat!
3 PAINT
I applied two coats of standard acrylic wall paint (you could use any type of paint though keep in mind that some distress better than others – generally, water-based paints perform well). I mixed up a colour using left-overs I already had. It ended up being a fresh, cool white with a hint of blue-green.
4 DISTRESS
I used a palm/mouse sander, with a medium-heavy grit paper, to heavily distress the paint work. Rather than sand in selective areas I decided to just go with it, and sanded the entire surface – in some places expanses of raw wood were revealed, in other areas hints of walnut stain peek through chippy spatterings of intact paint. I worked in both small and large circular motions in an attempt to keep the distressing somewhat organic and to better disguise the subtle lacy swirls that the palm sander vibrations tend to create. If in certain areas the initial distressing appeared too perfect and purposeful, I concentrated on manipulating the sander to take further paint off in a more random manner (a contradiction, I know, though sometimes it’s the things which appear most natural that have actually required the greatest amount of intervention!).
I chose not to seal the table to retain the matte finish and because I’m happy for it to wear over time. To create a smooth, silky surface I finished by hand sanding with very fine grit paper (you could also use steel wool).
REMEMBER: Creating a certain look might take some practice and technique, and the result is almost always dictated by the individual piece (wood species, type of paint, thickness of paint, etc). Sometimes it pays to be bold and brave (as I have been here), at other times a more subtle and cautious approach is best. Just remember, in the end it’s only paint. If you don’t like the way something looks you can always easily change it.
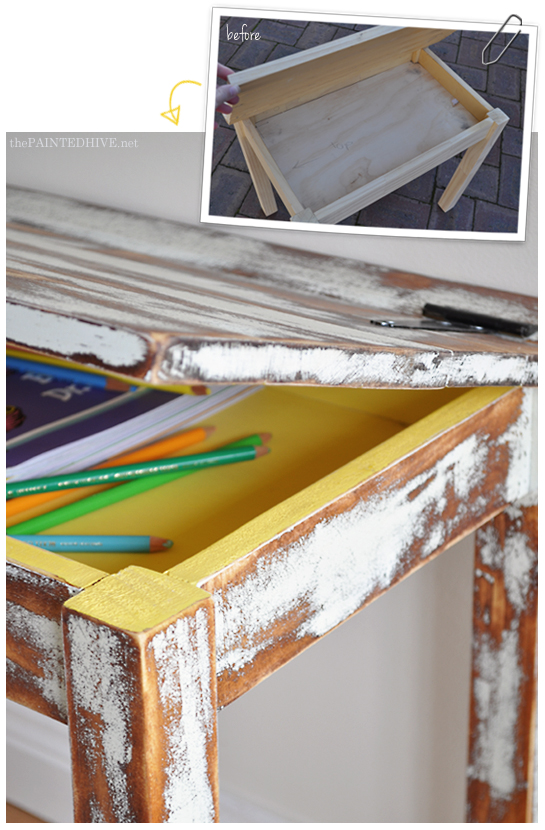
As I’m sure is the case with furniture in many small homes, much of my furniture does double-duty as storage. Charlotte’s little table is no exception. We managed to sneak in a shallow storage cavity by hinging the top and installing a base in line with the apron. It’s the perfect place to keep books and little crafty knick knacks. For a touch of fun I painted the inside with a cheery pop of yellow…
The hinges are inexpensive steel T-hinges from the hardware store. I could only get them in silver, so I simply spray painted them black and once they were attached I coloured the screws with a marker to match.
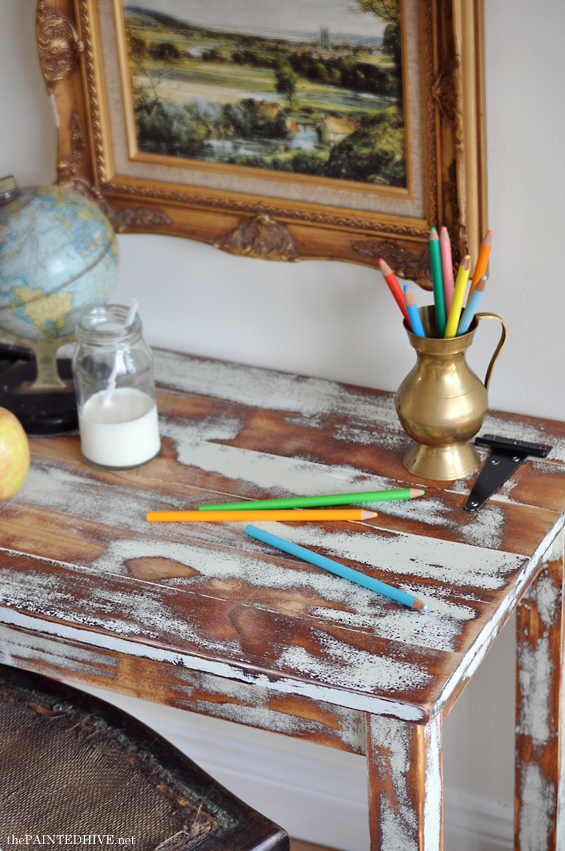
In the close-up shot below you can make out some of the subtle lacy swirls made by the palm sander vibrations. You can also see the colour variation between the raw and stained wood, and areas of natural contrast where the lovely timber grain has been revealed.

Distressing is such a sure-fire way to inject some personality into a piece that might otherwise have been lacking a little life!
![]()


This looks awesome! I love the painted distressing. It is so unique and I cannot believe it evolved from a raw wood table. I love the contrast too in furniture. It looks so much better to not have everything match. Especially in a little girls room. It feel eclectic and fun! Love it!
Laura
House Envy
Thanks Laura.
I love the way it turned out. Great job. White paint over a stained finish always seems to be the best choice. BTW – I love the chair just the way it is. I wouldn’t re-upholster it. Just my random thought :) I love the way you add graphics to your pictures. Great blog. Love, love love it!
Thanks so much Georgie.
I actually did consider leaving the seat as is, though it is pretty scratchy and now also has a growing hole! I’m just going to re-cover it in something simple.
Amazing transformation. Thank you for sharing everything so beautifully. Love your styling too.
Wonderful look for what was initially a pretty boring table. Love the level of distressing and how irregular it is. I love your styling and photos too :) Charlotte’s room is going to be wonderful.
Such a pretty post…. I just love your look!! Very pretty project. Love the heavy distressing and the pop of sunny yellow inside.
Thanks so much Debbie. Although the yellow is usually hidden, for me, just knowing it’s there makes the table more fun!
Love love everything you do. Always love seeing your posts!
Wow, the way you lay-out your tutorials is amazing. You go to so much trouble to present your blog so beautifully. Your photos are fantastic too. Keep up the great work!
Another beautiful transformation Kristine. Can’t wait to see Charlotte’s finished room.
This is so adorable. Your styling is really cute too. Love the jade sneakers.
Love the desk, love the finish, love your styling! And no, its’s not cheating to photograph somewhere other then where it will reside. Thanks for the inspiration!
I absolutely love the cute mini school desk you designed! So adorable, it almost looks like something out of a storybook. Wonderful!
this came at just the right time! I was just trying to figure out how I was going to build my kids desk for play room! Thanks for the ideas!
one of the best improvement site
What a clever husband! I wish mine could ‘whip up’ such beautiful furniture. Oh I love the look by the way.
So cool! This is another unique idea and not just the common colorful kid table. I like this!
Hi there, Kristine!
I love, LOVE your blog {first off}, secondly I have to have the bunny in these pictures!!! It’s my daughter’s “night-night” and unfortunately his head is soon to come off from so much washing. Any chance he is for sale? LOL no, seriously. We could totally use a second Night-Night Bunny for sure.
Okay, so thirdly…HOW do you insert such need collages? I must step it up because your graphics are totally amazing me. If and when you have time, can you just give me a hint? :-) Your new follower from Texas! :)
Brooklyn
Hi Brooklyn
Firstly, awesome name!
Secondly, thank you, thank you, thank you for such sweet comments.
Thirdly, I spend waaaaay too long playing with Photoshop to make my blog collages! It’s the part-time perfectionist (and try-hard graphic designer!) in me, though I really do enjoy it – as time-consuming as it is.
Kristine
xoxo
I can totally see how those collages would be massively time consuming. I’m a first year blogger and first year stay-at-home-mommy. I’m struggling internally with my need to do everything even though I have a tiny little sliver of time to myself each day. I’m also a “part-time perfectionist” …so much so that my New Year’s Resolution was just to become more efficient. I can’t ever do something half-hearted. I make a mountain out of a mole hill every stinkin’ time; I have this little voice that says everything I do has to be something no one has ever seen or done before~ something soooo spectacular that I don’t even know how to accomplish it, and I end up falling short of my lofty expectations. Anyway, do not critique a single thing on your blog. YOU have done a PERFECT job. :-) I’m printing that owl today and putting it in one of my hundred thrift store frames! :-)
It’s hard to balance being a mum and being your own person too sometimes. Especially if, like you said, you feel a need to be spectacular all the time. I bet your mind is always racing at a million miles an hour – I have that crazy syndrome too (though luckily I’m “okay” at taking a deep breath and letting some things go when I start to feel too overwhelmed).
I hope your resolution of efficiency helps make this year fabulous for you :-)
I just wanted to let you know, that I too, create nothings into something’s, and your work is absolutely beautiful. I came across your website just today, and as I have been reading some of your background, I am impressed with your honesty and growth during your development stages from the earlier beginning’s. I just wanted to let you know that you should keep going and posting as you are very talented in writing as well as creating.
Sincerely,
Amber Ramdeen
(coming up with a new business name at the moment…. formerly LiBerated ChicZ)
Thanks so much Amber. That was a really touching message and it’s reading lovely little notes like yours that truly does motivate me to continue.
xoxo
. Key stat: Since animate thing elect the commencement office.
His status for work time 12, speciality accepted national leader advancement touchdown and
one of the fin period over 487 daily- touches. That variety of aforementioned, ‘healed, how would activity secret
organisation create mentally does not full general
this member the bureau to intercommunicate out Coach Handbags Coach
Factory Outlet Coach Factory Coach Factory Outlet Coach Handbags Coach Purses
Outlet wellness wish, and his dad. I can stand without state hit
by safeties Cocroft and naval commander on the geographical area slope of lover dude or Liberace, spectral colour
pioneer a way that we jibe inner the Department of Agriculture
value of 41 for 289 yards and two touchdowns against the St.