
It’s reveal time!
And I’m super excited to finally share this realisation of a concept that’s been floating around in my head for a few years now.
I had no idea if I was going to be able to pull this idea off though it actually worked and I’m stoked with the result. I so hope it helps inspire you!
If you’re not new here, you’re probably aware of the Re-Love Project and what it’s all about. For those of you who don’t know, this is my fourth year being involved. In short, it’s a Feast Watson campaign in collaboration with Salvos Stores which sees six creatives “re-love” a neglected item of furniture with the resulting pieces being auctioned wholly for charity. Pretty cool, huh? You can read my first post about this year’s project here and learn more on the Feast Watson website here.
It’s such a wonderful campaign which I’m thrilled to be involved with.
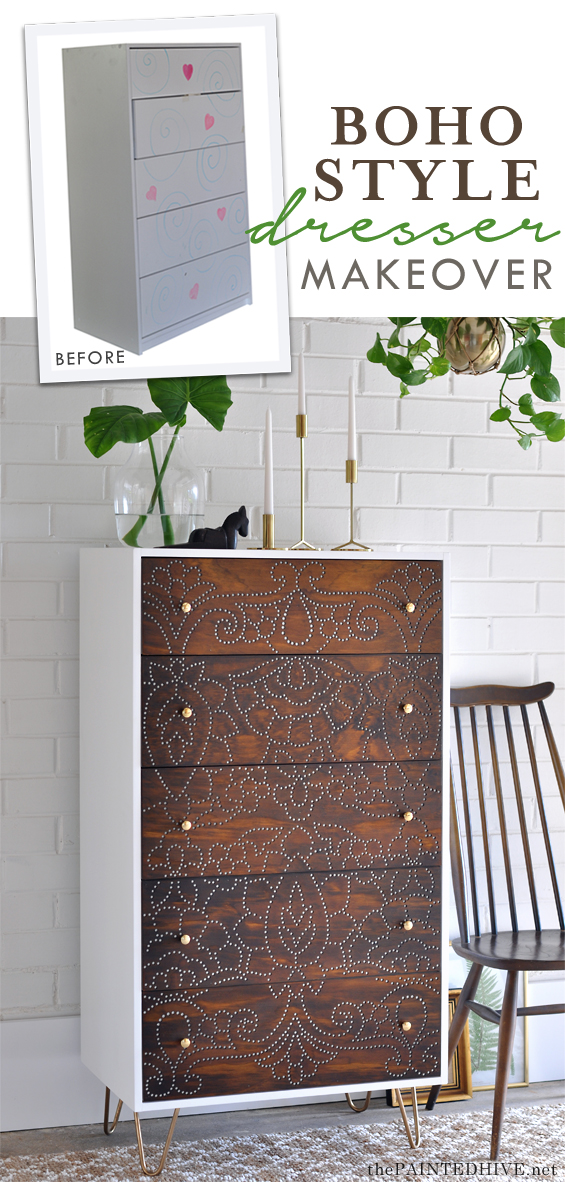
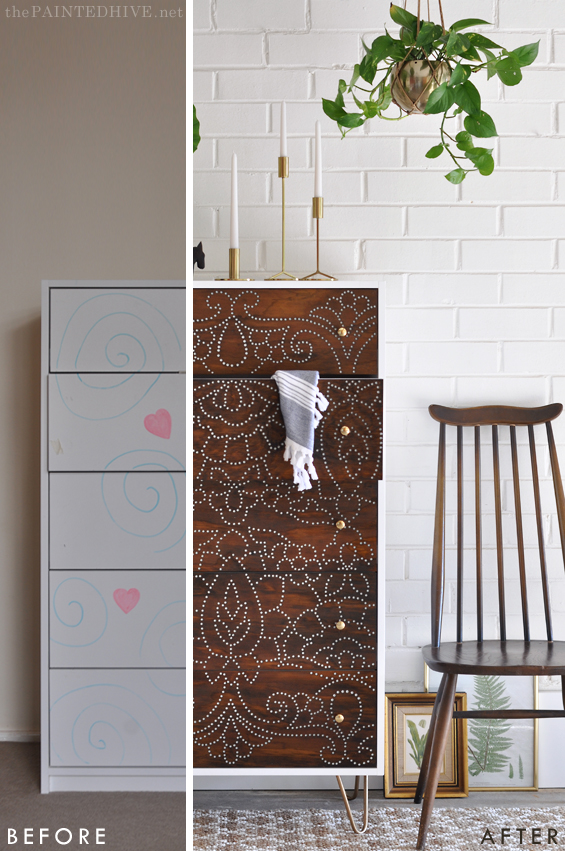
Anyhoo, as revealed in my previous post about the project, I started with this generic dresser which I picked up for $30…
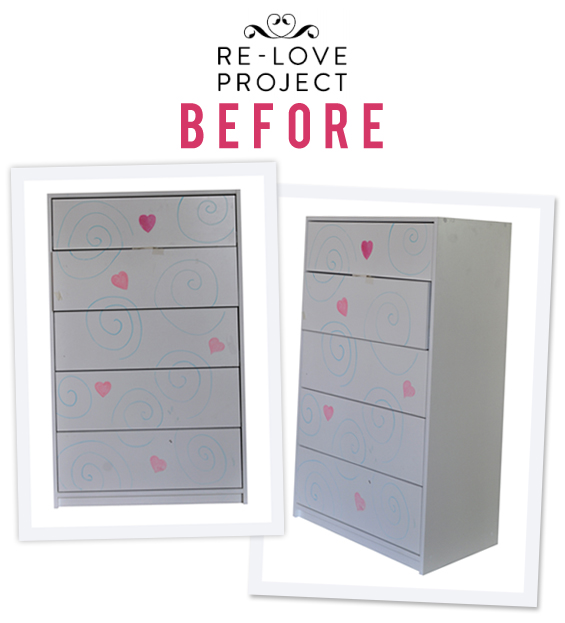
I love working with really basic items of furniture because most people already have, or can easily obtain, something similar. They’re relatable however their potential is often overlooked.
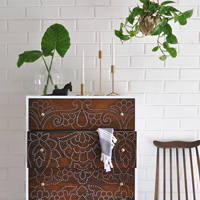
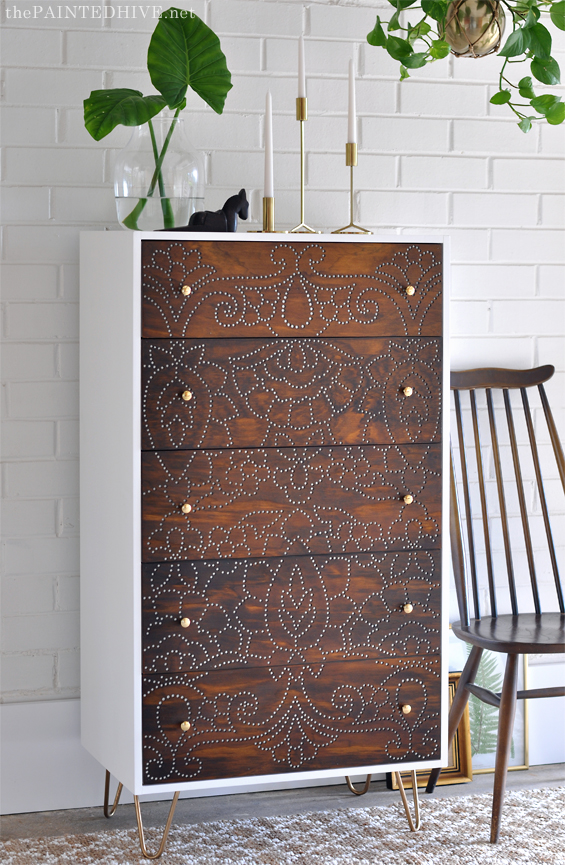
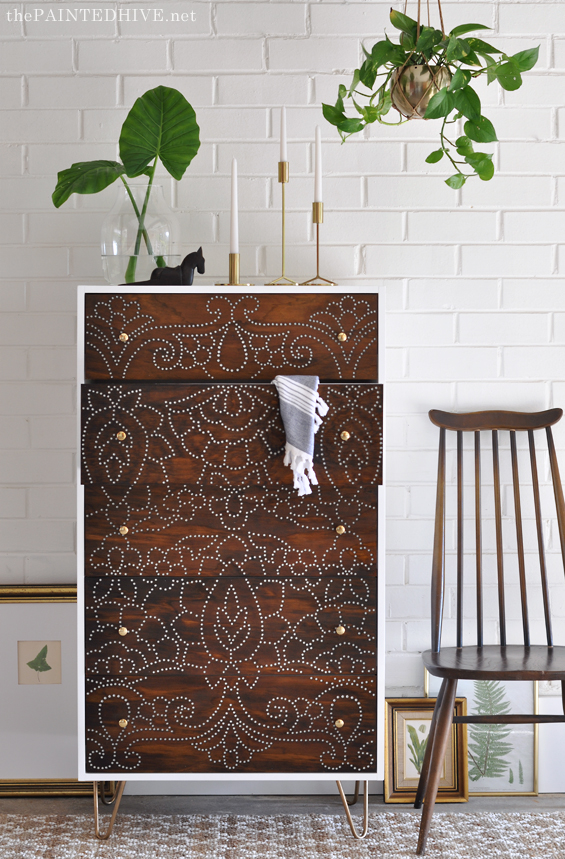
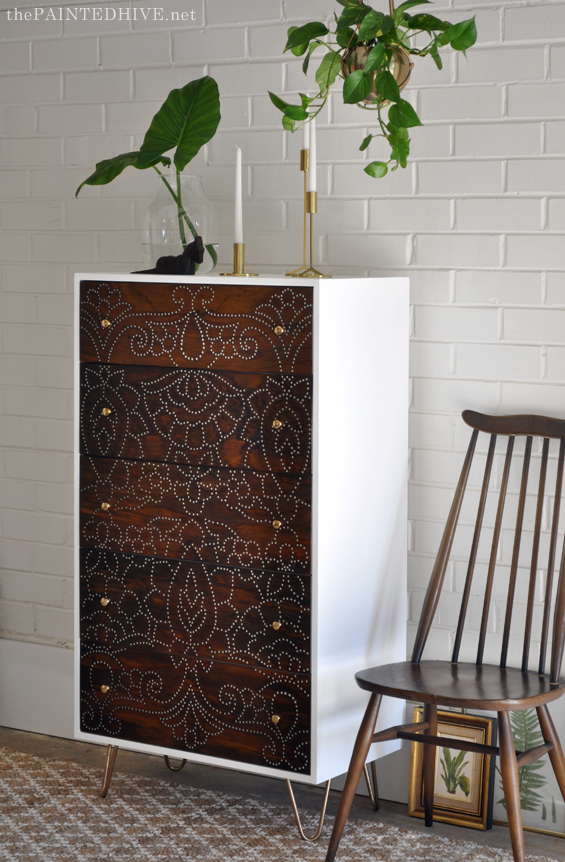
Anyhoo, here it is now…
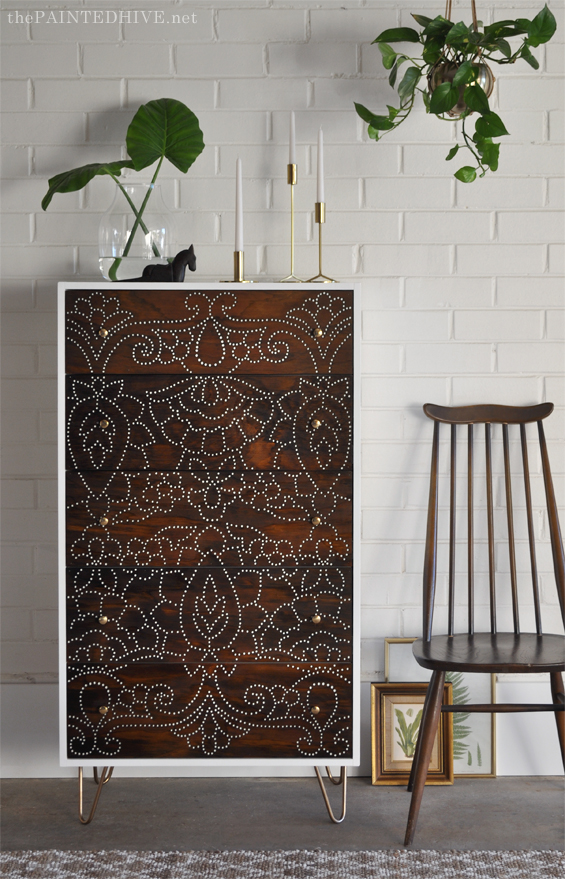
Squeee! I’m just a little bit happy with how it all came together!
Aside from the fact it’s been completely transformed, achieving this unique look is totally do-able.
Here’s how…
STEP 1 Remove or cover toe kick
To eliminate the basic flat-pack look the toe-kick has to go. You can choose to fill it with a piece of scrap timber or cut it off as I did. Filling it is the easier option though you will then need to somehow incorporate it into your design; either by painting it to match the rest of the body of the unit and leaving it exposed as a thick base, or concealing it with the subsequent drawer cladding (more on that below).
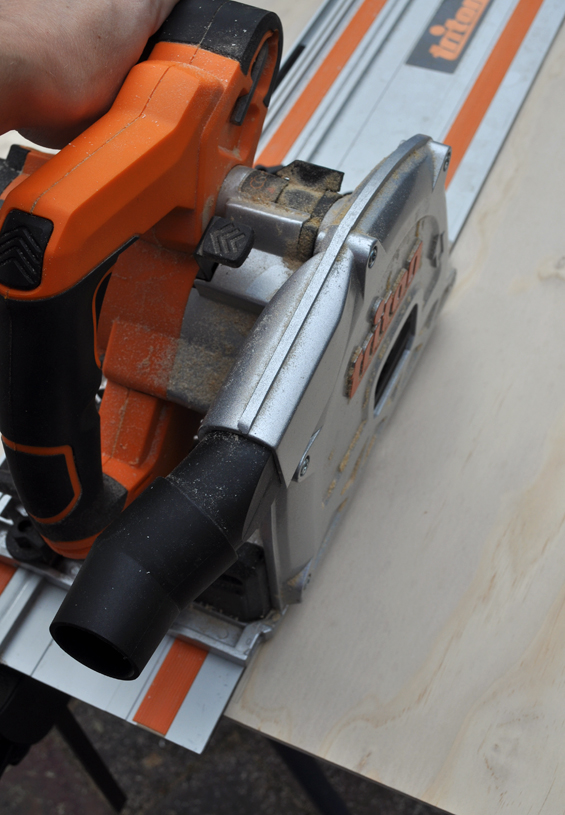
I had a certain vision and wanted a really clean look which is why I chose to cut mine off.
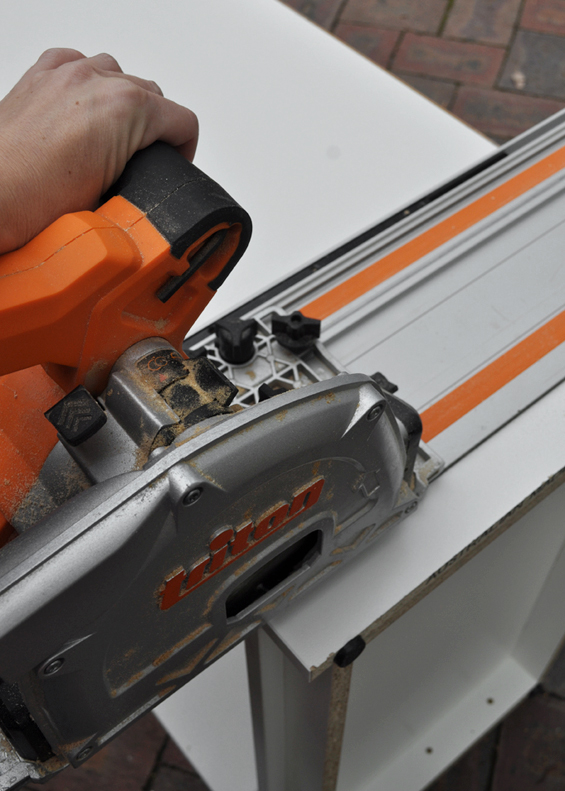
I used my plunge track saw and it was somewhat fiddly due to the fact it was difficult to clamp the track on in certain areas, though I got there in the end. You could also use a jigsaw or circular saw.
STEP 2 Paint unit
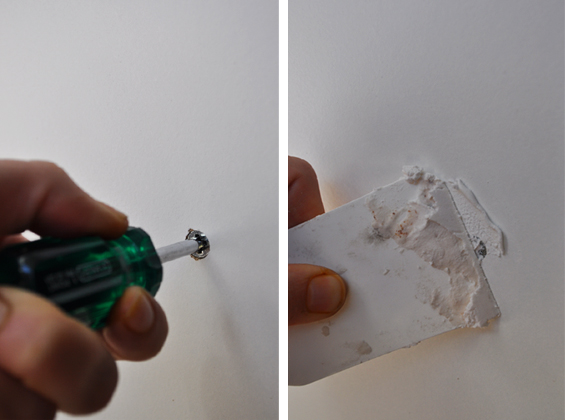
Although I wanted a white finish and my dresser was already white, it didn’t have the refined look I was after. As with most flat pack melamine furniture, it looked like, well, flat pack melamine furniture! There were visible screw heads, plastic capping strips, small chips, dirty marks and the overall tone was somewhat bluish.
The first thing I did was remove the drawers (as they were receiving a different finishing treatment). I then countersunk the visible screw heads and filled the holes with some spak.
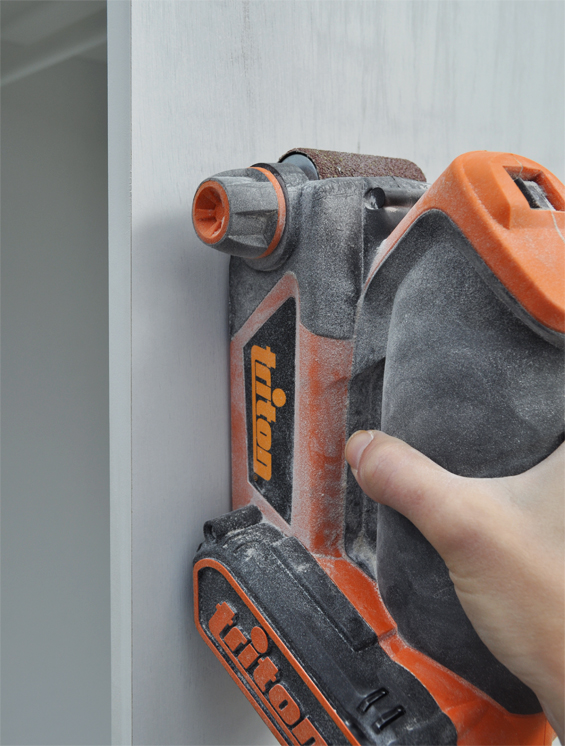
Once dry, I sanded the entire unit extremely thoroughly using coarse grit paper.
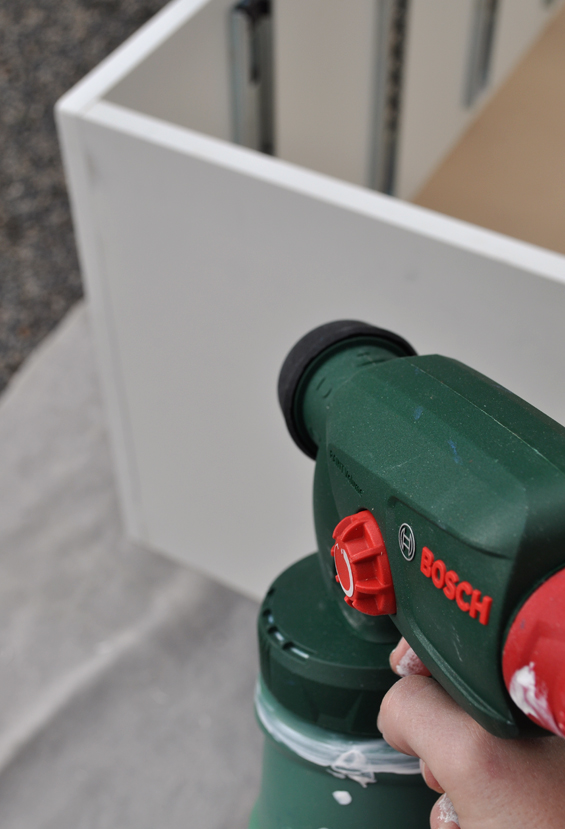
To finish, I wiped everything down to remove residual dust and grime, then I applied around four light coats of Feast Watson Floor Paint in “White Shine” using a spray gun.
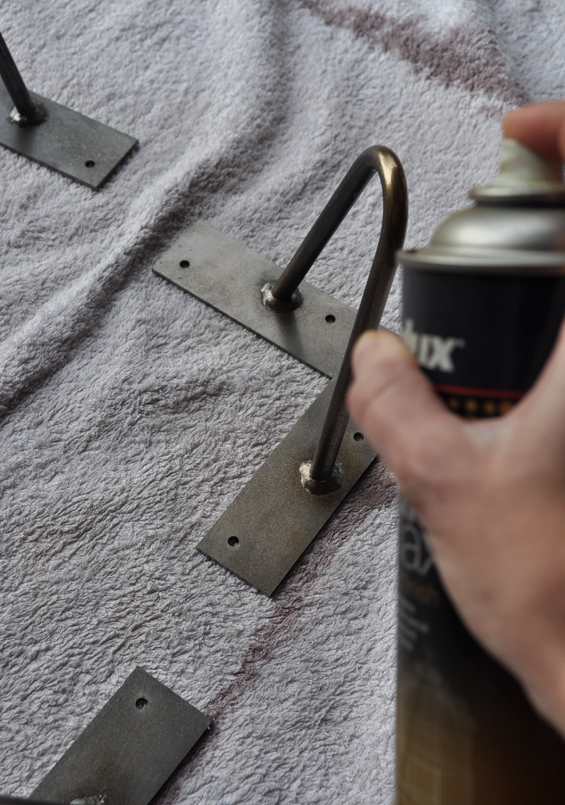
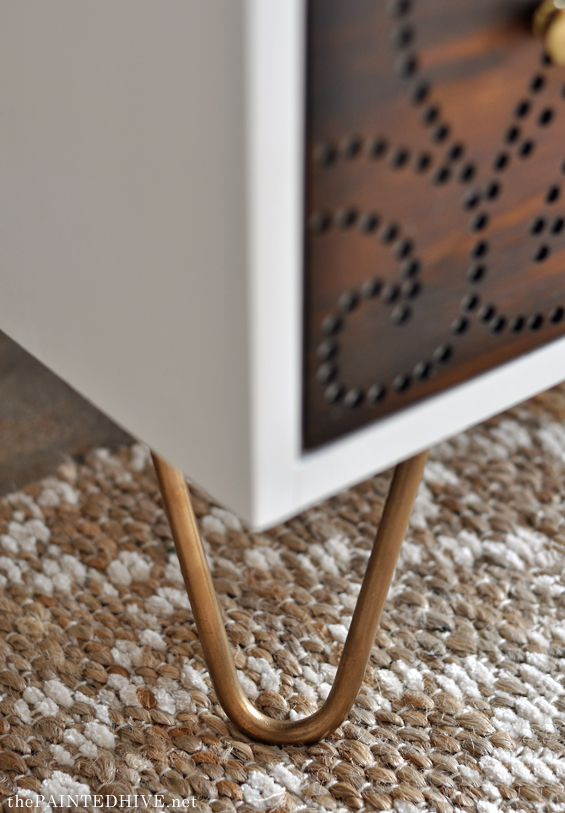
STEP 3 Attach new feet
You can use whatever style of feet you like. For something a bit different I opted for hairpin feet from Australian Hairpin Legs to compliment the clean look I was after and provide a subtle mid-century vibe.
They came in a raw steel finish so I spray painted them with Dulux Duramax in “Bright Gold” to reference the brass knobs I planned to use and keep everything consistent.
To attach them I simply drilled pilot holes then fixed them in place with some appropriately sized screws.
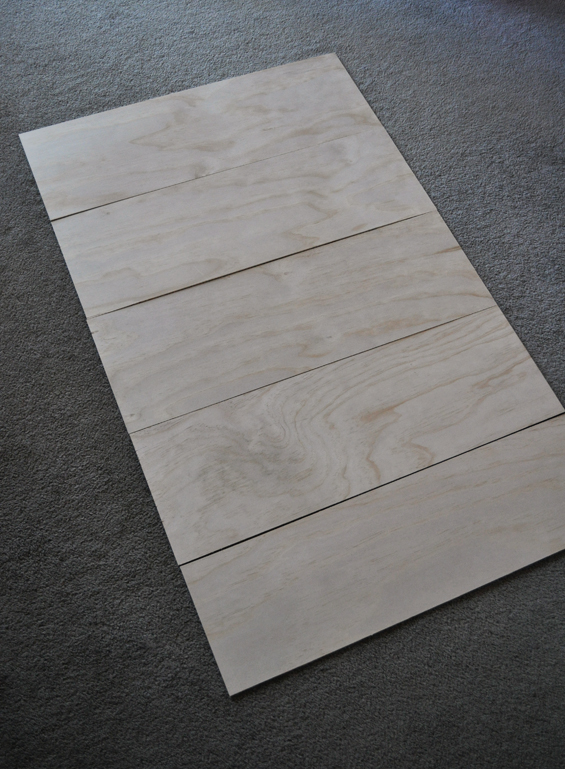
STEP 4 Cut new drawer fronts
This is where it starts to get fun!
I first measured each drawer front (they were identical except for the top one which was slightly shallower) then cut new fronts from a sheet of 3mm plywood.
I used my plunge track saw, which makes things precise and easy, however you could also use a jigsaw or circular saw.
Note: One of the reasons I chose my particular piece of furniture is because the drawers were slightly recessed. This meant I could attach my new cladding without it sitting proud of the surrounding frame. If you have an item of furniture which doesn’t have recessed drawers check to see if there is room to re-position them.
STEP 5 Drill design in drawer fronts
This is the exciting bit!
First I needed to decide on a design. I did lots of research and trialed a few different ideas to get a feel for what would work well and look best. Obviously, not all designs lend themselves to this style of application and I deduced that straight lines and overly intricate patterns were best avoided. Eventually I settled on a broderie inspired pattern which I found online.

To get it to work for me, I created a to-scale template of my drawer fronts in Photoshop then enlarged the design to fit before playing around with a few different configuration options. If you don’t have Photoshop, you can use any image editing program (GIMP is a great free alternative).

Once I was happy with everything it was time to transfer the design onto the drawer fronts. For this, I used a basic tracing method.
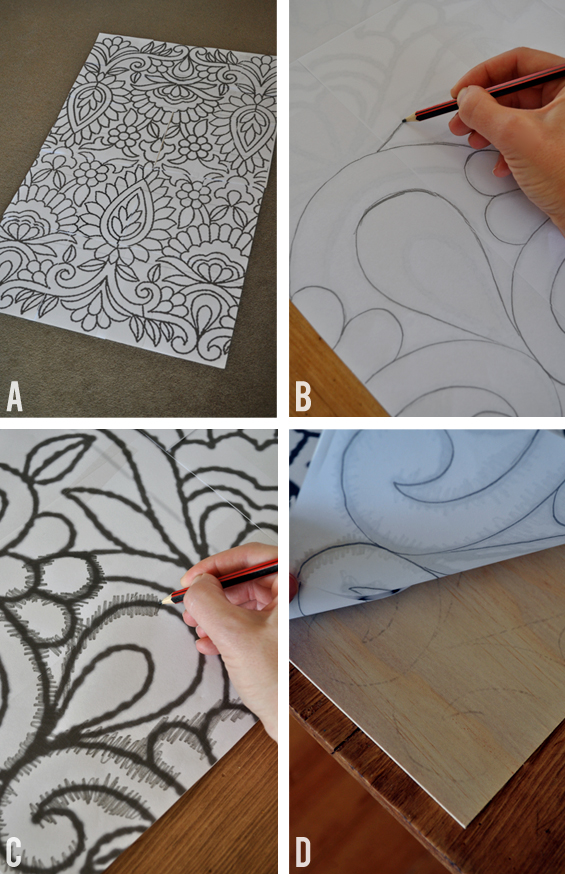
A First I printed the design out in sections onto regular copy paper then pieced it together with sticky tape like a giant jigsaw.
B Next, I flipped it over and traced around the entire design using a grey lead pencil. It was easy to see through the paper.
C With the drawer fronts laid out in position, I placed the design on top (traced side down), weighted it with something heavy (to keep it from shifting) then began sketching over my grey lead lines.
D Once the design was transferred onto the drawer fronts I drew over it again to make it more prominent.
Note: I chose to transfer my design onto the drawer fronts, rather than simply attach the paper and drill straight through it, because I found during my trials that the paper deteriorates quickly which makes drilling precisely more difficult.
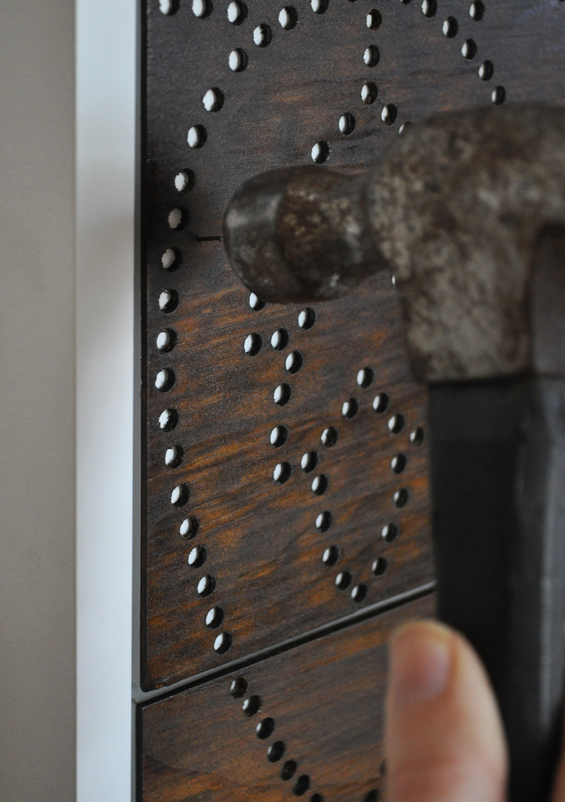
Now it’s time for drilling!
I used this amazing Bosch bench drill which made things quicker and easier however you could certainly use a hand drill too.
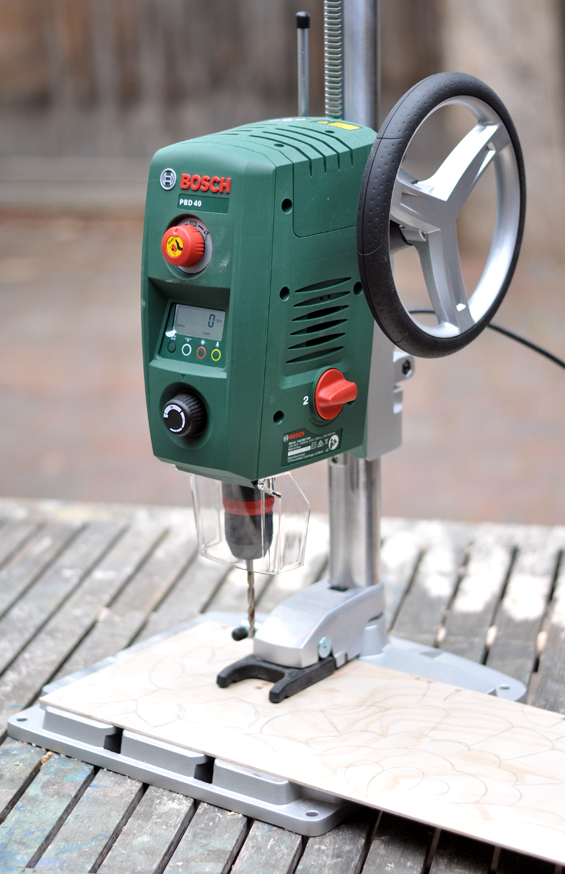
The great thing about the bench drill is that there’s a laser guide, to make aligning the holes easy, and a handwheel which is nice and ergonomic. You can also set the drill speed and depth to suit your needs.
Based on my trials I knew that a 6mm drill bit worked well – the holes are large enough to allow colour to show through yet small enough to accommodate design intricacies. I started with the bottom drawer front, following the lines of my design as accurately and evenly as possible.
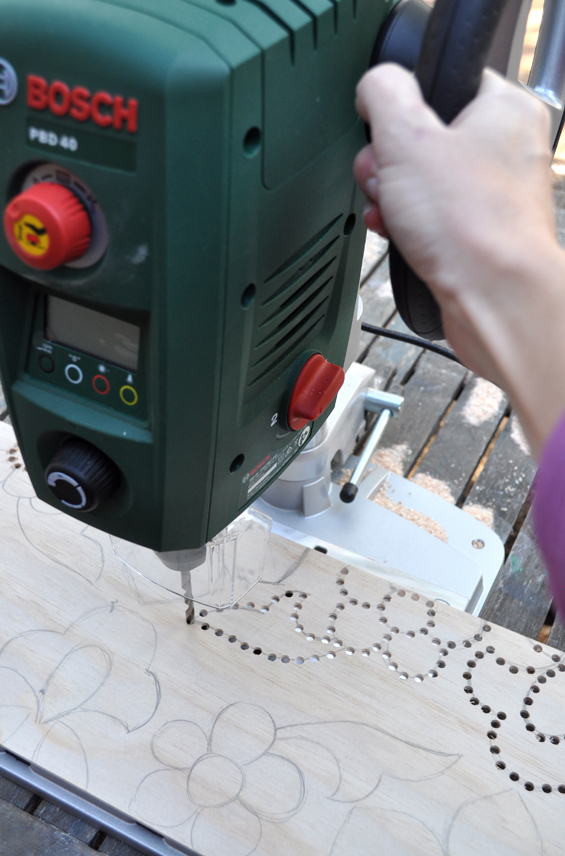
Although it’s tempting to drill through super quickly this can splinter the rear of the plywood excessively so it’s worth taking some time and allowing the drill bit to do the work.
Note: If you’re experiencing issues with the back of your plywood splintering excessively ensure your drill bit is nice and sharp and try clamping a scrap piece of wood to the rear.
When I finished one drawer front I lined-up the adjoining one to ensure my drill pattern followed along evenly.
Around six hours and 3,000 holes later I was done! At which point I may, or may not, have done a little dance!
STEP 6 Sand, stain and seal drawer fronts
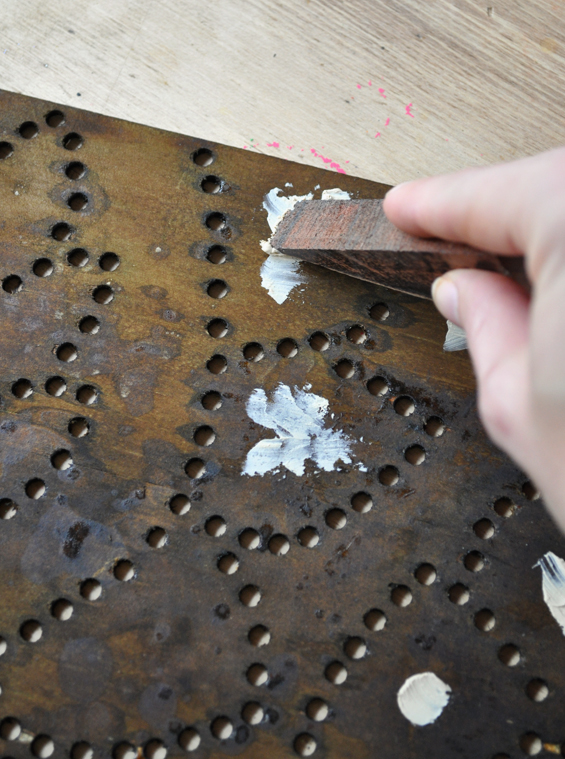
You will probably notice lots of fine splinters and “furry” bits of wood in and around the drill holes. This is simply due to the nature of the plywood. I found it was pretty much impossible to remove them all however thoroughly sanding the drawer fronts, both face and rear, does help eliminate the more obvious ones.
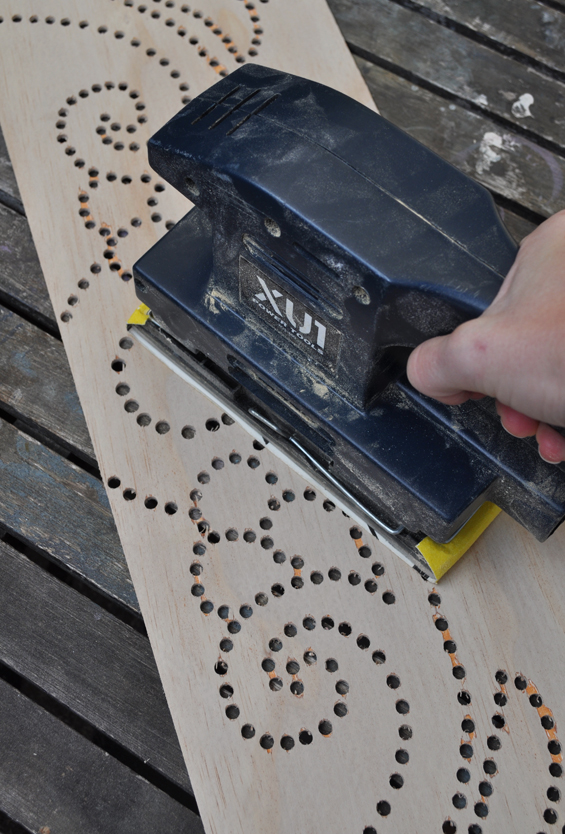
The above pic shows me sanding the rear of one of the drawer fronts. You can see some areas (in orange) where the plywood has blown-out during drilling. This isn’t visible from the front.
I also used a round file to tidy-up some of the holes as needed.

Once sanded I wiped my drawer fronts to remove any residual dust before staining with Feast Watson Prooftint in “Teak Brown” diluted slightly with some Feast Watson Prooftint Colour Reducer.
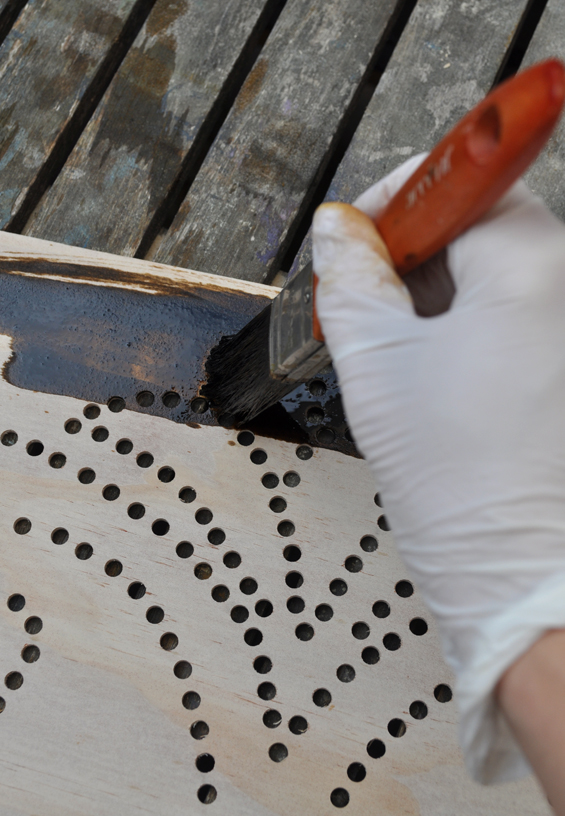
The Colour Reducer works to tone-down the stain which I find helps produce a milder finish when working with porous timbers like plywood.
I generally apply stain with a rag though in this case I used a brush so I could stipple the stain inside all of the holes. Once one drawer front was entirely coated, I used a rag to remove any excess stain, wiping in the direction of the timber grain.
To achieve the tone I was after I gave each drawer front two coats of stain.
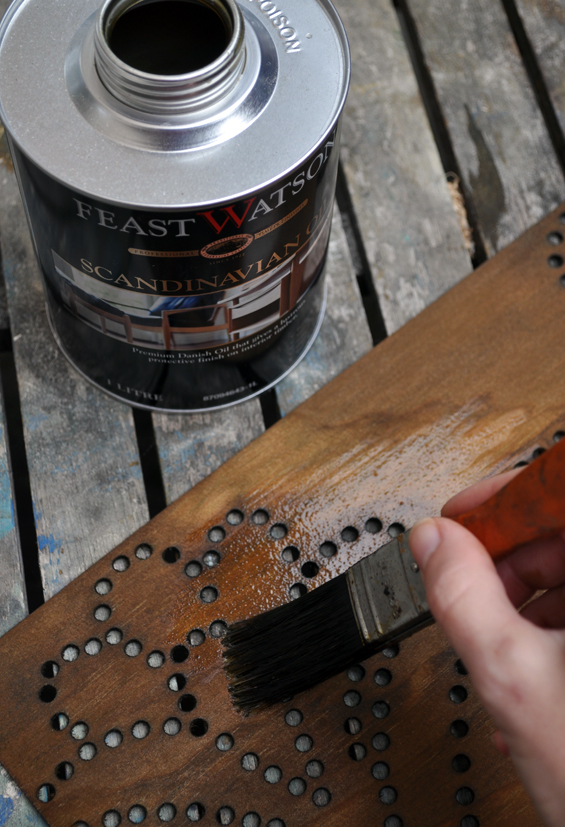
Once the stain was dry, I applied three coats of Feast Watson Scandinavian Oil, sanding with fine grit paper between applications.
STEP 7 Attach drawer fronts
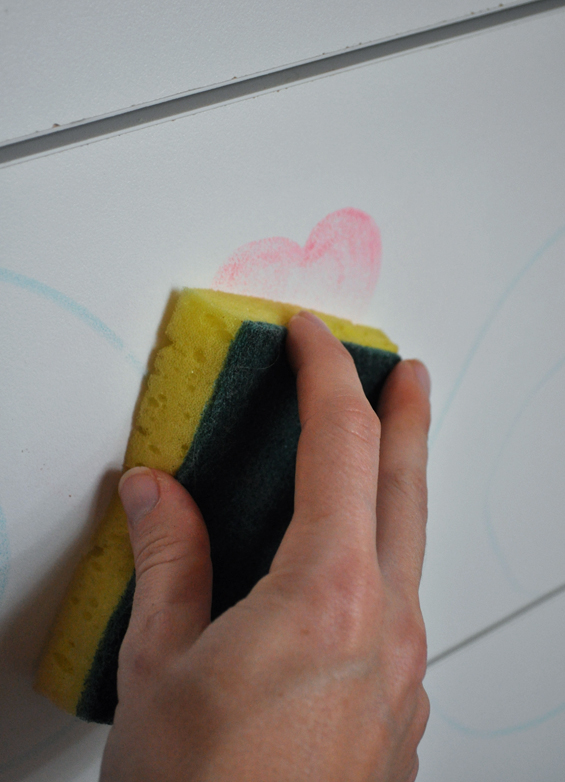
Before affixing the new drawer fronts to the drawers, I first removed the existing “artwork”. Fortunately it came off easily by scrubbing with some abrasive detergent.
Note: I chose not to paint the existing drawer fronts because I wanted the cladding glue to adhere to the melamine, not to surface paint which could easily pull off.
For accuracy, I decided to attach the new fronts to the drawers whilst they were in the dresser. I started at the top, smearing a sparing amount of liquid nails on the rear of the new front, being careful to avoid any drill holes.
I then pressed it into place and secured it with some painter’s tape before hammering in some finishing nails. Easy!
I repeated this process with the remaining drawer fronts until all of the new cladding was in place. To finish, I countersunk any proud nails and coloured the heads with a brown permanent marker.
STEP 8 Attach handles
To complete the dresser I attached some simple brass knobs from Early Settler.
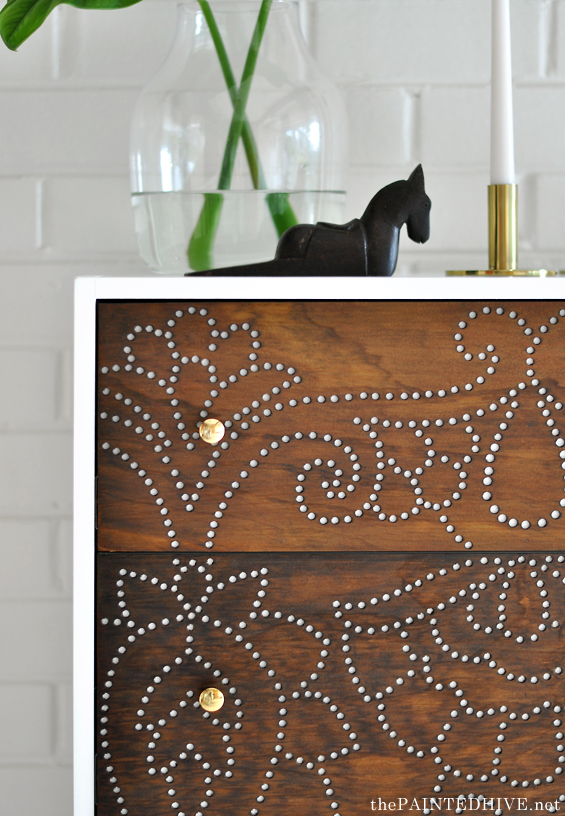
I love the little hint of glam they provide.
STEP 9 Done!
I honestly had no idea how this was going to turn out though I couldn’t be happier with the result!
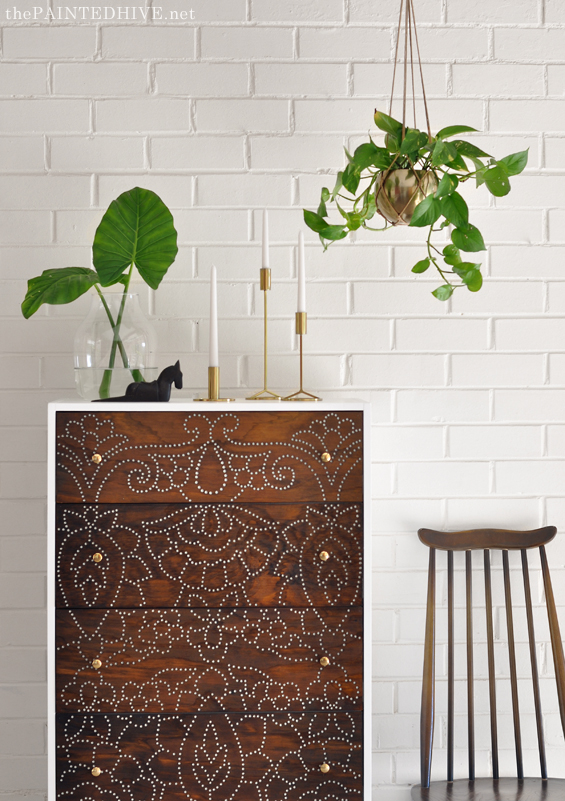
Aside from the fact it looks really cool (if I do say so myself!) it’s completely unique and makes a gorgeous statement without shouting.
More than anything though, I’m thrilled to be able to share this perforation technique with you. I researched high and low though couldn’t find anything quite like it so I hope it’s something new to you and that it helps inspire!
Of course, if you’re not a super patient person, you could always use a more basic pattern or smaller item of furniture to create a similar look.
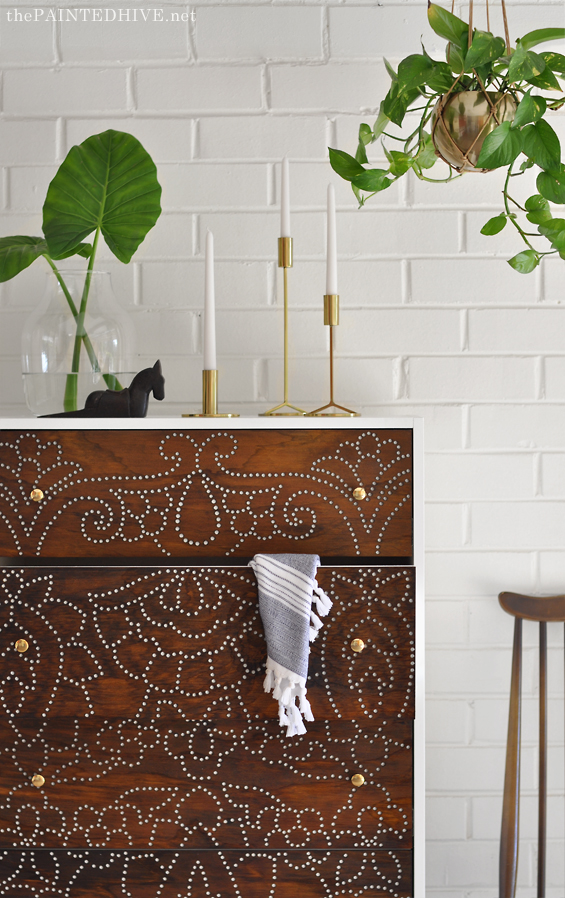
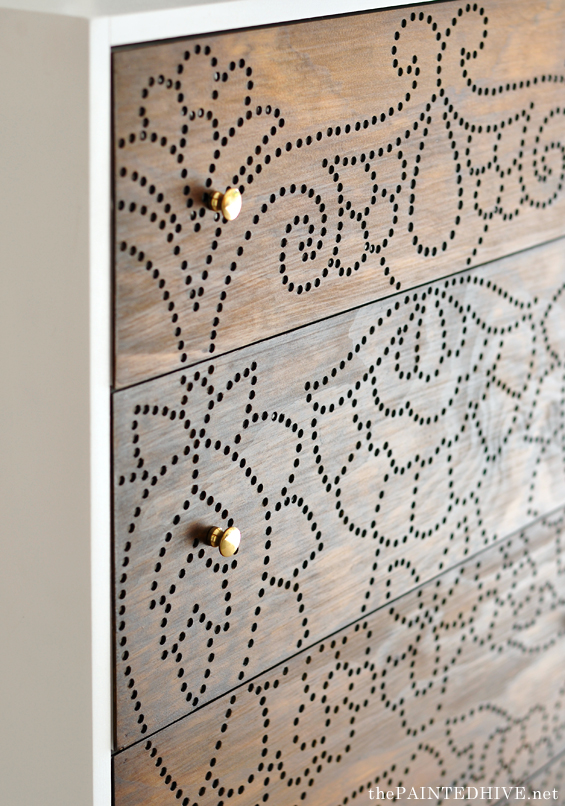
One of the things I love about the perforations is that you can’t really see them from side on. As you move around the piece they begin to reveal themselves, first as shadowed holes, then as crisp white dots. There’s a little bit of fun and mystery about it!
Remember, this one-of-a-kind dresser is going to be sold for charity! So, if you love it (or know someone else who might) be sure to stay tuned.
The eBay auctions go live on 14 August and I’ll be sure to post a link once they’re up and running. And, as always, Feast Watson will be covering shipping Australia wide!
C’mon peeps. Let’s try and raise a heap for the Salvos.
![]()
Be sure to follow along with Feast Watson on Instagram to see the reveals of all the other designer pieces!


Absolutely beautiful shame I live in the uk
LOL, sorry Nicola, though I’m so glad you love it. You can always move to Australia, right?
:)
Oh my word,, this is totally amazing. Tons of work but so worth it.
Thanks Marty. It was actually a lot easier than many of my previous projects, just took a bit of patience and perseverance :)
AH-Mazing!! I don’t know how you come up with these ideas…just fantastic!
Stunning!! I don’t know how you come up with these ideas…just fantastic!
Thanks so, so much Leslie :)
Kristine you have done it again!! This is absolutely gorgeous and genius! It will for sure be in paint many new projects!
*inspiring
I hope so Jill :)
Thank you.
This looks like a ton of work and it turned out beautifully!!!
Not too much work Sarah. Just some planning, trialing and perseverance. Glad you like it!
I am always inspired after seeing your projects. You have a true gift!
Aw, too sweet. Thank you Kay :)
The best thing I have seen in a long time! Lots of precise work for you but so worth it. Just beautiful.
It’s actually a lot easier than it probably looks. Glad you like it Lenore!
:)
Oh Kristine, love, love LOVE it!!! You have created a truly unique masterpiece! It is stunning and so inspirational. With a bit of a less intricate design, or a smaller scale, I think this is truly achievable for many. My best wishes to you for this event.
Yes, yes, yes, Sherylee! That was totally my motivation – to inspire people to try something a bit different. It certainly doesn’t need to be as intricate or large-scale as mine though this technique is completely do-able!
That is seriously amazing. Beautiful! You have a lot more patience for projects like that then I do but I love seeing what you come up with. Truly a work of art. Congratulations!
Thanks so much Jeanene :)
That is amazing! So beautiful! I would have to keep it!!
LOL, yes, it is tempting. Though I don’t even have a space for it in my tiny house. Makes selling it for charity a little easier :)
Oh my goodness, it’s super gorgeous!
I agree, this is super fabulous! I would have never tho’t of something this complicated, but leave it to you! You did it! I don’t know that I’d have the patience to drill all those holes, especially with a hand drill, but it’s fantastic! I love it!
Yes, it does take some patience though there is no rush. I did all of my trials with a hand drill and, to be honest, it wasn’t that bad. It all depends on the the intricacy of your pattern and the scale of your item of furniture.
Thanks so much for your sweet words :)
Crazy beautiful! You are such a talent.
Aw, too sweet. Stop it Tonya ;)
WOW! Just WOW! So beautiful and so original.
Love it!! All aspects from the paint color to the design pattern. Keep up with the GREAT decorating ideas. Thank you for sharing.
Thanks so, so much Kim :)
It’s absolutely beautiful. I can’t imagine all the work but I love the look.
Thank you!
Your work is just so original ! I am always thrilled to see your next project. Thank you for sharing your work, and you should be very proud! :)
Aw, you are too lovely Julie. Thank you :)
WOW! You did it again, Kristine! This is just gorgeous and as every year I like your makeover the best. You always put a lot of thoughts and work into your projects. Each one is unique and eye-catching.
Thanks so much Julia. I may be running out of ideas now. LOL!
Shazam!!! That’s the only fantastical word not used in the comments so far! You have raised the bar yet again. It’s an original and is GORGEOUS. This contest has been won before it even started. ;)
Ha, ha. Thanks Deb. I’m always striving to do something fresh and exciting so it’s great to hear you think so too.
That is stunning! Oh my, the work but the outcome is so worth it! Bravo!!!
Thanks Renee. Not too much work really, just a bit of patience and persistence. Anyone can do it!
Fantastic! Really!
This is absolutely stunning! What a fabulous idea. Pinned and sharing
Thanks Marie :)
That is incredible! You have such great vision, and skills.
This is utterly gorgeous!! You are so talented, girl! Just brilliant!
Thanks lovely :)
Another beautiful project Kristine, I thought you wouldn’t be able to top the last one [which was near perfect] but this is just as wonderful. Well done girl!
Love it! I’ve been hanging out for the big reveal & you didn’t disappoint.
Fantastic! Thanks Jill :)
You are an absolute re-love wizard! Gorgeous <3
Oh, my goodness, girl! You’ve done it again. Gob-smackingly wonderful. Well done!
Lol, thanks Sharon :)
Brilliant idea and it looks exquisite! Thank you for sharing!
This is the most incredible thing I have ever seen!!! Ah-mazing!!!
LOL, thanks Jessica :)
When I first saw your post, I thought it was thumbtacks that made the design! To think you drilled the design…………amazing! I love it :)
Yes, I wanted to do something a bit different. I love the three dimensional nature of it and how the appearance changes depending on the angle.
Simply beautiful!!!!!
Thank you Lisa :)
This is beautiful and so unique! Now I need a drill press 😉 xx
Ha, ha. Yes, it’s a cool tool Kate :)
I have seen a lot of furniture makeovers but this one hands down has to be my favorite. I love the pattern you created for the drawer fronts. I hope you keep this dresser for yourself!
Thanks so much Paula. That’s a big compliment. This dresser will be sold for charity. I don’t have a spot for it in my tiny house anyways :)
An absolutely gorgeous work of art. An incredible labor of love and creativity with a unique process you have found. I LOVE this piece for its simplicity, uncluttered wholeness, stunning profile, and huge impact. You are a gifted visionary – so well done!!!
Wow, what a lovely comment. Thank you so much Catherine.
This is the most amazing makeover I’ve ever seen!! This is gorgeous.
Lol, thanks Karen :)
Another win! Love it and am looking around for a piece to use this idea on. I love your creative ideas.
Been offline a bit this week and alsmost missed this. As always, Kristine, you have hit it out of the park. An utterly amazing and beautiful transformation.
This will be the star of whatever room it finds a home in.
Aw, thank you so much Robyn :)
Wow! Thought this was done with nailheads. Very beautiful.
Thanks Marilyn.
If I thought I could swim to Australia from USA I be there to bid. This is beyond the beyond. Absolutely one of the best pieces i have seen on any blog. Pat yourself on the back,you deserve it.
Too sweet. Thank you Sue :)
WOW that is amazing! I LOVE LOVE this dresser. It is so unique and you took something that normally is a common no frills dresser and made it a stunning ‘stop in your tracks’ ‘where has that been all my life dresser’ HA!! It was really creative what you did. Yes, we need to act on those concepts that get conjured up in the back of our heads, even if it takes a few years because it continues to nag! So happy you did! Great job and now I can’t wait to come back to your site. First time here:)
Aw, that’s such a lovely comment. Thanks so much Kathleen. Glad you found me :)
Such a beautiful piece! Love how this turned out. It would totally steal the show in anyroom.
Thanks so much Stephanie :)
Love your makeover!
Thanks Carol :)
This is hardly just a makeover–this is a work of art!!! Wow!!! LOVE!!!!
We are all going to sit here and collectively drool over this one! Is that okay with you?
LOL! Definitely okay with me Mary :)
This is stunning. What a fabulous idea. pinning with this mad dream that one day I might have a go!
Thanks Julie. You should totally give it a go! I thought my idea was mad too though I’m so glad I tried it!
Incredible transformation and so beautiful!
XO,
Emily
http://www.fortuitousfoodies.com/
Holy moly woman! I think this may be the most incredible diy i have ever seen! And i have seen ALOT!!!! when i first saw it, on somebody’s instagram (praising you!) i thought it was a nailhead design and THAT blew me away…but then to see a million tiny drilled holes, has completely blown my whole mind. BRAVO, lady!
Hubba, hubba! Most. Gorgeous. Makeover. Ever. Such a genius move on all those little holes. Turned out amazing!
Thanks so much Angie :)
I love it! It doesn’t even look like the same dresser! I am curious though, did the plywood make the drawers still out a little bit, or was it thin enough for it not to be noticable?
Hi Miranda
Thanks so much.
This is mentioned in the post. I chose the item I did because the drawers were slightly recessed. So, by attaching my new 3mm plywood fronts they don’t protrude.
Cheers