
One of my closest friends recently had her second baby – another girl (which, for whatever illogical reason, makes me think I’m going to have another girl too!). Of course with a new baby comes the bestowing of gifts, which is sweet, though does anyone else find it difficult to buy for newborns who already have a gender equivalent older sibling? I mean, when the family already has at least three of everything (likely in twenty various shades of pink, or blue), what can you offer that is special, unique and, from the perspective of the possibly storage-deprived parents, actually wanted?
Well, something personalised of course (at least that’s the conclusion I came to).
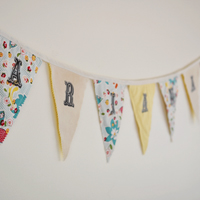
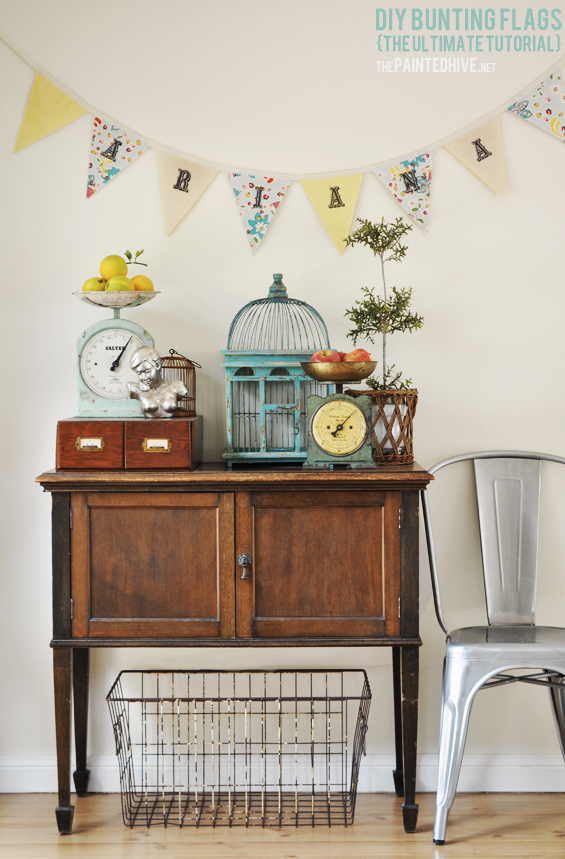
For a while now I have admired bunting flags. There are just so many different and creative variations, from whimsical to sophisticated, and they seem to add such a playful and interesting touch, plus they are compact and lightweight which makes them easy to hang, reposition and store as needed. I thought it’s something my friend would hopefully appreciate too, so I decided to create a hand-made customised bunting for her new baby girl, Ariana.
There are about a gazillion different ways you can make a bunting, most of which are super simple (even for an amateur sewer like me) and some of which are incredibly easy (and involve absolutely no sewing at all). As mine was to be a gift, I opted for a reasonably professional-looking finish though I’ve provided some variations in the steps outlined below if you’re after a slightly simpler method. That said, I have tried to make this tutorial as simple as possible regardless. As a ‘learner’ sewer who appreciates layman’s terms and furrows her brow at technical jargon, I wanted to appeal to fellow novices like me with clear and concise instructions. If you’re an accomplished sewer I hope you don’t find it too condescending :-)
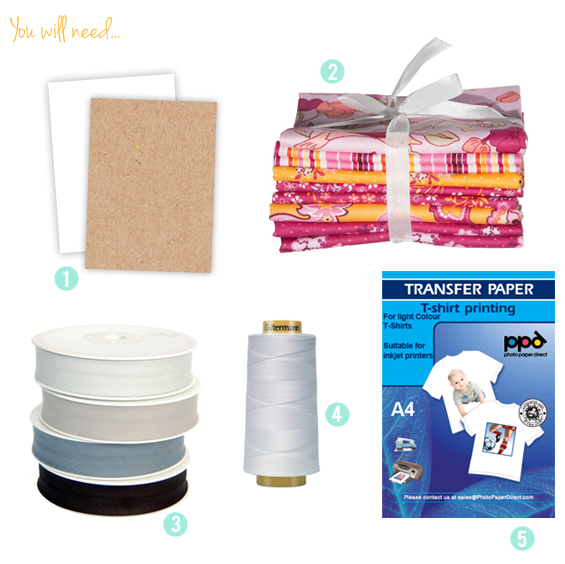
1. Cardboard or paper (to create a triangle template).
2. Fabric.
Of course you can use anything. Plain, patterned or textured, vintage remnants or brand new fat quarters. I used simple cotton (a contemporary floral along with a flat yellow) plus calico.
3. Bias binding.
I used around 2.5 meters of 2.5cm (1 inch) cream coloured binding. You can also get some really pretty patterned bindings. You could use ribbon instead though it will not curve as nicely as bias binding which is cut on the cross.
4. Cotton thread.
I used cream to co-ordinate with my binding though you could use a contrasting colour.
5. T-shirt transfer paper.
There are loads of different brands. I used an inexpensive generic paper I found on eBay. Ensure you choose the right paper for your needs – either laser or inkjet to suit your printer and either light or dark to suit your fabric.
You’ll also need the following equipment…scissors, pencil, ruler, fabric marker, pinking shears, pins, sewing machine, computer and printer, iron.
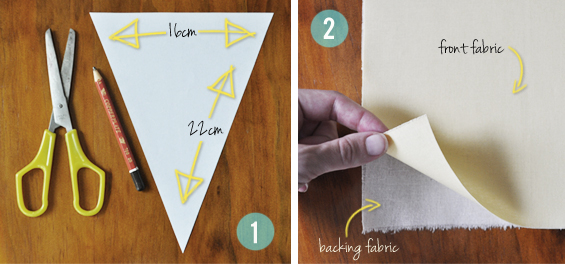
1. Cut a triangle template from cardboard or paper. I used a 16cm x 22cm triangle for my bunting.
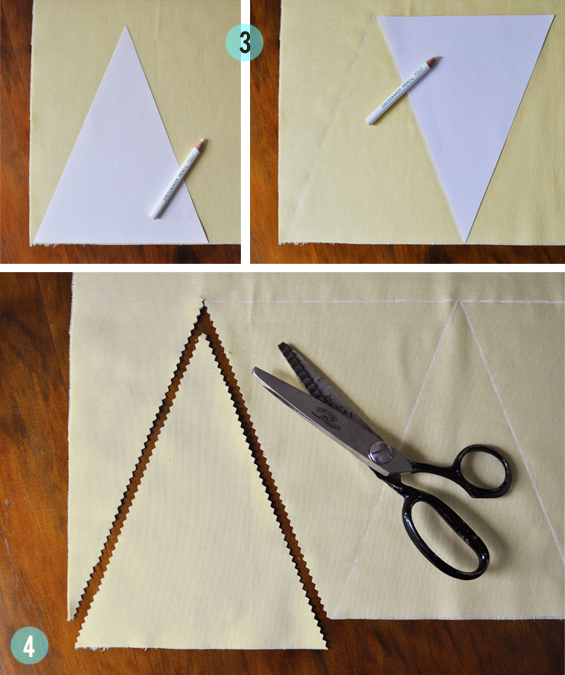
2. Line up your front and backing fabrics wrong sides together and lay them on a flat surface (so, right sides are up and down).
I like to press my fabrics with a hot iron at this stage which not only removes wrinkles though, for whatever reason, also seems to help keep them ‘stuck’ together.
You don’t need to use a backing fabric though it does provide a little more rigidity and gives a nice finish, it also allows you to make the bunting reversible if different fabrics are used front and back (though do bear in mind that depending on the weight of your fabric if hung in front of a light source the flags may be slightly transparent).
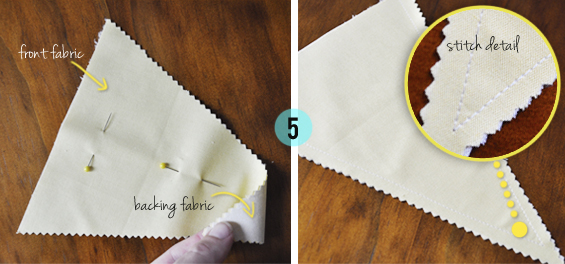
3. Using your template as a guide mark triangles on your fabric. Alternate triangles up and down to minimise fabric wastage.
4. Cut out your flags as marked, from the front and backing fabrics in unison, with sharp pinking sheers. Pinking sheers minimise fraying and create a nicely patterned edge.
5. Pin the front and backing of each flag together (just to help hold them in place) then sew along both long sides. I used a small straight stitch and sewed around 1cm from the edge.
For a no-sew alternative you could join the fabrics with fusible webbing (if you do intend to use this no-sew option, implement it during step 2).
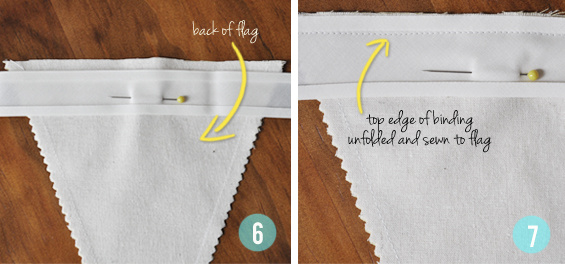
6. On a large clear surface, place all sewn flags right side down in a straight line at your desired distance apart then position binding right side down on top and pin it in position (as shown – don’t place binding in line with the top of the flags, instead leave a small gap approximately the same width as the binding fold).
Ensure you leave ample binding either side of the flags to create the ties. I left around 40cm at each end.
7. Unfold the top edge of the binding, so it is in line with the top edge of your first flag, then sew along the visible crease line, continuing to unfold and sew the binding to the flags as you go (remember, you are sewing through both the front and backing fabrics though along the back of the flags at this stage). Begin sewing a few cm’s before your first flag and continue through until just after your final flag (there is no need to sew the entire width of the binding at this stage). Of course, you could choose to unfold and press the binding gently into place with a warm iron first though I found it just as easy to simply unfold it as I sewed.
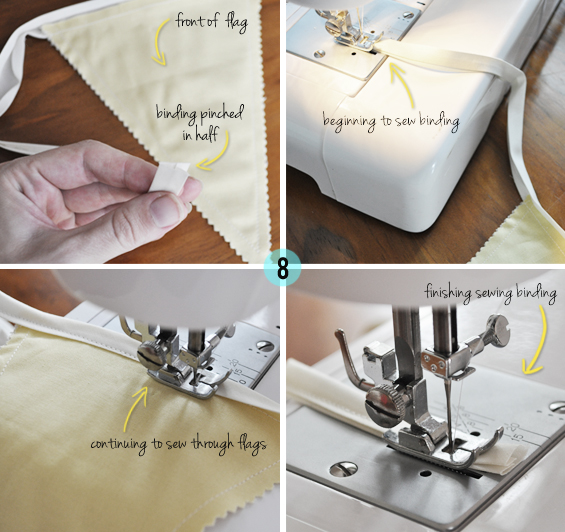
8. Remove the pins and place the flags right side up. Fold the binding up from the back (so it is visible from the front and ready to be folded over the top of the flags) then starting at one extreme end pinch the binding in half (as shown – so the folds are concealed on the inside) and begin sewing it together, continuing right through all of the flags to the other end of the binding, folding it in half over the top of the flags as you go (refer to photos for a visual guide). You could pin it in place if desired though I found it was easier to manipulate it as I went. Sew as closely as possible to the bottom edge of the binding and take care to conceal the previous stitch line (from attaching the binding to the back of the flags).
Note: Regarding the method for attaching the binding; my Mum advised me it was among one of the more ‘proper’ ways to do it. My Mum is a ‘proper’ sewer. I am not a ‘proper’ sewer, and had she not mentioned anything I would probably just have stuck the flags in the binding fold and sewn them in. Of course it’s up to you how you’d like to attach it. If you’re interested in a no-sew option, try using narrow hemming tape or even fabric glue.
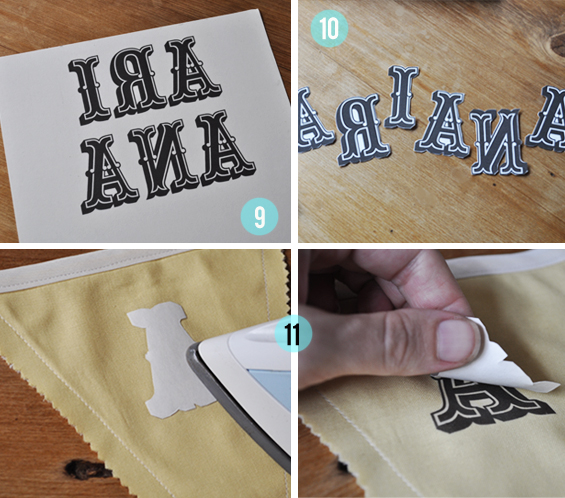
9. Use a publishing or editing program (such as Word or Photoshop) to create a document with your chosen letters in your desired font and size, flip the image (it is important to ‘mirror’ the font prior to printing as it is applied right side down) then print it onto the side of your transfer paper as indicated in the manufacturers instructions.
The font I used is Saloon Girl (Inline).
Of course, aside from t-shirt transfers, there are loads of different methods to personalise a bunting. You could; stencil, free-hand, stamp, embroider, appliqué, use ready-to-apply iron-on letters, print directly onto the fabric, use a gel-transfer or chemical-transfer method, even custom design your fabric and have it printed especially by a company like Spoonflower.
10. Trim closely around your letters.
Iron-on transfer paper for light-coloured fabrics uses a clear carrier film to transfer the image to the fabric. This film appears shiny and slightly opaque where any unprinted area has been left so it is best to remove as much remaining white space as possible.
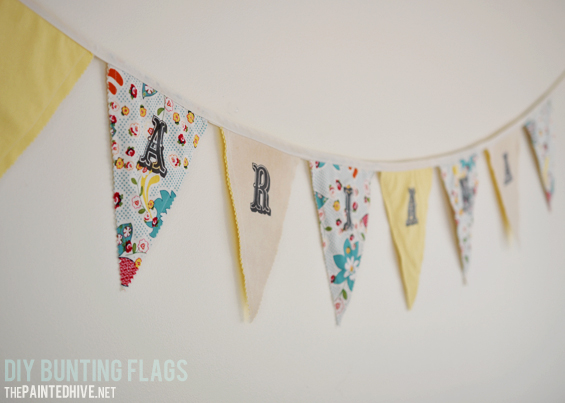
11. Place your first letter in position ink side down on your flag then press with a hot iron for around 30 seconds. Lift and jiggle the iron every now and again to ensure it doesn’t scorch the fabric. Allow the transfer to cool then very carefully lift and peel the backing paper off. Repeat as required with your remaining letters.
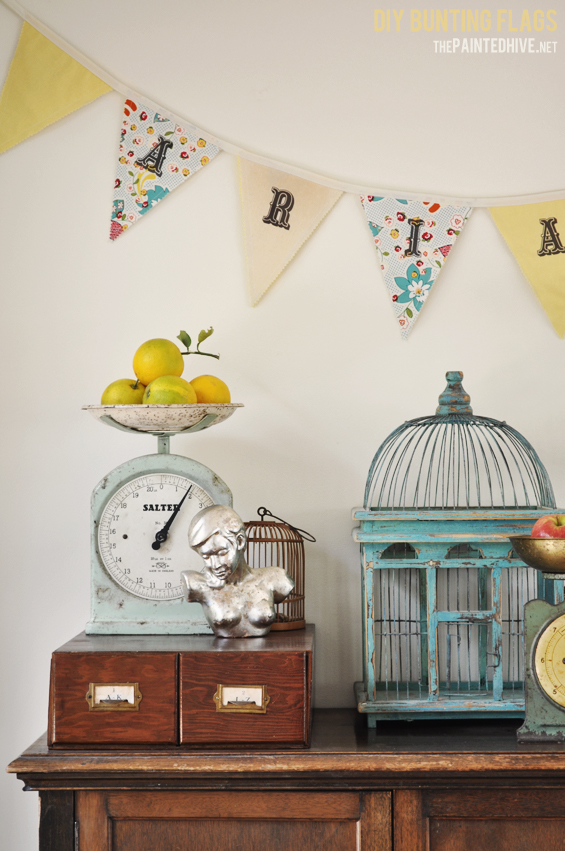
12. Done! Hang you bunting on the wall, from the ceiling, in front of a window or on a piece of furniture. You can tie it, hook it, pin it or tack it as desired.
![]()
On a different note, I hope everyone had an awesome Christmas and happy New Year! May 2013 be a fantabulous year for you all. Sorry I kinda went AWOL over the festive period. Amongst time spent with family and friends I was working on lots of little – and some biggish – projects, so with any luck I’ll have a smattering of new posts to share over the coming months.
Also, I just want to extend a humongous (hmmm, I don’t think I’ve written or typed ‘humongous’ before, it looks kinda weird) THANK YOU to everyone who visited me here during 2012. Your readership is what propels me to keep bloggin’ away, so really, THANK YOU…and BIG virtual hugs :-)


I love the look of this bunting! Many have been made in my craft room as of late but I haven’t thought about doing the lettering this way. So smart and clean! Love love love it!
Thanks so much :-)
What a darling bunting. I so love making them, and it sure adds a fresh feel to the room.
Aww! I love it. I especially love the pinking shears cut on the flags – it adds just the right amount of “softness” to the bunting.
Excellent tutorial! Looks absolutely gorgeous – maybe even I will give it a try!
Go for it Jennie :-)
I love it-Great tutorial. We made a wonderful one for Fall and now I think we need to make one for Winter. You did a great job- xo Diana
Thanks so much Diana.
This is the best tutorial for making bunting I have seen. I’m not a confident sewer though feel like I can actually give this a go thanks to your clear instructions. Thanks.
Super cute bunting by the way.
Tatem
xo
Soooo cute. Love the idea of transferring the letters using t-shirt paper.
Yours turned out so pretty! I love the pinking shears zig zag on them!
I’ve made bunting flags like this too but I didn’t use pinking shears (LOVE!) and I went through the trouble of painting my letters (GASP!) and I could have simply ironed on a fabulous font! (SIGH!) Thank you for a wonderful tutorial.
Adorable bunting, and a fantastic step-by-step tutorial–thanks so much! I’ll be trying this soon :-)
Thanks Leisa. Send me a pic of your bunting when you’re done :-)
Love this post! I shared it on my fb business page ;) Thanks!
ooops…here’s the link ;) https://www.facebook.com/ArtByAmandaHilburn
Wonderful tutorial, thank you for posting – quick question, and maybe I missed it, but what SIZE font did you use? Thanks again!!
Hi Shannon
Off the top of my head, I can’t recall the font size sorry, and I didn’t save the document so unfortunately I can’t check it for you.
To get the right size, first print a few sizes in greyscale onto standard paper, cut roughly around them and lay them on a flag then choose the most appropriate one before printing onto the actual transfer paper.
Kristine
What a great tutorial! I’d love for you to share this or any of your great ideas at the link party going on now (and every Saturday through Tuesday) at ‘Or so she says …’ Hope to see you there!
Such a wonderful tutorial! I ADORE the bunting!
Thanks so much for sharing this at The DIY Dreamer.. From Dream To Reality! Can’t wait to see what you link up this evening!
Love this! It’ super cute! I’m featuring it at my link party tonight!
Thanks so much for linking up to Your Whims Wednesday, I featured this on my blog tonight!! Come stop by and grab a featured button :) http://www.mygirlishwhims.com/2013/01/your-whims-wednesday-94-and-features.html
This is absolutely gorgeous! Thanks for the fabulous tutorial! I am pinning and plan on making some bunting to match the duvet cover that I am planning to make! Thanks so much for such a great tutorial!
I stumbled across your blog because I googled how to make a bunting. I love this… Although I have no sewing machine. But I am loving your blog and your gorgeous work. thank you x
Thanks so much Tahlia :-)
You could try the no-sew options if you don’t have a machine.
xoxo
This tutorial was a HUGE help. Thank you so much!
Hi, just wanted to mention, I loved this article. It was inspiring. Keep on posting!
Kristine, your site is so warm and lovely. I’m making a bunting for my friend’s baby shower and your tutorial is the best I’ve found. I’ve been out and bought everything I need, now to start :)
Thanks Megan :-)
I’m so glad my tutorial has helped you and I bet your friend will love the thought and work you put into creating a hand-made gift especially for her bub!
Thank you for the directions on this! I knew what I wanted to make, but wasn’t sure how to approach it. I actually bought a sewing machine and learned how to use it :). It turned out beautifully!
Thanks for letting me know that my tutorial came in handy for you Amy. Being an inexperienced sewer myself I really wanted this post to appeal to, and possibly inspire, fellow novices, so yay!
This looks great! I am thinking of making one for our upcoming wedding that says Thank You! :) you have just inspired me!
I think you ARE a proper sewer:)
What a fantastic tutorial. It looks so easy to do and would be the perfect personalised gift.
For an easy peasy strong template, use an old X-ray
Yes Lana, they are also great for making DIY stencils.
It’s my little girls 1st birthday soon and you’ve inspired me to sew bunting flags as the “happy birthday” banner. So excited :)
Oh yay! The friend I gifted this personalised bunting to actually used it as a backdrop at her little girl’s first birthday! It is such a rewarding project. Have fun!
Love it! Thanks for sharing!
This is such a great tutorial! I have very minimal sewing skills and with this tutorial I was able to make a great banner. Thanks so much!
Hi Teresa
Yay! Thanks so much for letting know it was helpful. I wanted the tute to give hope to novices like myself :)
I just checked out your ORC – awesome work girl! Love everything and am thrilled I was able to have a tiny part in it. Thanks for linking back to me.
Kristine
xx
wow many thanks for the tutorial :) i really wanna try it !