
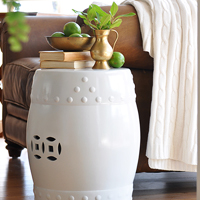
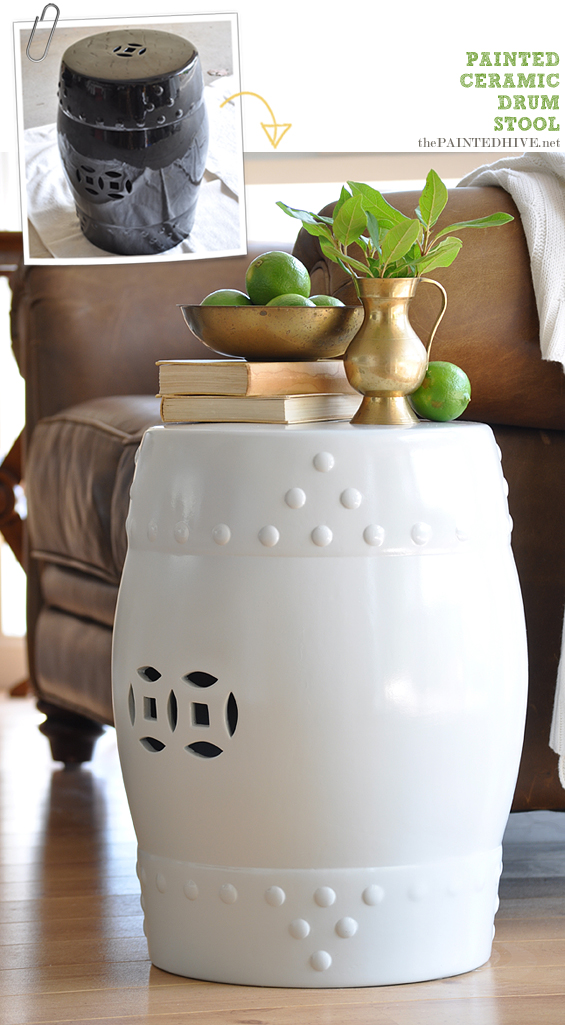
Some of you may ‘member that back in early December I shared a mini makeover of my living room and as part of that little re-do I included a new side table in the form of a ceramic drum stool. The stool was originally black (which is, of course, a perfectly fine colour) though it was always my intention to re-finish it in a lighter shade ’cause with brown leather sofas and lots of timber tones I felt the space didn’t really need any additional ‘darkness’.
So, why didn’t I just buy a light coloured stool to begin with then?
Well…I tend to get ants in my pants which for some strange reason makes me change out my accent pieces fairly often. This means I like to keep ’em reasonably cheap, though I found the going retail price for most ceramic drum stools here in Oz wasn’t really my idea of cheap (don’t get me wrong, they aren’t ridiculously expensive or anything, it’s just that I’m particularly tight :-). Anyhoo, so when I spotted some on eBay for in excess of half the price I’d seen them elsewhere I decided to snatch ’em up (two in total – one for me and one for Mum). Problem was, they were only available in red or black (sometimes, okay, most of the time, being particularly tight means forgoing the luxury of choice, though luckily I’m cool with that ’cause making decisions is hard)!
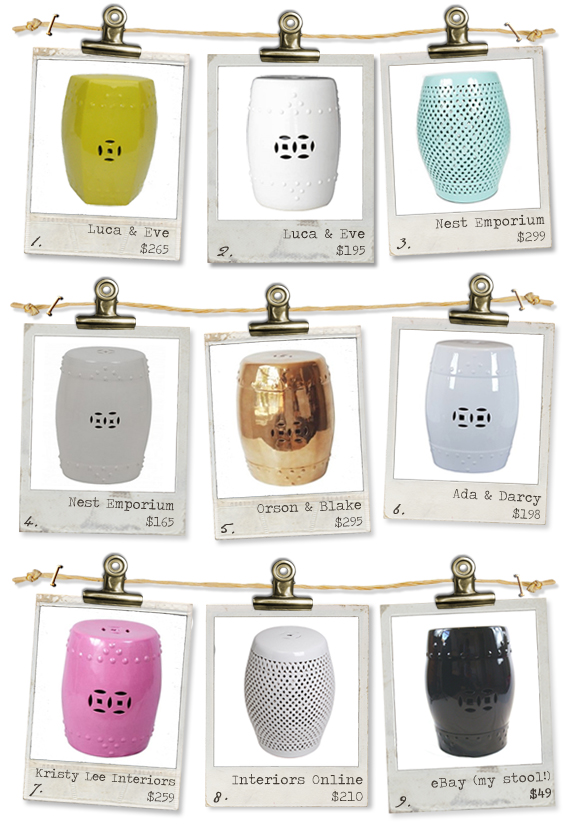
1 | 2 | 3 | 4 | 5 | 6 | 7 | 8 | 9
My Aussie readers may also have seen these stools in The Reject Shop late last year for $40 each. Along with red and black they also had white though I bought my stools about two weeks prior to seeing them in the catalogue – go figure! The previous stools all sold out pretty quick smart though the good news is The Reject Shop are currently promoting them again! Sale starts today (Thursday 14 Feb)! Check out the online catalogue here.
Also, for my Melbourne-based readers, in case you miss-out on The Reject Shop’s stools, you can still purchase the red or black ones from eBay (pick up only, no shipping). You can check ’em out here.
I’m well aware there is nothing particularly clever, original or skilled about transforming a piece of furniture (ceramic or otherwise) with some simple spray paint though when I mentioned it in my living room post there was quite a bit of interest, particularly in the durability and glossiness of the finish, so here’s how I did it…
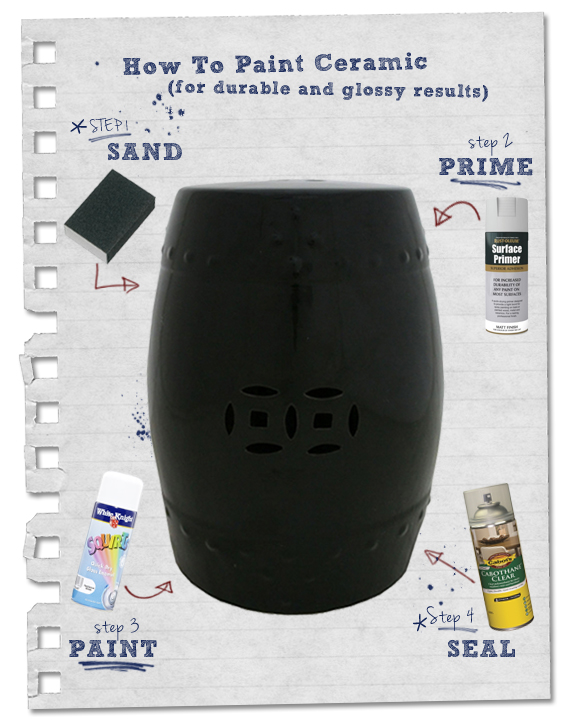
STEP 1 First lightly sand the entire surface by hand using a sanding block and some fine-grit sandpaper.
My drum, as with most ceramics, was smooth and glossy. Giving it some ‘teeth’ by scuffing-up the surface helps the paint stick much more effectively. Don’t be tempted to use an overly abrasive sandpaper thinking the more grazed you make the surface, the better the paint will adhere. Heavy-grit paper can cause noticeable scratches. A light all-over scuff is really all that’s required.
STEP 2 Thoroughly clean the item to remove all sanding dust and other residue before applying one or two coats of spray primer.
I used Rust-Oleum Surface Primer (from Masters).
You don’t have to use a primer though it does provide the best base.
STEP 3 Apply three light coats of spray paint, allowing the paint to dry thoroughly between coats. If you’re particularly proper you can also lightly sand between coats though I didn’t bother so I guess I’m not particularly proper.
I used White Knight Squirts Enamel in Gloss Riverstone (from Mitre 10).
Try and use a decent quality paint. In some instances, where it doesn’t really effect the outcome, I’m more than happy to advocate the use of whatever, though in this case a good quality paint does seem to make a difference.
Here in Oz the colour range of off-the-shelf spray paints is pretty limited. Aside from speciality stores (which are scarce) I’ve found Masters to have an okay range though don’t discount graffiti artist and automotive aerosols too. If you’re still really struggling to find just the right shade you can always try a Preval spray can kit or have an automotive shop custom mix and can a colour for you (both kinda expensive options though do-able if you’re desperate). There is also the option of using a standard domestic spray gun though make sure you use a high quality paint and follow the recommended dilution ratio.
STEP 4 Finish by applying two coats of clear gloss spray sealer.
I used Cabots Cabothane Clear Oil Based Interior/Exterior in Gloss (from Mitre 10).
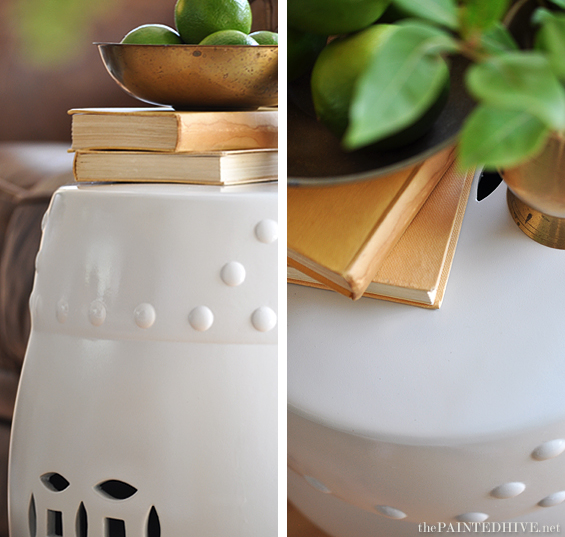
Not only does a clear top coat help create a lovely glossy sheen it also gives the piece a tough and hard-wearing exterior. Do keep in mind that over time most clear sealers will yellow slightly. This doesn’t bother me as my stool isn’t pure white and I’m not opposed to it gaining a bit more warmth though if you want to retain a crisp white finish try to track down and use a non-yellowing sealer.
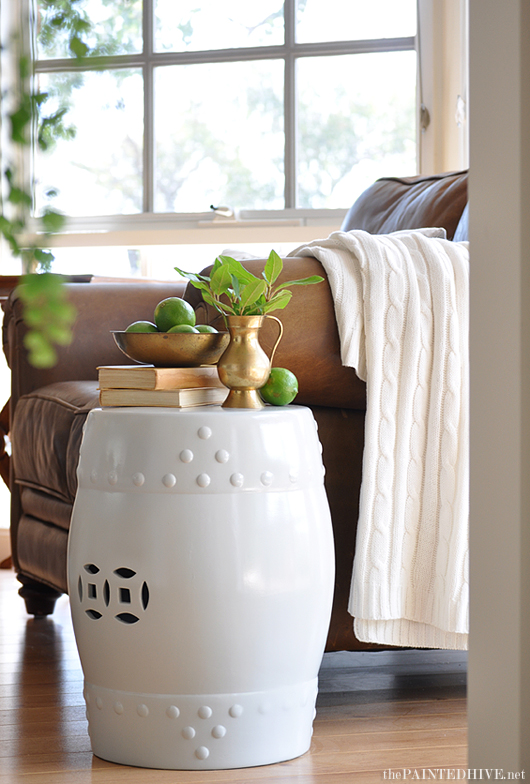
I’ve spray painted lots of small, ornamental ceramics before though never something large and functional. I mean, this thing was going to be sitting on the floor…in our living room. It would be at the mercy of Charlotte’s wayward glockenspiel mallets, Cooper’s clumsy paws, heavy-handed beer bottle set-downs and my not so un-aggressive vacuuming.
At first it seemed like blind optimism to think it’d hold up okay though now, three months on, I’m super pleased to say it still looks great and is completely scratch and chip free – yay!
![]()


WOW! What a great price on the stools.
Love the white finish – never thought of painting ceramic – thanks. :)
Thanks for the comment MrsSW.
The finished drum does look rather white in the pics though is actually a very pale grey-blue. It was an “I’ll-see-what-this-colour-looks-like” experiment and luckily it ended up to be just right!
Oooooo – pale grey-blue is even better. I see now that it’s Gloss Riverstone – once I get a stool I’ll see if we have it over here.
Thanks again.
I love this stool and am constantly looking for a reject or a sale one in the wrong color. I may paint it weathered look or metal like a steel. I wast thinking if you play around with the white balance on your camera (that’s if you have one) you may be able to get that color to come up the proper grey it is. I’d love to see it.
Anywho, love your blog. Just darling! And you are just adorable
Thanks Heather. It has only a very subtle grey-blue tint which can kinda be made out in the last photo on the right.
Although I think my photo compositions are okay I’m still trying to learn the technicalities of cameras (I even bought the Digital SLR’s for Dummies book!).
If you can find an affordable stool I think re-creating a metal look would be awesome!
Hi Kristine, Thanks for the tip about the reject shop. I have been going crazy looking for white ceramic drum stools for ages…on gumtree, ebay and other shops, but they were always too pricey. So this is perfect! Thanks!!!! xx Rani
He, he, a woman after my own heart.
Get into The Reject Shop quick smart girl…I think they sold out super fast last time.
Thanks for stopping by Rani.
xoxo
Great makeover, Kristine! It’s so true – if the style and shape are right, paint can fix just about anything!
xo,
Shannon
Yes, soooo true. Precisely why I love me some aerosol cans :-)
As always your tutorials are the best! Thanks for sharing where to buy, now if only I can convince the Reject Shop to post to me…I live in the.middle.of.nowhere!
Arghhh, don’t you hate that.
Every now and again my husband suggests we should move to Tassie (I do love Tassie) though them I remember there’s no IKEA (‘course I’m just being silly)!
Perfect timing, Kristine! I bought a white one from The Reject Shop yesterday, now I need to decide what colour to paint it!
Oh yay!
Like I mentioned, the finish on ours has held up great. I am a little careful with it though all in all it’s just another piece of functional furniture.
Bravo! Love the makeover… and the photos are spectacular. :)
Thanks so much.
Wow, ‘spectacular’ is a BIG word…you are too sweet. If only you could have seen me trying to kneel down over my tripod with an eight month pregnant belly and a toddler climbing all over me as I took the photos :-)
It looks fabulous! I know where I’m heading after work today. Thanks Lisa xo
A very big thank you on the shopping tip. I did managed to pick one up (the 2nd last one instore). Lisa xo
Yay! I happened to be at my local shopping centre on Friday and had a look in The Reject Shop (just to see – I DO NOT need another stool…willpower Kristine) though they were already sold out!
Another of my readers got the second last one from her store too. I wonder if they are all completely gone already.
This is so beautiful, i am in love. I really want one of these for my home. Your whole space is stunning.
I am now on a hunt for a less expensive black stool. Thanks for sharing the tip.
Great choice to paint them white! I’m so glad you posted this! I found a pair of ceramic lamps at a thrift shop with great shape and not so great color. I’ve been wondering how I can repaint them for a while, so this gives me a boost of confidence!
I have one that needs to be painted, I’m so glad you posted this :)
Debbie
Wow! I love garden seats and love how well your paint job worked out.
Thanks for sharing it…maybe one day I’ll go for it, too. I found you on the SNS hop.
Helen
Have just found your blog and have to say your house is beautiful. Such a great style-can’t wait to see more. I love the ceramic stools and want one in white-I think they go with lots of different decorating styles.
Wow Kristine, it’s come up beautifully! Thanks for the how to info, particularly for sharing which products you used and where you found them x
Hi Kristine, Thought you might like to know that I got the ceramic stools!!! Woohoo!!!! The drive to the reject shop was severely nerve-racking!!! And my heart nearly stopped when I couldn’t see them anywhere in the shop. But my awesome husband spotted them hiding in the corner!!! The very last 2 in all of the reject shops! LOL! Also wanted to let you know that I’m running a giveaway on my blog at the moment (http://lamaisonjolie.blogspot.com.au/2013/02/amazing-giveaway-by-personal-planners.html), would love for you to enter! Thanks once again! xx Rani
Hi Rani
Awesome work! My local Reject Shop was sold out by Friday morning! Luckily I didn’t actually need any more stools (note, I said ‘need’, not ‘want :-)
Just popped over and e-visited you. Great give away.
Kristine
Awww thanks Kristine! I was a woman on a mission at the reject shop, since I have been wanting, needing, sleeping these stools for a year!!! God knows why they are sooo expensive at retails stores! I bought the last two. One might go to a friend on her birthday- she loves them too! I’m redoing my entire home again one bit at a time and these will come in handy for sure! Also saw your music stand lamp post. I was trying to make the same thing out of a telescope stand, but now that I saw your post, a music stand in my garage is the way to go!!!
Just noticed your post! Thanks for entering and good luck! I can’t tell you how awesome it is to find another kindred blogger in melbourne!!! Just awesome! Maybe we should catch up oneday!!!!! And I just love love love your blog!!!! Xx Rani
so impressive! i love those stools and now i will be scouring ebay too:) {along with all your readers i’m guessing!} love it!
Great buy on this garden seat. Wish they had a shop like this in the states. Thanks for the tutorial on painting ceramics.
He, he. I’m usually the one pining for all the awesome and affordable stuff you guys have in the US! Though I have seen posts from a few US bloggers who have bought these stools for around $20 from certain stores over there…sorry, not sure which ones though :-)
Great tips! I too have been looking for a garden stool, and have been stopped by price & color. Now I just have to worry about price! Thanks so much :)
I have mine in white so your version definitely hits home with the original! Great job! i wonder though if you’ll stop there, maybe next year you’ll change it again to a different color since this one turned out so well!
That’s the beauty of paint, isn’t it Vel? It’s just so easy to make quick, affordable changes.
:-)
I just went and bought my stool-my reject shop has loads of them, looks great.
Awesome!
Thanks so much for linking to Make the Scene Monday @ Alderberry Hill. You are being featured today!
I hope you are having a wonderful weekend, and join me later tonight for Make the Scene Monday #63!
Oh my, this is gorgeous! Thanks for linking up.
Beautiful! Great makeover, I like the white! Also, your pictures are amazing!
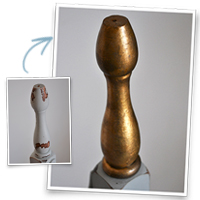
Kristine – I’ve been catching up on your posts all morning. Everything looks fantastic! Love the stools, the faux brass legs treatment, and all the other goodies you’ve shared. Congrats on the magazine cover!
See you soon and hope you are well
Jenny
http://Www.simcoestreet.blogspot.com
I love this! I’ve been seeing the ceramic stools in the reject shop for awhile but they don’t have the colour I want. I’m going out right now to get one! xxx
Hi
I love this and about to put it into practice! Well, try to to. Just thought I would share that these drum stools are now available at The Reject Shop (Sydney) for $40 in white , jade and a darker green-blue colour. I want to paint one in pink and another in yellow, I think. Thank you for the inspiration.
Uta
Thanks Uta! We don’t get many catalogues where I live though I just checked out The Reject Shop’s latest one online and sure enough there they are! I like the jade/turquoise the most I think.
Pink and yellow would be awesome. If you have a Masters store near you, they have one of the best colour ranges for spray paints. Let me know how they turn out :-)
Hey,
Apparently the Reject shop had black, red and white in a couple weeks ago but the new catalogue has come out with the teal turquoise and white, as Uta had stated so I went in to buy the teal and also came out with a white one as well as they had marked down the white ones from the previous catalogue to $20 which I thought was bizarre because they’re exactly the same as what’s in this weeks..woohoo BaRgAin !!!
Hey Gem
Yeah, as mentioned in the post, The Reject Shop originally had red, black and white. So bizarre to have marked down the white ones as ‘old’ stock considering they are identical to those in the current catalogue! Oh well, their weird decision is totally your gain – score!!!
Kristine
xoxo
I SO WANT ONE OF THESE! But I am in Indiana, any suggestions on how to get one from where I am from?! :)
Hmmm, I can’t really think of a viable way of actually shipping one over, though perhaps try Googling “ceramic garden stool” and search for some in your local area. I’ve heard of US-based bloggers picking up really cheap ones before. Hopefully you can find some on clearance somewhere.
Can you please tell em what sort of gold should I use to paint the stool gold. I want a a look of metallic gold.
Hi Kim
Give Rust-Oleum Metallic Gloss Gold a try. I haven’t personally used it though it catches my eye every time I see it at the hardware store and I have read some good reviews about it.
Let me know how you go :-)
Kristine
Thanks heaps. I am very new to all this.Lets see how I go. I will definitely let you know, even if I fail.
Beautiful paint job.
Fantastic. I have a one with a rather old fashioned Chinese design (it’s been siting in the garden for over a decade now) that I want to update and you’re right, they are a bit over priced here OZ. Thanks for the tips and the motivation.
Do you have an YouTube video for this ?
Sorry Isha, unfortunately I don’t.
I bought my white one of a very good quality for 45€. Haven’t yet found a place for it though
I’m learning a lot with your tutorials & want to thank you for all the links to suppliers and such.
Congratulations for your work.
Cristina
Thanks so much Cristina :)
Hi…from NY. I just found your site and I am loving it!
I was in Australia man years ago (around ’97-98) and I happened upon The Reject Shop. Not sure what town, but it was in the vicinity of Sydney. What a great place. I bought a few things to take back to the States…but I can’t remember what! I wanted to go back home and open my own Rejects-type shop! Or “Crave” coffee, which was nearby – don’t know if that’s still in existence.
I loved this project – my goodness, how long did it take you? What a complete change – you’re not just slapping paint on quickly and expecting a quick pay day (that’s what it’s like around here where I live) – inexperienced painters who think they are artists and they produce crap. (OK…rant over!)
I’ve had my Decorative panting hog up for quite a while but I became very disillusioned and I haven’t posted in a while. Seeing your blog has given me a bit more hope that I might still blog about a project that took many hours…but it was never a waste of time.
Thanks…
Linda
http://www.thecolorfulbee.com
Oh…a PS
The project I thought I was commenting on was the one you did for Feast Watson with the cladding etc.. that must have taken such a long time to do!!!
This one is great as well. Many times you see these Garden stools in horrible colors for cheap. Great idea!
Linda
Hi Linda
Ha, ha, yes, as I was reading your comment I figured you were referring to one of my Re-Love Project pieces.
Thanks so much for your kind words. I know that to some people time-consuming refurbs just seem like a waste of time though every now and then it’s great to pluck an idea from your head and bring it into reality! There’s something really satisfying about being able to stand back and say, “I made THIS happen”.
So glad you found me and decided to comment. Happy blogging :)
Wow! I was just about to sell two that I have…i can’t thank you enough for this brilliant idea and your tips for how to do this! I love a good DIY!
I have a blue one of these I bought in a Salvos store. I turned it upside down to use as an umbrella stand. But as I’m on a white kick at the moment I will respray it. The colour is a bit drab. Thanks.
Go for it! As long as you seal it well and treat it with a bit of care it should be fine.
Great post. I have two beautiful plant pots that are just the wrong colour. I’m going to give this a go…… cheers!
Have fun Sue :)