
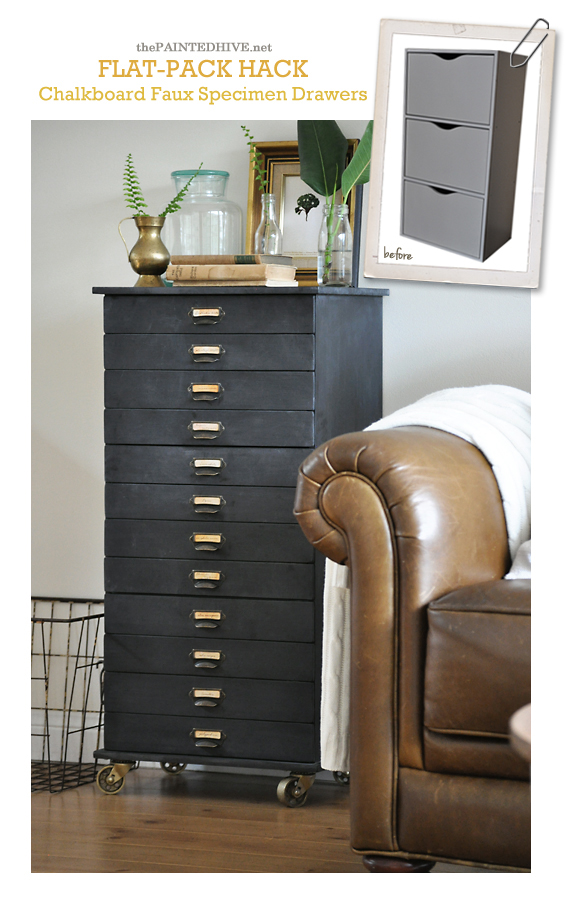
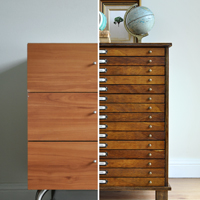
Flat-Pack. Knock-Down. Ready-To-Assemble. Whatever you wanna call it, there’s no denying the practicality, affordability, versatility and accessibility of this very basic form of ‘boxed’ furniture. Unfortunately though, often times there’s also no denying the generic, cheap and mass-produced appearance – luckily, however, there is always hiding it!
A little bit of elbow grease along with some head-cocked, squinty-eyed imagination can see any dime-a-dozen piece transformed into something that looks a million bucks (well, kinda). And anyone can do it!
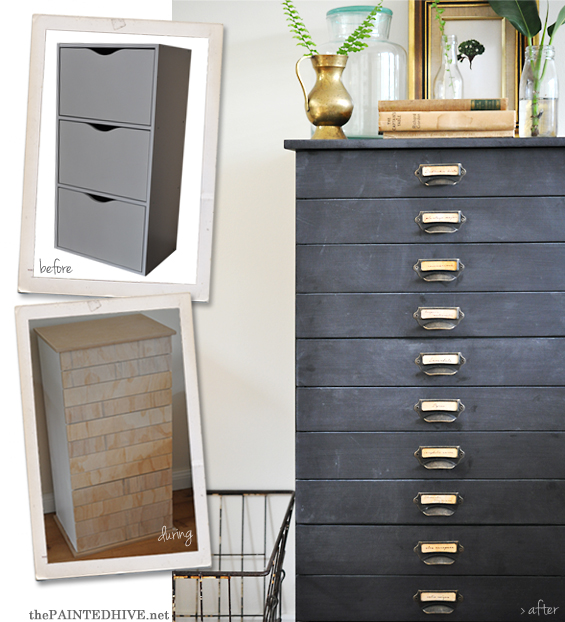
If you read my blog from time to time, you may have seen this recent post outlining my plan(ish) for reinventing a very basic melamine storage unit from The Reject Shop with the help of some White Knight paint products (amongst other things). I was unsure how achievable my initial vision was so the whole idea was disclosed in a pretty ambiguous way (so there was plenty of wiggle room to pretend I always intended for it to turn out just the way it did – though surprisingly it ended up pretty much as I had planned – maybe even better!).
I’ve had this idea in my head for years. There’s a lot to love about multi-drawer cabinets, though the commonly exorbitant price tag isn’t one of them. Also, whilst lots of little drawers are great if you have heaps of small knick-knacks or flat stuff to store, they can be a bit impractical for the more general sorta stuff…like toys, and toys, and maybe even toys (do you kinda get the feeling I’m drowning in toys at the mo’?). Of course, if you’re fortunate enough not to have to swim through toys, you can store other paraphernalia :-)
Anyhoo, here’s how the whole makeover thing went down…
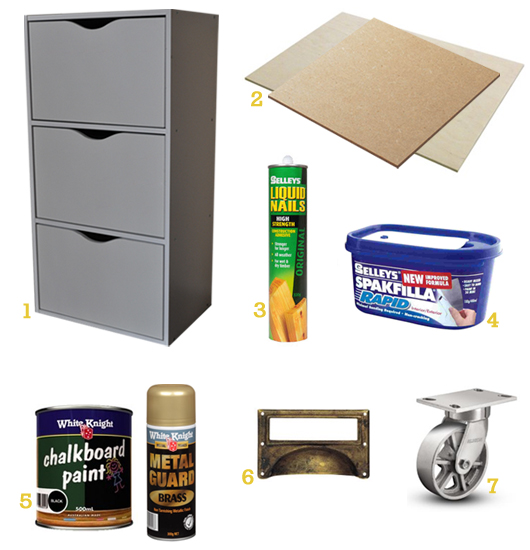
1 Storage Unit
As mentioned above, I used a very basic melamine set of drawers from The Reject Shop ($40).
2 Timber
I used a sheet of 900mm long x 60omm wide x 12mm deep MDF for the top and base (which I cut to size – $12) and a sheet of 900mm long x 40omm wide x 7mm deep ply for the faux drawer fronts (which I cut to size – $14).
Note: I used panels of timber which I could custom cut myself to save some cashola (around $60). If you’re not confident cutting timber, or if you don’t have the right tools, (or if you simply want to make the whole project quicker and easier), you can find more ‘ready-to-use’ alternatives or have your pieces cut to size at the hardware store.
3 Adhesive
I used Liquid Nails.
4 Caulk
I used Spak Filla.
5 Paint
I used White Knight Chalkboard Paint in Black for the entire storage unit and White Knight Metal Guard in Brass for the castors.
Whilst the intended use for chalkboard paint (that of creating a functional surface which can be easily written/drawn on with chalk) is obvious, the value of it as a stand-alone texture is often overlooked. For this project I actually chose to use chalkboard paint, not to create a functional surface to write/draw on (although this is of course a possibility), though primarily to produce a beautifully rustic graphite-like appearance – love!
6 Handles
I used antique brass card holder pulls from eBay ($14 for 10). LOVE these!
Note: Slightly different from the one pictured above in the supplies collage.
7 Castor Wheels
I used 50mm industrial swivel castors from Bunnings ($3.95 each). Bargain!
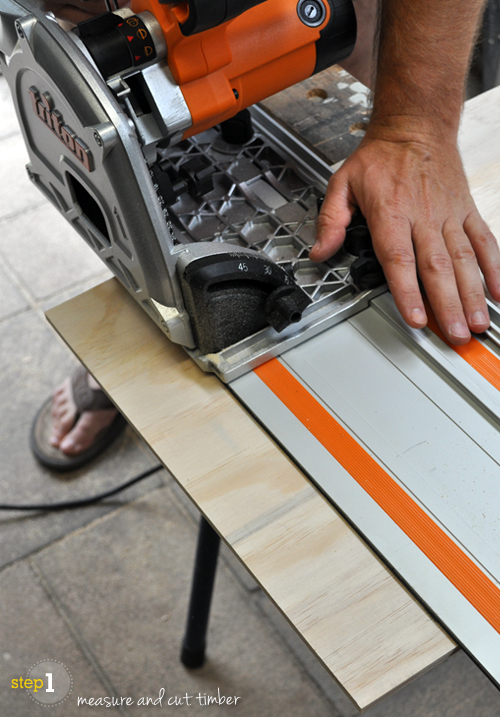
1 Measure and cut timber.
Top & Base: Measure the overall width and depth of your storage unit. Mine was 40cm wide x 29cm deep (29.7cm deep including the faux drawer fronts). Decide on your overhang (I went with 1.5cm) then add it onto the original dimensions (this made my top and base pieces 43cm wide x 31.2cm deep – remember to double the overhang when adding to the width to allow for protrusion at both ends!). I cut my MDF using our awesome plunge track saw which produces perfect lines. You could also use a circular saw, hand saw or jigsaw (if you have a steady hand!), or have it cut by the hardware store (do note however that due to health and safety regulations most hardware stores will not cut MDF – you could use an alternate material though, like ply or solid pine). Once cut, I lightly sanded the edges to smooth and round them slightly.
Faux Drawer Fronts: Decide on the number of faux drawer fronts you want (I went for four per original drawer – so twelve in total) and the approximate gap you’d like between each (I went for around 3mm). To determine the heights of my faux drawer fronts, I could have divided the total height of my storage unit (minus the cumulative gaps) by twelve, though for accuracy I decided to ‘zone’ the existing drawers (to give me optimal control over the placement of the faux fronts, particularly in relation to the horizontal ‘dividers’ to ensure they were neatly covered). Hopefully this diagram helps explain…
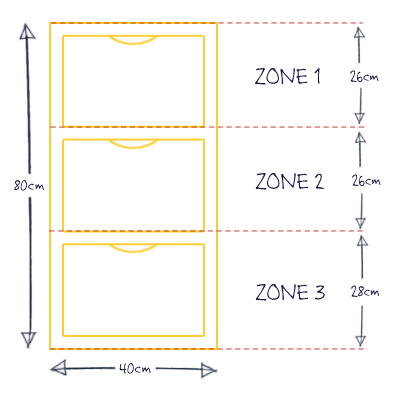
Zones 1 and 2 are identical, each incorporating one horizontal. Zone 3 is slightly larger, incorporating two horizontals.
Taking gaps into account, my eight upper fronts (for Zones 1 and 2) worked out to be 62mm high each. My four lower fronts (Zone 3) worked out to be 66mm high each. Again, I cut my fronts using our plunge track saw. I was really fortunate not to have to make any vertical cuts because my sheet of ply was the same width as my unit (40cm). Once cut, I lightly sanded each faux front to smooth any roughness, concentrating on slightly rounding each corner to help give the ‘drawers’ a subtle look of age.
Note: As mentioned in the ‘Supplies’ section above, I used panels of timber which I could custom cut myself to save some cashola (around $60). If you’re not confident cutting timber, or if you don’t have the right tools, (or if you simply want to make the whole project quicker and easier), you can find more ‘ready-to-use’ alternatives or have your pieces cut to size at the hardware store.
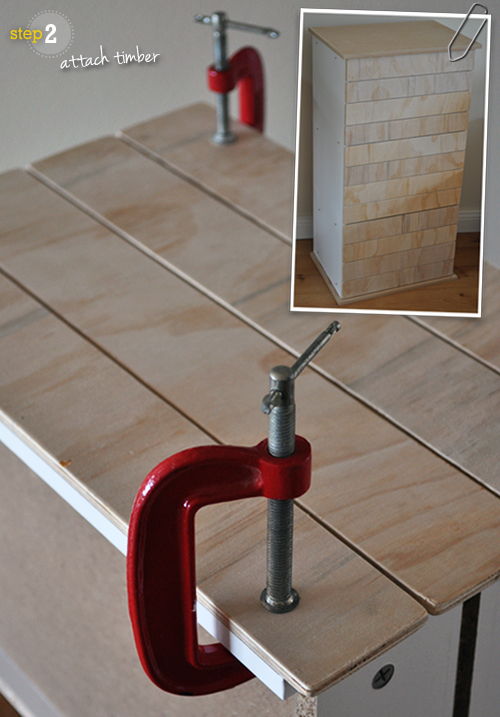
2 Attach timber.
Using liquid nails, I first attached my MDF top. Once set (overnight), I flipped the unit over and attached the MDF base – easy.
For the faux fronts, I worked with one drawer at a time (or one ‘Zone’ at a time). For Zone 1, I first held up the top faux front in position against the unit, marked the base of it on the actual drawer then measured and marked the center (of both the actual drawer and all four faux fronts) before removing the drawer from the unit, laying out the faux fronts in position on top (the top front in accordance with my markings and the bottom front in line with the base of the actual drawer – with the two middle fronts evenly spaced between) and adhering them one-by-one using liquid nails. To create a strong bond and eliminate any bowing, I clamped each faux front until the glue was completely set (around 12 hours). I then popped the drawer back into the unit and repeated the process for Zone 2. For Zone 3 I needed to mark positions for both the top and bottom faux fronts before removing the drawer from the unit (as, unlike with Zones 1 and 2, the bottom front in Zone 3 overhangs the base of the drawer – to conceal the horizontal). This whole step sounds much more complicated in theory than in practice!
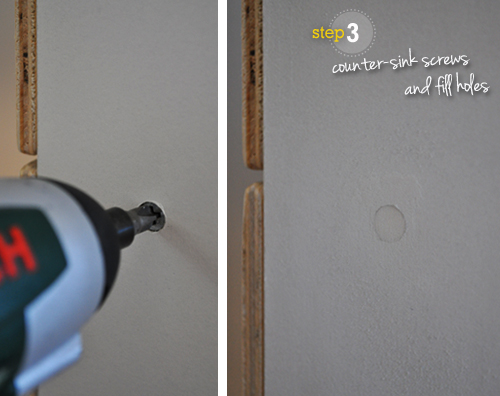
3 Counter-sink visible screws and fill holes.
I know visible screws can look industrially awesome on the right piece, though I don’t think my $40 flat pack is one of those! In fact, to me, visible screw heads are usually one of the dead-set giveaways of cheap production-line furniture. To conceal my screw heads, I simply drove them in a couple of millimetres using some good ol’ fashioned brute force. I then filled the depressions with caulk and sanded to a smooth finish once dry. If brute force isn’t enough to recess your screws, you may need to drill out a shallow depression first.
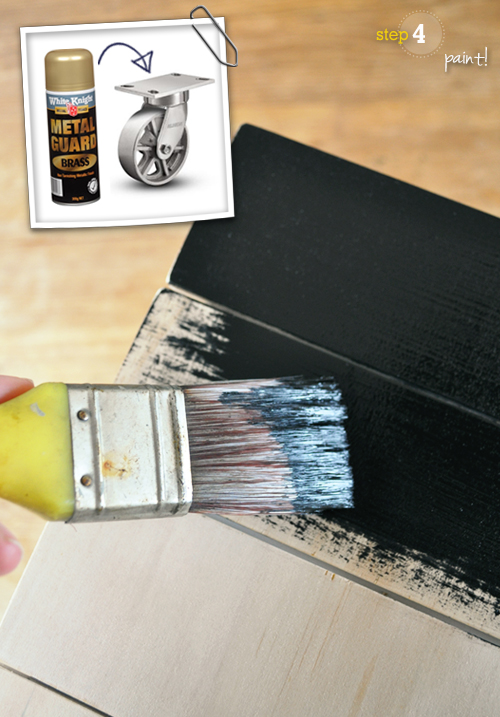
4 Paint!
To give my melamine some ‘tooth’ to grip the paint, I first sanded it using medium grit paper before making sure it was thoroughly clean. White Knight recommends an undercoat of Grip Lock Primer on melamine though I’m a bit of a rebel so I went straight for the chalkboard paint (if you’re a stickler, feel free to use primer). I applied two coats of White Knight chalkboard paint by hand using a brush, allowing drying time between applications.
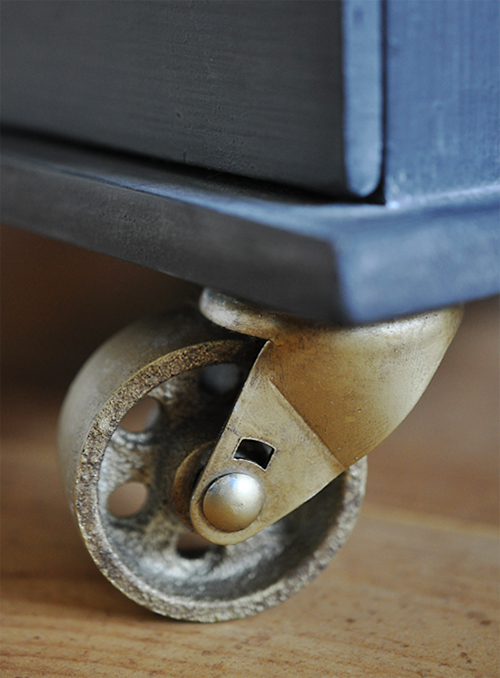
At this stage I also spray painted my castor wheels using White Knight Metal Guard. To age the perfect new finish, so the wheels better tied-in with my pulls, I also dry brushed them sparingly with some brown acrylic paint to give them a slightly tarnished appearance.
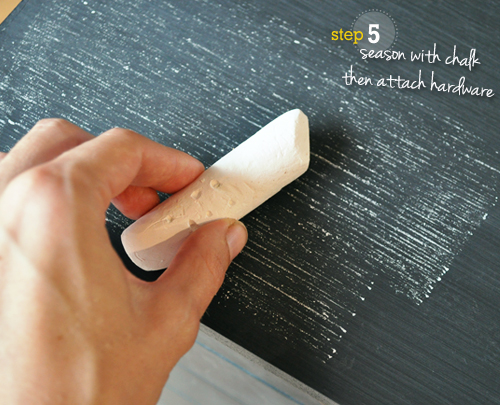
5 Season with chalk then attach hardware.
The fun part! It might feel a little daunting to scribble all over your perfect black paintwork, though the results are totally worth it. Seasoning the paint produces a distressed slate-like appearance with subtle contrast and natural imperfections that, in my opinion, is just lovely! I simply coated my entire unit with a fine layer of chalk (using the side of a fat stick) then wiped it away in a haphazard fashion using a felt duster. I also experimented with randomly flicking the unit with a damp cloth to create extra areas of tonal variation for a more grungy look.
Note: I seasoned my unit prior to attaching the pulls so they wouldn’t obstruct the process.
Once the unit was seasoned and the pulls were attached, I ummed and ahhed over using the castor wheels. I thought they might detract from the vintage-style simplicity and increase the already masculine feel too much. Though I decided to attach them knowing they can always be easily removed. I like them, though I’m not 100% convinced. For a boy’s room they are ideal. Maybe in the future, depending where I choose to use the unit, I might switch them out for something a little less industrial and more refined, like porcelain castors.
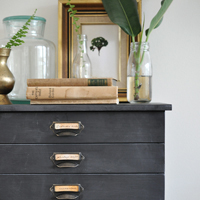
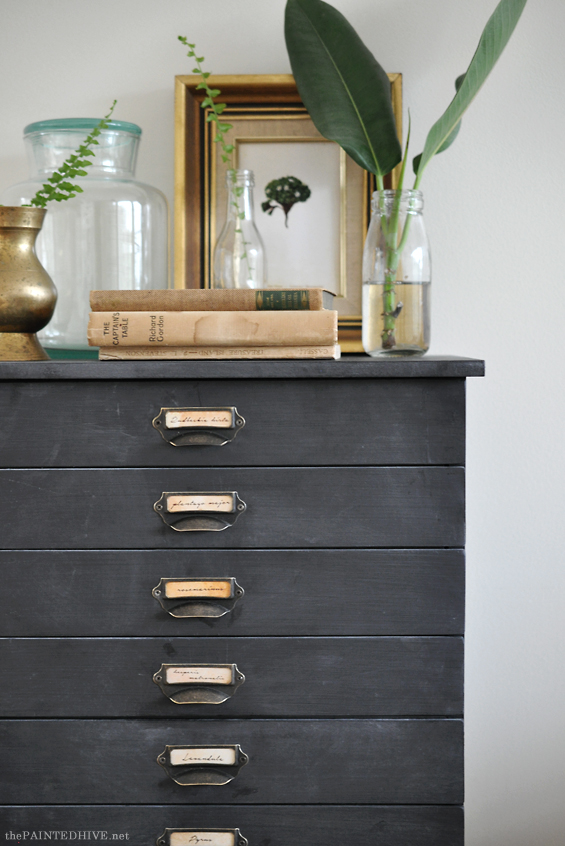
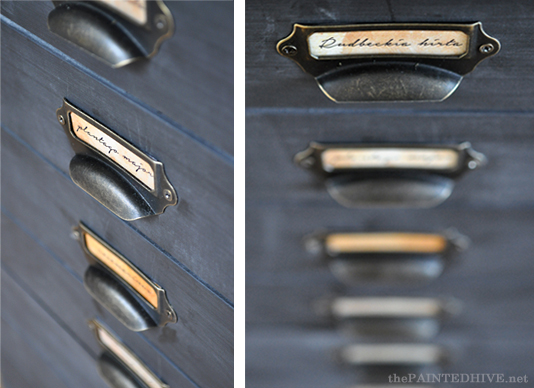
To finish off the pulls, I created some tab in-fills using a digital antique paper texture and handwritten script font (Notera). Because my unit has the appearance of specimen drawers, I decided to use scientific botanical names on my labels. I have attached my file as a downloadable printable if you’d like to use them too :-)
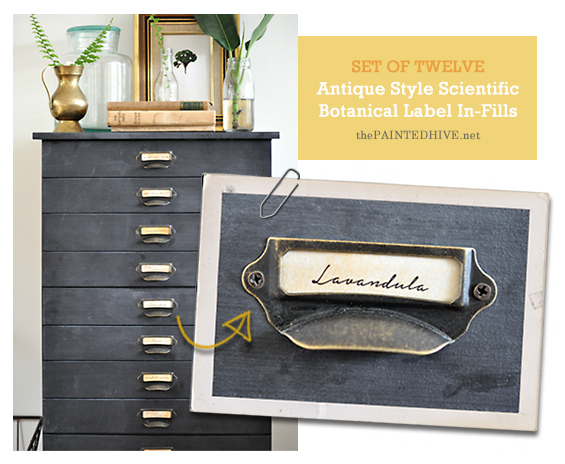
Twelve Antique Style Labels with Scientific Botanical Names
DOWNLOAD HERE
6 Finished!
Style it up, stand back and admire your awesomness :-)
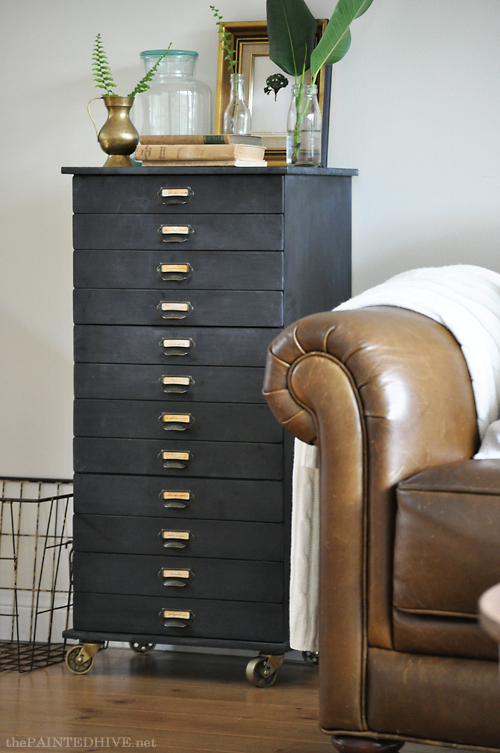
It’s hard to believe this is truly that same melamine storage unit. Maybe the tag line for step six should actually be “Hocus Pocus Alakazam!”.
I am super happy with how this little hack turned out! I think it’s easy for imagined outcomes to fall short in reality, though the result of this project actually exceeded my expectations – gotta love that!
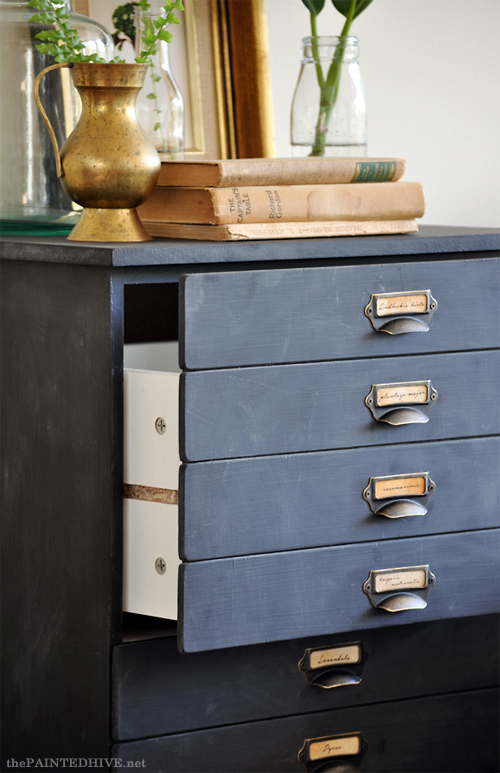
As you can see, I failed to ‘fancy-up’ the drawer interiors. I’m good at neglecting stuff like that. I think a nice spearmint colour would look pretty on the drawer sides (and would probably make my photo much more Pinnable – we Pinners do seem to be suckers for a good jazzed-up drawer interior :-) Perhaps one day that’ll happen. Perhaps.
As mentioned in my first post about this project (covering my plan for the hack), recently I’ve been going kinda crazy due to a build-up of creative energy (it’s hard to dedicate time to personal projects with four cute and persistent hands clutching at your track pants). So now, not only do I have a pretty cool, and completely unique, piece of custom furniture, though also affirmed faith in the therapeutic power of DIY and a renewed sense of excitement about actually getting stuff done – maybe even half decent stuff!
![]()
![]()
![]()
This post is sponsored by White Knight Paints.
All ideas and opinions are my own.
![]()


I knew there was a reason why I always get excited to see a new post from you Kristine. AMAZING work. Seriously. Abracadabra is right!!!
Katy, you took the words right out of my mouth; Kristine’s posts are always worth getting excited about.
Aw, shucks. You guys need to watch your dosage on those ‘super nice’ pills :-) Nah, seriously, thank you so much!
Knocked this outta the park! It’s funny, though I’ve never thought about the virtues of chalkboard paint as a stand-alone texture though I totally get what you mean. I love its distressed look. This is sooooo good.
Love everything about this. Thank you for the printable labels too :)
LOVE! LOVE! LOVE! Perfection! Have a great day!
I absolutely love this! I hope you’ll come share it at the Junkers United party going on now, with 12 bloggers – I’d love to pin this on our Pinterest boards! Link to party – http://knickoftimeinteriors.blogspot.com/2014/04/tin-can-wall-organizer-junkers-united.html
Blessings,
Angie
Thanks for the invite Angie. Popping over now :-)
I love it, what a fabulous transformation. I would love for you to link up to my Inspire Me Party that is ongoing. http://www.astrollthrulife.net/2014/04/212th-inspire-me-tuesday.html Hope to see you there. Hugs, Marty
Thanks Marty. Just linked up :-)
Definitely awesome! Great hack.
MAN, OH, MAN – that is just awesome! WOW!
This is soooo WONDERFUL! I love what you did. I too love those cabinets with the little drawers so much but the prices are too rich for me. Your project creates the same look at a fraction of the cost and it’s truly adorable (and so is the styling!).
Your DIY projects never disappoint! This looks great. Now I’m curious as to what you chose to store inside. I wish we had a Reject Store here in the states. I guess I’ll have to settle for Ikea hacks!
You shouldn’t need a Reject Shop Melanie. Similar units are sold in lots of places.
At the moment the drawers are packed with our over-flowing and ever-expanding collection of children’s books.
Kristine
xoxo
Two thumbs up – this is GORGEOUS! I’m thinking about doing this with my crappy IKEA dressers!
Wow! These drawers look amazing. You did such a great job. Looks like they just stepped out of an old library’s back room. Lovely.
http://llibbyslifestyle.blogspot.com.au
I get so excited when I see a post from you in my inbox, and you always blow my socks off! Love this and pinned it straight away.
HOLY WOW!!! This is amazing!!! I must do something similar soon because it’s just so gorgeous!! You are always so inspirational <3 xx
Thanks so much Liz Marie. So flattering – especially coming from you!
Gorgeous work!
What a transformation! I like the castors; I think they give it a finished look. Thank you for sharing your creativity!
This is brilliant and beautiful! I so love your decorating style and the projects you come up with.
Spectacular – no really! I have this ugly 5 drawer filing cabinet that I can’t hide but I can’t do without. If I glam it up like you did with your Reject Shop cheapo I can leave it out in my study for all to admire. Really great hack. Thanks!
Hey Kristine! It’s so good to see one of your wonderful projects again! LOVE IT! You are so darn clever but remember be nice to yourself. This time of little bods is for such a short time (even though at times it feels eternal!) one day you’ll have more time and the creative juice will pour!
I know Sandy. As lovely as these times can be they do feel eternal at the moment. I try and remind myself often to cherish the little things. Sometimes I catch myself looking at school-age kids of friends and thinking “wow, they really do grow up!”. He, he.
BEAUTIFUL. Oh my word, you have outdone yourself here. I am so inspired! I’ve had a similar set in the extra bathroom for ages. I’ve been looking for the perfect piece to replace it, but have had no luck. I’m going to refashion it now. Thank you for the details, as always!
Dear Kristine,
your projects are so inspirative I just cant believe what a great ideas you have ,I definetly will try make this piece for my dining room. I folow you from Slovakia! Best whishes ,Erika
Speechless! I love it, great job. I had emailed you earlier about a caster source, and found some similar ones for 5 bucks at Home Depot in the US. I’m using on an island I’m building. I will be adding this project to my unending list!! You always amaze me with what you come up with!!
Hi Lois
Great! So glad you managed to track down some castors. I keep waiting for them to hitch the price up here once they realise all us budget saavy decorators like to use them for cosmetic purposes! Your island sounds great. If you feel so inclined, send me a pic once it’s finished – I’d love to see it.
Kristine
Hi
So very clever
kind Regards
Karen
This is so awesome! Pinning :) Come on over to Be. You Tiful Link party on Thursday @6PST and link this up.
AWESOME !!!!! i am so in love with this look! and i want to say flat pack hack several times because it’s fun!
He, he. I know, has a nice ring to it, doesn’t it?
Oh my god this is stunning. You did an awesome job – I love it!
This turned out great! It is such an amazing piece and your styling is always impeccabe!
Thanks so much Lisa.
Wow, I am almost speechless!! That is fantastic.
Thanks Catherine.
Oh my goodness that is amazing!!! I love this idea! I may need to go try it now! You’re so talented!
WOW! I love what you did….you are one very creative furniture maker!
Thanks Valerie. Though I just stuck some wood on and painted it really. I’m merely an illusionist :-)
Totally awesome!!!
Great job! I love an idea that transforms a boring old filing cabinet. Will definitely be linking to this on my site next time I see a good cabinet on Craigslist. Thanks for sharing!
I absolutely ADORE this project!!! So much so… that I featured it tonight at From Dream To Reality!! xoxo
Thanks Christine :-)
Oh. My. Word. This is fantastic! I love the multi-drawer industrial look you gave this. You just opened up a world of possibilities for transforming regular old drawers! Thank you for sharing.
Thanks Deborah. That’s the best thing about this kind of cladding – you can do almost anything!
This is genius! LOVE. So much!
This is amazing. I love every bit of it and am thankful for your awesome tutorial which makes it seem manageable to do myself! I can’t wait to try this!
Thanks Michelle.
Awesome makeover worthy of inclusion in a Restoration Hardware catalog. It’s a knockout! Your layered Timber technique reminded me of a desk I made-over using molding a while back: http://www.thediyspot.com/2013/04/a-desk-molded-into-shape-part-2/
Thanks Jooselyn. Just e-visited you! I love your desk – so mid-century modern.
:-)
That looks FABULOUS!!!! Pinning! Would love for you to join up at Trash 2 Treasure Tuesday link party. We’re not a “new” party but alwyas love some “new blood”. :) http://www.kammyskorner.com/2014/04/trash-2-treasure-tuesday-linky-party_28.html
That is an amazing transformation! You would think it is an old vintage piece or something from Restoration Hardware! Love it, shared on Pinterest!
Thanks so much Bridget.
A M A Z I N G … that is all.
He, he. Thank you for such a big and spacious ‘amazing’ Sharon :-)
Visiting from Miss Mustard Seed – This transformation is incredible! I had to stop by to admire it some more and to compliment your amazing work!
Thanks Cassie! I didn’t realise I had been featured over on Marian’s blog. Always such a lovely form of recognition. Thanks for stopping by and taking the time to comment :-)
That’s just beautiful! I love your vision.
I absolutely love this piece of furniture you created! Very clever! I was wondering if you might be able to tell me where you got your drawer pulls? I have been looking for something like them for months. Love your work!
Hi Meagan
Thanks so much.
There is a link to the source for the pulls in the post (under the supplies section). They are from eBay (which I usually find has a really extensive and affordable range of cabinet hardware).
Kristine
WOW. And that is a serious understatement. I can’t remember I read a blog post about a good hack that I was so intrigued with! I was actually sad when I was finished reading all your steps because I was so enthralled with the process. I would have never seen the specimen cabinet come from that melamine piece. This was truly a creative genius project. If you can, I would LOVE to share this at Redouxinteriors. My link party is live until Monday at midnight PST. Please come link it up, everybody needs to see this!
He, he. Your unabashed flattery has totally made my day Karen.
Now, just heading off to grease-up all my door frames so my massive head can squeeze through then popping straight on over to your link-up – thanks for the invite.
:-)
I’ve been seeing this featured all over blog land – and it deserves all the publicity it’s getting!!! Well, I’m adding another to the list – featuring this tonight on Kammy’s Korner for Trash 2 Treasure Tuesday! :) Thanks so much for sharing.
Thanks so much Kammy.
At the mo’, I don’t have quite as much time as I’d like to peruse blogland so have only noticed my project featured on one or two other blogs. It’s lovely to hear it seems to be “all over” the place though – thanks for letting me know.
:-)
Wow this is totally utterly awesome!! I love love it! I for sure am pinning this! Great job!
The ideas are comprehensive showing how the drawers are transformed like that. I might try that one on my old drawers.
Sensational hack! And for once, a reference to a store I can actually shop at (being a fellow Australian). As much as I love all the other really good DIY bloggers, they’re mostly located in the States. You’re the only Australian blog I read. Love what you’re doing with your house (my favourite is your computer desk area). Nice to be able to read a blog for once who didn’t buy a five bedroom house with massive rooms for $200.000… ;)
Thanks so much Anna.
I know what you mean about all the blogs in the States. It can almost be a bit disheartening to see all the really cool DIY and decorating stuff they can easily and affordably obtain over there.
Glad to be a little slice of relevance :-)
OMG. I have just found your blog. I’m so excited to finally find an Ozzie DIYer
I am loving your pages
Yay, thanks so much Kylie :-)
I wish I could afford to take out a nation-wide TV ad or something so I could reach more Aussie gals looking for local DIY blogs. It’s just so hard to get the word out there. Trying to filter through the numerous, albeit fab, US based blogs is such a feat! Hang on a second, maybe next time I see Scotty Cam in Mitre 10 with a camera crew I can parade around in the background with some kind of placard? Hmmm.
Anyhoo, glad you managed to stumble upon me somehow. Hopefully I can produce some inspiring content for you.
A beautifully detailed manual, very easy to follow and this style is something I really like; simple but it has a soul. The latest similar piece I created was inspired by the idea of reusing and old cabinet I found here, so my workroom is starting to feel like home… Yours would blend with it perfectly, but it also seems like it takes much more patience than the previous one. I will try to make it :)