

Some of you may not know that when I started this blog, I was up-cycling and on-selling A LOT of furniture.
It was a hobby. My second job of sorts. And I LOVED it.
Though with the growth of my blog, and, more pertinently, the emergence of my little family, came the gradual demise of my blossoming furniture “business”.
Sometimes I miss that creative outlet badly!
Which is why I was excited to learn about Annie Sloan’s Made It My Own campaign.
Made It My Own encourages people to put their spin on a piece of furniture or item of decor using Annie Sloan products then share their creation to help inspire others…and there are $100’s in prizes up for grabs too! Painters are encouraged to upload a pic of their finished work directly to Annie’s online gallery and to share socially using the hashtag #MadeItMyOwn.
Yay, what an awesome excuse to get painting!
More than that though, I was super excited to actually try out Annie’s legendary products for the VERY first time (#anniesloanvirgin).
I received a little starter-pack in the mail and set myself the challenge of using each product contained there-in to totally transform a very basic brand new item into something authentically vintage.
Here’s how the whole thing went down.
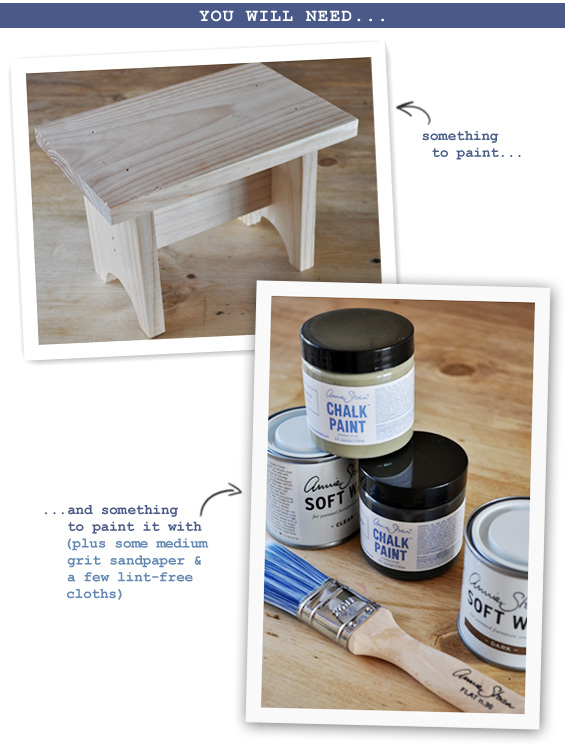
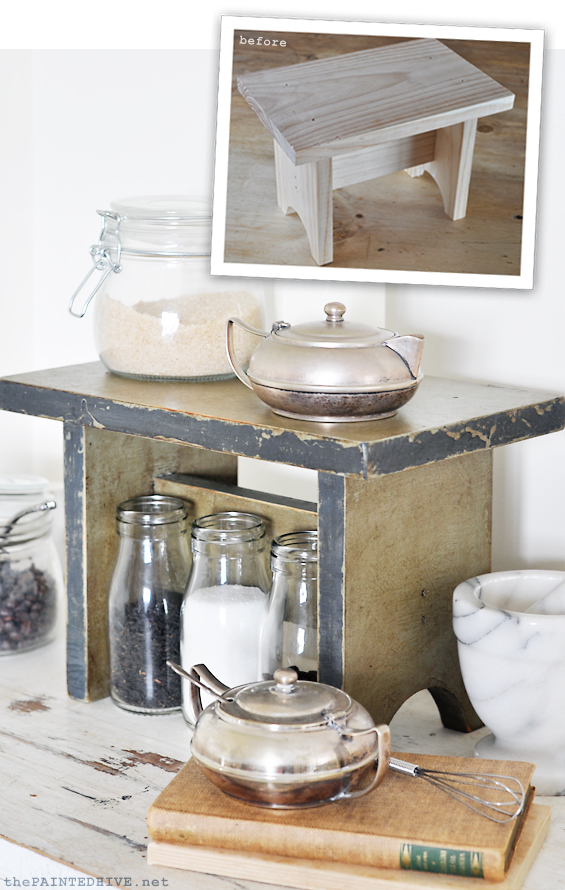
Raw pine step stool ($20 from Bunnings)
Chalk Paint by Annie Sloan (Chateau Grey)
Chalk Paint by Annie Sloan (Graphite)
Soft Wax by Annie Sloan (Clear)
Soft Wax by Annie Sloan (Dark)
Brush by Annie Sloan (Flat n. 38)
Of course, you can choose any item of furniture you like and any paint colours your heart desires. I also recommend a large round paint brush though a regular flat brush will suffice.
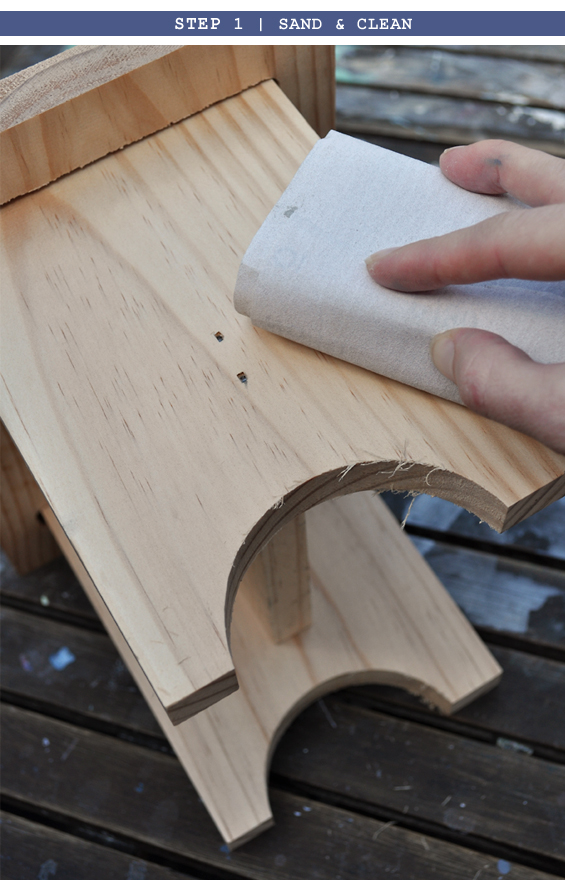
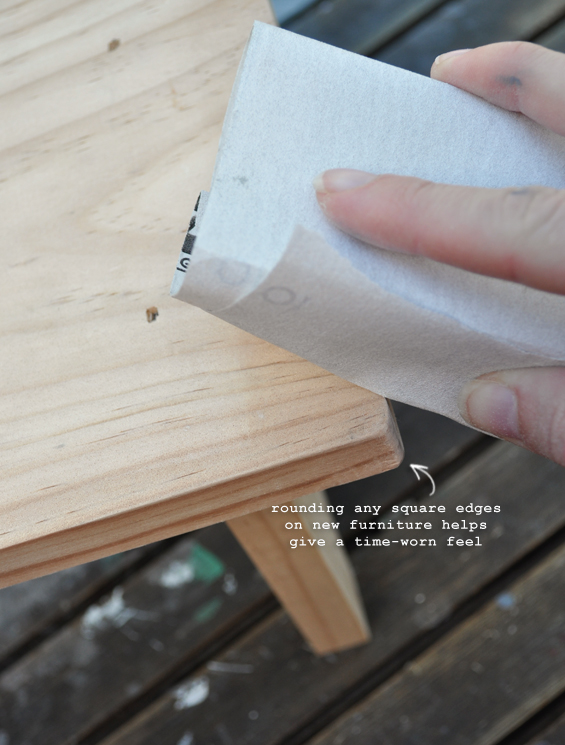
1 Sand and clean.
Chalk Paint by Annie Sloan doesn’t call for much prep (in fact, none at all – yay!) though some of the edges on my raw pine stool had killer splinter potential and were just plain messy so I gave the whole thing a super quick sand.
I also rounded off the square corners to give the piece a naturally worn look.
Once sanded, I wiped the stool down to make sure it was clean and dust free.

2 Paint colour one.
I was provided with two little pots of Chalk Paint by Annie Sloan; Chateau Grey and Graphite. I decided to make Chateau Grey my main colour. I gave the pot a really good shake (this is important; make sure your paint is well combined) then started liberally slapping it on my stool. This was, quite deliberately, the messiest paint job I have ever done!
Chalk Paint is quite thick and can be used to create texture. Hence, my intentional imperfection. I stippled, criss-crossed, dragged, dripped and dribbled.

Don’t be too discouraged by the sloppy appearance. I know it looks pretty crappy, and I had my doubts, though the subsequent steps bring everything together beautifully. Oh, and don’t be concerned about the unpainted or patchy bits; these are just process pics.
Quite a fussy painter ordinarily I found this haphazard process so liberating. How fun – an excuse not to care!
I used a standard flat brush because that’s what I had. It was fine though I do think a large-ish round brush would produce more random texture with greater ease.
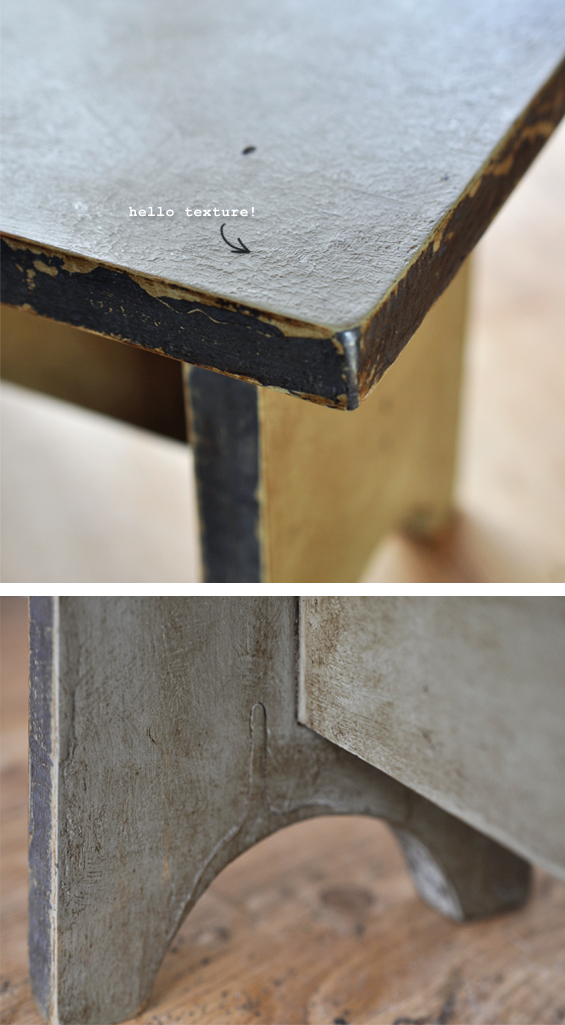
One of the best ways I found to produce interest in the texture was to wait until the paint had dried just a little and then gently drag an almost dry brush over the surface. This caused any still damp paint to “tear” and created very organic-looking “cracks” (this detail can be seen in some of the close-up after pics).
I applied two coats of paint for optimal coverage and to build-up textural layers.
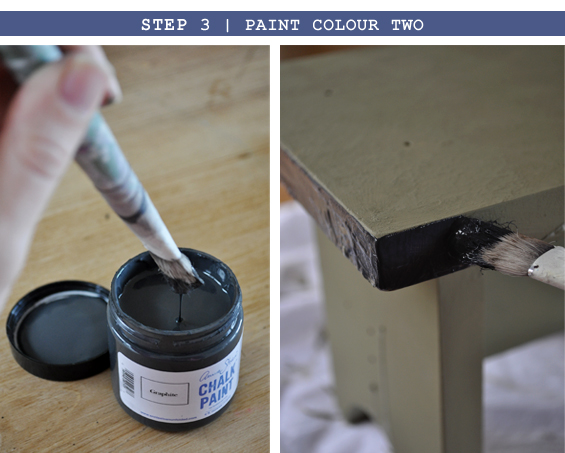
3 Paint colour two.
Once my paint was completely dry (I used a hair-dryer to help speed up the process – especially for the thick dribbles) I used a smaller brush to pick-out some of the edges in Graphite. Once again, I wasn’t fussy with my paint job. Oh, and please excuse the cruddy tattered brush!
The distinct green undertones in the Chateau Grey caused the Graphite to throw a lot of blue. Although they’re probably not colours I would ordinarily pair together, I instantly thought the combo would be great for a boy’s room. And that’s just where this stool will probably end up living; in my little boy’s bedroom.
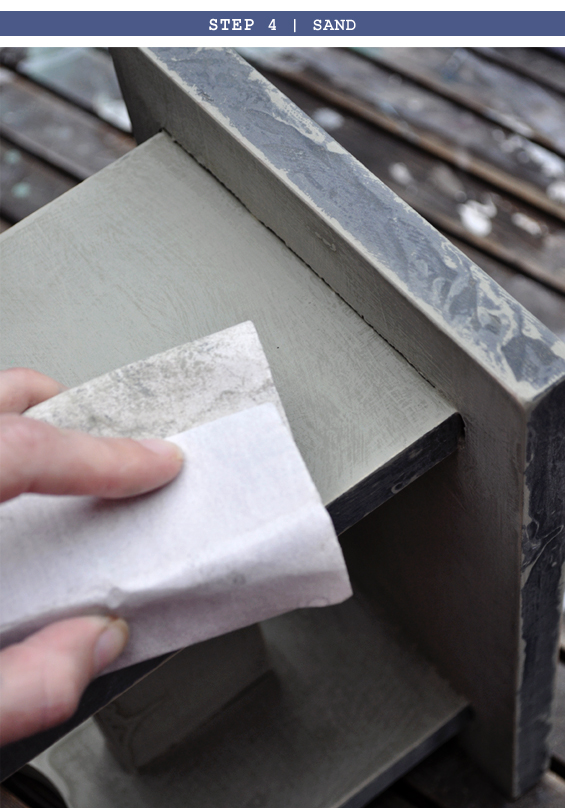
4 Sand.
Although I wanted to retain as much texture as possible, I needed to knock back the more obvious drips and any overt roughness. I also wanted to reveal some of the Chateau Grey beneath the Graphite and give the whole stool a bit more of a uniform appearance.
I sanded quite lightly, paying extra attention to any thicker areas of paint, and the transformation was almost instant. What was looking unattractively crude became, to me, quite desirably rustic! A little smile curled my lips :)
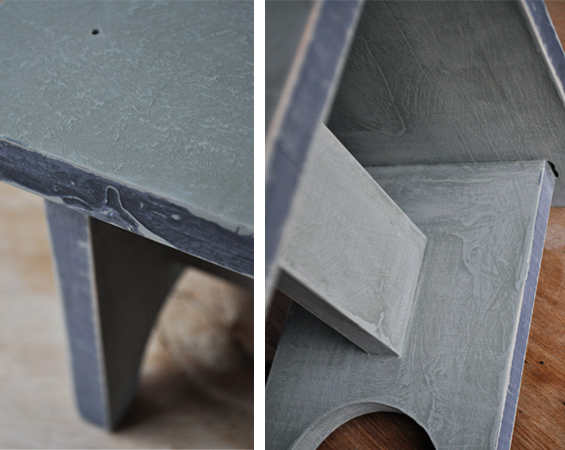
Sanding helps soften and meld the overall look.
I went back to raw wood in a few areas though only very sparingly.
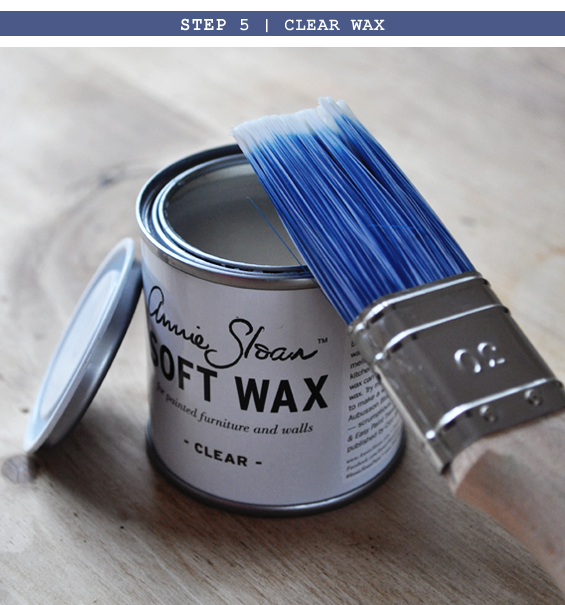
5 Clear wax.
Waxing isn’t a necessary step. If you like the chalky matte appearance of your piece and don’t require a protective finish you can omit it. As mentioned above, I set myself the challenge of using all of the products I received so although I did like the way my stool was looking I decided to go for it – and I’m glad I did!
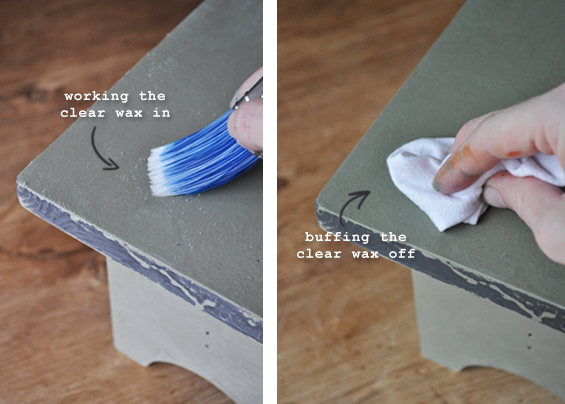
Please excuse my multi-coloured fingers – it’s not from this project though from painting with the kiddies!
I simply collected a small amount of Soft Wax (Clear) on my brush then went about working it into the paint (you could also use a lint-free cloth though I think a purpose round brush would be best). You will notice immediately how the paint becomes more vibrant and takes on a subtle sheen. I worked in sections (top first then each leg and so on), rubbing the Wax in with my brush before buffing it off again with a cloth. It’s a pretty quick and easy process and I found there’s no need to be overly fussy.
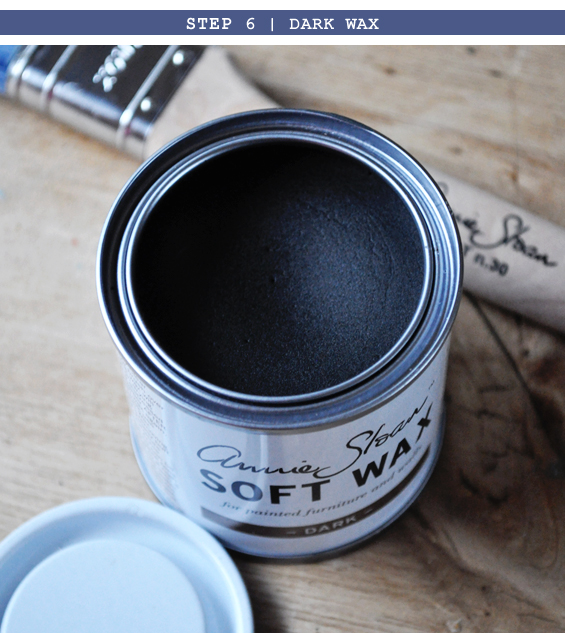
6 Dark wax.
Apparently this step scares a lot of people! I was a little tentative myself because I was conscious of perhaps not liking the result and having to start my stool all over again. But, meh right? If that’s what happened, then that’s what happened. Luckily I LOVED the result.
I applied my Soft Wax (Dark) using the same process as the Soft Wax (Clear); working in sections I rubbed some on then buffed it off again. I paid particular attention to any deep grooves (such as the staple holes) and areas of notable texture.
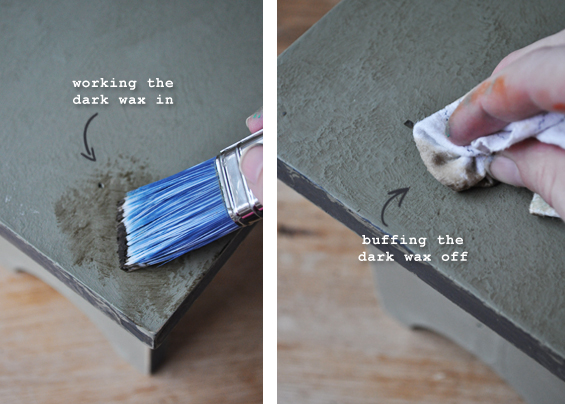
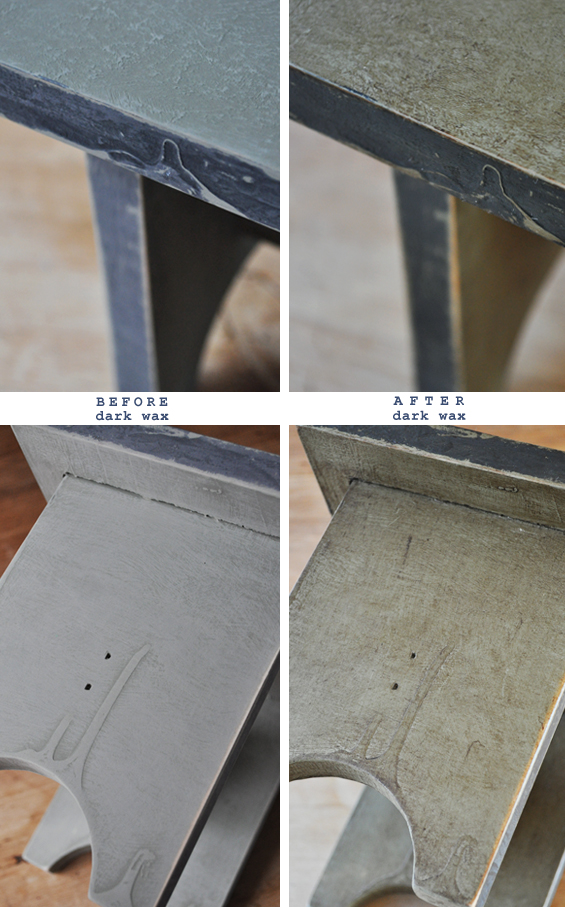
Now, I’m not gonna lie. It was kinda daunting at first. The Wax not only invades all the nooks and crannies (which is the intention) though can also look somewhat patchy to begin with and it does alter the over-all tone of the paint. For me, what was originally quite a soft sage green became decidedly more olive. It took me a little while to work out whether I liked this “new” colour. Thankfully…yes!
I love the sags and dribbles the most!
Following buffing the Wax may remain somewhat tacky though should continue to harden-up over time.
You might be wondering why I clear waxed first. This just provides a necessary buffer, ensuring the underlying paint doesn’t take on too much Dark Wax (as it is essentially a stain). If you do find your piece becoming overly dark, you can use some additional Clear Wax to tone-down the darkness during the buffing process.
Dark waxing was the most time-consuming aspect of this Chalk Paint make-over. Probably because I had never done it before and was experimenting with the finish. I just kept rubbing Dark Wax on and buffing it off, sometimes using Clear Wax to mute things down, until I was happy with the result.
And I am thrilled with it!
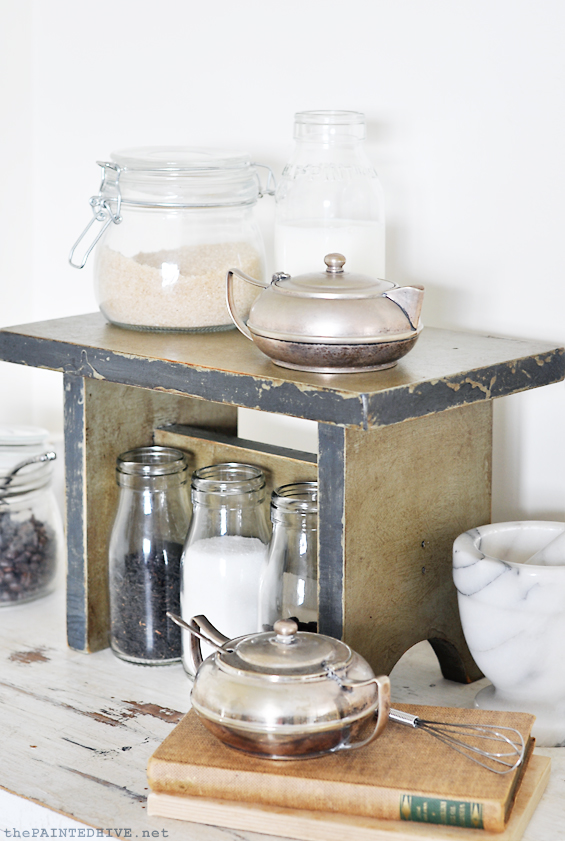
I love the idea of using a little step stool like this for a pretty tea and coffee station.
It’s hard to believe this was a BRAND NEW raw pine stool at the beginning of this process and that all this “new” grungy goodness can be attributed to some paint and wax alone!
I know this look isn’t for everyone and I myself have felt unsure about “antiqued” items of furniture in the past. There’s lots of potential for them to look just plain dirty and very contrived if not done right (I’ve probably been guilty of the “forced” look myself!). I think this is especially pertinent for new-looking, perfectly painted pieces which are merely dark waxed or antique glazed, almost as an afterthought.
One thing I’ve learned from this project is that the use of painterly texture can be a BIG factor in creating a genuine looking patina. And with this paint it’s so easy to achieve!
All those cracks, brush strokes and dribbles are what really help make this piece look so authentically vintage.
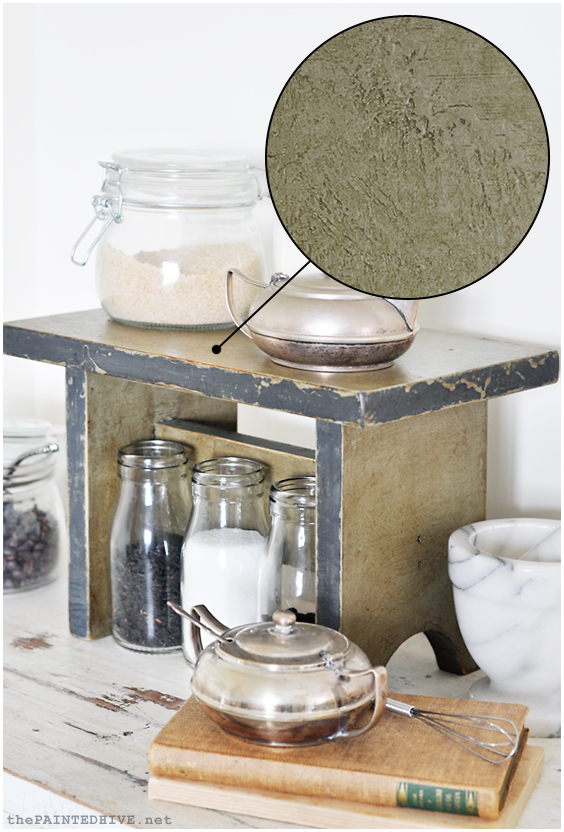
Super-duper close up detail! You can see just how random and interesting the surface is. Although it appears somewhat rough on very close inspection it is actually smooth to the touch.
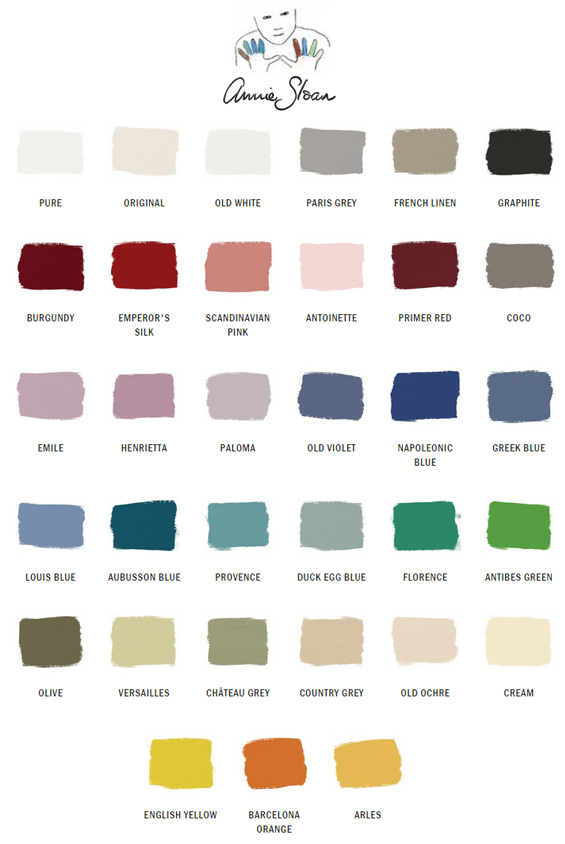
Although I have gone for a rustic, aged finish using muted neutrals, Chalk Paint can also be used to produce sleek, modern results and is available in 33 gorgeous shades.
I’m really looking forward to trying some different colours and using this technique on a larger item of furniture. I think a basic dresser or hutch could be transformed into a totally amazing feature piece.
Remember, the Annie Sloan Made It My Own gallery is open right now! Whether you’re a seasoned Chalk Paint user or, like me, are maybe looking for a good excuse to give it a try, why not get creative then share your amazing work to help inspire others – and maybe win a prize or two in the process!
![]()
Click here to find your nearest Annie Sloan stockist.
This post was sponsored by Annie Sloan.


Gorgeous little stool. And one of the best distressing/antiquing tutorials I’ve ever seen. You are good!!! LOL.
A great tutorial and the stool looks lovely. I love painting furniture and have used ASCP a few times. I think next time I will have to work towards more texture and age as you mentioned.
Thanks Elizabeth. Well, if you’ve used ASCP a few times then you’re doing better than me and are sure to produce a beautiful finish! I really just went for it blindly and am so pleased with the result.
:)
This is the best ASCP tutorial. Thank you!!
Oh wow, really? Thanks Kamila :)
Wonderful, inspiring tutorial, as usual. Love how it came out. I have yet to use AS chalk paints as you don’t see them everywhere where I live. And when I researched them a while back, they didn’t come in the mostly pastel paint colors I like. Expensive, too, I thought.
ASCP is rare where I live too Ann. I think my nearest stockist is actually over an hour away (thank gosh for online shopping!). There is a somewhat limited colour range, when compared to large commercial paint companies, though if you like pastels don’t forget that you can always mix a white shade with a hue of your choice to create your very own colour.
Kristine this piece is beautiful. As a builder I love seeing awesome finish posts because they are a great reminder to readers that not all ‘old’ pieces are really old. You can recreate that look and you are proof. Thank you for such a wonderful tutorial.
Thanks Jaime :)
Yes, usually genuinely old or professionally aged pieces can be pricey and elusive. It’s encouraging to know that an authentic vintage look can be DIY’ed – and as a major bonus you get to create something completely custom and save some cashola in the process!
good gosh it looks like it is a hundred years old love it xx
Thanks Chris. Believe me, I’m as surprised as you – it really does look genuinely old!
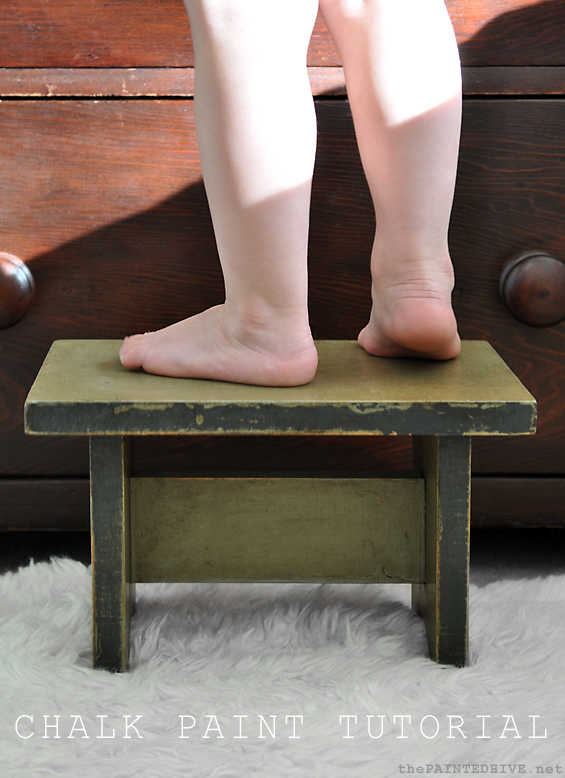
A simple little step stool turns into a beautiful small piece of furniture!
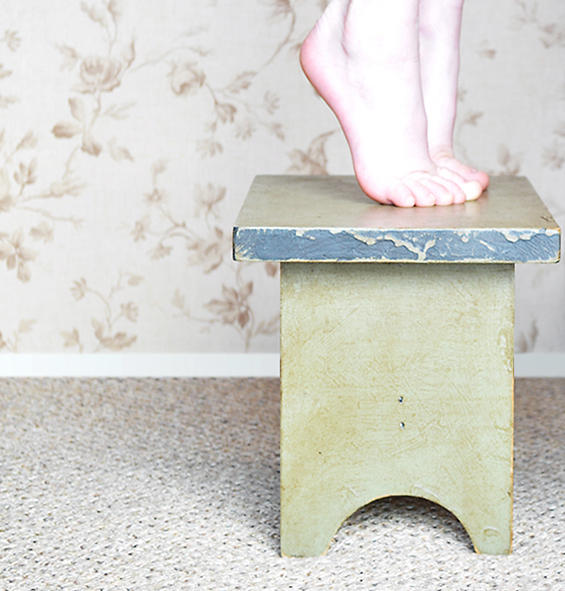
But with the great way you merchandised it for the pics, no way that will make it to your son’s room, lol! :)
LOL! It’s in there right now (beside his big boy bed)!
:)
I love your blog! Thanks for the wonderful tips and sharing so much. I think I subscribed twice, inadvertently. If there’s a way to delete the extra subscription, please LMK. Thanks!
Kathy
Thanks Kathy :)
Hmmm, I don’t think it’s possible to subscribe twice. The subscription service detects duplicate emails and doesn’t allow it. If you do notice any probs though, let me know and I’ll look into it.
Terrific! And Fun!!!
Always a delight to receive an email from The Painted Hive with the latest post. Fabulous project as usual and love those sweet little legs on the stool.
Thank you Julie :)
I had to be super quick to catch those squirmy little piggies!
Here’s a tip to improve your writing: buy a dictionary! “Infamous” means famous for being terrible. I don’t think that’s what you meant to say, is it?
LOL! I was dreading someone picking that up. I just realised a few days ago though couldn’t edit the mistake (which was actually an auto spellcheck typo) due to being away with no computer access. Arghh! Of course I meant simply “famous”. Having thought about it though I have now changed it to read “legendary”.
Yes!
I agree you should change “infamous” to “legendary”.
;)
I made the change a few days ago Pia :) Unless your system is using some kind of cache, it should be showing-up in the post now.
Kristine
As a serial DIYer I have to say that I am just so impressed with this little stool.
I can only imagine that SO many mistakes had to happen before this glorious little Creation came to be.
Thank you for sharing all the steps, blow-by-blow, in so much detail.
You’ve tempted me to finally get on board the ‘Annie Sloan Chalk Paint’ train :)
<3
Pia
Thanks Pia.
This was actually my very first time using Chalk Paint to attempt this effect. During the process I definitely thought it was going to be a fail – everything just looked so messy and unprofessional – though the final steps really pulled the whole thing together beautifully. It is actually surprisingly fool-proof!
WHAT!!!
This was your first time?
Who are you . . . . the Mozart of the Crafty/Creative genre?
You are such an inspiration!
<3
Pia
LOL! Okay Pia, you are waaaaay too lovely :) I’m calling it luck!
Oh this is gorgeous – I love the rustic and homely effect. I think this would be a lovely thing to do to furniture in a new house – to make it feel more lived in, more like home. I’ll be trying this out soon – thanks!
Yes, a few pieces painted like this and scattered throughout a new house would definitely help make it feel more like home.
I tried this chalk paint and I love the result! It’s Highly recommended to first time user.
OMG!! I was just on here to order some more labels, and came upon the stool/shelf. Just told my co-worker I need to figure out some shelving for my kitchen, and this comes up.. I have numerous sizes and shapes of the stools. Can’t wait to go home and dig them out of my shed. THANK YOU for sharing this. BTW.. LOVE THIS SITE! Great ideas!!
Ha, ha. Awesome TeriLyn. So, so glad to have sparked an idea for you :)
And thanks for the lovely comment.
Love your work and very helpful!!
It turned out so sweet!! Everything you do does though :)
Too sweet. Thanks Khristine :)