
Bet you thought I’d totally forgotten all about my parent’s suite extension?
Well, whilst I can’t say it ever left my thoughts entirely, over the past six months it certainly managed to get buried in the depths of my mind.
But, now that things have finally begun to settle down a bit, it’s time to address some of the unfinished aspects of that space.
Starting with the entry door!
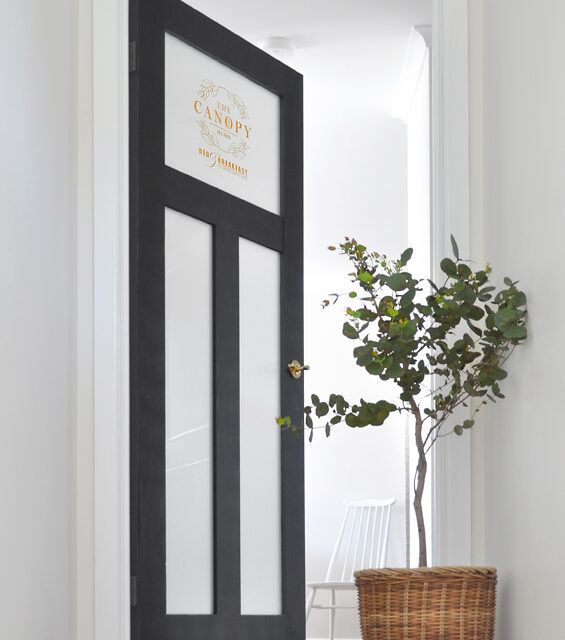
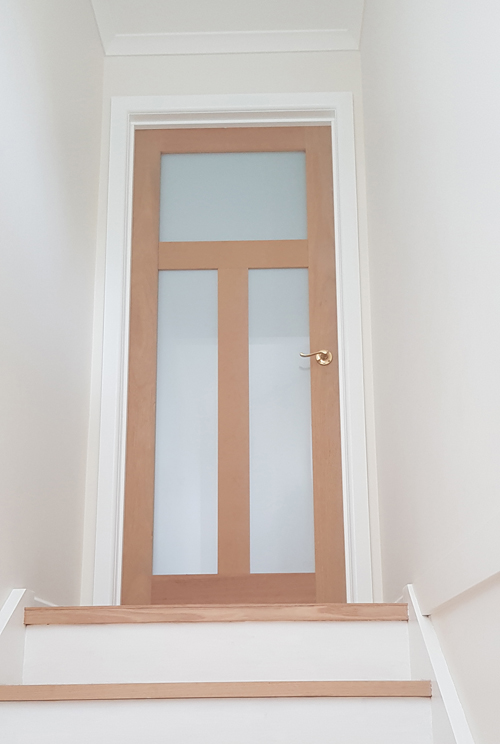
In order to provide privacy and a sense of separation for the suite, adding a door at the top of the stairs was always a priority. In addition, it can be closed when the suite isn’t being used to help with climate control in the main part of the house.
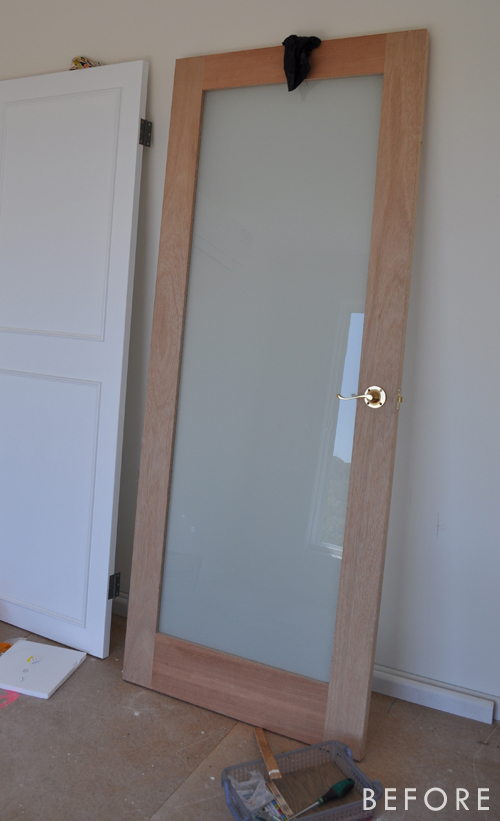
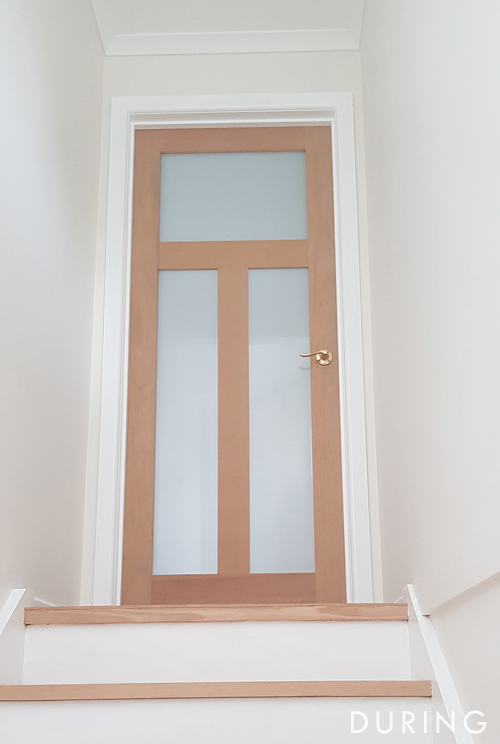
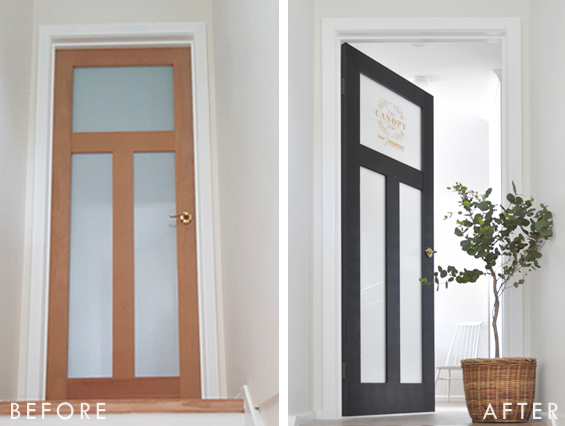
Here’s the door my mum chose many, many months back…
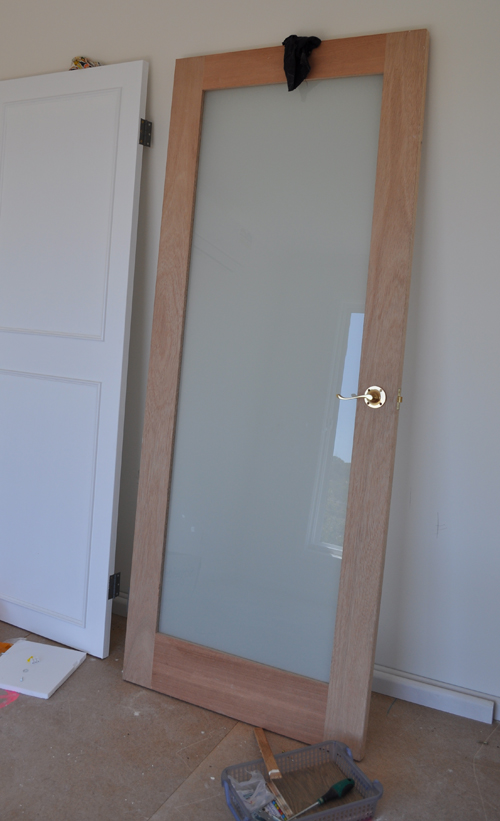
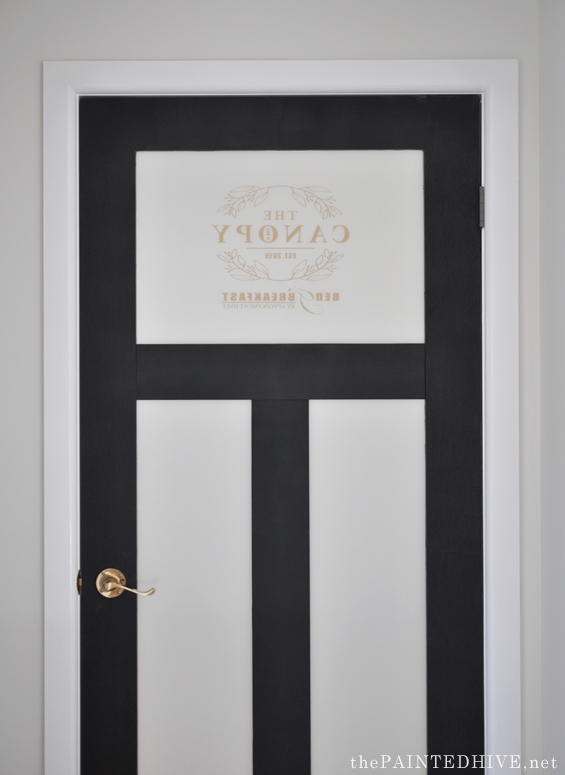
As you can see, it’s nice and basic, with a timber frame and single frosted glass panel.
When it was originally purchased, we weren’t sure what the end goal was exactly. Paint? Stain? Dress it up? Keep it simple?
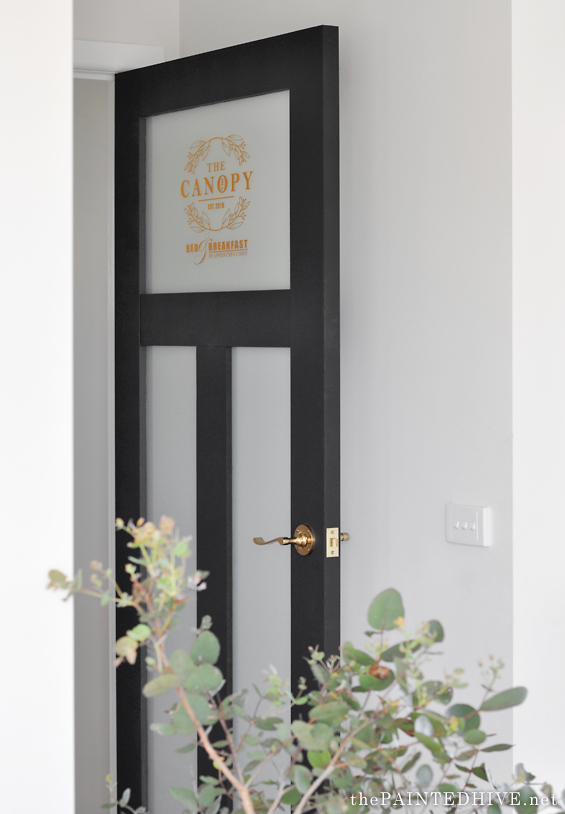
But mum kept coming back to the idea of adding some trim to turn it into a three lite door, so we eventually decided to start with that.
Yes, you can buy three lite doors like this off-the-shelf, and we could have purchased one instead, but at the time we were looking, the price difference was pretty extreme. From memory the three lite option was around $200 more than the single panel option!
All we did was trim some 12mm/.04″ MDF to size, then attach it to the glass with clear silicone. Of course, we did both sides of the door.
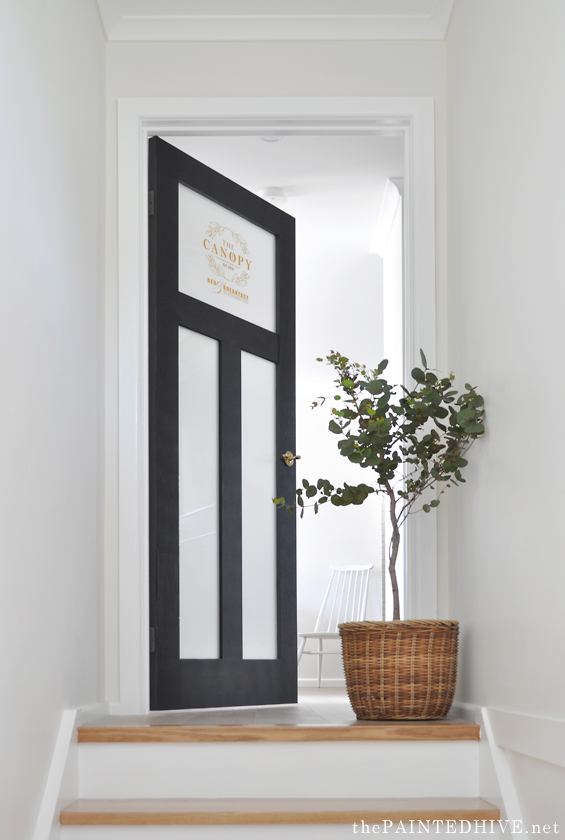
Using MDF meant we then needed to paint the door, but that was my secret preference from the start anyway! We already had plenty of timber in the space with the flooring, bathroom vanity, porch doors and some of the furniture, so painting the door was a nice way to break things up by introducing some impact and contrast.
And what colour works better for that than black?
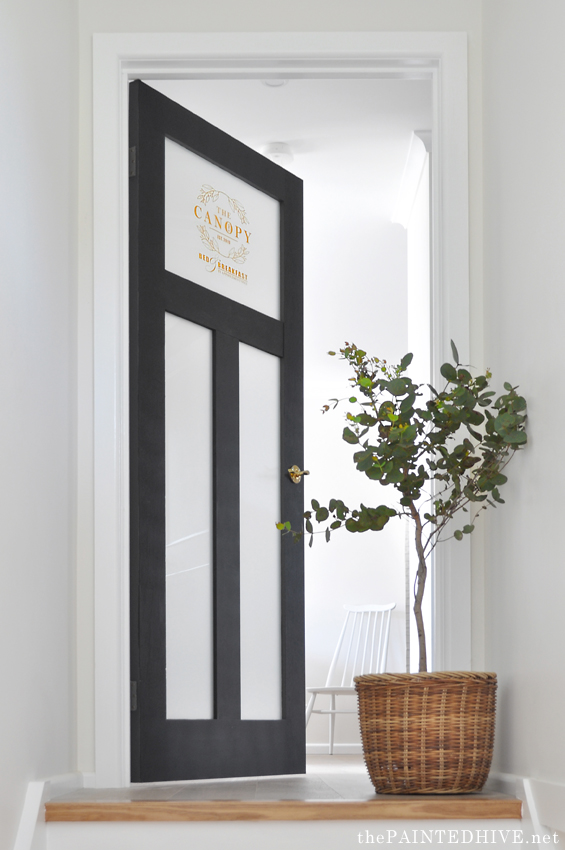
We simply used some satin black exterior paint we had left-over from a past project, applied by hand with a brush.
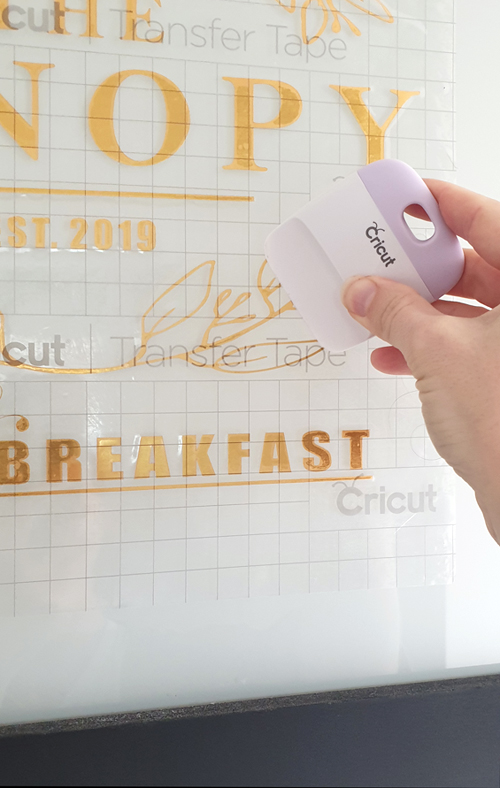
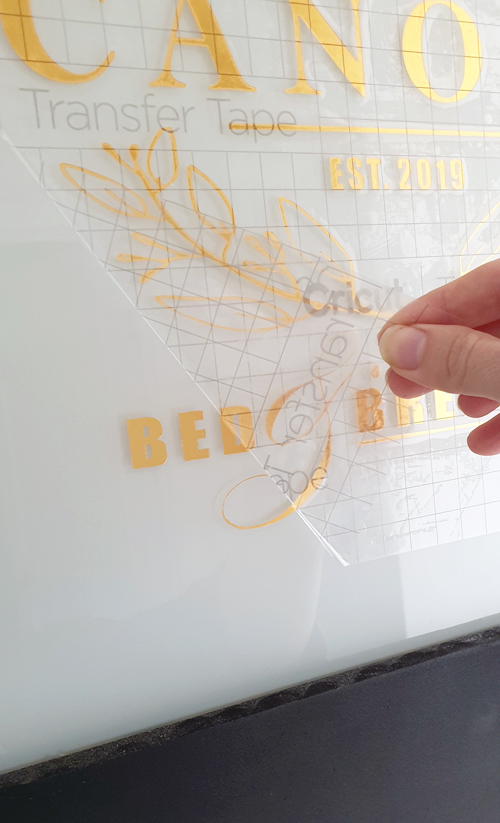
And as you can see, I also added a typographic decal!
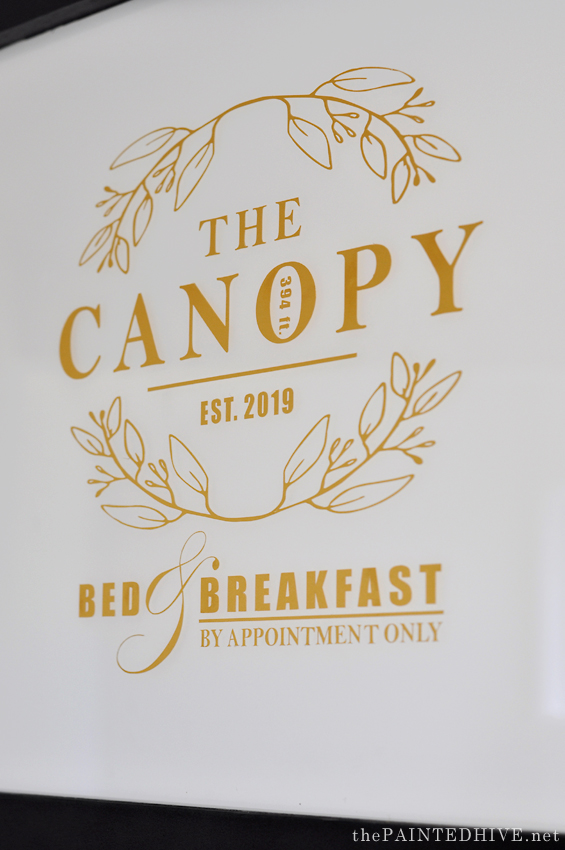
This was just for a bit of fun and whimsy, and can be easily removed or changed at any time. But I so love the way it turned out!
A few weeks ago I was lucky to get my hands on a Cricut Maker! I’ve wanted one of these machines for years and years, so it was pretty exciting!
In the past I’ve had to out-source my decal cutting needs by engaging sellers on sites such as Etsy, and whilst it’s lovely being able to support small businesses, as a creative I’ve always yearned to own the entire process.
I designed the graphic in Cricut Design Space which is purpose companion software devised to make things easy. I always dread having to learn how to use new design programs but this was super intuitive and simple to get the hang of – in all honestly, my biggest obstacle was my own style indecision!
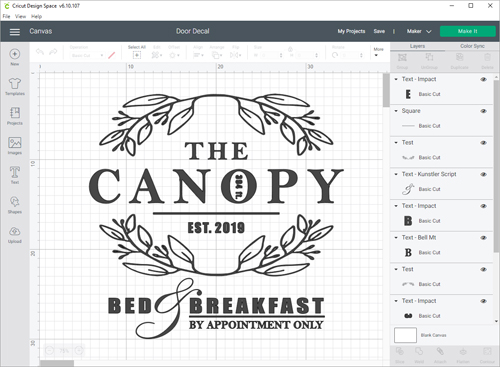
At first I was going to design something very simple, but once I started playing around with ideas I may have gotten a little bit carried away!
“The Canopy” is just something which popped into my head given the suite sits at the top of my parent’s house, and the fact that it has sweeping views of the surrounding treetops. I added the elevation of the property to solidify the canopy reference, along with gumleaf wreaths which also lend a touch of pretty. The general idea was to give the door a sense of having been salvaged from a vintage building, so the Bed & Breakfast inclusion offers that business-ish note.
Yes, it’s all a bit cheesy, but hey, I’m alright with that.
There are millions of Cricut decal tutorials out there from people waaaaay more accomplished than me, so I’m not sharing the full-how to in this post, but feel free to let me know if you’d like more info. What I will say is that it’s in no way hard, however it is a little fiddly. But apparently the foil material I chose to use is one of the trickiest to work with!
I love the way the gold foil works to reference the brass door handle and off-set the black.
I was a little bit worried that it might not look great from the rear due to the frosted glass, but it’s totally fine.
It’s just a muted (and mirrored) version of the front, which actually has its own charm.
So, here’s to one more project crossed off the list!
![]()


WOW, that sure is looking really fine. I bet your mother loves it!
Love it!!
That looks great. Love the style of door. I need to replace all our internal doors, they’re in such poor shape, but I never get around to it because I change my mind on the style every month. Door ADD? Don’t even get me started on choosing handles!!!
The decal is super cute. Very creative.
Thanks Anna. I know what you mean, there are so many different styles to choose from. Can’t go wrong with something classic.
Love it.
That’s so clever!!! Looks amazing!
Looks fantastic! So clever, so creative.
Beautiful, as always! I need to make some decisions about our house but I’m so indecisive. Love to see what you are getting up to, thanks for sharing and inspiring. 💜💜
It can be hard to choose when there are soooo many options out there! I’m way better at making decisions on behalf of other people – LOL!
That is so true, Kristine! So many choices and me being fickle and indecisive!😊💜
Love this! It looks so perfect for that space too. Are you able to share a little more info about the Cricut and the process? I have looked at them, but there seems to be a number to choose from. Some seem to be more “flexible” to work with (for creating your own design vs stock design) Thank you!
Hi Leslie. To be honest, I really don’t know much about the difference between machines. Well, or much about the machines themselves for that matter! I’m really a total newbie. The Maker seems to be able to do pretty much everything I would need, and as far as I can tell there are no real limits in terms of design capabilities. Of course, whilst creating decals is one of the main uses for a Cricut, there is so much more they can do! I really had no idea and am still learning. Sorry, that’s probably not very useful info, is it?
Love this door so much !! All the color choices are so perfect.
What a nice surprise to see at the top of the stairs… Thanks for sharing : )
Really cool!
Wow. Always … wow.
Looks wonderful! Your style choices are superb!
Thank you ;)
This looks so good – and so easy to give an otherwise boring door some pizzazz!
Absolutely LOVE IT. Great idea to create a stunning visual without sacrificing light. I definitely feel the vibe you were going for. :)
Thanks Deb :)
classy and whimsical, delightful combination. it looks elegant.
Again …. just wow. Agree with all the other comments, great style, retains the light, love the colour combo, and it just looks awesome!!
Thanks Megan :)
I love it, looks amazing! Bring on the cheese I say. Makes me smile!
Wow, so simple, yet such a BIG bang for the buck. I’m with you all the way in saving $ on a less expensive door and doing a little extra work to make it look more expensive. And the typography is the prefect touch to the entrance. It may not seem like a big deal to you, but it is such a clever touch. I hope mom and papa are pleased. Great job!
Thanks Pat :)
Lovely👌
Hi Kristine, I really love the door handle you chose for this door, with the wave in it. Can you tell me where you sourced it please? Thanks
We actually got given a heap of these handles from friends who changed their mind during a reno. I think Early Settler and Shots have this style.
Great idea to create a stunning visual without sacrificing light. color combo, and it just looks awesome!!
Thanks for this article this article is very informative and helpful for home improvement.
I am amazed to read this blog this blog is related to home decor.
If you are looking for online home decor product then homesweetlinens offer a vast selection of luxury bedding and home decor products at unbeatable prices. Our team of experts is constantly searching for the newest trends is catered to adequately provide a professional level of accuracy with great integrity towards providing the best customer experience. Shop from our wide selection of top-notch bedding sets online that are of the finest quality. Visit our Bedding Store
Wow That looks great. Love the style of door. Thanks for sharing and inspiring.
I am always so amazed when I see your DIYS! I love how creative you are!