
If you’ve read this blog more than once then you’d probably know I like the creative challenge of making the most of what’s already there, so rather than replace the lights completely (which, let’s face it, could probably have been done relatively cheaply and easily) I decided to flex some inventive muscle and see what I could come up with. That said, without my magic wand the frilly glass shades were a certain loss. Luckily, I already had an idea….
A while back I had stumbled across these plastic bulb cages.

(If you’re in the US then there are products like this everywhere – just Google ‘lamp cage’ or ‘lamp guard’ – though here down-under they are elusive so I was pretty pleased with finding them – even if $16.90 is a bit pricey if you ask me).
They are just standard lamp guards intended for industrial use (such as on building sites, in work shops etc.) though I thought they had definite adaptability potential so I tucked them somewhere in the back of my brain. Luckily, they stayed put in there, and when I was pondering a solution for Mum’s new sconce shades they jumped out from hiding.
“Hmmm, they could maybe work”, I thought to myself, and after checking some dimensions I ordered my cages.
Now, if you’re a ‘safety yellow’ kinda gal you could leave them as is though I wanted a more natural look so it was always my intention to use a paint-based disguise. The trouble, however, with painting plastic is that sometimes it can look like, well, painted plastic, so I thought I’d try this amazing metal effects paint.

(I bought mine from my local Bristol paint specialty store. See my ‘At a Glance’ quick guide at the end of the post for some helpful links).
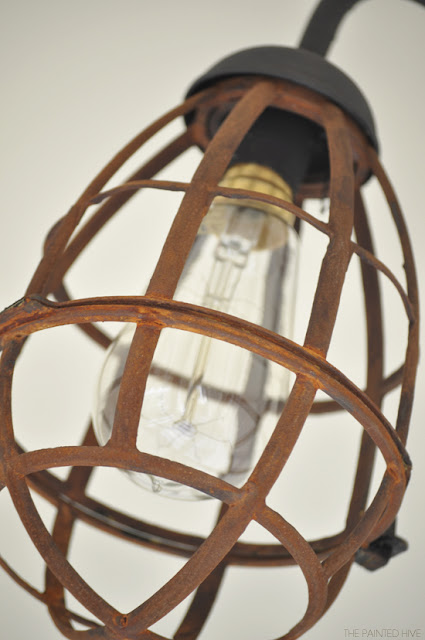
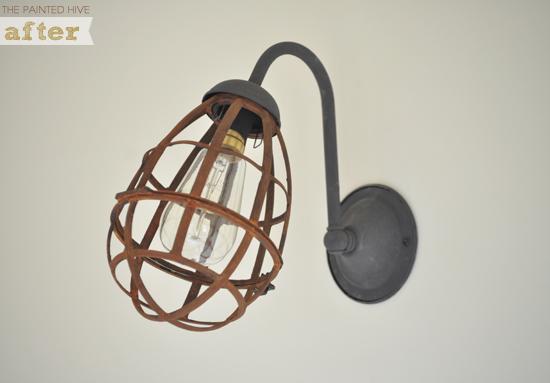
The reactive iron paint contains real metal pigments and the rust activator generates real rust, so rather than a faux finish it is actually real (okay, so have you got my point about it being real?). This is high quality paint which sticks to just about anything and is a cinch to use. Just apply two coats of iron paint, allow to dry for at least an hour then use an atomiser to spray on the rust activator (you can go here to view a really clear and easy-to-follow manufacturer video tutorial). This paint is kinda pricey, though it’s so good only a small amount is needed to give ample coverage.So, after just a little bit of craftin’ here’s Mum’s new sconce….

For contrast, I only used the rust activator on the cages and simply left the sconce arms coated with the iron paint alone, which has an awesome textural graphite appearance. I swear, if it wasn’t quite so dear I might paint an entire room with it!

The clasp, which hinges the cages to allow for changing light bulbs, is incredibly tight to open and close so inevitably the paint does rub off from this small section when it is used. So, to combat the bright yellow which was peeking through I simply coloured the clasp area with a permanent brown marker – easy. The marker ink blends in seamlessly with the rusted iron and has so far stayed put so there is no longer any visible yellow plastic where the clasp pushes in and out.
To complete the look I used reproduction Edison bulbs. I contemplated painting the brass bulb capping black (to match the sconce sleeves) though I think I like the hint of tarnished gold.
For all my Aussie readers I finally found some bayonet cap Edison bulbs here in Oz – where else but on eBay of course (find the link in my ‘At a Glance’ list below). They’re not as ample or affordable as the ones in the US though I’m learning to live with it :-)
I’m happy to admit this style is not everyone’s cup of tea though I’m really pleased with how it turned out.
I reckon Mum’s lights would thank me if they could, plus it was a fun, fast, easy and cheap (about $20 per light – excluding the globes) way to burn off some creative tension and get a good DIY decorating fix!

Wouldn’t even know it was the same light, huh?
SOURCES
Cages: Online Lighting, Amazon
Rust Effects Paint: Modern Masters, Dulux
Edison Bulbs: eBay, Amazon



You are brilliant! That is the most perfect light makeover I have ever seen.
TFS!
xox
This is excellent! Seriously what a great re-do for a dated sconce. I am pinning it, because I can do that!
~Bliss~
Wow. What a huge transformation. Your paint choices and technique are spot on. Great job!
This is genius! I love it…Thanks so much for sharing. I’m slowly trying to change out boring builder fixtures and this is a great way to do it!
Kristen
Wow! What a difference! Great makeover!
in awe at your lamp!! what a totally think outside of the box moment!
laura
Where have I been? I had not heard of this fancy rust paint before, I will be on the look out for it for summer projects now! Your moms new light is awesome! What a great transformation! t.xoxo
absolutely brilliant!!!
You are clever.
cheryl xox.
Very clever! And COOL!
AMAZING! You are brilliant and talented – so glad I found your blog and can now follow along with your creativeness! Thanks for sharing and have a great Tuesday – Jalon
wow! This really turned out wonderful, go you! I can’t even stand how great the rust finish looks … you’re awesome!
What a great new look.
OMG this is truly fab! Way to go imagination.
Greetings from Holland
That’s a cute makeover. I have saying i was going to paint my brass a nice rust color. Smiles, Susie(She Junks)
Honestly all I can think of to say is WOW! I can’t believe it’s the same light. The Edison bulb really makes it.
That is fantastic (and so great to see such an original idea!). That can rest in the back of my mind for when I need it now.
Holy smokes, you are AMAZING! I love them!!!! You are so creative, good job!
Really? From those pieces you made that great lamp?
I love it! That was an amazing transformation!
Susan
Homeroad
You are a creative genius! Every time you post, I always look forward to it because I know it’s going to be something fabulous. Thanks for sharing!
I just love your creativity!!!!!!!
You are so crafty! What a creative solution. I love it.
You are amazingly talented. Wow. I love the way they turned out and the metal paint alone is worth it’s price tag. It really looks like iron. Thanks for this. I can think of a few things I’d like to paint.
Your mom must have been very happy!
Karen
Great idea! So neat!
-Kendall
{songbirdsandbuttons.blogspot.com}
Wouw! Looks great! Very creative. You inspire me so much with your blogs, thanks for that!
Have a nice evening!
Greetz, Pietrik
I love, love, love it.
I am in the middle of getting a rental property for sale. We have tapes that are whit and brass, do you think that the iron paint would hold up to the water and use?
Sarah
Hmmm, to be honest I’m not certain. You could contact the manufacturer directly to enquire or simply trial it yourself!
You never cease to amaze :-)
I love them! they look great!
Absolutely amazing transformation!! you never fail to impress me!! I literally can’t wait for each new post/project!! {Pinned it!}
xo Becca
Looks great! I did the same thing a couple weeks back but haven’t gotten it attached yet to the wall. Nicely done! Saw this on The Lettered Cottage’s FB page :)
Impressive… Reminds me of Those circa lights?? Very cool and very expensive!!
Impressive… Reminds me of Those circa lights?? Very cool and very expensive!!
OMG I Love it!!! You are a genius me lady!!!! I love this look for outside though… You have just solved a problem of mine! Love it!!!
I can’t believe that’s plastic! I would never have guessed. We have a similar product here in the U.S. but I’m wondering if it has the same results. Hmm…
Great job!!
Looks wonderful? Question : did you paint this in situ? ie with the lamp still screwed onto the wall?
Lilian
Yep, the screws needed tightening anyway (as you can kinda see in the ‘before’ pic) so I just fitted some scrap paper behind the light to protect the wall and painted it while still attached.
Kristine
fabulous. i bet their sales of this lampshade skyrocket!
Wow! I love this, what a brilliant transformation.CJ
Wow, so creative. well done.
Absloutely amazing transformation!!
I love them.
That is an awesome transformation! What a difference a little rusty plastic can make. :) Very creative and beautiful.
That is a seriously cool sconce transformation! So much more fun to make something new out of something old than to just buy a replacement.
I can picture this paint (either iron or rusted) on the base of a rustic wood table to give it that industrial look without the industrial price!
LOVE this! Brilliant!
Simply brilliant! We used to be able to get the rust treatment paint…I haven’t seen it anywhere for a while…But what you did is amazing…
You don’t have “laws” against those lovely incandescent light bulbs?? They are awesome….
Living in CA (US) it is getting hard to find lightbulbs that are not florescent (ick)…..
Great job…
Nancy
Wow!!! Magic… i follow you!!!
That? Is amazing. You’re unreal. And I totally stealing this. Mwahahaha.
Very unique, love it!
Really unbelievable that this cage started out as a yellow plastic ‘thing’ and became this classy light fixture! Great job!
Hi Kristine- I love your blog, came upon it thru pinterest. Do you think this method would work on a brass bed? I dont think its solid brass, but brass plated. I’ve wanted to do something with it for a while, maybe without the rust, just the iron look. Thanks, Marti
So clever! I love the industrial look! The light bulb was certainly on in your head when you came up with this one!!! :)
Fantastic job! I love it!