
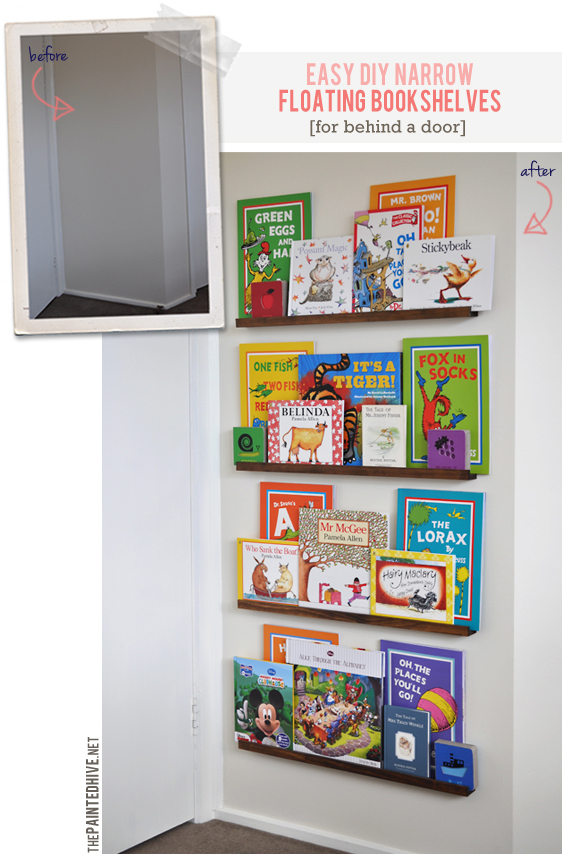
As mentioned in my last post, I’m trying to capitalise on the modest proportions of Charlotte’s new little bedroom by making use of as much space as possible. This includes taking advantage of the often forgotten area behind the door.
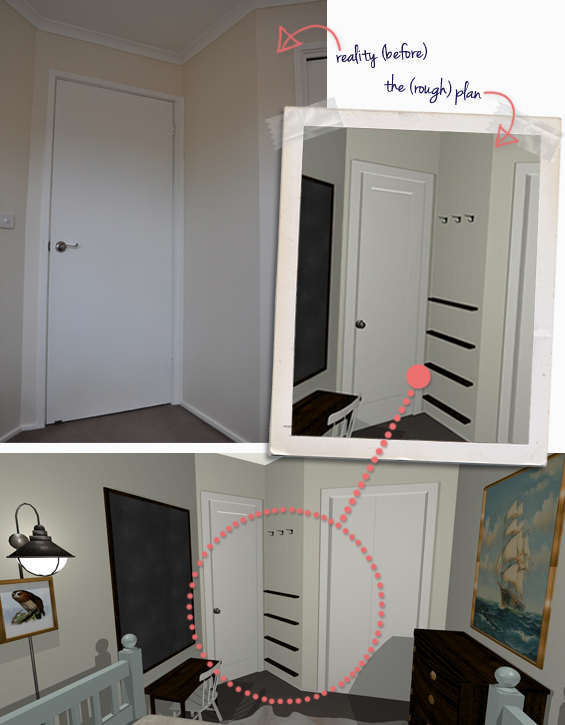
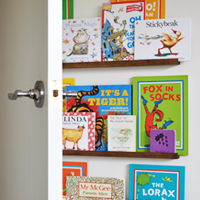
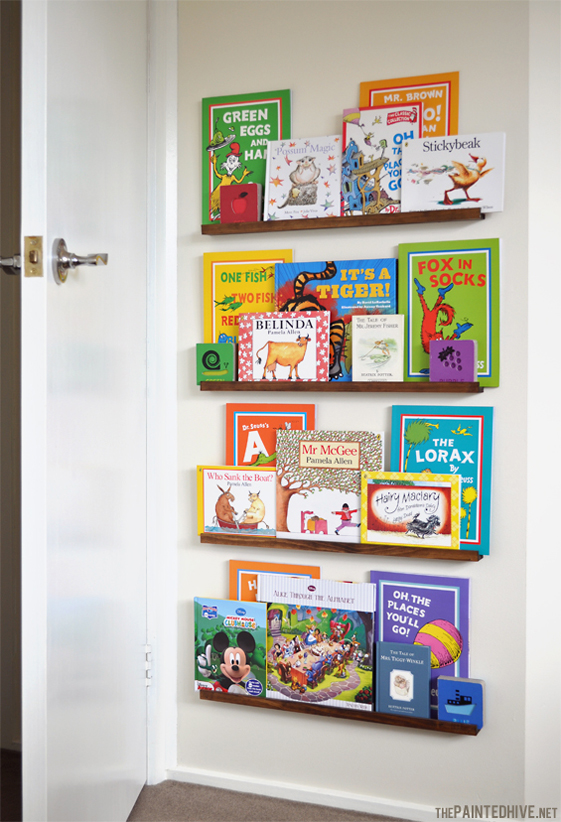
One of the first elements I envisaged for her room was a series of simple narrow bookshelves, reminiscent of those from my very own kindergarten, which display the face of the books, rather than the spines, in a semi-haphazard, layered fashion. Given most of the wall space (reachable by a two year old!) will be occupied by furniture, I thought the slim cavity behind her door would be perfect for this. Of course, a quick Google search revealed my idea wasn’t original (damn you Google – computer directed fist shake), though it is still a clever way to use a defunct wall, and whilst floating shelves aren’t exactly unique either, the design and construction of these babies is all mine (well, Google would probably contradict me there too, though I decided that ignorance is bliss!).
This tutorial is based on mounting the shelves to a hollow cavity plaster wall. If you have a solid wall or access to studs, obviously you can omit the use of anchors. These shelves are super thrifty – they cost me less than $15!
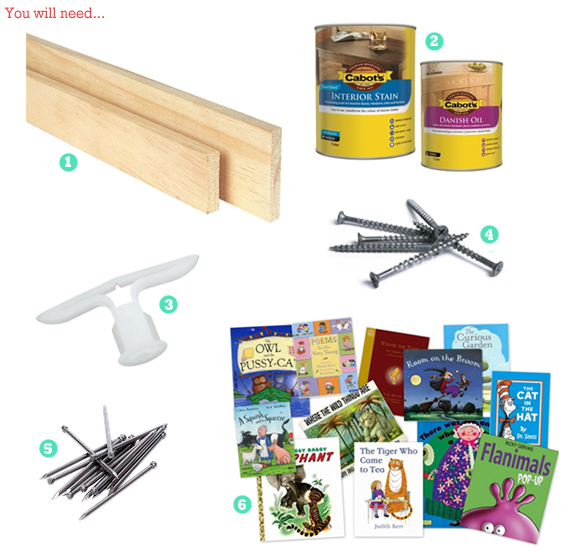
1 Lengths of timber.
I used Pine DAR (Dressed All Round) – two lengths of 3cm wide x 1.2cm deep x 120cm long (1.2″ wide x 0.5″ deep x 4′ long) which I cut in half to make four pieces, for the shelves themselves, and two lengths of 2cm wide x 1.2cm deep x 120cm long (0.8″ wide x 0.5″ deep x 4′ long) which, again, I cut in half to make four pieces, for the ‘lips’. Of course you can use any timber you like.
2 Stain/paint.
I wanted a natural timber finish so used walnut stain and danish oil. I was tempted to go for neon spray paint which I think would add a pretty cool colour pop.
3 Drywall anchors/plaster plugs/cavity wall fixings.
I used nylon toggle anchors rated to 8kg (that’s plenty of strength for my purposes). Ensure the head of your anchors is smaller in diameter than the depth of your shelf timber otherwise they will be visible.
4 Screws.
I used 8cm (3″) long screws as specified by the anchor manufacturer. Keeping in mind that a large portion of your screw will be inside the shelf, make sure they are long enough to easily penetrate the wall. Ensure the head of your screws is flat and is smaller in diameter than the head of your anchors.
5 Finishing nails.
I used slim 3cm (1″) long nails.
6 Books!
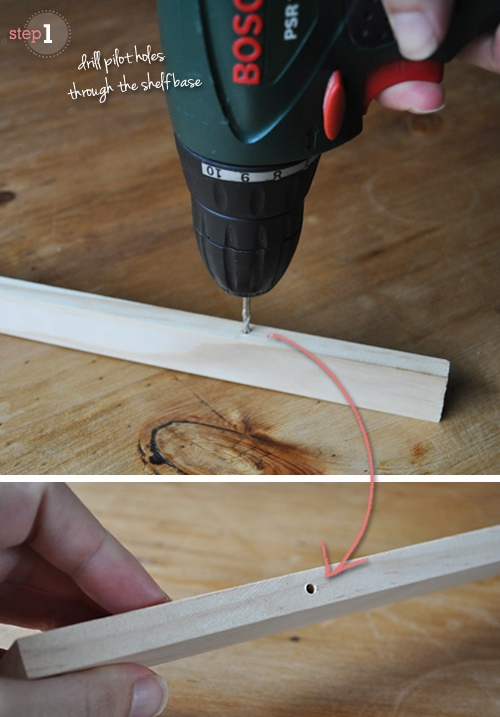
STEP 1 Drill pilot holes width-wise through your shelf base.
If necessary, first cut your timber to length and lightly sand all pieces to smooth any roughness. For now, set aside the ‘lip’ lengths. Use a reasonably fine bit to carefully drill small pilot holes width-wise through the shelf base around 10cm (3″) in from each end (refer to pic).
I used two holes for each of my shelves. You may require more holes if your shelves are longer. So, why bother with pilot holes? Well, if you’re super confident you can forgo them, though given the narrowness of the timber creating straight central holes is imperative (so the timber doesn’t split and the screws aren’t visible) though also tricky. Using a smaller drill bit first to create pilot holes to act as a guide is just a little easier. If some of your pilot holes get a little wayward, simply fill them with putty (or similar), move along and try again. I may, or may not, have had one, or more, slightly wayward holes :-)
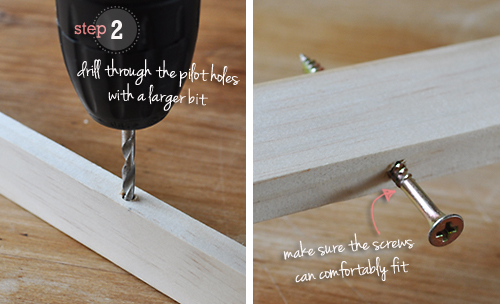
STEP 2 Drill through your pilot holes with a larger bit.
Using your pilot holes as a guide, drill through with a larger bit to create holes big enough to comfortably accommodate your screws.
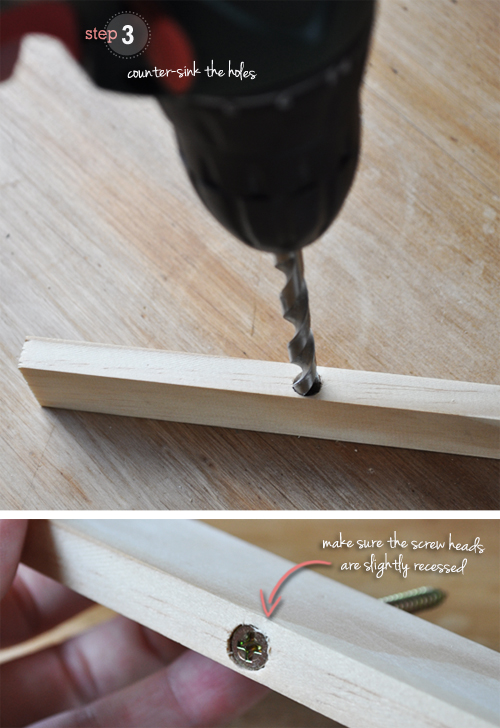
STEP 3 Counter-sink the holes.
Using a larger bit again, carefully drill a shallow depression, deep enough to counter-sink the heads of your screws by around 2mm (.05″) (refer to pic).
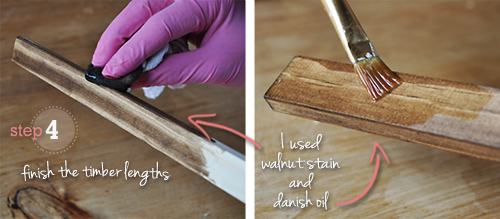
STEP 4 Finish your timber lengths as desired.
At this stage, stain or paint all of your timber lengths. As touched on in the ‘Supplies’ section above, I tinted my timber with walnut stain and sealed it with danish oil. Don’t forget to look super cool when you’re undertaking this step – wearing a highly fashionable pair of ill-fitting pink latex gloves should do the trick.
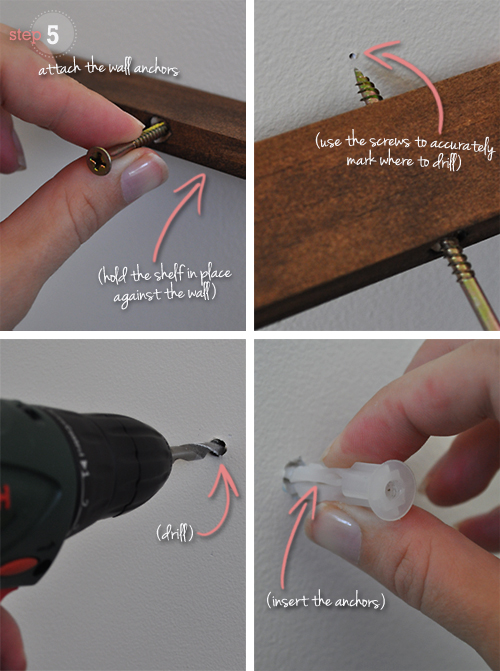
STEP 5 Insert your anchors into the wall.
Decide where you want to mount your shelf on the wall then measure and mark accordingly (use a cable and stud finder to ensure the wall cavity is clear, and a level and tape measure to ensure everything is straight). To accurately and easily determine where you will need to insert your wall anchors, hold your shelf in position against the wall (ensure it is in the exact location you want it) then push each screw tip into the wall to create small indentations which will act as your guide (refer to pic). Using a drill bit just large enough to make a hole which can accommodate your anchors, drill into the wall through the indentations, then push your anchors in until they sit flush against the plaster (you may need to use a hammer to tap the anchors in). Certain anchors do not require pre-drilling and can be screwed directly into the wall. Refer to the manufacturer instructions for your particular anchors.
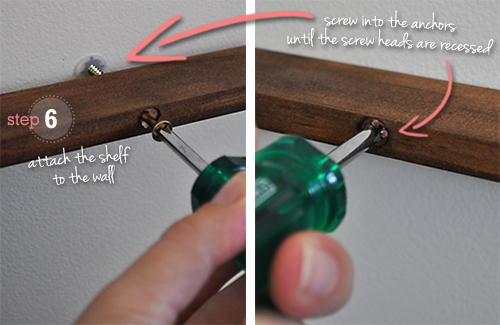
STEP 6 Mount your shelf to the wall.
Align the tips of your screws with the wall anchors then screw them in until the shelf sits flush against the wall and the heads of the screws are nestled into the counter-sunk depressions. If, like me, you are using soft pine, the screws will probably recess further upon tightening. This is fine.
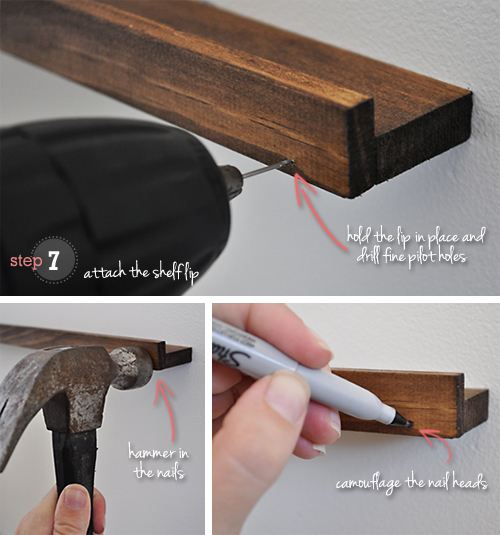
STEP 7 Attach the ‘lip’.
Hold your ‘lip’ in position in front of the shelf then create pilot holes for your nails, around 3cm (1″) in from each end and one in the center (obviously avoid where the screws are already located), by drilling through with a very fine bit (note; fine bits can snap easily, so take care – um, no, I’m not speaking from experience here…okay, maybe I am :-) Ensure your drill bit is slightly smaller in diameter than your nails and try not to drill in the entire length of the nail. If the holes are too big and deep the nails wont ‘grab’ the timber. Still holding your lip in position, carefully hammer in your nails. If needed, use a punch to tap the nails so they are slightly recessed. If desired, use a pen, marker or paint to camouflage the nail heads. I used a black marker to mimic small imperfections in the timber grain.
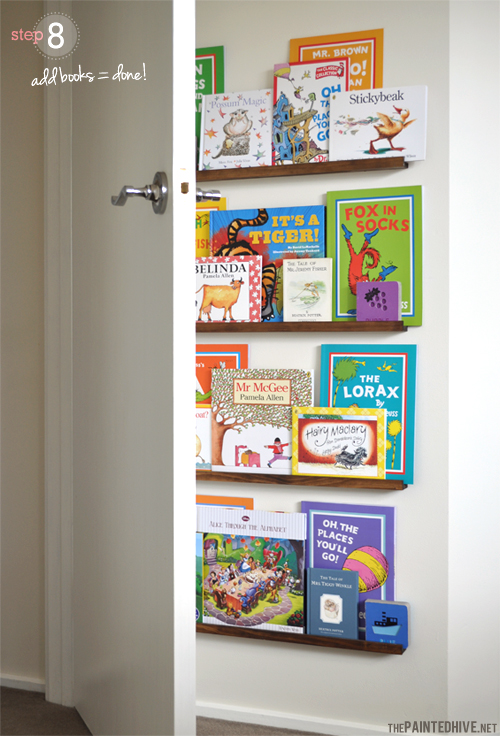
STEP 8 Done! Adorn your shelves with lovely children’s books and create a library-esque feel in your little kiddie’s room!
NOTES
:: I chose to use nails and no glue so if ever I want to remove the shelves I can simply pry the ‘lip’ off to access the screws.
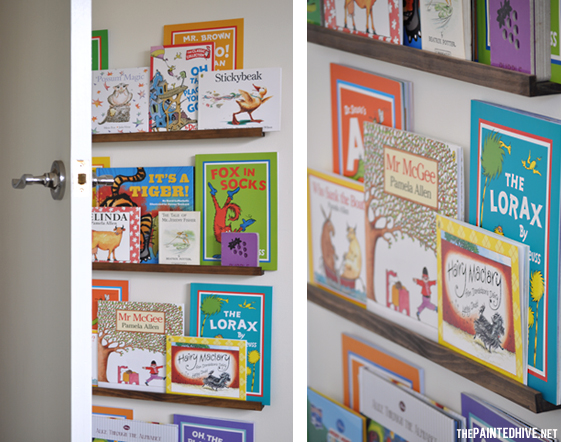
:: If you are installing shelves behind a door, take note of where the handle sits and allow enough room for its protrusion. And, if you don’t already have one, install a good door stop or catch.
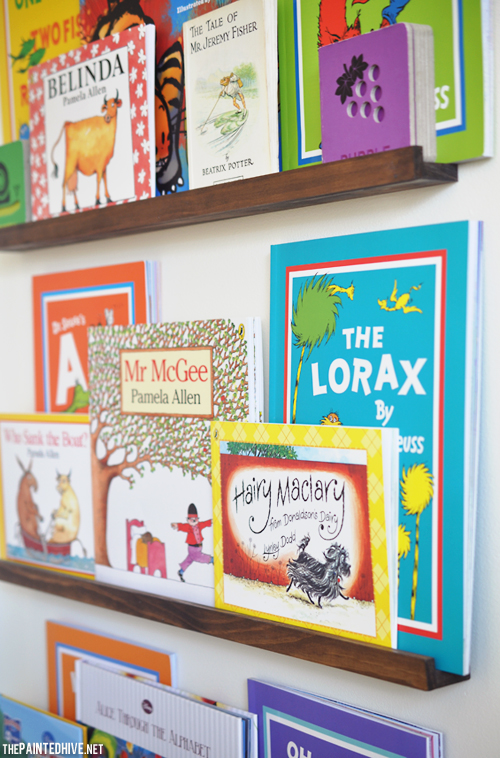
:: I purposefully designed these shelves to be slender, simple and discreet, holding only a portion of Charlotte’s book collection at a time (her other books will live on our bookcase and in baskets beneath her bed – we will rotate them occasionally).
:: The narrowness of the ledge means that some care and restraint is needed when adding books so they are configured in a somewhat balanced manner, otherwise they might have a tendency to topple over (this basically means avoiding stacking them too deeply – they need a slight lean).
:: Of course, there are heaps of variations you could make to this design, both style and function wise, to best suit your needs.
:: Whilst I’ve positioned my shelves behind a door to hold books there is no reason you couldn’t use them in a more prominent position to display photos or artwork.
I really love the way these little shelves turned out. I was tempted to install them floor to ceiling though restrained myself because I want the added practicality of coat hooks on the upper portion of the wall (still yet to buy said hooks). Soooo, onto the next project I guess!
![]()
![]()
I’m lucky to have a sparkling new sidebar sponsor in Map My State. And you’re lucky too because they are offering a generous 20% discount to all of my readers who use the coupon code ‘thepaintedhive’ upon checkout!
Map My State specialise in unique typographic designs featuring cities, states and countries. Alongside their vast existing selection, they are also happy to work with customers on customisations and completely new designs!

If you would like some information about promoting your business through The Painted Hive, please feel free to visit this page for all you need to know.


Yes, yes, yes!!!! I NEED this and your tutorial is so amazing I feel like I can actually DO it! Thanks, thanks, thanks! Will send pictures ;)
These are adorable. Such a great way to use that space, especially for a small room where making use of as much space as possible is essential. I love your shelves and I love how you explained it. This is certainly something I would never have considered tackling before though now feel like I could actually do. Thanks.
I’ve seen a few versions of behind door book storage though this is my favorite. It doesn’t look too bulky or clunky like some of the others. It’s just nice and simple and clean looking. Awesome job.
Love these, and love your tutorial. Thank you for going to so much trouble to take all those photos. It’s so amazing that a few pieces of plain wood can become stylish shelves with just a bit of work and courage.
For those of you who want an easy out. You can buy these shelves at IKEA for a decent price. I know, that’s not DIY anymore. But it does give you more time to concentrate on what you put on the shelves. Just saying…
Hi Laura
Yep, there are lots of off-the-shelf options for floating shelves if you don’t have restrictive space requirements or a specific custom design in mind. I actually looked at IKEA a few months ago though, whilst they certainly do have lots of floating shelves, there wasn’t anything quite like what I needed/wanted (size and style wise). Unfortunately all of the shelves I found were too deep to fit behind a door.
Kristine
The space behind our grands room door is also not very deep. I actually bought the shelves at IKEA and they were too deep to use. We will be using your design for our very limited space! Thank you for great instructions and pics to help us feel confident to bring some fashion and functionality to that unused space behind the door! You’re a doll 😮💞
So glad it has helped you :)
Terrific idea and great tutorial!!!
The book shelves look adorable and so kid-friendly, perfect for a toddler or any age. However, for Charlotte to be learn to hang up her own things like sweater, purse etc. it’d be more ideal for the hooks to be below the third book shelf so they are within reach for her.
Thanks Erika.
I did play with that idea though decided to keep all of the shelves low instead so she can reach her books. Of course the height of the hooks means they will more so be for me – just to easily keep some of her frequently worn clothes off the floor!
What a great project! They look fantastic, and I think even I could make them :)
These look amazing! Awesome job. Your tutorials are so clear and well explained. Thanks!
I think the shelves look really great in the timber. The books provide the pop of colour you were after. Her room is going to be so lovely for her.
That’s true Libby. I always love a bit of timber to add a natural element and some warmth.
Thanks for this tutorial and for the photos( I am a visual person) The shelves turned out great.Perfect for your little girls room * I am thinking of doing something similar for my studio* Well done ** Have a nice day :)
Oh hooray, thank you! I have been looking at these type of shelves on Pinterest for a couple of weeks, so your tutorial is very timely, not to mention it being a tutorial with METRIC measurements for a change, lol. I did look at the Ikea (Ribba?) shelving as an alternative but my nearest store is two and a half hours away, and yours are nicer anyway; I love being able to stain them to match my decor. Perfect!
Oh yay! I really hope my tutorial helps you out Julie :-)
The IKEA Ribba ledge is a great off-the-shelf alternative though I only had around 7cm total depth to play with and the Ribba shelves are 9cm deep (and although they aren’t ridiculously expensive they are still around double the cost of my DIY – plus I’m stupidly fussy and wanted true floating shelves without the backing).
Let me know if you do install some shelves – I’d love to see them!
Oooo you clever young thing you! I would never have thought of that in a million years! Its giving me all sorts of ideas – some shoe shelves perhaps (shoe sitting sideways of coarse) :)
Have been thinking about how I could make these, and here they are. Saw them in Ikea catalogue but no ikea here in lil ‘ole NZ….what’s a girl to do? Now I will definitely be making them, not buying them. Thankyou yet again Kristine, for yet another fabulous idea!
Andie, you are just too sweet :-)
This is a great idea! I have been planning to do something like this with my daughter for a long time. She has a ton of books and doesn’t know where to put them. Great post!
Fantastic to use the space behind the door. I love the look of books on the shelf. I’ve got a couple of the white ikea RIBA ones however given your area behind the doors the depth of these wouldn’t suit so you,be come up with a great look and use of space. Regards Kathy A, Brisbane, Australia
ok, i seriously JUST finished building behind the door bookshelves! they aren’t floating, but still, i knew i loved you and your blog for a reason!
Awesome!
And thanks so much :-)
This does look so easy and I love the fact that it really doesn’t take that much space to do it too.
How much space between shelves and how far from floor did you start?
From memory I started around 20cm from the floor and there is a gap of around 40cm between the shelves.
Great job. These shelf look awesome and do not take much space. Our daughter books are lying on the floor usually. Wish to be able to make something similar.
Thank you for inspiratio.
Wow … Shelves Are looking good. Looks Like Beautiful Picture Frames
Thank you so much for this tutorial! I was looking for this exact concept for our new baby’s room. We built it over the weekend, and it turned out so great! I am adding your blog to my reader, it’s great!
Thanks so much Tessa. The main purpose of my posts is to (hopefully!) inspire and encourage others so it’s totally awesome to hear that you used my tutorial to replicated a project for your own home.
Love the idea – and especially love that you have Hairy Maclary in pride of place. A true classic!
:-)
Hi, I just wanted to stop by and tell you thanks so much for your tutorial. Your shelves look great! I had been wanting to make some shelves like these and a few of your details about how to mount the shelves was just what I needed to get motivated. They came out wonderfully!
Thanks so much for taking the time to let me know Melanie. I post detailed tutorials like this for just that reason – showing others how they can do it to!
Well done on a great idea they are now up and full of books and look smashing!! Thanks a lot!
Thanks Claire. That’s awesome!
Wow, what a great project! It’s beautiful and functional, with you saving space too. A must try! Don’t the books fall though if you are to accidentally slam the door or something?
Thanks!
Do you mean if you accidentally slam the door into the shelves? If so, there is a catch which stops the door before it can hit them. If you mean simply slamming the door shut, then yes, sometimes the air pressure associated with this can cause a few books to topple though this only happens very rarely and generally only two or three books will fall.
Hi, I really like your floating bookshelves for to be hided behind a door and like how you show a step by step on how to build a floating bookshelves all by yourself and no help needed from your hubby. I really like that part about being able to DIY. I would like to thank you for sharing some of your creativity to all of us.
Have a great weekend and try to stay cool and don’t get over heated 😆
Delama Starling or beeone3 on pinterest 🙋 bye bye
Looks great and your tutorial is really straightforward and easy to follow, thank you!
One question though…….the shelves might be easily ‘levered off’ from the fixings, leaving the surrounding plaster with a bit of damage?
I’m only imagining how some more adventurous children might enjoy climbing a ‘new ladder’ to reach the top shelf?
Hi Mozz
Totally. Like anything attached to a wall they could be pulled free if levered on. I often thought this might happen when the kids were younger though they never attempted to climb them (this was a strict rule I enforced early on). We have had curtain brackets ripped from the wall before though! :)
Cheers
Hi Kristine,
Thanks for your prompt reply – yes…..a strict rule not to climb on the shelves is a great idea and possibly resulting in a lot less extra woodwork requirement!
Best,
Mozz