
PART II: SETTING-UP FREE PRINTABLES FOR AT HOME PRINTING
This is post two in a three part series.
Post one covered understanding and editing free printables.
Post three covers setting-up free printables (particularly those of large-scale) for professional printing.
Aren’t we lucky? Thanks to some lovely, generous, sharing online folk, we have the ability to download awesome images, edit them to suit our custom needs, then print them straight at home – all for virtually no cost and even whilst wearing stripey pink pyjamas – if that’s your thing.
Yep, it’s a pretty dandy way for us budget-concious, DIY-focused home decorators to create potentially AMAZING wall art with the potential to make our modest rooms really pop.
Though going about customisation of digital images can sometimes be tricky. To achieve great results, often quality and size, and sometimes even shape, require precise modification. So, what’s the best way to go about said manipulation?
Well, of course, there are loads of different methods to employ, and of course the best technique is subject to personal opinion. Following – in step-by-step detail – is simply my favoured process. If you’re unsure about maximising the potential of free printables for your tailored needs, hopefully it might help :-)
![]()
Of course there are heaps of different programs to use and alternate methods to employ when customising free printables. The following tutorial merely outlines my preferred process based on personal experience. It focuses on setting-up small scale (standard letter sized – or smaller) images for framing that you can easily print at home (I will publish a future post which concentrates on setting-up large-scale prints for professional printing). Though of course you can always choose to have them professionally printed. In order to ensure the outlined method can be accomplished by everybody, I have created two tutorials; one which uses Photoshop (CS4 – which is fantastic though expensive) and one which uses GIMP (2.8 – which is a Photoshop-like program that can be downloaded by anyone for FREE!).
![]()
TUTORIAL ONE: PHOTOSHOP
(see below for GIMP tutorial)
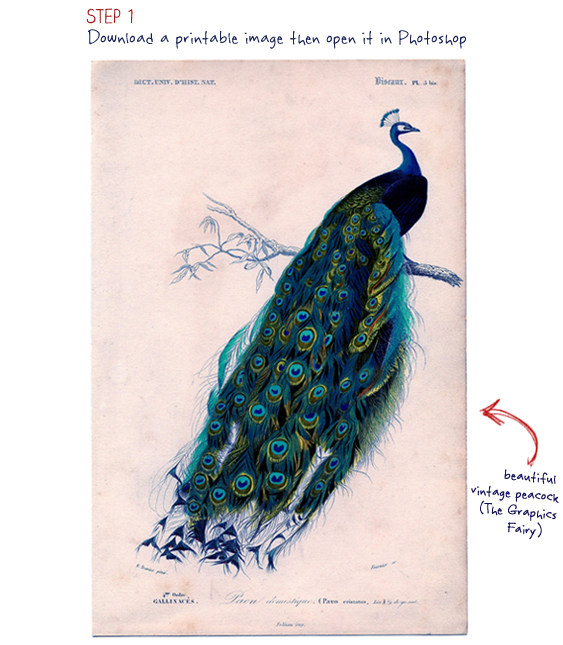
STEP 1 Download a printable image then open it in Photoshop.
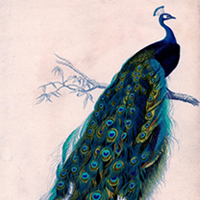
Find a printable image online then save it to your computer (remember, depending on the image, you may need to maximise it or use a provided Download link to ensure you download the full printable version – not just a minimised screen version). If needed, browse my Free Printables Directory for lots of great sources for free printables! Once downloaded, open Photoshop and go to File>Open, then browse for your image, or find the image on your computer, right click it and select Open With then select Photoshop. For the purpose of this tutorial I am using this lovely vintage peacock illustration from The Graphics Fairy.
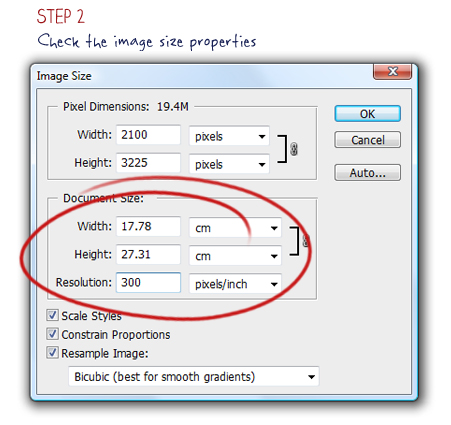
STEP 2 Check the image size properties.
Make sure your chosen image is sufficient for your needs – in both size and quality. Go to Image>Image Size. Take note of the Document Size (Width, Height, Resolution). We can see that this image has a Width of around 17cm, a Height of around 27cm and a Resolution of 300 PPI. These are great values for the purpose of printing at home. For further information about size properties, how they effect the image and how to edit them refer to my first post (Understanding & Editing Free Printables) in this series.
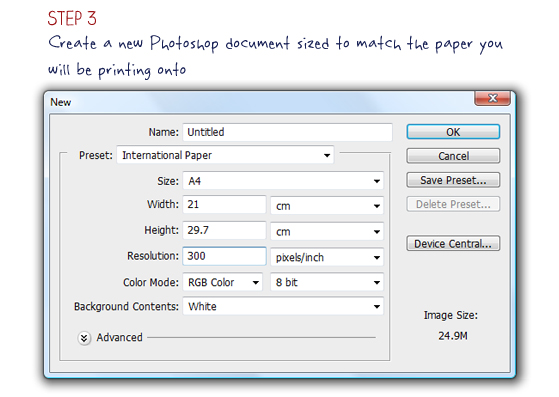
STEP 3 Create a new Photoshop document sized to match the paper you will be printing onto.
Go to File>New. Choose from one of the Presets or enter custom specifications. I have selected International Paper> A4 (standard letter size – with default values as shown). Ensure the Resolution is correctly set at your desired print output (keeping in mind that if your chosen Resolution differs from that of the original image it could drastically affect the physical size – for more information see note in Step 4). Once your new document is open, if necessary go to View>Fit On Screen (I find it much easier to work when the whole document is visible).
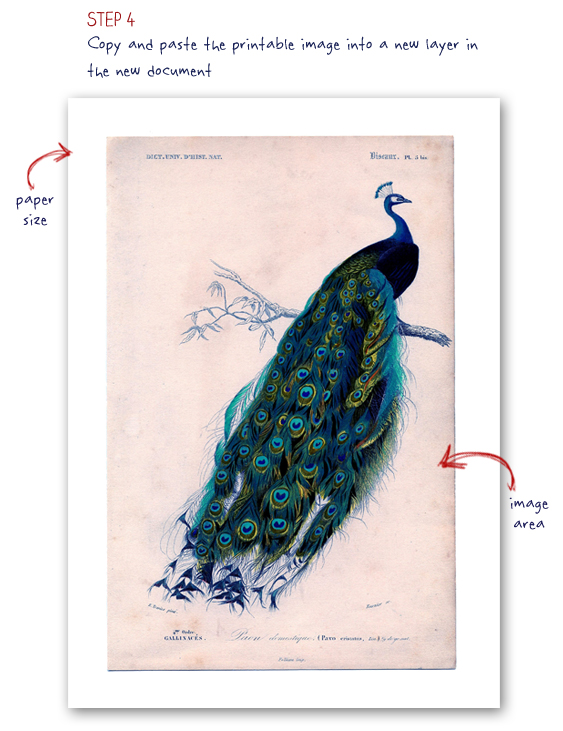
STEP 4 Copy and paste the printable image into a new layer in the new document.
Go back to the printable image, choose Select>All then Edit>Copy. Go to the new document then select Edit>Paste. We can see that the peacock image fits perfectly on our ‘paper’ (canvas). Depending on the size of your image you may need to scale it down to fit on the canvas. Do this by selecting the Move Tool, then clicking and dragging one of the corner boxes whilst holding the Shift key. The Shift key ensures the aspect ratio is retained so the image isn’t distorted.
Note: If once pasted your image suddenly seems to appear much smaller or larger, there may be a resolution conflict between your new document and the original document. Pasting an image with a low resolution into a document with a high resolution will automatically decrease its size, and vice versa.
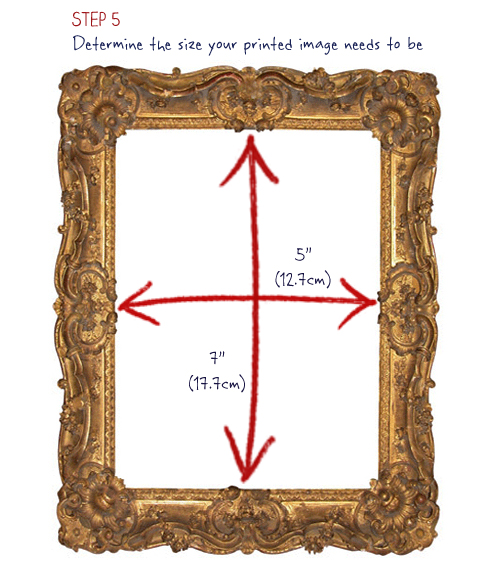
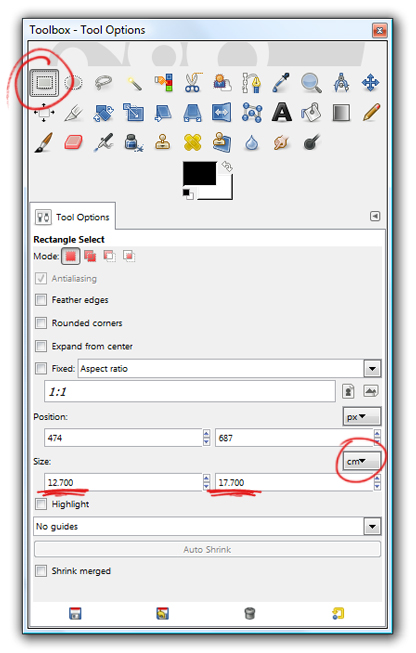
STEP 5 Determine the size your printed image needs to be.
Measure the opening of your frame – just the area where the print will be visible, not the overall size. For the purpose of this tutorial, I am using a standard 5″ x 7″ frame (12.7cm x 17.7cm).
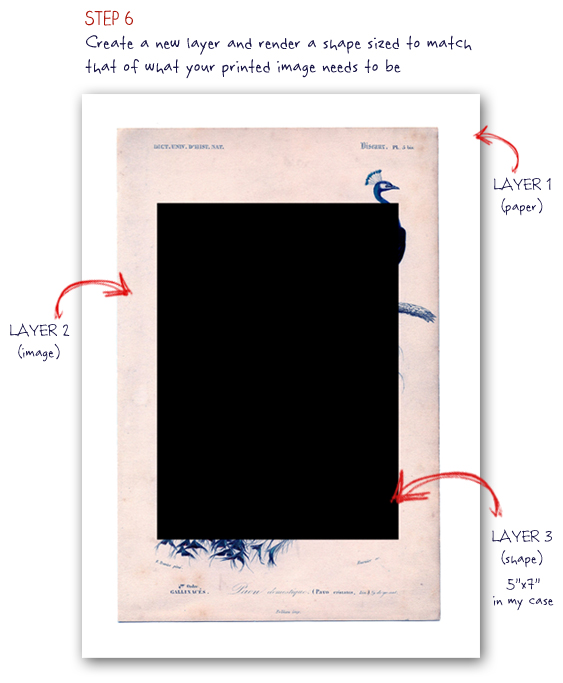
STEP 6 Create a new layer and render a shape sized to match that of what your printed image needs to be.
Go to Layer>New Layer. Select the appropriate Shape Tool (I am using the rectangle) and ensure that Fill Pixels is chosen. In the Geometry Options check From Center, click Fixed Size and then enter your dimensions (12.7cm x 17.7cm/5″ x 7″ in my case). Ensure you are working with a colour that will contrast with your background (I’m using black).
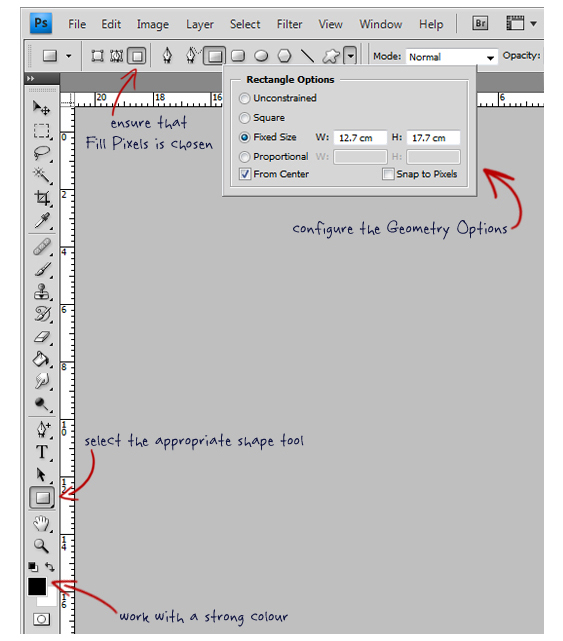
Place your cursor near the middle of the canvas and click. Your shape should appear. If necessary, use the Move Tool to reposition it. You now have a to-scale replica of the display area of our frame! This shape will form a precise guide for sizing the printable image so that, once printed, it will fit perfectly within the visible opening of your frame.
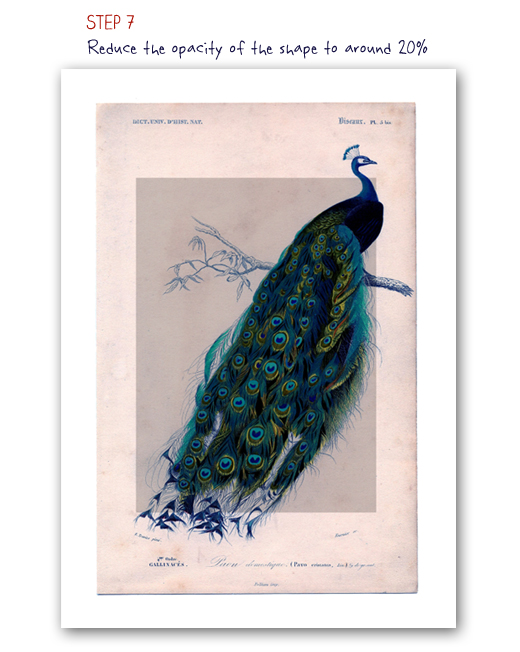
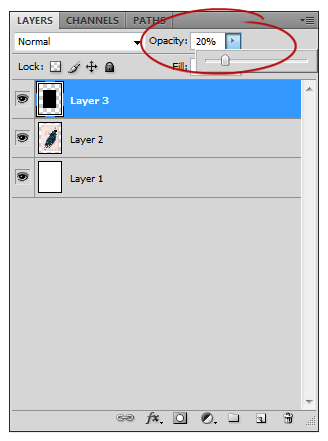
STEP 7 Reduce the opacity of the shape to around 20%.
Move the Opacity slider down to around 20% (or manually enter a value of around 20%).
The printable image should be quite visible through the now translucent shape.
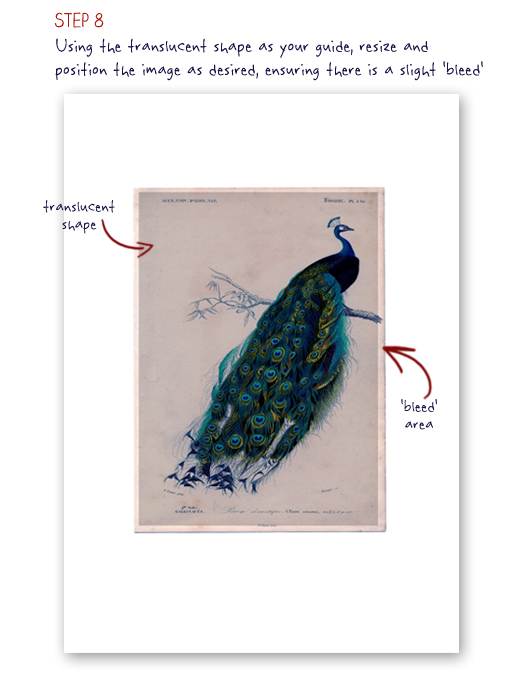
STEP 8 Using the translucent shape as your size guide, rescale and position the printable image as desired, ensuring there is a slight ‘bleed’.
Select the image layer. Click on the Move Tool. Your image will be framed by a bounding box (identified by a fine outline with eight small points). To reposition the image click anywhere within the box, hold and move. To resize with constrained proportions, click on a corner point, hold Shift and drag. To distort the image, click anywhere on the outline, hold and drag.
Leaving a slight ‘bleed’ (small portion of the image outside the shape guide) provides a buffer which gives you some wiggle room to ensures no unprinted area is visible once framed. Of course, this helps provide a professional-looking finish.
It’s highly likely your image won’t have the exact same aspect ratio as your frame. This means that when resized with constrained proportions, it won’t completely fit within your shape guide (some cropping will occur). We can see that when resized with constrained proportions, my image is too tall – small portions at both the top and bottom fall outside my shape guide (obviously, once framed, these areas will not be visible). Due to the nature of this image, it’s not really a problem (some of the text is simply excluded), however to fit the image in its entirety, I could simply try distorting the proportions.
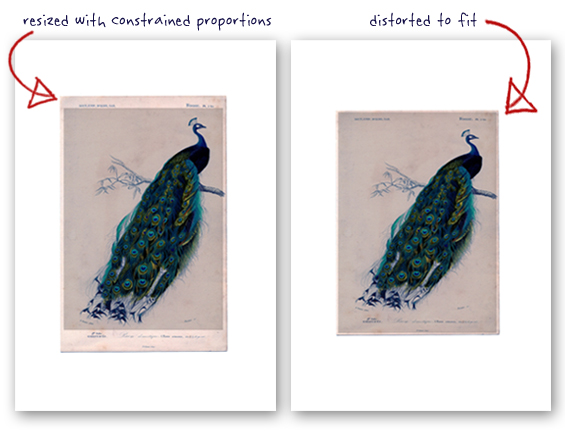
Distorting any image will result in some quality degradation, the level of which is dependent on the extent of distortion, and can make it appear disproportionate. I find that much of the time a minor amount of distortion causes no discernible adverse effects, though if you’d prefer to try incorporating an image in its entirety without resorting to distortion, another alternative is playing with some more advanced techniques and tricks (such as extending the image background or, where possible, repositioning certain elements). And of course there is also always the option of changing the physical display area of your frame by using a custom sized matte.
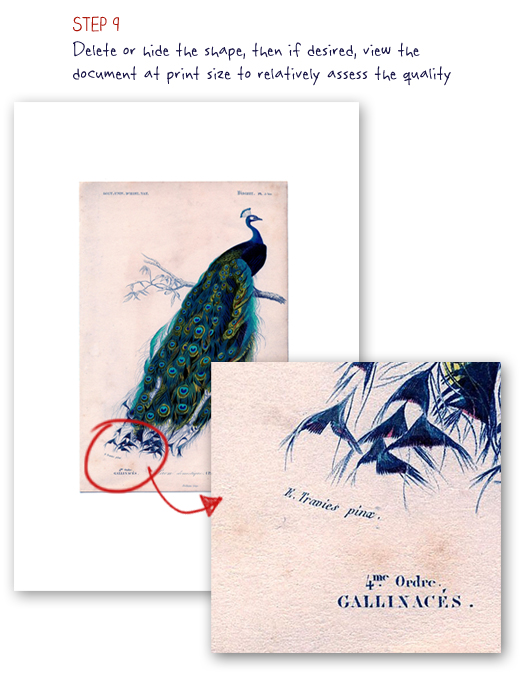
STEP 9 Delete or hide the shape, then if desired, view the document at print size to relatively assess the quality.
Right click the shape layer and click Delete, or click the Eye beside the layer to hide it. Go to View>Print Size. Due to monitor variables, Photoshop will not always display Print Size accurately. If when compared to your actual paper the canvas size does not match, here is a great tutorial for rectifying the issue.
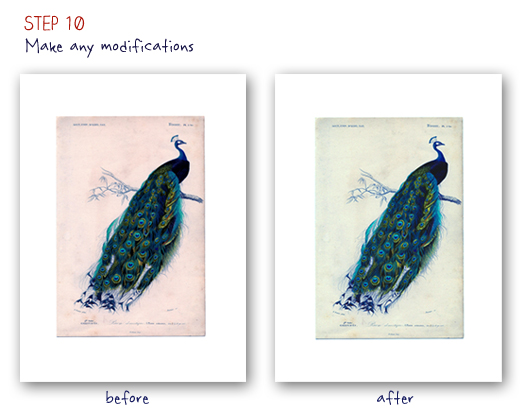
STEP 10 Make any modifications.
Here is where you can have some fun! Change the hue and saturation, add a border, increase sharpness, incorporate text, play with artistic filters, tidy-up any unwanted blemishes. The possibilities are almost endless! My peacock image didn’t really need any editing, though for demonstrative purposes, I simply added a cooling filter and slightly increased the blue saturation.
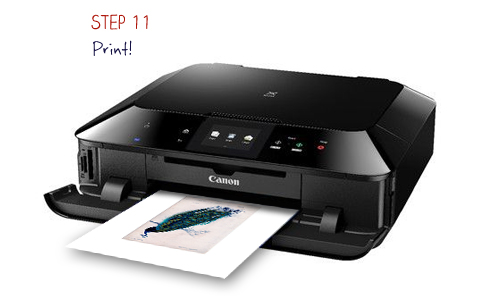
STEP 11 Print!
Print immediately from Photoshop (go to File>Print) or save as a JPEG and print later (go to File>Save As). This tutorial focuses on setting-up small scale images so that you can easily print from home though of course you could always have them professionally printed.
For good results, use a good printer and good photo paper. For great results, use a great printer and great photo paper. And don’t forget to select the best print settings. Nowadays, good desktop printers can be purchased for as little as $50 and a great photo quality printer might cost around $150. I just recently bought a fantastic new Canon MG7160 which is awesome!
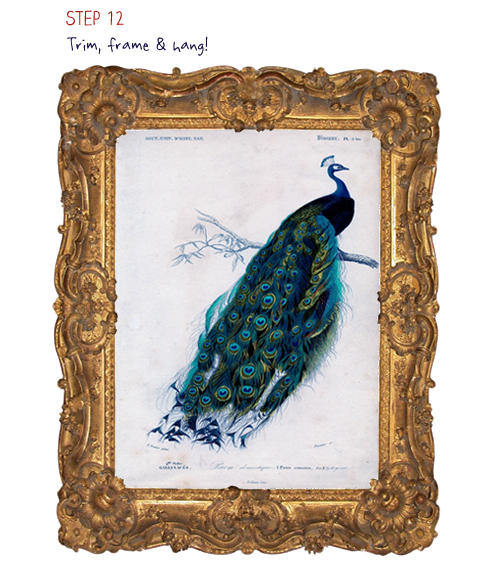
STEP 12 Trim, frame and hang!
I like to use the frame glass or matte as my guide when trimming the paper to fit neatly inside the frame recess. I simply accurately position the glass or matte over my printed image then trace around the outside of it before trimming away any excess paper. If preferred, you could pre-measure your frame recess and based on the dimensions add a fine border (to act as a trimming guide) to your image in Photoshop prior to printing it.
![]()
TUTORIAL 2: GIMP
(see above for Photoshop tutorial)

STEP 1 Download a printable image then open it in GIMP.
Find a printable image online then save it to your computer (remember, depending on the image, you may need to maximise it or use a provided Download link to ensure you download the full printable version – not just a minimised screen version). If needed, browse my Free Printables Directory for lots of great sources for free printables! Once downloaded, open GIMP and go to File>Open, then browse for your image, or find the image on your computer, right click it and select Open With then select GIMP. For the purpose of this tutorial I am using this lovely vintage peacock illustration from The Graphics Fairy.
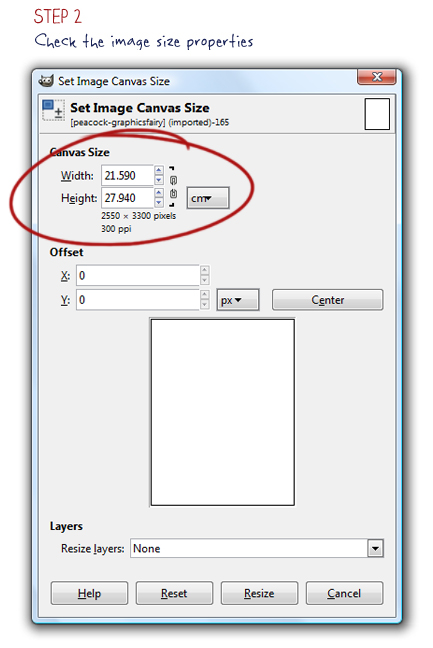
STEP 2 Check the image size properties.
Make sure your chosen image is sufficient for your needs – in both size and quality. Go to Image>Canvas Size. Take note of the Width and Height (in physical dimensions – you may need to select centimeters/inches from the drop down) plus the PPI. We can see that this image has a Width of around 21cm, a Height of around 27cm and a Resolution of 300 PPI. These are great values for the purpose of printing at home. For further information about size properties, how they effect the image and how to edit them refer to my first post (Understanding & Editing Free Printables) in this series.
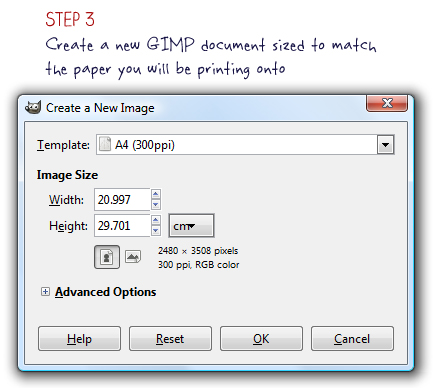
STEP 3 Create a new GIMP document sized to match the paper you will be printing onto.
Go to File>New. Choose one of the Templates or enter custom specifications. I have selected the A4 template (standard letter size – with default values as shown). Ensure the PPI is correctly set at your desired print output (keeping in mind that if your chosen PPI differs from that of the original image it could drastically affect the physical size – for more information see note in Step 4). If needed, you can manually adjust the PPI in Advanced Options. Once your new document is open, if necessary go to View>Zoom>Fit Image In Window (I find it much easier to work when the whole document is visible).

STEP 4 Copy and paste the printable image into a new layer in the new document.
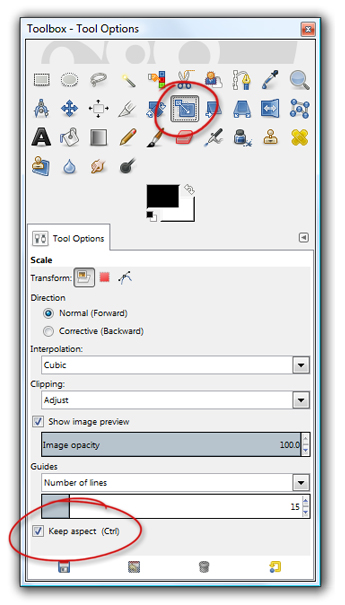
Go back to the printable image, choose Select>All then Edit>Copy. Go to the new document then select Edit>Paste. The image will be pasted as a floating selection. Go to Layer>To New Layer (to make the floating selection into a layer). We can see that the peacock image fits pretty perfectly on our ‘paper’ (canvas). Depending on the size of your image you may need to scale it down to fit on the canvas. To do this select the Scale Tool, ensure Keep Aspect is checked (so proportions are retained) then click on your image (a grid will appear). Drag one of the corner boxes to reduce the size of the image as required.
Note: If once pasted your image suddenly seems to appear much smaller or larger, there may be a resolution conflict between your new document and the original document. Pasting an image with a low resolution into a document with a high resolution will automatically decrease its size, and vice versa.
STEP 5 Determine the size your printed image needs to be.
Measure the opening of your frame – just the area where the print will be visible, not the overall size. For the purpose of this tutorial, I am using a standard 5″ x 7″ frame (12.7cm x 17.7cm).
STEP 6 Create a new layer and render a shape sized to match that of what your printed image needs to be.
Go to Layer>New Layer (ensure Layer Fill Type is set to Transparency). Choose the appropriate Select Tool (I am using the rectangle), hover anywhere over your canvas then click, hold and drag to create a shape (position and size don’t matter at this stage). Next, in Tool Options ensure Fixed is unchecked and that centimeters/inches is selected from the Size dropbox then enter your dimensions (12.7cm x 17.7cm/5″ x 7″ in my case).
Lastly, fill the shape by selecting the Bucket Fill Tool and clicking anywhere within the shape. Ensure you are working with a colour that will contrast with your background (I’m using black). If necessary, use the Move Tool to reposition your shape. You should now have a to-scale replica of the display area of our frame! This shape will form a precise guide for sizing the printable image so that, once printed, it will fit perfectly within the visible opening of your frame.
STEP 7 Reduce the opacity of the shape to 20%.
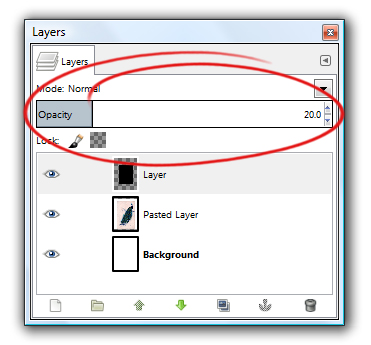
The printable image should be quite visible through the now translucent shape.
STEP 8 Using the translucent shape as your size guide, rescale and position the printable image as desired, ensuring there is a slight ‘bleed’.
Select the image layer. Choose the Scale Tool then click anywhere on the screen – a few things will happen; a grid will appear atop the image, the Scale dialogue box will pop-up, and the image layer will ‘jump’ to the front (forcing the shape layer to be hidden beneath). The aim now is to resize and position the image so that the desired print area is just covering the underlying shape. There are two ways to achieve this; 1) first crop your image (if required) then manually enter dimensions in the Scale dialogue box which are slightly larger than those of your shape, 2) first crop your image (if required) then manually rescale it so it is just covering the shape – this might take a few stages, a bit of playing around and some repositioning though it is by no means difficult. To resize with constrained proportions, ensure the chain icon (beside the Width & Height in the Scale dialogue box) is linked. To distort the image, ensure the chain icon is unlinked. Whenever you click the Scale button in the Scale dialogue box, the image will be resized as specified, the grid will disappear and the transparent shape layer will ‘jump’ to the front again – use it to more accurately check your size and position. To reposition the image select the Move Tool (ensure that Move The Active Layer is checked in the Tool Options) then click, hold and move.
Leaving a slight ‘bleed’ (small portion of the image outside the shape guide) provides a buffer which gives you some wiggle room to ensures no unprinted area is visible once framed. Of course, this helps provide a professional-looking finish.
It’s highly likely your image won’t have the exact same aspect ratio as your frame. This means that when resized with constrained proportions, it won’t completely fit within your shape guide (some cropping will occur). We can see that when resized with constrained proportions, my image is too tall – small portions at both the top and bottom fall outside my shape guide (obviously, once framed, these areas will not be visible). Due to the nature of this image, it’s not really a problem (some of the text is simply excluded), however to fit the image in its entirety, I could simply try distorting the proportions.
Distorting any image will result in some quality degradation, the level of which is dependent on the extent of distortion, and can make it appear disproportionate. I find that much of the time a minor amount of distortion causes no discernible adverse effects, though if you’d prefer to try incorporating an image in its entirety without resorting to distortion, another alternative is playing with some more advanced techniques and tricks (such as extending the image background or, where possible, repositioning certain elements). And of course there is also always the option of changing the physical display area of your frame by using a custom sized matte.
STEP 9 Delete or hide the shape, then if desired, view the document at print size to relatively assess the quality.
Once you are happy with the size and position of your image in relation to the shape, right click the shape layer and click Delete, or click the Eye beside the layer to hide it. Go to View>Zoom 100%. Due to monitor variables, GIMP will not always display Print Size accurately. If when compared to your actual paper the canvas size does not match, ensure your monitor resolution is correctly set in Edit>Preferences>Display.
STEP 10 Make any modifications.
Here is where you can have some fun! Change the hue and saturation, add a border, increase sharpness, incorporate text, play with artistic filters, tidy-up any unwanted blemishes. The possibilities are almost endless! My peacock image didn’t really need any editing, though for demonstrative purposes, I simply added a cooling filter and slightly increased the blue saturation.
STEP 11 Print!
Print immediately from GIMP (go to File>Print) or save as a JPEG and print later (go to File>Save As). This tutorial focuses on setting-up small scale images so that you can easily print from home though of course you could always have them professionally printed.
For good results, use a good printer and good photo paper. For great results, use a great printer and great photo paper. And don’t forget to select the best print settings. Nowadays, good desktop printers can be purchased for as little as $50 and a great photo quality printer might cost around $150. I just recently bought a fantastic new Canon MG7160 which is awesome!
STEP 12 Trim, frame and hang!
I like to use the frame glass or matte as my guide when trimming the paper to fit neatly inside the frame recess. I simply accurately position the glass or matte over my printed image then trace around the outside of it before trimming away any excess paper. If preferred, you could pre-measure your frame recess and based on the dimensions add a fine border (to act as a trimming guide) to your image in GIMP prior to printing it.
Like I mentioned at the top of the post, I really hope this info is helpful. I know at first glance the process might seem kinda convoluted and maybe even over-thought, though I promise it is really quite simple and actually makes perfect sense. If, like me, you’ve ever wrestled with customising printables for optimal results, this method just might save you a few extra brow furrows!
As always, if you have any questions feel free to ask – I’m always happy to try my bestest to help :-)
![]()
RELATED POSTS
 Free Art Printables: Understanding & Editing…plus a Resource Directory
 Christmas Advent Calendar Wall Chart (full tutorial with free printables!)
 Free Art Printables: Finding, Setting-Up & Printing Large-Scale Images
 Create Your Own FREE Art Paintings (from photographs)!
 DIY Quote Art…and free printable sign!


Woah man. Are you kidding me? That’s one hell of a post. Thank you SO MUCH for putting in so much work for us. I tried to customize some free printables in Word once. Alas, I gave up because I could’t get them right. I am totally downloading GIMP and trying your method. I want to put a gallery wall in my guest bedroom. Thanks again.
Thinking to do tutorials for people who don’t have photoshop is a lovely gesture. I can’t wait to try this. Thankyou.
Such an amazing tutorial! Your generosity with sharing your experience with those of us who mightn’t be as saavy is highly valued. Please keep it up :) I love your posts.
Kristine, thanks once again for this second amazing tutorial. I much appreciate your sharing your knowledge with all of us.
This is such a stellar set of tutorials! You really have a gift. Between the pictures, arrows and written instructions I feel pretty confident I can walk through your instructions with fantastic results. Thank you so much-Jessie
Thanks Jessie. I try really hard to be as comprehensive and clear as possible so anyone can feel confident about giving it a go. So many of the Free Printables out there are just so amazing…I really want to help budget-focused decorators gain the knowledge they need to take advantage of them!
I am going to flag this and make sure that it doesn’t get deleted. This is great thank you so much. I will have to keep all three in the series.
Thanks so much Marisa. It’s lovely to know that the info is helpful and appreciated.
:-)
Thanks so much for all your hard work :) This is exactly what this tech challenged gal needs to get the job done!
Thank you for the great info, how and what to do and for sharing.
Thank you Thank you Thank you for not assuming everyone has/can afford Photoshop
He, he. I know. I’m lucky to have it only because my husband is a teacher and part of his role involves maintaining his school’s website (couldn’t live without it now though so am dreading the day I need to update!). I downloaded GIMP solely for the purpose of writing this series of posts and I’m really impressed with it. Especially as a totally FREE program – pretty fantastic.
I love these printables and thanks so much for sharing and all the time it took you to do so. I have no idea how to do any of this and want to so very much. I am not even sure my computer is equipped to do this; however, I am going to study it later when I have more time and really hope it works. If not, I need an upgrade ASAP, right?
Debbie, I’m more than happy to try and help if you run into trouble. You definitely have to give it a go though!
:-)
Thanks for the tutorial! It’s an easy way to decorate the house with wonderful pictures)
Hi! Where can I find the image you have on the top of this page with the bull? Or any other farm animal/ western images? Thanks so much!
Hi Teresa
Isn’t he awesome? I found him on Wiki Commons: http://commons.wikimedia.org/wiki/File:Friedrich_Voltz_Ochse.jpg
The full resolution download is around 16 x 11 inches, though only 72 DPI. If need be, refer to my first post in this series for info regarding customising print quality and size:
https://thepaintedhive.net/2014/01/free-art-printables-understanding-editing-plus-a-resource-directory/
I’ll have a little search around some of my resources and email you with links to any other similar images or collections I find :-)
Kristine
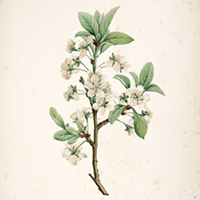
Do you remember where the botanical print on the bottom left is from? Super helpful tutorial by the way :)
Hmmm, sorry I can’t remember. I do know that it’s a Magnolia though if you want to have a Google around.
Ooh, wait. I just found it on the Biodiversity Heritage Library Flickr stream here.