
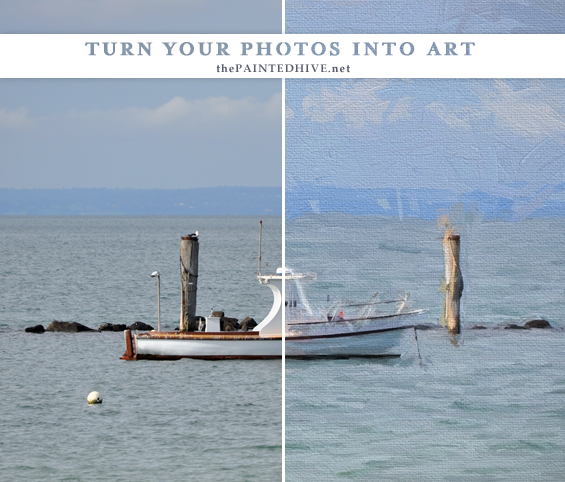
In keeping with my completely, absolutely, totally not weird obsession with budget-friendly wall art I wanted to share a really cool and easy way to create your very own custom ‘paintings’.
I’m sure many of you are familiar with the concept of digitally turning photos into paintings, and maybe some of you have already played around with the process, though for anyone a little sceptical or uncertain, hopefully this post sheds some light, sparks a few ideas and helps inspire.
I started playing around with applying painterly effects to photos a few years ago after I got Photoshop and stumbled across a few on-line tutorials. It was a new and exciting discovery for me, opening a whole world of possibilities. Achieving really good results using Photoshop can be tricky, so at the time I also trialed a few auto-painting programs which offered simple “one-click” filters.
Since then there has been heaps of progression in the photo-to-art realm. Having sooooo many options is awesome and empowering, though can also be confusing and overwhelming. So, here’s my little break-down.

Of course, you need a photo to begin with.
The choice is entirely personal, though keep in mind that some may work more successfully than others. Certain compositions and subject matter just lend themselves better to artistic treatments. And remember, one of the bonuses of turning your photo into a painting is that it doesn’t need to be particularly spectacular to begin with.
The photo could be an existing one of your own, one taken specifically for the purpose of applying a painterly effect or a scan of an old photograph.
In addition to using your very own photos, it’s also nice to know that there are literally millions to choose from online. This can be handy if you’re after something specific that you simply don’t have the ability or inclination to capture. Online photos can be purchased through stock image websites or even downloaded directly for free (just be sure to obtain consent first).
A few of my fave subject matters for painting conversions are…
BEFORE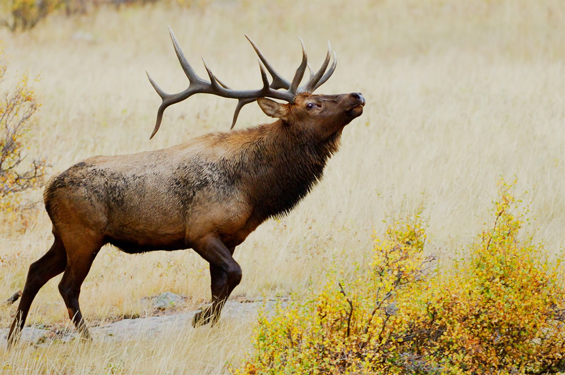
AFTER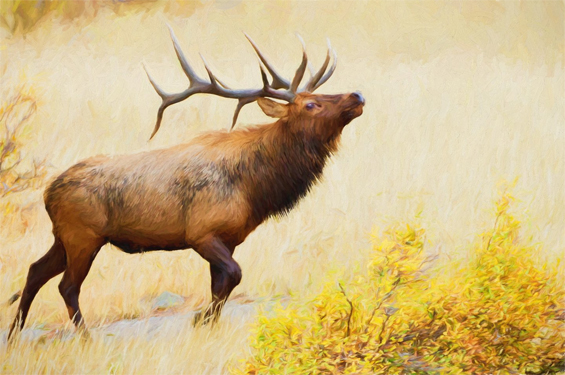
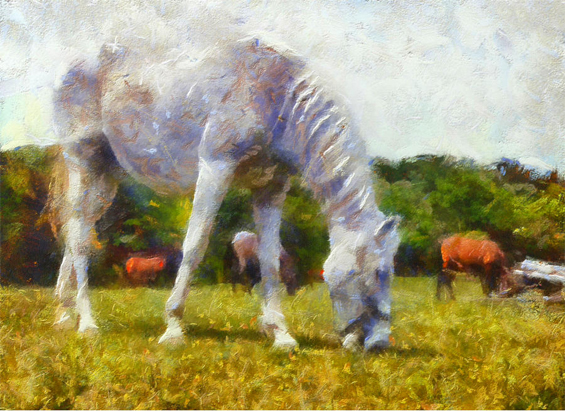
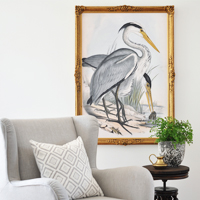
ANIMALS
Who doesn’t love a painting of a beautiful animal? I especially adore the impact of large-scale animal art and, for whatever reason, am particularly drawn to farmyard animals and birds (along with the more obscure, like camels and giraffes – weird). I also like the idea of using photos of your very own pets.
The above deer has been converted by the team at Topaz Impression.
BEFORE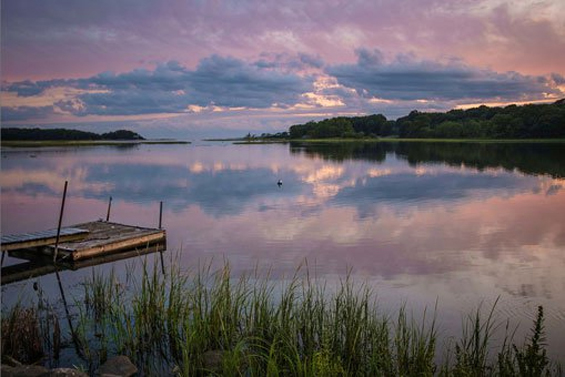
AFTER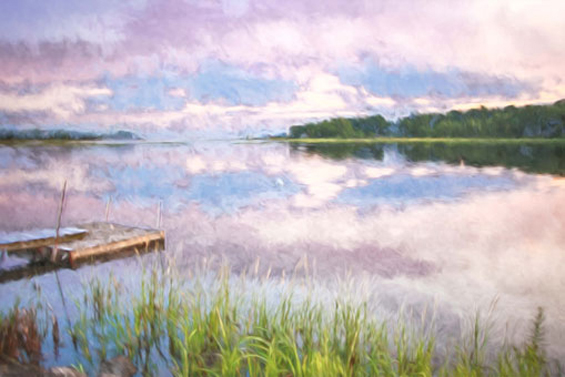
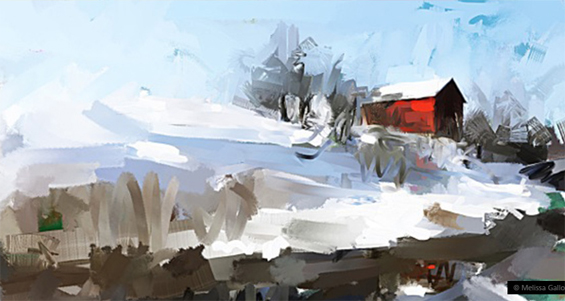
LANDSCAPES
The natural romance of most landscapes makes them well suited to painterly transformations. Imagine turning your cherished travel snaps into custom works of art. Or converting scenic home-town pics into meaningful paintings.
The above lake has been converted by the team at Topaz Impression.
BEFORE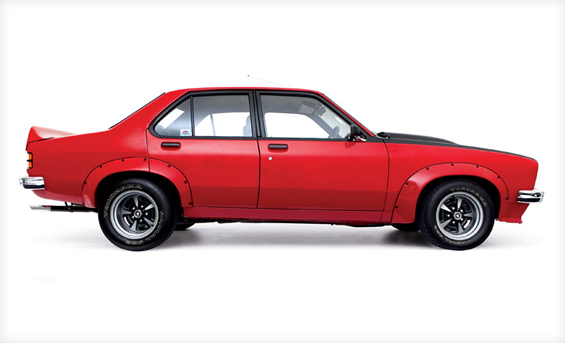
AFTER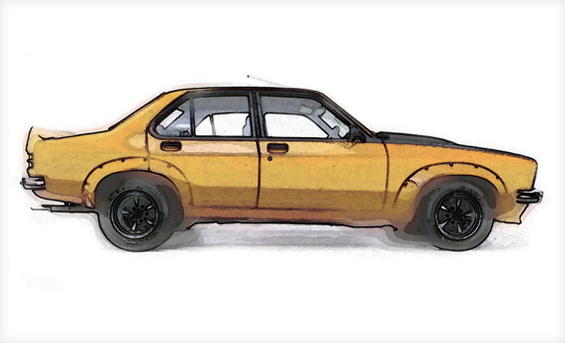
ISOLATED
A grouping of themed isolated objects (that is, individual items on plain backgrounds) can have amazing impact. I LOVE the possibilities here. Think Gramdma’s old china, your kid’s favourite toys, fruit, leaves, shells, kitchen utensils, precious trinkets, vintage wares, little knick-knacks…anything! Simply place your chosen object against an all white background then snap your pic. If needed, further editing to clean-up the ‘canvas’ can be undertaken during the conversion process. As a shortcut you can also find lots of isolated images online.
The above car (not my usual style, I know, though this was done for my brother and I think a collection of cars would be great in a masculine space) has been converted by myself using a combination of Paper Artist and GIMP. Original image from Performance Garage.
BEFORE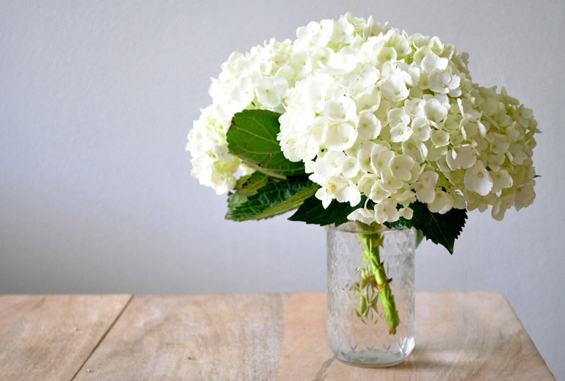
AFTER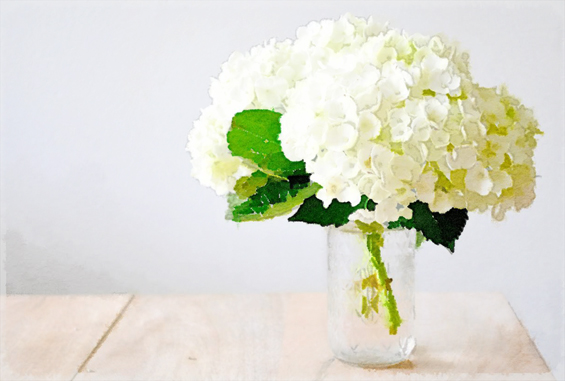
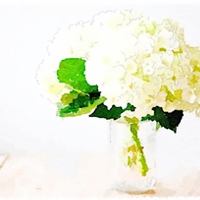
BOTANICALS
From a vase of carefully orchestrated roses to clusters of clematis still on the vine, botanicals can range dramatically in terms of style. This makes them incredibly flexible. So, whether your taste is neutral and natural or bold and bright there is sure to be a composition to suit. For sentimental types I like the idea of immortalising a special bouquet. Or how about simply capturing your favourite backyard blooms?
The above hydrangeas have been converted by myself using Waterlogue. Original image from Jentertaining.
BEFORE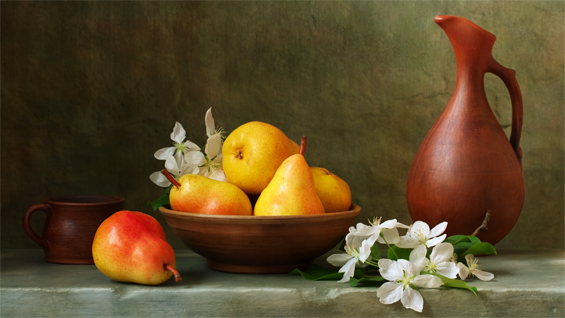
AFTER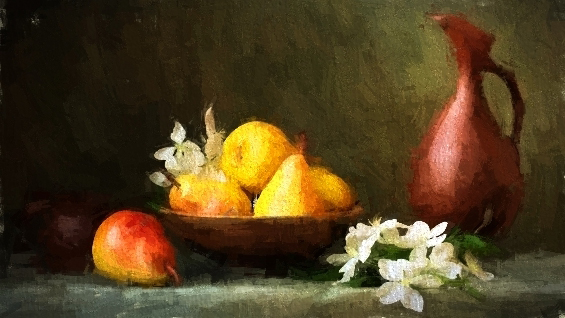
STILL LIFE
If you’re looking for an easy, fun and rewarding project, why not try composing and photographing your very own still life then converting it into a painting? You could use some of your favourite items and even incorporate sentimental objects. Remember, the photo itself doesn’t have to be spectacular though you might want to pay attention to light and balance.
The above composition has been converted by myself using Topaz Impression. Original image unknown.
![]()
Note: Generally speaking, you can’t simply download and print photographs taken straight from the internet because the resulting quality will be super poor due to insufficient resolution (refer to my Understanding & Editing Free Printables post for further information about this). Even high resolution photos carry limitations in terms of quality when it comes to enlargement. It doesn’t take much for them to begin to appear blurry or pixelated which is a shame because photos really rely on crispness to look their best. Digital paintings, however, are much more forgiving in this respect. This is part of the beauty of applying painterly effects – the flexibility they provide in terms of size and quality. This allows for the use of poor resolution images and the considerable enlargement of almost any photo with little discernible degradation. For me, the ability to create HUGE statement art is one of the most exciting aspects of using painterly effects.

Of course, the look of the ‘painting’, and the way it’s achieved, is essentially dictated by the method (and program – more on those below) you use. Some processes are super quick and require absolutely no skill, whereas others demand quite a bit of patience and artistic ability. The options are almost endless, and needless to say, results vary.
I’m partial to the more traditional looking artistic styles, though the sky really is the limit here. From funky pop art to something more whimsical you’re only limited by your imagination!
Essentially, there are three main methods for turning a photo into a painting. Keep in mind these describe the different photo-to-art techniques. Photo-to-art programs may incorporate capabilities for one or all methods – refer to the program list below for more details.
AUTO-PAINTING
This involves using pre-set filters which, as the name suggests, are applied automatically. Simply select one of the available styles (such as ‘watercolor, ‘oil painting’ or ‘pastel’, for example) and via smart algorithms your photo is instantly transformed! In some cases you can also make controlled changes by adjusting certain parameters (such as brush size, stroke direction and texture, for example) or making other edits to tweak the effect to best suit your image and desired look.
ASSISTED DIGITAL PAINTING
Unlike auto-painting, which is, well, automatic, assisted digital painting calls for the manual conversion of photos through the application of user-applied brush strokes. This might sound complex and labour intensive though smart technology, known as ‘cloning’, does much of the work for you. You see, rather than having to create your painting from scratch on a blank canvas, cloning uses the original photo as a source, instantly transforming areas in a painterly fashion as you apply custom strokes! This process does require some practice and an artistic eye though the results can be amazingly realistic and quite striking.
Note: Whilst you can certainly use a standard mouse to paint digitally (I do), a tablet and stylus does give greater control.
IMAGE EDITING
Of course, all of the methods involve image editing, though what I’m specifically pertaining to here is the clever blending of standard photo manipulation techniques. Different effects can be applied to your photo then layered in such a way as to mimic a realistic painting. I know this sounds kinda technical – and, well, it can be – though for beginners there are lots of on-line tutorials to educate and build confidence. Results can be fantastic and the process is really rewarding.
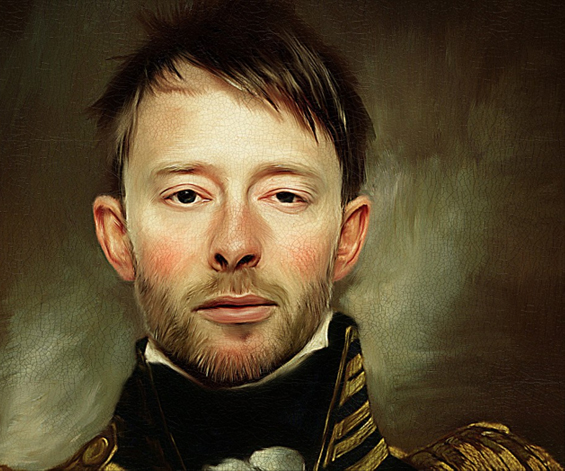
Photoshop (via Thom Yorke)
Note: Although image editing isn’t the obvious choice for photo-to-art conversions, it’s a great technique to try if you already own a powerful image editing program. It can extend your knowledge of the program’s capabilities and ensure you get the most out of it. It also negates the need to buy any new software.
For the purpose of clearly explaining the different methods I have segregated them however they could be, and often are, combined. For example, you could begin by applying an automatic filter then build upon it with some custom digital painting and subsequent editing to achieve your desired look. This layering of styles can produce amazing results.
As an aside, keep in mind that the way your painting appears on screen may not accurately reflect the way it will look once printed. Play around with different resolutions and sizes and always choose the best available quality when saving your work. If possible, view at print size and print a test patch first.

From basic apps for hobbyists to comprehensive software packages for professionals, program options are vast and varied. Obviously, they all differ in terms of capabilities, cost, and out-put quality, and some are super simple to use and require absolutely no skill whilst others come with pretty steep learning curves and the need for some talent. I think you really need to use a program to get a good understanding of how it works and what it offers. Fortunately, most of the more pricey options provide free trials.
Here are just a few programs to check out (prices are a guide only)…
WATERLOGUE ($3.00)
A popular app (Apple devices only) featuring a small selection of luminous watercolour filters.
TOPAZ IMPRESSION ($100)
An intelligent program featuring hundreds of realistic editable filters.
PAPER ARTIST ($4.00)
A fun app with a vast collection of different artistic filters.
COREL PAINTER ($400)
A professional program with a focus on manual digital painting.
COREL PAINTER ESSENTIALS ($40)
A condensed version of Corel Painter.
COREL PAINT IT ($40)
A fun program with several artistic filters and the ability to make some custom changes.
PHOTOSHOP ($30 monthly)
A powerful photo editing program.
PHOTOSHOP ELEMENTS ($100)
A condensed version of Photoshop.
POPSICOLOR ($3.00)
A funky app (Apple devices only) which renders splashy watercolours.
FILTER FORGE ($30 – $300)
A versatile program inclusive of thousands of filters and the ability to create and save your own effects.
DYNAMIC AUTO PAINTER ($100)
A world-class program with numerous detailed filters and the ability to create your own effects.
JIXIPIX ARTISTA SERIES ($35)
A suite of artistic filters with some customisation options.
POSTWORKSHOP ($120)
A comprehensive program featuring hundreds of editable and layerable filters plus the ability to paint manually.
SYNTHETIK STUDIO ARTIST ($300)
An extensive program with hundreds of editable filters and assisted painting capabilities.
SNAP ART ($100)
An effective program featuring a wide selection of artistic style filters with options for customisation.
AKVIS ARTWORK ($70)
A simple program inclusive of several artistic style filters which can be adjusted and combined.
GIMP ($FREE)
A free photo editing alternative to Photoshop.
Of course, there’s no denying the beauty and pure specialness of real art, though let’s face it, not all of us have the skill to produce lovely paintings. These clever digital alternatives are a perfect cheat – and just plain fun! To be honest, I’m actually reasonably artistic (if I do say so myself :-) and really enjoy drawing and painting, though I’m not exactly what you’d call ‘efficient’ (read: I am slow and messy!), so for now I’m loving playing around with this virtual substitute!
I’m also loving the possibilities it opens up in terms of gift giving. How cool would it be to gift someone special a custom ‘painting’ of something symbolic?
I’m actually working on some cool free printables for you guys using a few of these programs and techniques so will share more in-depth tutorials when I get around to that.
![]()
PS Hope everyone had a great Christmas and New Year!


GREAT post! So timely for me too. I’ve seen this done before though always thought getting actual decent results was something I could never do. So well explained and great list of resources.
Oh cool. Another craft endeavour for me to become obsessed with ;) Ha, ha. No really thank you for sharing.
i couldn’t make the slider work for me, but i didn’t try too hard, i was so excited about the effects you demonstrated–i’m a retired crime scene photographer and kinda lost my interest in photography after i left the crime lab… i started shooting photos again when digital photography became so easy. i really admire impressionist art and found Waterlogue, which i love, but after your post today, bought Percolator and Popsicolor. This is more fun than a barrel of monkeys. Thanks. My dog and husband are going to be very tired of me practicing on them.
He, he. The apps are fun and easy June.
I just downloaded Fotosketcher a few days ago. I’m just a hack who wants to print cool pictures of my dogs, house, acreage, etc. You know, as a hobby. There’s only about 50+ different types of “effects” but it is free and I don’t have an IPhone. Cartoons, pixelations, yeah! And Mary, you’re right…another obsession. Thanks for doing all that investigative work – great blog! I always learn alot.
I tried Fotosketcher a while back Lynn. Good for free. If you ever find yourself wanting more, check out some of the other programs I have listed above. Some are pretty affordable and offer really great features.
I was hoping you were going to talk about printing options. I have used an app and like the results but haven’t decided the best way to print them yet. I would like to hear your opinions
That’s a good point Debbie. I guess I simply focused on the conversion aspect as once the photo is transformed it can be printed just like any image.
That said, it can actually get a bit complex. If you haven’t already I would encourage you to read my previous series about working with printable art: https://thepaintedhive.net/tag/free-printables-series/.
Basically, with lots of these photo-to-art programs it can be difficult to determine the size and resolution (print quality) you are working with. Some don’t even provide options to set these properties. On top of that, certain filters may render more effectively at certain sizes and resolutions. The problem with this is that it’s almost impossible to tell what your printed image will look like by simply viewing it on screen.
I’m yet to determine if it’s best to size your image before or after applying a painterly effect. Some programs (particularity apps) will automatically reduce large images anyway.
What I would do, and what I recommend, is (once the image has already been transformed) double checking size properties and printing a test patch then making any necessary adjustments prior to print. Do this using a dedicated image editor such as Photoshop or GIMP (more detailed instructions for checking and adjusting properties can be found in my series as linked to above). You can then save your perfect image as a JPG and print it from home or through a pro printer as per usual.
Hope this helps.
Kristine
Do you print them on photo paper at home? I would take it to a print shop to print. I don’t like the way my photos turn out printing them at home. But I guess I would like these pseudo paintings to look more like paintings than photos, so I guess my question was how to get them to look more like a painting. I wouldn’t like them on glossy photo paper and I don’t think regular printer paper would be thick enough to handle being saturated with ink. I haven’t asked at a print shop what options are available, or gone back to read your previous post….yet, sorry! But as you stated, the resolution and size, those are issues I hadn’t even thought about. Thank you so much for all your information. I love your blog!
Ah, okay Debbie. Gotcha now.
Well, I guess the prints need to be treated just as that – prints. To mimic original art, short of applying paint topically, there’s not a whole heap you can do. Though I understand you probably mean just giving them a more special, extra professional looking finish.
You might benefit from reading a few articles about how professional artists reproduce their original works. Try Googling “how to turn paintings into prints”. Of course, you can ignore the digitisation aspect, though it’s interesting to read about the ink and paper selections. The main thing I took away from the process of professional artists was the importance of archival longevity (I think this is mainly due to the fact they are selling their prints). For us regular folk producing ‘art’ for our very own walls it seems similar (if not identical) visual results can be achieved using alternate, albeit qualitative, products.
I guess the key is researching different print shops and what they offer.
Kristine
xoxo
Fabulous post! I wish other bloggers would take a cue from you and provide such high-quality, thoughtful, and well-presented info. PINNED!
Aw, thanks Cathleen.
You are so right Cathleen; so many bloggers try to post every day and it ends up being the same old stuff rehashed but we can rely on Princess Mary to deliver fantastic posts every time.
Thank you Julie. I just hope I can sustain this crazy pace of mine ;-)
No, seriously, I write each post in the hope of sharing something that will be appreciated so it means a lot reading comments like yours.
this is awesome. I am so excited to make some gifts using these programs. cheers
Hi Kristine. Always love to see your posts and keeping in touch via Facebook. I’ve brought back my linky party Thriving on Thursdays, from a 12 month absence and I’d love for you to link up. Hope to see you there.
http://domesblissity.blogspot.com.au/2015/01/thriving-on-thursdays-linky-party-116.html
Anne @ Domesblissity
LOVE IT!! Great idea, and thank you for the real life helpful list of programs along with the costs. I’m going to use this idea for making cards.
Great!
Hi Kristine. Thanks so much for linking up to Thriving on Thursdays last week. I love this post and can’t wait to try it. Hope you enjoyed your time away. A beautiful spot. I’m featuring this one at tomorrow’s party. Thanks for coming.
Anne @ Domesblissity
Thanks so much for the feature Anne.
:-)
Thanks for all the links. I use Photoshop Elements, but I’m interested to see what some of the other programs you suggested have to offer. Came over from Domesblissity. Pinning.
Photoshop is so fantastically diverse though can be tricky in terms of painterly effects. Some of the purpose programs make is soooo easy. Hope you have fun!
Very cool. With the right frame these images can definitely give any home an exclusive look. I will be sure to look more into this. Great post!
Thank you.