
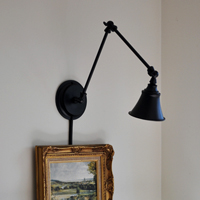
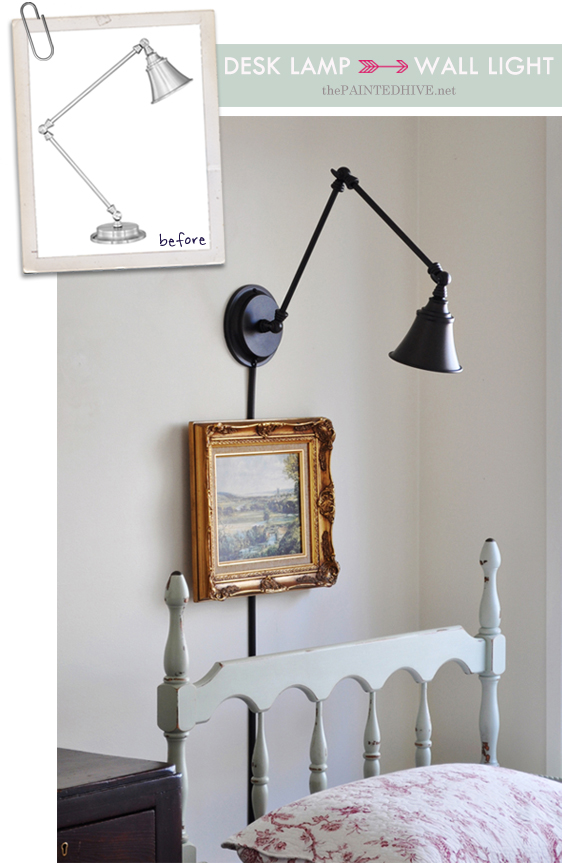
I’ve coveted adjustable arm wall lights from the first moment I saw one.
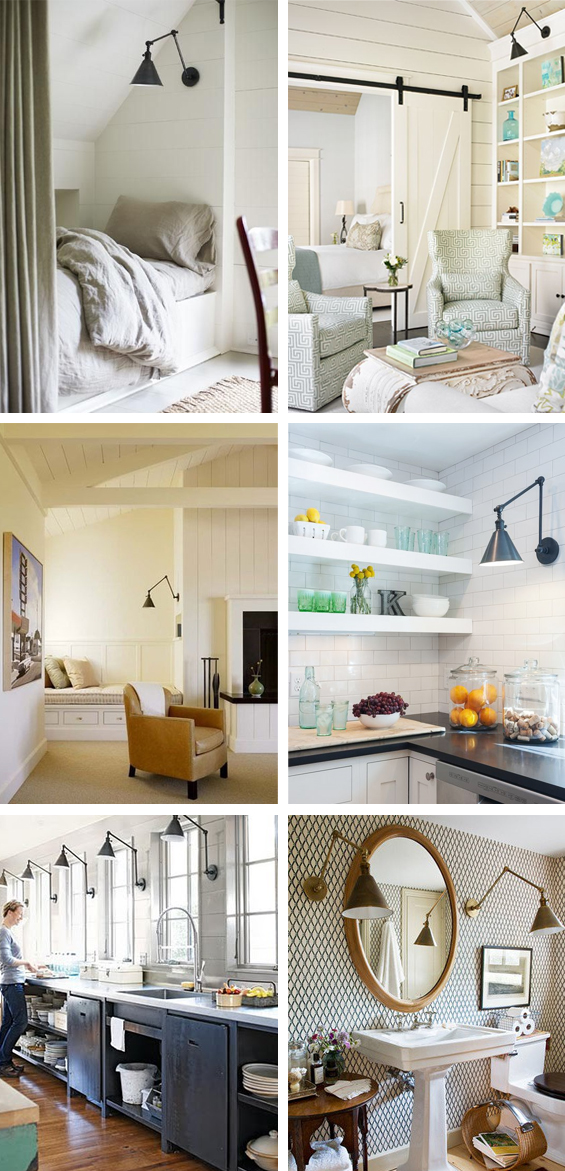
To me there’s just something so desirable about their sculptural form and subtle industrial edge. That said, I never really envisioned actually using one in my own home.
You see, despite the oft crazy price tag (and down-right unavailability – especially here in Australia, anyways) I’m just a bit too fickle to commit to the permanence of hard-wired wall lights. I simply like the flexibility of everything in a space being easily repositioned (I guess that’s the reason I’m also a fan of free-standing ‘built-ins’, like the one in our home office). I know, I know, it’s not too difficult to reposition sconce lights if required, though with the cost and work involved with installation, I’d simply rather not go to the trouble. Yep, I’m stingy and lazy like that.
So, when it came time to implement my lighting plan for Charlotte’s room I needed to think a bit outside the box. I considered buying iron pipes and making my own lamp by renting, or even buying, a grinder and a multi-function welder for beginners, but there were other options I could explore.
Remember my inspiration rendering from ages ago…
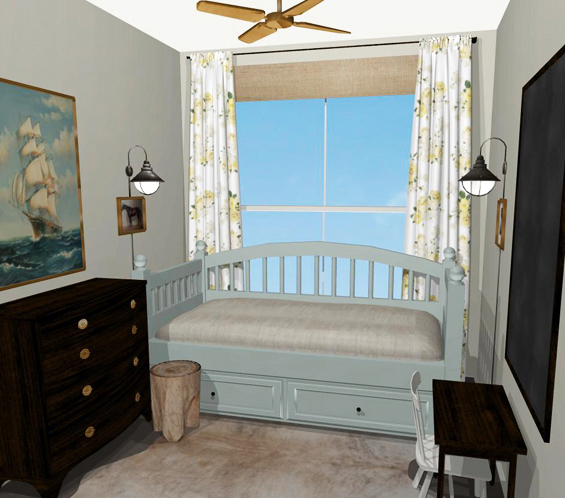
Given the tininess of Charlotte’s room and the position of her bed, I really liked the idea of using sconces in place of a table lamp. My initial plan was to use two. I do still like the symmetry of this though for now have decided to opt for one over the bed head only. As already mentioned however I didn’t want to have to hard-wire it in.
So, I decided there were three main options…
1 Use a plug-in wall lamp.
Simple, right? Well, not exactly. I discovered that aside from the IKEA options there are almost NO plug-in wall lamps available here in Australia and certainly none of the adjustable arm variety. Trust me. I looked, and looked and looked, and annoyed people with seemingly perplexing emails and phone calls, and looked and looked, and looked some more. There was the option of having one shipped from overseas though with the cost of postage plonked on top of the cost of the actual lamp it wasn’t gonna be cheap, not to mention the hassle of incompatible electrics.
2 Convert a hard-wired wall light into a plug-in option.
Definitely do-able (or so my husband tells me) though I was kinda set on using an adjustable arm wall light and the minimum cost for one of those is around $250!
3 Get my décor crazy on and stick a desk lamp to the wall.
Sure, why not, hey?
If you follow me on Facebook you might remember a post (from about a year ago now) where I shared some adjustable arm desk lamps which, at the time, were on sale from Wayfair for just $35 each (it seems they are no longer available through Wayfair though you can buy them from other retailers – here, here, here. You can, of course, also find similar ones).
I know desk lamps like this aren’t anything new though for some reason I immediately associated these particular ones with the swing arm wall lights I’d been crushing on. Sure enough, my head was soon tilted at a right angle (looking at the lamp pic on my screen) and my noggin cogs were turning! Before committing to buy however, rather than trust my imagination alone, I had a bit of a play around with the product pic in Photoshop, manipulating the lamp into something that might actually work on a wall.
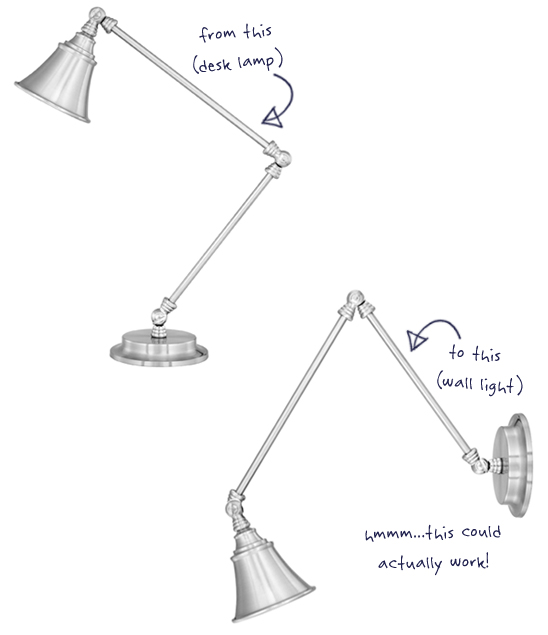
You see, although I was planning on simply sticking a desk lamp to the wall, I didn’t really want it to look like I’d just stuck a desk lamp to the wall. I wanted it to look as legit as possible. Luckily, my rough Photoshop renderings convinced me it could work (in fact, I thought it looked just like the real ones!) so I went ahead and made the purchase.
Once the lamp arrived, I played around with the arms in person. I noticed that the beehive style “hinges” restricted the amount of angle I could achieve because they hit each other. Fortunately, this didn’t effect my desired configuration. I also felt the leading arm was a little too long though figured this was just me being overly fussy.
Anyhoo, here’s how the whole (easy and affordable) project went down…
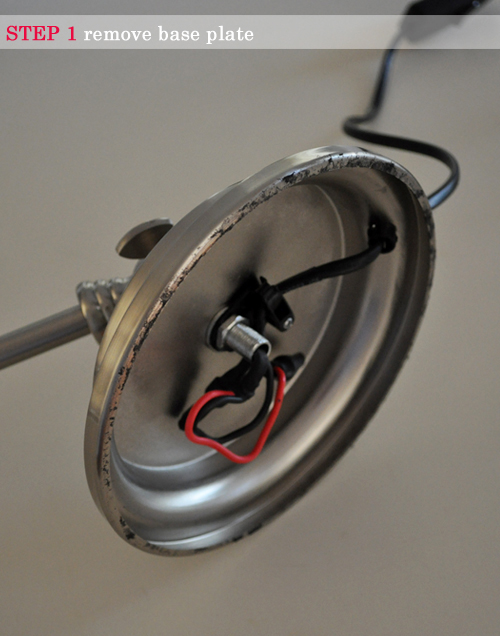
STEP 1 Remove base plate.
Adjustable arm desk lamps come with pretty hefty bases to balance the weight of the angled arms though for my purpose it was just making the whole lamp way too heavy. To remove the base plate, it was simply a matter of pulling off the glued-on cover, undoing a few bolts and nuts then releasing the heavy resin disk.
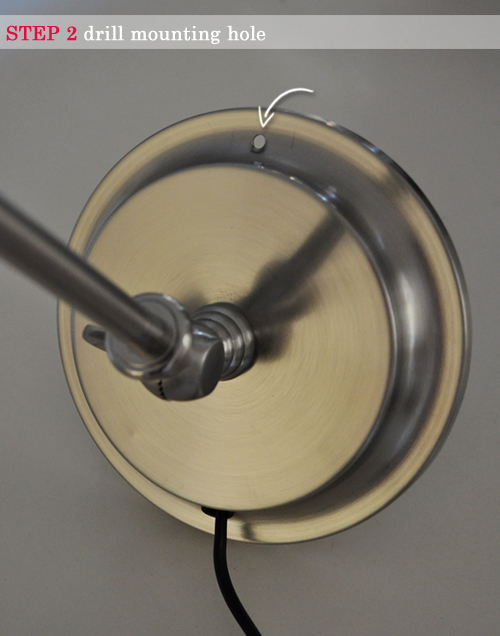
STEP 2 Drill mounting hole.
With the base plate gone the lamp was surprisingly light (like, lighter than a picture frame light) though I still needed to come up with an effective means of attaching it to the wall. After brain-storming a few different ideas I concluded that one long central screw was the simplest and safest method. Sure, this meant there would be a visible screw head though with the slight industrial style of the lamp I decided this wouldn’t bother me. To accommodate the screw I drilled a neat hole in the top of the base opposite the cord. For obvious reasons I did this prior to painting.
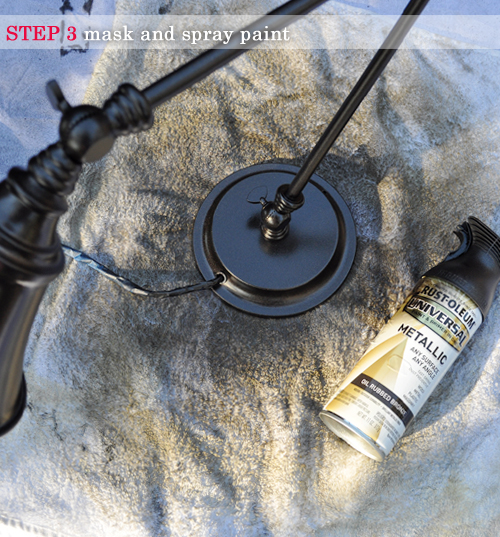
STEP 3 Mask and spray paint.
Ideally, I would have loved an antique brass lamp though they just weren’t available in my stingy price-frame. I contemplated creating a brass finish myself, though decided instead to go with something very neutral and chose Rust-Oleum Oil Rubbed Bronze. I simply taped-off the bulb socket and cord (in hind-sight I didn’t need to tape the cord though) then gave the lamp around three light coats, adjusting the arms as needed to achieve all-over coverage. I thought about doing the whole ‘colour pop’ thing on the inside of the shade (which I do love) though decided to keep things simple. Maybe I’ll hand paint it a sunny yellow or something in the future, maybe.
Of course, the original brushed chrome finish was totally fine, just not in-keeping with the scheme for Charlotte’s room.
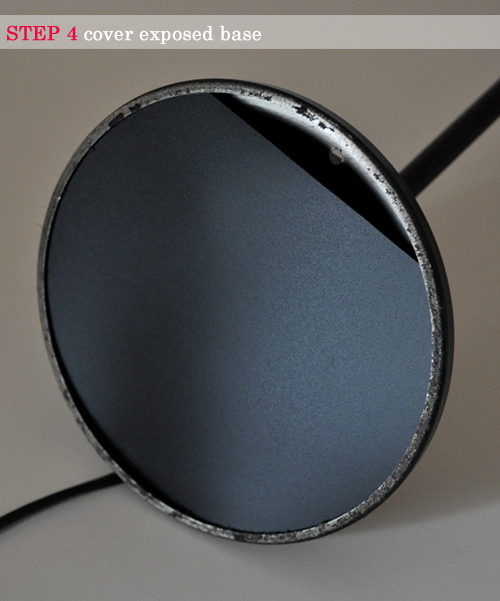
STEP 4 Cover exposed base.
Just to keep things neat and conceal the wires I cut a disk from the front of an old display folder (you know, those flexible plastic ones) and inserted it behind the rim. I also made sure to cut a slot for the impending screw.
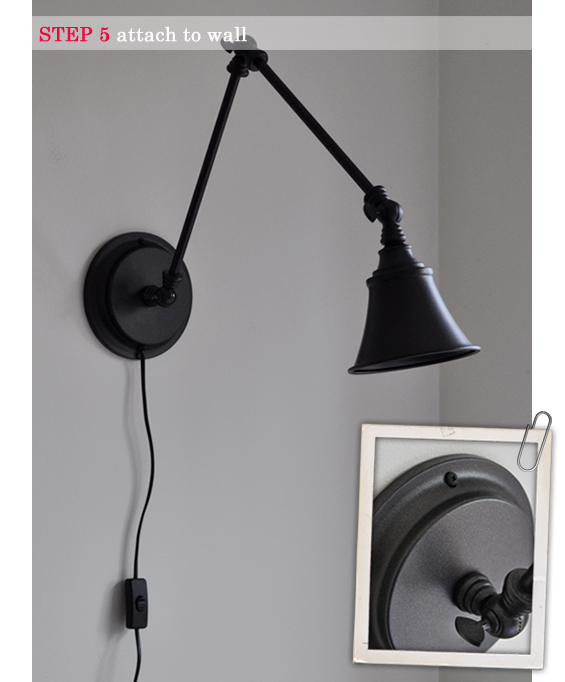
STEP 5 Attach to wall.
As mentioned in Step 2, I decided that once long central screw was the best way to mount the lamp. I was lucky to have an appropriately located wall stud so my lamp is actually anchored in solid timber though given the lightness of the lamp I think a heavy duty plaster plug would also do the trick. To ensure my screw head nestled neatly into the lamp groove, I drilled into the wall on a slight downward angle and used a dome-head screw. My screw was originally black so already matched my lamp though of course you can paint the head any colour to co-ordinate.
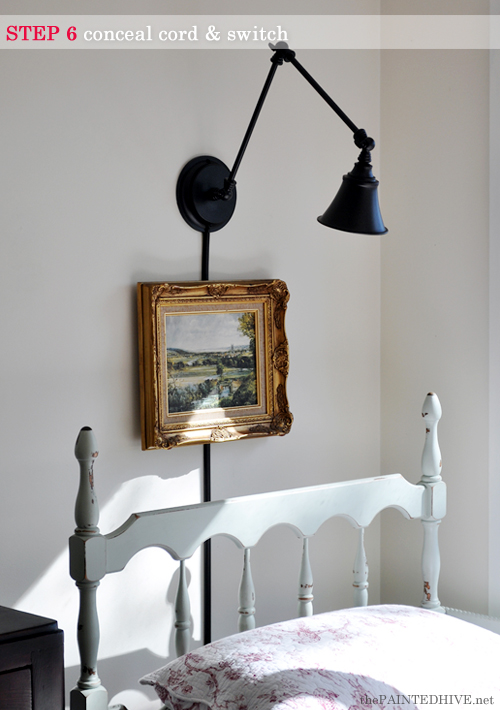
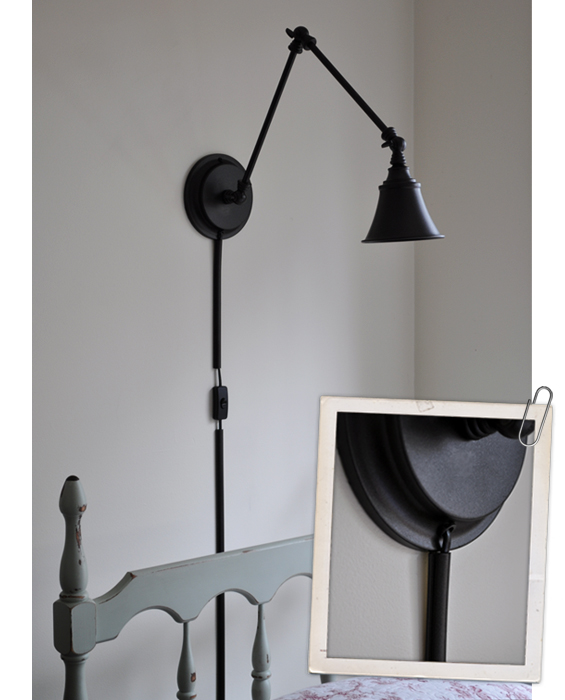
STEP 6 Conceal cord and switch.
I knew from the beginning that the visible cord and switch were going to bug me. That said, I think that in the right space the casual nature of the exposed cord can work. I just wanted something a little more ‘finished’. If it doesn’t bother you then you just saved yourself an extra process!
I decided to hide the cord in a narrow concealer made to appear like part of the light itself. I actually quite like this look. I found an adhesive cord cover (D-Line Micro – $10 from Bunnings), cut it into two portions (one for above the switch, and one for below) then spray painted it to match the lamp. Of course, you could instead choose to paint the cord cover to blend in with the wall, though I think this is a look better suited to dark coloured walls. I wanted the cord cover to abut the light so it looked like part of it. This created a slight lean away from the wall where it meets the lamp due to the cord needing some clearance space. Thankfully this is only discernible upon super close inspection and the dark colour of the lamp, cord and cover really does help disguise everything.
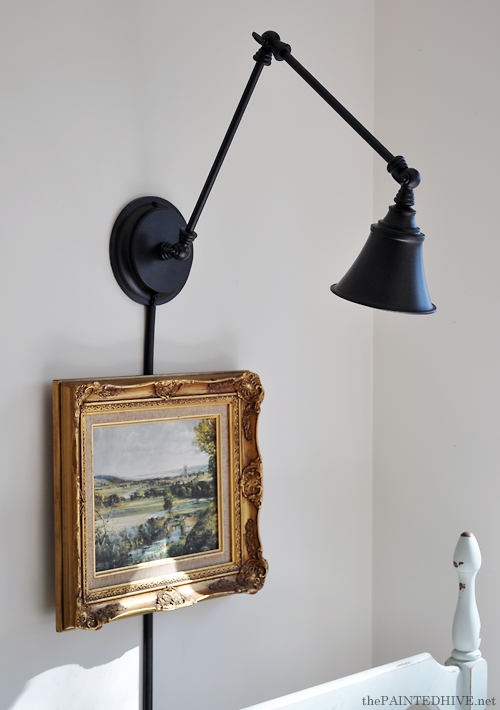
To deal with the exposed switch I decided to hang a pretty picture over it.
I know, I know, you’re probably thinking how ridiculously impractical that sounds – “A picture over the switch, how the heck do you actually use the dang thing then? Duh”. I thought this too which is why I installed a remote power switch (click the link if you’re not sure what a remote power switch is – sorry, I couldn’t find a link to my actual brand). I love this thing. Essentially, the lamp is always ‘on’ though power to it is controlled via remote. The remote is simply attached to the side of Charlotte’s chest of drawers with a 3M Picture Hanging Strip so it’s nicely hidden, completely removable and super accessible.
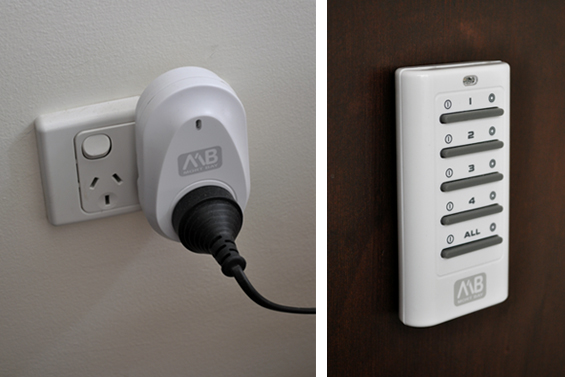
The remote is capable of operating multiple power points which is why it has so many buttons. Of course, we only need to press the top (“1”) button to operate our lamp and Charlotte has this down to a fine art.
I thought about using some kind of hinge system to hang the picture though decided that was overly complicated (and extra difficult given the fact the switch means the picture can’t sit flush on the wall). Instead I simply opted for basic picture string and two long nails hammered in on a steep downward angle. It’s easy to lever the picture without the string slipping off the nails so the switch can be accessed (if needed).
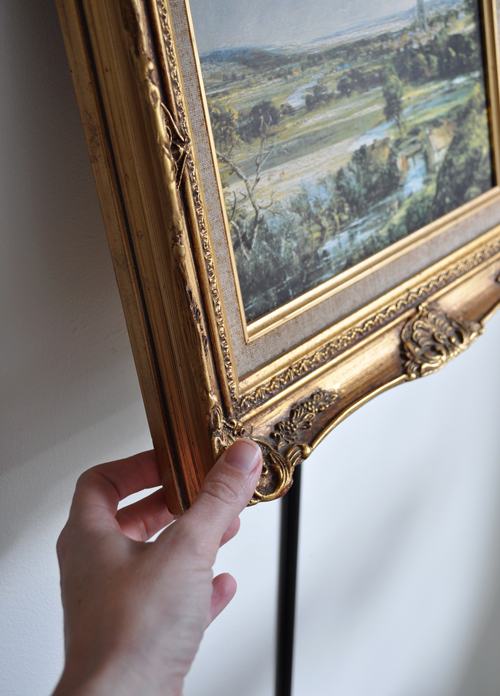
The length of the nails, which sit just proud of the switch plate, also mean that although the picture doesn’t sit flush against the wall it does rest neatly parallel to it. An unintended bonus is how having a piece of art below the sconce gives it the impression of being a picture light, which I like.
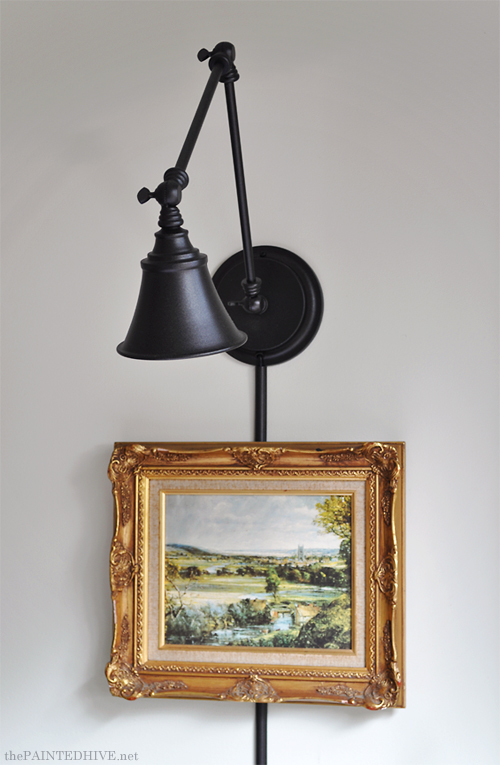
I went with a 15 watt pilot bulb which, although very soft, throws ample reading light. I was initially concerned that the position of the light might be somewhat blinding though have laid beside Charlotte on numerous occasions to read bedtime stories and have never once found it to be a problem – on the contrary, it’s actually quite nice to have a warm back light for a change (and, of course, the tilt of the shade can always be altered to redirect the cast, if need be).

Although I wasn’t ever attempting a specific “knock-off”, before publishing this post I did a quick Google search and found these similar lamps…
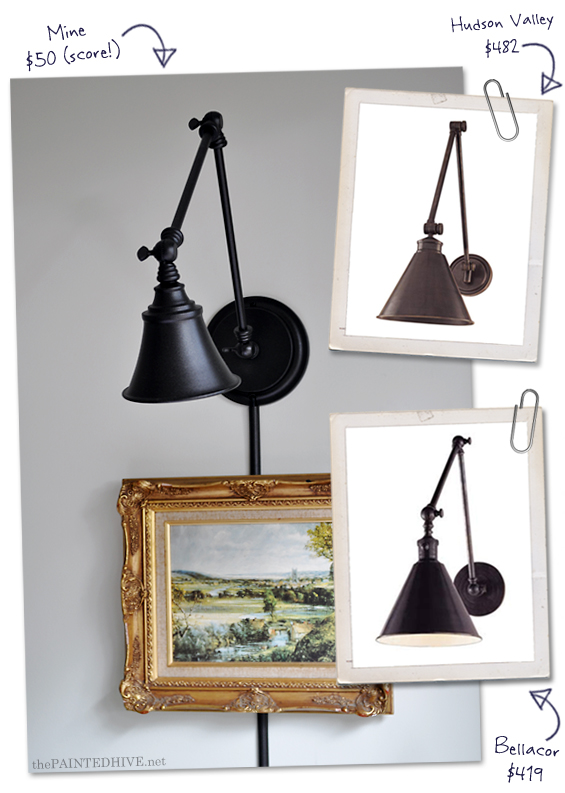
The $50 for mine includes the lamp, cable cover and paint. I know those proper wall lights are pretty gorgeous, though I do prefer my price tag!
This whole project was a total experiment and I’m really happy with how it turned out though the fact the concept is kinda weird hasn’t escaped me. So, tell me…successful or stupid?
![]()


genius!
Awesome! I think it turned out great and does not look like a table lamp! Great job!
That is genius! It looks fantastic and I love that picture and frame. Just beautiful!
Cool!
I love this. When you purchase the actually wall lights they can be so expensive. And you don’t have an electrical outlet…then you have to make one. This is an awesome idea. Thank you…thank you…thank you.
I think you already know the anwer: SUCCESS!!! I did this with a small Ikea lamp, but may try it with a fancier one. Great job and wonderful tutorial, although I can’t quite picture what you did with the plastic disc thingy to conceal the wire in the fixture. I’m going to have to see if we have the remotes here in the States. I would love that.
Thanks Teresa.
If you look at the photo for Step 1 you can see the exposed wires (not exposed in a dangerous way, just not covered) and the little lip which I slipped the flexible plastic disc behind (you can see the outside rim of the lip – the part which is holding the disk in – in the photo for Step 4).
I actually don’t think re-covering the base was necessary though my husband requested it (he is a safety first kinda guy). I guess it just provides a little buffer between the wires (although they are safely insulated anyway) and the wall. Does that make sense now?
Also, I’m pretty certain you guys do have those remote switches in the States. When I was searching for them online I cam across a few on Amazon :-)
Kristine
Sigh, I just have to say how much I love this blog. It is by far my favorite – You don’t post often, but when you do, the ideas are so clever and lovely. It is well worth the wait in between posts. It is so much fun when I new post gets delivered to my inbox!
I have been looking for an awesome plug-in wall lamp for a while now, but didn’t want to spend crazy money. It never occurred to me to adapt a desk lamp. Such a good idea.
Thanks so much Meg. It’s comments like yours that encourage me to keep on going. I’m really looking forward to having a bit more time to work on new projects and posts when the kids are a little bigger. There is just so much more stuff I’d like to do and share.
My pleasure! Your ideas and solutions are always so original. Thanks for taking the time to share it with us!
Completely awesome, and very creative!
Hello,i live in Melbourne,Australia and i love following your posts,they are wonderful,Thankyou
Thanks so much Kat.
:-)
Inspirational as usual. How do you manage to combine all this creativity with princess duties Mary? :)
Looks great! Definitely a success! I am looking at my desk lamp in a new way now. Though I would be interested to know whether your kids are tempted to move the arm around and play with it. Something I think my kids would do.
Thanks Jane.
The lamp has been up for about a month now and although Charlotte is somewhat fascinated by it (particularly the remote side of things!), surprisingly she hasn’t touched it (and Riley has shown zero interest). Not sure if this is something that might change though I’m confident the light is reasonably robust.
you are insanely genius! What a great idea!
Great idea! I just love all your creative ideas and the fact that you go beyond the expensive option to get same look at a fraction of the price. Thank you!
I do not see the difference between your lamp and those precious , it is gorgeous and I’m fascinated by what a practical and keativ you are great job !! Have nice day ,Erika
I love this lamp! It turned out beautifully.
I did a similar conversion of a desk lamp that works well in an area of my home that didn’t have an overhead light: http://bit.ly/SAFsconce
Great idea Susan – it looks so clean and modern. And here I was thinking I was the only weirdo willing to stick a desk lamp to the wall!
:-)
Kindred spirits in lighting indeed! :)
I love this. I can’t get over the savings over the ‘real’ sconce lights. I have a frugal streak and getting a high end look for not a lot of money REALLY appeals to me. Well done. I am not as creative as you are in seeing things outside of the box but I’m glad that you share your vision. Thanks!
Just goes to show how over-priced the high-end versions can be. I know materials and quality can vary though surely, cost wise, producing the fixtures couldn’t be that different.
Kristine, it turned out wonderfully! I think it looks just a pretty as the high end versions. I think I’d seen where Emily had done a faux-hard wired lamp where they just ran the cord through a hole behind the drywall and then punched a hole further down the wall to plug it into an outlet. In the event someone wanted to mimic your idea here but still conceal the cords, I thought that could help!
This opens up quite a few possibilities, definitely pinning for future use!
Thanks Corinna.
My husband actually suggested punching through the wall. For this particular lamp it would have meant some re-wiring (to pull the cord back in behind the base) for a neat finish and I didn’t really mind using a cord cover so we decided to keep things simple. You’re right though, it’s a good alternative for anyone wanting to create a hard-wired illusion.
I say hugely successful!!!!!! Thanks for sharing your ingenuity & creativity with us!!
What a brilliant idea! That desk-lamp-turned-wall-light has simply blown me away. It definitely added an extra style to your house. You are a smart and wise lady. That tutorial is very detailed and easy to understand. I’m pretty sure lots of moms out there have already benefited from this post. Keep it up!
This is fantastic! Well done! I have to say I like the look of your lamp better! I have a thing for industrial lighting and have considered doing something like this but now that I see it done I will definitely try it! Thank you for sharing the how to :0)
Smiles!
Terry
Ahh…It’s like she’s going to bed each night with that little Pixar Lamp watching over her…(from the pre-movie short where the little pixar lamp is ‘alive’ and bouncing on the ball)…It’s an adorable ‘short’ and that’s an adorable lamp (gorgeous actually!)
Such a sweet way to imagine it!
Thanks Coreen.
You’re the upcycling queen! :)) I like your version even more than the expensive ones! My most successful DIY transformation was an old suitcase that I use as a side table (kind of): I like to get lost in small, “messed up” antique stores and other (for someone) strange places (I don’t know if you have those kind of stores that look like this) where you can buy something unique and a slice of history. When I found the suitcase, I just fell in love :)) To transform it into a table was a spontaneous idea, but I’m still proud of the result :D
Those “messed up” antique stores are some of my favourite places.
Your suitcase table sounds like my kind of project. You should be proud :-)
I think this is a wonderful idea, one I may copy someday :)
You ought to be a part of a contest for one of the finest sites online.
I most certainly will recommend this site!
I think this is very successful. Looks just like the proper ones.
My spouse and I absolutely love your blog and find almost all of your post’s
to be precisely what I’m looking for. can you offer guest writers to write
content in your case? I wouldn’t mind creating a post or elaborating on a few of the subjects you write related to
here. Again, awesome web site!
This is so cool!
You know what?? I like yours better! It’s classic, unassuming and unpretentious. Very well done — I admire your creative and practical brain!! Just started following you and can’t wait to read more! :)
Thanks Bethany :-)
Ok, this idea is so creative! And I really like the look of the final outcome. It doesn’t look at all like a desk lamp and I really like the angular shape that it makes. Great work here and good job putting your imagination and creativity to work. I say, BRAVO!
i think a series of these above my long workbench in my craft room would be great. I can aim them where I need light and they are out of the way and not taking up workspace.
Great idea Tami. These lights look awesome in a row.
Okay, that is so genius. I love that you pulled this off so gorgeously. Well done!
Thank you Sarah :-)
Absolutely genius. Love it. Your instructions are so complete, I actually believe I could do this!
You could totally do this Vanessa!
Great job. I wanted one for the longest time, too. Just so expensive. I did exactly what you did and got creative. By now I’ve done half dozen and many, many for friends. Another option I used to avoid hardwiring was that I put decorative wood panels on either sides of my bed and ran the wires right thru the panels. They look like they’re hardwired into the wall.
Yep, another great option Deb. I bet the panels make them look very custom. Thanks for sharing.
This is brilliant!! I couldn’t justify the cost but if there was something I actually had to have this year, this was it. Thank you for test driving it and making it affordable for all of us. Terrific blog by the way :)
Thanks so much Maria :)
Late to the table, but good on ya. Two years on and we still can’t source swing arm or single arm wall sconces here in Oz! So dang annoying. Having stumbled upon your hack though, I’m thinking “MAYBE”!! Thanks Kristine. Cheers ~ heather
Ha, ha. “Dang annoying” is one way to put it Heather. I actually often wonder about the buying agents for our major retailers. There is such an awesome pool of wholesale products available out of Asia – why the heck don’t they import a container load? Although, I must admit that Kmart is getting it right. Maybe they’ll start selling them soon? We can only hope.
:)
The idea of converting a desk lamp into a wall sconce has been tumbling around in my mind for a while. It’s SO INSPIRING to find someone who did it…and did it well! YAY!! Thanks for the step-by-step so I have the courage to take my idea turn them into reality. Any suggestions on what to look for in a desk lamp??
Thanks Shara Lee.
Hmmm, I guess it depends what style you’re going for. Obviously, you don’t really want it to look like you’ve just stuck a table lamp on the wall as that could come across as a bit immature and novelty-ish (unless you’re after a playful look for a kid’s space). I guess it’s important to pay attention to the overall proportions, and maybe also the shade shape, to ensure it looks “proper” enough once converted.
Hope this helps a bit. Shout out if you have any more questions :)
Kristine
Could this lamp have been hardwired instead? Just wondering cause I’d really like that!
Hi Yam. It certainly could, though I wanted to make this project quick, simple and affordable. Here in Australia it’s also actually illegal to undertake most electrical work without a licensed tradesperson. If you were going to hardwire a sconce I would suggest simply buying an actual wall light, not a desk lamp.
Cheers
I have been wanting to do this with one of my desk lamps for years now and am finally taking the plunge for my son’s nursery. Hooray!!! One question though – how did you get your resin disk off without cutting the wires? Mine has a tiny hole just large enough for the cord and can’t accomodate the switch and plug. Ive tried taking a hacksaw to the weight but it’s taking forever!!! Any thoughts?
Hmmm, as mentioned in the post, my disk was simply held on with a bolt. Once I released the nut it came away. Do you have a pic of yours? Feel free to email me (thepaintedhive@gmail.com).
Thank you! This was very helpful!
any idea where you can currently get a similar lamp in Australia? I checked the link and the only one that was still showing was out of stock :(. Great work btw!!
Hi Lorelle
Just replied to your email then saw this :)
I’m not sure sorry. Will see if I can find anything online when I get home from our weekend trip.
Kristine
I believe that is one of the so much important info for me.
And i am happy reading your article. However should remark on some normal things, The web site
style is wonderful, the articles is in point of fact nice :
D. Just right task, cheers
Thanks for posting this magnificent money-saving idea, it saved me the trouble from buying another wall light fixture. It also helps me reclaim valuable kitchen counter space. I mounted a white desktop gooseneck lamp on the side of my white kitchen cabinet overlooking the sink area (a spot that was in the shade due to poor overhead kitchen light placement).
Oh yay. So glad it helped inspire you :)
What an innovative article is this! I am impressed with your post. You have stated how you have made a desk lamp into a wall light. I love this blog and really happy to come across this exceptionally well written. Thank you very much for posting these innovative ideas.
Its not my first time to go to see this site, i am browsing this site dailly and take good information from here every
day.
Nice post. Loved reading this.
Fabulous👌