
There’s something about the large-scale use of bold patterns which scares me a bit.
I know that probably sounds stupid (I mean, it’s just ‘stuff’ after all) though as a budget-concious DIY decorator with a decidedly fickle streak I think it’s the fear of expending a fair amount of both cash and time on something only to tire of it after five minutes – not to mention the ridiculous dread of getting it just plain wrong in the first place!
I’m sure some of you probably feel the same way, and, like me, wish that maybe you didn’t, because as much as I adore the timeless appeal of my go-to ‘subtles’ there’s no denying the energy and impact a striking pattern can impart. Which is why I decided to step outside my comfort zone with this window treatment project for Charlotte’s room.
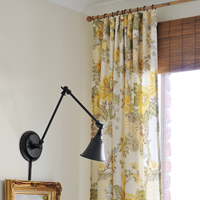
It all started with the Pottery Barn Florian Palampore collection…
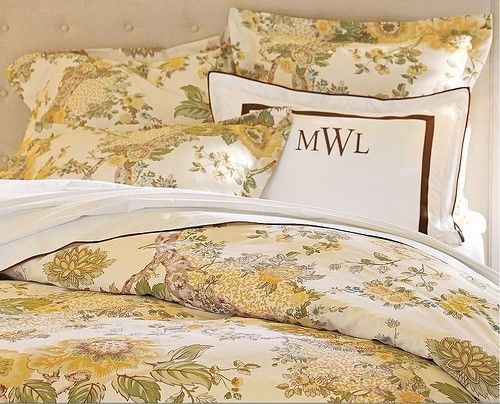
The Florian Palampore range (which included quilt covers, window drapes and shower curtains) is around four years old and now discontinued.
I was smitten!
Despite my instant love however, I never intended using anything from the actual range. You see, aside from the fact it was already discontinued, it was never even sold here in Australia (and even if it had been I’m betting it wouldn’t have been cheap). So, I decided instead to go on one of my relentless (and in no way obsessive :-) quests for something similar. I was concentrating on sourcing affordable vintage sheets which could be repurposed into curtain panels and after a few months of fruitless searching, guess what I just happened to stumble across on eBay? Yup, an actual Florian Palampore queen-sized quilt cover! Squeee!
Although a little more than I was intending to spend, at $80 (plus $20 for international shipping) I couldn’t say no. The best thing was I also discovered that the quilt cover was actually double-sided – same beautiful fabric front and back! – and based on my calculations one side alone was all I needed to create my pair of curtains. Soooo, I really only used half of the quilt cover which means that technically each curtain panel cost me just $20 – and, as a bonus, I have a whole “sheet” of that gorgeous fabric remaining!
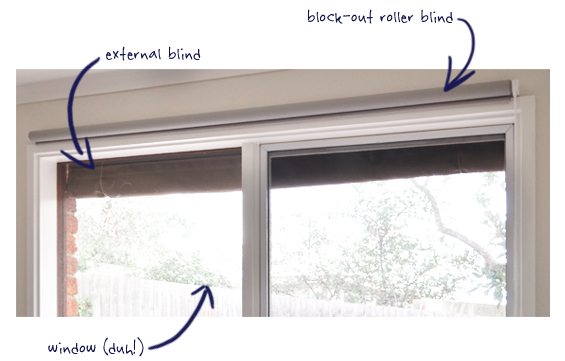
I always intended using the curtains purely for decorative purposes so of course needed something functional to accompany them. I settled on my go-to of an inexpensive block-out roller blind concealed by a faux bamboo roman shade (a pretty yet practical combination I also used in my master bedroom and my parent’s bedroom). Anyhoo, here’s how the whole project went down…
Just as a note, the window I worked with for this project is a standard-sized floor to almost ceiling (180cm wide x 210cm high). There is also an external blind (which you can see in some of the photos) as this is a westerly facing room which can get super hot in summer.

This is what forms the functional component of the window dressing, helping control light (and temperature, to some extent). I like using roller blinds because they are effective, easy to operate, slim and discreet and generally really affordable. I picked-up this basic block-out roller blind (just $20 on sale from Spotlight) and mounted it just above the window frame.
Prices for roller blinds can vary dramatically. For a project like this where the entire thing is concealed, there’s nothing wrong with using a low-end version. I find the basic functionality is completely comparable. Of course, if you don’t have standard sized windows then buying off-the-shelf might not be an option. I considered using a textured roller blind (so I could forgo the bamboo valance) though I couldn’t find any suitable ready-made options and the price for a custom blind was super expensive. I also toyed with the idea of topically covering my cheap roller blind with a textured fabric or wallpaper, though decided against it. Maybe that’s something for a future project.

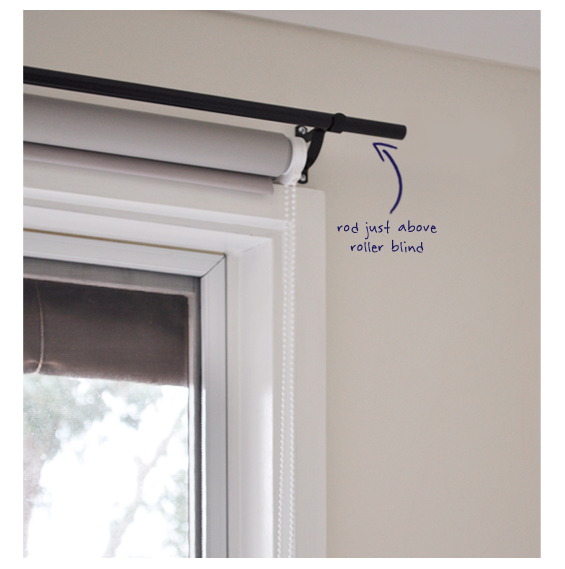
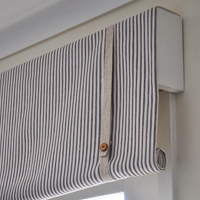
This is really just a valance imitating a bamboo shade. It does double duty by concealing the roller blind and instilling some lovely natural warmth and texture. It also hides the external blind from view when inside the room. To create this valance, I first mounted a basic curtain rod ($10 from Spotlight) just above the roller blind (making certain the brackets were deep enough to comfortably clear it).
I then simply cut an inexpensive matchstick blind ($35 from Bunnings) in half horizontally, removed a few of the “sticks”, re-tied the strings (this is why I needed to remove a few sticks, to give enough slack to re-tie the strings) then wrapped and draped one half over the rod until I was happy with the look.
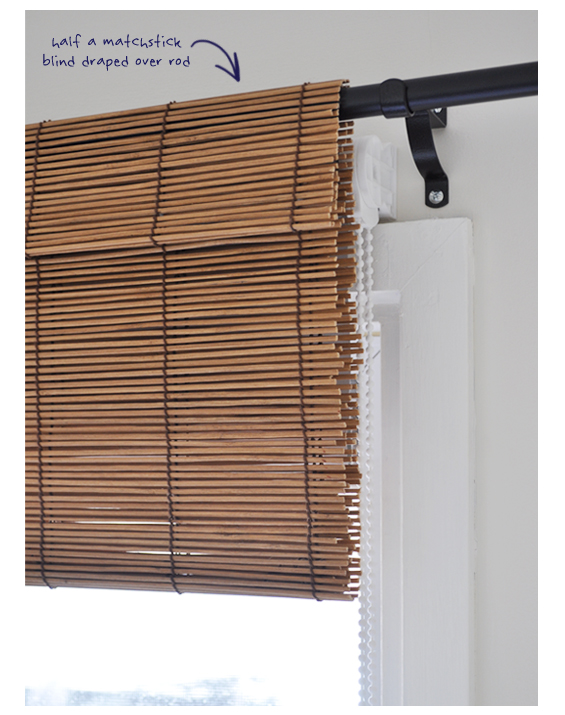
Remember, all the ugly exposed ends will be completely hidden by the curtains.
Note: I played around with using the upper half of the blind complete with the solid length of mounting timber though couldn’t get it to look and work as I wanted. If you plan to use the upper half, I recommend removing the mounting plank.
My valance is merely balancing on the rod though it’s incredibly stable (I’ve had this exact treatment in my master bedroom for over three years and the bamboo has never budged). You could use some clear string or thin wire to secure it if you like.
Here you can see how the block-out blind is lowered behind the valance without disturbing it in the least.
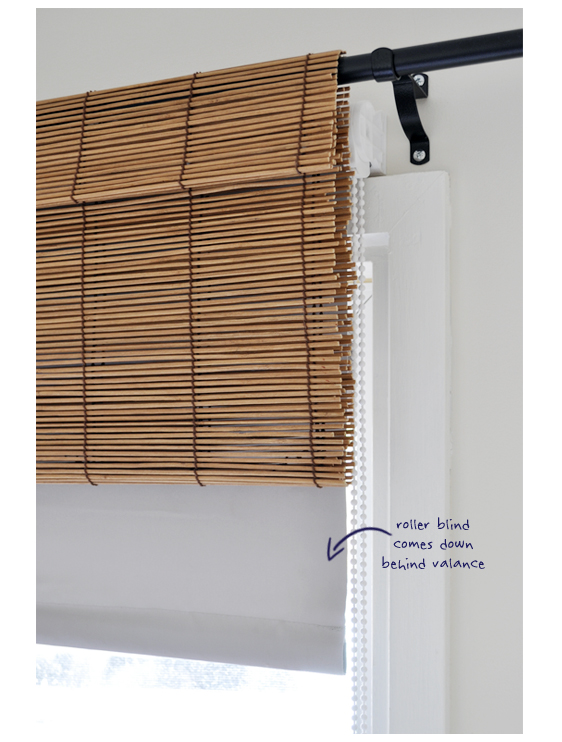
The above pic shows the blind only partially lowered for photographic purposes. Obviously it can be lowered all the way to the floor.
You might be wondering why I didn’t just forgo the roller blind and valance and use a real bamboo shade in their place. This does seem to make sense though I needed something with block-out capabilities and most bamboo shades are merely light filtering. This limited my options somewhat, though more than that, given the width of my window a bamboo block-out blind would have been extremely heavy to operate (and using two, with alternate string sides, would have required customisation – pricey). Charlotte likes opening her blind in the mornings and simply wouldn’t have been able to lift a big timber one. Also, they are pretty expensive. The cheapest ones I came across were more than double the price of my combined roller and valance alternative!

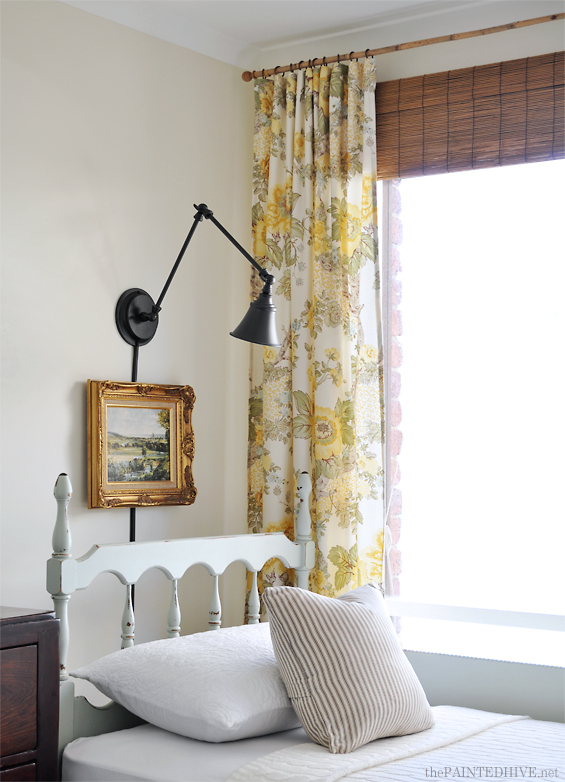
These lovely, bold botanical drapes are the real statement component of this window dressing. From a cosmetic perspective they add pretty vibrance whilst concealing the ends of the valance and plastic cord of the roller. From a functional perspective, although they are essentially “dummy drapes”, they help filter excess light which creeps in from the sides of the roller, making the room even darker (and they can be closed too if need be).
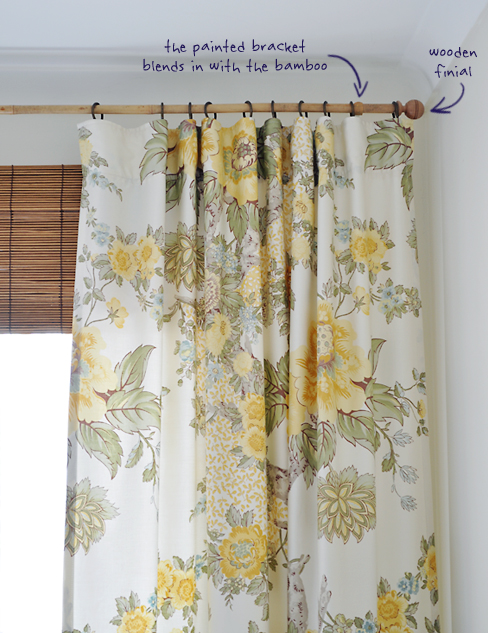
From the beginning I had envisioned using a natural bamboo pole though unfortunately I couldn’t find a long enough one which didn’t taper down considerably (like, to pencil thinness) at one end. I eventually decided to simply cut two bamboo poles in half then connect the fatter ends together (bamboo poles are super cheap from hardware stores and garden centers). To join the halves I pumped some clear expanding glue into each natural hollow then inserted a 50cm length of dowel and forced the ends together – it’s important to use a relatively long dowel to give the joint structural integrity otherwise it may bow. This created one long, strong pole with a nice even girth and because I had cut and connected both ends at the point of a node the join is invisible. I mounted my pole quite close to the ceiling on basic cream brackets deep enough to clear the valance. For a finishing touch I added some small timber finials ($4 each from eBay – the ones I used are no longer available sorry though drawer knobs are a good alternative) and painted the visible ends of the brackets to co-ordinate with the bamboo pole.
To transform my quilt cover into two curtain panels I first trimmed off the end section (where the buttons and holes were) then separated the front and back to give me two clean “sheets” of fabric (as mentioned above, one sheet was all I needed for both of my drapes so I simply set one aside for use in future projects – awesome!).
I then hemmed the top and checked the length only to discover they were marginally short. Not to worry though. I had anticipated this and already pre-planned to add some simple natural linen I already owned as lengthening base trim if need be. This is not only an easy fix though also provides a nice bespoke detail. I simply added the trim during the remaining hemming process.
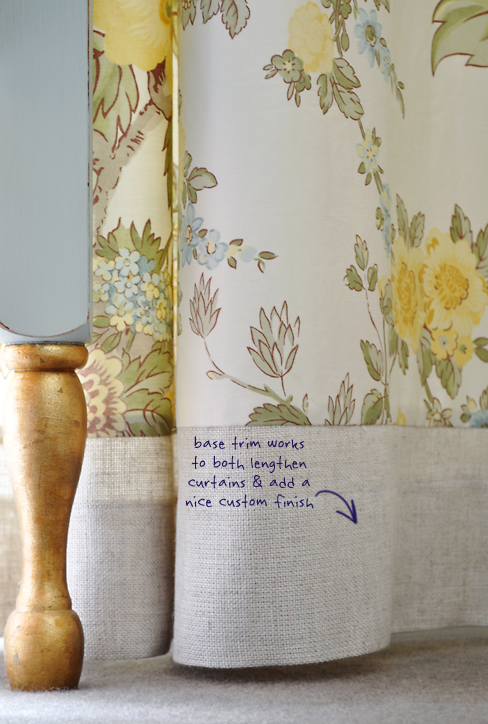
In this pic the base looks a little wonky though it’s just the camera angle and wave of the curtain. It was kinda hard to photograph given it’s practically behind the bed!
For the heading I defied convention (that is, my convention) by doing something that was slightly conventional (say what?). I used actual proper curtain gathering tape and hooks (super cheap from IKEA) and antique bronze rings ($15 for twenty on sale from Spotlight).
Gathering tape is more commonly associated with tailored pleats though can also be used to form the more casual ripples I went with. I sewed my tape on though you could simply use fusible webbing.
I love the soft, relaxed waves and the finish is so professional.

You might be wondering why I didn’t just use block-out drapes and forgo the roller blind and bamboo valance? Well, I don’t really love the way block-out drapes hang. I find their fall can be a bit too stiff, heavy and ‘fat’, flanging considerably at the base. For windows with plenty of wall at either side this can be okay, though in this case they would have encroached on the actual glass, blocking some of the natural light and making the window appear smaller. Also, I don’t find opening and closing high-up, heavy drapes the most practical of options, especially in this instance where a bed impedes access – it’s much easier to simply reach over and pull the roller cord. In addition, I do like the look of layered window treatments.
I’m kinda smitten with the happy vibe the sunny botanical print is imparting and am taking my husband’s call of “70’s caravan curtains” as some weird sort of compliment.
Of course, whilst in this instance I re-purposed a quilt cover, you can use just about anything made of appropriately proportioned fabric; flat sheets, tablecloths and drop cloths being just three options. And remember, the size doesn’t need to be perfect. Adding some co-ordinating trim at the base, head, or even somewhere mid-way, is easy and effective.
Anyhoo, Charlotte’s room is really close to complete now! I just need to finalise bedding and artwork, build some custom storage boxes and add some fun, whimsical touches – looking forward to ticking this one off!
![]()
COST BREAKDOWN
Roller Blind – $20
Bamboo Valance (including rod & brackets) – $35
Bamboo Pole (including brackets, rings and finials) – $30
Curtain Panels (including tape and hooks) – $50
TOTAL
$135
I know this doesn’t sound super cheap, though compared to buying something similar the price is pretty great.


This is beautiful and so clever. I just love how you DIY so much in your projects. The room is coming together so lovely.
Just adorable. That fabric is knock-out!!!
love that layered look! i love those happy colors in that sunshine!
Gorgeous. I love the print and I love the roller shade idea too. Very clever.
Simply gorgeous! You have such amazing taste and great style!!!
Thanks Brandi. You always leave the nicest comments :-)
The curtains turned out beautiful. They really finish off the bedroom and your ideas are fabulous
These are gorgeous. I love your ideas and quality of posts. Now I’m ashamed that I spent $200 on some generic curtains from West Elm!
Pfft, if you ever find perfect stuff that’s ready-made off-the-shelf then go for it I say! Can save lots of heart-ache and indecision.
:-)
This is so, so smart. I love the layered look, but I don’t love the black out abilities (or lack thereof) of bamboo blinds. I’m definitely stealing this idea for you when I finally get around to adding curtains to my bedroom (talk about lack of light blocking).
Thanks Julia.
Whilst most bamboo blinds don’t come with black-out capabilities I did come across a few which had black-out backing. I decided to stick with the roller and valance option though because the window I was working on is so wide and tall and a black-out bamboo blind would have been impractically heavy – plus it was just much cheaper to use the roller and valance. If your windows aren’t particularly big you could consider looking for some black-out bamboo blinds maybe.
Kristine
Charming. The entire ensemble MAKES the room.
Another fantastic project! Your tutorials are the best. I am considering adding similar shadecloth external blinds to our windows for the Melbourne summer – is it something you can recommend?
Thanks Etta.
If you have trouble with excess heat from the hot summer sun then I can recommend external blinds. We only have this one and it really does seem to make a difference (it’s also great on extra icy winter nights for keeping the cold out – especially considering Charlotte’s bed is right by the window).
Ours isn’t shadecloth though. We have this one (https://www.masters.com.au/product/900019112/filigree-roll-up-outdoor-shade-slate-180-x-210cm) from Masters.
Only thing is, it can get a bit tiresome opening and closing it all the time because the brackets which secure it down are a little fiddly. Though that’s probably just me being lazy ;-)
Hope this helps.
Kristine
Thank u for the link to Masters Kristine, I would not have thought to shop for blinds there!
No probs. I think this particular one is actually even cheaper now than when I bought ours more than a year ago! Still, you might want to shop around to check out all the different options.
Hi,
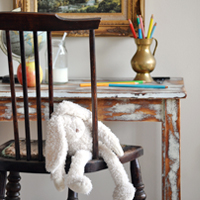
Where is the single wooden bed frame from in the last photo – Im looking for something similar for my place.
best,
Joy
Hi Joy
It was an eBay find I have refinished. I’m yet to share the project on my blog though it was actually originally two single beds I joined to create one sitter style bed.
If you search second-hand classifieds/markets you should be able to find something similar. Colonial style furniture is pretty prevalent and can be picked up super cheap. You just might need a bit of vision as it can look plain ugly and dated at first glance.
Kristine
Thanks so much! I can’t wait to see your project on it. I love your blog by the way :)
/Joy
Love the 70’s caravan curtains. They look fabulous. And the multi-layering gives a lovely feel. I like what you have done with the bamboo shade and rod, great ideas. I might have to steal those.
I used quilt covers I bought from the very special bin at Spotlight to make my great-nieces and nephew tee pees for last Christmas. It’s a really economical way to get large pieces of fabric.
http://www.libbyslifestyle.com/2013/11/how-to-make-tee-pee-finally.html
Thanks Libby.
Those tee pees look great, and you’re so right, quilt covers (especially when on sale) are such a great alternative to bolt fabric. I’ve been meaning to make a tee pee for Charlotte. You may just have motivated me to actually get it done before Christmas this year!
Kristine
The kids just loved their tee pees, Kristine. They are easy sewing. The biggest challenge is the amount of fabric to deal with at the machine. I got the quilt covers for very little, I think $15 maybe. So cheap compared to buying a ready made tee pee. My great-nephew refused to sleep in his bed for a few nights. He and the cat shared the tee pee.
This made me smile…I did the very same thing! Loved the same fabric immediately, found the duvet on ebay, and made myself some dining room drapes with it. It’s such a nice and cheap way to get a full look (versus skimpy) because of the wide width of fabric. Love your daughter’s room and have been contemplating copying your wall light idea, also!
He, he, great minds. Your comment made me smile!
looks lovely! using real bamboo for your rods was a great idea!
Thanks Jessica :-)
It looks beautiful, I am thinking of doing the faux blind with a roller behind for my kitchen window, so that I can have a pretty fabric at the top and out of the way, and just put the blind down at night – sometimes. I love the fabric – and just realised that I have seen it from the Country farm house blog in her main bathroom as a shower/bath curtain fabric. She used a light fresh blue which also looks beautiful. I think you have made this have a very tailored and beautifully classic look.
Thanks Rebecca.
I love the look of pretty fabric window treatments in kitchens. They can add such a nice softness and hint of pattern. And, if you make something basic and removable, you could create a few and switch them around from time to time.
I actually have the A Country Farmhouse bathroom pic pinned to one of my boards. I didn’t realise it was the same print until after I actually bought mine! Love her style.
Beautiful! I wish that was my bedroom :) Just maybe with a bigger bed hehe!
He, he, yep, it might be a bit cosy in there!
Thanks Khristine.
Really beautiful design! The bamboo blind is really cool! Thanks for the post!
Hi Kristine,
I have a couple of interior decorating friends who I’m sure will enjoy your site. I will send them to have a nosey.
Damian
Genius, Genius, Genius !!!
Great ideas & such simple yet thorough description/instruction – even I can follow(!)
Thank you.
The combination of 2 curtain styles together makes the space stand out. I like so much.