
Just in case you’re wondering…yep, this is a re-post of my project from last year.
I wanted to share it again, a little earlier on in November this time around, to give everyone a better chance of getting it completed before December 1st.
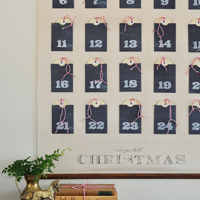
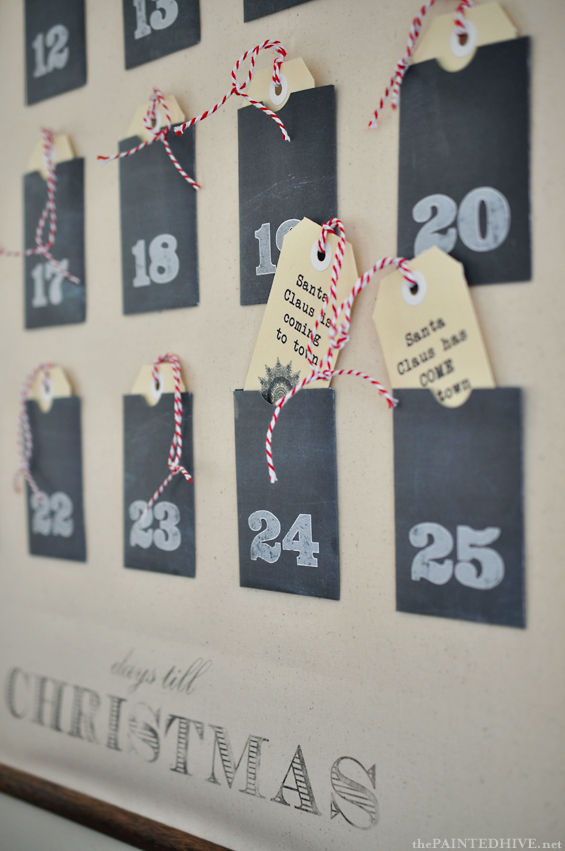
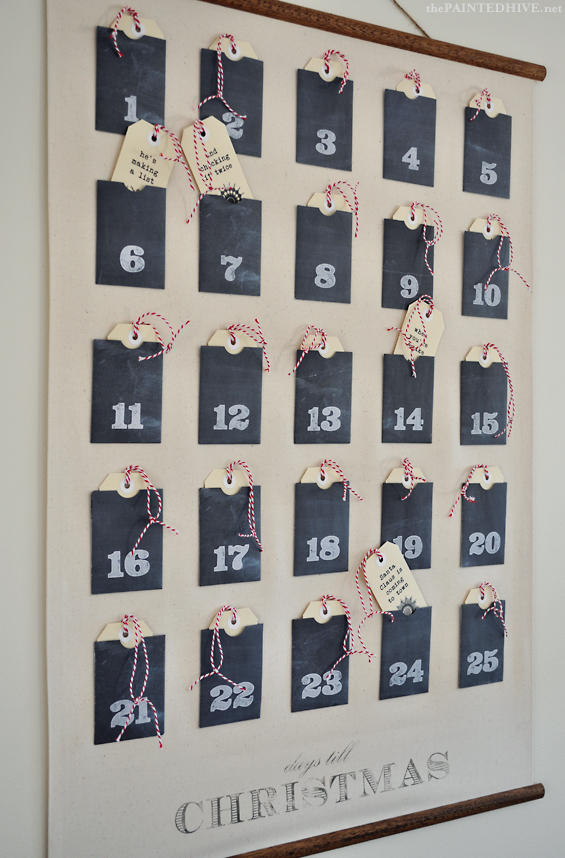
I love Christmas. It’s my favourite time of year. So, it seemed only fitting that my advent calendar should bring together a few more of my most fave things; wall charts, chalkboards, typography and bakers twine!
The countdown to Christmas day isn’t something I’ve given much thought to since childhood, though now with little kids of my own, it’s once again a time to celebrate. My vision is for this advent ritual to become a special family tradition which builds fond future memories (for myself, hubby and the kids).
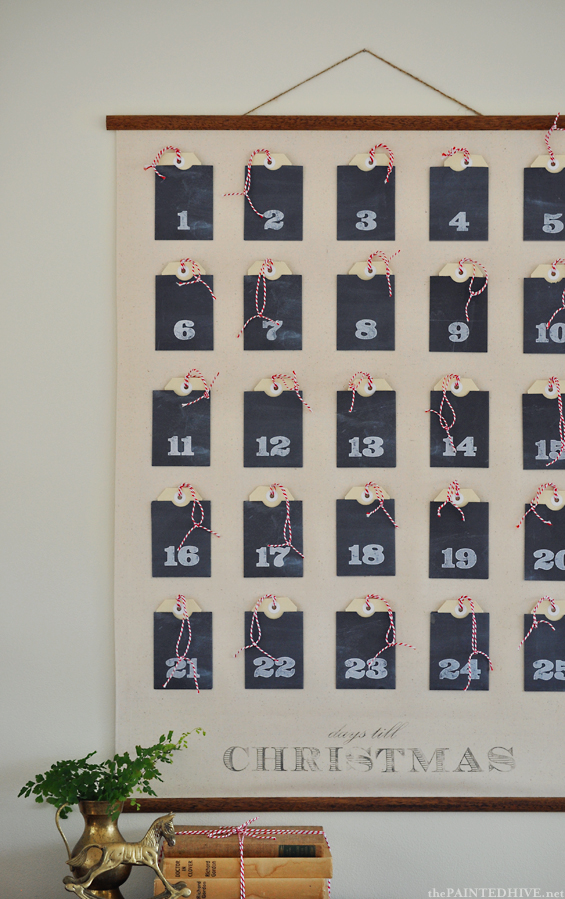
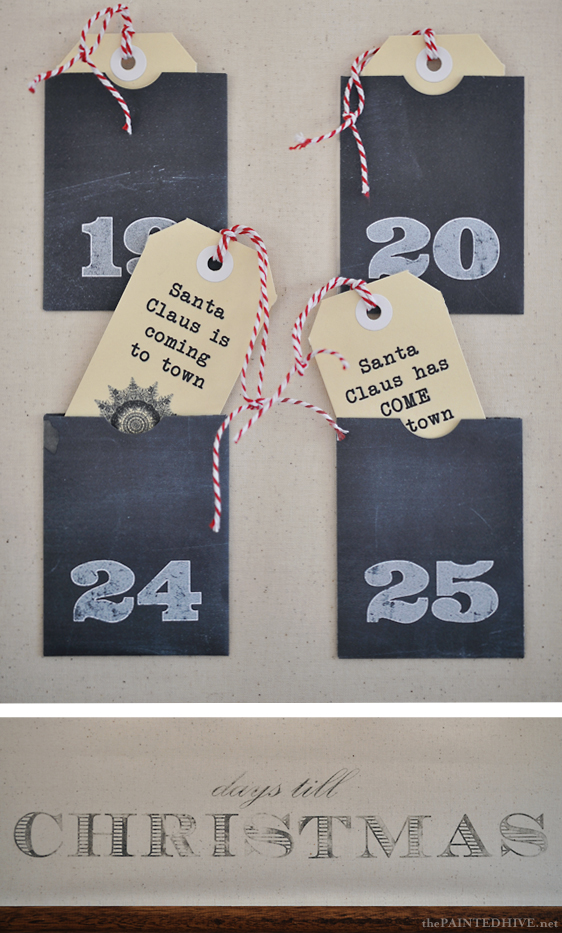
This calendar was part-inspired by the old-fashioned borrowing system used at my primary school library (where there was a wall of modified envelopes filled with laminated borrowing cards) and features faux chalkboard date pockets which each hold a cute little shipping tag ready to be hung on the tree. The tags are adorned with a decorative snowflake and lyrics from ‘Santa Claus is Coming to Town’.
I really love the look of this calendar – it’s big, eye-catching, vintage-esque and gives just a subtle nod to the festive season – and am already kinda lamenting having to eventually take it down :( Though, thanks to its re-usable nature, I’m also looking forward to hanging it again next year!
This project is really easy, super affordable and completely rewarding (oh, and kinda awesome too :-). It’s also a project the kids can help with, and…there’s still plenty of time to have it complete before the start of December!
You will need…
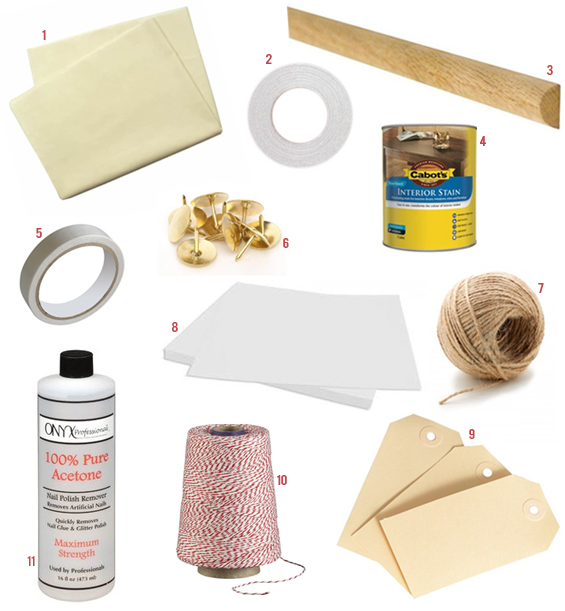
1 Fabric. I used lined (backed) seeded calico (from Spotlight). Of course you could use almost anything. I chose the calico because it had a lovely organic look and a nice medium weight (due to the backing). Plus, at only $5 a meter (on sale) it was also super affordable.
2 Hemming tape. Obviously, this is to hem the fabric. You could choose to sew the hems, use fabric grade double sided tape or fabric glue.
3 Timber trim. I used 18mm (3/4″) half dowel.
4 Timber stain. I used water-based interior stain in Walnut.
5 Double sided tape.
6 Thumb tacks or upholstery pins.
7 Hanging string. I used twine.
8 Paper. I used good quality photo paper though you could simply use standard copier paper. Light cardstock would also be good.
9 Shipping tags. I used 108mm x 54mm (4 1/4″ x 2 1/8″) tags (from Officeworks). I wanted the simplicity of traditional buff though you can find them in lots of pretty colours. Red would be nice.
10 Bakers twine. I used traditional red and white (from eBay) though you can buy it in lots of colours.
11 Acetone. For transferring the chart title onto the fabric. There are quite a few different mediums you can use for fabric transfers (Citrasolv and Artist Gel Medium being two popular ones). I found the acetone worked really well for me.
You will also need these completely free printables (click to view and download)…
Chalkboard Tag Pockets
Shipping Tag Template & Graphics
Calendar Chart Title
Free for personal use only.
Republication, reproduction or redistribution in any form is forbidden.
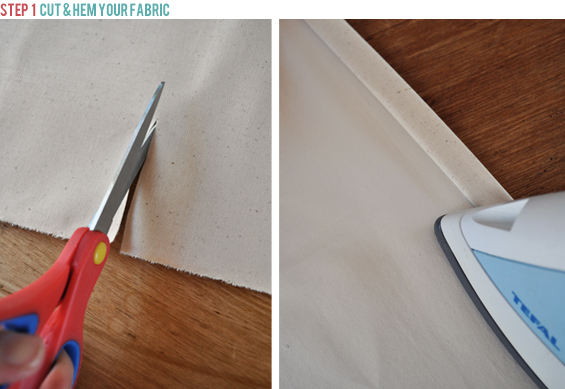
STEP 1 Cut and hem your fabric.
Cut your fabric into a rectangle measuring approximately 950mm x 650mm (1 yard x 25″) then hem all four sides. As mentioned in the supplies section, I used iron bond hemming tape to fuse my hems though you could sew them, or adhere them with fabric grade double sided tape or fabric glue.
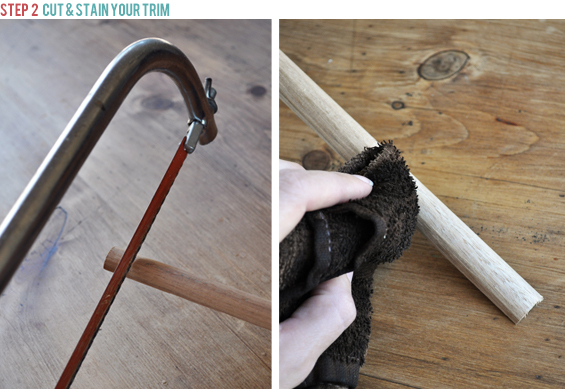
STEP 2 Cut and stain your trim.
Cut your timber trim so it overhangs the fabric by around 15mm (1/2″) at each end. If necessary, lightly sand it then tint with timber stain.
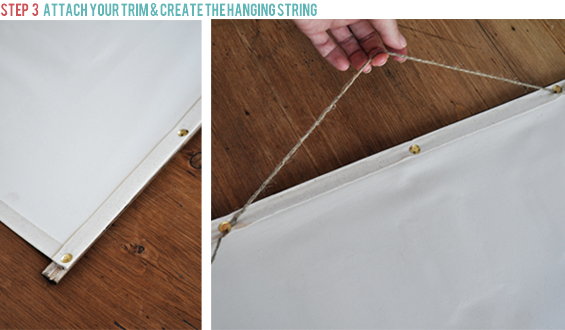
STEP 3 Attach your trim and create the hanging string.
Run strips of double sided tape along the rear of your trim, lay the pieces in place on your fabric then press down firmly. Flip the fabric over and push in five thumb tacks along each length of trim to secure them in position. At one end, create the hanging string by winding some twine around two thumb tack stems prior to pushing them in completely. Depending on the density of your timber trim and/or the strength of your fingers, you may need to tap the tacks in with a hammer (or, in my case, the flat end of a logistically convenient meat mallet!).
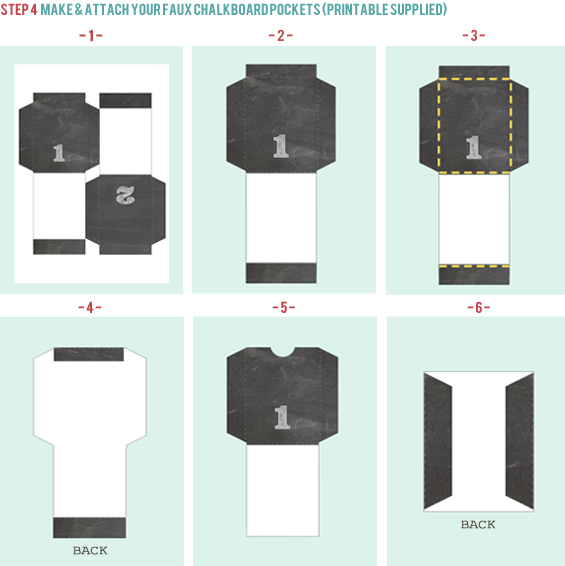
STEP 4 Make and attach your faux chalkboard pockets (printable supplied).
How to assemble a pocket (visual guide above):
1 Print out page one of the ‘Chalkboard Tag Pockets‘ printable.
2 Cut around the outline for the number ‘1’ pocket.
3 Fold along the dotted lines. Take care to fold a smidgen inside/outside (as applicable) the lines so they aren’t visible on the finished pocket.
4 Use double sided tape to secure the top and bottom ends first (these ends are both doubled-over to hide any white paper and reinforce the pocket opening).
5 Punch (or cut) a semi-circle in the top of the pocket front. This isn’t essential, I just think it looks nice.
6 Fold up the back and use double sided tape to secure the rear flaps.
Once all 25 pockets are assembled, lay them out in position on your fabric then attach them using double sided tape. I just eyed this process though you could measure and mark.
NOTE: Double sided tape works fantastically for this project. It holds the pockets perfectly in place though can be easily peeled off the fabric if required. This is great if you need to reposition a pocket. It’s also handy if you want to remove the pockets for storage purposes – simply peel them off and stack them with a square of grease proof baking paper in between each layer. And, if in a few years time the pockets need updating, you can also easily and super cheaply create a whole new batch!
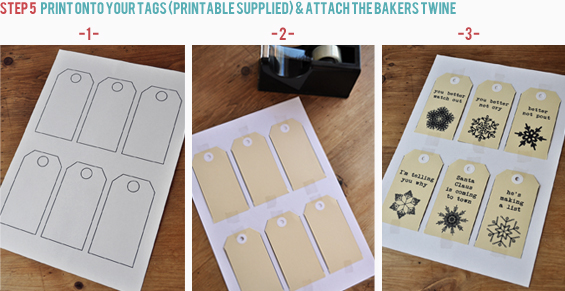
STEP 5 Print onto your tags (printable supplied) and attach the bakers twine.
How to create the tags (visual guide above):
1 Print out a copy of the shipping tag template (page one of the ‘Shipping Tag Template and Graphics‘ printable). Remember, this template uses 108mm x 54mm (4 1/4″ x 2 1/8″) tags.
2 Place a tag over each tag outline and secure temporarily in place with low tack tape. If your tape is too sticky it could tear the tags when you remove it so if necessary dull the tack by pressing on a cloth.
3 Insert the sheet complete with tags into your printer as per usual and print page two (remember, page one is the template) of the ‘Shipping Tag Template and Graphics‘ printable onto the tags.
4 Repeat with the remaining four pages until you have printed onto all 25 tags. When printing the 25th tag you need only tape one tag over the top center outline of the template.
5 Carefully peel off the tape.
6 Thread each tag with a bakers twine loop then insert into the date pockets.

I chose to adorn my tags with decorative snowflakes and the lyrics from ‘Santa Claus is Coming to Town’ for something whimsical and light-hearted.
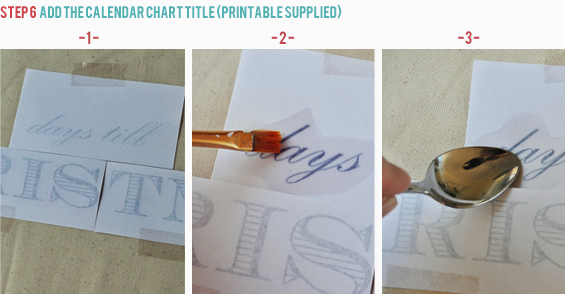
STEP 6 Add the calendar chart title (printable supplied).
How to transfer onto fabric (visual guide above):
1 Print out the ‘Calendar Chart Title‘ using a laser printer or have it copied using a laser photocopier (inkjet will not work for this process) then cut out each line of text (it has been fragmented because it is larger than one standard letter sized sheet of paper) and reassemble it in position right side down on your chart. Secure temporarily in place with tape.
2 Working in small sections, brush on some acetone.
3 Whilst still damp use a hard smooth implement (such as a spoon) to burnish the text, transferring it from the paper to the fabric. Lift the corner of the paper from time to time to check the transference progress.

This transfer method creates faded, distressed, aged looking graphics, which is just what I wanted for this project. It also leaves no visible residue so post washing isn’t required.
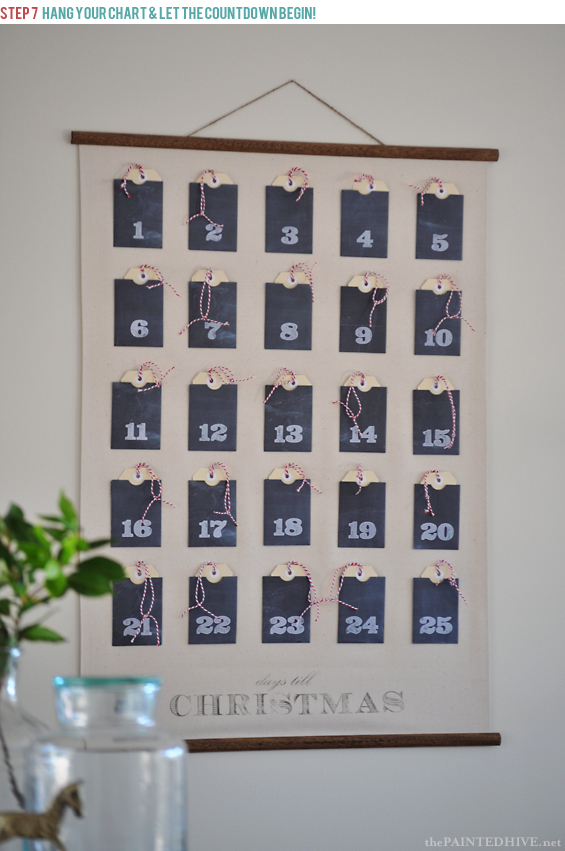
STEP 7 Hang your chart and let the countdown begin!
On each day of December leading up to Christmas take a tag from the corresponding date pocket and hang it on your tree. I couldn’t resist sneaking in a few random sweets too and I’m also going to include a simple activity every third day (such as ‘write a letter to Santa’ or ‘choose a toy to donate’). Of course you could fill the pockets with whatever you like!
There are so many ways you can tweak this project to really make it your own. And whilst I know super fast crafty projects are all the rage right now, occasionally it’s nice to take a little more time to create something that’s just that bit special (not that this particular project is overly labor intensive).
Hope it helps inspire!
![]()
Chalkboard Tag Pockets
Shipping Tag Template & Graphics
Calendar Chart Title
Free for personal use only.
Republication, reproduction or redistribution in any form is forbidden.


It looks amazing! Love how it has such a vintage look. I am inspired to try making one. Thanks!
I remember this! Definitely worth resharing. It’s such a pretty advent calendar. Sharing!
Thanks Corinna.
So cute! Thanks for sharing :)
Thanks Nikki.
I love the distressed typography that ends up; and those little tags are amazing, my sister has this great tree wall sticker which would look amazing decorated with hand made stuff like this around it! – I might have to surprise her by doing just that hehe
I love this just as much as I did when you posted it last year… maybe even more than last year :) I just have a question. I was wondering how you stored this while you weren’t using it. I would be worried rolling it up.
Thanks Khristine.
It is actually hanging up on a little adhesive hook attached to the back of our laundry room door. It’s out of sight and out of reach for the little hands in the household!
Love it! In Fact I really like all your ideas. You explain very well and interestingly.
awesome idea