
A few months back my mum mentioned she was looking for a new bedside lamp to grace the guest room at her beach house.
Well, actually, that’s not entirely accurate. When I say “looking for” I really mean “dreaming up”, and when I say “new” I really mean “not new at all” because, like me, she has the same weird can’t-leave-well-enough-alone-or-just-buy-stuff-from-a-store-like-most-regular-people disease.
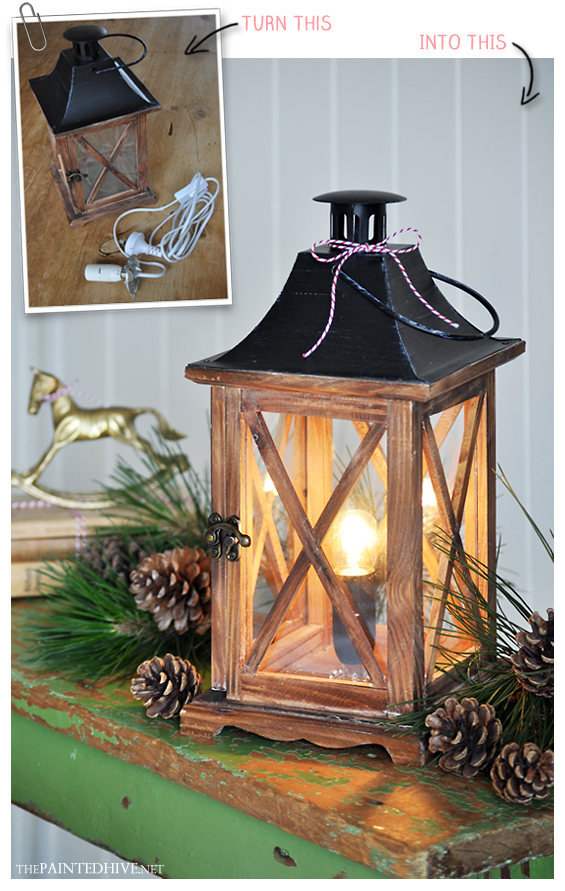
Anyways, her plan was to simply combine two elements she already owned; an inexpensive lantern and a complete lamp cord. Yep, two basic items anyone can get their hands on!
And when I say “simply combine” I really do mean just that! Truly ruly, this is one of the easiest DIY lamps ever. It’s also super affordable, completely one-off and the possibilities are almost endless! Oh, and did I mention the absence of any wiring?
You only need three ingredients…

LANTERN
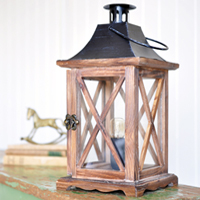
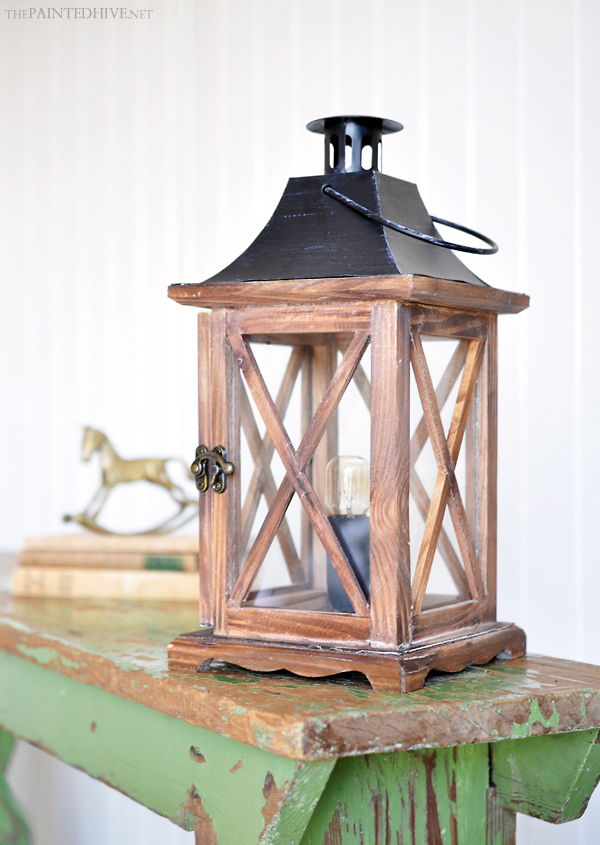
We used a rustic wooden lantern that was found at a discount variety store a few years ago for just $8. Although we used a lantern you could use almost anything with an appropriate form (as long as it’s safe to use as a lamp – remember, some light bulbs can get pretty hot). I’m liking the idea of a cute wooden birdhouse!
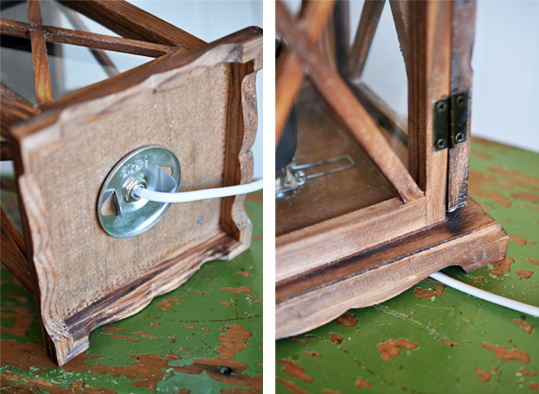
If possible, use something with a raised base to allow space for the socket flange and to provide a feed for the cord (demonstrative photos below). Of course, if you can’t find something raised, you could always add your own little feet/apron or consider the option of hollowing out certain areas (if possible).
LAMP CORD
Did you know you can buy wire-free DIY lamp cords? Whilst we used a cord from an old Ikea MYLONIT lamp (this was a really cheap self-assemble lamp with a complete cord which was entirely independent of the actual lamp form – now discontinued) Ikea still sells super affordable similar lamps with all-in-one cords which would work just as well for a project like this (check out the LATER, KVARNA and KAJUTA).
Note: As an alternative to the Ikea lamp cords, you could try a plug-in pendant cord though they can be pretty pricey (up to $60) and may not be as well suited for this type of use. I know there are lots of really affordable lamp kits available in the US (and I’ve also just discovered you can actually buy separate cord sets from US Ikea stores) though I think due to legalities they are pretty much non-existent here in Australia. I found using the Ikea lamps to be the best option.
LIGHT BULB
We used a little 15 watt pilot bulb (available at supermarkets or hardware stores) which, for whatever reason, I think compliments the subtle nautical style of the lantern. It’s low wattage also emits just the right amount of warm light given it’s shining through clear glass. Of course, you could get fancy with a more decorative filament bulb or use a traditional candle-shaped one.
To convert the lantern into a lamp…
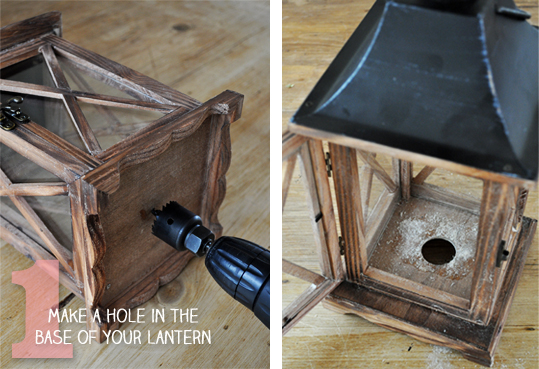
ONE Make a hole in the base of your lantern.
This needs to be large enough to accommodate the socket, though not so large that the flange fits through (refer to diagram below). The flange needs to be ‘caught’ by the underside of the lantern so the socket can be properly secured.
In the case of our old Ikea spring-loaded lamp cord, we had a little room for error in terms of hole size as the circumference of the flange was quite a bit larger than that of the socket. The newer Ikea lamp cords however require a little more precision as the difference in size between the flange and socket isn’t as generous…
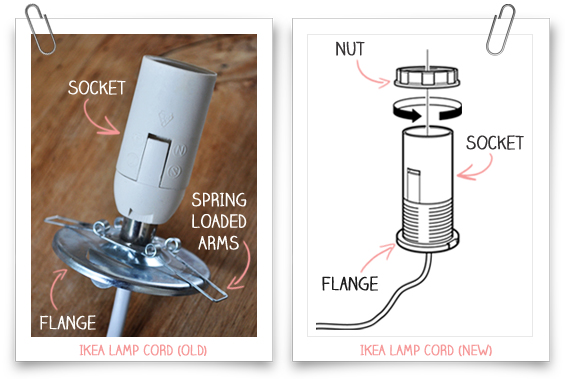
That said, for greater ease or to correct any oh-oh-I-made-the-hole-too-big mistakes, you could always use a washer to fake a larger base area.
To create our hole we used a hole saw bit (as can be seen above) though there are lots of ways to go about it. A spade bit (if you have a large enough one) or a multi-tool are just two alternatives.
Note: These methods for creating the hole should work for metal too – as long as the cutting bits are good quality and sharp. Getting through might just take a little longer.

TWO Paint the socket sleeve (thanks for being my hand model mum!).
This just helps disguise the plastic look of it. We went with basic matte black, though you could opt for a trendy colour pop or faux metal finish. You could also choose to conceal the sleeve once in place – I contemplated wrapping it in twine, fine rope or even a sleeve of metallic card, though decided it wasn’t really necessary. I actually quite like the simplicity of it.
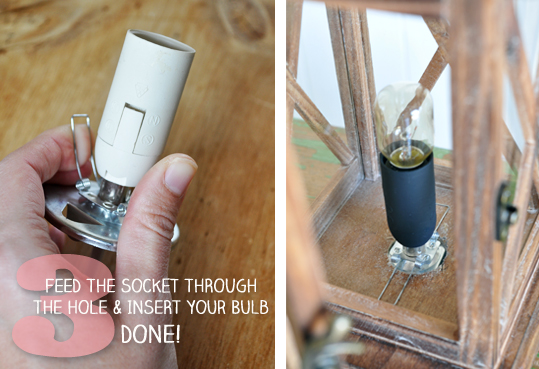
THREE Feed the socket through the hole and insert your bulb – DONE!
Obviously I took the above demonstrative spring arm photo before I painted the socket sleeve!
In our case, this meant squeezing up the spring-loaded arms and inserting the socket from the underside before allowing the arms to snap back, securing the socket in place. If you are using one of the newer Ikea lamp cords, this would simply involve inserting the socket from the underside then screwing down the plastic nut to sandwich the base of the lantern. Essentially, the nut and spring arms serve the same anchoring purpose.
And it really is as simple as that!
Mum now has a totally unique lamp to both compliment and illuminate her beach house guest room – and all for less than $15 and in under fifteen minutes!
I tested the lamp at night and was immediately smitten with its warm glow and shadow cast. The decorative x’s cut the light quite boldly and produce, what is to me, quite an enchanting ambiance.
Below you can see what I mean about the lantern needing some sort of raised base or hollow. There has to be space to accommodate the socket flange and somewhere for the cord to feed out or the whole thing won’t sit level.
As nice as it is to use lanterns with actual candles, this is just a bit of a quirky take which makes for a unique lamp and provides easy one-click radiance.
I know this isn’t really a Christmas project though given the time of year I thought I’d style it a bit festively.
Since creating this lamp I’ve found my eyes lingering longer over every lantern (slash hollow object) I come across. Do you ever do that too? Get so excited about the possibilities of a project that you just want to make more and more for no good reason? Fortunately stuff like this can make pretty cute one-of-a-kind gifts!
Hope everyone’s Christmas preps are going well :-)
![]()


superbe lampe
quelle bonne idée
bonne journée
Thanks Elise.
:-)
What a GREAT idea! Love this.
Blessings,
Beth
You can buy the plug-in pendant cords in Australia. I Love Lights sell them.. Great tutorial again, you give me courage to try new things! Love the lantern.
Thanks Etta.
What a great site – they have some beautiful stuff.
Yep, as mentioned in the post, you could use a plug-in pendant cord instead (which are available from a few places here in Oz) though they are generally pretty pricey – the I Love Lights ones are almost $70, the Ikea lamps are all under $10. I guess because the pendant cords are designed to be a feature unto themselves though in this type of application they would be practically invisible. Also, the lamp cords are designed to be, well, lamp cords, whereas the pendant cords are designed to hang. Having not used them before I’m not certain how easily they would transfer to use as a lamp.
In the US you can get really cheap lamp kits and complete cords which, as far as I can tell, we don’t sell here :(
Kristine
Kristine, thanks for the tip about the lamp cord. I’ve been wanting to do some lamp making, but my partner is an electrician who won’t let me fiddle with anything electrical. On top of that, he is often away from home working so is rarely here to help. So, now I can do it myself! Yay!
Oh great Libby!
Of course these all-in-one cords aren’t suited to every application though can be used in lots of instances. They open the door to some great little re-purposing projects.
Kristine
LOVE this !! PINNED ..Christine from Little Brags
Absolutely fabulous!
Let’s see if Tara thinks so too!
Lesley
xx
He, he :-)
Thanks Lesley.
As always; a fabulous blog post. :)
Thanks so much Julie.
:-)
I just saw that you were featured in the best of the blogosphere on Censational Girl. You’re a star!
Ha, thanks Julie. Kate is so generous to share projects the way she does. Helps us little guys get out there a bit more.
You are awesome. This is such a great tutorial and a really inspiring project.
Thanks for the info about the lamp cords. I have tried to find them here in Australia many times and they just aren’t available. Such a shame we have to buy a lamp just to get one!!! C’mon Australia.
I love your lantern remake!!! Featuring you tomorrow. XO, Aimee – ItsOverflowing.com
Oh wow, cool! Thanks Aimee.
That looks great!! Such a good idea!
Thanks so much Khristine.
“The Painted Hive” has been included in our A Sunday Drive for this week. Be assured that we hope this helps to point even more new visitors in your direction.
http://asthecrackerheadcrumbles.blogspot.com/2014/12/a-sunday-drive_21.html
I love how rustic this looks! What a great idea. I would never have thought of this myself. Thanks for the inspiration!
I have a lantern just like this but with a battery light in it, I wonder if I can convert that into a plugin like this!
I’ll also need to stain it just like yours, love the color!
I’d love it if you’d come link up with me and my 4 blogging friends at Talented Tuesday Link Party on my blog!
I LOVE this!! I have an old lantern I bought at a yard sale last year that’s just sitting in our storage. I need to go to IKEA to pick up a few other things and I’ll have to get a cord too! Thanks for sharing with us at Talented Tuesdays; I hope you join us again next week.
Thanks Sydney. Yes, drag that old lantern of yours out of storage, slap a cord in it and put it on show! Thanks for hosting :-)
I must say I have never seen this idea, I just saw this on Pinterest. Such a wonderful idea!
Thanks Judy :)
Lovely, this would be a great thing to make on a rainy day.
where did you buy the lantern? Where I live, I only see “metal” lanterns. I love the wooden body and metal roof.
Hi Patricia. I just came across it in a homewares/gift store one day. If you Google “wooden lantern” you should find quite a few that you can buy online.
Kristine
I have been looking for bedside table lamps exactly like this! Have not found any! Does anyone make/sale electric lantern lamps? I’m needing dark brown/beige combo.
Thanks!
Hi there
Hmmm, to be honest, I’m not really sure if you can buy ready made lamps in this form. I have some seen some metal ones, though nothing made of wood. That said, you could always paint something which didn’t have the finish you were after. Failing that, why not have a go at converting a lantern like I did in the tutorial?
Kristine
I’ve looked everywhere, in store and on line for a flange like the one you show. Where did you get yours?
The light fitting I used was taken from an old IKEA light. They have some really affordable lights which you can easily disassemble to get the fitting out.
I only have a phone I was looking on I do not have a computer so I do not know where the enter button would be.
On a phone you can use the return icon :)
I bet your mum will love her new bedside lamp Kristine! Lovely idea! 👌
Hi there! We truly enjoy your site and would be absolutely delighted if you could feature Pedalisa Art. It’s a unique opportunity for your followers to experience something creative, hands-on, and culturally rich.
At Pedalisa Art, we host inspiring mosaic Turkish lamp workshops where guests can design and craft their very own glowing Turkish mosaic lamp in just 2.5 hours—no experience necessary! It’s the perfect mix of fun, relaxation, and artistic expression.
As a bonus, we’re offering a special discount for first-time visitors! Whether you’re looking for a unique date idea, a group activity, or a memorable solo experience, this workshop is a fantastic choice.
Find your nearest location and book your spot today—we can’t wait to welcome you!
Learn more at: http://www.pedalisaart.com.