
Ever since spying a collection of antique-style typographic signs in a boutique homewares store a few years back my love for their understated appeal has done nothing but blossom.
It seems the charm of these simple yet striking pieces also isn’t lost on others, as over the last few months I’ve been seeing them more and more.
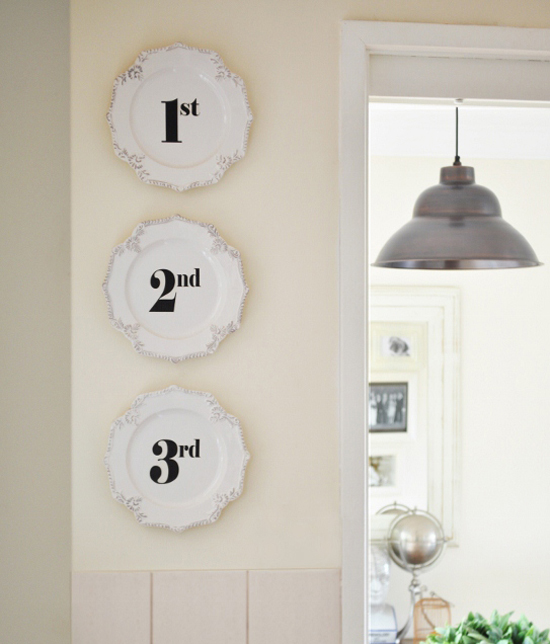
I was particularly smitten with these over-scale book page quotes I came across on Pinterest a couple of weeks ago…
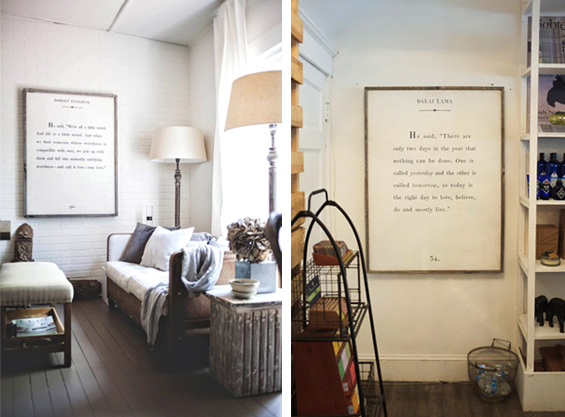
Fable & Flame | Unknown
And although I don’t have a good spot for something quite like that right now, it settled it.
Enough was enough already.
I needed a typographic sign in my life.
Stat.
However with prices averaging in the hundreds I also needed to come up with an affordable (and easy!) DIY alternative.
Well, here it is…
OPENING NOTE
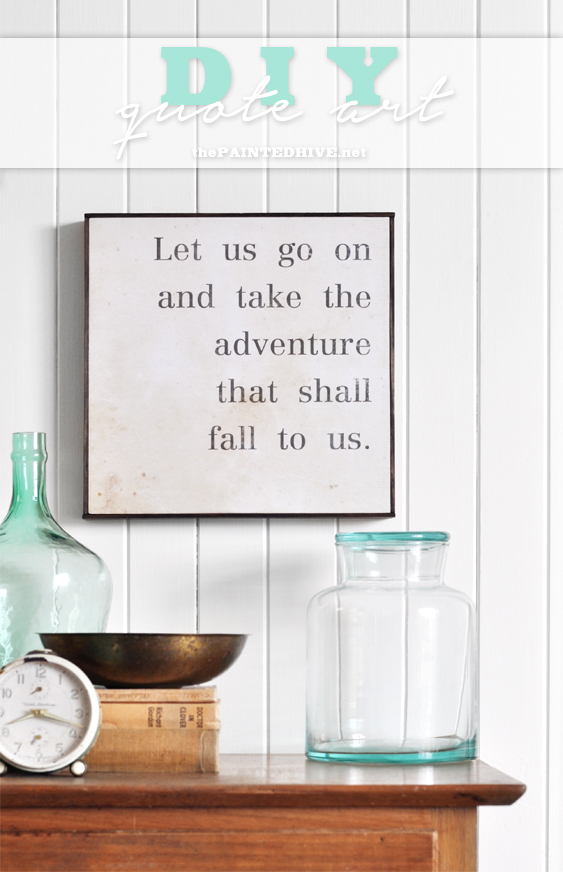
Although I created a relatively small (around 29cm/11″ square) sign with quite a “clean” design my basic process can be applied to a work of pretty much any size and style.
The affordable nature of the materials used means that even large-scale artworks can be created at very economical prices. My sign cost around $4 as I was thrifty and used timber off-cuts I already had though would have cost closer to $15 if I had bought everything new – still super cheap! I’ve done the math and a large-scale (say 100cm x 140cm/40″ x 55″) sign should come in at under $60 if you’re savvy. I can’t wait to find a decent excuse to make one!

1 Design and print artwork.
This is the fun bit!
Decide on your words, and a rough size for your sign, then play around with formats and fonts in a graphic editing or word processing program.
I like the idea of creating a digital “artwork” and using a print, as opposed to hand lettering the sign, because it’s just so dang quick and easy and anyone can produce a professional result – no real artistic ability (or patience!) required. It removes any room for error too and is especially handy if you plan to use lots of words. Imagine having to hand letter something really long with a heap of little text.
Anyhoo, your design can take any form you like. Here are just a few some examples…
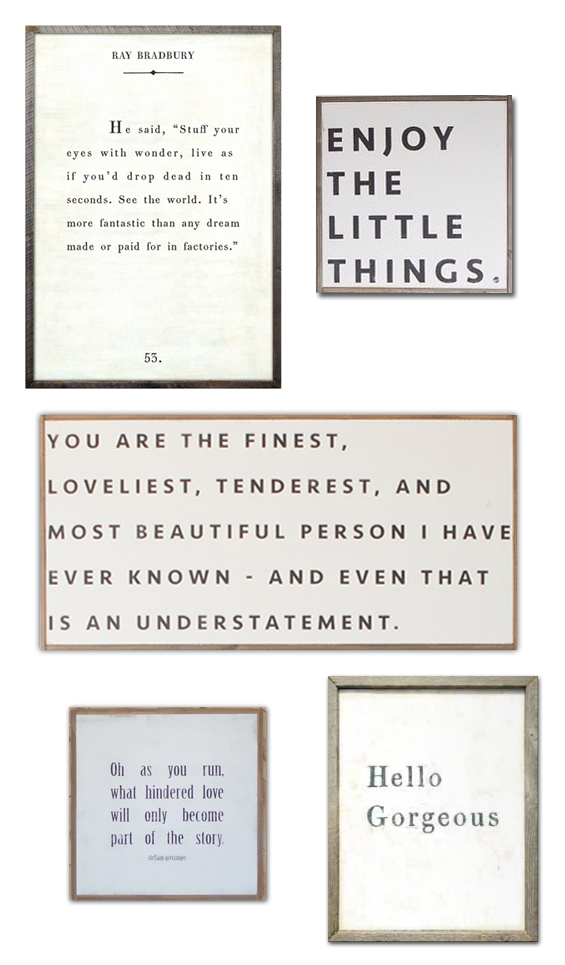
Above signs from Sugarboo Designs and House of Belonging.
If you’d like to use my art, there is a download link towards the end of this post.
Although you can design your artwork using a basic processing program (such as Word) I personally prefer a purpose editor (like Photoshop), especially for large prints. They just provide more flexibility and give you greater control. If you don’t have a purpose program, GIMP is a great free alternative to try out.
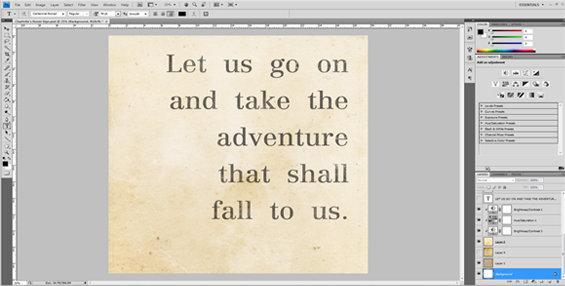
I designed my artwork using Photoshop.
Note: If you do use a word processing program, remember to customise your paper size as required. For Word the maximum page dimensions are 56cm/22″ square (this can be set in the Page Setup properties). Ensure you save your work as a PDF for printing purposes and up-scaling potential. If you decide to use a purpose graphics program though are a little unfamiliar with the software, feel free to refer to my three part in-depth Printables series to learn more about setting-up and and printing your artwork for optimal results.
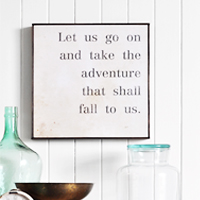
I created an image to fit on an A3 (Ledger/Tabloid) sized sheet of paper (for printing purposes, be mindful of standard paper sizes when designing your sign). The font is Centennial Roman and the stoic words are taken from the novel ‘The Lion, The Witch and The Wardrobe’ by CS Lewis – love! I digitally distressed my text a little using some grungy eraser brushes though you could take to your printed sign manually with some sandpaper – and other implements – to achieve a time-worn look. My overall design is relatively sleek as I wanted it to have a clean and bold, almost modern, feel to contrast with the prettiness of Charlotte’s room (where it will eventually live) though you can go as rustic as you like. As mentioned above, just play around with different formats and fonts.
This is entirely optional, though – because I’m lazy – I also used a free high resolution aged paper digital background (you can easily find numerous of these via a Google search). Ordinarily, I would simply apply this antique effect myself post-printing using a tea stain or tinted sealer (or similar).
Note: If you plan on creating a large-scale sign, you may find that most digital backgrounds simply aren’t large enough. Try searching for “large scale paper texture” or “high resolution paper texture” in order to find something suitable. Depending on the size of your sign even a large-scale texture may need to be further enlarged. Just be mindful that over-enlarging can result in quality loss (bluriness, pixelation, etc.). If you can’t find a large enough digital texture you like, you can play around with creating the effect yourself in your editing program using colour overlays, texture filters, grunge brushes, and so on.
If you’d like to save yourself some cash by using a black and white print service, as opposed to colour, though would still like the yellow aged look, you will have to apply the effect yourself. It’s not difficult though you do need to be mindful that any moisture applied (through a tea stain or tinted sealer, etc.) may cause the paper to wave and/or the ink to bleed.
If you have the capacity to print your image at home then feel free. I had my image professionally printed for just $2 through Officeworks via their online service. I selected “Document Printing” over “Photo Printing” and “Poster Printing” because it’s cheaper though the quality is still really great (your choice of services may be limited depending on the out-put size of your image). I chose 200gsm white bond matte paper. This is a slightly thicker upgrade on the standard paper and for 30 cents is totally worth it.
Note: If you’re looking to have a large-scale sign printed, simply check out some online print shops to get an idea of sizes and prices. If you’re in Australia Officeworks offers full colour BO (100cm x 140cm) prints from $47.
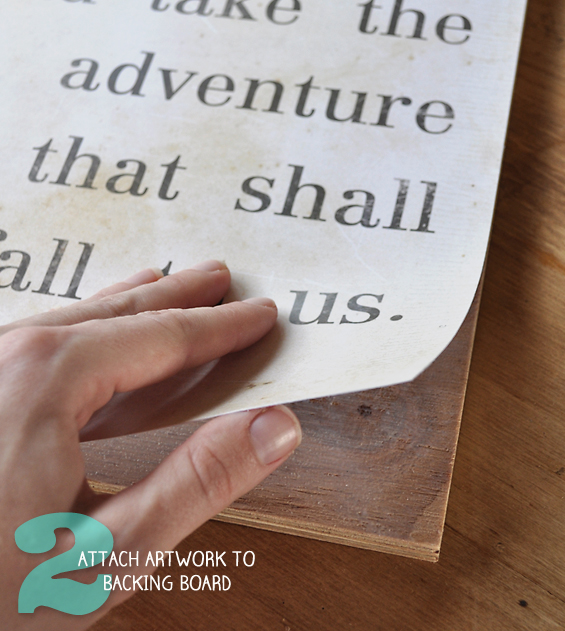
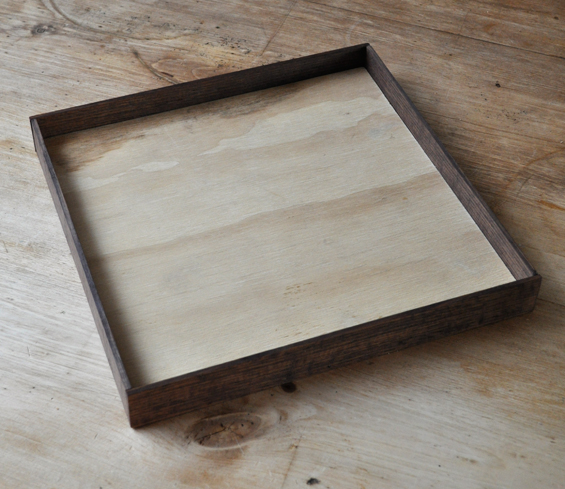
2 Attach artwork to backing board.
You can use anything thick-ish and rigid as a backing board (it needs to be relatively thick because, for ease, the frame is attached directly to it – see following step). I used a 12mm/1/2″ deep plywood off-cut I already had which I simply trimmed to size using our drop saw.
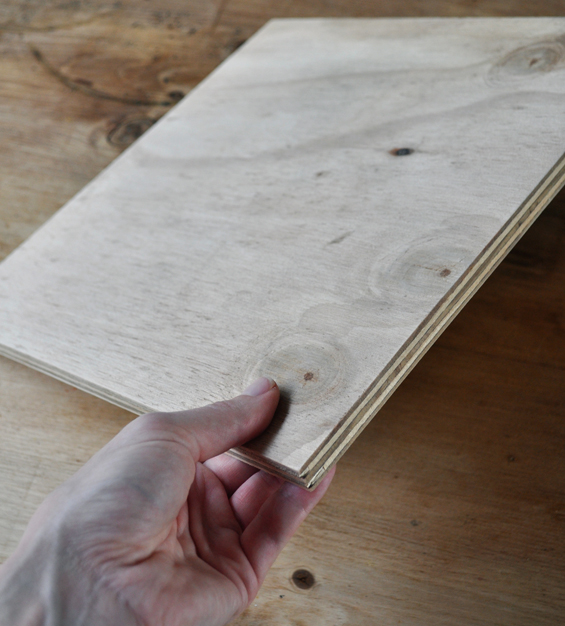
I used plywood as a backing board.
If you’re not confident with cutting wood, your local hardware store will probably do it for you. Otherwise, use something which is already appropriately sized, like an inexpensive stretched canvas. Of course, if you do use something which can’t be trimmed, purchase it first and then design your artwork to fit.
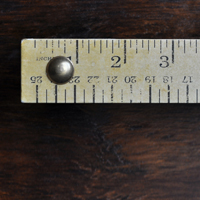
I cut my print using a steel ruler and craft knife to fit perfectly on top of my plywood backing board.
I then brushed some Mod Podge (you can use anything sticky, even double sided tape) onto the ply and pressed my print into place.
Ensure the edges, in particular, are well adhered. You might even want to spread some additional glue over them.
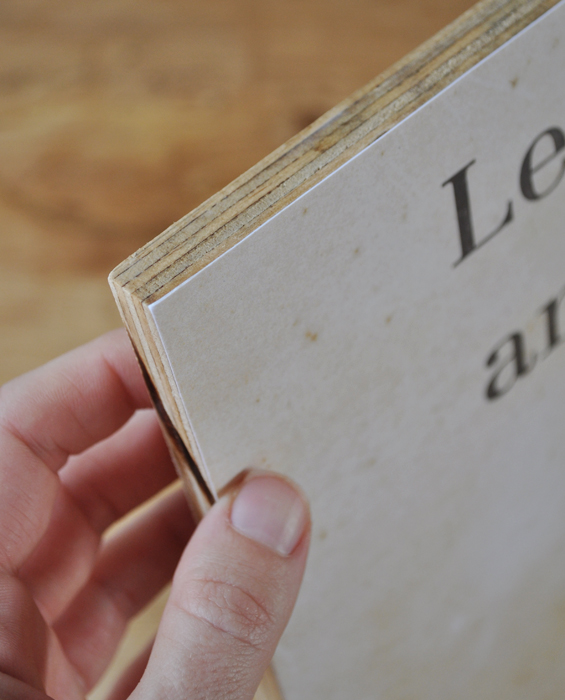
I made sure my edges were neat and well adhered.
The paper might bubble a little due to the moisture in the glue. Don’t stress. Any waves should dry out.
You could stop at this step and leave your sign as is for a plaque-like finish. Maybe just paint or stain the edges of the wood.
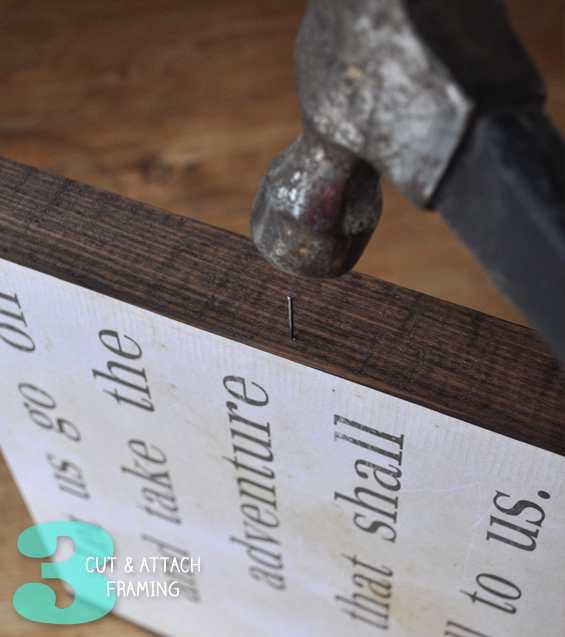
3 Cut and attach framing.
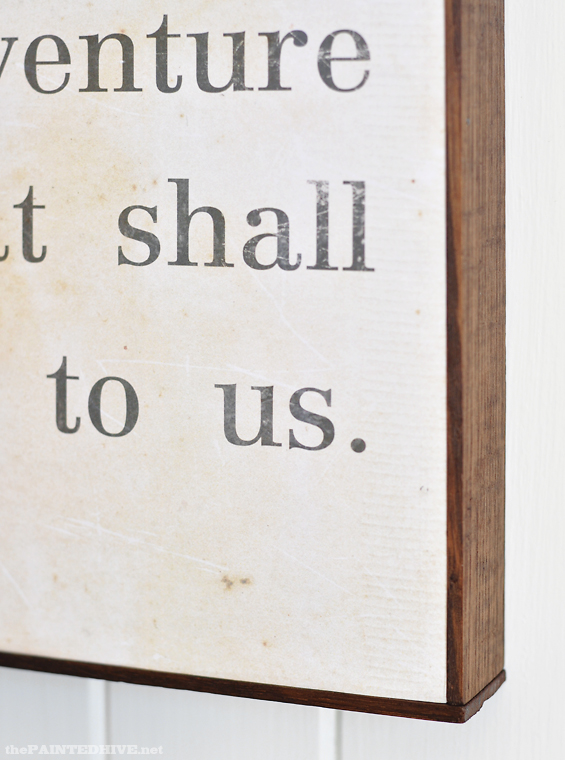
To give my sign that hand-made custom feel I created my own frame. It was cheap and easy though if you can find an affordable frame you like, you can certainly use it instead. Just remember, you don’t need any glass (so for Step 2 attach your print directly to the provided frame backing).
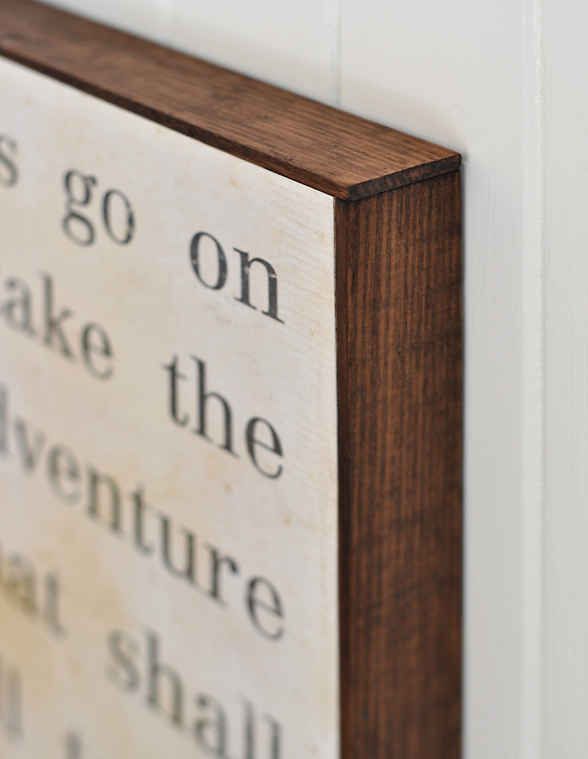
I used a length of 3mm x 38mm/1/8″ x 1 1/2″ square pine trim (which was an off-cut I already had) to frame my artwork. It’s probably a little thinner than ideal, though is still totally fine. I decided to butt, rather than mitre, the corners as I felt the simplicity of the join is more in-keeping with the primitive feel of the sign (as a bonus, butt corners are much easier anyway as mitres can be a little finicky). I simply cut my trim to size, gave it a light sand then hit it with two coats of walnut stain.
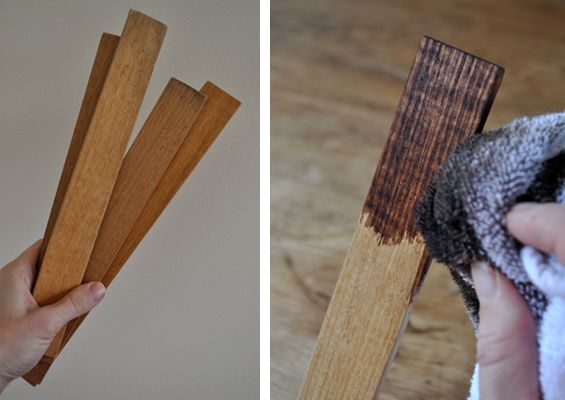
I stained my framing trim to give it some extra richness.
Note: My framing trim came from an off-cut I already had and was slightly worn and weathered. Using reclaimed wood to frame this style of sign is very common so before you head to the store, see if you can get your hands on some cheap (or free!) second-hand lengths.
To attach the trim, I applied a sparing bead of wood glue along the side of the plywood, smeared it with my finger to ensure it was smooth and even, positioned a piece of trim on top then drilled a very fine pilot hole through (I drilled my hole in the center of the length of trim, though toward the front, as shown in the below pic, to ensure I caught the ply). I then hammered in a little finishing nail, ensuring the head was slightly counter-sunk (you can use a punch to achieve this if needed).
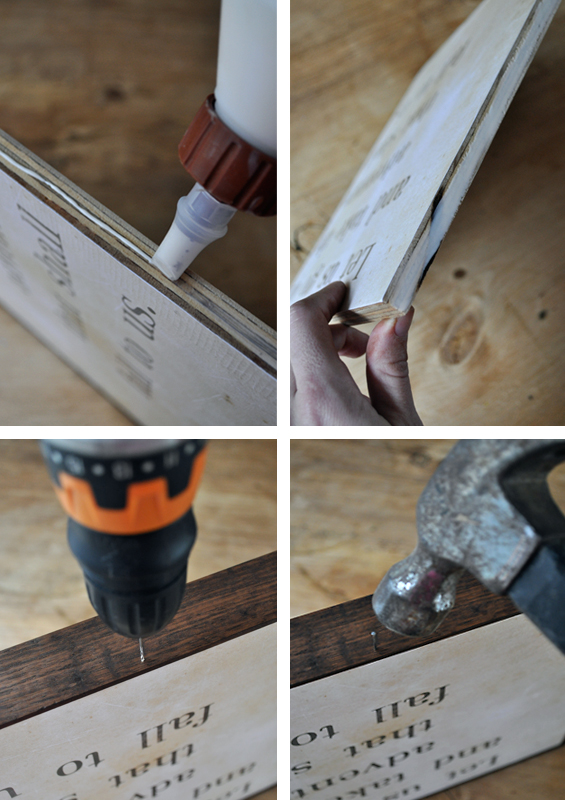
I glued and nailed each piece of framing trim in place.
Tip: You don’t need to drill a pilot hole though I personally always find it easier. When creating the pilot hole, ensure you use a drill bit one size smaller than your nail and don’t drill the entire nail length. You only need to create a guide as you want the nail itself to bite into the wood to ensure a good hold.
Although finishing nails are very inconspicuous, if, like me, your nails are silver, you can fill their small divots with tinted putty or simply colour the heads with a marker.
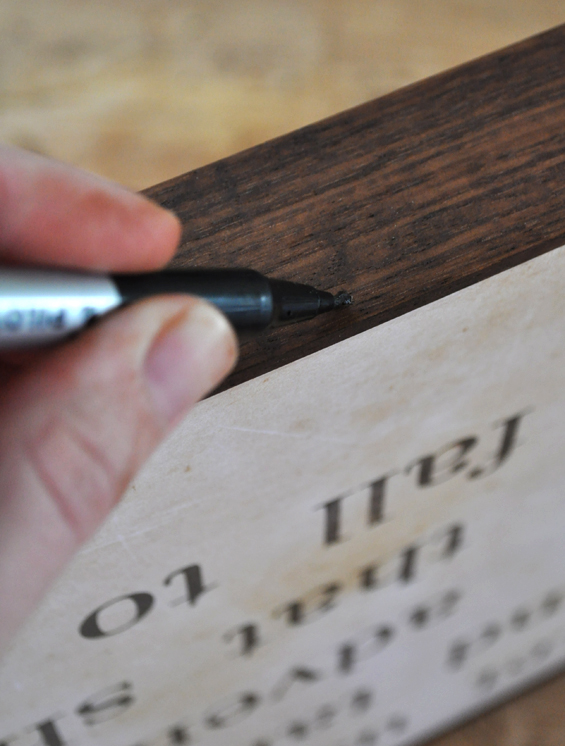
You can disguise any nail heads by colouring them with a black marker.
Note: I decided to use a nail and glue combo because I figured it was the fastest and easiest fastening method. If you don’t like the idea of using nails, you can glue and clamp your framing trim. It just means a longer build-time as you need to allow for glue curing.
I wasn’t sure if one nail would be enough to hold my trim flush along its entire length though it worked perfectly. Of course, if your sign is larger or if your trim is warped, you will require more nails or some form of clamping until the glue is dry.
Above you can see the butt jointed corners. In hindsight, I probably should have made the side pieces the full length ones. Meh.
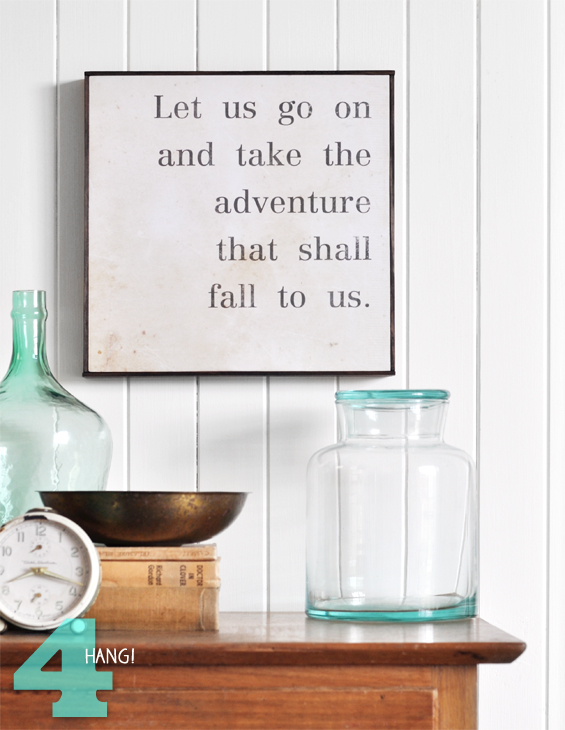
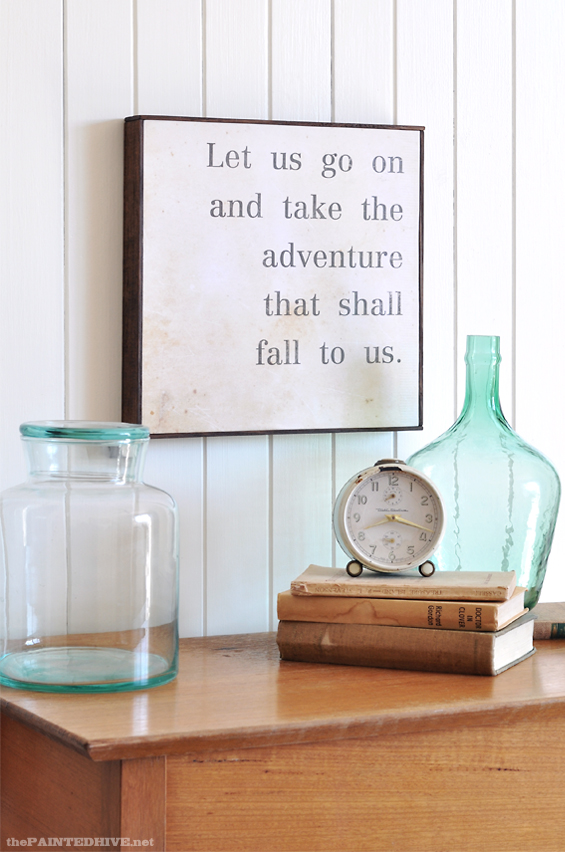
4 Hang!
Because the frame trim is much deeper than the plywood backing it protrudes by quite a lot.
Above you can see the recessed back.
This makes it super easy to hang the sign straight from the top length of frame on two appropriately positioned nails. You could also choose to add some string and hang it wall chart style.
And here is your free printable! Simply click the below image to view and download.
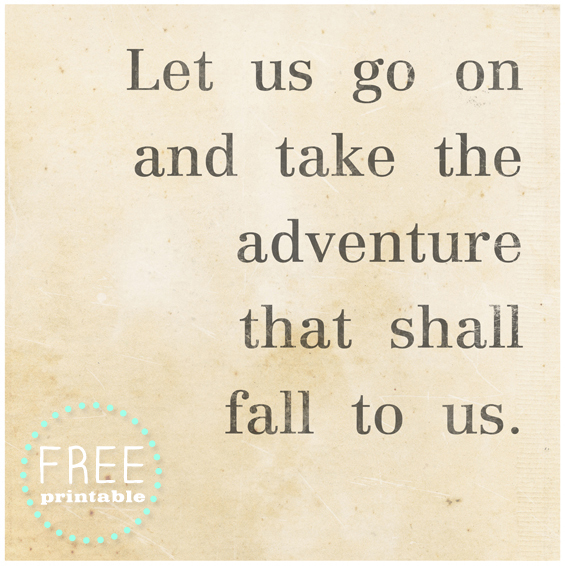
29cm x 29cm/11″ x 11″ at 300 DPI.
Designed to fit standard A3 (Ledger/Tabloid) sized paper.
Can be enlarged or reduced by around 50% with great quality retention.
Making these signs is kind of addictive. They are just so easy and the possibilities are almost endless. Unfortunately, I don’t really have a need for any more signs like this right now though do think they would make an awesome gift. Imagine creating something with a meaningful message just for the recipient – how special. Not only would it be thoughtful and personal, though also hand-crafted with love.
And, despite my need (or lack there of) for any further signs, due to their addictive nature I am looking forward to creating more free printables along this vein. Is this something you guys might like? I would love to be able to offer some large-scale ones, similar to those in my first two inspiration pics above.
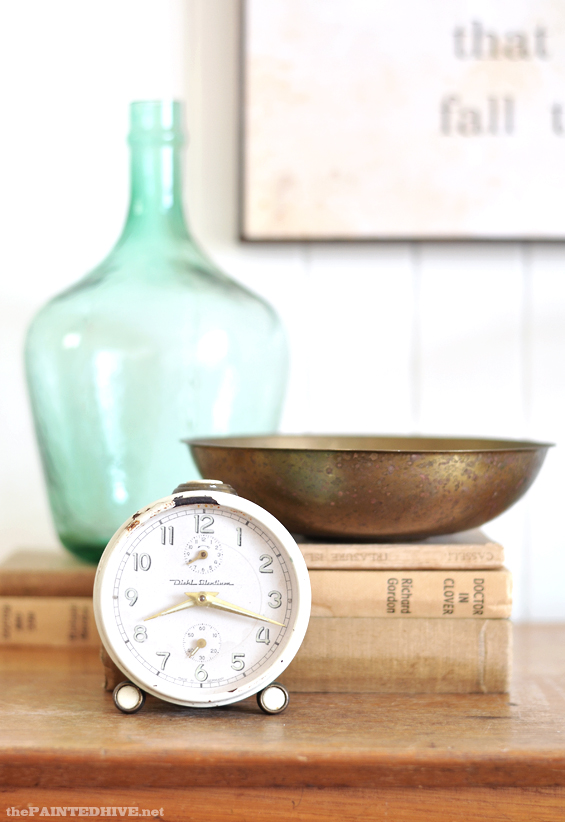
This sign of mine will replace the rather grown-up landscape which currently hangs above Charlotte’s bed. Although she can’t read it for herself yet, I have told her what it says and means and where it’s from. Her eyes lit up. Love that!
![]()
Free printable for personal, non-commercial use only.
Republication, reproduction or redistribution in any form is forbidden.


You are so awesome. I have been trying to come to terms with the fact I can’t afford to buy these signs which all seem to b in the US anyway. I have lousy hand writing and never thought I’d be able to make one. With this tutorial I so can. YAY!!!!! Love your sign too. Very simple and lovely.
Thanks Treagan :) Glad my post has helped inspire you.
Just gorgeous as always. Your photos and styling are impeccable.
Thank you for the thorough tut. I really appreciate the time and effort you put into explaining your projects. I know not everyone needs ALL the how to info though I am someone who does so I am thankful.
H
Ha, ha just snuck over from your IG in case the post was up and here it is. Stunning and lovely.
Thanks you so much for the printable I LUV it!!!!
And…OH YES! I would love some more free printables like this. The large book quotey ones would be cool.
Thanks Amanda. I’ll see what I can do :)
Stunning!
Every time I go to IKEA I consider their huge RIBBA frame, but have yet to bite the bullet. Which I’m grateful for now as this style is so much nicer and your clear instructions have me ready to hit up Bunnings asap :)
Large scale prints would be fantastic. Here’s my fave quote/saying for your consideration, I’m so in love with it:
“And every day, the
world will drag you by
the hand, yelling, “This
is important! And this
is important! And this
is important! You need
to worry about this!
And this! And this!”
And each day, it’s up to
you to yank your hand
back, put it on your
heart and say, “No. This
is what’s important.”
Thanks Erica.
I was actually going to suggest the RIBBA as an alternative to the DIY frame. $60 for 100cm x 70cm isn’t too bad. I wonder if discount stores (like The Reject Shop) have similar ones too. You’re right though, the style isn’t quite as nice though good if you want a more contemporary feel I guess.
Love that quote. Do you know who said it?
Kristine
x
Ooh, just found it I think; poet and author Iain Thomas.
Well done! Especially love how you trimmed the edges! Thank you for showing us how it’s done. :)
Thanks Diane. Glad you like it :)
Being a former teacher, I have always loved signs printed like this; they remind me of the Dick and Jane primers I had as a student. What is more impressive here is the excellent way you described the process and product as you are a gifted teacher as well. Thank you for providing the information and inspiration for me to tr;y this myself.
Aw, thanks Phyllis. Not sure if I’m gifted so much as persistent though! LOL. Writing these tutorials takes me a while though I think (and hope!) it’s worth it.
This is really cool!!!
Thanks for the continuing ideas!!
Love it!
Kay and Will Lake
Thanks guys, as always :)
love love it and want want more really awsome xx
Cool. I’ll see what I can do :)
Beautiful job! I love the antique look and the DIY frame is perfect. Thanks for the inspiration.
Thanks so much Katie :)
You sign tutorial is perfection! I love the trim you selected. I will now be gleaning my quote collection to make the perfect sign for fall.
Thanks Bren. I’ve been doing the same. Have become slightly quote obsessed!
I have loved the typography signs too. Lovely DIY! I think this has inspired me to something similar. Thanks for the inspiration.
Great! Thanks Ashlea.
Loving this!! Great detailed tutorial. Thanks for sharing Pinned it for later :)
Thanks Chelsea :)
This is SO fantastic! It looks professional, beautifully done! I would love to have you come link up at my Friday Free and Fun link-up! I direct-linked to it in my URL. :) Hope to see you there!
Thanks for the invite over Sarah Eliza. I just linked up :)
Following you on twitter now!
Visiting from your link up at Devastate Boredom and I just have to say wow. You made this tutorial amazing and I’m so excited to be able to try achieving this look. I’ve been working on gathering inspiration for a gallery wall on a budget and this will fit in perfectly. Thanks for the free printable too! I love the Narnia series.
Thanks Samantha. I love hearing when my tutorials have provided someone with a true sense of do-ability – yay!
:)
THANK YOU for this great tutorial!! We have large walls in our house, and I always struggle with how to fill them without paying $$$$ for large-scale art. I was able to print one of my favorite quotes and a large old map (from the 1870’s!) at my local office supply store as engineering prints for only $25 (I’m in the U.S.). I’ve got thin plywood and “framing” material on-hand, so this project hasn’t cost me anything more than the prints!!! I can’t wait to attach the paper to the backing & get my frames made this afternoon! The hard part will be deciding where to hang them!
Oh great! Love hearing this Trilby! If you’re happy with the way they turn out, feel free to send me some pics (thepaintedhive@gmail.com). I’d love to see :)
Oh well done you!! I just picked up my copy of Real Living and there you were!.
Great stuff.
Lesley
Thanks so much Lesley. It was a surprise to me too – I had no idea! Very surreal :)
Very nice. And I like that it looks easy enough for me!
Here from Free Fun Friday.
Thanks so much Melinda. Love that you find it achievable – sharing all things do-able is one of my main goals.
:)
Very nice tutorial, thanks. They look great and the possibilities really are unlimited. I think the oversized ones look particularly nice.
You are featured today!! Thanks again so much for linking up, you’re awesome! :D
Oh yay! Thanks so much Sarah Eliza :)
I love how you do the trimming and make it simple but has a classy vintage look. Printable signs are always awesome and resourceful you can create anything you want.
Thanks Gail :)
As the owner of a print shop (with small format and large format machines), this tip is very important: “for printing purposes, be mindful of standard paper sizes when designing your sign”.
Or better yet, if you’ll be taking your PDF to a print shop for printing, check with them first to inquire of any output limitations! For example, an 11×17 is much more cost-effective than a 12×18 (at our shop).
People always come to us last, and often have to go back to editing.
Thanks for the extra info Karen. You’re right, it definitely pays to investigate first. It’s kind of like that old adage “measure twice, cut once”.
:)
wow really brill, thanks hun will defo use x
Well, this is my first visit to your blog! But I admire the precious time and effort you put into it, especially into interesting articles you share here!
Love, love, love this. I just found your blog from the lettered cottage and its wonderful. I’ve been creating these kinds of signs for a couple months the hard way….hand stenciling, which for these signs, doesn’t look as good. I’d love to hear your thoughts on how best to make the background a color other than white (grey or a weathered white)? I’m looking forward to digging into your blog. It’s lovely!
Thanks so much Kristen.
I actually touched on this in the post (under Step 1). Don’t worry though, I don’t blame you for not reading every word – I’m a skimmer myself :) If you don’t want to use a digital background to create a weathered, aged look – as I did – you can apply a wash or tint post-printing. For a grey finish, there are two main ways of going about this…
1. WET METHOD: Mix up some water, clear sealer, decoupage medium or glue (or similar – ensure whatever you use has a matte finish and is clear drying) with a grey paint colour of your choice and slap it liberally onto the paper.
2. DRY METHOD: Again, use some kind of clear-drying matte medium mixed with a grey paint colour of your choice, apply a sparing amount to your brush, dab some off onto a rag then randomly colour the paper.
In either case, use haphazard brush strokes and splatters to create an uneven effect and maybe even use a darker/lighter colour in places. You can also rub areas with some fine sandpaper to further age the paper. Be mindful that dampening the paper (especially if it’s very thin) can cause waves. These may be ironed out if needed though sometimes will subside on their own. Also, ensure your paint has the same base as your clear medium (oil with oil, acrylic with acrylic).
Hope this helps.
Kristine
Kristine- I’m so sorry to make you go to all that trouble. That is one of my pet peeves when people ask a question you took the time to already answer in either the post or the comments. I’ll blame my inattention on drifting off to sleep as I found this post. You were very kind and patient to go to all that trouble answering again. Thank you, thank you! I’m looking forward to digging into your archives for more great stuff!
Oh, no probs. My posts do tend to be pretty wordy so I don’t blame anyone for missing bits of info. Either way, I hope it helps :)
Like Kristen, I found you through the Lettered Cottage. May I say how much I love this. Have you ever thought of doing a video of this? I am such a visual learner and while everyone else probably gets a 100% of it, I’m left scratching my head. lol!! Did you take it to somewhere to have it printed out? I am such a fool of these kinds of signs, but I really can’t afford, $180.00 a pop. I really want to make a lyric one for my autistic son from one of his favorite songs, but I really don’t want to spend that kind of money. This would help a great deal. Thanks.
Hi Erin
Firstly, thanks so much :)
I realise videos can sometimes provide a better picture, especially for visual learners, though to be honest they kinda scare me a bit! I would definitely like to get into making some in the future though for now I just don’t have the skills, equipment or resources to produce something I would be happy enough with.
I know the article is pretty wordy, though if you’re really keen to have a go at making your own sign, have a thorough read through the post. I think you should find all the info you need.
As mentioned in the article, I did have my sign professionally printed through an office supply store. To make this sign from scratch should only cost around $15 all up. A super large one should come in at under $60.
If you have any more questions or find something confusing, feel free to ask. I’m happy to try and help :)
Kristine
Thanks Kristine for replying. I totally missed it where you said you had it printed out. Typical. lol. I will give it a go, maybe if my husband helps me the first time, then I will get it. I am sure it’s very simple, but, my brain doesn’t work on simple. ;) Thanks again.
Ha, ha. Like I said, if you have any questions feel free to ask :)
Thank you for such an amazing post & very detailed tutorial. I absolutely love every single one of them. I’ve looked all through this post & could only find one free downloadable printable file. By chance do you have your files for all the other sized prints on your site? In particular the large poster size book page. I don’t have the ability to create these in the various sizes you have using my iPad or phone but love them all & would love to send to print in the various styles, sizes & coloring. If you don’t have them as downloadable prints, would you please be so kind to create the files or email them?
Hi Awnya
Yes, I only made the one free printable for this post, the others are inspiration images from various other suppliers so I actually don’t have digital versions of those.
I have been working on some large free printable book page quotes very similar to those I have shown in the post. I’m not sure when I’ll get a chance to finish them though as I have about twenty other projects on the go at the moment, I’ll try and get to them as soon as I can.
Kristine
Do you use any type of stain on the printable? The one you made isn’t as white as mine.
Thank you for any help :)
Hi Angel
No, I didn’t. Mine is just as printed. If you think yours is too white you could tea stain it or apply a tinted sealer though keep in mind this could cause some waviness.
Kristine
Thank you for replying and the advice. I might try the tea stain. I love your blog and your work 😄
If you only knew how long I’ve been searching for a tutorial just like this! Thank you, thank you, thank you!!!! I can’t wait to get started!
Oh great Angela. Before I did this project, I searched around for a tutorial too though couldn’t find one. So glad this one has helped you :)
Hi there! I just stumbled upon your blog from this Pin. Do you have the ability to create prints for people?
I’d love to purchase a print and then make the frame and the rest myself!
Thanks,
Trish
Hi Trish
I can create a digital file for you which you can then have printed. If you have a design in mind, just let me know.
Kristine
It is lovely! And the way you framed it is perfect. Thanks for the freebie too :)
Thank you so much for sharing all your knowledge and ideas…..
This particular saying speaks to me and always makes me smile ….
“when I saw you
I fell in love
And you smiled because you knew”
This is the best, most comprehensive tutorial I have seen on making and framing digital images. Thank you so much!! I am looking forward to trying one myself.
Thanks so much. Glad it helped you :)
I just found your site, and I am very impressed. Your ideas are creative and fun. Thank you.
Thanks Marilyn :)
Love, love, love your blog and the projects you have shared.
Thank you for inspiring me!
Thanks so much Denise :)
Outstanding!
Love the tips! I would like to know where ypu got the aged background for the document, please?
I simply found the background online. Sorry, I can remember where exactly though it was from a texture website which offers free public use high-resolution files. If you try Googling “aged paper texture” you should come across some.
:)