
I’m so excited to finally share this!
If you’re not new here, you’re probably aware of my involvement in the Re-Love Project and what it’s all about. For those of you who don’t know, in short it’s a Feast Watson campaign in collaboration with Salvos Stores which sees seven design personalities “re-love” a neglected item of furniture with the resulting pieces being auctioned wholly for charity. Pretty cool, huh? You can read my first post about it here and learn more on the Feast Watson website here.
It’s such a wonderful campaign which I’m thrilled to be involved with.
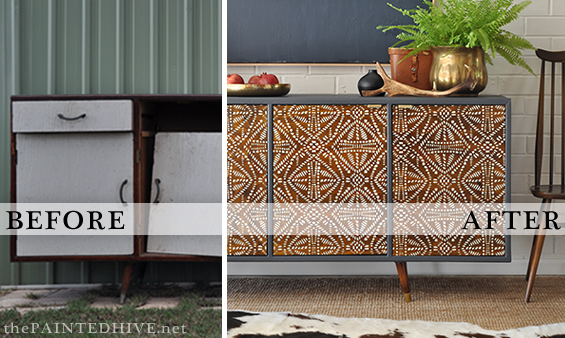
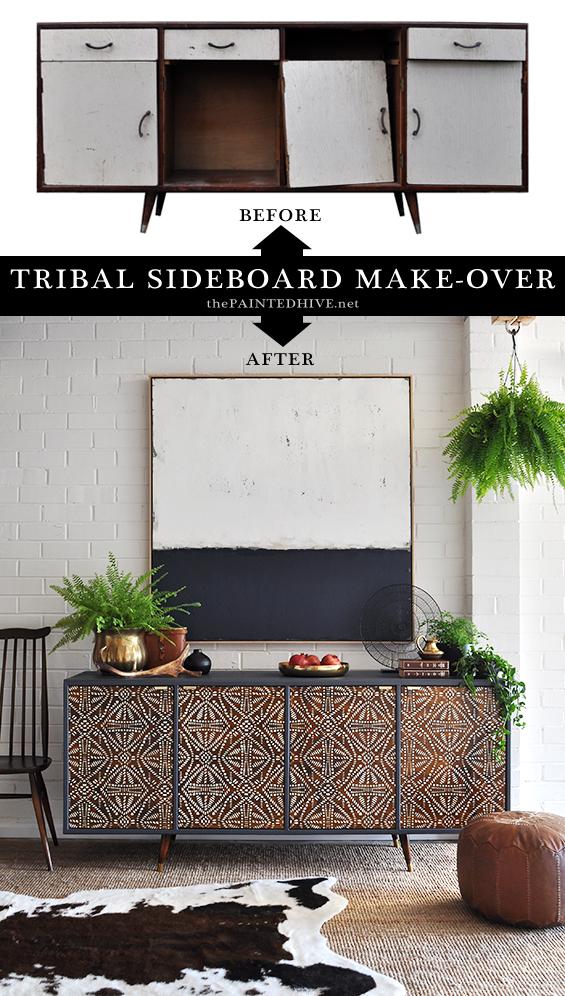
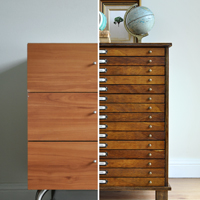
Anyhoo, as revealed in my previous post about the project, I started with this crappy old sideboard which I picked up for just $5…
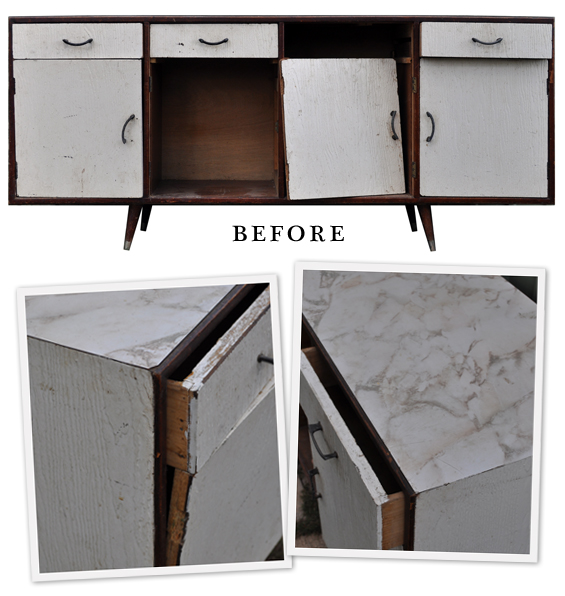
I bought this baby “site unseen” (after a friend sent me a photo) because I loved the clean mid-century lines and generous proportions.
I also really liked the fact it looked so disheveled. I know that might sound weird, however I love “sow’s ear to silk purse” makeovers, and knew I could do something completely transformative with this piece.
And how bad could it be, right?
Right?
Turns out…pretty bad.
I mean, it was clear there was a missing drawer and door (I could deal with that) though what wasn’t clear was the fact that the remaining doors and drawers were all constructed from faux wood-grain textured chipboard! And that the top and sides were nothing more than super thin faux marble laminated masonite!
Yikes!
Still, I had a vision and it was going to come to fruition!
Here’s how the whole thing went down…
![]()
This basically involved stripping the sideboard down to its frame.
I first removed the drawers and doors. Unfortunately, there was no salvaging their swollen, water-damaged chipboard. Regardless, I wasn’t keen on constructing one, let alone four, new drawers anyway, so for ease I had decided to forgo them completely in favour of installing new full-height doors in their place. Not only was this a simpler solution, it would also give the sideboard a nice, clean look.
Next I removed the internal drawer runners and section dividers (this was a simple matter of prying them off) and all of the old hardware.
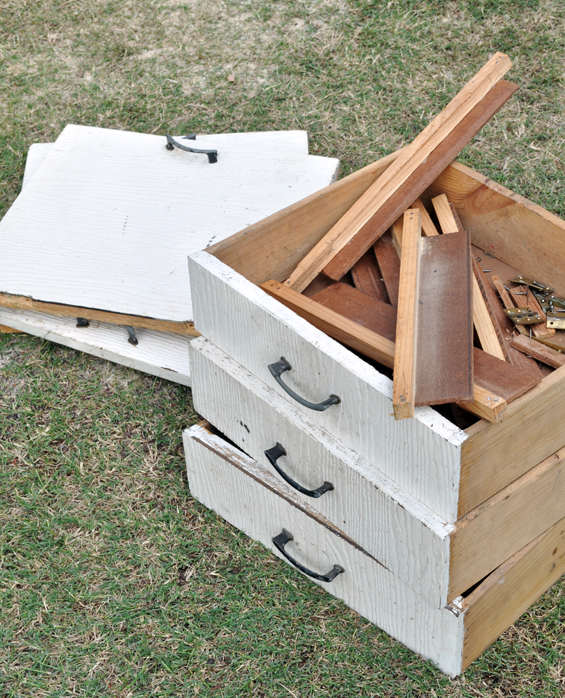
The doors, drawers, internal runners and dividers, plus all of the old hardware, were removed.
Initially, I had been hopeful of retaining the exterior panels though they were warped and damaged and just plain inferior. The best solution was to remove them completely.

Removing one of the panels. As you can see, it was simply glued and nailed on.
A few decent bangs with a hammer later and my sideboard was down to its (thankfully very solid) birthday suit!
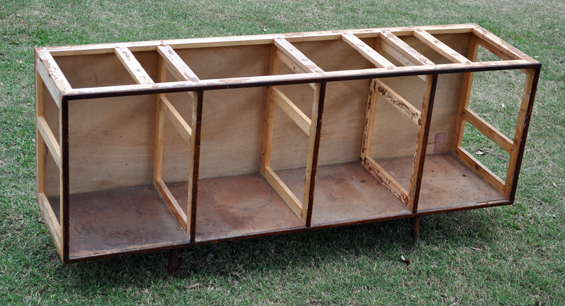
The “naked” sideboard. Fortunately the pine frame was nice and solid.
Although the prospect of replacing the panels was a little scary, it actually turned out to be one of the easiest processes in the whole project! Sometimes the seemingly big jobs which appear intimidating are actually the most straight-forward!
To complete my prep I gave the frame a good general clean-up. This involved removing any stray nails, chiseling off areas of glue and sanding everything until it was smoothish and even.
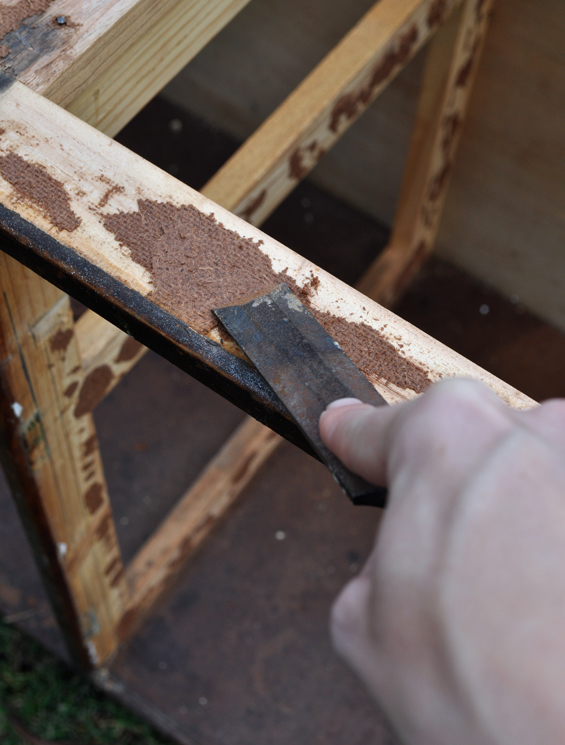
Cleaning-up the frame.
Note: As touched-on above, it wasn’t my intention to go back to the frame on this sideboard. It does seem pretty extreme and the last thing I wanted to do was make this refurb seem over-the-top or counter-productive, or just plain unappealing to my fellow DIY’ers. It’s easy to look at a project like this and think “Hmmm, she would have been better off just building from scratch” or “It’s basically a brand new piece, what’s the point?”. Well, those are valid arguments however from my perspective I was definitely better off not building from scratch, and for the purpose of this campaign, which sees the finished piece being auctioned for charity (hopefully at a good price), the existing panels simply weren’t good enough to keep. If anything, through replacing them I actually hope to demonstrate just how do-able it is and possibly open-up some eyes to the work-ability of pieces which may otherwise have been discounted.
![]()
![]()
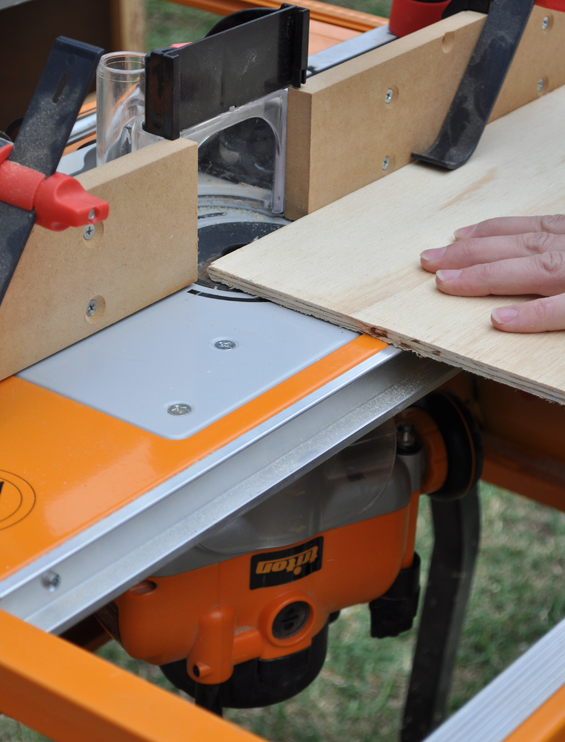
To start “dressing” my sideboard again, I first cut four new doors from 12mm (1/2″) plywood using our track saw.
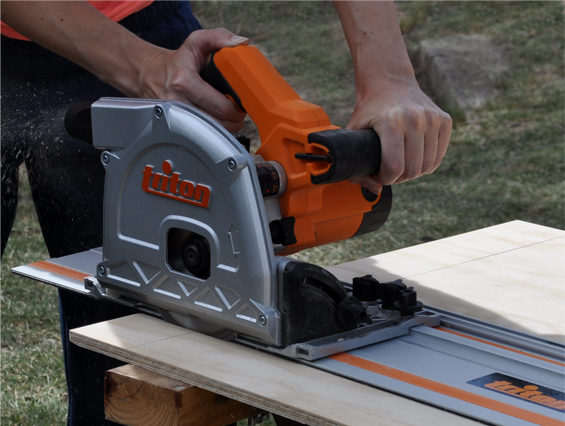
Cutting the new doors from 12mm (1/2″) plywood.
Now, I’m not gonna lie. This wasn’t the simplest process. I mean, the trimming was easy enough, however creating accurately sized pieces was tricky due to the sideboard frame being out of square and all of the door openings being slightly different. I may have stuffed up a few times and had to cut certain doors more than once – oops! Lucky ply is cheap.
Anyhoo, stuff ups aside, the basic process involved measuring each opening as thoroughly as possible, cutting new doors as accurately as possible then making sure they actually did fit.
Once I had created, and was happy with, all four doors, I went about attaching them to the frame. Although the doors will need to be removed again for subsequent finishing, it’s important to hang them at this stage just to determine whether any further adjustments need to be made as a result of hinge position and swing movement. I decided to fit the doors prior to re-panelling the top and sides for ease of access and better visibility.
I wanted my doors to have a seamless flow so went with concealed hinges – surface mount concealed hinges to be exact. I didn’t even know these babies existed! They are much easier to fit than traditional concealed hinges which need to be embedded. They are also much cheaper.
To install the hinges I first sat my doors in place to determine how deep they needed to be mounted on the frame (because obviously I had to allow room for the doors to sit within the cavity too). I then held each hinge in position and marked the screw points before drilling pilot holes and attaching the hinges to the sideboard carcass.
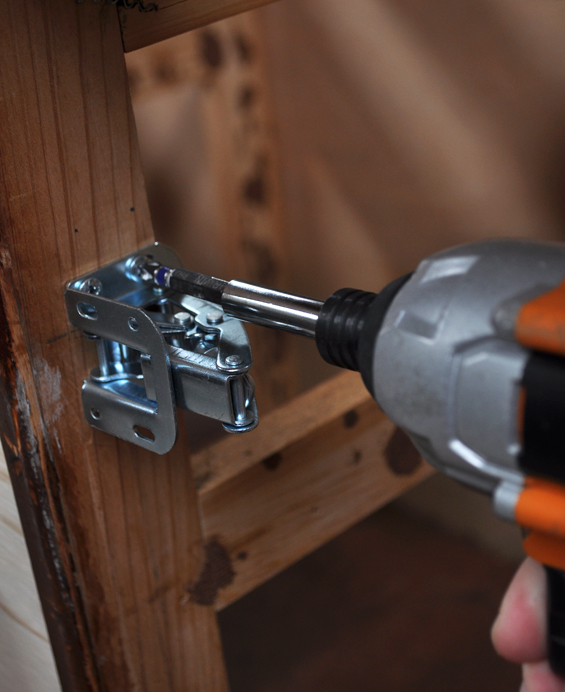
Attaching the surface mount hinges to the sideboard frame.
Next, with the doors sitting in position once more and propped up on narrow shims (to provide an allowance for swing clearance), I marked the screw points on each door and went about attaching them.
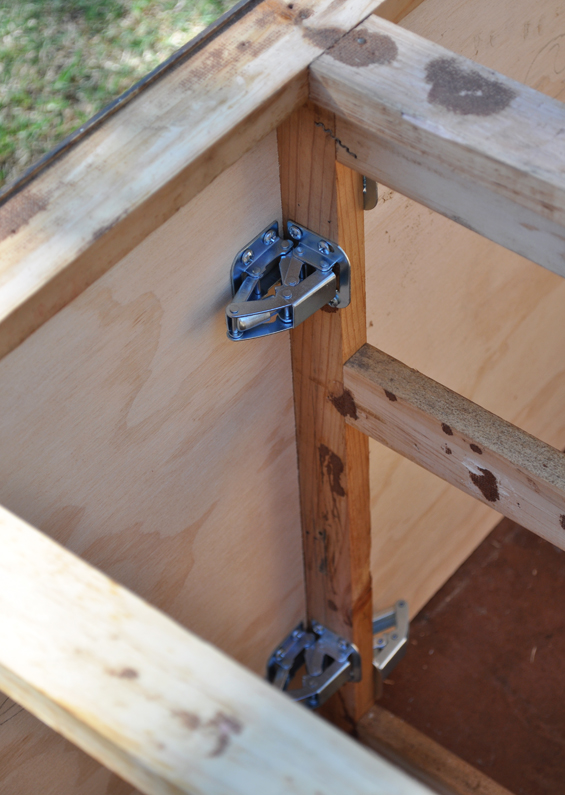
The inside of the frame with the doors attached.
The hinges are off-set on either side of this central upright so that their fastening screws didn’t collide.
Once all the doors were mounted, I checked for clearance consistency.
As suspected, some of the doors were now rubbing on the frame in places. To remedy this, I marked the problem areas, removed the doors and trimmed them slightly using our track saw.
Due to the slightly wonky frame, the doors aren’t perfect though they’re pretty darn good.
The new doors.
Note: I have no doubt there are better ways to fit hardware and mount doors though I also think practice probably plays a huge role in making a job like this easy. And if, like me, you’re not a professional or hobby carpenter, it’s kinda hard to get a heap of practice installing furniture doors! I watched video tutorials and read how-to guides though in the end I just had to tackle the job to the best of my ability. If anything I hope this gives you the confidence to try it too because I’d never done anything quite like this before – and, well, now I have!
![]()
We cut the new top and sides from one large sheet of 3mm (1/8″) ply using our table saw.
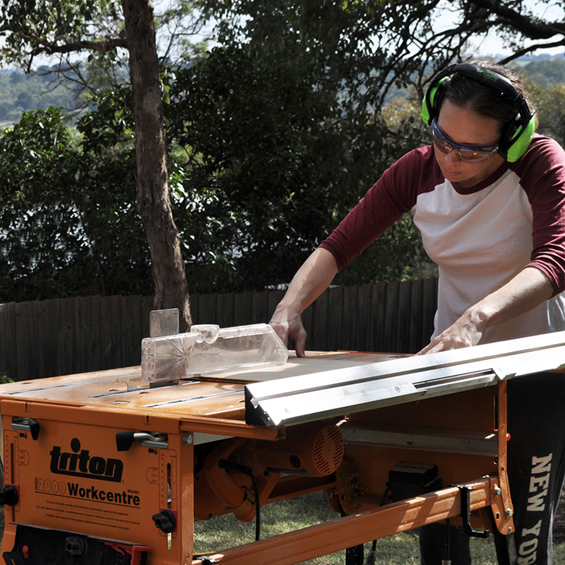
Cutting the new panels from 3mm (1/8″) plywood.
Again, sections of the frame were crooked though rather than try to compensate for this (which isn’t easy to do using a table saw which likes to cut everything square), we based our dimensions off the widest measurement (so, if the bottom of the right side was 50cm wide, yet the top of the right side was only 48cm wide, we cut the panel to a consistent width of 50cm – that way, we could simply sand back any over-hang once the panel was attached).
The new ply was thicker than the previous masonite so sat proud of the existing lip at the top, resulting in an obvious step.
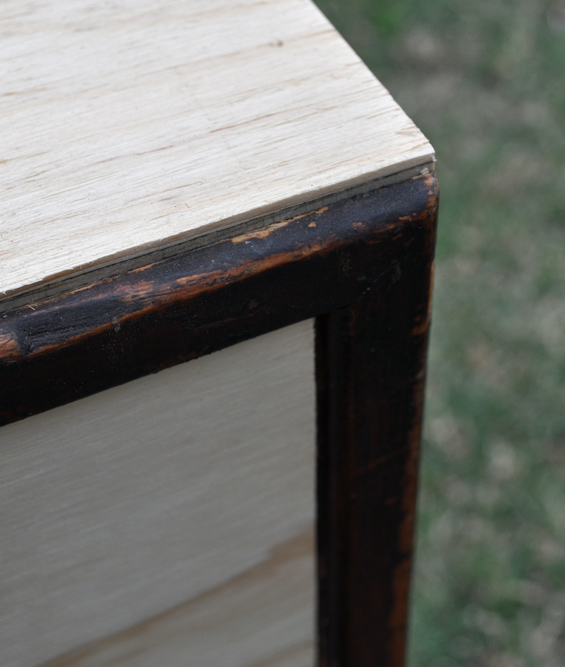
The new plywood was thicker than the previous masonite so sat proud of the frame.
I considered simply rounding the edge using an electric sander, which would have worked fine, though decided to route a small bullnose instead.
Routing a bullnose into the top.
It’s just a small detail though it makes the new top look much more integrated.
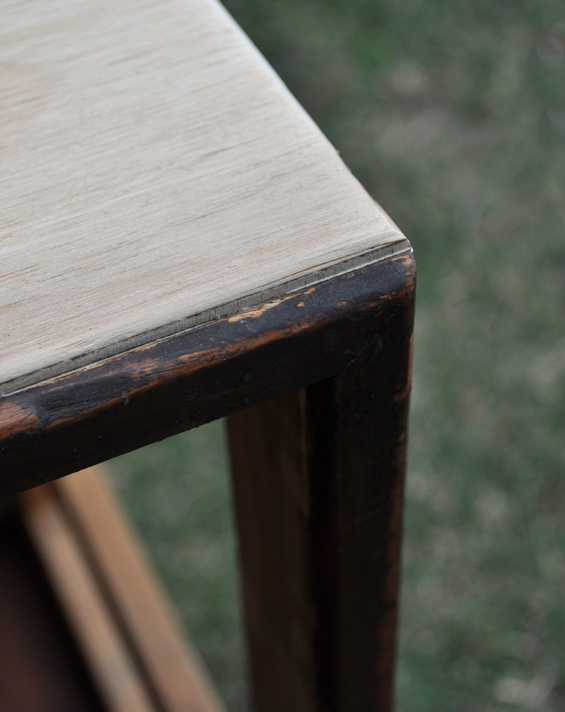
It’s hard to see properly, though the routed edge creates a nicely rounded step.
Attaching the panels was pretty straight forward.
I smeared the frame with some wood glue, clamped a panel in position (to save having to hold it) then hammered it on using small finishing nails which I spaced every 5cm (2″) or so.
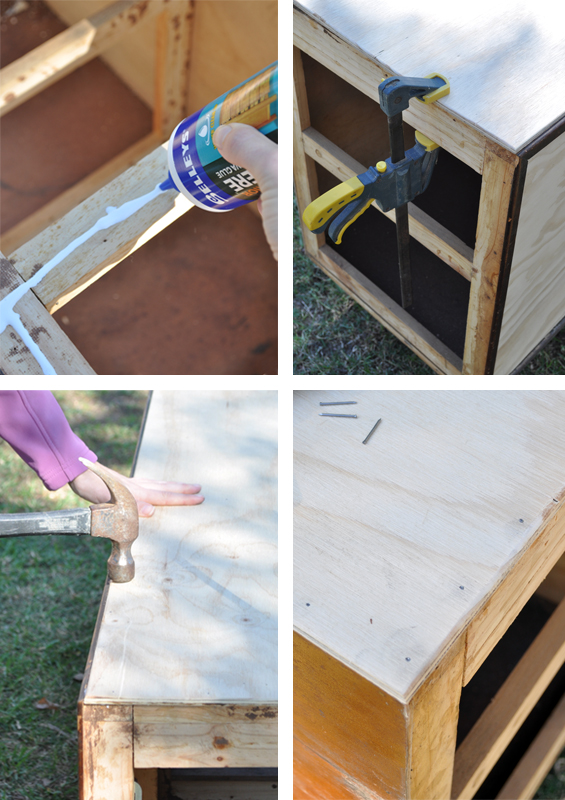
Attaching the panels.
Once all of the panels were attached, I went about counter-sinking any proud nails, filling holes and gaps then sanding back the over-hanging sections until everything was nice and flush.
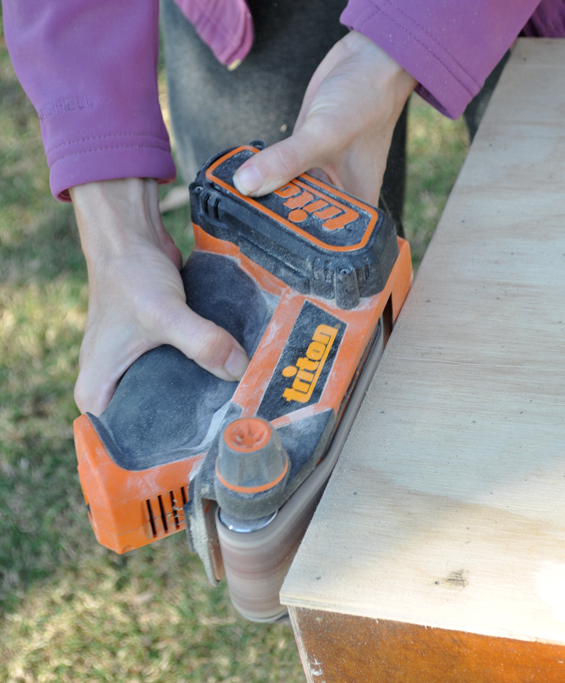
Sanding back an over-hanging section of the top to make it flush with the side.
I then did an all-over finishing sand using fine git paper to ensure everything was smooth and ready for painting.
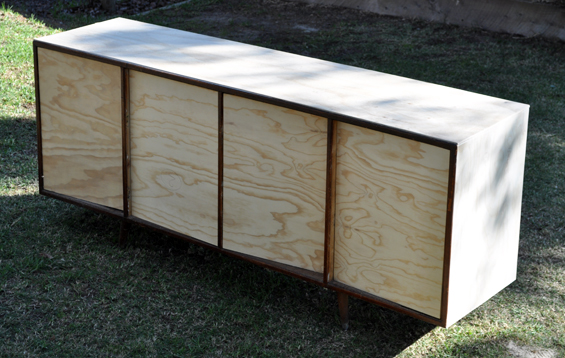
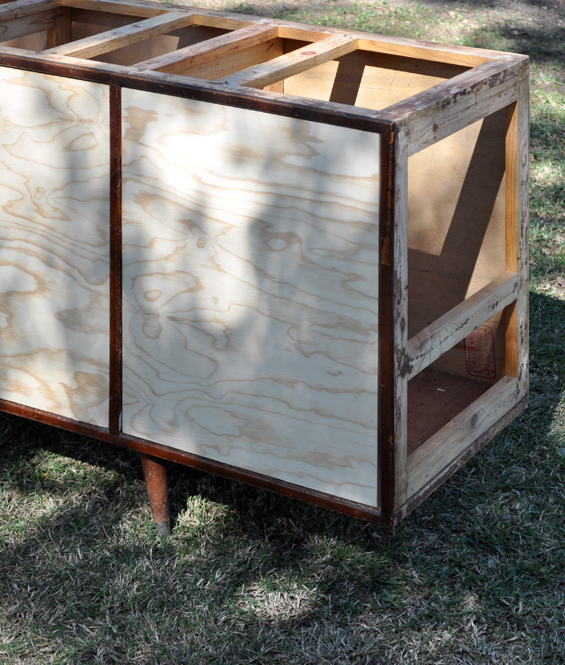
The complete (well, almost complete) sideboard.
Excuse the wonky doors, I didn’t align them for this shot.
Note: If you don’t have the right tools, or if you aren’t confident with cutting large panels of wood, your hardware store will probably do it for you. Just be sure to have accurate dimensions and stress that you need them to be precise.
Tip: Choose a plywood panel that isn’t bowed or warped and if you intend to stain it, check for imperfection and pay attention to the grain pattern. Some plywood panels are much prettier than others.
Tip: When creating several panels which are similar yet not identical (like my doors) be sure to number and mark them so you know their location and orientation. It saves lots of jigsaw playing later on!
![]()
![]()
I ensured the entire carcass was nice and clean then gave it two coats of Feast Watson Floor Paint in “Charcoal Edge”.
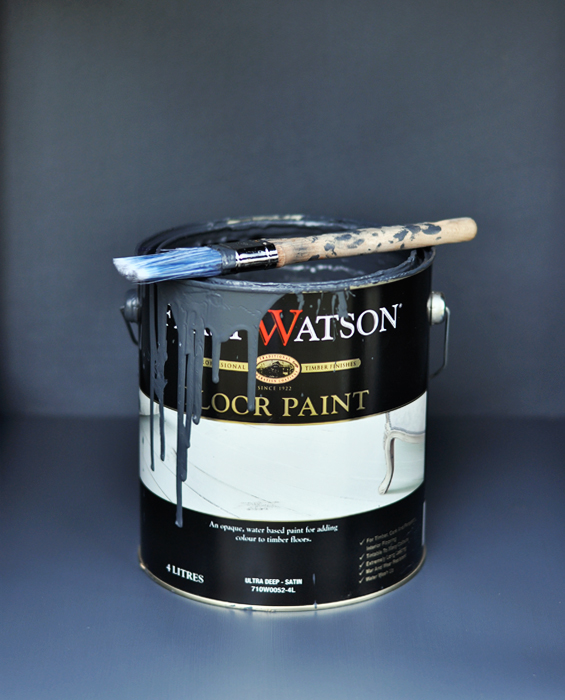
Feast Watson Floor Paint in “Charcoal Edge”.
I’ve never used this paint before and I found it fantastic. It has great coverage and a lovely satin sheen. More than that though, it’s incredibly durable. I scratched, scraped and bumped the finish several times with numerous sharp implements and the paint did not chip once! It’s not cheap though if you’re working on a special project I think it’s definitely worth considering.
To keep the finish super smooth I sanded between coats with fine grit paper and buffed the final coat with steel wool.
![]()
Ahhhh, the doors.
And I don’t mean that in an adoring way (although now I do love them) because these babies gave me some grief!
It was just that I was using products in a way I hadn’t before so things didn’t go to plan from the get-go and lots of subsequent experimentation was called for.
Anyhoo, for the purpose of this tutorial I’ll spare you all the trials and tribulations and keep things simple by explaining the method I did end up using.
First, I sanded each door thoroughly, concluding with fine steel wool for an ultra smooth finish, before cleaning away any residual dust. Ply can be quite rough so it’s important to spend some time on the sanding process.
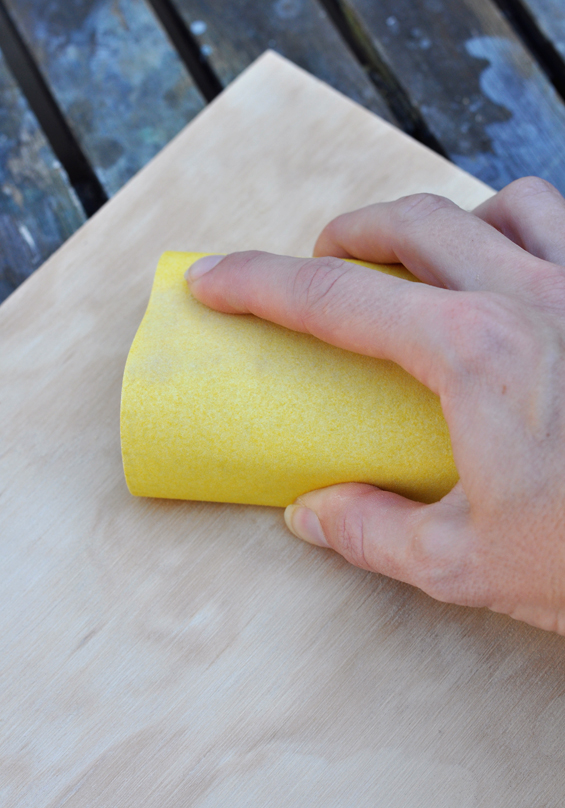
Sanding the doors.
Next, I combined some Feast Watson Satin Clear Varnish with 10% Prooftint Traditional Stain in Teak Brown. This essentially created a tinted sealer.
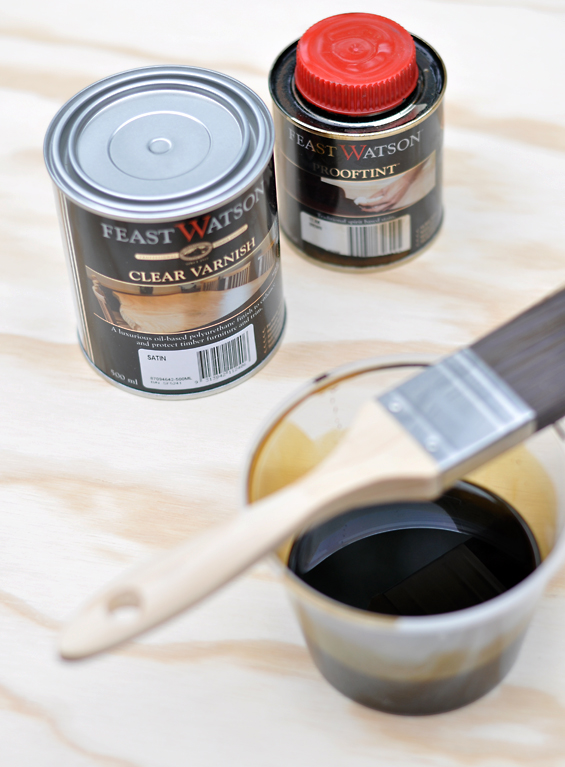
A combination of Feast Watson Clear Varnish and Feast Watson Prooftint creates a tinted sealer.
I then applied two coats to each door (front, back and edges) in the direction of the grain using a brush.
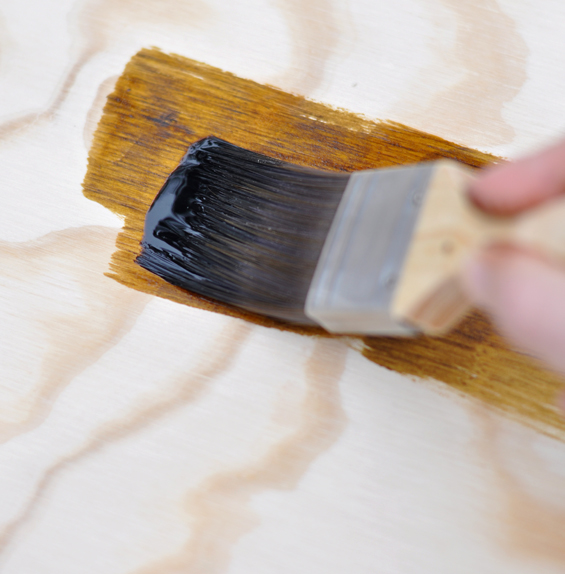
Staining the doors.
I sanded lightly between applications with fine grit paper, and also at completion to ensure the ensuing stencil paint had something to grip to.
Once completely dry, I laid the doors down in order on the floor, taking into account the gaps of the sideboard frame.
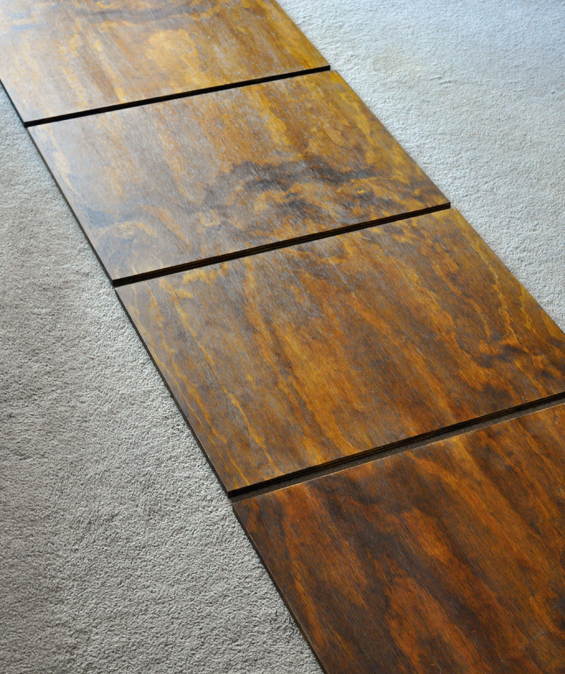
Laying the doors down in preparation for stenciling.
Pardon the terrible lighting and weird angle – it was tricky to get a shot of this.
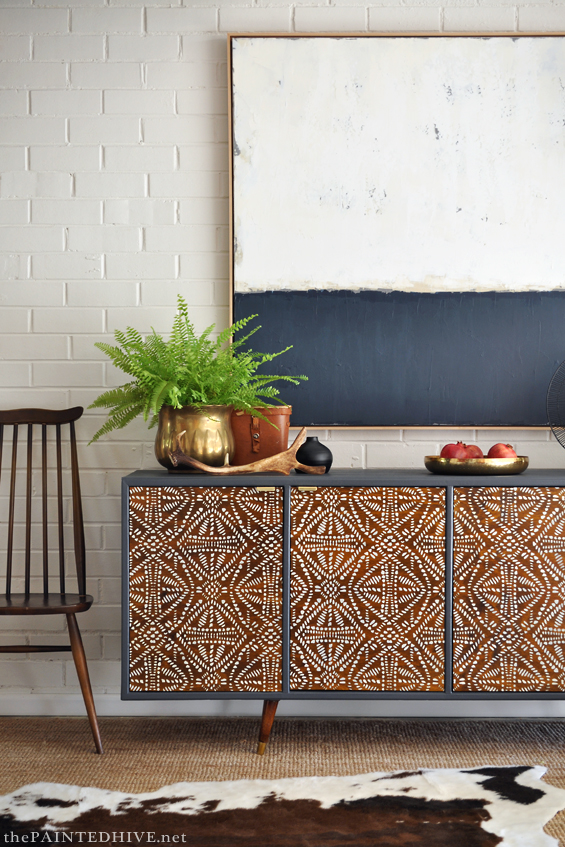
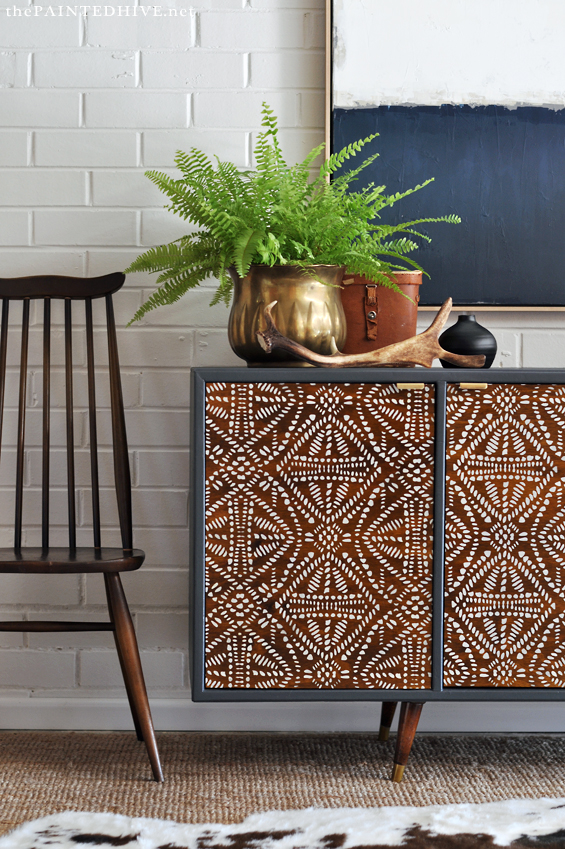
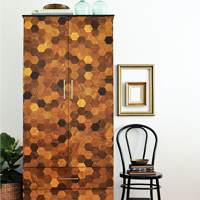
Next, I placed my all-over stencil (Tribal Batic Stencil from Royal Design Studio) in position and tacked it in place with some masking tape.
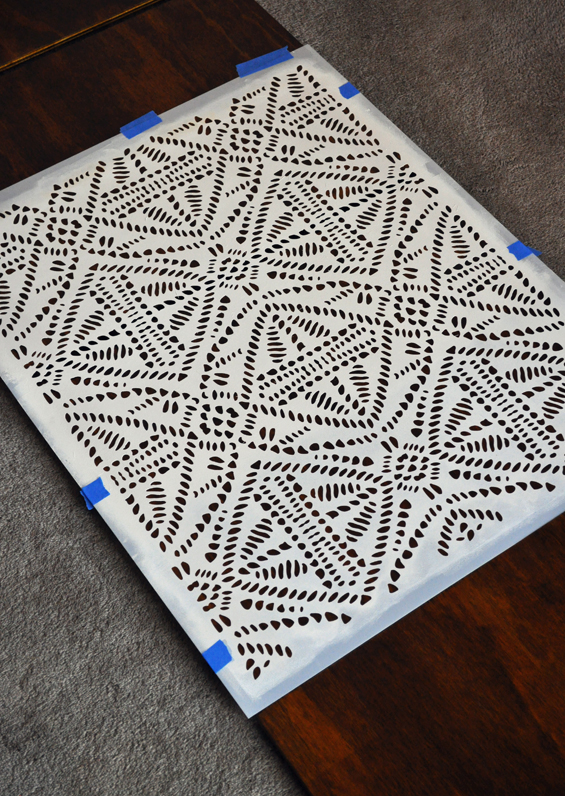
I stenciled multiple doors in one pass.
I then used a small foam roller lightly coated with white acrylic paint to embellish the doors.
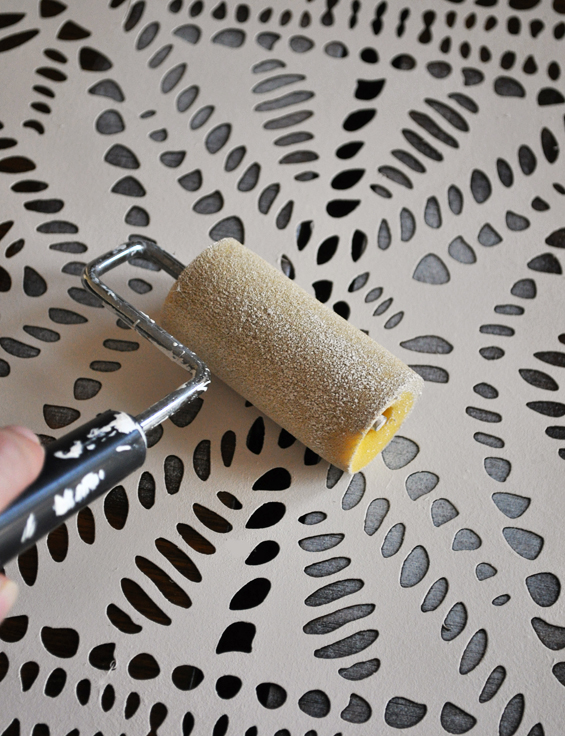
I found a foam roller produced the best results (and was also the fastest and easiest stenciling tool for this project).
When I had completed one whole pass, I carefully lifted and accurately re-positioned the stencil (using the in-built register elements – see below), continuing until all the doors were fully covered.
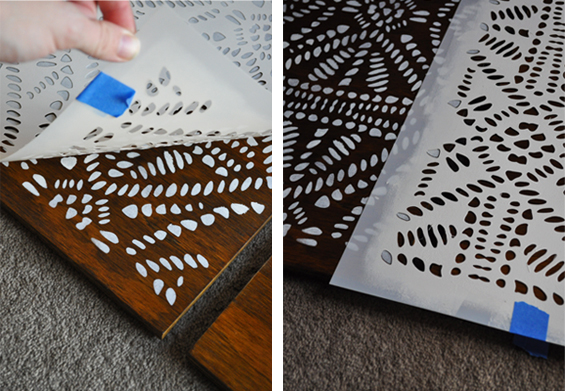
I re-positioned the stencil using the built-in register elements (you can see them in the pic on the right – they are over-lapping elements which act as a re-positioning guide).
For an extra special touch, I stenciled both the front and rear of each door.
Once dry, I brushed on one final light coat of Feast Watson Clear Varnish to seal the stencil and protect the paint before reattaching the doors.
Tip: In the course of removing any hinges, take note of their specific location (even better, as you remove a hinge from a door, attach it to the finished frame in the corresponding position – this is what I did). I noticed that the amount of stiffness and movement varied from hinge to hinge. As my doors are all slightly different and customised to accommodate their particular hinges, this disparity could adversely effect their resting position.
Note: As touched on above, I don’t want to burden you all with the woes of this project though I think it’s pertinent to share the core of my misfortune. Basically, I initially had trouble with my stencil yellowing excessively. I think this was caused by two things: 1) stain pick-up – I originally failed to seal the stain prior to applying the stencil so when I did eventually seal the doors too much residual colour was drawn out of the wood by the brush which subsequently tinted the white paint, and 2) acrylic v’s oil – stencils work best with fast drying acrylic paints however the oil-based sealer I originally used (Feast Watson Scandinavian Oil – which I absolutely LOVE ordinarily) seemed to react adversely with the stencil paint.
![]()
The feet were just screwed on so I simply removed them.
Next I sanded them lightly, gave them a good clean, taped off the silver tips and hit them with a few coats of Dulux Duramax Bright Finish in Gold.
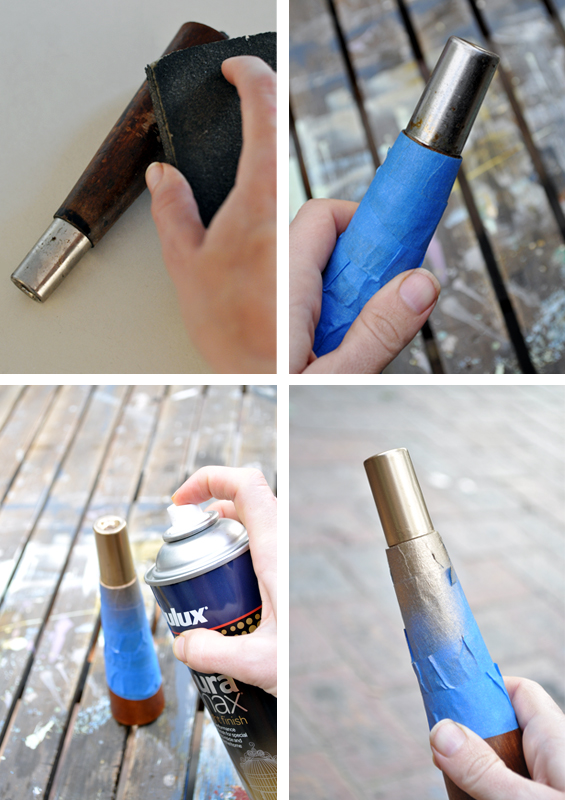
Painting the tips gold.
I felt the gold was a little too brilliant so I decided to glaze it to create some richness. I mixed some Feast Watson Clear Varnish with a dash of Feast Watson Prooftint Traditional Stain in Golden Teak then brushed it on each tip. The result is a mellow, and realistic, aged brass patina.
Glazing the gold tips to create a rich antique brass look.
Please excuse the poor lighting. I took these pics at night so they’re not the best.
Glazing the tips also gives them a more durable finish so they won’t chip or scratch anywhere near as easily as regular un-coated spray paint might.
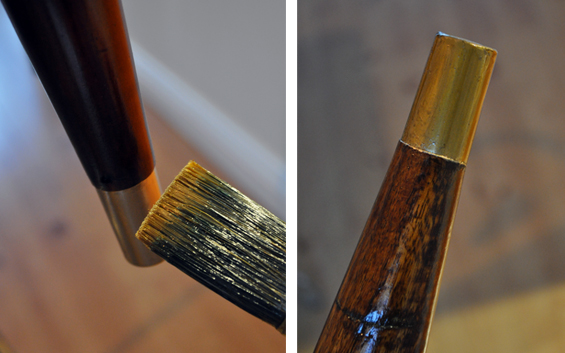
Finally I re-stained and sealed the timber portion of the feet using the same mixture of Feast Watson Clear Satin Varnish and Prooftint Stain in Teak Brown I used on the doors.
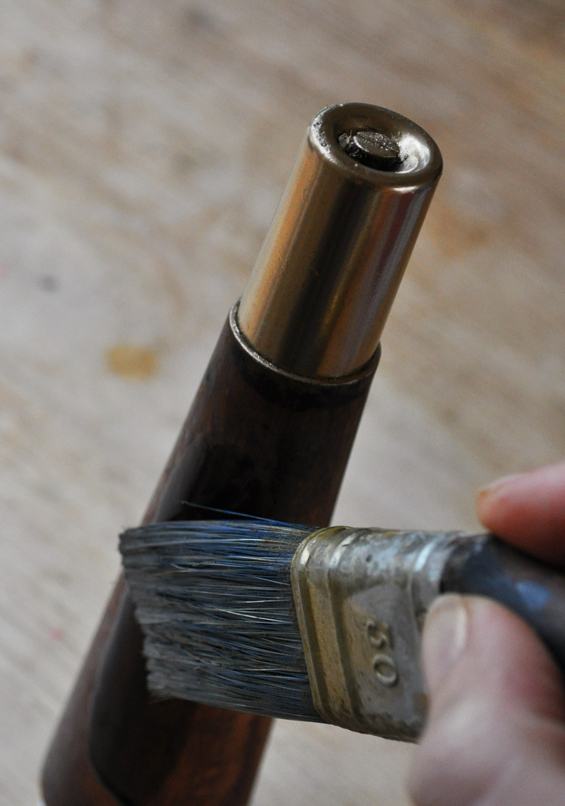
Staining and sealing the feet.
Pardon the awkward look of this. It’s kinda hard to demonstrate a technique and hold a camera at the same time!
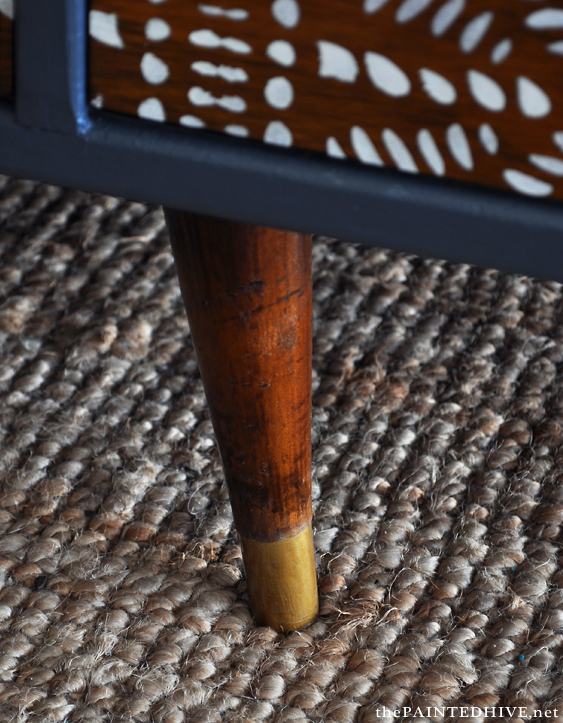
I love the way the feet look refreshed yet still give a gentle nod to the history of the piece through their evident bumps and scrapes.
![]()
AKA, the home stretch!
Given I had removed the drawers, I thought I’d better add some new internal dividers.
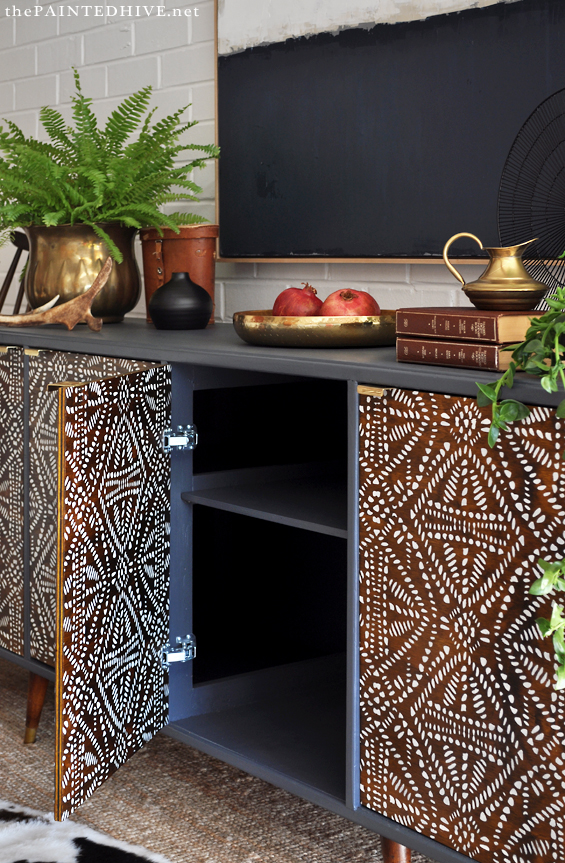
This was a simple matter of cutting four ply shelves to fit, painting them to match the body then installing some brass shelf stays for them to rest on.
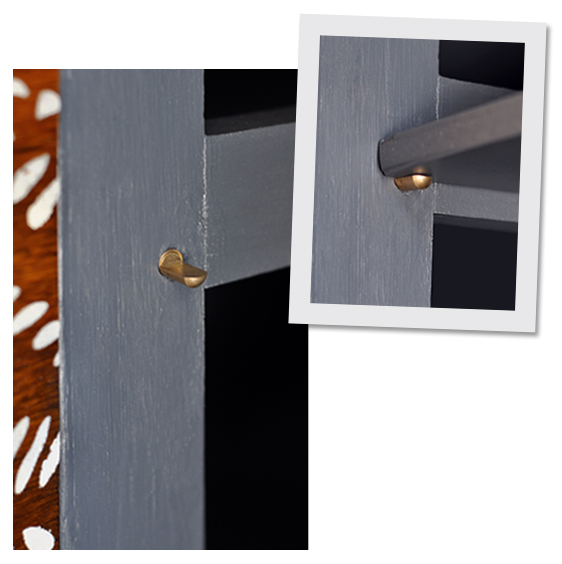
The shelves rest on brass stays.
Finally, to complete the unit I attached some brass handles.
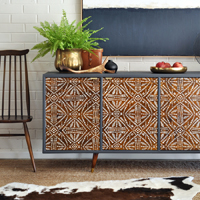
I was tossing-up whether to use bold, statement hardware or go with something sophisticated and discreet when I came across these great little tab pulls.
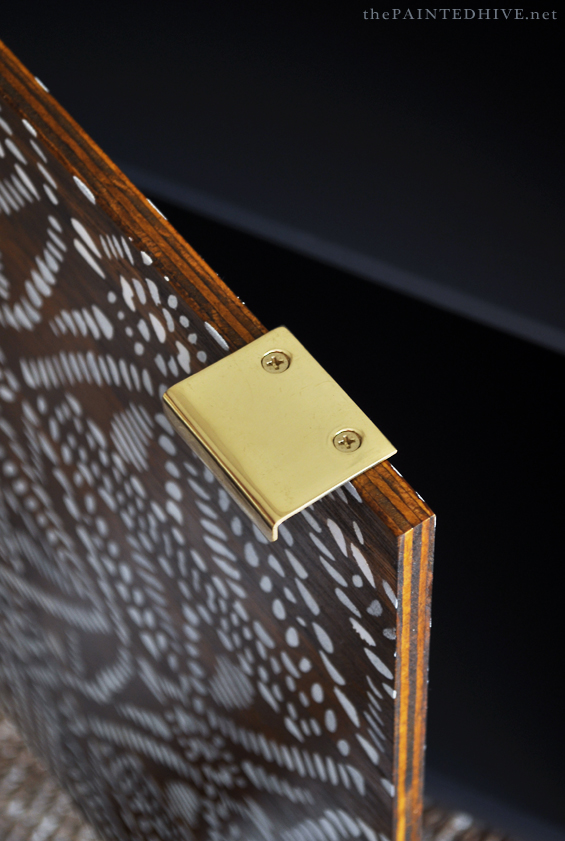
I absolutely adore these handles! They could not be more perfect.
They provide a hint of gold which ties-in perfectly with the feet tips and co-ordinates so well with the paint and stain. More than that though, they are ideally positioned so as not to compete with or interrupt the graphic doors.

Sadly, I couldn’t find any brass ones in Australia so I had to order these from the US (where they thrive in abundance!).
They are super affordable at around $5 each. Sadly though, the international shipping is a bit of a killer at almost $40 – yikes!
Still, this was a special project so I had to have them.
![]()
When I took this sideboard on, I thought it was going to be my simplest Re-Love Project make-over to date (you can see my previous contributions here and here).
I must have been partially asleep…or just really, really drunk. LOL!
In all seriousness though, I learned heaps and am so, so proud of the finished piece.
I truly hope this refurb encourages a few of you to tackle something you might otherwise have felt a bit intimidated by. Absolutely everything has potential.
Of course though, you don’t need to start with a piece that’s already got one foot in the dumpster to create something amaze-balls. This basic stencil over stain technique can be used to transform anything with super high-impact results.
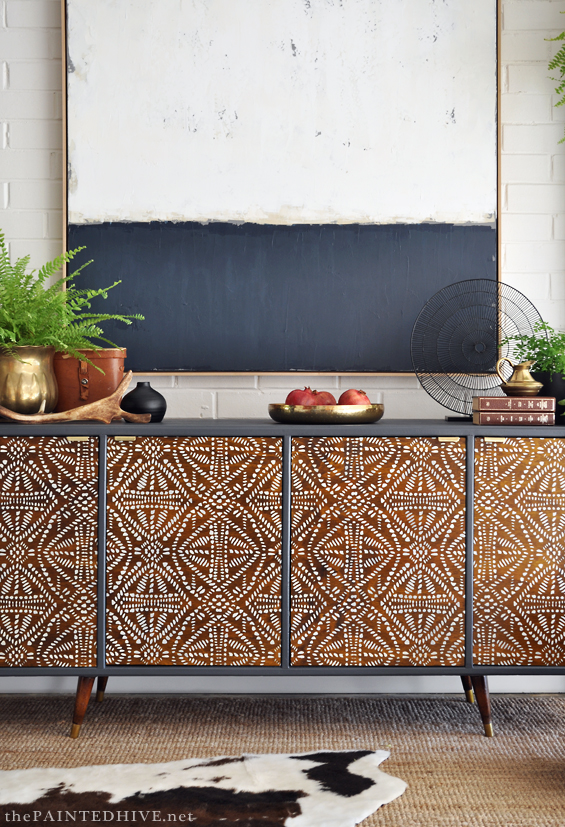
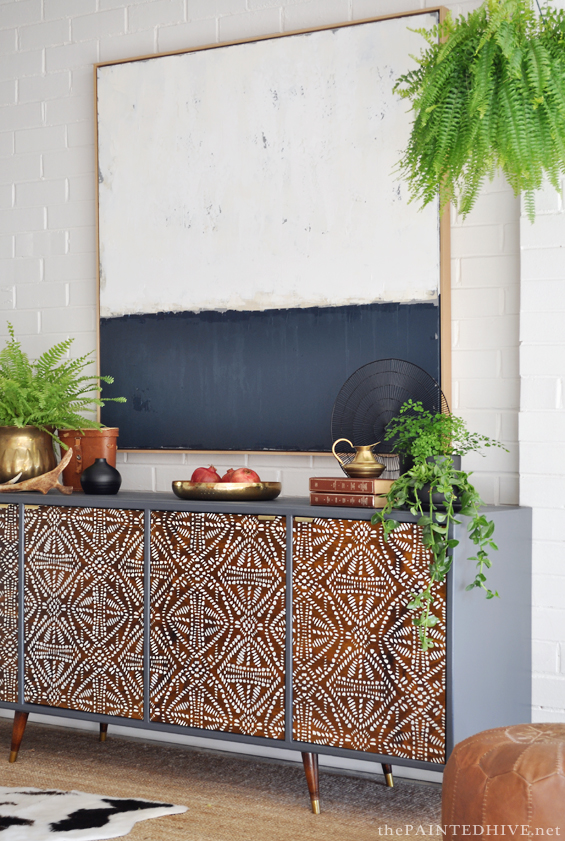
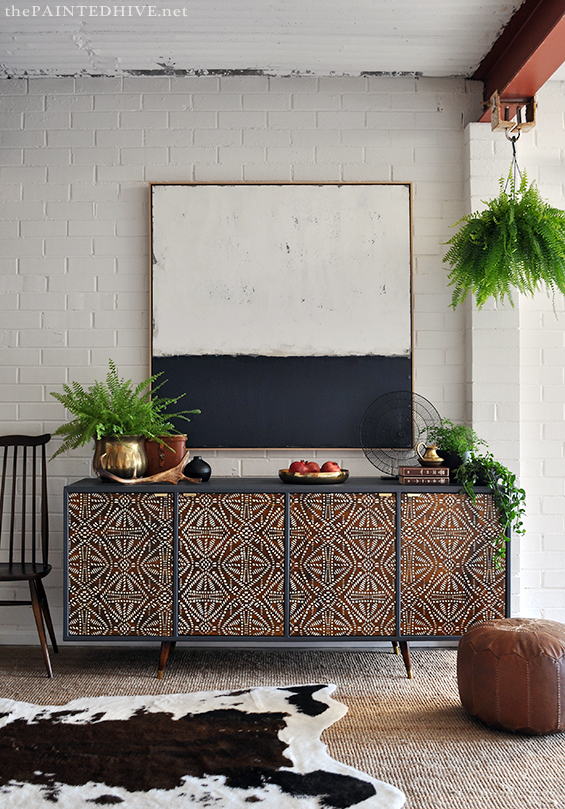
A huge thank you to Freedom who loaned some of the styling props, including the amazing artwork, the leather ottoman and the radial decor accent.
Remember, along with the pieces of the other awesome designers involved with this campaign, this unique sideboard is being sold for charity!
So, if you love it (or know someone else who might) be sure to stay tuned!
The eBay auctions go live in August and I’ll be sure to post again once they’re up and running (Feast Watson will be covering shipping costs Australia wide!).
C’mon guys, let’s spread the love (free hugs to everyone who shares socially!) and work up some hype for the Salvos!
![]()
Be sure to follow along with me and Feast Watson on Instagram to stay updated about the auctions and see the reveals of all the other designers involved!
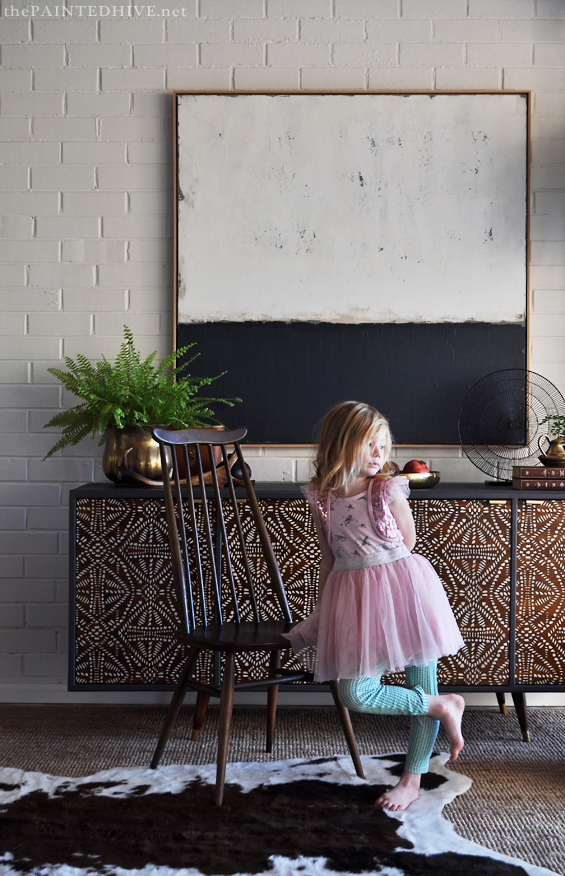
I snapped this pic right at the end of my shoot and thought it was too precious not to share. My little messy-haired Charlotte.


Oh my word, this is such an amazing makeover. I love it.
Thanks Marty :)
Absolutely brilliant! I am not a big mid-century buff, but I would love to have this piece in my house. As usual, you balanced all aspects of the form, function and color perfectly. And Charlotte is no longer a toddler! ;) You are bound to get the most money for your project again this year.
Ha, ha. That would be nice Deb though there are some big names taking part in this campaign who certainly have the ability to pull much higher $$$ than little ol’ me. Still, it doesn’t really matter. As long as we all do the best we can for the charity.
Thanks so much for your always encouraging words :) And yes, Charlotte just turned five last week! Eeek!
So, so beautiful. Love the stencil and pulls you selected. Thank you so much for sharing!
Thanks Carrie :)
i am from the us and we have some words that would state how i feel about this make over freaking awesome. or gorgeous but the english have a word i like better… i am gobsmacked xx
Ha, ha. Thank you Chris :)
you knocked it out of the park again! seriously gorgeous. swooning.
Thanks so much Liz :)
Wow, I love it!
Thank you Katie :)
Fantastic work as usual Kristine ! The stencil was a good choice .
Crissy
Cheers Crissy. Do you know how many stencils there are in the world? To say it was a hard decision is an understatement. LOL!
Wow-what perseverance and courage you have.
It looks beautiful and so does Charlotte. Congrats!
Kay Davis
Thanks so much Kay.
Perseverance…maybe. Courage…I’m getting there :)
Stunning piece! Thank you for all the detail. Very inspirational!!!
K
Great. Thanks so much :)
Loved pic of your daughter!! I think the messy hair gives the picture character and adds to the cutness. Do they still have photo contests?
I’m not a do it yourself-er but love watching your creations! Very nice job!
My jaw is still hanging to the floor – wow!! What a stunning makeover. I can’t believe how you took that dilapidated cabinet and turned it into this! Pinned to share and hopefully get more drooling over this stunning piece of furniture :)
Thanks so much Marie.
Any shares are much appreciated. The more exposure I can garner for the charity auction, the better! Virtual hugs coming your way. :)
Where is Alex Lloyd when you need him for a serenade. You Are Amazing! AGAIN! Love the nonchalant pose of your adorable little model. Kristine, you never fail to inspire us. X
LOL! Thanks so much Julie :)
You are amazing. What a fantastic job, and to think it will be auctioned and benefit those in need is just icing on the cake. Congratulations.
Thanks so much Cheryl :)
Another triumph! Well done Kristine, it’s beautiful :)
Cheers Kate :)
Woah Kristine, this is truly STUNNING! I was in Freedom recently and recognised the decorator accents in your photos – and my first thought was that your cabinet would fit right in as one of their furniture pieces for sale! Actually, I like yours better than theirs :-) If I had room for it in my house I would seriously bid on it at auction – I’m half tempted to sell my existing (very old) sideboard in the meantime to make room for it! Well done, it’s very inspiring xx
Do it Julie! Or at least have a go. The auctions start at just $1 and shipping is covered nation-wide so anyone has a chance to win.
Thanks so much for your lovey comments. This was outside my styling comfort zone so it’s nice to know it seems to work.
What a make-over!! That is fantastic – for all your hard work, it has come up a treat! Gorgeous photos too as usual.
Thanks Sherylee :)
Now this is up and running I should have some time to get to your living room rendering. Thanks for your patience lovely :)
For the girl that professes not to have any woodworking skills… you sure have up-skilled in a hurry for this one!! ;) Don’t you love the fact that old pieces like this may have crappy finishes on the doors and top but the bones are still solid timber and sooo worth resurrecting. :) Love your tribal print idea and the use of accessible materials like good old plywood for the rebuild. Who knows how many closet DIY-ers might be encouraged to give it a try too. Awesome job <3
Aw, thank you Nikki. You really get it!
PS I’m sure I’m still crap at building (like, building “building”) stuff.
x
I just…wow. There really are no words for this…completely amazing.
Ha, ha. Too sweet. Thanks Erin :)
I think my definition of skilled and yours are miles apart. I was blown away with last years effort and you have somehow managed to do something even more fabulous. This is an amazing makeover and you have excelled yourself with it. The stencilled doors are just wonderful. Well done Kristine, a fantastic result that will be sure to raise plenty for the Salvos. Congratulations.
Thanks heaps Robyn.
If your definition of ‘skilled’ involves stuffing things up twenty times then eventually fluking/mangling the end result we might be closer than you think ;)
Thanks for your lovely words.
Amazing and the shot with “messy haired” Charlotte is precious :)
That’s my fave shot Marcie! Thank you :)
So gorgeous! And thanks for the detailed DIY! It gives me courage to go beyond my comfort level….
Oh yay! That’s exactly the kind of thing I love to hear Karen. Sometimes I’m not sure if my detailed explanations are encouraging people or scaring the heck out of them. Of course, I want nothing more than to inspire and empower so it’s lovely to know you feel a sense of courage :)
Totally amazing! I, too, love major transformations. Great job!
Thanks Larissa. Yep, we are birds of a feather :)
It is amazing ! Thank you for sharing your work. You give me the energy to do my work. Greetings from Poland :).
Thanks Emilia. Comments like yours give me energy to keep sharing :)
That is absolutely gorgeous. What an incredible makeover!
Thank you Mary :)
Oh my, I don’t know where to start. You have done a wonderful job on this piece of furniture. It is simply stunning and looks like a high end piece of designer furniture. You are very talented and should be very proud of how that piece of furniture turned out.
Thank you so much Shannon. What a lovely compliment.
:)
Wow! That’s all I can come up with. So perfect.
Superb resurrection! What a wonderful save and I really love the graphics you added. Definitely a top drawer piece, you should be super proud of this one!
Thanks heaps Brenda :)
Gorgeous! What a beautiful transformation and you have incredible patiences. Hands down my favorite piece and I enjoyed visiting your lovely blog. Thank you so much for linking up at Dishing it & Digging it link party. We love having you and I enjoyed stopping by.
Thanks so much Vanessa, and thank you also for hosting and giving me a platform to share this project :)
Such a beautiful transformation!! Looks amazing.Love the stencil design. #HomeMattersParty
Thanks Sahana :) The stencil totally makes this sideboard.
That is a stunning turnout. You did a wonderful job.
Thanks so much Christine :)
I was excited to see that you just completed a project using stencils…..and what a project! Great job! Wonderful timing since I had just sent you those pics of some stenciled art work……and thought that I might give it a try myself! Serendipity for sure!!! Love it! :)
Thanks Lindy. Yes, this one has been in the works since January! I actually completed it in May though the reveal was embargoed. How did you go finding a stencil for your project?
Absolutely amazing transformation! You had a vision and carried it out perfectly. Kudos to you. I hope you are enjoy the holiday.
Thanks so much Linda :)
Wow! The buffet turned out absolutely amazing. I wish I could transform old unloved furniture this way. Good work :)
Anyone can have a go Lizette. I didn’t really know what I was doing – I just started doing it!
Wow! The transformation is amazing! Talk about having a vision. ;) I thoroughly enjoyed reading abut the process. Thanks for sharing on Family Joy Blog Link-up Party! Have a great week!
Whaaaaat?! Your skills at taking something that was destined for the rubbish bin and turning it into a work of art is truly astounding!!
Aw, thanks so much Cheryl :)
I don’t know HOW I missed this post! I’ve waited with baited breath to see what you would conjure up this year. And I’m not disappointed. What a transformation! And not just the transfomation, but what a stunning pice of furniture. The stencil gives a little aboriginal feel and I love that. You have once again done so well. I wish your creative thought process could be bottled! I’ll have ten, thankyouverymuch. :)
Ha, ha. Oh Anna, you’re just too sweet. Thanks so much.
Kristine
BTW Are you subscribed to my blog via email? You’ll get all of my posts delivered straight to your inbox that way and never miss a thing.
Wow! What a stunning transformation! You turned it into such a beautiful piece!
Jill
Doused In Pink
Thanks so much Jill :)
Kristine, you have got talent, girl!! Plus incredible patience! Fabulous job!
Thank you Lori :)
Wow! what a lovely transformation! thanks for sharing!
Visiting thru 2justByou linky party!
Thank you Cassandra :)
This looks AMAZING!! What a transformation!
Thanks so much Haley :)
You should be very proud…you did an amazing job. The finished piece is stunning!
Thank you Terry :)
Wow! This is absolutely beautiful, you did such an amazing job :)
Thanks heaps Megan :)
WOW! Amazing transformation! Good luck on your charity auction! I’m sure you’ll get many bids. Thanks also for the hardware source. Showerrods is a new one for me. Take care.
Glad to have helped you find them Cynthia. It does seem a bit weird to buy cabinet hardware from a site called “Shower Rods”. Ha, ha.
Thanks so much :)
Kristine,
This is hands down one of my all-time favorite restorations. I was so shocked at the before photos that I thought my computer skipped to a different page. Thank you so much for sharing with us at Friday’s Furniture Fix. I’ll be getting it out on all my social media. Susie from The Chelsea Project
..Oh…also…look for this piece among the features tonight….
Ha, ha. Thank you Susie. I’m thrilled and honored you like it so much :)
Absolutely amazing transformation. Love everything about it!
Your cover photo made me fall in love at first sight! I love how much you put in this project and it came out really really well!
And congrats! We have chosen to feature this delicious post on the next Peace, Love, Linkup! Grab a feature button and stop by tomorrow at 6 to share more great content! : )
Oh wow, thanks so much Ashleigh :)
Good gracious, you went the distance on this project. Amazing!! Visiting (and subscribing!) from Friday’s Furniture Fix. I’m glad to know there are others who like to to write detailed tutorial posts. ;) Love the way this turned out – and your styling for the piece is spot-on! Gorgeous.
Thanks Christina. Had so much fun styling this piece!
Not sure that I “like” to write detailed tutorial posts (ha, ha – this one took me about three days!) though I definitely think it’s appreciated by readers who might like to replicate a project.
xoxo
Blown away! Featuring this on Sundays at Home today! Thank you for linking up!
Oh wow, thanks Kelly :)
Unbelievable transformation. You are one creative lady. And Charlotte is adorable!
Thanks Brenda :)
WOW!! Speachless….