
This was one of those “gee, if this actually works it’s gonna be really cool” kinda projects.
Well, thankfully, it did…and it is! If I do say so myself :)
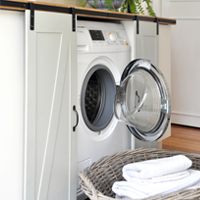
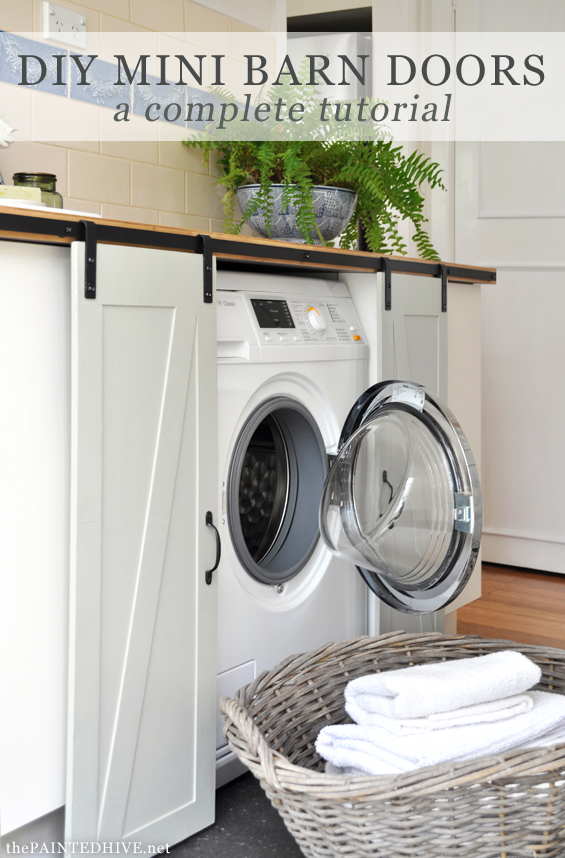
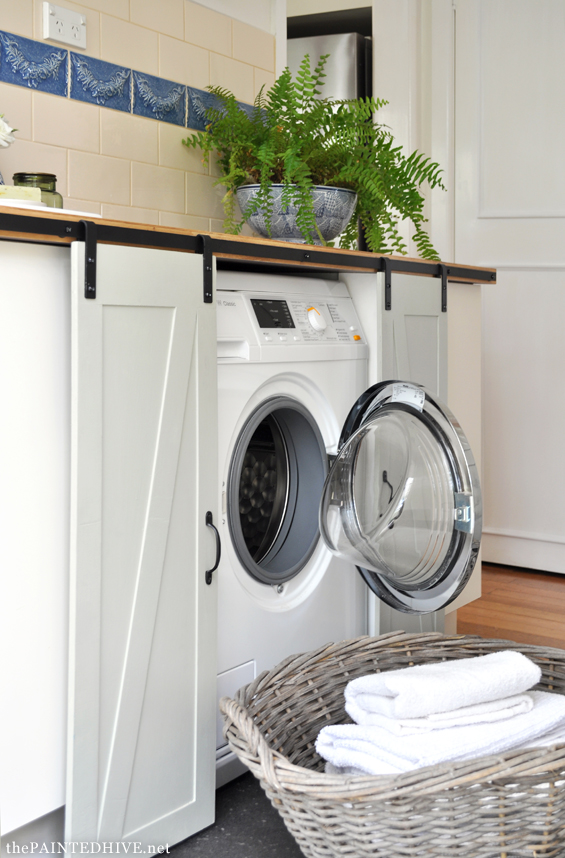
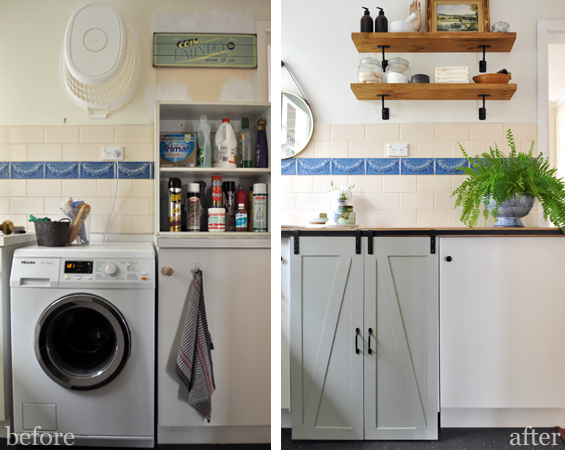
Although I installed these DIY barn doors specifically to conceal a washing machine, they could be used in place of ordinary doors wherever space permits. Wouldn’t they make a great TV cover? And, whilst mine are attached directly to a counter top, you could also affix this style of DIY barn door to a free-standing piece of furniture, such as a buffet. On top of all that, you could opt for a single door instead of two. The possibilities are almost endless!
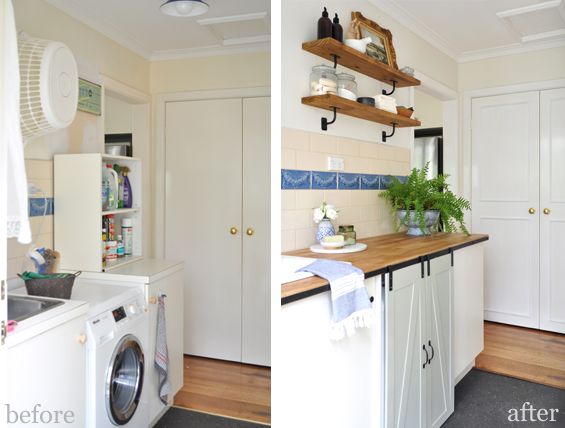
I know that concealing the washing machine in a laundry room might seem a tad extraneous, and in most cases it probably is, though when I was charged with the task of refreshing my parent’s laundry room, it was almost a given.
You see, this room adjoins a main hallway in their house and has no dedicated door (or even doorway) so is entirely open! Not only is it super visible, though it’s also often used by guests as a powder room of sorts to service an adjacent water closet.
Yep, something pretty, yet still practical, was certainly called for.
Here’s how the whole thing went down…
Given the tight time-frame for this makeover (and the fact this was an entirely experimental project I thought might not even work!), I didn’t take progress photos of this DIY. That said, I have taken a few “example” pics and will do my utmost to explain everything as clearly and concisely as possible.
You will need…
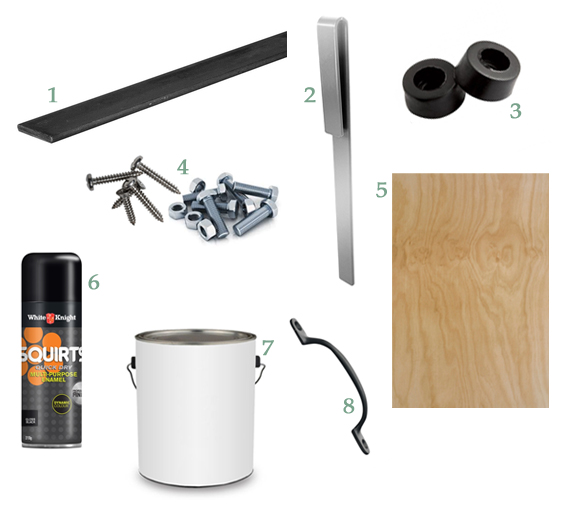
1 METAL FLAT BAR
This can be found in several lengths, widths and thicknesses at most hardware stores. I chose a black steel bar that measured 25mm/1″ wide (just narrower than my counter thickness) x 3mm/.1″ thick x 2 meters/6.5′ long. It only cost $5.
2 METAL GARDEN EDGING PEGS
I swear, when I stumbled across these at the hardware store a string orchestra started playing and a sudden beam of sunlight illuminated aisle 4! I had a pretty open mind about the style of hardware I could repurpose for the door sliders though these matched my vision perfectly! And they were only $1 each! Squeee!
3 SPACERS
To provide a gap between the counter and bar I used some rubber chair leg stoppers (because, well, that’s what I found in the shed – plus, they just happened to be perfect). You could use almost anything with appropriate dimensions; washers, nuts, felt pads – you could even make your own spacers by slicing up a wooden dowel. Just ensure that whatever you use is thicker than the arm of your edging pegs or they will rub and won’t glide easily. And remember, don’t worry too much about what colour they are as you can always paint them.
4 SCREWS & BOLTS
Screws to attach the metal bar to the counter (ensure they are long enough to provide a decent hold). I used dome head screws. Bolts to attach the edging pegs to the doors (ensure they are long enough to go right though the doors with enough remaining thread to attach the nuts). I used dome head bolts.
5 PLYWOOD
You could use anything similar to make the doors. I like plywood because it’s inexpensive, comes in lots of sizes and thicknesses and is more hard-wearing than most composite boards (such as MDF and masonite). I needed the total thickness of my doors to be around 1cm/.4″ to fit nicely within the arch of the edging pegs so I used 7mm/.3″ plywood for the door panels themselves and 3mm/.1″ plywood for the decorative trim.
6 SPRAY PAINT
For the metal bar and edging pegs. I simply used matte black for an industrial feel. A brassy gold would be cool for a more contemporary look.
7 PAINT
For the doors themselves. I used standard acryclic wall paint in “Green Result” by British Paints.
8 HANDLES
I used basic handles from the hardware store which cost just $4 each. In my case, these are merely cosmetic as the doors glide best when they are pushed from the top, plus it saves having to bend to open them.
STEP 1 Trim metal bar.
Measure how long you need/want your metal bar to be (mine is just shy of the full length of my counter) then trim it to size. I simply used a hacksaw and it was quick and easy.
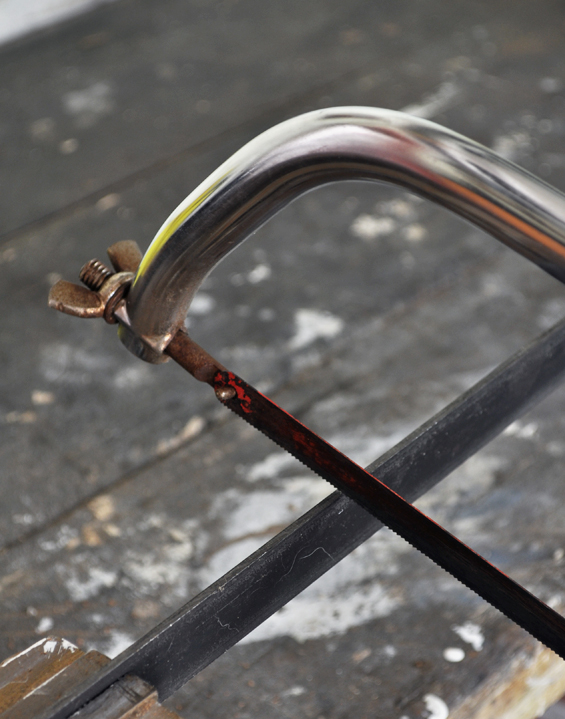
Tip: If the cut end is overly rough, you can smooth it with a metal file.
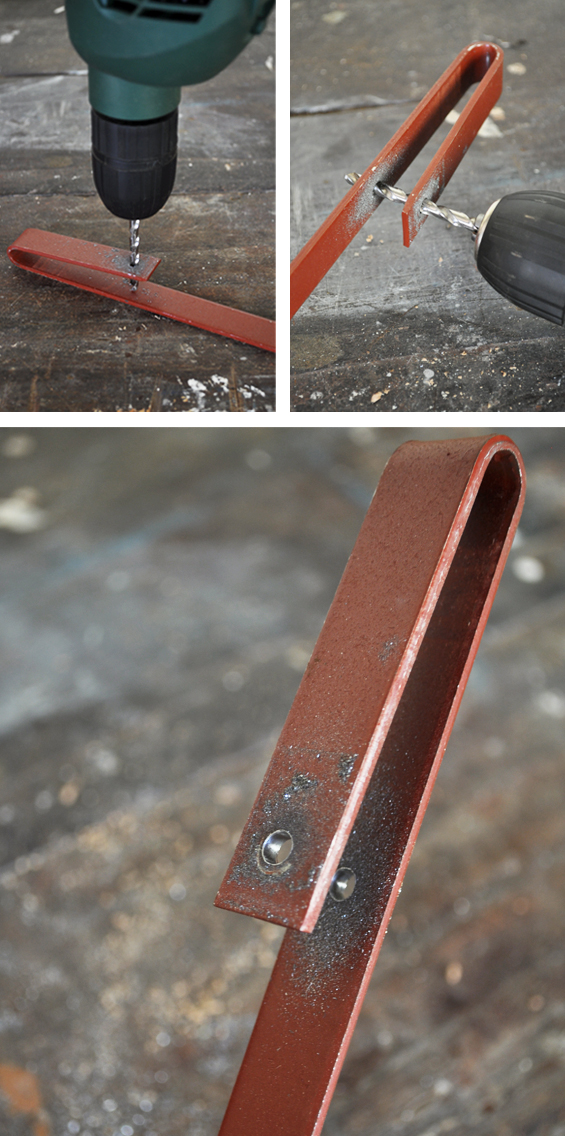
STEP 2 Drill holes in metal bar and edging pegs.
For the metal bar…
You will probably need affixing holes at each end plus one in the center. You may also want additional holes to form stoppers for the doors and/or help stabilise your bar if it’s quite long. I added two extra holes around 30cm/12″ in from each end.
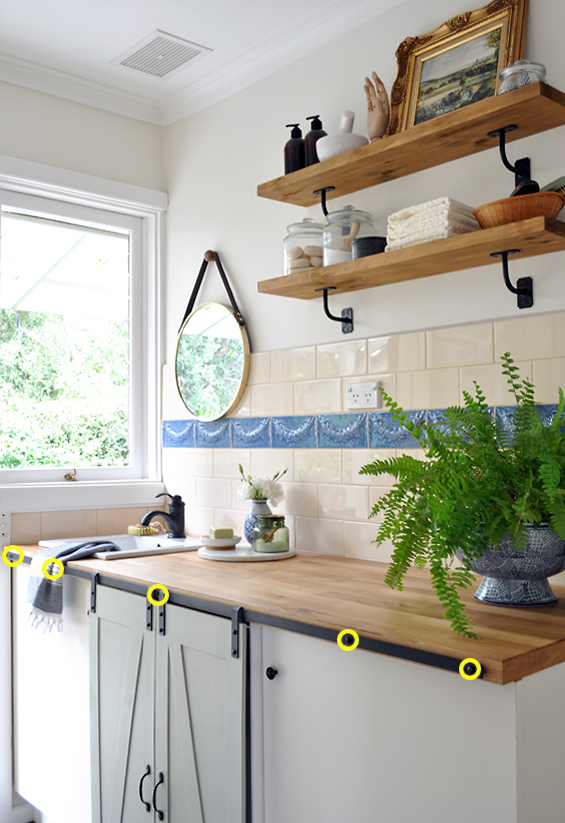
My five affixing points are circled in yellow above.
Note: If you do add more holes, ensure they are positioned so as not to impede the desired opening span of your doors as the peg arms will hit the screws.
To make the holes, use a drill bit one size larger than your screws. You want the screws to fit through the holes with relative ease.
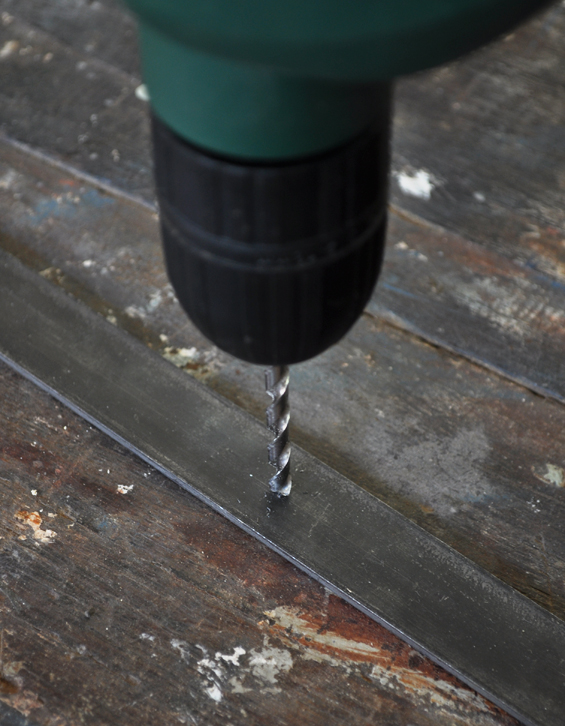
Apply even and steady pressure – getting through can take a bit of strength and time – and ensure your underlying surface isn’t anything precious as you’re likely to hit it one you get through the metal. If you have trouble with the drill bit slipping at first, use a smaller bit to create a pilot hole.
For the edging pegs…
Work out where you want/need to bolt your doors to the pegs. Remember to account for the “dead” space the bar will occupy at the top of the pegs.
I made one hole towards the base then another around 3cm/1″ above it.
To make the holes, insert a scrap piece of wood into the arch of the peg to keep it rigid. Drill through your holes, then remove the wood scrap.
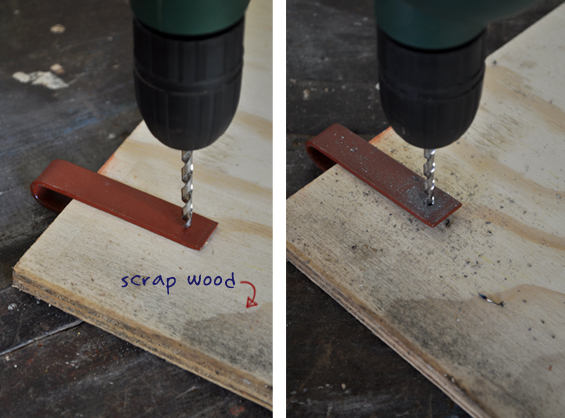
For demonstrative purposes, I’m only making one hole. Of course, I made two in my actual pegs. Also, this red peg is slightly smaller than the silver ones I actually used though it’s all they had at my nearest hardware store!
Using the holes as a guide, next drill through the back side of the peg too, being careful to keep the drill as straight and level as possible.
Again, choose a drill bit one size larger than your bolts. You want the bolts to slot through easily.
Note: You can use regular bits to drill through metal (I did) though it can take a while and will blunt the bits. Purpose metal bits are far better if you have them. Once you’re done, you can use a file if you need to smooth any particularly rough edges.
STEP 3 Paint hardware.
Clean all of your hardware then spray it your desired colour.

To ensure you get a good, long-lasting finish, wipe each item with isopropyl alcohol first.
STEP 4 Attach bar to counter.
Measure to the center of your counter. Hold a spacer in place then drill a pilot hole straight through both the spacer and counter (use a drill bit one or two sizes smaller than your screw – if your spacers already have a central hole then you can drill the pilot hole through the counter alone). With the spacer still in place, line up your metal bar (using the central hole you’ve already drilled in it as a guide), insert a screw then screw the bar, together with the spacer, to the counter.
Note: If, like me, you’re using rubber spacers be careful not to tighten the screws too much. It may overly compress the rubber and result in too narrow a gap for the edging pegs. Of course, you can always loosen the screw if you do happen to tighten it too much.
Repeat with the remaining affixing points until the bar is completely attached.
Note: I decided to attach the bar at this stage so I could use it as a definite guide for determining the accurate dimensions for my doors. I liked that I could drape the pegs over it and get a good visual by playing around with everything first. I don’t do so well using measurements alone! If you feel confident enough working out the size for your doors without having the bar in place, you could attach it during Step 6 instead.
STEP 5 Make doors.
Accurately measure how large each of your doors needs to be. Remember to allow for some clearance at the base if you’re taking your doors all the way to the floor like mine. My doors are 30cm/12″ wide x 85cm/33″ long.
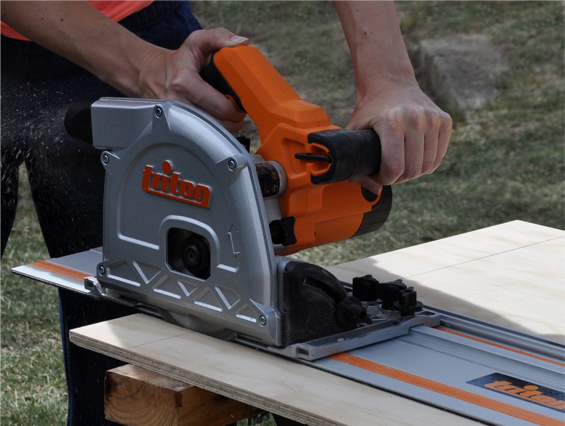
Cut your door panels from the plywood sheet. I used my plunge track saw for this though if you’re not confident with power tools (or, if you don’t even have any) your hardware store may cut it for you.
Add decorative trim in any style you like (I went with a basic farmhouse inverted “V”).
I created my trim by cutting down a sheet of plywood however you may be able to find off-the-shelf strips at the hardware store, or perhaps you could repurpose something, like venetian blind slats.
Attach the trim with wood glue, ensuring it is evenly clamped until completely set. If you notice areas where the trim is lifting or not sitting flush, you can use some small nails or screws. Just be sure to countersink the heads and fill any divots prior to painting.
Once the doors are constructed, caulk any gaps (if required), finish them as desired with your choice of paint or stain then attach your handles.
Note: Plywood has a tendency to warp, particularly if one side becomes overly hot or damp. I was working on my doors outside in the sun and they bowed considerably. I was a little worried they would be ruined, though once I got them inside they straightened out again. If you have trouble with warping which doesn’t seem to self-right, you can compress the doors under something heavy overnight.
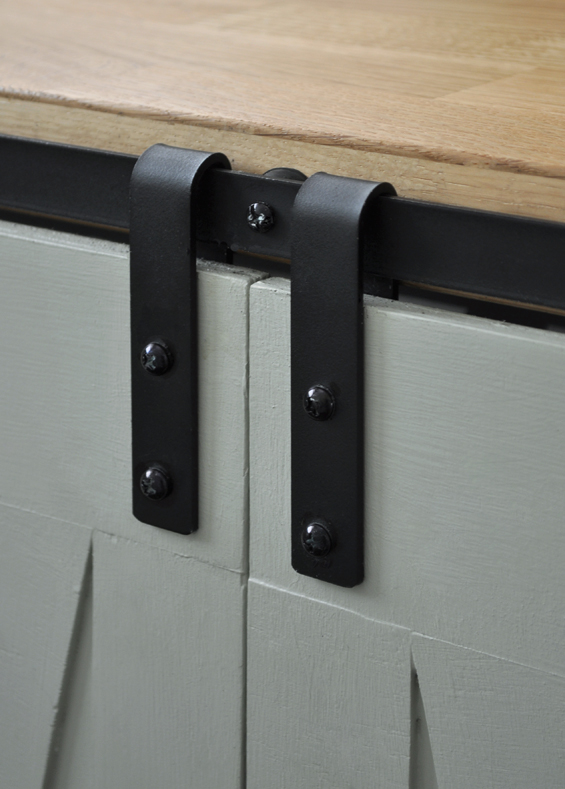
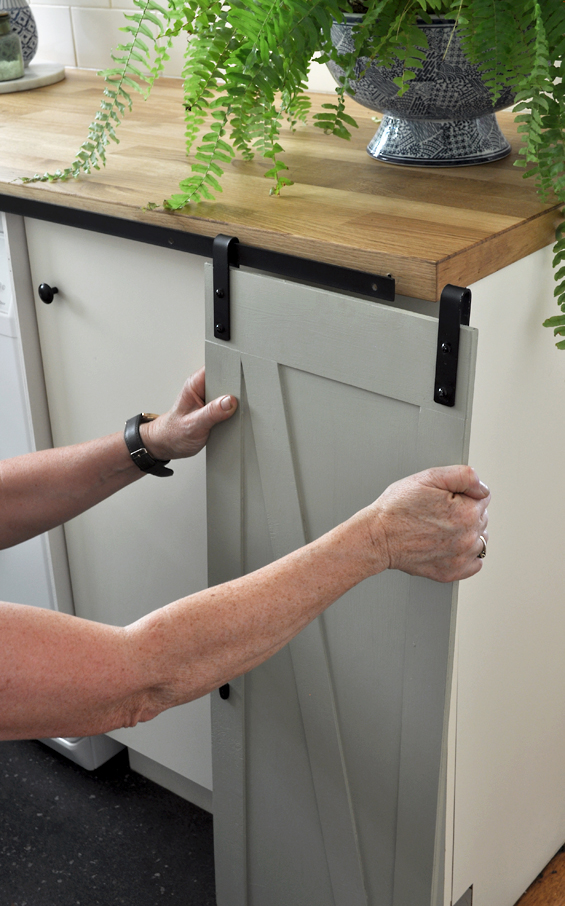
STEP 6 Attach doors.
As mentioned above in Step 4, if you feel confident working everything out based on measurements alone, then go for it. Measurements alone are not my friend. I like to play around with the actual components and position everything in place to determine where I need to drill and join. So, this is how I went about attaching my doors (feel free to do whatever suits you)…
Drape the edging pegs over the bar then slot each door in place. Use a spacer (I just used a narrow timber off-cut) to hold the doors up off the floor at your desired clearance height.
Tip: If you find the arch in your pegs is too narrow for your doors, pry them open a little by leveraging them using your foot.
Once the pegs and doors are in exact position, mark the doors where the bolt holes need to be made (by inserting a pencil through the holes in the pegs). Remove the pegs and doors and drill the bolt holes in the doors (use a bit one size larger than the bolt).
Next, line up the holes in the doors with the holes in the pegs and push the bolts through. Fasten at the rear with a nut.
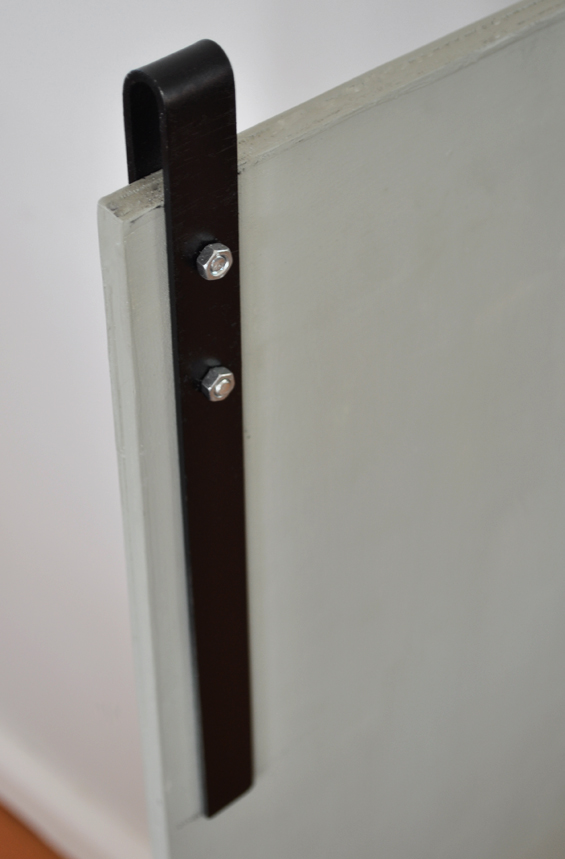
If your bolts overhang, you can trim them down with a grinder or hacksaw.
To get the doors on the bar, remove a few of the fastening screws (in my case, the central one along with the two on the right hand side) then slide the doors into position before re-attaching the screws.
Note: Depending on how accessible your space is, you may need to completely remove your bar to slide the doors on. Alternatively, you may be able to slide the doors on from each end. Just do whatever works best for your situation.
STEP 7 Finishing touches.
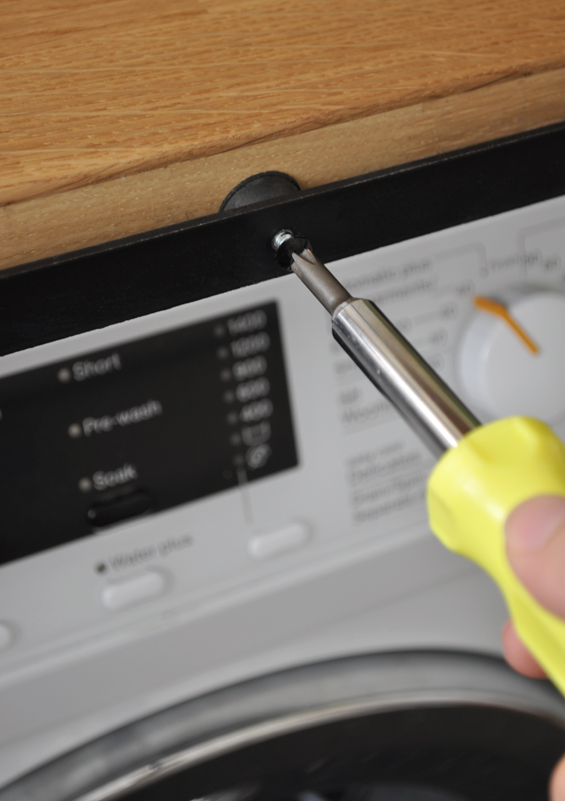
Due to the fact the existing cupboard doors abut the underside of the counter, and because the washing machine protrudes somewhat, I had no choice but to attach my doors to the face of the counter. As a result they sit further out than the existing cupboard doors which initially produced a relatively obvious gap when viewed side-on. To remedy this, I attached two plywood off-cuts to act as “blinkers”.
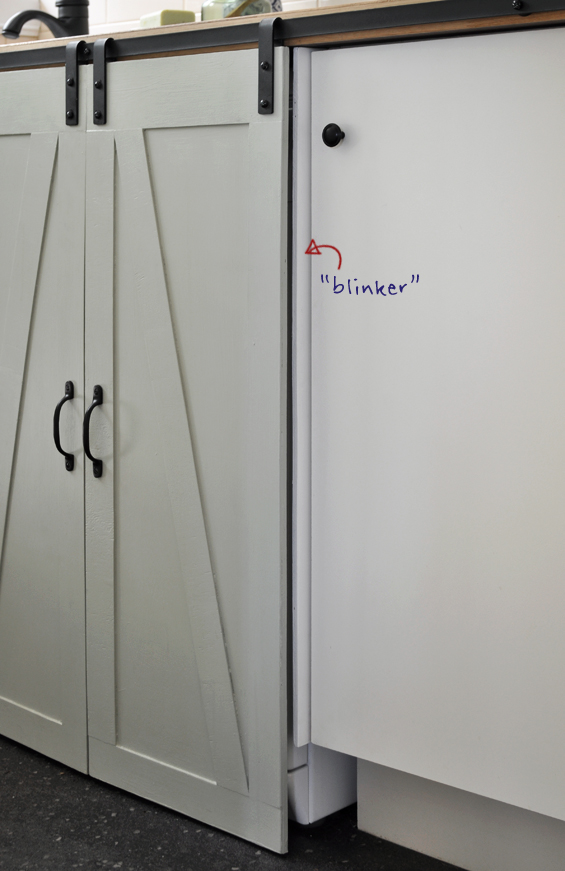
They are attached to the sides of the cupboards (screwed on from inside the cupboards) and, painted cream to co-ordinate, look just like part of the cabinetry.
Although it was part of my original plan, these doors have no floor guides or stays. I found that they hang neatly and glide smoothly as is, which I think can be somewhat attributed to their petite nature. If you found you had difficulty getting your doors to sit the way you wanted, or if they didn’t glide in a nice straight line, you could install some simple floor guides or stays, or even attach cute little wheels.
To finish, I coloured the screw and bolt heads to match my hardware. I just used a permanent marker though you could also paint them.
If needed, you can also touch-up any paint chips elsewhere on the doors or hardware.
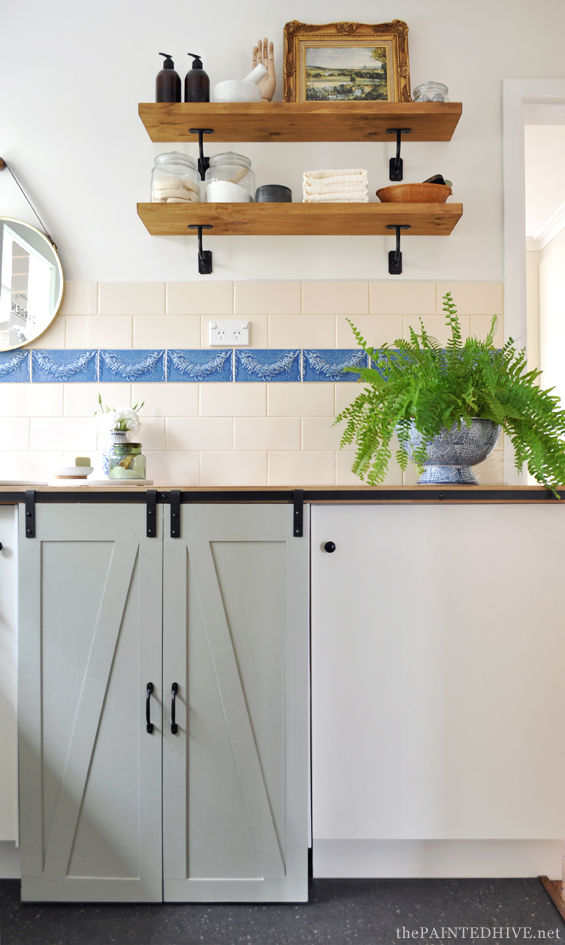
STEP 8 Done!
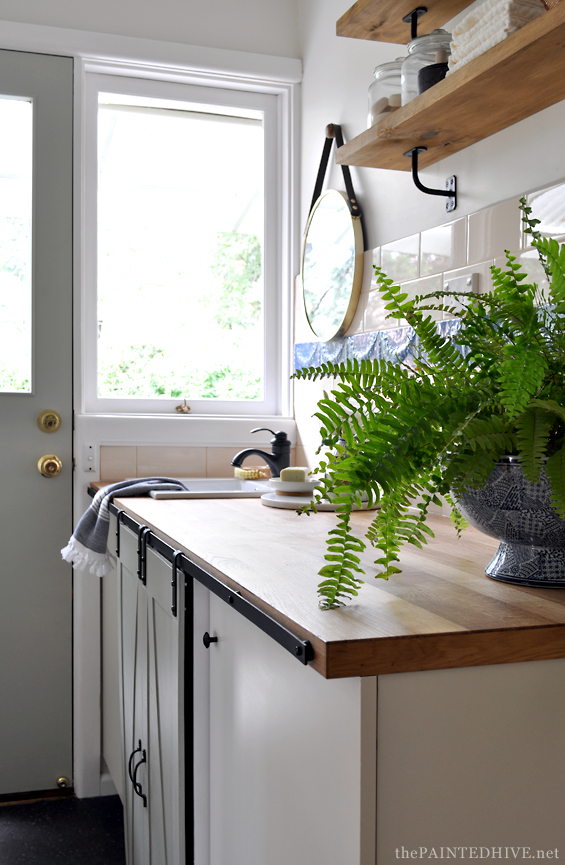
I don’t think I need to reiterate how stoked I am that this crazy, affordable, and not too tricky, project actually worked!
Love them!
END NOTES
:: Although these little doors work exceptionally well, I’m hesitant to recommend upping the scale unless you use larger pegs (so the doors can be thicker, thus less prone to waves or warps) and some sort of floor runner (to assist with smooth motion).
:: Some of my readers expressed concern about the “metal on metal” screeching which might arise from the opening and closing of the doors. I can honestly say that there is almost no sound at all!
:: I thought that the spray paint might chip easily though it’s holding up incredibly well. Like, really, really well! There is barely any sign of wear and these doors are opened and closed several times daily. I have used isopropyl alcohol a few times to clean metal prior to spray painting it and I think it makes a huge difference.
:: Not only do these doors work to conceal the presence of an unattractive appliance, though they are entirely practical. They glide with ease, don’t shake or rattle when the washing machine is in use (which surprised everyone!) and sit neatly side-by-side when closed. Don’t ask me how it all came together so well…maybe thanks to a gut-full of determination sprinkled with a hand-full of luck :)
:: If building a DIY barn door feels a tad too much for you, there are some great off-the-shelf options you can check out at White Shanty.
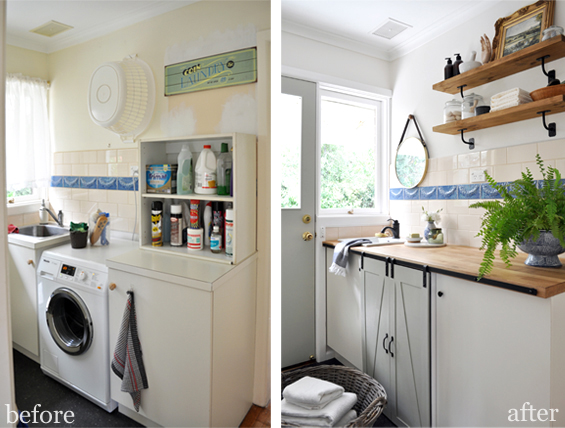
Here are some before and afters just for context’s sake…
I hope this tutorial inspires a few of you to give it a go!
Catch up on all the laundry room refresh projects here.
![]()
PS If you’re an email subscriber of mine, you may have noticed a little change this week.
I’m currently in the process of moving to a new service, which is super exciting as it provides fresh subscriber features I’ve previously not been able to offer!
My deepest apologies if something strange or annoying went down. I’m handling the migration myself though am far from an expert so am doing my very best to get any kinks ironed out.
If you’re not a subscriber, now would be a great time to sign up! Use the “Subscribe” tab on the left of my site, the widget in my sidebar or the cute lil’ envelope at the end of this post.
If you’re already a subscriber (thanks!), you don’t need to do anything. You will be rolled-over automatically.


Wow, I am so impressed. Very nice.
Thanks Lynn :)
Very nice tutorial! And I am loving this laundry space!
Thanks so much Randi :)
So cute.
Thanks Sally.
Terrific article Kristine!! The detail is easy to read and so thoughtfully laid out!!
Love your blog!!
Keep it up!!
Kay and Will
Thanks as always guys. Too sweet :)
Kristine, I have been a designer and DIYer for over 30 years. I must tell you that this makeover and the design/construction of these doors completely impressed me! (I voted for you in the makeover competition). Your instructions are a bonus I wasn’t expecting and were very easy to follow. And, I appreciate the follow-up ~ addressing questions readers had (very helpful). Kudos to you and a big “Thank You!” I can see this being applied in making a TV cover. I’ve researched designs for TV covers and have been saving ideas to build my own. I wanted the “barn door” look but had not found inexpensive and “petite” enough looking hardware. This is just perfect! Your blog is great, m’dear!
Thank you so, so much Kathy.
Yes, using it as a TV cover is a great alternative (I should actually add that to the post!).
Am so glad you like the project and tutorial.
:)
I just realized, there is no dryer! Is that the norm in your parts?
Wow – I am truly impressed with the fact that you basically created something from nothing. I assumed you had used a “barn door” kit for the hardware. Fantastic job finding the bits and bobs needed to make this look so seamless. I just stepped back out of your league with this one. ;)
Ha, ha. Didn’t you notice that Deb? Yes, it’s not uncommon. Our weather is pretty temperate and most people have an outdoor clothes line (saves on power bills and is kinder to the environment). Lots have dryers as well (I do), though not my mum.
It is essentially a “barn door” kit – it just comes with a bit of assembly, and at under $10 is probably much cheaper! LOL!
Thanks :)
I appreciate that you are so clear on the details. Nice job on working all that out, though I know you excell in that! I, too, do a lot of improvisational work. It’s fun and rewarding to make something from basically nothing. I like seeing the projects you do for your parents’ house. Kudos to you and keep it up! Thank you.
So true. It’s the entire creative process that makes DIY so appealing to me. It’s not just about the end game though also how you get there. Glad we share the same sense of fun and reward.
Thanks so much Jen :)
Wonderful make over. I also voted for you!! I have no idea why you didn’t win. You were by far the best!! Keep up the great work!!
Thanks Cathy :)
This is just absolutely amazing I love it. I want to make these for my washer and dryer set eventually so I sat down to read this post thinking I’d be here a while because these are so great they would have to take up a lot a lot of time to read and learn exactly how you, ordered parts, put it all together and hung it etc. I’m from Ireland so I was waiting to be disappointed that I wouldn’t be able to order the heavy duty hardware pieces without spending a fortune so I’m beyond over the moon and had a little ‘squeeee’ moment myself when I saw you just made up the whole lot yourself out of what you found!!!! I agree with the others. You should have won!! Anyway thank you so much for this post and this idea and for making it seem easy for all of us to make one. I’m defo going to try it soon..
Oh yay! I’m so, so thrilled my little project has inspired you and am especially chuffed it gave you a little “squeeee” moment – LOL!
It’s really lovely to know that you find it so achievable. That’s actually something I put a lot of thought into – making the projects I share totally do-able.
Be sure to let me know if you do have a go at something similar. I’d love to see.
Kristine
x
Hi again Marie. Just wondering if you happened to see/read my latest post about the DIY large-scale quote art? I thought it might be something you’d like. Also, I totally stole your lovely “squeee moment” phrase. I was going to write “yes moment” then I was like, “Hang on a second, what did Marie say again?”. LOL! “Squeee” is much cuter!
I really LOVE the blue and white bowl with the fern. I don’t suppose it’s currently available anywhere, but it doesn’t hurt to ask.???
Hi Kathy
Sorry, I just checked the website of the store I bought it from last year though it’s no longer available :(
I’m sure you can find some similar ones if you Google “large blue and white bowl”.
Kristine
Wow, this is awesome–you did a great job!
Thanks so much :)
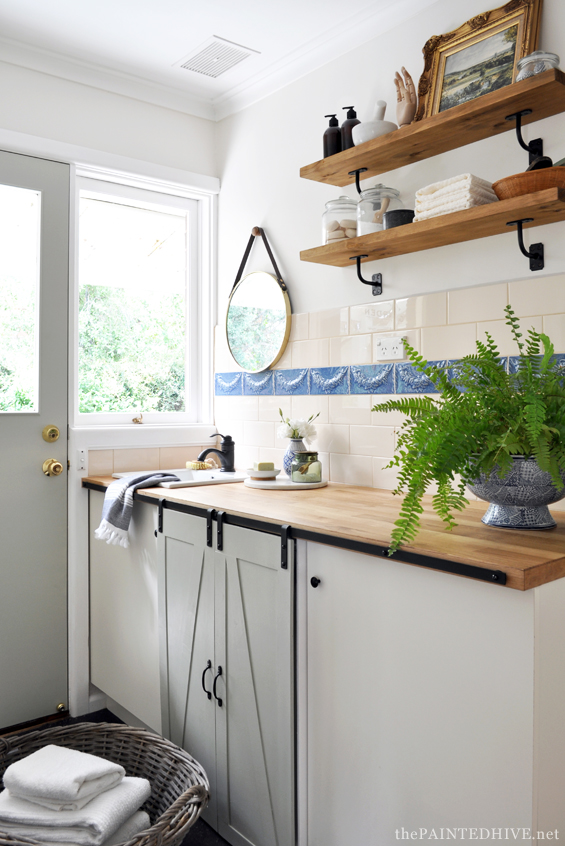
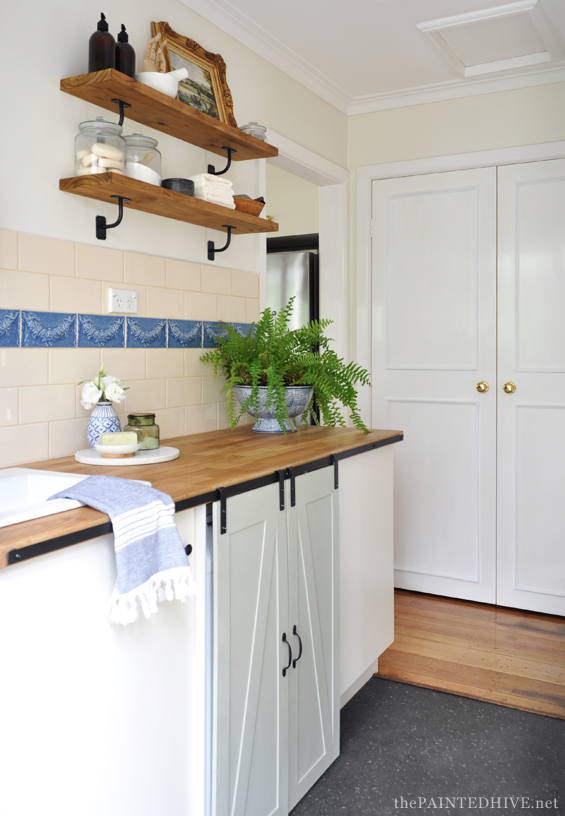
Love the sliding doors! Now, what about those shelf brackets above for the shelves on the wall! Are those repurposed as well?
Of course they are Holly :) They are actually hand-rail brackets. You can find the blog post here.
x
Did you make the wood shelves too or did you purchase them?
Hi Arleen
Yes, I made the shelves though it was super simple. I just found a plank of pine that was the right width then I chopped it down as needed and stained it. You can read and see more about the shelves here: https://thepaintedhive.net/2017/02/diy-modern-farmhouse-wall-shelves/
Kristine
Oh my word, this is SO CLEVER! Thank you for sharing your method for building these doors. What a great job you did! Your parents’ laundry space is now a beautiful room!
Thanks so much for joining the Grace at Home party at Imparting Grace. I’m featuring you this week!
Oh wow, thank you so much Richella :)
Do you think the garden edgingyou used for this would work on a full size door – would it hold the weight of a large fill size piece of plywood? Love this!
Hi Heather
If you used some wheels or guides at the base I think it could work. Though for a full-sized door it would need to be quite thin as the pegs only allow for around 1cm in their arch. Large, thin doors could easily wave or bow. Also, while my small doors look fine being thin, a full-sized door might look a little odd. It’s certainly do-able though might take some re-working to get it looking really good and functioning really well.
Kristine
Terrific site! Your projects are so meticulously crafted that the results are truly impressive.
How do the barn doors slide? Do they make noise when you open them? They look great!
Hi Abbie
The pegs simply glide along the metal bar. They are very quiet as the doors are so lightweight and only need to be opened around 30cm/1′.
Kristine
I would not say that is easy, but looks very cool!
Nice tutorial ;)
Nice. Can I ask, where can I find the brackets you used for your shelves?
Hi Melinda. They are handrail brackets! You can read more about them here: https://thepaintedhive.net/2017/02/diy-modern-farmhouse-wall-shelves/.
Best
Kristine
I love this idea. I am buying a home and believe it or not, the hookups are outside under the covered porch. I live in Sacramento, California and thankfully we have more warm months than cold. The former owners built a cabinet around the W/D. Do you think the S/D would have to be elevated off the concrete floor?
Okay, excuse my ignorance. By S/D do you mean ‘source drain’?
Look nice and beautiful laundry style ,
Thanks for the tutorial !
No ROLLERS? After awhile you’ll wear and scratch the heck out of the runner.
I guess it could scratch after a while (still holding-up great at the six month mark) however as the bar is black steel any scratches won’t be particularly noticeable. Plus, it would be easy to touch them up with a black marker if needed.
I highly doubt the metal will wear down – perhaps in a few hundred years! These doors are only small and super light-weight.
Hi
For some reason my landlord installed the washer and dryer hookups out on my back patio area and it is horrible looking at all the time. I want to have people over to bbq and pool party but am embarrassed. The washer and dryer are under the roof area of the patio. Would you have suggestion on making a box to surround the 3 sides, slider doors to access dryer (front load) and maybe a top on hinges to access washer (top load) ??? Help please
Hi Johanna
Feel free to email me a pic (thepaintedhive@gmail.com). More than happy to try and help with some ideas.
Kristine
:)
So cool
I love your tutorial, the instructions are easy to follow…we’re getting ready to attempt this for a tv stand/Ikea hack….I am having the hardest time finding the edging pegs. Do you have any other suggestions? Would so appreciate it! Thanks!!
Very Cool! What is the height of the counter top?
Thanks Kim. Hmmm, I think standard 900mm/36″.
Hi
Love this makeover. My laundry is exceptionally small but similar and is on the one day plan. We also have the dog sleep in there so floorspace is limited.
Do you have instructions for the counter top and sink installation? And where is the glass door from? Our laundry faces south and doesn’t get much light?
Looking forward to seeing more projects. Thank you.
Hi Claire
Glad you like it :)
Not sure where the door is from sorry – it was already in the room.
I don’t have a post about installing the counter and sink though it wasn’t too difficult. First we removed the original counter which involved carefully releasing the grout from where it was joined to the tiles (this was a painful, slow job) and unscrewing from underneath. Then I cut the new counter to fit. Obviously, I cut it along the concealed edges beside the window and along the back. Then we maneuvered it into place and attached it by screwing through from the underside before caulking where it joins the tiles. To install the sink I cut a hole in the counter using a jigsaw then popped it into place and once it was plumbed in we siliconed around it.
Cheers
This is beautiful. The blue and white theme looks so crisp and clean. Great job! I do have a question, though. Is there enough room to leave the washer door open a bit for air circulation? These front loader washers have an odor problem is the door is not left open. I am curious.
Yes, there is space to leave the door ajar if needed though I’m pretty sure my mum always has it closed. She does washing pretty much everyday and tells me she has never noticed an odor problem :)
I have laundry room envy.
Thanks so much. So do I as this is my parent’s house!
If you don’t mind me asking, I’ve noticed a lot of new traffic to this post today, were you directed here via a feature on another site?
Cheers.
So thrilled to have found this post. About 8 months ago, I purchased a two bedroom cement block house that is completely gutted. I mean it has a sink, bathtub, and water-closet. That’s it. Concrete floors are very unlevel and bare. My intent is to finish it out myself in a rustic, Amish-farm style. I love the barn door look and need to eliminate door swing where possible. The kitchen is long and narrow. Definitely, a galley style kitchen in that space. The barn doors will be prefect on the sink cabinet front. I am wheelchair bond at times and the “doors” won’t open past the wheelchair. I wasn’t certain how to do the barn doors and my quote for the work was unbelievably high. That all just went away! I can have my barn doors and I now know I can do them myself!!!!
My front exterior door is going to be a barn door. I am biting the bullet and paying the price for a custom barn door front entry door. I love light and I have dogs, dogs, and more dogs. They like to look outside but are short and small. So, the barn door shall a made from glass and feature the wooden frame with standard cross bars with black cast iron hardware.
I now have the confidence to attempt these barn doors as well as a construction starting point. I’ll see where your post takes me. Thanks a bunch.
Oh, this is fantastic! Thanks for sharing your story with me. It sounds like such a fun adventure! I truly hope my project has helped :)
I’m sorry I ask about the wrong item OOPS! I put washer which is what you did, Stupid me, We need to know where the dryer is in the room?
Hi Linda. My parents have never had a dryer. Although most people here in Australia have one now, it’s not a necessity as we tend to dry our laundry outside on a clothes line. Cheers.
I love your idea❤ can you make barn doors or buy them and do it for anything?
beautiful! I’m going to use your plans for a built in dog kennel in my laundry room. I’m concerned with the high use and how easily it slides. Should I get some small rigid casters for the bottom of the door?
The doors slide very easily though if you plan on using them super often, some castors couldn’t hurt.
Well I sincerely liked studying it. This subject provided by you is very useful for accurate planning.
Wow I definately enjoy every little bit of it and I have you bookmarked to check out new stuff of your blog a must read blog
This is a brilliant blog! I´m very happy with the comments!
A very excellent blog post. I am thankful for your blog post. I have found a lot of approaches after visiting your post.
Lovely to see DIY’ers nowadays doing great work. Keep it up!
Awesome barn door, easy to follow this guide. Post more informative article.
Brilliant article and very useful. We want to cover our fridge and freezer which are at each end of our small kitchen. The gap in the middle will house the trolley my husband made with all my collection of spices on show. Problem, it nearly touches the worktop so no room to build sliding doors below so this idea of fixing to the edge of the worktop is perfect and I love the sliders idea. We live in Cyprus and runners and wheels are hard to find but we have a friend who can make the sliders for us and we will spray black and use old wooden pallets to make the doors! Thank you for the inspiration!
That sound amazing. So glad to have helped inspire you :)
Amazing! What a great idea! I hope you are ok with us using this idea of mini barn doors for some of our upcoming projects and designs. Love it!
These are such a great addition to any room, it makes things so easy. We installed mini barn doors in the kitchen, bathroom and our bedroom. Love them!
Beautifully done! I love these doors they are great! I would love to add these over my mini fridge or wine cooler.
What a great way to hide appliances, it really changes the dynamic of the entire room. Well done!
Funny, we just installed these barn style doors on a garage we built last month. Obviously they were quite larger than your mini doors. But they look really good to go along with the rustic siding we put on too.
Thanks for this post, I am a big fan of this website would like to go on updated. http://www.insulationvictoria.com
I appreciate the variety of examples you provided. It made the content more relatable.
Awesome post! Thanks for this great shared content.
Thanks for taking the time in sharing this interesting post.
Very informative post you shared.