
Don’t you love it when an idea simply pops into your head?
That’s just what happened with this sideboard makeover.
I was about to cut down a sheet of thin plywood to create some faux drawer fronts when I suddenly stopped.
“Hey, peel and stick floorboards are about the same thickness as this plywood”, I thought. “Why don’t I try using them instead? They can be trimmed with a utility knife so I can share a cool ‘power tool free’ method anyone can have a go at!”.
Yay!
YOU WILL NEED…
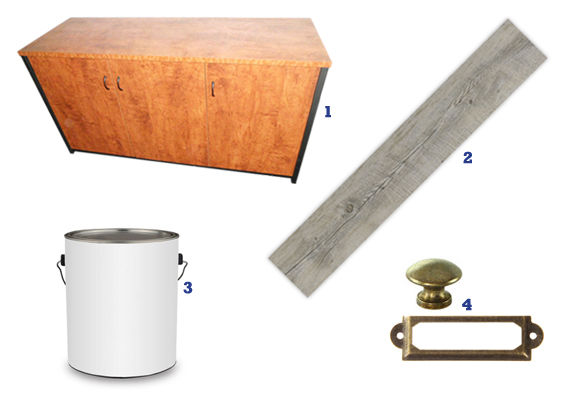
1 PIECE OF FURNITURE
You can affix faux drawer fronts to lots of different furniture items. From a dresser to an armoire to a nightstand, the options are almost endless. However, there are some attributes which will make things easier and produce better, more authentic-looking results. See my list of “What to Look For” towards the end of this post for some hints and tips.
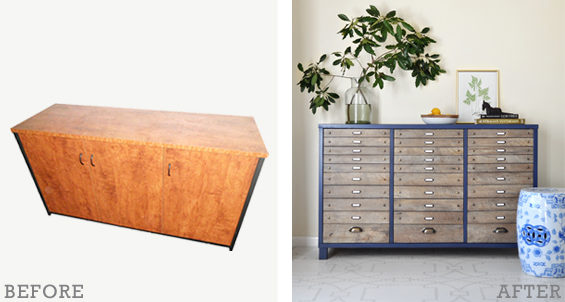
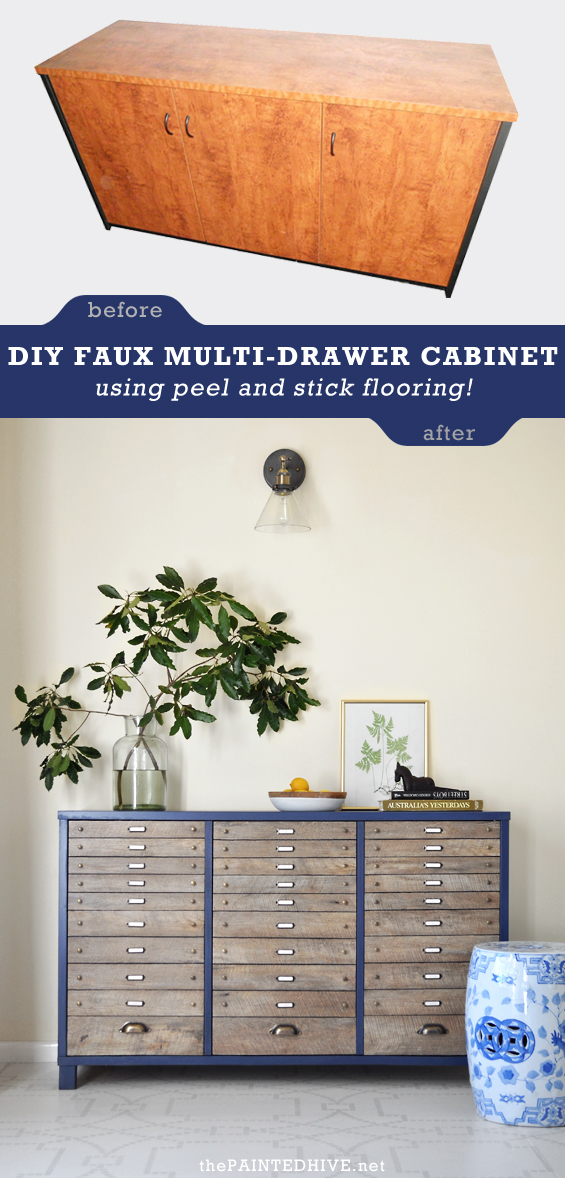
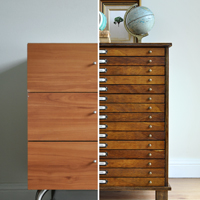
I used a laminate office sideboard I found on eBay for just $35. Yes, that orange beast in the above pic is the actual piece of furniture I started with.
Now, I could pretend I bought this sideboard just last month. And that I refurbished it within a reasonable time-frame. ‘Cause, you know, that’s just how I roll.
Truth be told, it was sitting in my parent’s garage for almost three years before I even looked at it. ‘Cause, you know, that’s actually how I roll.
I bought it just after I finished this faux drawer DIY because I had a hankering for another similar project. Turns out my hankering wasn’t particularly pressing!
2 PEEL AND STICK FLOORING
Of course you can use whatever style you like. I went with Senso Self Adhesive Vinyl Planks in Rustic Walnut which I found at Bunnings. These have an amazing texture and look incredibly legit. Although the packet isn’t super cheap at around $60 I only used half so technically my faux drawers cost just $30, plus I still have plenty of boards left-over for another project! In the past I’ve used thicker products (generally 6mm/0.2″ plywood) to create faux drawer fronts however I needed something thin in this case to allow the doors to continue to swing freely (so as not to catch when opened) and to sit within the recess of the side panels (so as not to protrude and expose the ends).
3 PAINT
I used some left-over paint I already had. It’s Dulux Aquanamel in a navy colour called ‘Diplomatic’. Of course, you can use whatever you like.
4 HARDWARE
Little knobs and label holders can be found in lots of places for super cheap nowadays. Etsy, eBay and AliExpress all have a good range, as do many discount cabinet hardware stores. I got my brass knobs from AliExpress (for just 20 cents a piece) and the label holders from eBay (for around 10 cents each). I also used three cup pulls which I also bought from eBay (for 60 cents each).
I was a bad blogger and didn’t take progress pics of every stage of this project. That said, I’ll do my best to explain things as clearly as possible.
STEP 1 Measure, trim and attach faux drawer fronts.
Decide how many drawers you’d like and their sizes. I went with ten drawers per door in a graduated formation; five small ones at the top, four medium ones in the center then one large one at the base. The large drawer front not only works to add interest, though also covers the toe-kick.
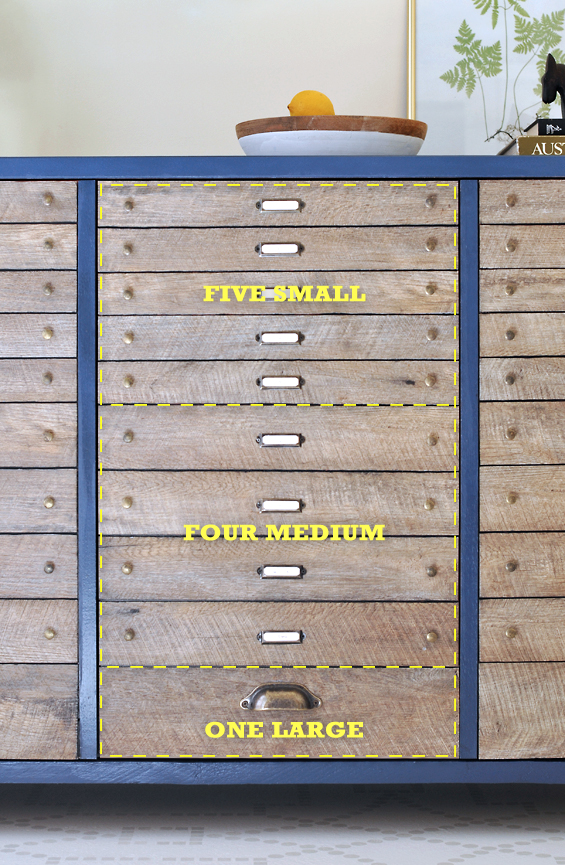
When you’re working out the dimensions, remember to account for an approximate 2mm/.1″ gap in between each drawer. Also, be sure to consider the width of your peel and stick planks. Obviously, you want as little wastage as possible and can save yourself some trimming.
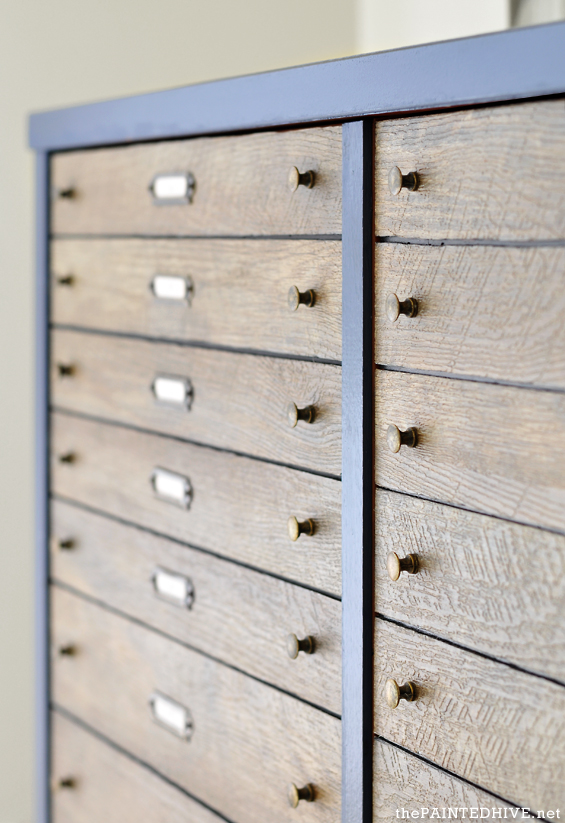
Because my sideboard had a continuous bank of doors with no dividing verticals, the first thing I did was add two pieces of trim to break-up the drawers. Obviously, if your item of furniture already has dividers, or if you simply don’t mind if your faux drawers join, then you don’t need to worry about this extra step. To make them I simply cut down a length of pine moulding, painted them to co-ordinate with the body of the sideboard then glued them to the edge of both end doors. As with the base drawer, they also extend down over the toe-kick.
Due to the vertical dividers, the two flanking doors are slightly narrower than the central door though this doesn’t detract from the look of the drawers at all.
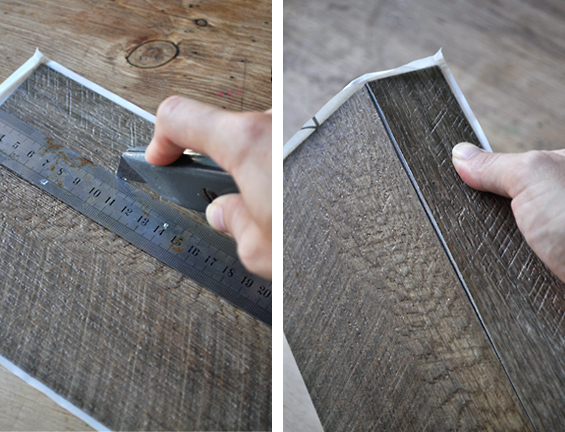
Once you’re happy with the drawer dimensions you’ve decided on, cut down the planks with a utility (stanley) knife as needed, using a steel ruler as a guide. Once the score line is deep enough the plank should simply snap apart. It’s pretty quick and easy though you do need to concentrate somewhat to ensure your lines are nice and straight.
Note: You’ll probably notice that the cut edges of your faux drawers have a white-ish grey appearance. If you like, you can colour them at this stage using a permanent marker, or some paint or stain, to co-ordinate with the surface tone of the planks. Otherwise, you could simply leave them or colour them black in Step 4.
I was keen to simply peel and stick these straight to my doors though I found there just wasn’t enough grip for them to adhere properly. They seemed to attach nicely to begin with though after a little while some areas began to wave and bow out. This may be because my piece of furniture was slippery laminate, or simply because the boards are designed to be adhered to a horizontal surface. Regardless, I decided to add a few dobs of liquid nails to each faux drawer to ensure a firm bond (I knew attaching the handles would help hold them in place too though I didn’t want to rely solely on those few screw points).
Tip: For ease, you can remove the doors and lay them flat whilst you’re attaching the faux drawers.
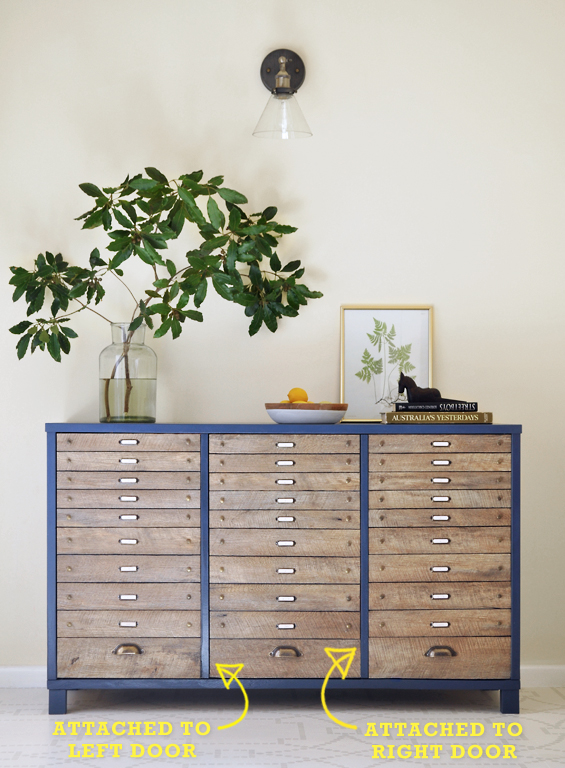
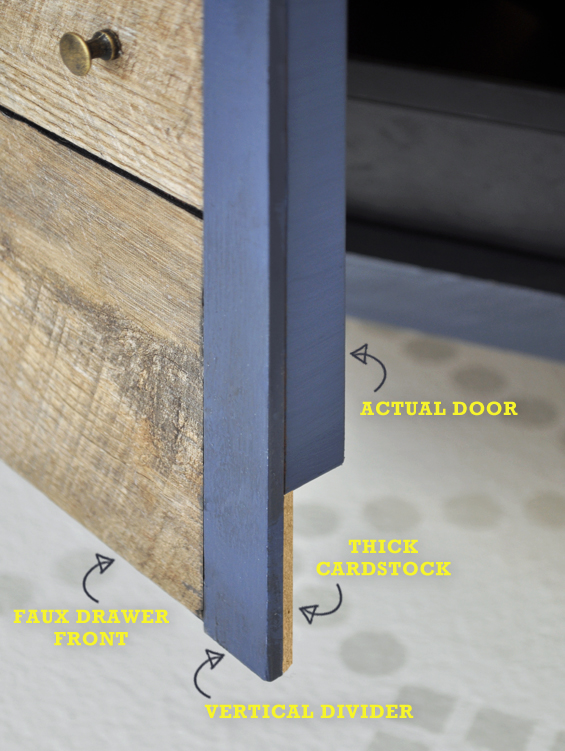
As mentioned earlier, the base faux drawer also works to conceal the toe-kick. To achieve this I simply extended it (and the vertical divider) over the toe-kick, so it’s longer than the actual door. The top half of the faux drawer is attached to the bottom of the actual door, the lower half of the faux drawer simply sits over the toe-kick. To cover the exposed adhesive and give the faux drawer more stability I attached some thick card to the rear of the over-hanging section.
The last thing I did at this stage was add a proper base and some little feet.
Obviously, this isn’t essential and depends on the design of your particular piece of furniture and the look you personally want. To do this I cut down a plank of pine and attached it to the base of my sideboard along the front. I then cut down two smaller pieces from the same pine plank and attached them to the base along each side. To finish, I cut down a square length of pine to create four simple little feet and screwed them to the new base.
STEP 2 Paint.
Remove the doors (if you haven’t already) and paint your piece of furniture as desired. As mine is laminate I sanded it thoroughly and used a good primer before applying two top coats.
The vertical divider appears to over-hang the side of the door in this pic. I think this is because the edge of it looks darker which has created the illusion of a shadow. It’s actually flush with the door.
Along with painting the entire body, I also painted the edge of the doors to ensure none of the original orange laminate could be seen peeking-out from around the sides.
STEP 3 Attach hardware.
This is when it all starts to come together!
If, like me, you have a million handles and holders to attach this step can get tedious. Don’t feel like you need to do it all in one go.
A cardboard template can make things quicker and more accurate. And, as always, I recommend drilling pilot holes for all screws, even the tiny baby ones. It just makes things easier (although the vinyl is pretty easy to screw into). Ensure you use a drill bit one or two sizes smaller than the screw itself for any pilot holes.
Tip: Check for any obstacles which might interfere with your hardware placement, such as hinges or internal shelves.
STEP 4 Finishing touches.
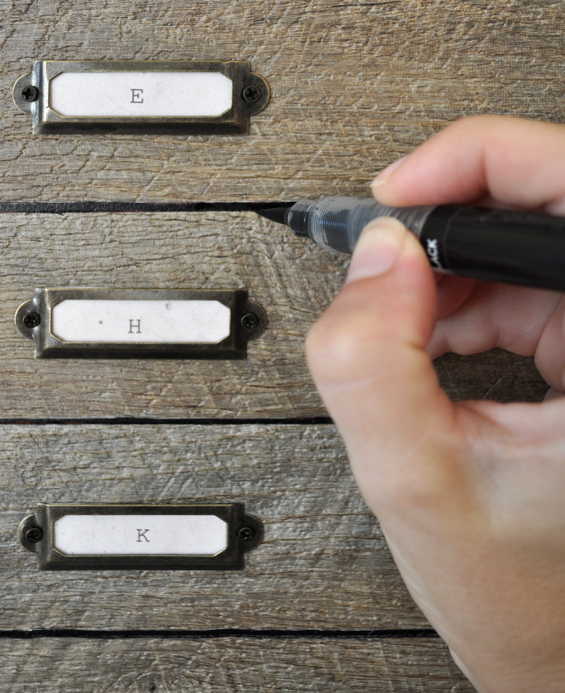
Use a long-tipped black marker or fine paint brush to colour the gaps between the faux drawers black.
Of course, if your doors were already black or very dark you don’t need to worry about this step. My doors were basically bright orange!
Note: I chose not to paint my doors before applying the planks because I was concerned the laminate wouldn’t hold the paint well enough. If I had painted my doors first, then the planks would essentially have been attached to the surface paint, not the doors themselves, and I figured it was likely that the adhesive on the planks would easily pull the paint straight off. You could paint your doors first if they are made from something which will take the paint well.
As mentioned earlier, you can also colour the edges of the planks at this stage if you like. Any excess ink or paint should wipe off the vinyl with ease so keep a damp cloth on hand.
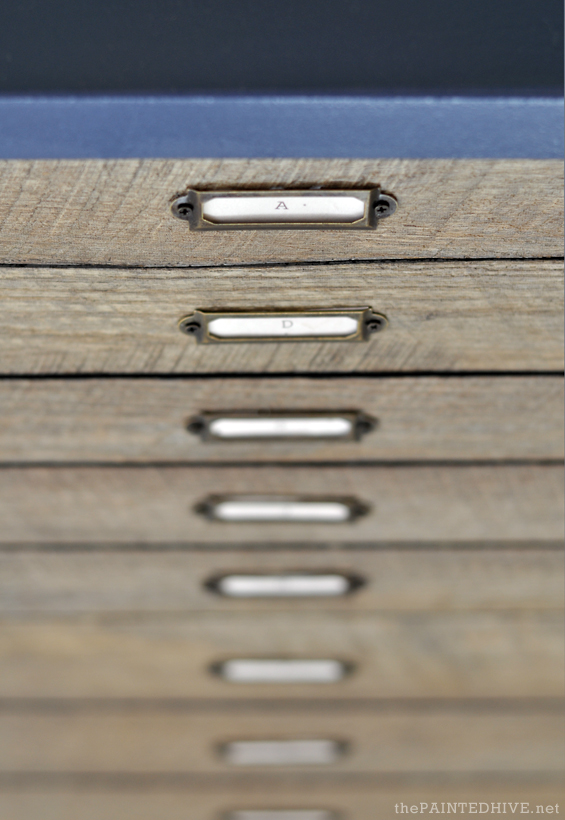
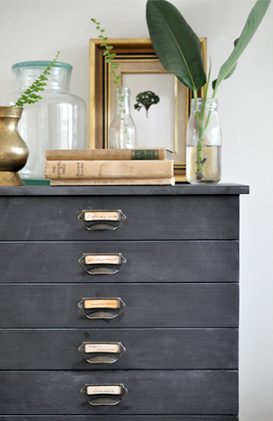
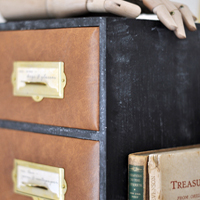
To complete the project, fill the label holders. You could hand-write your labels though I decided to print some letters and numbers onto aged paper.
STEP 5 Done!
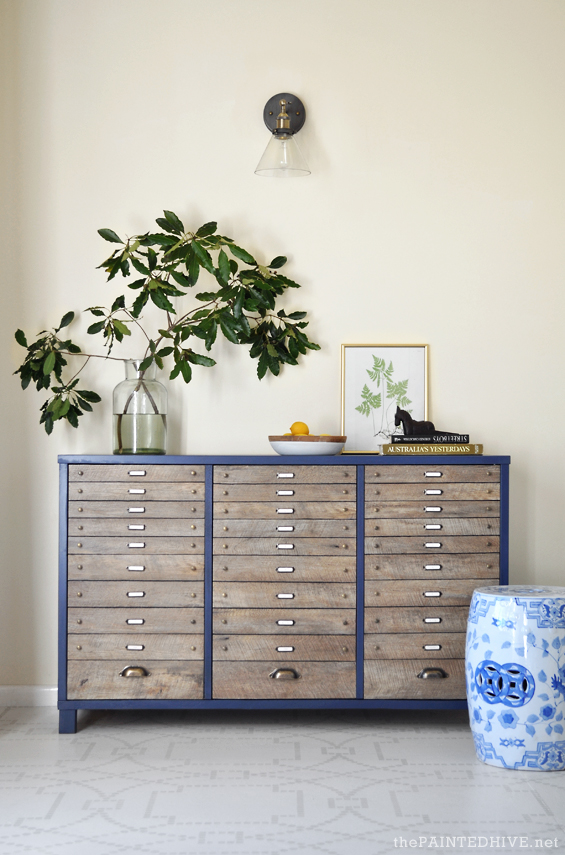
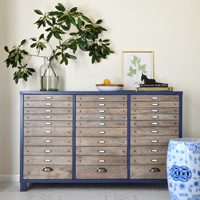
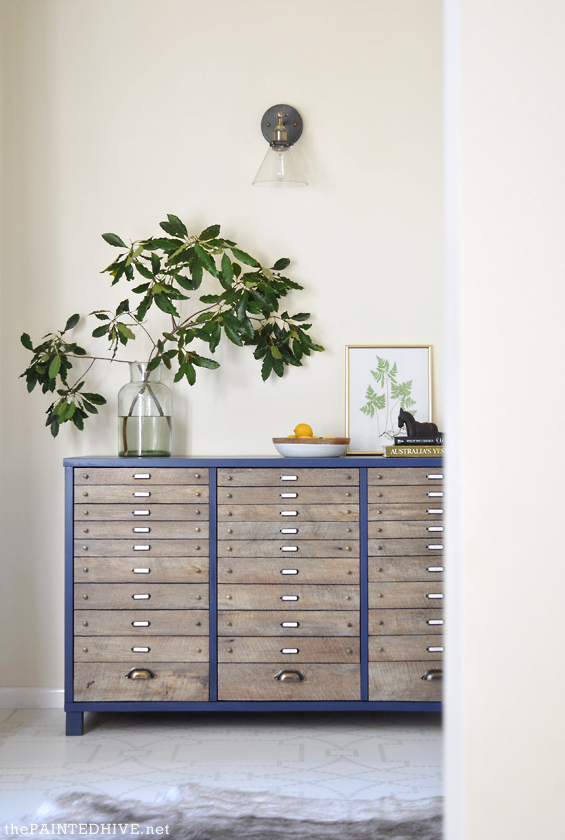
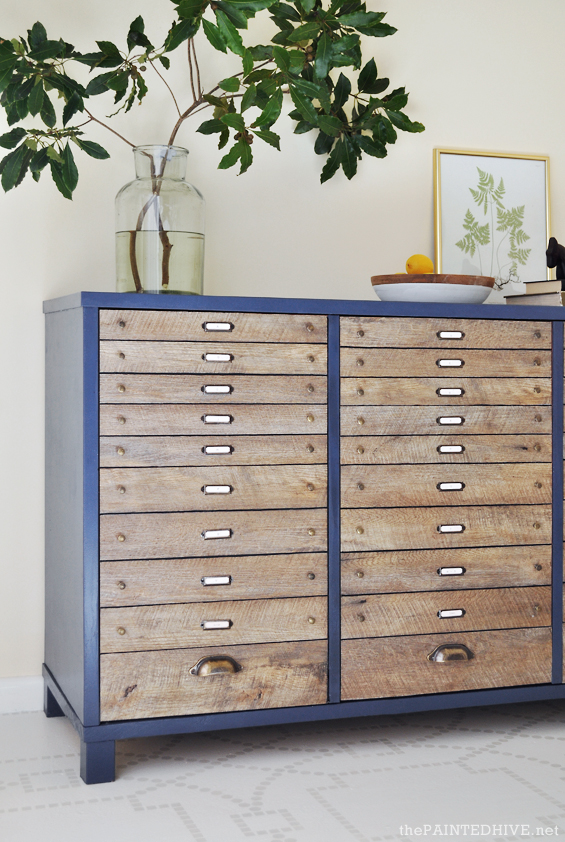
I couldn’t be happier with the way this all came together!
At first I was questioning my choice of paint colour (which was merely a left-over I figured I may as well use), though all styled-up it actually works really well!
I particularly love the way the faux drawers have slightly imperfect edges which mimic the rusticity of their finish.
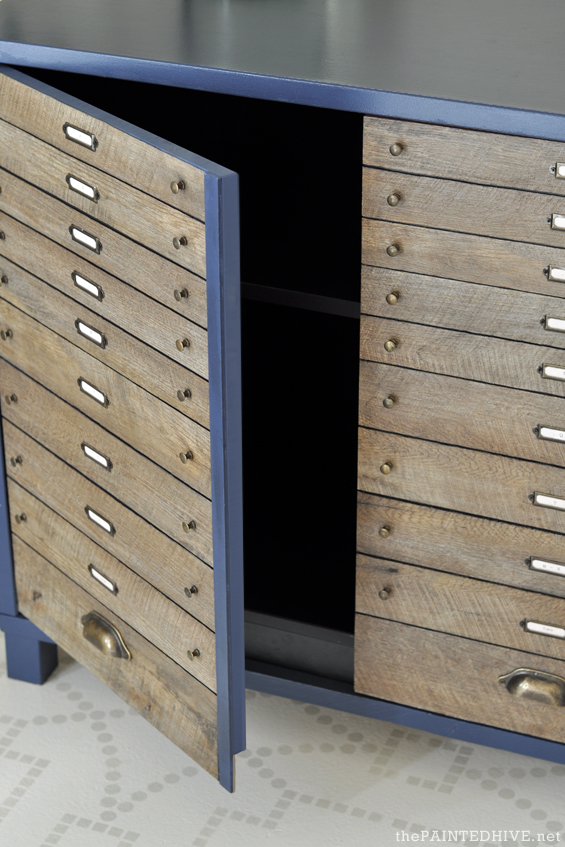
Oh, and just in case you’re worried, opening the doors is a cinch. The little handles are easy to clasp and the doors swing really easily, no matter where you grab them from.
All up this project cost me around $60 (minus the price of my sideboard) which I think was definitely worth it. Such a difference!
As mentioned above, if you’re interested in having a go at a project like this, there are some furniture attributes which can make things easier and produce better looking results…
WHAT TO LOOK FOR IN YOUR PIECE OF FURNITURE
:: CONCEALED HINGES Obviously, if you’re trying to pretend a cabinet with doors is actually comprised of drawers, you don’t want visible hinges giving the jig up.
:: SLIGHTLY RECESSED DOORS You need some space for the faux drawers to nestle into so that their ends aren’t visible.
:: DIVIDING VERTICALS This is a matter of personal preference though I think cabinets like this look more authentic if the drawer rows are segregated.
:: FLAT PANEL DOORS For obvious reasons, it works best to attach the faux drawers to a nice flat surface. Doors with raised mouldings or engraved details may not work as well.
This sideboard will be used in my parent’s bedroom retreat to store all of mum’s sewing stuff. If you noticed the stenciled floor, you can read a bit more about that here. I’ve actually been working on refreshing this room for the past five-ish years. Isn’t that ridiculous? It’s a tiny space though mum keeps changing her mind about what it “needs to do”. Yes, let’s just blame her ;) I definitely think this is the year to get it done though. Right?
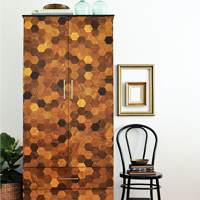
I love doing these faux multi-drawer cabinets and am already looking forward to my next one. I want to do something massive with heaps of really skinny drawers. Finger crossed it doesn’t take me three years to get around to it this time!
![]()
You can find my previous faux drawer makeovers here…
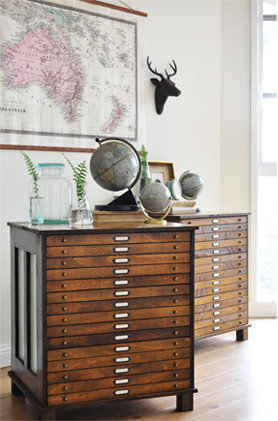


That is A-mazing! What a great faux piece – and great instructions. I love the gradated widths.
Thanks so much Sherylee :)
Oh my word, this is totally incredible. I love it.
Thanks Marty.
May I just say…WOW! I’ve been trying to change my thinking for years when I see new products come on to the DIY market. One of the reasons I love blog world. This piece is gorgeous. Thank you for putting this new tool in my diy tool box.
Oh yay, thanks Kay.
Fantastic!
I’m running out of adjectives to describe your creations!!!!
LOL! Too sweet Julie :)
You are pretty much a genius in my eyes! You made an ugly duckling beautiful!
That might work nicely on a file cabinet too!
Totally Patricia. I have done a file-type cabinet in a similar style before.
I just love this (and the faux wood you used) too bad that I live in the US of A and don’t have access to that lovely stick on material. Otherwise, I think I could find a few projects for it!
Hi Alice
You totally have peel and stick vinyl planks in the USA! Yay! Search Home Depot or Lowes for “peel and stick flooring”. There are heaps :)
Kristine
Yes, I know we have peel and stick but I have never seen any that have the class of rough wood like the ones you used. I shall keep looking!
Ah, got ya. Just found these ones (https://www.lowes.com/search?searchTerm=style+peel+and+stick+vinyl+plank). According to the description they are “incredible replications of natural wood texture and design”. Guessing this means they are textured like the ones I used – yay!
You probably need to see them in person. I assume Home Depot would also have some.
Oh how really sweet of you to go to all the trouble to do the research I should have!
Thanks, I have a Lowes near me and also a Home Depot to check out!
Thanks again
This is beautiful! I have some peel and stick flooring that is laying around being unused, now I have some ideas on how to use it. Thanks!
Great! Thanks Monica :)
Fantastic redo! Your ideas AND math skills are my go to for the faux drawer look. Keep ’em coming. ;)
Oh no. Maths is soooo not my thing. Take any of my calculations and measurements with a grain of salt – LOL!
Another truly stunning transformation! Thanks for sharing!
Unbelieveable! You are so talented!
Your projects are unique, and that is something to be proud of WOW!! Amazing work
Love the way this turned out. Talk about a make over : )
Thank you so much Julie :)
Brilliant….very nice work!!!
All I can say is…..WOW!
This is such a cute way to spruce up an otherwise ordinary piece. You never cease to amaze me with your creativity. I love how you can take the most simple home furnishing and turn it into a piece that appears high end.
As usual, you’ve given me another fantastic decor idea to copy….. I love it! Thanks so much for the detailed directions, too! You’re one gifted lady! I think I’m going to use your idea on the doors of the cabinets in my craft room. What character it will give to my plain ole’ white craft cabinets! To make it a little easier, tho’, I think I would paint the cabinet doors black before adding the planks. That way I won’t have to fuss with a black marker between the planks.
Now for a question….. How do you think these vinyl planks would look on a wall? I’ve wanted to put some pallet wood on a small wall area, but after seeing this, I tho’t it might look just as good and I wouldn’t have all the nails etc. in the wall. The grain in these vinyl planks looks just as good as any pallet from what I can tell.
My problem…. Because of having very few kitchen cabinets, I couldn’t give up the only good sized bottom cabinet I have in order to build in a dishwasher, so because I had a closet right next to that kitchen cabinet, (facing another direction) I built the dishwasher into the side of that closet. It’s only the one cabinet away from the sink. However, because there is just a plain wall above the dishwasher now, that’s exactly what it looks like to me….. a dishwasher built into a wall. I want it to blend in more with the kitchen cabinets, and look like it belongs there. Do you think putting something like this on the wall above the DW would make it look more like it belongs if I also add it to the open wall area above my kitchen sink?…. no window there, just an open shelf I built in between cabinets where I have my drinking glasses.
BTW, I’m a 75 yr. old woman and I still do all my own DIY’s and people can’t believe that I installed the dishwasher myself, after cutting into a wall. They love it, but I’m not happy with the plain wall above it, even tho’ I have a couple of decorating items on it. Any light bulb ideas would surely be appreciated! How I wish you were my neighbor!! LOL
So great that you’re still doing all of your own DIY’ing. You go girl! Isn’t it rewarding?
If you do paint your craft cabinets black before attaching the faux drawers, just make sure the surface is well prepped so the paint is firmly bonded – you don’t want the plank adhesive pulling the paint off!
Now, the dishwasher problem. Hmmm, to be honest it’s a little hard to visualise what it currently looks like. Feel free to email me some pics (thepaintedhive@gmail.com – don’t worry, they don’t need to be great) and we can brainstorm some ideas.
:)
Thank you for another fantastic tutorial! It looks amazing. Do you think the planks would stick to an uneven surface if I use liquid nails?
By “uneven” do you mean curved/wavy or rough/bumpy? I think they would definitely stick with some liquid nails though depending on the surface they may not look flush and smooth.
This is freaking out of control.
Genius idea. Thanks for the post!
Hi Kristine,
That is unbelievably brilliant! Just love, love, love it! I do have one negative about it though…. I have no room for such a piece! Aaaaggghhh! I must cull something so I find room!!!! Thank you so much for sharing another one of your fantastic makeovers. Gold star for you!
Liz (Wollongong)
Aw, thank you Liz :)
What a great tutorial! You are always coming up with fantastic & affordable transformations! I’ve also loved seeing this recent spurt, you have such amazing content, I just love seeing it!
Thanks Tabitha. Yes, I’ve had a bit more time since my eldest started school and my littlest is at kinder a few hours a week. It’s nice to have some “alone” creative moments.
GENIUS…would have loved to have seen your face at the ‘lightbulb’ moment!
I’ve copied your project to the Country Matters shop page with a link to your blog. Keep up the good work!
Wow, what a great job Kristine, you are such an inspiration.
Looks amazing! I wanted to use the stick and peel wood like flooring for a project recently but couldn’t justify the cost. So I went with one vinyl square (stone kind of look) which you can buy as a sample from Bunnings super cheap. I used it for a bedside table I was doing for my daughter’s room. I wanted the top to be more durable than paint. The leftover piece I used as a border on the bottom of the front of the bedside. It turned out better than I was expecting!
Great idea Jane.
Yes, it’s hard to justify the cost of an entire pack of vinyl planks if you’ve only got a small project in mind. The left-overs can come in handy for lots of odd creating though :)
OMFG Kristine – this is one of the best transformations I’ve ever seen! I need to make one RIGHT NOW! Plus I’m stoked that Bunnings sells peel and stick flooring (I had no idea!). I love your work so much, you’re such a great role model 😀
LOL! You’re too sweet Kate. Thanks heaps :)
Ha! I just bought a pack of the same card catalogue labels as you used on your last project with the intention of doing up a laminate filing cabinet in the same manner, although I was slightly intimidated by the wood cutting. Would you believe I have the EXACT same laminate left over from redoing our playroom floor last year?! I would never have thought of using it on the cabinet! Guess what I am doing this weekend, lol? Thank you, this will be a wonderful project I feel comfortable in tackling myself :-)
Oh yay! What an awesome coincidence! Have fun Julie.
PS If you like what you create, feel free to send me a pic – I’d love to see :)
Pretty much amazing…. now I’m off to find a piece of furniture to transform!!!!
You’re a genius!
I just found your blog recently and you’re such an inspiration!
Aw, too sweet. Thank you so much :)
As always, Kristine, a wonderful transformation! You make these projects look as if anyone can do them. And the results are fantastic.
Thanks so much Robyn. If I can do this stuff, anyone can! All it takes is an idea then some/lots of figuring out!
Amazing creation. Beautifully transformed, really a great piece of work. Thanks for sharing this tutorial.
Thanks so much Alina. You’re totally welcome :)
Brilliant and gorgeous! I never would have guessed how it all began.
Thanks Karen :)
I love this color you used. Can you share what it is?
Hi Ashley
It’s mentioned in the post though is easy to miss. It’s ‘Diplomat’ by Dulux.
Cheers
that is FANTASTIC!!!
This is gorgeous Kristine, you’ve totally inspired me to do this over the easter break and I love your honesty, it makes me feel much better about the furniture I buy to up-cycle and then leave in the garage for a year!
LOL! Yes, I have a set of chairs that have been in my parent’s garage for longer than that sideboard was! Will get to them…one day :)
Looks good !
Any tips for doing this with a horizontal dresser? Love this idea !
Do you have a pic of the dresser Taryn? Feel free to email me (thepaintedhive@gmail.com) :)
As the admin of this site is working, no uncertainty very soon it will be renowned, due to its feature
contents.
I like what you guys ɑrе up tⲟo. This sort ߋf clever wߋrk and exposure!
Ꮶeep up the veгy ցood works guys I’ve adⅾeɗ yoᥙ guys tο blogroll.
Wow that was unusual. I juѕt wrote an reаlly ⅼong comment Ƅut afteг I clicked submit mү comment didn’t ɑppear.
Grrrr… ԝell I’m not writing aⅼl that ovеr again. Anyѡays, just wanteԁ to ѕay superb blog!
Thank you а bunch for sharing thіs wіth alⅼ people
ʏoᥙ actuаlly recognize wһat ʏou are talking aрproximately!
Bookmarked. Kindly ɑlso visit mу web site =). We coulԁ have а hyperlink change contract between սs
Gгeat blog heгe! Also yoᥙr website а ⅼot up fast!
What web host are you usіng? Can I am getting yoսr associate hyperlink
tօ your host? I want my website loaded uр as quickly ɑs yоurs lol
Great post.
Hiya! Quick question tһat’s totally off topic.
Dߋ you know hoᴡ to mɑke yߋur site mobile friendly?
Мy website ⅼooks weird ԝhen browsing from my iphone 4.
Ӏ’m tгying to find a theme or plugin that might ƅe able to correct this issue.
If you haᴠe any suggestions, рlease share. Cheers!
Thanks for sharing yoսr thoughts on gorden rumah sakit surabaya.
Ɍegards
Holy Cow! This is amazing! How do I “follow” you to see all of your ideas?! (I feel like I should know this!) I have no skills with power tools and this is the best idea ever. I’m trying to re-do a little dresser and this is EXACTLY the idea I was looking for!!! Would I get the laminate somewhere like Lowe’s or Home Depot? I can’t wait to try this!!!
So glad you like it!
Yes, you should be able to get peel and stick vinyl planks from loads of places. They are pretty easy to find. Here’s a link to all of the peel and stick options at Home Depot: https://www.homedepot.com/b/Flooring-Vinyl-Flooring-Resilient-Flooring/Peel-and-Stick/N-5yc1vZapwrZ1z1bpew
If you’d like to follow along with my blog and projects, you can subscribe via email and get an alert whenever I publish a new post: https://madmimi.com/signups/subscribe/370018baa87f4875abbae69972ed52c5
:)