So, while my bedroom makeover drags on and on at least I can share some insightful snippets of the journey thus far to (hopefully) keep you keen.
I know a lot of you have been hanging out to know how I was going to create a massive wall map on a budget – cause, dang, those things can be super expensive.
Well, it all started with this image…

Which got the cogs a-turning, and then evolved further when for $40 I scored this…
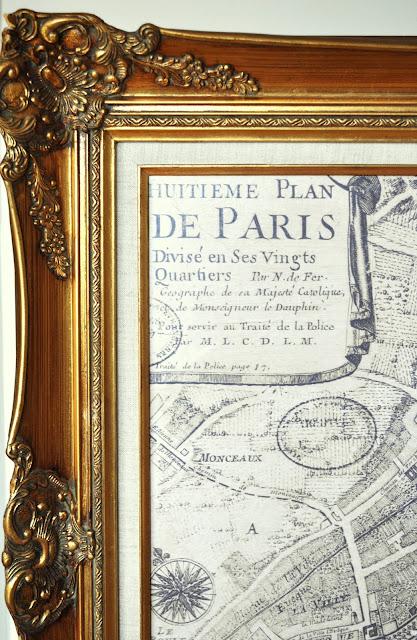
It was one of those, “Honey, stop the car!” moments when I spotted it outside our local charity store. You might think $40 isn’t all that cheap though this frame is MASSIVE – 150cm x 80cm (60 x 31 inches)!
And finally, after some deliberation, I settled on this map…

So gorgeous. Who doesn’t love vintage cartography?
And now, after some further research and a little bit of work I have this…
(Okay, still to actually be hung though you get the idea – BTW, that’s my TV bench it’s sitting on and overhanging…it’s biiig!).
And all for just $70 total (that’s $40 for the frame and only $30 for the massive map!).
So, here’s how I did it…
1. Find a high resolution, zoomable map somewhere on-line.
Map History is a great resource for this kinda thing. Just remember to make sure the map isn’t copyright protected and reproducing it is permissable.
2. Here’s where the ‘zoom’ feature is important. If you simply tried to copy and paste the whole map in one go the image resolution would be way too small to enlarge it without massive pixilation. So, starting in one corner, zoom in (as far as you need to depending on the size of the map you want to create) then copy that one section or save it as a picture file.
3. Once saved or copied, open up your map segment in an editing program like Photoshop (if you don’t currently have an editing program you can use this program which is free to download).
4. Still in your editing program, make the canvas size the same as that you want your finished poster to be (in my case 120cm x 60cm (47 x 23 inches) – which is the size of the opening in my frame) and assess, based on your initial map segment, if after you copied the entire map in comparable sections it would be large enough to cover your desired area.
5. Sound complicated? It may take some playing around though it is actually pretty straight forward. Trust me, I’m no computer buff (or maths expert) and I managed to work it out somehow :-)
6. Go back to your on-line map and move from segment to segment, copying and saving each section so it overlaps slightly, then pasting it all together, like a jigsaw puzzle, in your editing program to form one giant image (some sites will be more user-friendly than others when navigating from segment to segment).

To make up my completed image only took around 15 map segments and around 1 hour of copy-pasting so, while it sounds like a lot of effort, it’s actually pretty quick and easy.
7. Once you have completed your digital image, edit it as necessary (i.e. change the colour, add a border etc, etc, etc) then save it as a JPEG file. To double check that once printed-out you will have a good quality image, zoom in to relative size (use in-built rulers as a guide) and check for pixilation.
Very slight pixilation can only be seen in my map from as close as around two inches away which is really nothing to worry about.
8. Save your JPEG file to a USB and take it to your local budget printing store to be printed.
Depending on the size of you map you may also be able to print it at home in sections.
9. Do with it what you will!
I simply attached mine with Mod Podge to the existing oil reproduction print already in my frame then sealed it with a burnt umber glaze.
Seriously, this was waaaay easier than I made it sound though I was just trying to be thorough. I am now hooked and am making massive maps for everyone I know!




I love this post on diy large scale maps, thank you! Although, I’m having trouble finding a map to use/copy (most sites I’m finding aren’t allowing me to copy the map period)…I’m looking for vintage”ish” map of the North/South Carolina coast. Nothing in particular, I’ve just lived in Charleston, SC and Wilmington, NC and thought a large-scale map of the coast would be cool. Any advice would be greatly appreciated!!!
:)Kristin
Hi Kristin
It can be a little tricky working out ways to download images from some sites. Even the browser you are using can effect the download options you might see.
Give this site a go: David Rumsey. Or, more specifically, try these pages: North Carolina and South Carolina.
You can download full images of the maps in one go (so no zooming, copying and re-assembling required!). You do need to register to download full resolution maps. Most resolutions are only 72dpi though the actual dimensions are generally quite large so in an editing program you can increase the overall resolution by minimising the print size.
Make sense? If not, just let me know and I’ll try my bestest to help you through the process.
Anyhoo, hope this helps. Let me know how you go :-)
Kristine
Hi,
Love your work, I found the map in high res….I printed 32 a4 pages and put it together like a puzzle…..spend about 20 minutes…..now I need to find the frame………meanwhile I practiced using a smaller frame…..and looks really nice…..thanks for being a inspirations……Bless you
Can you tell me the map you used? I love the one you used and want to do the same. Thanks
Hi Karla
If you Google “Huitième Plan de Paris” you should find lots of zoomable ones.
Have fun :-)
Hi there. Love your idea! Just wondering if the modge podgy changes the coloring of the map?
Hi Rachel
No, the mod podge shouldn’t change the colour of the paper. If you’re wary though, maybe try some on a scrap piece of paper first.
I wanted mine to look a little vintage-y so did give it a subtle brown glaze.
Kristine
Love love love your bedroom! So much so we’re trying to copy! Do you have any more tips about the glazing step?
We love love love your bedroom! So much so we’re trying to copy. Do you have any more steps to describe the glazing process?
Hi Patty
This is an older post though from memory I simply mixed up some clear acrylic sealer with a dash of burnt umber craft paint then coated the entire map. The paper waved and bubbled though flattened out again as it dried.
Kristine
Oh, I should also say, I coated it with a reasonably large paint brush in a haphazard kind of fashion.
:)
I have tried this technique and used map history to find some I like. I have been able to zoom in on some high res pictures on this site, but I cannot for the life of me figure out how to copy it other than doing a printscreen and then cropping out the other stuff around it. When I try to save a small piece, it save the entire map. Or I can’t copy it at all because the zoom box around it causes issues, there is not option for copying (assuming copyright) etc. I have pulled up the one you use and I have the same issue with it either saving the entire map or having to use PrtScr and then crop. How did you do it? Thanks!!
Hi Samantha
The problem with Map History is that it just provides the links to the maps, so the maps come from all different websites which have all different types of viewing and download options. Do you have a link to the particular map you were trying to copy?
Cheers
indica edibles
Nice blog site. The design is good and very creative.