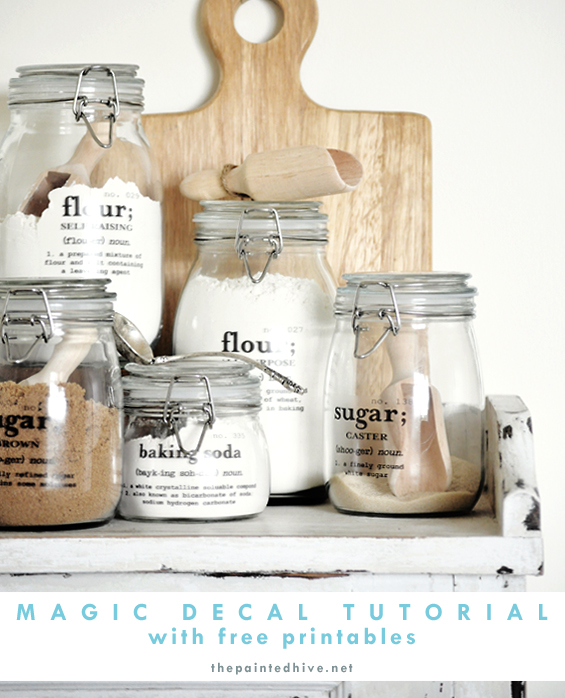
Some of you may remember, a little while back I posted a tutorial for DIY waterslide decals.
Among other things, I mentioned how awesome they are for creating custom embellishments without the need for any fancy-pants equipment. Yep, waterslide decal paper is a truly fab product, though as great as it is, there is one drawback – although it’s somewhat tough it’s not especially durable. So, whilst it’s perfect for ornamental purposes, it’s not ideal for more practical applications…until now that is!
Magic decal coating paper is a product designed to be used in conjunction with standard decal paper to make the finished transfers super durable – yes, even dishwasher resistant!
If you’re already familiar with magic decal coating paper then please excuse my tardy excitement, though for everyone else who is just getting to the party now too, feel free to start throwing the streamers!
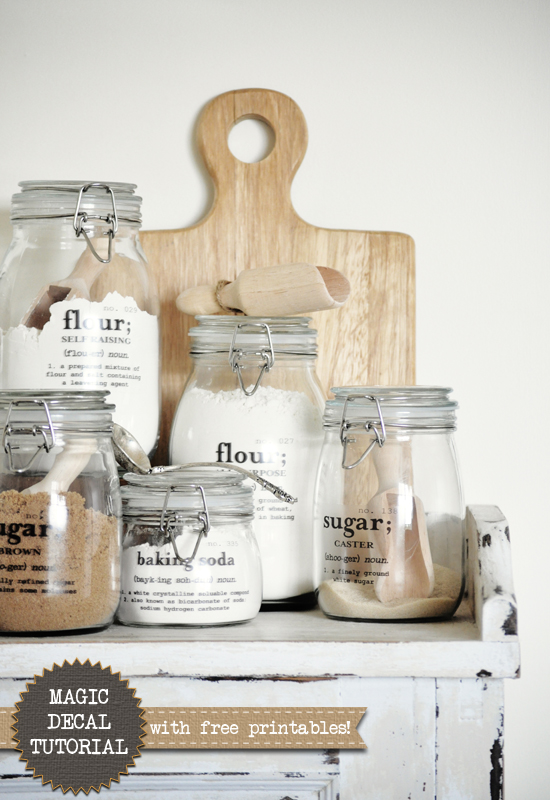
My recently acquired assortment of SLOM jars from IKEA were awaiting some DIY craftiness and seemed the perfect candidates for my first magic decal experiment.
As there may be several brands of magic decal coating paper out there, each with slightly differing application requirements, for clarity in this tutorial I will specifically pertain to the particular product I used which I attained from here. The paper seems a little pricey though you can create several decals from one sheet so in reality the individual decals are actually quite inexpensive.
The paper I received came with three sheets of waterslide decal paper (distinguished by a blue watermark on the back) which you print your image onto, and three accompanying sheets of the magic coating paper (distinguished by attached translucent protective paper).
GATHER YOUR SUPPLIES
1 Image to transfer.
Use anything you like. I made up my canister labels in Photoshop though a standard publishing program would be fine too. I wanted them to be a bit different and quite typographic so decided to style them based on dictionary definitions (my artwork is attached as a free printable if you would like to use them – see the ‘At a Glance’ section at the end of the post to view and download!).
2 Printer.
You can use either a laser or an inkjet printer. The decal paper comes in two varieties, designed specifically for the type of printer you plan to use. Just make sure to purchase the right paper for you. I used an inkjet printer.
3 Decal paper (blue watermark on back).
Decal paper comes in clear or white. I’m using the clear paper because I want a transparent background around my image.
4 Magic paper (attached translucent protective paper).
5 Laminator.
Basic laminators can be bought for around $15 from most office supply and department stores.
6 Scissors.
7 Water.
8 Soft cloth.
9 Item to embellish.
As already mentioned, I’m using my plain SLOM jars from IKEA.
10 Microwave, oven or hairdryer.
THE PROCESS
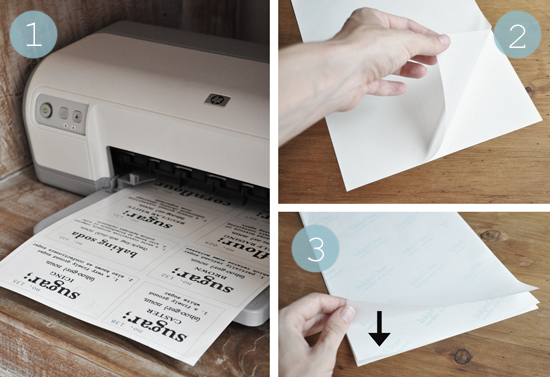
1 Print your image onto the glossy side of your decal paper (DO NOT mirror your image). Allow to dry thoroughly. I created my canister labels in Photoshop and have attached them below as a free printable (see the ‘At a Glance’ section at the end of the post to view and download!).
2 Separate the translucent protective paper from the magic paper. Do not throw the translucent paper away.
3 Place the magic paper gloss side up on your table. Lay the decal paper printed side down on top of the magic paper. Place the translucent protective paper gloss side down on top of the decal paper (the translucent paper is designed to act as a protective barrier of sorts between the decal paper and laminator heat).
Note: As my image took up the entire sheet of decal paper I did not need to trim around it first. If you are working with a smaller image you may wish to cut roughly around it with scissors.
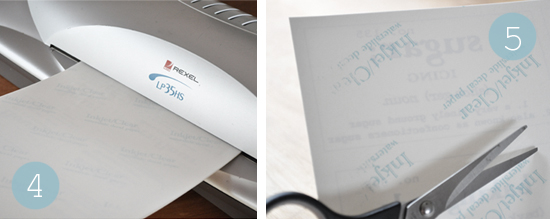
4 Laminate your stack of three papers on low speed and at low temperature.
Note: Laminating pouches are not needed. Laminating is performed to fuse the decal paper and magic coating together. Basic laminators can be bought for around $15 from most office supply and department stores.
5 Discard the translucent paper. Your decal paper and magic paper should now be fused together. Trim closely around your image – you can see it quite easily through the paper if you hold it up to the light.
Note: By nature, waterslide decals have a very fine, slightly translucent carrier film. On close inspection this will be visible on completed transfers. As my image is text alone with no border I experimented with techniques and found the neatest finish to be a nice even box (trying to mimic the outline of the text just looked messy). If your image has a distinct border then trim approximately 2mm all the way around it (leaving a small buffer ensures you get a good seal).
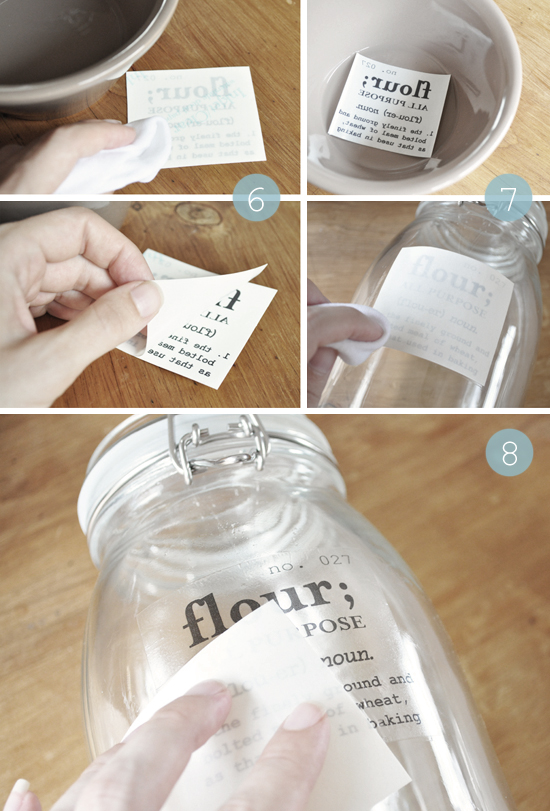
6 Dampen the back of the decal paper (watermarked side) with a cloth until it becomes translucent. Wait around 15 seconds then gently peel the paper away completely.
Important: Ensure you remove the watermarked decal paper only at this stage.
7 Immerse the decal in a shallow dish of water to dampen the other side then position it, image side down, on your item, smoothing it down with your fingers and a slightly damp cloth to remove excess water.
8 Carefully slide off the backing paper and manipulate the decal into its exact position then continue to smooth it until it is water and air bubble free.
9 Finally, set the decal by either:
Baking in an electric oven for 8 minutes at 150 degrees celsius.
Cooking in a microwave for 5 minutes on low.
Blowing with a hairdryer for 5 – 10 minutes.

Although I was hesitant, I did find the courage to run these babies through the dishwasher (twice, just to be certain) and they didn’t show any signs of distress. I was honestly AMAZED! Of course, given I have only had them for a few days I can hardly vouch for their longevity so advise hand washing for frequent use.
As I mentioned, there is a very faint translucent background (which is the case with waterslide decals) though once the canisters are filled it’s barely noticeable. You could choose to use basic clear stickers in place of decals. Just be mindful they will not be as durable and their border and background will be more visible.
I am super stoked with how these turned out – absolutely love! Don’t forget to download your complimentary printable sheets of labels below!
If you’d prefer the labels without the work you can now buy them in easy ready-to-apply format from my little on-line store here.
And excitingly, along with the PDF file, you can also now download the free editable PSD version of my labels below!
Finally, the SLOM range of jars has since been discontinued. KORKEN is IKEA’S new alternative though similar clip-top jars can be found in lots of discount/dollar stores.
SOURCES
Jars (Ikea)
Decal Paper with Magic Coating Paper (Australia – eBay)
Decal Paper with Magic Coating Paper (USA – Robin’s Eggcetera)
Decal Paper with Magic Coating Paper (UK – Crafty Computer Paper)
Wooden Scoops (eBay)
CREDITS
Fonts: Courier New, Another Typewriter, Mrs Eaves Bold
FREE DOWNLOAD
Click here to view and download the printable PDF
Click here to download the editable PSD (for Photoshop users)
Republication, reproduction or redistribution in any form is forbidden.



Thanks so much for sharing your talents with us! I dearly love the post and found you on pinterest! I can’t wait to get to Ikea and order what I need to make these new canisters.
“The Painted Hive | MAGIC Decal Tutorial with Free Printables!
” was in fact a delightful post, can’t wait to read even more of ur blog posts.
Time to waste some time on the net lolz. Thanks for the post -Jerry
Love these. Can’t wait to get started. Going to use small jars and use in our camper. Wat to keep things organized
This would be a great idea for families who want to teach their children a second language. Pantry items can be labeled in multiple languages.
Thank you for sharing! I can’t wait to try
THIS IS FANTASTIC !!!! I LOVE IT !!!!
I am new to photoshop and was wondering if you could tell me where I could make these (and other ones) in the dictionary format. Thanks much!
Hey Rebecca
You can download my template as a PSD file (find the link at the end of the post). Just open the PSD with Photoshop then you can edit as you like.
Let me know if you need more information or help.
Kristine
Hey, do you realize that the company that makes these is using your photos on their ebay listing? I hope they have your permission.
http://www.ebay.ca/itm/5-x-Magic-Photo-Transfer-Decal-Paper-LASER-Paper-/370626635097#ht_2232wt_1165
Loved this idea, I’m actually putting it all together right now! Thanks so much!
Love them! great for a pressie, good work :D
ps. i have the same scales, they were my Grandmas
Thanks. I just remodeled my kitchen and these are perfect!
I was just wondering, I’ve aleady bought a printer, ink, the magic decal paper & a new set of canisters to do this project…Do you think I could avoid buying a laminator & use an iron to laminate the sheets of magic decal paper together? Thats how I used to laminate before I started using self adhesive laminating sheets. If you could just give me your opinion, I would really appreciate it a lot. Saving every little bit helps.
Hi Jamie
I definitely get your desire to save as much as possible :-)
I’ve never used an iron though have heard from one of my readers who did try it. She said it worked though the paper crinkled slightly however I’m not certain if it actually affected the finished decals or not. I have heard that irons can be used in place of laminators so I guess there is a good possibility it will work just fine.
Perhaps you could try just one decal to begin with. Simply layer your decal paper and coating paper together (as if you were going to laminate them) then cut around one label only (through both the decal paper and coating paper) and try ironing just that one label. This way, although they would not be complete rectangular sheets, the remaining paper will line up fine and still be able to be fused together (with an iron – if it works – or a laminator) without any wastage.
I’d be interested to hear how you go so please feel free to let me know.
Kristine
These are wonderful! Where abouts did you get the definitions from!? I’d like to add a few others like dates, peanuts, raisins etc Ta
Hi Candice
I just used an online dictionary to find the basic definitions then I tweaked them as needed.
Have fun!
Kristine
yes, Yes, YES. . . . .It’s a year since you posted this and I’m just now discovering this! When I stop doing the happy dance, I’ll be ordering everything that I need to work on some projects! THANK YOU for sharing this!
He, he…have fun (both dancing and decaling!).
have you seen this:
http://www.impressionen.de/shop/produkt/vorratsdosen-set-2-tlg/5815290?query=*&filterKategoriebaumROOT%2FWohnen=K%C3%BCche&filterPreOrder=false&filterKategoriebaumROOT=Wohnen&origPos=1&pos=24&origPageSize=9&pager=true&page=1
Hi Lutz
Yes, a few people have sent me this link now. I’m not sure there is much I can do about it – oh well.
Thanks for taking the time to let me know though :-)
I downloaded the photoshop file so that I could use these for all of my labels, however, it says that I’m missing fonts. Can you tell me what fonts you used so I can add them to edit some of the labels?
Thanks!
Sure Jennifer :-)
There is a list and links to the fonts I used within the post. Just see the “At a Glance” section at the very end of the article.
Let me know if you have trouble…and have fun making your labels!
Love it…thanks for sharing
me encanta buenisima idea y muy facil de hacer gracias
As soon as I saw these I fell in love…. thank you for your post. I wanted to make a label for coconut… what font and size are the writing on your labels?
Just saw the other post thank you
Is it easy to peel off? I’m thinking in the event that I don’t longer buy some ingredient.
Thank you!
Hi Daniela
These decals are designed to be pretty permanent though you could probably scratch them off with a steel scourer and remove any adhesive residue with eucalyptus oil.
If you’re after a less permanent solution you could use clear sticker sheets instead of waterslide decals.
Kristine
What a great idea can’t wait to try this
Helle, our catalogue ” Impressionen” has copy your idea!
Stefanie
The German Version….
I love this project! I’m a bit slow on the uptake to comment on this one, but I just love it and cannot wait to replicate it. Thanks for the tutorial!
Hi,
What size are the jars you used? Ikea doesn’t have the SLOM jars anymore and the KOREN jar that seems most similar only comes in .5L and 1L and I think that may be a bit too small. Thanks!
Hi Chandra
Thanks, I didn’t realise that IKEA had now discontinued the SLOM range.
I used a variety of sizes in the SLOM jars (.5L, 1L, and the big ones were 1.8L).
You can find similar jars in other places if you think the new IKEA KOREN ones aren’t quite right. Try Googling “clip top glass jars” (or similar).
Good luck!
ps: I found this tutorial on pinterest. Actually another friend saw it and knew I would love it! I just ordered all of the materials, will go to IKEA this weekend and can’t wait to try it out. Thanks so much!
I love these – I discovered your post through pinterest. Unfortunately when I download the PSD file I can only open page 1 :(
Hi Mina
The PSD is a Photoshop file so there aren’t any pages, just layers. When you open the file some of the layers (those from page 2 of the PDF) are hidden. You need to make them visible by clicking the box to the layers left. You can also hide layers by un-clicking the same box. Does this make sense?
Let me know if you have trouble or need more help :-)
Kristine
xoxo
Hi Kristine
Thanks for the reply. I was trying to import using illustrator which worked but converted it to single layers. I’ve sent it to work and opened in PS and can now see all layers! I’ve got rubbish paper stickers on my jars right now – and I’ve had the original lazertran from ooo about 15 years ago sitting in my craft drawers just waiting for the perfect project – so guess what I’ll be doing over the next few nights then…thank you!!!!!!!!!!!!!!!
Oh, good. Glad you got it worked out. Have fun!
What a great idea and tutorial! I haven’t seen waterslide decals since the 50’s when I was a kid! You have great ideas and are very detailed in your tutorial! Thanks again!
Where did you get the jars?
Hi Laur
The jars are from the SLOM range from IKEA. I think they have been discontinued now though they have been replaced by similar ones from the KORKEN range.
Kristine
I really am happy with this tutorial but have a question. Can you use a sealer on the decal after the glass application? My first attempt with the dishwasher was not successful when using the hair dryer method. Second attempt I used the oven method & am afraid to try the dishwasher again. I plan to use the stemless wine glasses for our vacation cabin rentals & expect a lot of wear. Do you have any suggestions? Thanks. Louann
Hi Louann
As mentioned in the post, whilst the magic decal coating helps give regular waterslide decals some dishwasher resistance (I have run mine through the dishwasher twice with no problems) it does not make them dishwasher proof. I still recommend hand washing.
You could try laser waterslide decal paper instead (the link provided is to a UK based online store – it’s the first one I found on Google. If, like me, you’re not based in the UK try a more thorough Google search for a stockist near you). Laser ink is less susceptible to water penetration.
Sorry, though I can’t think of an additional topical sealer which would give the magic coating any further durability.
Hope the laser paper might help though.
Kristine
Love this and can’t wait to try it out, not sure what on but I’m sure I’ll find something to use. Thanks for sharing all your great tips.
Hi, I found your very cool project after searching for what seemed like years to find a product that I could put on growlers to expand my business. Love them! However, after proving the growlers could stand up to tap room wipe-downs and requests for other items (pint glasses, mason jar glasses) I decided to see how well they held up in the dishwasher. I made some trail glasses and followed your directions exactly, but time after time, the labels came right off in the dishwasher. I contacted the woman who sells the decal paper and magic paper to see what I was doing wrong, and she said that the decals were never meant to go in the dishwasher. So, my question is….. how did you make it work? I really want to get the results you did, but I fell like I am missing something?
Thanks so much! Love your canisters!
Woops! Just saw that you answered this question above! Sorry for the double question!
I love these! I cannot edit them since I don’t have Photoshop but who would want to except for maybe a different font. You did an exceptional job!
Hi, thanks for the “tip” of the magic paper and for your greats tutorials!
Do you know if it works with colour inkjet?
Thank you so much for your reply and for your work! Cathy
Hi Cathy
Absolutely, colour ink works just fine (though do bear in mind that the clear backing film means the ink does not appear as dark or bright as it would on a white backing).
Kristine
Thank you so much for your answer! Have a great day! Cathy
I am so happy I found this tutorial. I am planning to personalize mason jars for a wedding. I was going to pay to have this done. I think I will save quite a bit of $$ doing this myself. I just hope they hold up to the dish washer as they will also be my favors. Any advice on or long term results?
Hi Sarah
As mentioned in the post, decals are dishwasher resistant (not completely dishwasher proof) so they do need to be treated with some care (I recommend hand-washing to be safe). I have only run my labels through the dishwasher twice so I can’t really comment on the long term effects of dishwashing. If your mason jar favors are intended for frequent use I probably wouldn’t recommend waterslide decals, however if they are more for decorative purposes then the waterslide decals should be completely fine (though perhaps you could include a little care label).
Kristine
You’ve been featured on Whistlin’ Wednesday on Be Wit’n Wise!
http://bewitnwise.blogspot.com/2013/04/ww-decal-transfer-tutorial.html
Where did you find the definitions for each type of product ? What are the numbers associated with them (ex. sugr no.138) ? I want to look up different types of flour etc…
I love this idea and I am modifying slightly for a different type of container.
Thanks!!!
Hi Lisa
I found basic definitions in online dictionaries then modified and summarised them as needed. The numbers I simply made up (though I did group like items with like numbers). I just added them because I thought they looked kinda cool and added a little something extra.
Have fun making your labels!
Kristine
xoxo
What font did you use in Photoshop to make these particular labels?
Hi Valencia
The fonts, and links to download them for free, are included in the post itself. Check out the ‘At a Glance’ section at the bottom of the post :-)
Beautiful!!!! Can you do this with any inkjet printer like Canon – IP1188 or Canon Pixma – MP 287? I’ll buy one if I know for sure. I live in India & we don’t get Magic Decal Papers here :( Thanku :) :) :)…
Hi Meenal
Yep, you can use any standard domestic or commercial inkjet or laser printer with waterslide decal paper (just ensure you buy the decal paper which is compatible with the type of printer you plan to use – either inkjet or laser). If you don’t have the magic coating in India you can use acrylic sealer in its place.
Kristine
Just made this project as a gift for my best friend’s bridal shower tomorrow! I could not find decal nor magic paper (also not widely accessible even on ebay or amazon!) in MN. So I improvised a bit and found inkjet window decals from Office Depot. The results were equally as charming, minus all the steps of paper transferring, laminating, etc! The only snag I ran into was that (I, too, used similar round jars from Ikea) the decals, like stickers, weren’t flat-friendly to a rounded surface! While I saved a lot of time cutting out the steps provided above with the magic/decal paper, I made up for it by cutting every or every other line into strips and then lining them up so they all ended up flat.
Like I said, darling project. Thank you so much for this idea, tutorial, AND most of all the downloadable template! I loved the outcome of the jars so much I am printing out more and doing the same to our plain glass containers. Luckily ours are flat and rectangle/squares- no tedious cutting! :)
Hi Kaity
Yep, there are quite a few alternatives to waterslide decals (such as clear sticker sheets, transparent adhesive labels and window film) which will create similar results. I simply used waterslide decals and the magic coating as a means of trialling the product and introducing it to others who may not have known about it.
I found the beauty of the waterslide decals was that they were super thin which made them easy to manipulate and almost invisible once applied. And of course the magic coating makes them really durable.
I’m so glad my project helped inspire you to create your own improvised version :-)
Kristine
xoxo
This is such a great idea. Thank you so much… I am just going to have to give this a try I think!
Hello there. I’m trying to make personalized wine glasses for a few weddings this summer. I saw some questions about being able to wash the surface; do you think this is durable enough for regular use? Also, I checked out the link for where to buy the paper, and it said you need a conventional oven to set the decal more. Did you do this? Thanks:)
Never mind, I see the answers above:)
WOW! This is SUCH an amazing idea, i am completely inspired! Thank you! :)
I simply had to thank you for these BEAUTIFUL labels and allowing them to be free. I can’t tell you how much I appreciate the fact that you have taken the time to do these AND offer them on download for free. Really, thank you SO VERY MUCH!
Delighted in Dublin,
Ireland
(Ali) :-)
You’re most welcome Alison. Thanks so much for taking the time to let me know you appreciate them :-)
Hello, can you please let me know where you get the jar lids on your mason jars? I love them and how well they seal. Thanks so much :-)
Hi Rosa
They aren’t mason jars. They are clip-lid jars from IKEA (in the SLOM rage – recently replaced by the KORKEN range). Similar jars can be found in lots of kitchen and homewares stores.
Kristine
Just to clarify, in the laminating step the point of laminating is just for the heat of the laminator, correct? If my laminator has a film in it I need to remove that film before I run the magic paper/decal paper stack through it?
Hi Archaa. Yep, laminating simply fuses the waterslide decal film to the magic coating. There is no need from laminating pouches or films. Kristine.
Have you ever used the decals on plastic storage containers?
Hi Judy
I haven’t, though I imagine though should work fine. I have used them on timber, ceramic and glass.
Kristine
Hi there
I’m really wanting to do this to a few bottle in my house, but I’m from south africa and finding it difficult to find any of the “MAGIC PHOTO transfer Paper “. I have however found this on a website in SA:
http://www.bidorbuy.co.za/item/104590048/20_sheets_Thermal_Transfer_Paper.html
and
http://www.bidorbuy.co.za/item/104985691/10_PCS_Master_Tattoo_Stencil_Transfer_Paper.html
Would this do the same job as the Magic photo transfer paper you speak of? I can buy it online, but it’ll cost me a fortune to get it here, so hoping this alternative will work. Looking forward to your response.
Many thanks!
Hi Candice
The magic coating paper (which is simply a sealer for the decal) can be hard to find, however the waterslide decal paper (which makes the decal itself) is more readily available. You can simply use a clear spray sealer in place of the magic coating paper (which is what is normally used on waterslide decals – the magic coating is just a bit more durable).
Try searching eBay for ‘waterslide decal paper’. I just did a quick search and found a few sellers who ship worldwide for under $5.
I hope this makes sense. If you have trouble or need more information just let me know :-)
Kristine
Hi Kristine!
That’s awesome! Thanks! I managed to get waterslide decals from EBay and getting that shipped from the States. Was really affordable. Trying to get everything together before attempting this and the only thing I couldn’t get hold of what the transparent paper. If the Waterslide decal paper works, then that’s great!
Really appreciate the help and advice! :) :) :)
Regards,
Candice
That’s great! Waterslide decal paper is exactly what I did use for this project. It comes in white or clear, for laser or inkjet printers, so hopefully you got the right one for you :-) The magic coating paper is just the sealer for the waterslide decal paper. As I mentioned before, you can use clear spray sealer in its place.
I LOVE these labels but I was curious how I could put these on plastic canisters? I’m sorry if someone has already mentioned this but there were just so many comments I couldn’t sift through.
Hi Sarah
You can apply waterslide decals to plastic just as you would to glass. You just need to be careful when curing them that the heat isn’t too intense for the type of plastic (so use a hair-dryer and keep a close eye on it).
Kristine