
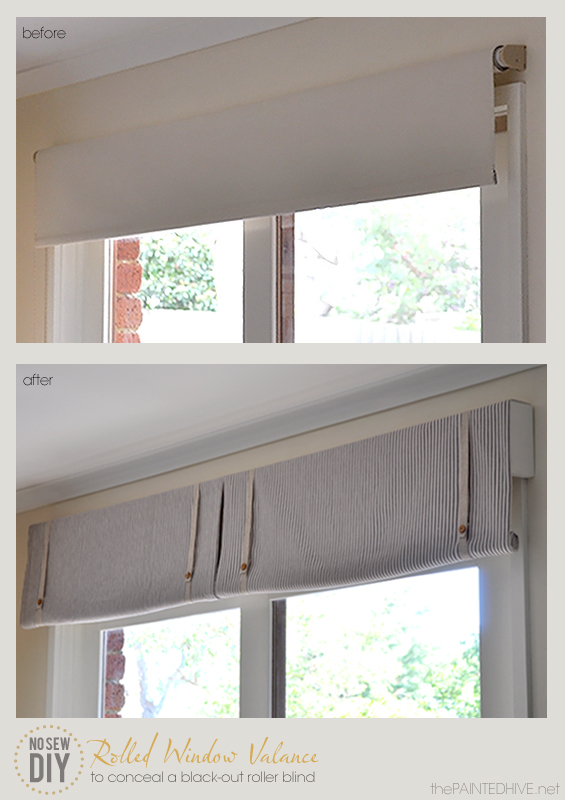
In our newly appointed home office space (which is almost finished and soon to be shared!) there’s a floor to ceiling double sliding windowed door (as briefly blogged about here). The natural light it affords the space is lovely. The blinding summer sun and frosty winter coolness which occasionally penetrates the glass…ummm, not so lovely. This was never an issue previously as the room was used as little more than a walkway, though now that it’s actually a functioning area there was need to install some sort of practical window treatment.
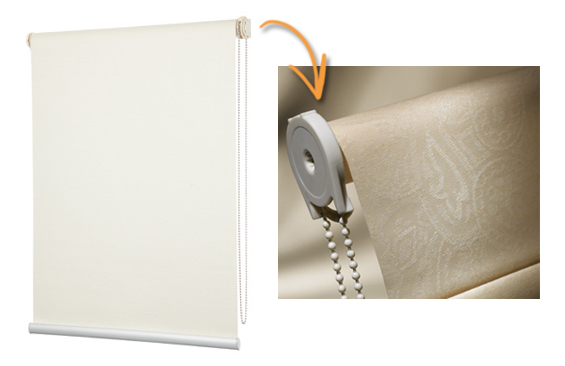
My usual solution in this type of scenario is a simple, off-the-shelf, black-out roller blind. They are cheap, effective, light blocking, climate controlling, easy to use and readily available, though on the unfortunate down-side, they are not particularly pretty. The blind itself I find discreet enough – a neat roll when up, a neat panel when down – though the visible plastic end caps, mechanism and chain kinda burn my eyes.
Previously, I have simply hung curtain panels to hide the ugly ends of my roller blinds though this particular window-slash-door isn’t really suited for drapery. However, it is easy enough to install some kind of pretty valance to conceal them instead. Though, of course, you don’t need the excuse of concealment to install a window valance, they are a lovely way to dress-up any window regardless.
I’ve called this a ‘no sew’ valance though it’s entirely up to you whether you choose to use fusible webbing (hemming tape) or a sewing machine – either will work equally well.
Note: the following tutorial is based on my particular requirements and the specific materials I used for my standard window (180cm wide x 210cm drop). Depending on several factors (window size, fabric weight, desired appearance, etc, etc) you may need/want to tweak the process slightly.
Measurements provided are predominately metric. If needed, for quick and easy conversion you can go here.
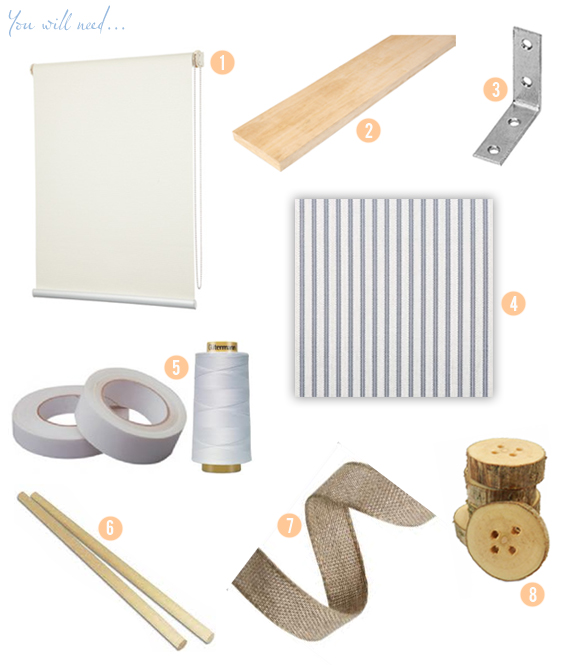
1. A roller blind (if applicable).
If you don’t actually require a usable window covering as I did, then this rolled valance can be effectively used purely for decorative purposes. I used a standard off-the-shelf block-out blind.
2. A length of timber to form the pelmet.
I used a 2.5 meter (8 foot) piece of 70mm (2.7″) wide x 18mm (6/8″) deep pine. Ensure your timber is longer than your window frame and slightly wider than your roller blind (if you are using a roller blind).
3. ‘L’ brackets.
4. Fabric.
I used a lovely mid-weight charcoal ticking I found online here at No Chintz, which I was fortunate to purchase at 50% off. The fabric was 137cm wide and I purchased 2 meters.
5. Fusible webbing (for the no sew method) or cotton thread (for sewing).
6. A fine dowel rod.
I used a piece of 2 meter (6.5 foot) long x 5mm diameter dowel.
7. Ribbon (or similar).
I used around five meters (5.5 yards) of 16mm (5/8″) wide natural linen herringbone I found here on Etsy.
8. Buttons (or similar).
I used rustic timber buttons.
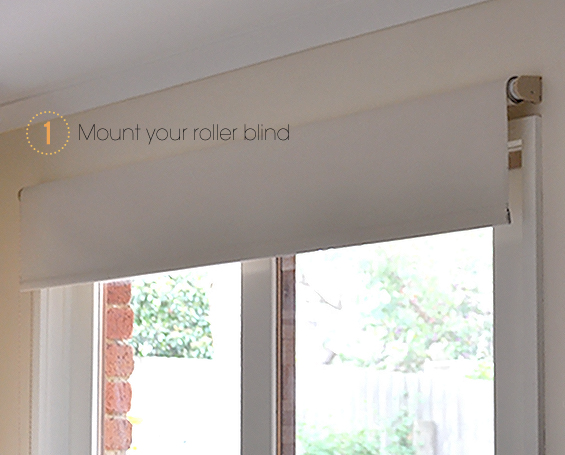
1. Mount your roller blind (if you are using one) according to the manufacturer’s instructions.
Position it inside, on or above your window frame as desired. This will form your guide for pelmet depth. If you are not using your valance to conceal anything then the window frame itself will be your depth guide.
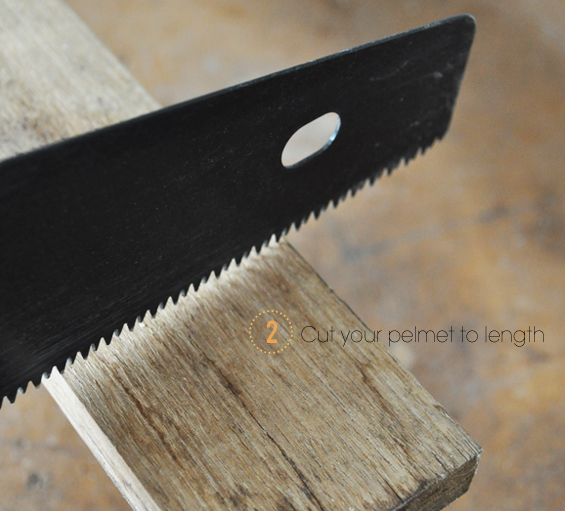
2. Cut your pelmet to length.
To get the length for your pelmet, measure your window at its widest point (frame to frame) then add around 5cm. This will ensure you have a slight overhang at either end.
Because my window sits on an intersecting wall…

…the side of it (at the kitchen end) is clearly visible from elsewhere in the house so I also used a small off-cut of timber to form a little cap at this end to hide the roller blind when viewed from the side (this does create a nice finish though I wouldn’t have bothered with it if the side of the window wasn’t easily viewed).
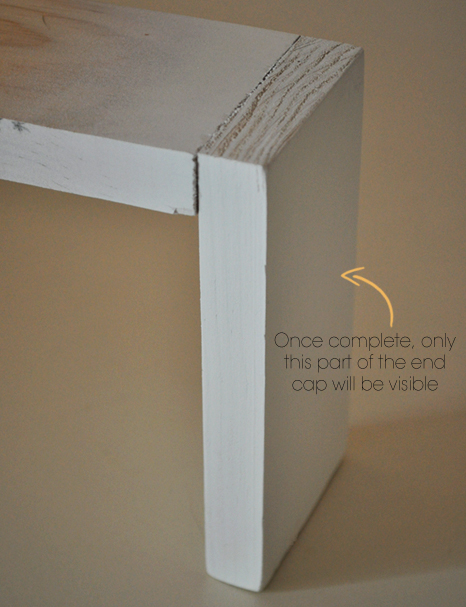
I simply attached my end cap with some wood glue and two counter-sunk screws. I then filled the screw holes and painted it, along with the center of my pelmet where the two valances would meet, to co-ordinate with my existing architraves (of course you could choose to paint your entire pelmet though most of it will be covered by fabric).
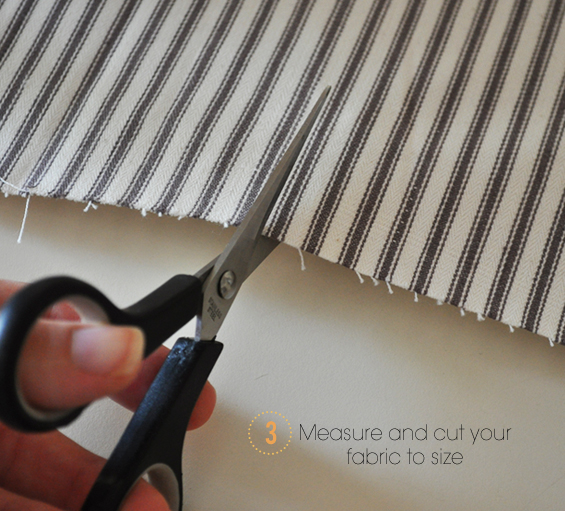
3. Measure and cut your fabric to size.
Basically, you’re simply after a panel (or two) of square or rectangular fabric. For my window I created two individual valances, hence I needed two identical panels. My pelmet was around 190cm long so each piece of my fabric needed to be about 95cm wide (once hemmed) to cover the pelmet entirely and, as I decided, around 100cm long to allow for ample ‘roll’ (though the length is not crucial). I allowed 5cm at each side for hemming so both of my un-hemmed pieces of fabric measured 105cm wide x 100cm long. Of course the size of your fabric panel/s is dependant on the width of your window and your desired amount of ‘roll’ (which can easily be experimented with). If your fabric is particularly thin or flimsy you may want to back it first for some added rigidity and opacity.
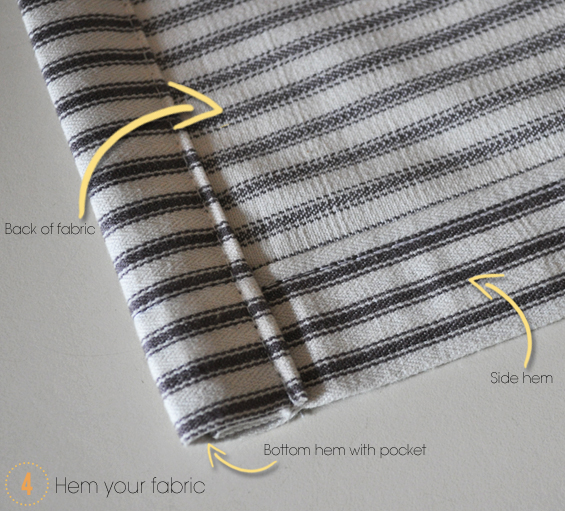
4. Hem your fabric.
As already mentioned, you can do this with fusible webbing or with a sewing machine. Fold each side under twice (so the cut edge is concealed) in a straight line at the hem width you allowed for then press your hems into place with a hot iron to create firm creases. Pressing them in first not only gives you a distinct line to follow when actually sewing or fusing, it also allows you to double check that all is fine dimension wise prior. Once both sides are pressed, measure your fabric width and if you’re happy it is correct, actually fuse or sew your hems into place. Finish by hemming the bottom (this should naturally ensure you create a narrow pocket which is needed for step 5 – refer to photo above) then iron your valance panel/s so they are wrinkle-free and ready for hanging.

5. Trim and insert dowel.
Cut your dowel slightly shorter than your panel/s and thread it inside the pocket you created in the bottom hem (as mentioned in step 4). I found that dowel was rigid enough to help give a nice, neat finish (and counter any floppiness, particularly at the ends) though also flexible enough to allow for some softness. Depending on many factors (the weight of your fabric, amount of roll, thickness of hems, look you’re after) you may not need it. Adversely, you may choose to use something larger and/or stiffer to create a more defined roll. It’s all just a matter of experimentation.
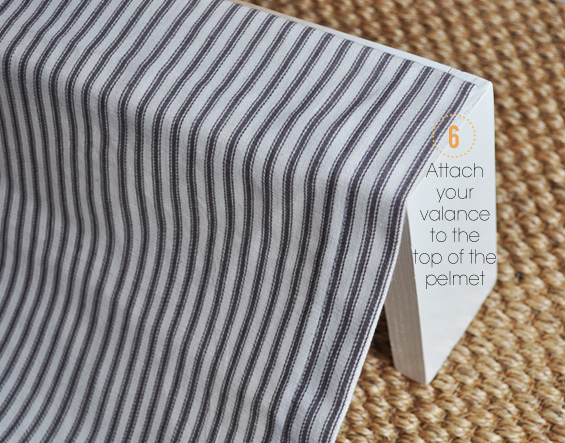
6. Attach your valance to the top of the pelmet.
Place your pelmet on a solid surface (I just used the floor), position your fabric panel/s in place on top and attach away! You can use a staple gun or upholstery tacks or, for a less permanent solution, something removable such as velcro strips, double sided tape or even masking tape (I used double sided tape). This may be handy if you have plans to take the valance down frequently (for washing etc.) or if you like the idea of creating additional valance panels in different fabrics which can be easily interchanged! Although it’s not visible, for a neat finish I folded the raw top edge under before attaching it.
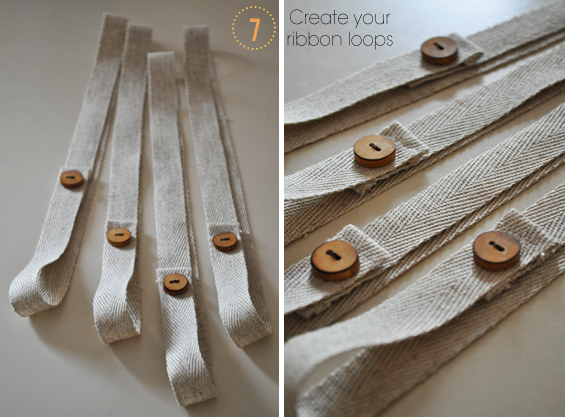
7. Create your ribbon loops.
Determine how long you want your valance to hang down, double the length then cut your lengths of ribbon a few cm’s longer. I wanted my valance to hang down around 35cm, so I cut my lengths of ribbon to 80cm each, which allowed for hemming the ends and overlapping the join. I hemmed my ribbon with a sewing machine though you could use fusible webbing. I joined my ribbon lengths to create the loops using rustic timber buttons which I simply hand-stitched on.
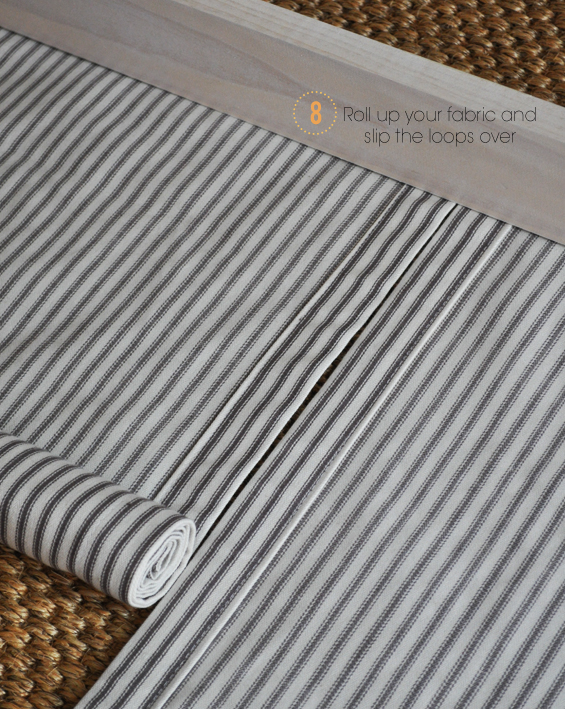
8. Roll up your fabric and slip the loops over.
Place your pelmet with the fabric right side down on a large clear surface (I just used the floor) then roll up your panel/s, reasonably tightly, almost to the top. I rolled my fabric to the back though you could certainly choose to have your roll/s at the front (though just make sure you adapt the method for creating your panels so they are reversible – you could even use different complimentary fabrics front and back!). Slip your loops over the pelmet and rolled fabric then shimmy them roughly into place then. If desired, you can pick up your pelmet at this point to see how it will look once mounted. The fabric rolls should fall to rest within the ribbon loops. If needed the position of the loops and neatness of the fabric can be adjusted later.
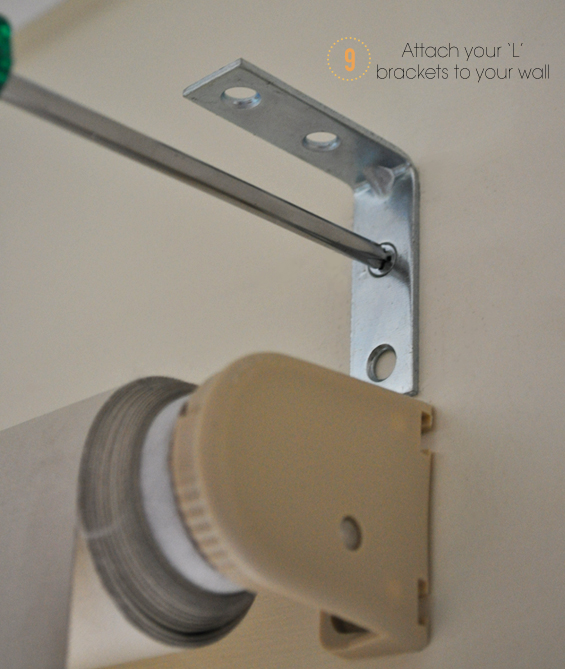
9. Attach your ‘L’ brackets to your wall.
Your pelmet should be reasonably lightweight though it’s best if you can position your brackets in wall studs. If not, plaster plugs are fine. I used two ‘L’ brackets which I positioned just above and inside each end of my roller blind.
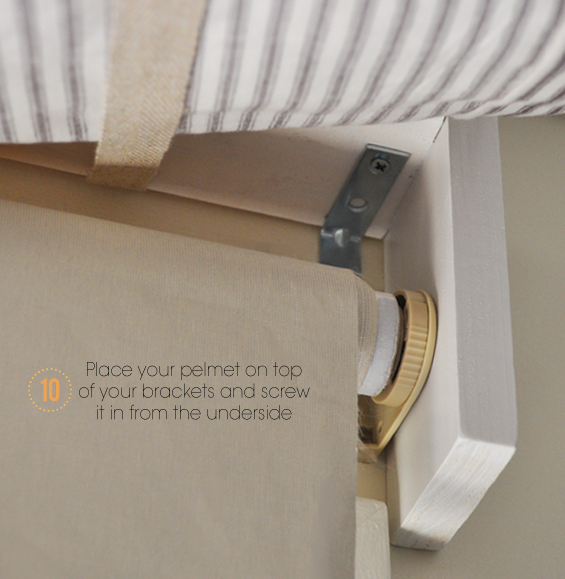
10. Place your pelmet on top of your brackets and screw it in from the underside.
You should have clear enough access if you lift the fabric valance/s out of the way (though you may need to dismount your roller blind). My soft pine pelmet required no pre-drilled holes and was easy to attach in situ. You may need to mark and pre-drill if you have difficulty. In the above photo you can clearly see how everything ‘goes’ together. The roller blind sits in under the pelmet and behind the fabric panels though can be easily lowered or raised without effecting the valance.
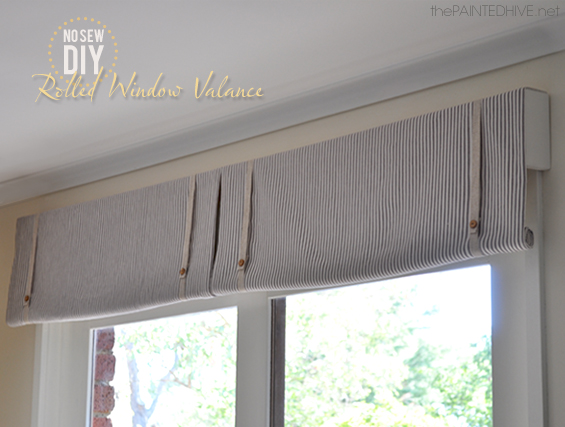
11. Done! If needed, re-mount your roller blind, smooth your valance/s and neaten your ribbons, then stand back and admire you new window dressing.
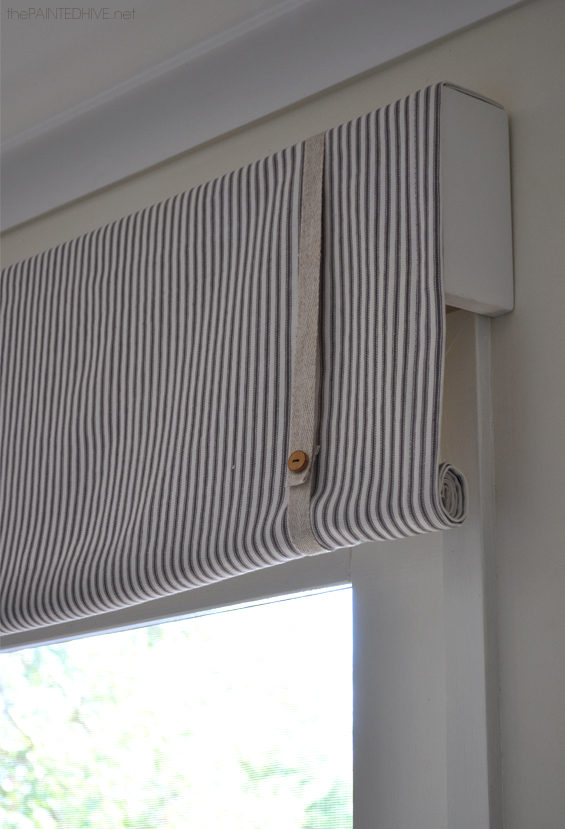
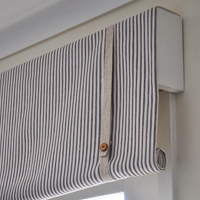
I’m really happy with how this ‘experiment’ turned out and I especially like the informal, cottagey look of it. As mentioned above, the now concealed roller blind sits under the pelmet and behind the fabric panels so can be easily lowered or raised without effecting the valance one bit.
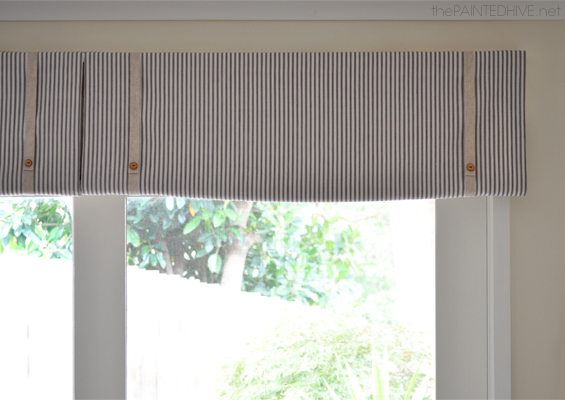
I think the combination of timeless ticking fabric, natural linen ribbon and rustic timber buttons helps with the overall unpretentious feel, and the subtle curves seem to impart a gentle softness.

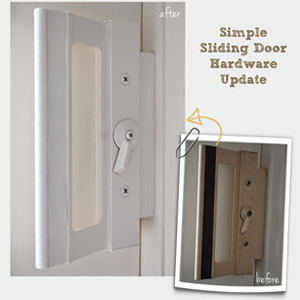
Oh, and about the plastic chain (which can be seen in the photo for step 1 hanging down the left side of the window)…I completely hid it by anchoring it alongside the window frame using two small screws – one screwed into the side of the frame toward the top (which I tuck the chain behind) and one screwed into the side of the frame near the center where the chain ends (which I loop the chain around). Sorry, though it’s pretty much impossible to get a decent photo of this given it’s hidden behind a bookcase so I hope my explanation is clear enough.
![]()
SOURCES
Roller Blind – Spotlight ($35 on sale)
Ticking Fabric – No Chintz ($22 a meter on sale)
Linen Herringbone Ribbon – Etsy ($7 for six yards)
Rustic Timber Buttons – Spotlight ($5 for six)


Ticking, linen ribbon, rustic buttons…PERFECTION!
And all done in such a clever, thrifty way. Thanks so much for sharing the tutorial. I now know what to do with my kitchen window.
I love the cottagey look of these! I hope to try them one day!
I love this idea…I will definitely be copying it! So do you just pull down the basic beige shades at night for privacy and just roll them back up in the day?
Hi Erika
Yep, because the roller blind is slightly shallower than the pelmet it can be easily lowered and raised as needed without effecting the valance one bit.
So, when the blind is down it simply looks like a neat off-white panel protruding from behind the valance, and when it’s up it’s completely hidden!
Kristine
Such a great project. Love the ticking stripe you used!
Thanks Jen. I am such a sucker for ticking!
You are amazing! You are Australia’s own Martha Stewart! I love how the rolled valance has a little curve at the bottom. I love how you are so thrifty yet your results look so expensive.
OMG! This is just what I never knew I always needed. Will definitely be copying this. Love, love, love!
Hi Kristine. I was only thinking of going back to roller blinds this year. I grew up with them and they were an effective way to keep out the heat in summer and keep in the warm in winter here in Brisbane. This makes a lovely alternative to a traditional valance. Thank you.
Anne xx
Hi Anne
I love the practicality of roller blinds too so it’s nice to know there are ways to make them pretty as well.
I just linked up to your party :-)
Thanks for the fresh inspiration! I have pelmets from a previous project in my closet, and I actually was thinking of ticking window coverings. Love what you share. Blessings!
Thank you…..you just solved my kitchen window(s) dilemma! I have double windows and get extreme sun in the summer. Great idea….I’ve very grateful….:)
LOVELY. Been wanting to make these for a while. My kitchen needs curtains. May give them a try. Stop by:)
Hi – wonderful idea! I don’t sew very well, so this would be right up my alley. How long did it take you to do all of this (and…how long did it take you to write this blogpost with all of the graphics etc?? That was a labor of love!!).
It always takes me so long to write a blogpost – that many times I am exhausted just thinking about it! i have to blog about some easier things just to give my mind a break!
Great post. Found you on Common Ground. I have a project there too – called “Making a Realtor’s Office Pretty.” Hope you will visit and comment.
Linda
Hi Linda
I’m not much of an accomplished sewer myself which is why I like to try and share simple projects other novices like me can attempt to tackle too!
I was basically making this up as I went along so it took the better part of an entire morning though if I had known what I was doing from the start it would probably have taken an hour or two.
I agree that blogging can be exhausting though I absolutely love it! I take FOREVER to write my blog posts :-) It’s the ridiculous part-time perfectionist in me, I think.
Kristine
Thank you for this brilliant tutorial, and the links as well. I am off to Spotlight right now!
Love this! It is so perfect and I think I could manage doing it myslef. Thanks for sharing!
Exactly what I’ve ben looking for!! I like that it adds height too. I will be doing this in my son’s room eventually!
Love this! Question for you – can you/do you roll down the valace? It looks like you can, but not sure if you would ever need to, and how it would look.
Hi Donna
I made the valance purely for decorative purposes. It hides our blackout roller shade which is what we use for privacy, temperature control and light blocking when needed.
Because we have the roller blind there is really no need for the valance to ever be rolled down though if desired it could be modified to be functional.
My buttons are simply sewn onto my ribbon loops though if I’d taken the extra time to actually create button holes instead they could be undone and the valance panels could be lowered. That said, it would be a little tricky and time consuming to roll them up neatly again by hand each time they were used though it is certainly achievable.
Kristine
Fabulous! Thanks for the tutorial! We need so many window treatments in our home and this is just what we’re looking for! Smiles,Jill
Great Jill. So glad to have helped provide some ideas for you :-)
I love this! I have had a piece of fabric hanging in my bathroom with binder clips for nearly 6 months while I tried to figure out an easy window treatment. I have honeycomb blinds there already, so this will allow me to keep those in place. Thanks to you I will soon be crossing a project off my list. I came to your blog from The Lettered Cottage, by the way. I’m looking forward to checking out the rest of your website.
Hi Amy
Yay, nothing better than some list crosser-offering to start the new year :-)
These are some of the cutest shades I have ever seen! So happy to find this link from The Lettered Cottage. Your tutorial makes me believe even I could do it…maybe : )
You could definitely do it Mindy :-)
Thanks so much for visiting.
Great idea….I have been looking for a solution for my kitchen and diningroom windows so this is great, plus just lovely to look at. Thanks!
This is so cool! Love it…thanks for the AWESOME idea! XO, Aimee
Congratulations! You’ve been featured on Wicked Awesome Wednesday! I love this idea! Thank you for sharing and please feel free to stop by the website and pick up your “I’ve been featured” button.
Just beautiful, Kristine! I know you’ve been featured elsewhere but I’m including a link back in my DIY highlights just in case someone’s missed it. ;) Thanks so much for sharing your creativity! Great tutorial and gorgeous result!
I just love everything about your shades! I’ve seen covered rollers before, but I’m loving the fabric and the ribbon and button detail. Thanks for sharing. Have a great week!
Deborah
I love your blog and would like to become a follower. Can you put me on you mailing list please? I found you via Traci’s blog which showcased your painted $6 chairs, I love them!!! A woman after my own heart!!! Thanks for sharing, Deb
CONGRATS!!! You have been featured at The DIY Dreamer… From Dream To Reality! Come on over and grab you featured button, you deserve it!
http://thediydreamer.com/from-dream-to-reality/from-dream-to-reality-linky-party-52/
I am so going to do this for the three windows in my sewing/craft room! I’ll be attaching the fabric using Velcro so that I can change valances for the seasons and holidays. Thanks for the idea!!
Hi Pat
Awesome! Send me a pic if you feel inclined. I’d love to see :-)
Right away I am ready to do my breakfast, when having
my breakfast coming over again to read more news.
These are perfect and so pretty. Thank you!
It came out great and you are a lifesaver! I have been searching around for how to finish my shades for several weeks. I used to have custom, complicated pull-up balloon shades on my windows but they got so faded and dusty that I took them down. That said, I was smart enough to leave the brackets up and save the pelmet that is covered with a thin muslin already and the screws and dowels. So I found some fabulous fabric covered with pastel puffy pillows and tassels and sewed two shades with ruffles on the bottom. Then I got stuck because I was not certain how to utilize the pelmet and hang it. I did think I would create ribbon tie-ups because I didn’t have any fabric left for those. And I didn’t think using my staple gun to attach them was a smart idea. But you have given me options! I can’t wait to finish this project. I am embarrassed to tell you that these two lovely wanna-be shades in the making have been tacked up to my hallway wall for probably 5 years or so, while I slowly allowed other project to take hold–projects that I could figure out how to finish. You know, sometimes I don’t even notice them hanging there? Thank you for showing me the way!!!
Hi Ann
Don’t ever be embarrassed about the longevity of your projects – lovely things take time :-) So glad to heave helped spark some ideas/options. Send me a pic when you get them done – I would love to see.
Kristine
Very clever! The design goes so well with the whole office, I can see adapting this for other styles very easily. Thanks for a great idea, I will be sharing on pinterest!
Excelente….. ¡¡¡
I have always hated all the unsightly plastic/metal parts of the blind. This is such a great tutorial to really upgrade a simply window treatment from drab to fab!! You should check out the blackout fabrics online at weaveup. They offer so many different patterns in customizable colors!
I simply loved that! So carefully planned and made with great craftsmanship… <3
Hola soy colombiana soy amante del buen diseño, me encata los diseños de cortinas son de todo mi gusto.felicitaciones
Thanks so much :)
I’m a little confused. I have fake wood slat blinds. Is the fabric “valance” able to be let down to help keep out the cold in the winter if you would line it? I don’t understand why you use so much fabric if you are just using the fabric part for a valance.
Thanks
The amount of fabric I used is needed to create the rolled look. You could certainly make it full window length and secure it in a way which allows you to easily let it down if you wanted to use it as an actual window covering. I have a block out roller blind beneath the valance which I can use as needed so the valance is purely cosmetic in my case.
This tutorial is perfection! Thank you for sharing! I’m in love with this farmhouse simplicity and can’t wait to try it.
So glad you like it!
Great alternative for the typical blinds
Hope you see this even though you posted this last year. Does the roller blind actually roll up after you have the window covering in the closed position, or do you have to manually roll it up?
Sorry, I’m not totally sure what you mean exactly but the roller blind is perfectly functional.