
So, I know the post title is kinda an oxymoron though it actually does make some sense. You see, there are elements of both ‘actual’ and ‘artificial’ in my experimental process. Anyhoo, read on to see what the heck I’m on about…
With a new baby due in (gulp!) just four weeks time (when did that happen?) Charlotte will soon be vacating the nursery in favour of a ‘big girl’s’ room. For now the nursery will remain un-touched – at least until we discover if this new bundle is a boy or a girl – though over the past few months I’ve been slowly working on Charlotte’s new space. I conceded months ago that it would never be properly finished before the new addition arrived though figured as long as there was a bed and window dressing the rest could happily wait.
I’ll be sure to divulge all the room’s details when I actually get around to deciding on and implementing them (I’m kinda just letting this one evolve) though for now I wanted to share a metal dipped treatment I experimented with on the bed legs.

A while ago I picked up two colonial style single beds from eBay for just $25 each…
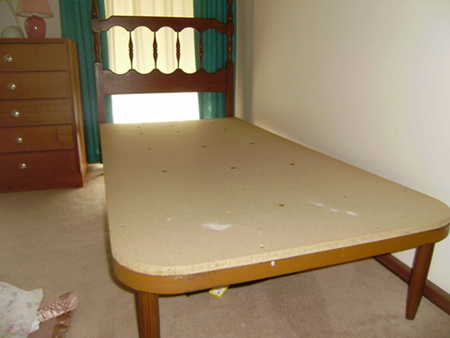
Photo from eBay listing.
I know, I know, you’re cringing right now, though never fear…I have a vision…kinda.
So, why two beds? Well, more on that in a future post (it might have something to do with the fact that I can’t leave well enough alone and may, or may not, get slightly crazy ideas).
Anyhoo, whilst I liked the timber tone of the beds they were badly coated with an obviously streaky stain so I decided a distressed painted finish was the best option, though I also wanted to add something a little different…I just wasn’t sure exactly what.
When I began preparing the frames for painting I noticed there were cute little brass caps on the tips of the upright posts (which were previously masked by the colour of the stain).
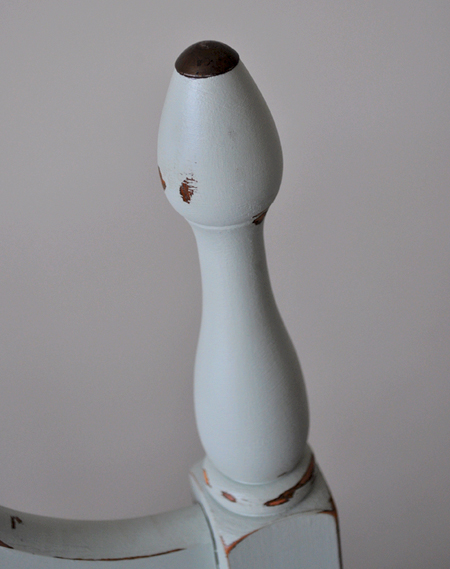
Seeing them gave me some inspiration so I decided I’d try a faux brass ‘dipped’ effect on the feet!
I know brass is on trend right now though to me it has always been desirable. Done right, it’s classic and timeless and I’ve always loved it and used it in my home. I prefer the deep tones and dirty patination of antique brass over the yellow hues and perfect sheen of polished brass though I guess they both have their place.
![]()
The following tutorial merely outlines the experimental process I used to achieve the metallic look I wanted. Depending on the type of brassy finish you’re after, you can tweak the process, omitting or adding steps as needed. To create as realistic as possible an effect, I used a multi-layered approach though there are loads of single application products you can try (including spray paints, waxes and standard liquid paints) if you’re after a quick, easy metallic hit! Without layers I find the results are usually somewhat flatter, though, like I said, it’s all just a matter of personal preference :-)
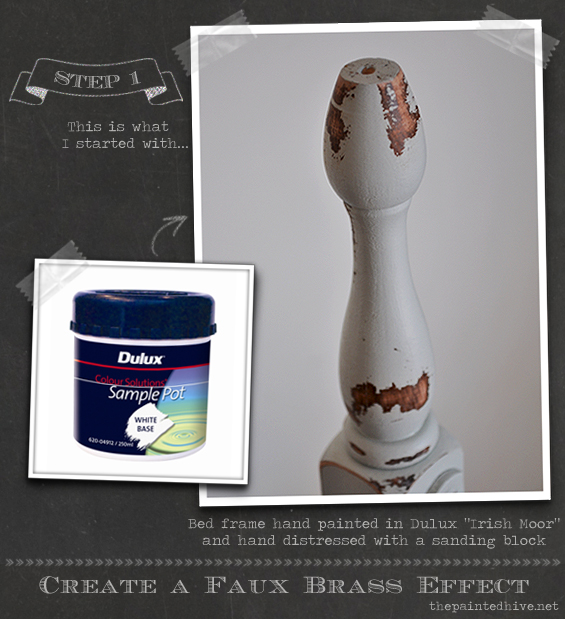
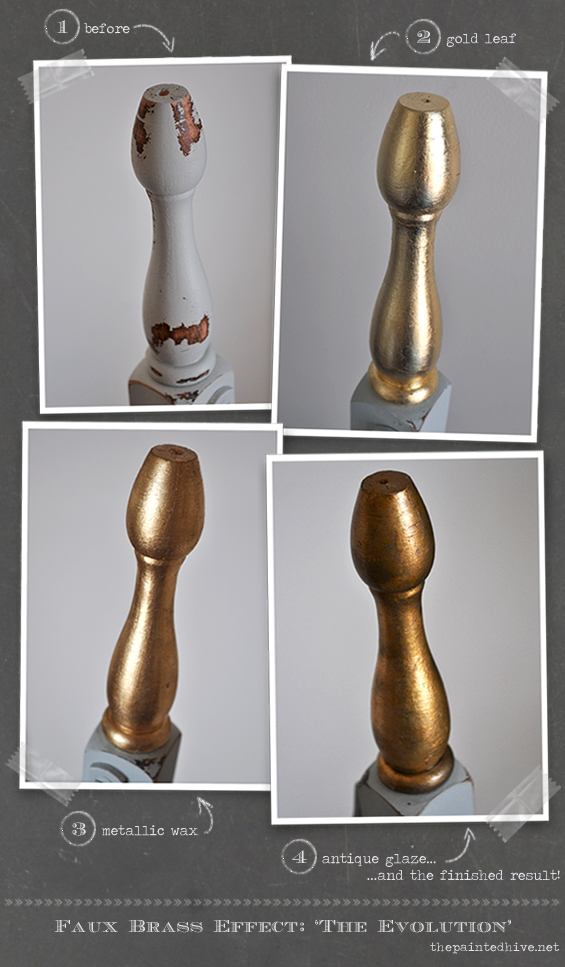
STEP 1 My starting point; as per the rest of the bed the feet were hand painted and distressed.
Granted, I didn’t need to do this (seeing they would be ‘brassed’ anyway) though given that at painting stage I was still a little uncommitted to my ‘dip experiment’, I did it regardless (so just in case I backed out at least the bed frame would still be consistent).
I used a sample pot in Dulux ‘Irish Moor’ ($8 – which is from the green colour spectrum though presents more like a blue) from Mitre 10. I know sample pot paints are s’pose to be for colour testing only and are not really recommended for actual application purposes, though I find the Dulux ones fine for finishing furniture if you also use a sealer (and, when you only need a reasonably small amount, they are much cheaper than a whole 500ml tin).
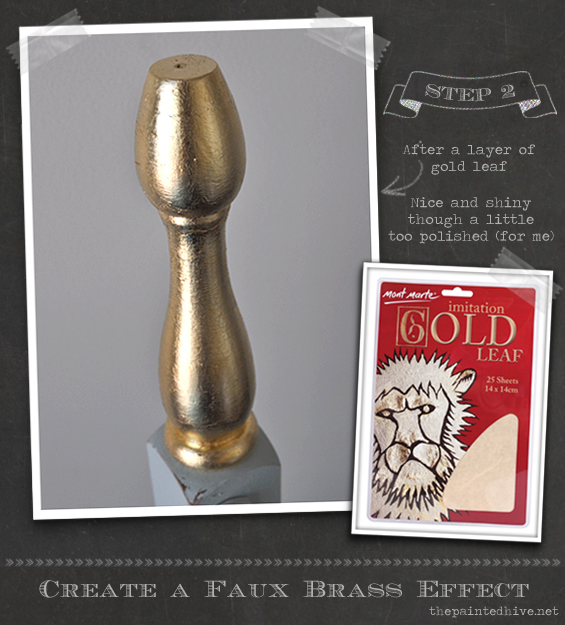
STEP 2 I applied a layer of imitation gold leaf.
So, here’s where the post title comes into play…imitation gold leaf sheets are actually a composite of metals made-up predominately of brass. So, my dipped legs are technically ‘authentic’ brass, though the antiqued appearance is definitely ‘faux’. If left unsealed imitation gold leaf will tarnish naturally over time as per real brass (though we’re talking ages and I wanted the look NOW!).
I’d never ‘leafed’ before and at first found it a little challenging, probably because I was impatient and didn’t use the proper adhesive. Lesson learned; don’t use ordinary craft glue because you don’t have leafing size and can’t be bothered getting some, leafing size makes things easier (and better). To apply the leaf follow the manufacturers directions and try to be patient, and remember, if you’re going for an ‘antiqued’ finish it doesn’t need to be entirely perfect – in fact, it’s probably better if it’s not!
Having never used gold leaf before I wasn’t sure how it would look. I was really impressed with the metallic sheen though thought it was a little too gaudy, which is why I decided to persist with some extra layers. If you’re after a bright golden finish (or are patient enough to wait for the leaf to tarnish naturally) you could ignore my additional layering steps and leave your piece as is.
I used Monte Marte Imitation Gold Leaf Sheets ($4 for 25 sheets) and Leafing Size ($3 for 60ml) which I found in the arts and crafts section at a local discount store. You can easily find them online or in most craft stores. I used around three sheets of leaf per bed foot. Don’t be put off by the dull appearance of the leaf through the packet (as I initially was) because there is a layer of semi-transparent paper over it (as I later discovered!).

STEP 3 I applied a sparing amount of metallic wax.
I’m not convinced how necessary this step was though it did seem to tone-down some of the stark straw-ey brightness to a more subtle champagne-bronze (due to some shadowing the colour looks a little deeper in the photo than in real life). To apply the metallic wax follow the manufacturers instructions. The key is to use only a small amount at first then build upon it as necessary to achieve the tone you’re after. Though don’t over do it. You don’t want to deplete the gilded sheen of the leaf. I found that buffing the wax harder in some areas wore away some of the leaf, though in a good, naturally aged kinda way which I think helped with the final patina. If you’re after a slightly muted golden finish you could skip my following step and leave your piece as is.
I used Amaco Rub ‘n Buff in ‘Gold Leaf’ (around $12 for a 15ml tube) which I already had. It is expensive though a small amount goes a super long way. You can find it at discounted prices on eBay or Amazon.
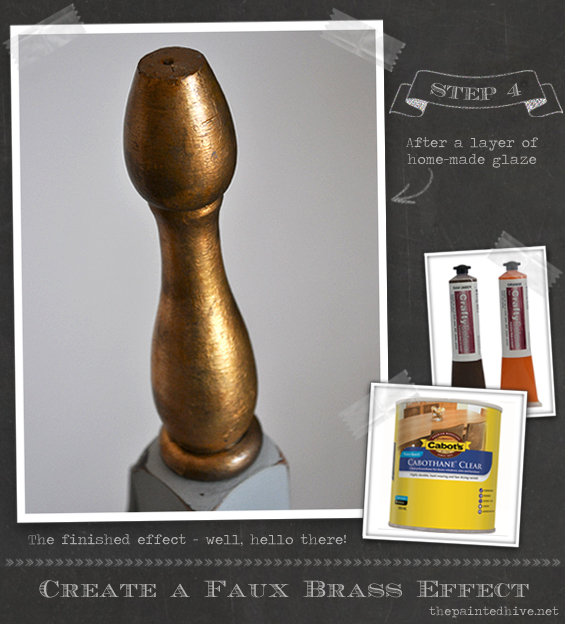
STEP 4 I finished by painting on a glaze.
Rather than using a traditional brown glaze I actually decided to try a predominately orange one. I know this sounds kinda crazy though I was looking at some of the actual aged brass I had lying around my home and noticed the pieces that appealed most to me had a subtle amber glow.
To make my glaze I mixed a small amount of acrylic sealer with a dash of orange craft paint and a tad of brown craft paint (just so you know, a tad is around a third of a dash – ‘course I just made that up :-) then applied it sparingly with a brush (you may also want to wipe off any excess as you go with a damp cloth). As per applying the wax, the key with glaze is to start with a small amount and build upon it as necessary – it’s kinda like making icing (frosting); you can always add more liquid if needed though taking it away is a little more tricky (and having to add extra sugar always results in waaaay too much mixture which you then have no choice but to lick off the spoon)! Mmmm, icing…did I just digress?
I used Cabots Cabothane Clear Water Based Satin Sealer ($20 for 500ml) cause I already had some, and simple cheap acrylic craft paints ($2 for a 75ml tube). You only need a small amount of glaze and can use any acrylic low-sheen sealer as the base (or, you can of course use proper glaze medium which has a retarded drying time and is probably easier to work with on larger projects).
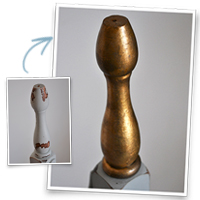
I’m really, really, really happy with the results! When compared to some of my actual aged brass it’s a pretty close match. It’s not quite as smooth or reflective as real metal though it has a lovely lustre and authentically aged patination. I’m totally digging the grungy texture and warm amber glow. I realise the depth of colour is completely a matter of personal preference, which is cool, cause with a glaze you can adjust the level of tint and amount you apply to make it as subtle or intense as you like.
All up, I used under $10 worth of product to complete all four bed feet – bargain!
I found a few online examples of actual antique brass so made a little collage to compare…

Not bad, eh?
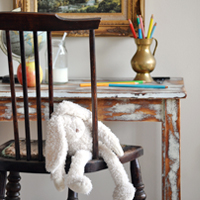
My dipped bed legs will eventually be partially concealed by a new bed skirt so will only end up being a subtle little detail in Charlotte’s new room though now I know how to achieve a realistic faux brass effect I’m looking forward to trying it on a larger, bolder scale!
![]()
PS I haven’t forgotten about my chippendale chair and lumber cushion posts…if I haven’t gone into labour they should be coming up next week :-)


OMG!!! Love this effect and LOVE that you shared how you did it.
I have a major brass crush going on and I am so doing this to something this weekend.
Thanks for sharing.
The best tips by far. I have uoir blog as a short cut on my phone
Wow, it really does look real. I will have to try this.
I can’t wait to see all the details you put into Charlotte’s new room.
Good luck with the last four weeks of your pregnancy :)
Beautiful! I am going to try it on a table.
Oooh, send me a pic!
Not bad AT ALL. Those are some very nice legs! I agree, it will never go out of style, especially for a little girl. Take some time to relax over the next four weeks!
Thanks Shari.
I’m totally terrible at relaxing…perhaps I’ll try and practice though.
xoxo
Honestly! Those feet look amazing! Thank you for the tutorial – I am working on a gallery wall for my dining room with a mish-mash of frames and I think might just do a little faux-real-bronzing!
I LOVE antique brass/bronze picture frames. They make gallery walls so stunning. Be sure to let me know if you try it :-)
I love how this turned out. Thank you for sharing.
Vanessa
Thanks Vanessa.
cool – the layers really give depth
Thanks, I’m lovin’ me the layers!
Your tutorials are always the best. I also love the way you make them look. Just like a magazine…even better. Thanks so much for sharing this. I’ve seen lots of repainting with plain metallics though it does usually look kinda fake. This looks so real.
thanks for an interesting tutorial – I love old brass and have quite a few bits dotted around my home, and also some picture frames that are still gold but need a redo. Your bed will look fab.
Wow! Impressive!
Hi, I have a carved framed in dark chocolate , I want to change to faux antique brass…do you think it will work?
Thanks
Absolutely! Gilding picture frames is one of the most common uses for this type of finish.
If your frame is quite detailed you might want to paint some of the deeper carved areas gold first (with metallic wax or paint). This is just because getting into the intricate details with the leaf can be quite tricky so if they are gold to begin with at least they should blend better in the end if you miss any little sections with the leaf.
Have fun!
Great info and demo…fantastic ‘brass’ finish. Very interested in your chalkboard background to your pictures…Is that your own program?
Thanks Coreen.
I use Photoshop to create images for my blog. The chalkboard background is a free downloadable texture.
Kristine
xoxo
I love the difference between the wax and the antique glaze. They turned out great, but probably too many steps for me! :)
Oh, Jill, you can do it! There are only three steps; leaf, wax, glaze. Easy.
Kristine
:-)
Thanks for your prompt reply! I love your work
:)
Perfection! You really got this just right. I’m with you I love brass! What a wonderful tutorial! I would love you to join my weekly linky party, TUTORIALS TIPS AND TIDBITS! Link goes live Wednesday 8:00 pm. Come on over and share!
This is amazing! I just gold leafed a chair and it was looking way to bright for me. I love that you figured out how to make it look more like brass! It turned out so pretty.
Thanks Debbie. Let me know if you try this on your chair. Would LOVE to see an entire piece of furniture with an antique brass finish – how cool!
Wow, fantastic transformation! It looks incredible :-)
You are amazing! You out do yourself each time. I can’t wait to see Charlottes room and what you do with the nursery for your new baby. Best wishes for your impending birth! I want to try this on something, anything. Hmmmm. I’ll come up with something.
Thanks Laura.
I’m sure you can find something to try it on.
I’m kinda having to hold myself back cause everything in our house is in danger of becoming ‘brassed’ at the moment.
:-)
Nice job. Turned out beautifully.
What a great project! Please share it on a terrific linky – Design Décor Tuesday. http://www.designdecortuesday.blogspot.com. See you there! ☺
Fabulous!! I love the dipped bronze legs!! Can’t wait to see the completed room.
Ruth
I’m workin’ on it as fast as I can Ruth…which is sadly rather slowly at the moment :-)
Thanks for linking in to Design Decor Tuesday. Looking forward to seeing what you post next week!
Jennifer
http://www.thejennyevolution.com
LOVE the beds, even prior to your high end, French decor styling! I have been looking for beds exactly like this, and you really found a goldmine!
You mentioned there is a liquid paint that could have a similar look. I have to paint moldings and banisters and am looking to get as close to your end result as possible, but need a liquid paint as its a lot to paint. Could you recommend a liquid paint?
Thanks,
Aiden
Hi Aiden
Wow, mouldings and banisters in antique brass – that sounds pretty spectacular!
Maybe start by checking out the range by Modern Masters. They have some pretty cool stuff.
I’m sure you’ve probably already had a search around the internet (guessing that’s how you came across my blog) and have likely seen that there are a heap of reasonably realistic looking metallic paints available (liquid gild and liquid leaf being two of the most popular) though they do tend to produce rather flat, albeit somewhat sparkly, results. I don’t know of any one-step paint that produces the multi-tonal, antique finish you seem to be after. In my experience a finishing glaze, wax or paste would still need to be applied for that more authentic, aged look. Of course, this would mean a two-step process for your mouldings and banisters. A bit of work though achievable for sure.
Liquid metallics are generally designed for small scale projects though and tend to be available only in small quantities. Not sure how pricey it could get.
Anyhoo, hope this helps a bit. Sorry I can’t share any miracle one-step product!
Kristine
Hi Kristine!
This looks amazing! I have a banker’s lamp which has a very bright and yellowy golden base that I would like to update. Do you think your technique would work on plastic? And could I skip the gold leaf step?
Thank you! Your blog is amazing!
Charlotte
Hi Charlotte. Yep, absolutely, I think it could work. If your lamp base is already shiny and golden you could skip the gold leaf stage and simply rub on some metallic wax to dull it down and age it. If you find it doesn’t seem to stick well to the plastic perhaps you could try lightly sanding it with some fine grit sandpaper. I guess then depending on how it’s looking you could also glaze it to refine the colour and add some more patination if desired. Let me know how you go!
Found you on Pinterest and absolutely love the finished piece. However, I am very confused. The pictured antiqued brass you created does not match the legs of the “before” (ebay listing picture) bed, but rather looks like a dead ringer for the posts on the headboard. Assuming it is the posts, I am curious as to how the finish has worn on them with an active child. I know how my children love to use a post of any height to play “Tarzan”. I cannot imagine that a pretty finish would make it any less appealing. Also, did you find that applying the rub n’ buff caused the leaf to wear during the process? I have been tempted to try leafing, but the one gold leaf mirror I already own cannot at all tolerate friction, especially with any form of liquid involved in the process. That is my excuse for not dusting well. ;) Thank-you bunches!
Hi Pamela
Actually, the brass finish is on the legs. I bought two of these beds and used the heads to make one “sitter” style bed. You can’t see the legs on the heads in the before pic, only those mid-century style ones which I removed for this project.
Given it’s not on the posts, I can’t vouch too much for it’s durability in terms of being “played” with. That said, the feet do get bumped quite a lot (by shoes, toys, boxes being pulled in and out from under the bed, and me vacuuming) and have held up fantastically well.
I didn’t have any trouble with the Rub ‘n’ Buff wearing away the gold leaf at all.
Hope this helps.
Kristine
x
This is great! I recently did the trim on my skirting in a matt gold, I’d love to see this on my dressing table legs.
What a cozy, so real girl’s room. So many blogs rooms all look alike. This looks like a room in a home gradually put together over years with things acquired from family and creativity. I never post on blogs , not even sure you will receive this. Can just imagine a little girl who grows to be a yong women in this special room. Big is not best. What a delight.
Hi Kristine! I know this is an old tutorial but I just recently found it while looking for faux brass techniques. I love the end result but I have a quick question for you. I was told that you can’t use a water based product over a wax (rub and buff) because the wax acts as a resist to the glaze. Is that true? How has your finish held up through the years? Thank you for your time! Blessings 🙏🏼
Hi Alexis. We have since upgraded my daughter’s bed though she used it for nine years and there were no issues with the glaze at all. As I mentioned, I applied it sparingly so it was almost like a dry brushing technique where it was integrated with the wax so it clung to the finish with no trouble. Cheers.