

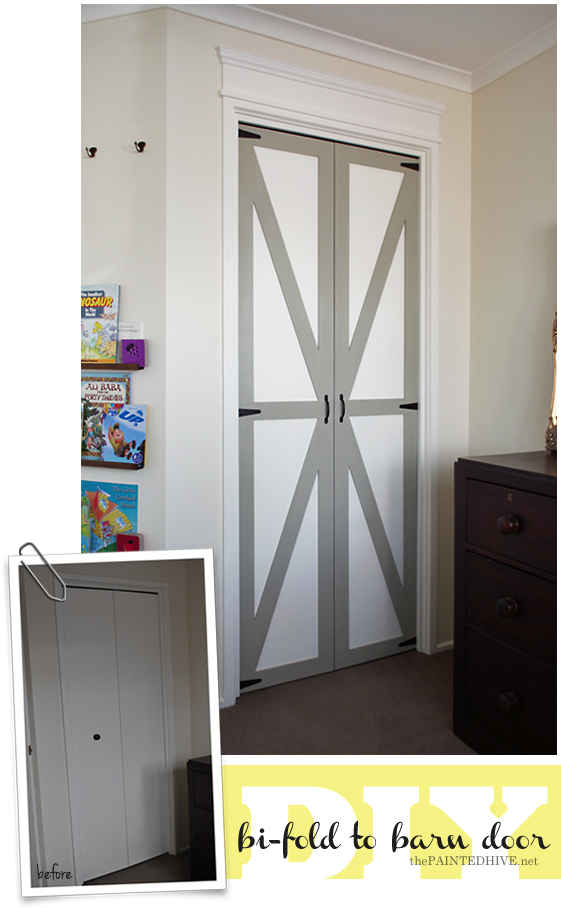
This is the final post in a three part series covering the transformation of bi-folds into barn doors. You can read the first post here and the second post here.
What a naughty blogger I’ve been – three whole weeks without a post! I am trying to publish more often, really I am, it’s just every now and again this whole ‘life’ business seems to get in the way. I hope you guys understand and can sympathise enough with my apparent inefficiency to stick around and indulge me with the occasional courteous pity visit :-)
Okay, excuse offered, onto some (Christmas-trend-bucking) house-y stuff…I am really stoked (and also, admittedly, a tad surprised) with just how well this project turned out! The finished door is almost identical to my inspiration rendering, which was initially designed to act as little more than a very rough guide – score!

As far as little architectural transformations go, it was a relatively quick, easy and affordable project. Plus the new look just adds soooo much character to Charlotte’s emerging room which lends a real sense of personality to the space and excites me about its potential! I’m now feeling super motivated about getting a wriggle-on and finally finishing it already (just whether said motivation actually transfers from physiological to physical is yet to be proven :-)
Anyhoo, here’s how the door re-do went down…
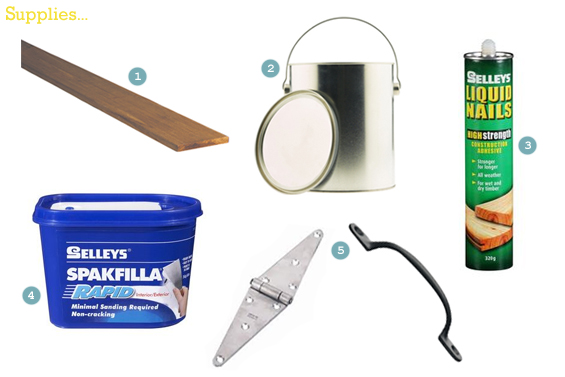
1 Timber
To keep costs low (and because I wanted something quite thin), I opted to use a sheet of ply which the friendly associates at Masters cut down for me. I ended up with 16 pieces measuring 6mm (1/4″) deep x 60mm (2 1/4″) wide x 1200mm (4 feet) long.
2 Paint
I used a sample pot in a colour called Lyndhurst Castle by Wattyl. LOVE this colour and want to try it on a piece of furniture one day.
3 Glue
I used Liquid Nails.
4 Caulk or filler
I used Spakfilla.
5 Hardware
I used 75mm (3″) strap hinges and simple metal handles.
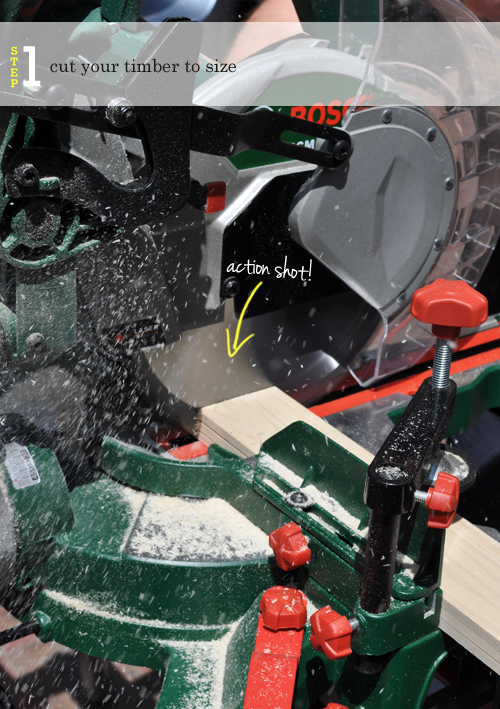
STEP 1 Cut your timber to size.
Measure your door, decide on the configuration for your cladding then trim your timber lengths to size. I needed 18 pieces of timber (8 x verticals, 6 x horizontals, 4 x diagonals) to form my design. I used our sliding mitre saw which enabled the cutting of multiple identical lengths at one time – awesome! I first cut the straight lengths (the verticals and horizontals) then configured one rectangle on the ground to determine the angles needed for the diagonals.
REMEMBER: If, like me, you are cladding a bi-fold, keep in mind that both panels may have slightly different dimensions so measure carefully.
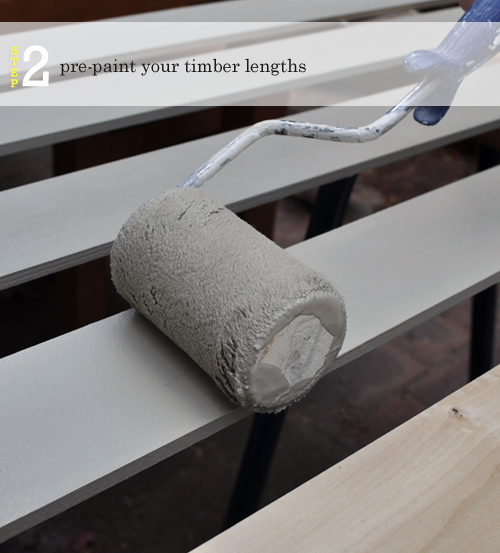
STEP 2 Pre-paint your timber lengths.
If, like me, you want to create a dual-toned door, pre-painting the cladding can save a lot of time and possible frustration. I lightly sanded my timber then rolled on three coats of paint. Two would have been sufficient though it was a hot day and the paint dried conveniently fast.
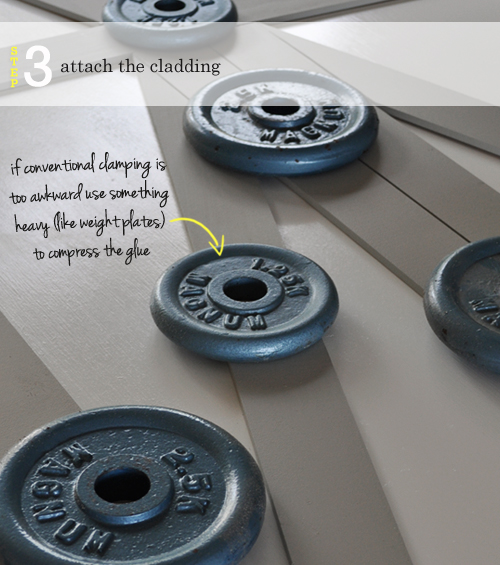
STEP 3 Attach the cladding.
You could adhere your cladding in situ, though for ease I elected to remove the door and lay it flat. I glued on one complete rectangle at a time, compressing each timber length with a weight plate until the adhesive was sufficiently set.
REMEMBER: If, like me, you are cladding a bi-fold, a narrow portion of the door (along both sides) will probably be concealed behind a door jam. Obviously, these areas needs to remain un-clad. So, when attaching your timber, start from the center to ensure you don’t impede on any areas that need to remain bare.
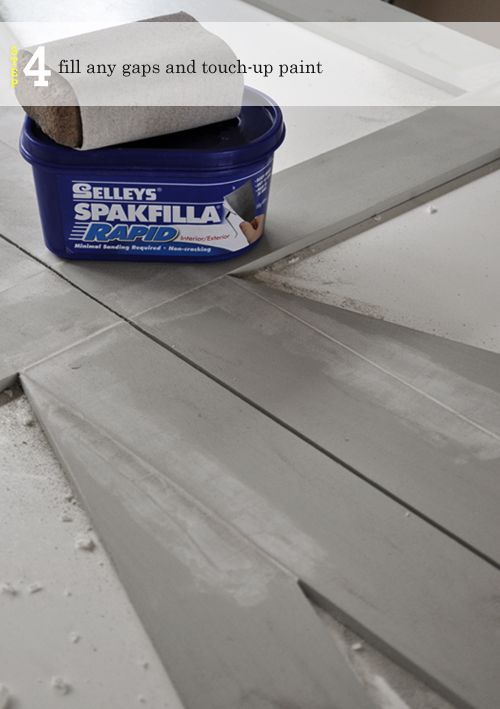
STEP 4 Fill any gaps and touch-up paint.
Once all timber lengths are attached, patch any joins with your chosen filler, sand until smooth, clean, then re-coat with paint as required. Because I used a sample pot paint (which has a very matte finish and low washability), I also painted my cladding with one coat of clear acrylic sealer for a durable finish and satin sheen.
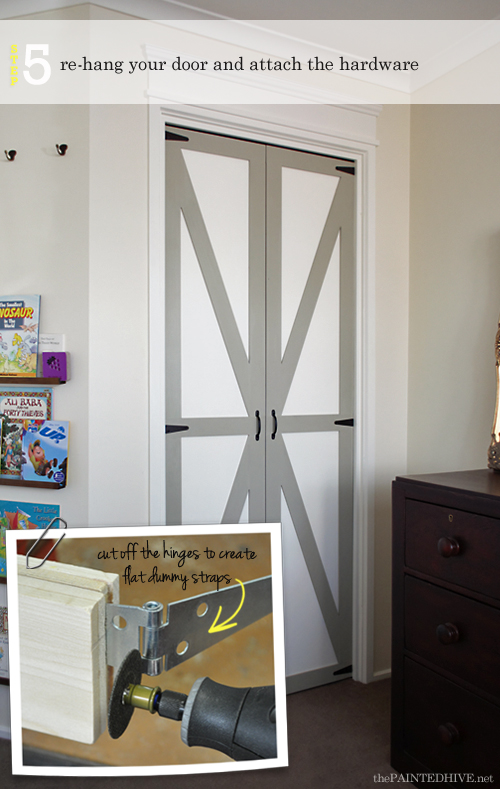
STEP 5 Re-hang your door (if required) and attach the hardware.
If you did remove your door, re-install it then whilst fully closed attach your hinges and handles. To transform my functional hinges into dummy straps, I simply ground off each hinge using my Dremel (you could use an angle grinder or hack saw – or, if you’re lucky, you may even be able to buy appropriate dummy straps). I also hit them with some black spray paint so they better co-ordinated with my handles.
TIP: Black spray paint is both a classic and practical choice. If needed, screw heads and any future chips can be easily, swiftly and seamlessly coloured with a black permanent marker.
NOTE: Before you embark on cladding a bi-fold (or any door for that matter) thoroughly examine how the door swings and take note of any existing space allowances which need to be retained in order to maintain proper function. If your cladding is too deep, inaccurately positioned or overly heavy you may find you have trouble opening the door. Check the size and position of your timber lengths is appropriate prior to removing your door and attaching any cladding.
Charlotte’s room is really starting to come together at last. So now, onto the next project I guess – there’s a little chair to be re-upholstered, window dressings to be made, artwork to be created and hung, bedding to be finalised, décor to be considered…I could go on, though how ’bout I stop typing and use my fingers to actually get at least one of those things done!

![]()
![]()

![]()
![]()
![]()
This is the final post in a three part series sponsored by Masters Home Improvement.
You can read part one here and part two here. All opinions expressed are my own.
![]()


love this! we have horrible bifold doors in our hall closet and this is perfect! just need to wait for spring here. :)
Thanks so much Cassie. Always lovely to hear from you.
xoxo
This is awesome!!!
Hi Kristine
I have been following your blog for quite a while and just wanted to leave a comment and let you know how much you inspire me. Your projects are all so well explained and photographed. Thank you for the time you take to share.
Grettle (from Sydney)
This turned out so great Kristine. I was waiting to see the finished door and it hasn’t disappointed. Great work as usual.
It’s looking great, Kristine. You did a fantastic job. We’re about to begin our drive south to Sydney in a few days time. Three years in Sydney will be different for me, but exciting too.
Thanks Libby :-)
It does sound like an exciting adventure. I’ve never even been to Sydney. Have flown over it and driven past it a few times. Will definitely have to stop one day (soon hopefully). Good luck!
Kristine, you are amazing. How many times do you find yourself just standing in front of a Finnish project so pleased you just carnt help visiting again and again. I’m there with you, enjoy. My husband and I have lots of projects to do. But life has gotten in the way too at the moment. One of the projects is the shelves, we still haven’t done them. Bought an amazing little bungalow for my daughter and grandchild to live in. So many more projects to do now. Will find out how to send you picture of befor and afters. If they can be done privately, not so brave to open to public thaughts. Have a wonderful Christmas and a fabulous new year. And as always thanks for sharing.
Carol
Thanks so much for such a lovely comment :-)
I would love to see before and afters of any of your projects. Don’t hesitate to email me (thepaintedhive@gmail.com) if you ever want to share.
Wishing you and your family a fantastic Christmas and all the best for the new year.
Kristine
This is the cutest project I’ve seen in a while. So stylishly done.
I love the dual tone doors and the gray color is gorgeous. You are so clever and your projects are always perfectly executed. Love this so much.
Too sweet Wendy :-)
looks great!! what a great idea. Thanks for sharing how to do.
Thanks Sheryl :-)
Looks awesome. I love the barn door look. :) We had mirrored bifolds that were really ugly and ripped them all out…still deciding what to replace them with!! :)
You make me want to sell my new house and buy an old house, so I can justify these kinds of projects!
I know Tania! My house is only around twenty years old so there’s only so much I can do. Sometimes I wish it was a true old tragic so I could justify all kinds of crazy DIY projects. One day I would love to buy and renovate a totally sad old house…dream.
I am in the process of building a pantry (enclosed shelf unit) for my “country/farm” style kitchen. I plan to use this design on the doors. Even though my pantry doors will not be bifold, it will work as long as I remember to consider clearance for when the doors are opened. Thanks for sharing!
Awesome Taryn! The barn style ‘x’ design will look soooo good in a farmhouse kitchen.
I actually plan to do something similar on my currently plain pantry door when we eventually re-do our kitchen too :-)
Very cute barn door and a great project! Great post!
It all looks AMAZING :) I hope you had a lovely Christmas holiday.
Check out my new post…Cute Swedish Curtain inspiration :)
Have a fab day.
LOVE Maria at inredningsvis – Swedish decor, food, and fashion
How clever is this? Love it!
Love all your ideas. Look forward to receiving e-mails. Keep up the fantastic work.
Kristine,
What a fabulous idea and it makes a tired door really POP!
Your details in the how to’s are very through as well.
Thank you!
Thanks for such a great idea. The door is looking very nice.
I love this door make over what a great idea! Thank you for sharin.
Chris
Thanks Chris :-)
I have a nook half way along my passage as a laundry with room for front-loader washer/dryer, has a sink and cupboard, it’s very handy and a huge space saver. It has double bi-fold doors which look pretty bland to me, so I am going to give your creative idea a go. I find your step by step instructions are so clear that any novice could accomplish your projects. Thank you so much I will be waiting to watch for your up-coming new ideas.
Thanks for your comment Dianne. It’s great to know that my instructions are clear and encouraging :)
A treatment like this can totally transform the feel of boring bi-fold doors. Just make sure that any trim you plan to add is quite thin and won’t impede their ability to open fully.
:)