
PART III: SETTING-UP & PRINTING LARGE-SCALE IMAGES
This is the final post in a three part series.
Post one covered understanding and editing free printables.
Post two covered setting-up and printing images at home.
In my opinion, wall décor can be one of the most important aesthetic components in a space. It generally sits at a level which commands attention and consequently sets a tone for the room as a whole. One of my favourite forms of wall décor to incorporate in a space is large-scale art – done right, its presence wields the power to pack one mightily lovely visual punch! Sadly though, more often than not, oversized prints are just far too pricey or elusive. It’s fortunate then, that with a little knowledge and resourcefulness, we can essentially produce our very own large-scale art – and all at a totally do-able price!
![]()
Of course there are heaps of alternate ways to go about setting-up large-scale art for print. There are also loads of different options when it comes to having large-scale images printed.
The following article merely outlines my preferred method based on personal experience. It pertains to large poster-like prints, not huge wallpaper-type murals. The tutorial focuses on using a purpose editing program (see note below) to perfectly customise images before having them printed through the Officeworks online print and copy service. Although my tutorial pertains specifically to Officeworks (which is the service I tend to use) much of what I share can be easily transferred to other online print services. You can, of course, also choose to visit a print center in person.
Note: In order to ensure the outlined ‘set-up’ process described in my tutorial can be accomplished by everybody, I have included instructions for two different editing programs; Photoshop (CS4 – which is fantastic though expensive) and GIMP (2.8 – which is a Photoshop-like program that can be downloaded by anyone for FREE!).
![]()
SO WHAT EXACTLY IS A LARGE-SCALE IMAGE ANYWAYS?
You’d think an explanation wasn’t really warranted, right? In it’s physical form, the name is pretty self-explanatory, though understanding the digital mode can be a little more complex.
Physically, a large-scale image is just that – an oversized, poster-like print. To me, a large-scale image is any print which has at least one side sized over around one meter (one yard) in length.
Digitally, large-scale images are technically those that have generous physical dimensions. However, resolution (or quality, measured in Pixels Per Inch – PPI) can also play a role (to better understand resolution and scale, refer to my first post in this series).
Let’s say you find an image online. You download it and open it in an editing program (such as Photoshop or GIMP) to check its size attributes (detailed instructions for locating the size attributes are outlined in my tutorial below). It’s 120cm/41″ wide x 160cm/63″ high at 72 PPI.
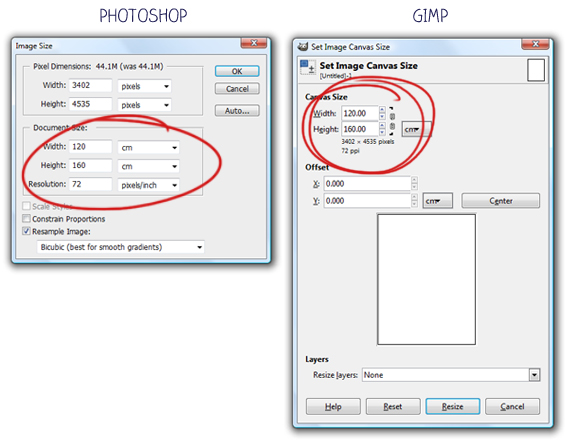
Whoa! That’s certainly large in scale though also low in resolution. The resulting print would have some discernible pixelation (though only when viewed at quite close proximity). I would recommend simply increasing the resolution (300 PPI is standard for print though anything from 180 PPI should be fine) whilst maintaining the physical dimensions (for further information and more detailed instructions for altering resolution refer to my first post in this series). Although this can introduce some minor blur (as the program ‘invents’ new pixels based on neighbouring ones) it does eliminate the more obvious pixel blockiness. This alteration of the number of pixels in an image is known as ‘Resampling’.
Now, let’s say you find an image that is only 30cm /12″ wide x 40cm/15″ high at 1200 PPI.
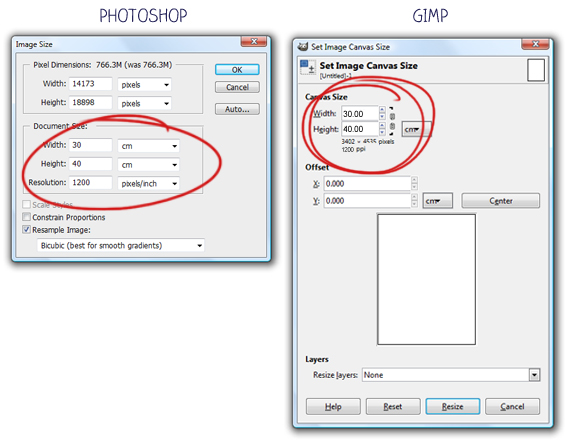
Poo! Although far from tiny it’s also far from large. Though, before you disregard it on grounds of physical dimensions alone, take a look at that stonking high resolution – 1200 PPI! In most print scenarios that level of quality is simply superfluous. Either the printer won’t have the ability to out-put that level of detail or it would have little to no visual effect on the image anyway. I would recommend decreasing the resolution to 300 PPI (in line with print standard) whilst maintaining the pixel dimensions (this is the opposite of ‘Resampling’). Because the pixel dimensions must remain constant, any change in resolution automatically forces a compensatory change in size, and vice-versa. In the case of this image, a decrease to 300 PPI (the original resolution divided by four) causes an increase in size to 120cm/41″ wide x 160cm/63″ high (the original image dimensions times four) with no loss of ‘information’. Score! You could also play with lower resolutions to create even bigger (huge-ish) prints!
Finally, let’s say you find an image that is 15cm/6″ x 20cm/8″ at 96 PPI.

Hmmm. There’s not much you can do to significantly enlarge an image with these size attributes without completely depleting the quality or altering the appearance (such as playing with artistic filters, like painterly effects or obvious textures). Lowering the resolution in an attempt to enlarge the image would only result in a minor size increase whilst further depleting the print quality. Increasing the resolution in an attempt to make the image much larger would result in obvious blur. When you’re looking to create a large-scale print and come across a digital image with properties like this, unfortunately you’re best to keep on searching.
Note: Whilst for the purpose of this post I am focussing on using general-purpose photo editing programs (Photoshop & GIMP) there are some dedicated image enlargement programs designed specifically for precision resampling which tend to produce crisper enlargements. I usually find general-purpose editors fine for my purposes, though depending on what you’re enlarging you might want to try a purpose enlarger. There are both free and premium (paid) options (some are stand-alone programs, some are extension plug-ins for existing programs like Photoshop). A few I have come across: Perfect Resize 8 (from $50), Smilla Enlarger (free) and Ben Vista Photo Zoom (over $200).
ACCEPTABLE PRINT RESOLUTION (QUALITY) FOR LARGE-SCALE IMAGES
How often do you actually examine your wall art? Especially from closer than, say, half a meter (1 foot) away? Maybe with the exception of inspecting the odd photograph, practically never.
Whilst the standard for general printing is 300 PPI, which is a good rule of thumb (and required for professional-looking documents, especially those containing text – such as brochures, flyers, leaflets), in certain scenarios it’s simply not necessary. Consider billboards. Their resolution can be as low as 3 PPI. That amounts to only 9 pixels per square inch! I’m sure you can imagine how obviously blocky that would appear at close proximity though when viewed at relative distance billboards appear smooth and sharp. Similarly (kinda), large-scale art is designed to be viewed from a slight distance. Also, by nature, elements within large-scale art are themselves generally large. This provides wiggle room where crispness is concerned so pristine quality isn’t essential.
When I started working with free printables, I knew nothing about resolution. I printed several large-scale images at 72 PPI, and to be honest, I found them great! Some minor pixelation becomes observable from as close as 20cm/8″ away, though for me even the small text in my vintage maps was legible enough. Knowing what I know now however, I usually like to increase the resolution prior to print. I find anything from 180 PPI fine, though where possible I do aim for 300 PPI. Anything above 300 PPI is usually redundant. Remember, the more you increase the resolution of an image through resampling, the higher the possibility of introducing some blur (caused by the ‘invention’ of new pixels).
Keeping in mind that computer monitors fail to give an accurate visual indication of print quality (they display images based on pixel dimensions, not resolution) and the subsequent unpredictability of said print quality, if you’re ever unsure I recommend playing with a few different resolutions and printing test patches prior to final printing. It may also be beneficial to view your image at print size (detailed instructions for how to view at print size are outlined in my tutorial below), rather than by actual pixels. Although not 100% accurate, this can help give a rough idea of print quality
Here’s an example which demonstrates how different viewing modes can impact on perceived quality…
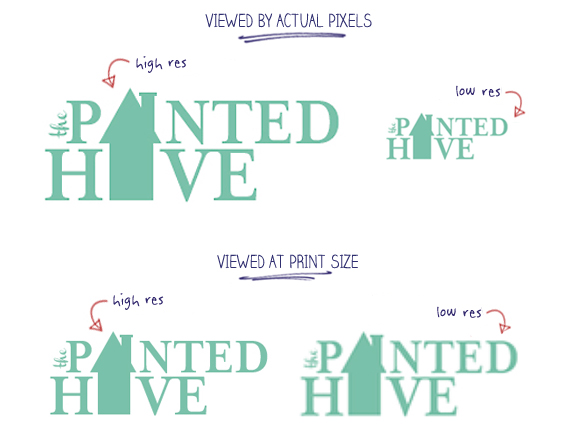
Let’s say these images are all 9cm/3″ x 3cm/1″. The ones on the left have a high resolution of 300 PPI (equalling 1063 x 354 total pixels) and the ones on the right have a low resolution of just 50 PPI (equalling 177 x 59 total pixels).
When viewed on a computer monitor by actual pixels the high res image appears significantly larger than the low res image. This is due to the high res image having much more pixels (although both images have the same physical print dimensions). Whilst there is a clear difference in size there is no real observable difference in quality. Both images appear sharp and crisp.
When viewed at print size both images appear equal in size though now there is a very noticeable difference in quality. The low res image is fuzzy and pixelated. This is because there simply isn’t enough pixel information to sustain crisp quality at the specified print size. The existing pixels have been forcibly expanded to the point of blurriness.
Based on this example, I’m sure you can imagine how viewing a large-scale image on your comparatively small computer monitor might give you a false impression of print quality, particularly if the image has been condensed to fit within the screen. Again, be sure to view at print size for a rough idea of quality and always print a test patch if you’re ever uncertain.
Note: The above images are merely demonstrative examples and are not displayed at relative size.
FINDING LARGE-SCALE IMAGES
There are loads of different online resources for free printable art though not all of them offer large-scale images (in fact, most of them don’t). Through persistence (okay, and maybe just a tad of obsessive scrounging), I’ve managed to establish a pretty good little collection of places to look and a rough idea of some of the ‘clues’ which might initially indicate a digital image is large in scale (such as the size it presents on a computer monitor or whether there are ‘version’ options). That said, to learn the true size of a digital image you will almost always have to download it first and open it in an editing program to check the attributes (detailed instructions for locating the size attributes are outlined in my tutorial below). Remember, depending on the image, you may need to maximise it or use a provided Download link to ensure you download the full printable version – not just a minimised screen version.
Keep in mind that the resolution values of downloadable images might not always be truly indicative of their quality. As touched on above, it’s easy for anybody to simply increase a low resolution image through resampling. If an image has been recklessly resampled it’s likely the quality won’t actually reflect the resolution (an image with a resolution as high as 1200 PPI could in fact be quite poor in quality). For an initial rough idea of quality, view your image at print size (detailed instructions for how to view at print size are outlined in my tutorial below) and, again, always print a test patch prior to final printing.
For a good place to start searching for large-scale images, feel free to refer to my Free Printables Directory for a few of my fave sources.
In addition to free printables online, you might also want to consider…
Scans: Any printed media can be scanned at a high resolution and enlarged to produce unique, custom wall art. The amount you can successfully enlarge a scan will depend on the physical size and quality of the image to begin with along with the resolution it is scanned at. Consider vintage illustrations from books, magazines and newspapers or antique photographs.
Photographs: Digital photographs are great for enlarging, though do keep in mind that like any digital image, they too have size limitations (here is a great explanatory chart). Also, keep in mind that if you don’t have a scanner, or if you have an image that is difficult to scan, you can try using a high megapixel camera in its place – just be careful with lighting, angle and steadiness.
Premium (Paid) Images: Whilst everyone loves something for free, don’t discount premium printables. You can find some really fantastic and affordable digital images that may have already been optimised for print. Try Etsy or do a few Google searches using keywords like “downloadable art”, “high resolution digital images”, “oversized instant downloads” or “large-scale printables” etc.
CUSTOMISING IMAGES FOR YOUR NEEDS
Once you find a suitable image, chances are some editing will still be required. Whilst customising the size of a printable is in most cases necessary, tweaking the appearance (such as altering colour, increasing sharpness or generally ‘touching-up’) is not essential though can help improve the overall look.
Customising Size: When it comes to editing size, you’ll probably be bound by particular dimensions, such as those of an existing frame or confined hanging space. On rarer occasions you may be free of any specific size requirements, such as if you plan to DIY your own frame or create something frameless, like a wall chart.
Having certain size specifications can make resizing a little more tricky. This is because the aspect ratio (width to height proportions) of any chosen digital image will almost certainly differ from that of your frame/space. After all, the image wasn’t created with you in mind – it’s up to you to make it work! This might mean having to thoughtfully crop or distort an image (refer to my tutorial below for detailed instructions outlining my preferred method for tailoring size).
Being free of any size restrictions certainly makes things easier. You can determine an approximate desired size (ensuring it works with the current size and resolution values of the digital image) and re-scale your image proportionally (maintaining the aspect ratio).
Customising Appearance: Unlike tailoring size, editing for cosmetic reasons is entirely optional. You can make subtle changes, such as altering the hue or cleaning-up imperfections, or bold adjustments, such as adding entirely new elements, layering textures or completely transforming the colour. I usually like to experiment with minor colour and sharpness adjustments. If necessary, I will also sometimes tidy-up imperfections, such as age spots or water marks, though only if I feel they detract from the overall image. In rarer instances, I might edit out or replace text, as unlike pictorial elements, it can appear noticeably blurry or pixelated.
PRINTING LARGE-FORMAT ART
Of course, to produce quality prints, you need a quality printer. There’s little point taking time and care to perfectly optimise a digital image only to print it on an inferior machine. I find that professional printing is by far the best way to go (I personally prefer the convenience and control of using an online print service). Not only is the quality awesome though there are several paper size options (and even different substrates, such as canvas) and surprisingly the price is almost comparable to at-home printing (remember, printer ink is one of the most expensive liquids on earth – if it were wine a standard bottle would cost $3,000!). If you’d prefer to print at home, there are several online tools which will grid an oversized image for print, and some printers even have this option in-built.
If you do choose to print professionally, here are a few factors to consider…
Size Generally, print services offer substrates (the medium the ink is printed on to, of course most commonly paper) in various set sizes (up to a maximum of around 1.5 meters/5 feet in length – if you have a super huge image you might want to consider custom wallpaper) at fixed prices. They tend not to tailor price based on actual image size. This means it’s up to you to choose the most appropriately sized substrate for your image or, where reasonable, tailor your image to fit what’s on offer. At times you might find that the proportions of your image fail to take advantage of the full substrate sheet. If so, you might like to ‘sneak’ some additional smaller images into the ‘gaps’ – I love to do this, it’s like getting prints for free! Conversely, you might sometimes find that your image exceeds the maximum size available. In this case you will need to ‘split’ the image prior to print (then, once printed, reassemble it again – a bit like wallpaper, I guess). It’s super important to keep in mind that some print services might try and auto resize images to fill the chosen substrate sheet. This can result in image expansion, contraction, cropping and/or distortion. This is why it’s imperative that you don’t simply upload your image as is. First, create a ‘canvas’ sized to match your chosen paper dimensions then copy and paste your perfectly sized image onto it (detailed instructions in my tutorial below). The print service will recognise that the document is identically sized to your chosen paper and retain its exact dimensions.
It’s also important to note that in most cases there will probably be some kind of print margin. Edge-to-edge printing is not always available. For this reason I recommend ensuring your image doesn’t completely cover your ‘canvas’.
Substrate Along with offering different types of paper, print services may also supply other materials, such as canvas and polyester. As far as paper is concerned, there will probably be two factors to consider; weight (or thickness) and finish. Weight (or thickness) is measured in GSM (or microns). The higher the GSM (or microns) the denser the paper, with 80 GSM (100 microns) being general-purpose document paper and 300 GSM (380 microns) being card-stock. Paper finishes may include options such as matte, satin or gloss. Depending on the intended use for the print, I normally find that around 100 GSM (130 microns) is fine and I personally prefer a satin finish.
Colour Most print services will have an output option of either colour or black and white. Obviously, select whichever best suits your needs. In relation to colour format, printers generally recommend using CMYK mode which is the standard for print. In most cases RGB is also acceptable. To be honest, I find both fine. The colour mode of a document can be set in Photoshop or GIMP (detailed instructions in my tutorial below). If, like me, you like to push stuff out of your bran by shoving more stuff in, here is some further reading about how colour modes effect prints: RGB v CMYK.
File Type Refer to your print companies specifications for recommended file types. In most instances, PDF files along with standard bitmaps (such as JPG, PNG, TIFF) should be fine.
Service In most cases you will need to select a particular type of service before uploading an image. For example, Officeworks offers ‘Standard Colour Posters’ or ‘Premium Colour Posters’. As far as I can tell, the only difference between the two being the weight and finish of the paper available. Be sure to take the time to learn the difference between particular services to ensure you choose the right one for you.
Cost Of course the price for prints will vary from store-to-store and service-to-service so do your research and feel confident about your expenditure. Keep in mind that cheapest isn’t always best, and vice versa. Officeworks offers premium colour BO (1oocm x 150cm) posters for around $70. Considering that large format prints can cost hundreds, or even thousands, of dollars in stores, spending around $70 on a huge print doesn’t worry me one little bit! I also don’t mind the marginal price increase for selecting slightly higher quality paper. If you’re considering a different substrate, such as canvas, the price can jump considerably so be sure it’s what you really need. At Officeworks, large-scale canvas prints start at around $120.00.
![]()
TUTORIAL: HOW TO CUSTOMISE & PRINT LARGE-SCALE ART
(or rather, how I usually customise and print large-scale art)
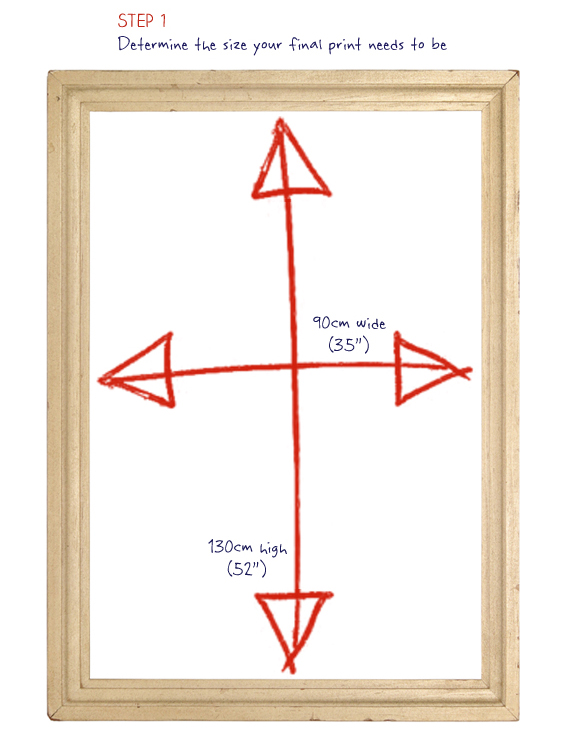
STEP 1 Determine the size your final print needs to be.
If you already have a frame, accurately measure the opening (display area). If you’re not restricted by an existing frame (due to the fact you plan to construct your own or create something frameless, such as as a wall chart) roughly decide how large you want your print to be. For the purpose of this tutorial, let’s say I have an existing frame with a display area measuring 90cm/35″ x 130cm/52″.
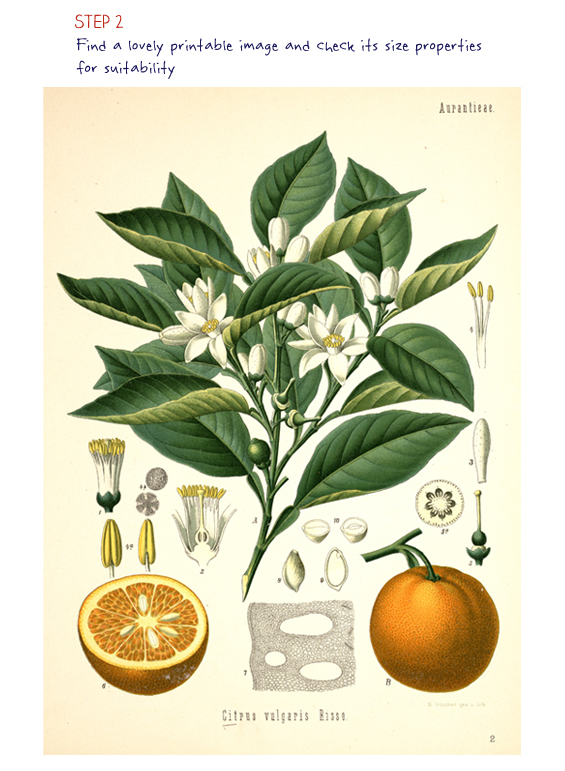
STEP 2 Find a lovely printable image and check its size properties for suitability.
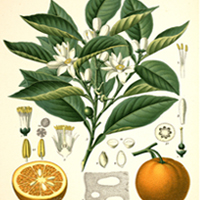
Search online for a free printable image then download it to your computer (being certain to download the full-sized version). For the purpose of this tutorial I’m using this lovely vintage botanical from one of my fave printable resources – Botanicus (love!).
Once downloaded, check the size properties in an image editing program.
How to check the size properties…
Photoshop: Open Photoshop and go to File>Open, then browse for your image, or find the image on your computer, right click it and select Open With then select Photoshop. Once open in Photoshop, go to Image>Image Size. Take note of the Document Size (Width, Height, Resolution).
GIMP: Open GIMP and go to File>Open, then browse for your image, or find the image on your computer, right click it and select Open With then select GIMP. Once open in GIMP, go to Image>Canvas Size. Take note of the Width and Height (in physical dimensions – you may need to select centimeters/inches from the drop down) plus the PPI.
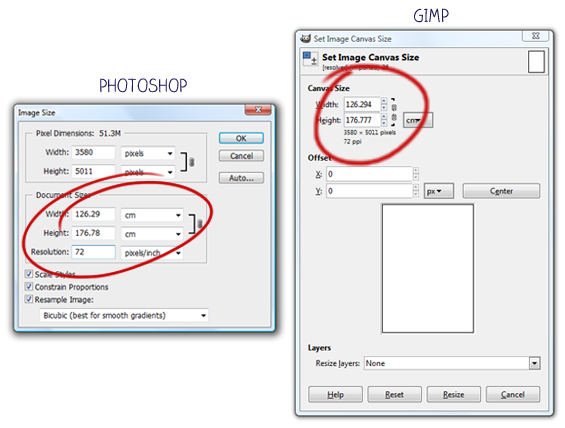
We can see that my image has a resolution of 72 PPI and a physical size of 126cm/50″ wide x 176cm/70″ high. Definitely something I can work with. At this stage I usually also view the image at print size to gauge the approximate scale and quality.
How to view at print size…
Photoshop: Go to View>Print Size. Due to monitor variables, Photoshop will not always display Print Size accurately. Here is a great tutorial for rectifying the issue.
GIMP: Go toView>Zoom 100%. Due to monitor variables, GIMP will not always display Print Size accurately. Ensure your monitor resolution is correctly set in Edit>Preferences>Display.
Remember, computer monitors do not provide an accurate indication of print quality as they display images based on pixel dimensions, not resolution. Viewing at print size just provides a visual idea of scale and a rough impression of quality. If the quality appears poor on a computer monitor, it will look even worse in print.
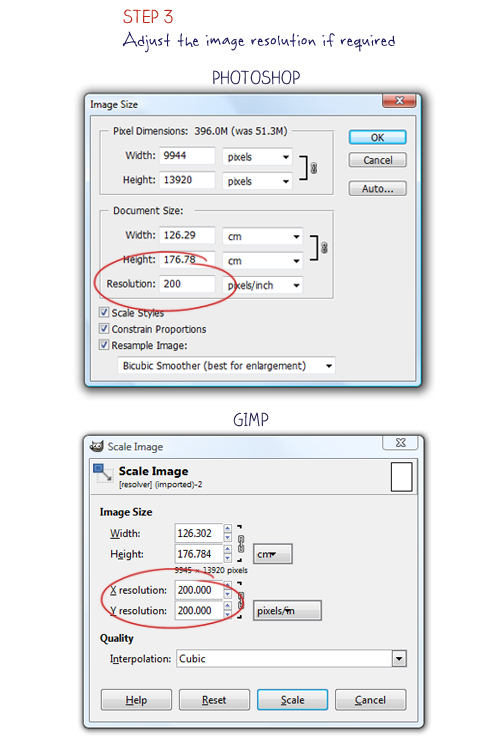
STEP 3 Adjust the image resolution if required.
At this stage it’s a good idea to set the resolution at your desired print out-put. As mentioned above, I usually find anything from 180 PPI fine though it’s really a matter of personal preference. If you’re unsure, play with a few different resolutions and print test patches to gauge the difference.
At 126cm/50″ x 176cm/70″ my image is much larger than required to fill my 90cm/35″ x 130cm/52″ frame so before I jump to resampling (and meddling with the existing pixel information) let’s see how much I can increase the resolution simply by reducing the size (thus avoiding altering the pixel information).
How to adjust the physical size (without resampling)…
Photoshop: Go to Image>Image Size. Ensure that Resample Image is unchecked. Enter a new height value based on that of your desired print size (be sure to add a few extra cm’s to give you a bit of wiggle room, and make sure the width doesn’t automatically drop below what is required). Take note of how the Resolution is effected. If you’re satisfied, click OK.
GIMP: Go to Image>Print Size. Enter a new height value based on that of your desired print size (be sure to add a few extra cm’s to give you a bit of wiggle room, and make sure the width doesn’t automatically drop below what is required). Take note of how the Resolution is effected. If you’re satisfied, click OK.
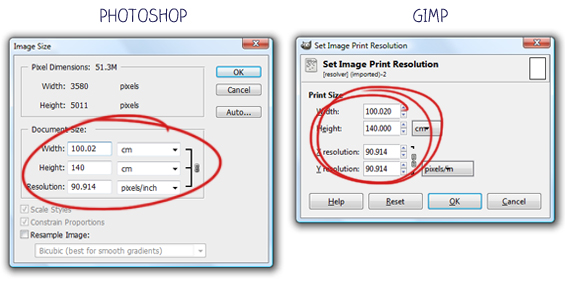
We can see that by reducing the height of my image to 140cm my resolution increased only marginally from 72 PPI to around 90 PPI. I want a higher resolution than that. I think something around 200 PPI should be great so I will have to resample the image.
How to resample an image…
Photoshop: Go to Image>Image Size. Ensure that Resample Image and Constrain Proportions are checked. Select Bicubic Smoother from the drop-down. Enter your desired resolution. You will notice that the Document Size (Width & Height) remain constant and that the Pixel Dimensions automatically adjust.
GIMP: Go to Image>Scale Image. Ensure that Cubic is selected from the Interpolation drop-down. Enter your desired resolution (note that the width and height automatically adjust to retain pixel density, however, in this case we actually want to alter pixel density). Re-set the width and height at your desired size. You will notice that the number of pixels (shown below the width and height) has changed.
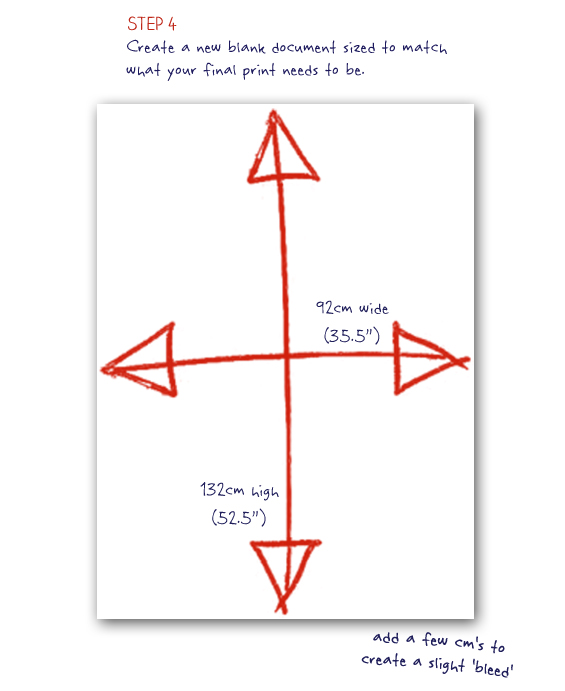
STEP 4 Create a new blank document sized to match what your final print needs to be.
Using the dimensions obtained in Step 1, create a new document to act as a fresh ‘canvas’ for perfectly scaling your image. Add a few cm’s to give yourself a ‘bleed’ area if needed. This will ensure that the edge of your image extends beneath your frame so no white paper will be visible. Keep in mind that if your image has any elements right near its edge they too may be lost beneath the frame. My image appears to be central enough.
Note: I prefer using a new canvas to manually re-scale the image over simply changing the numerical values within the Image Size (Photoshop)/Print Size (GIMP) dialogue boxes because it allows for visual editing which gives greater control over image placement, cropping, distortion and bleed. More information in the following step.
To create a new document…
Photoshop: Go to File>New. Enter your custom specifications for Width, Height, Resolution, Colour Mode and Background Contents. Click OK. Once your new document is open, if necessary go to View>Fit On Screen (I find it much easier to work when the whole document is visible).
GIMP: Go to File>New. Enter your custom specifications. If needed, you can manually adjust the PPI in Advanced Options. Once your new document is open, if necessary go to View>Zoom>Fit Image In Window (I find it much easier to work when the whole document is visible).
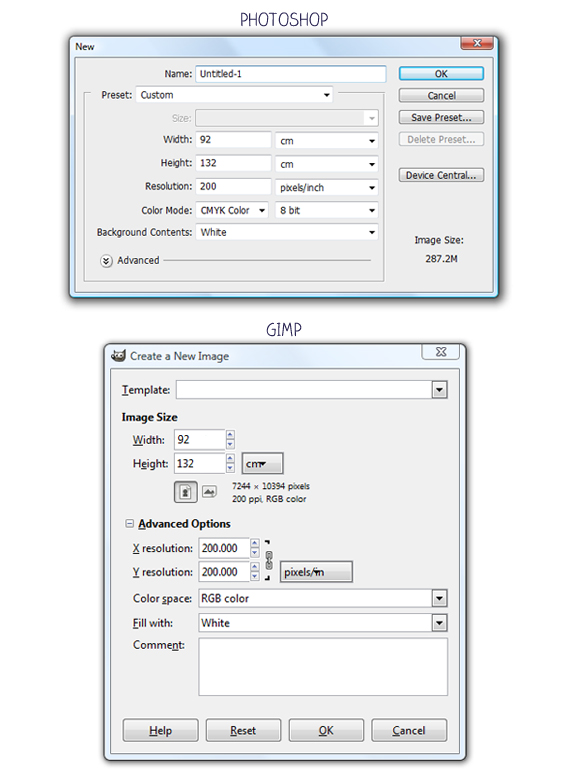
Above are the values I have selected. Here’s why…
Width: 92cm/35.5″. Based on the display area of my frame which is 90cm/35″ wide. A 2cm/.5″ buffer provides a ‘bleed’ area.
Height: 132cm/52.5″. Based on the display area of my frame which is 130cm/52″ high. A 2cm/.5″ buffer provides a ‘bleed’ area.
Resolution: 200 PPI. In line with that of my image.
Colour Mode (Photoshop)/Colour Space (GIMP): CMYK/RGB. To be honest, I’m not really that fussed about the colour mode I use. For my purposes, I find it doesn’t seem to make much difference. CMYK (Cyan, Magenta, Yellow, Key) is generally what is recommended for print. GIMP doesn’t support CMYK natively though you can install a conversion plug-in. If, like me, you like to push stuff out of your bran by shoving more stuff in, here is some further reading about how colour modes effect prints: RGB v CMYK.
Background Contents (Photoshop)/Fill With (GIMP): White. You could also select Transparent.
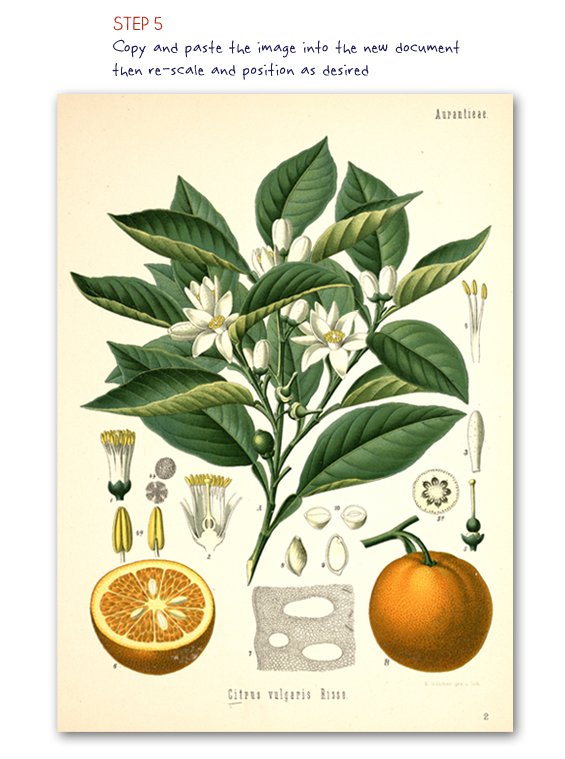
STEP 5 Copy and paste the image into the new document then re-scale and position as desired.
How to copy and paste…
Photoshop/GIMP: In the image document, go to Select>All then Edit>Copy. Move to the new document then go to Edit>Paste.
My pasted image is larger than the canvas of the new document – perfect! Now we can re-scale and position it just as we want.
How to re-scale and position…
Photoshop: Select the Move Tool. A bounding box will appear. Click and drag one of the corner squares whilst holding the Shift key. The Shift key ensures the aspect ratio is retained so the image isn’t distorted. If you want to distort the image, don’t hold the shift key and click and drag anywhere on the bounding box.
GIMP: Select the Scale Tool. Ensure Keep Aspect is checked (so proportions are retained) then click on your image (a grid will appear). Drag as required to reduce the size of the image as required. To distort the image ensure Keep Aspect is unchecked.
Because the aspect ratio of my image differs sightly from that of my frame, I needed to change the proportions of the image a little in order to make it work for me, thus introducing a tiny amount of distortion. This is one of the main reasons I prefer to re-scale manually using a perfectly sized ‘canvas’ (rather than simply altering the numerical values via the size properties dialogue box). Using the ‘canvas’ as a visual guide just makes tailoring the size, scale and position so much easier and more precise.

At this stage, you may also want to do any cosmetic editing, such as increasing sharpness, altering hue or just generally ‘touching-up’.
Note: When selecting your image, keep aspect ratio in mind. Obviously, if you have a rectangular frame, choose a rectangular image (or one that can be successfully cropped without looking ‘chopped’). Distorting an image excessively in an attempt to make it work will probably just result in it looking, well, distorted. If you really have your heart set on a particular image which has conflicting proportions to that of an existing frame, remember you can always consider matting it.
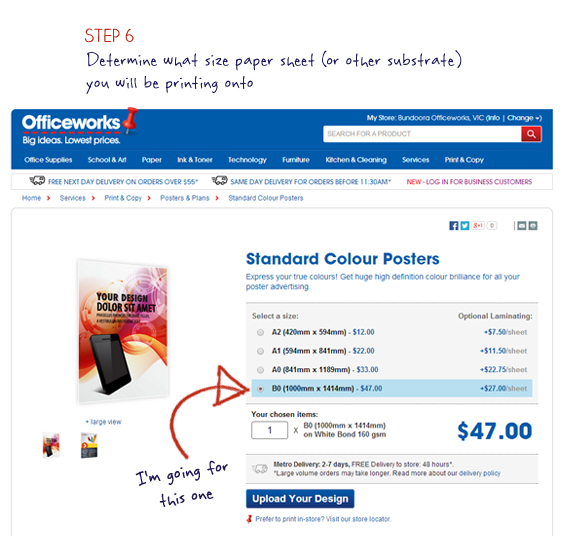
STEP 6 Determine what size paper sheet (or other substrate) you will be printing onto.
Visit your preferred print company (virtually or in person), inspect what they offer and choose the most suitable option. As mentioned above, I generally use the Officeworks online print center. For my image, I’m going to select the Standard Colour Poster service and the BO sized 160 GSM white bond paper ($47). At 100cm x 141cm it’s almost perfect for my 90cm x 130cm image.
Note: If your find the available sizes aren’t suitable for your needs (too small or ill-proportioned) there are some things you can do. Refer to my note in Step 8.
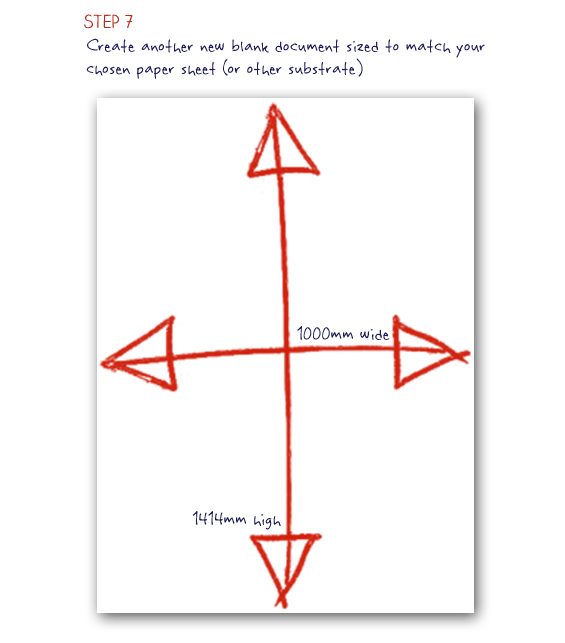
STEP 7 Create another new blank document sized to match your chosen paper sheet (or other substrate).
Using the same process as in Step 4, create another new document sized to match your chosen print substrate exactly.
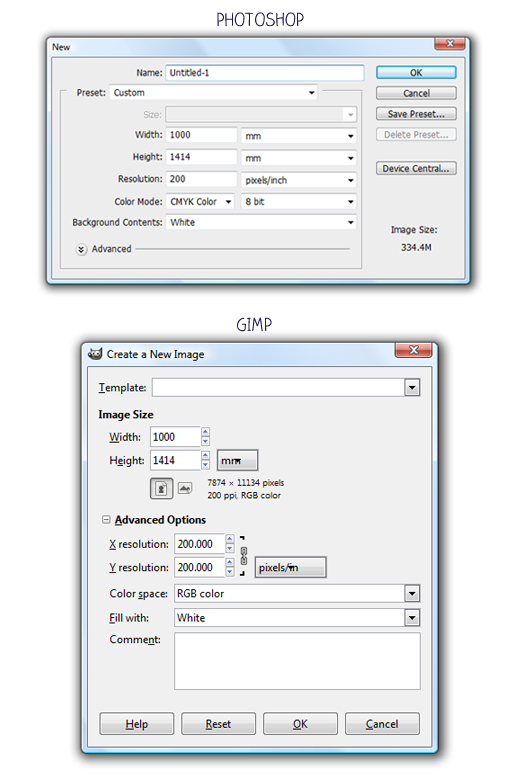
Above are the values I have selected. Remember, my chosen paper sheet was 1000mm x 1414mm. Ensure you set the resolution in-line with your previously determined print output (mine was 200 PPI) and the colour mode at CMYK (or RGB) with the background content being white or transparent.
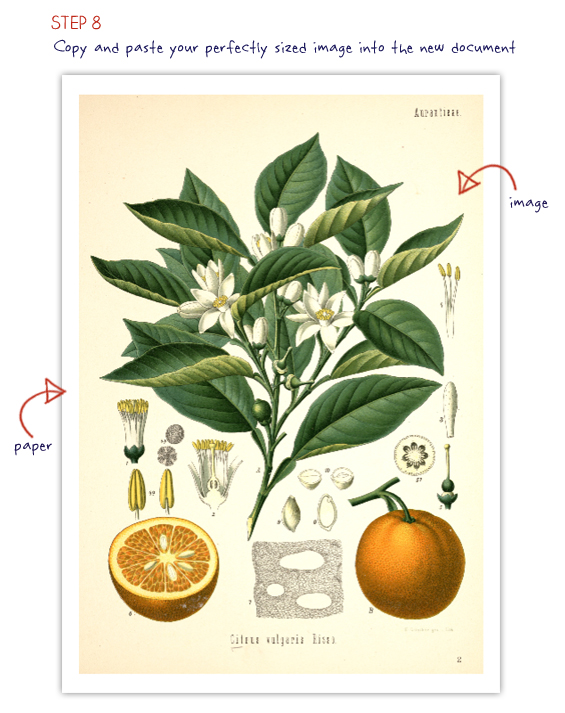
STEP 8 Copy and paste your perfectly sized image into the new document.
Using the same process as in Step 5, copy and paste your perfectly customised image into the new document.
You now have an exact, albeit smaller, digital version of how your finished print will look – substrate and all! We can see that my image sits beautifully on my chosen paper. Make sure you’re happy with everything. If desired, print a small test patch to check image quality though keep in mind that printer quality also plays a role and professional print centers have awesome quality printers (which will probably produce much better results than most domestic printers).
So, why go to the extra trouble of pasting the image into this new document? I mean, why not simply use the already customised image as is? Well, as touched on above, some print services might try and auto resize images to fill the chosen substrate sheet which can result in image expansion, contraction, cropping and/or distortion. Also, seeing just how the image fits and sits upon the substrate lets you know what your finished print will look like exactly. Obviously this helps ensure the result will be just as intended.
Note: Remember, most print companies offer set paper sizes and prices which means you’re charged the same amount for your print regardless of actual ink coverage – so make the most of the entire surface area! This might mean sneaking a few smaller images into any ‘gaps’ if you have an oddly proportioned image and lots of blank space. Also, if you find that your image is too large for the substrate sheets available, you can always split it then either divide it between two smaller documents or attempt to fit it all (jigsaw style) on one large one.
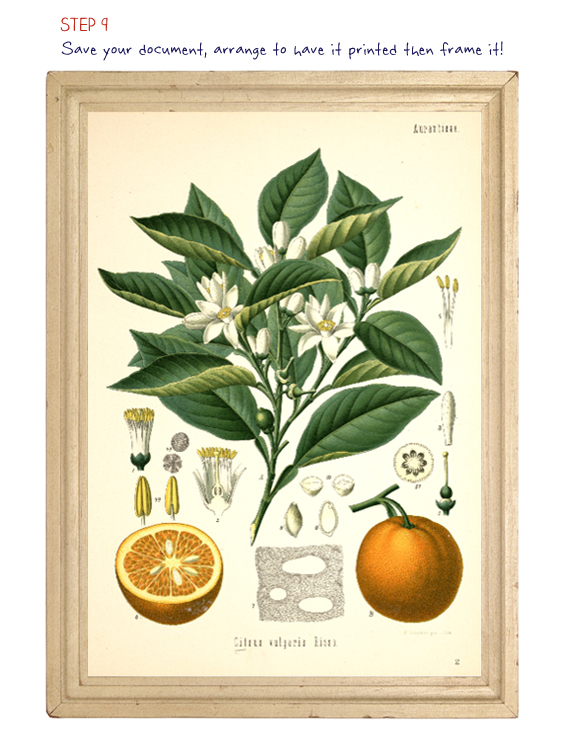
STEP 9 Save your document, arrange to have it printed then frame it!
I usually save my images as standard JPG files.
If you plan to visit a print center in person, save your image to a portable device and take it along with you. If you plan to use an online service, visit their website, navigate to the correct section and follow their prompts (remember to select the same sized substrate as decided upon in Step 6).
Here’s the process I usually follow using Officeworks (again, this should be easy enough to adapt and transfer to a myriad of similar online services)…
1 Go to the Officeworks website.
2 Click the ‘Print & Copy’ menu tab.
3 Select ‘Posters & Plans’ from the left-hand sidebar.
4 Select ‘Standard Colour Posters’ (sometimes, if I want thicker paper and a choice of finish – gloss or satin – and am willing to spend a little more, I might choose ‘Premium Colour Posters’).
5 Select the paper size as already determined (if using the ‘Premium Colour Posters’ service also select either ‘Gloss’ or ‘Satin’ from the paper type drop-down at this stage).
6 Click ‘Upload Your Design’, select file and upload.
7 Click ‘Accept Digital Preview & Add to Cart’.
8 Done! To order, visit the cart and proceed to checkout.
![]()
Okay, seriously. Was that one mother of a post or what?
Anyhoo, I really, really, really, really hope you, at least one of you, have found this series beneficial. I truly believe that having this kind of knowledge can be super empowering, especially from a cost-concious decorating perspective. And although at times I know this whole topic can seem down-right dull the possibilities it presents are actually super exciting (or maybe I’m just weird :-)
As always, I’m happy to try and help if you have any questions so please feel free to ask.
![]()
This is the final post in a three part series.
Post one covered understanding and editing free printables.
Post two covered setting-up and printing images at home.
RELATED POSTS
 Free Art Printables: Understanding & Editing…plus a Resource Directory
 Christmas Advent Calendar Wall Chart (full tutorial with free printables!)
 Free Art Printables: Customising For At Home Printing (a complete tutorial)
 Create Your Own FREE Art Paintings (from photographs)!
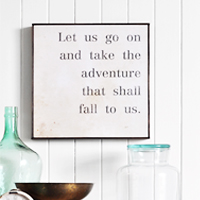 DIY Quote Art…and free printable sign!


Thank you for this series. I agree that the prospect s are exciting. I’m actually looking forward to creating some large DIY wall charts. A project I never would have considered before reading your excellent posts.
This is wonderful information. Thank you.
Thank you so much for this! I wouldn’t have a clue how to do this without your help :)
He, he. Glad to help.
You are seriously my saviour.
Can’t thank you enough for this info. Especially all the gimp tutorials as I can’t afford photoshop.
I so appreciate the time this must have taken.
This is so useful and the timing couldn’t be better. I was just last week pondering where to get large images printed though it all seemed too hard. Now I know I can do it all without leaving home. Thanx.
Thank you for all the Officeworks info. I often print stuff using a web based center though this format seems much simpler and more cost effective.
BTW Looking forward to your parent’s bedroom reveal post.
Rosey T
Thank you for really big, and helpful tutorial, it’s one from my the favorites blogs.
Anna.
This tutorial is the most amazing post that I’ve ever seen. Your attention to detail, writing, visuals, … just blows me away. I know how much time this took, and it’s so greatly appreciated. Thank you for your talents! I plan to get started soon! I can’t wait to see the results!
Thank you so much Sherrie. I truly, ruly appreciate your comment. I know it’s not the most sexy topic, though I think it’s empowering stuff to learn.
:)
Such a nice and informative blog!
This has to be one of the best blogs that I have ever read. Thank you so much for your patience and attention to detail. You explained this so well that I was able to make the perfect poster size printable (that I saved from you also) for my wall of photos. Thank you so much!
Oh yay! This was a pretty full-on series of posts to write so I’m glad it’s helping people. Thanks for letting me know you appreciate it Nikki :)