
I’m so excited to finally share this!
If you’re not new here, you’re probably aware of my involvement in the Re-Love Project and what it’s all about. For those of you who don’t know, in short it’s a Feast Watson campaign in collaboration with Salvos Stores which sees eight design personalities “re-love” a neglected item of furniture with the resulting pieces being auctioned for charity. Pretty cool, huh? You can read my first post about it here and learn more on the Feast Watson website here.
It’s such a wonderful campaign, and is bigger and better than ever this year, which I’m thrilled to be involved with alongside some pretty impressive peeps!
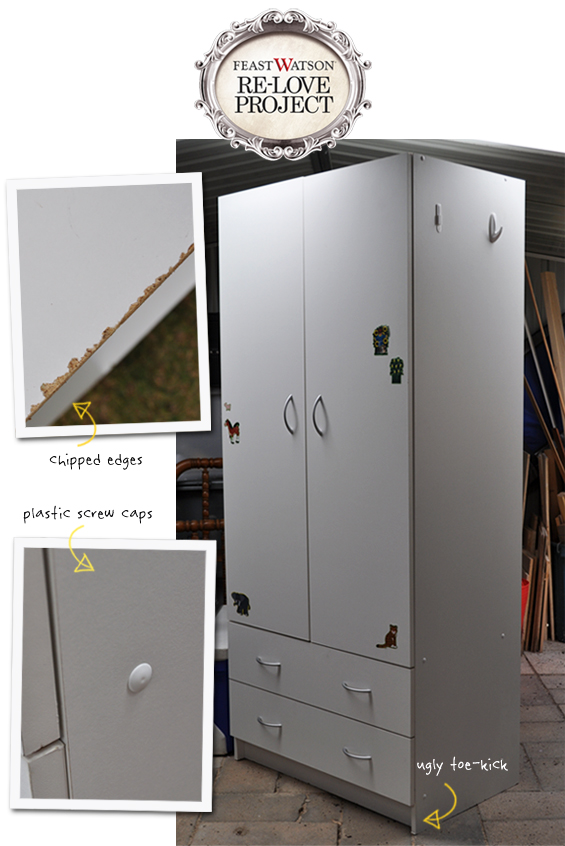
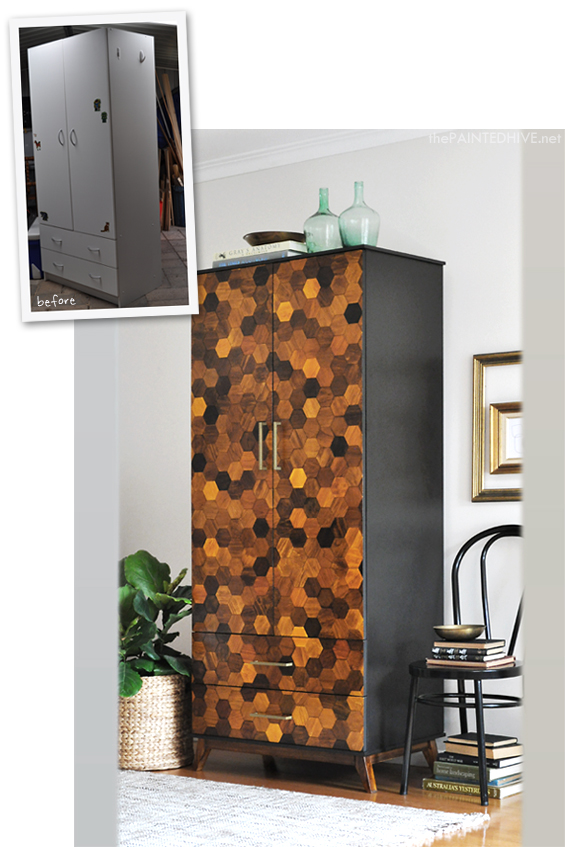
Anyhoo, as revealed in my previous post about the project, I started with this basic melamine wardrobe which I picked up for $50…
Rather than take on a sympathetic restoration, I wanted to challenge myself to completely re-imagine something very ubiquitous in the hope of inspiring others to think a bit sideways. I’m sure many of you guys have an item like this languishing away in a dark corner somewhere. Or maybe you’ve frequently passed up similar pieces in charity stores or at garage sales. They do come across as rather potential-less.
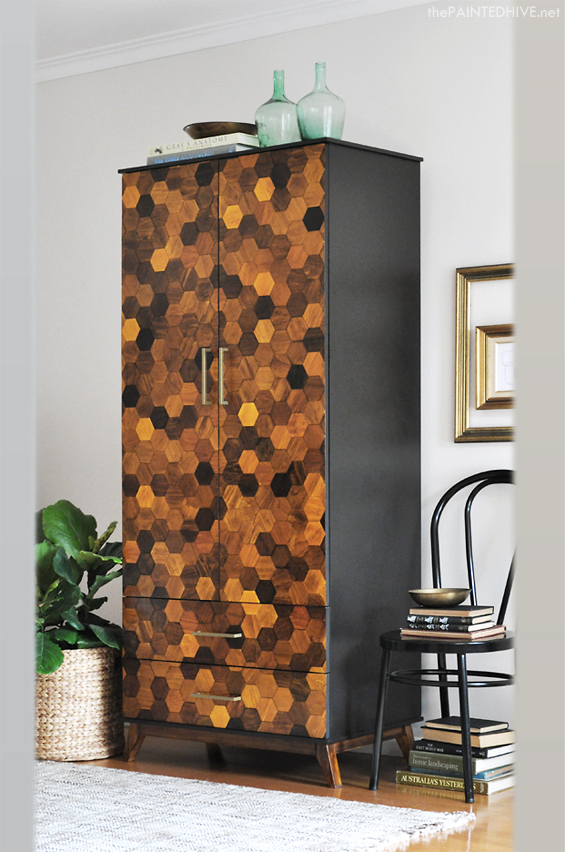
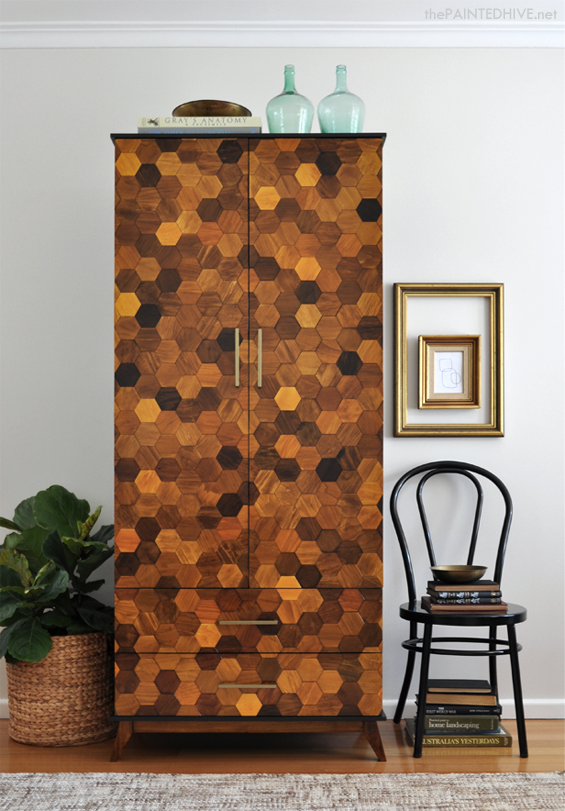
Well, despite a few hiccups along the way, numerous vision adaptations and those customary moments of self-doubt (I really didn’t think I was going to pull this one off!), things actually worked out in the end and I’m stoked with the result! I think – I’ve been staring at if for too long now.
The mid-century modern mood of this piece is a departure from my usual farmhouse-y style which made for a slightly ambitious, yet fun, creative challenge. I’m under no illusion this is a piece for everyone though am hopeful the basic principle of the make-over sparks a few ideas. The possibilities are almost endless!
So, here’s how the whole thing went down…

I know this goes without saying, though to begin with I gave everything a really good clean, took off the doors, pulled out the drawers and removed all the hardware.
Note: I failed to do this, though before removing the doors it would have been beneficial to measure the gap between them and the gap where they meet the drawers. This just would have saved me some guesswork whilst I was attaching the hexagons in terms of allowing for any negative space. Also, it’s a good idea to mark the doors as left and right. My doors were identical though sometimes they have individual quirks and need to be hung a particular way.

To give the hexagons a nice frame of sorts I decided to add a new over-hanging top and base (I was also going to add side cladding though decided against it in the end).
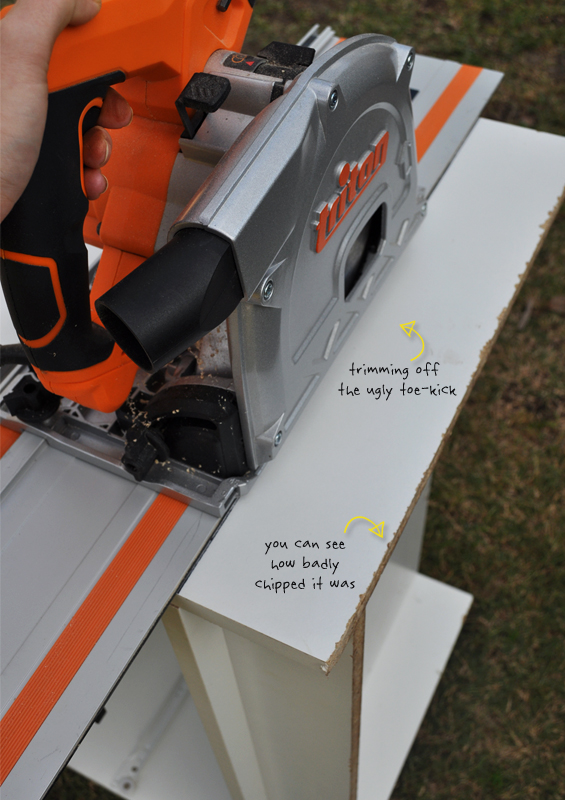
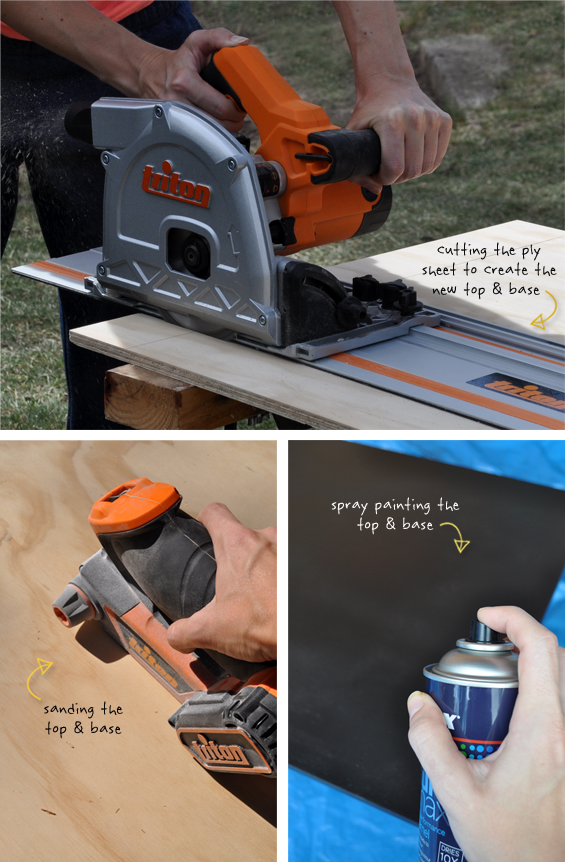
First I needed to lose the ugly toe-kick. This can either be filled or removed entirely. For ease I opted to simply cut mine off using our plunge track saw (you could also use a jigsaw or circular saw).
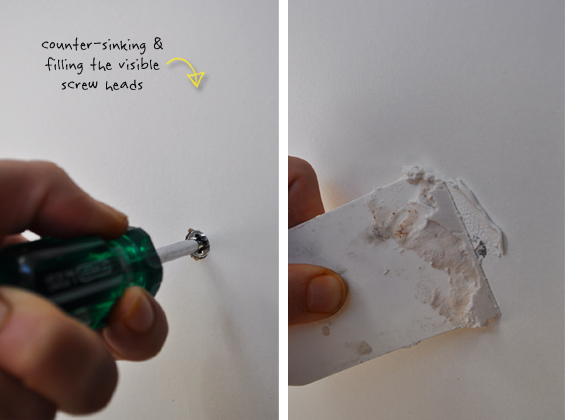
To create the new base and top, I cut two identical panels from basic ply sheet (if you don’t have the right tools, or if you’re not confident with cutting timber, you could have it trimmed to size at the hardware store). Next I sanded them thoroughly, finishing with fine grit paper for a nice smooth finish, then sprayed them black (Dulux Duramax in Flat Black).
For the wardrobe sides, I first counter-sunk the visible screws and filled the holes.
I then sanded down the sides thoroughly using an orbital palm sander and heavy grit paper.

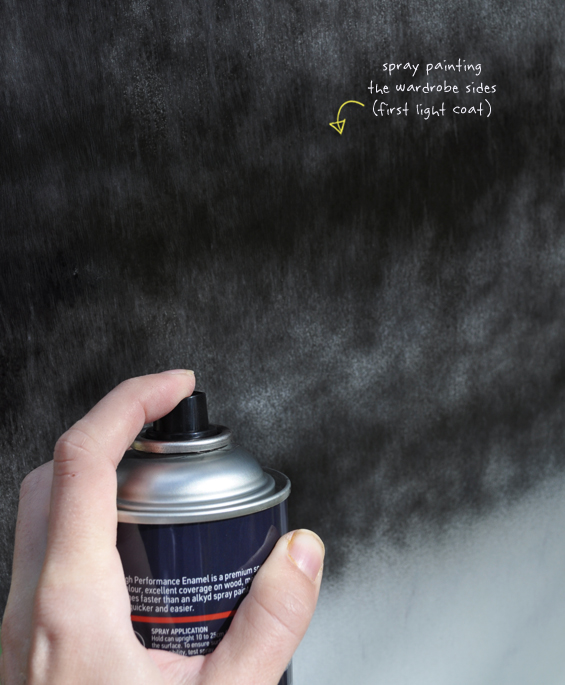
Melamine is slick and shiny so thorough sanding is required to ensure any topical application adheres well. I also noticed that using coarse paper created a subtle texture which, once painted, gave the melamine the look of timber! I taped off the wardrobe as necessary to avoid over-spray then painted the sides black to match the top and base.
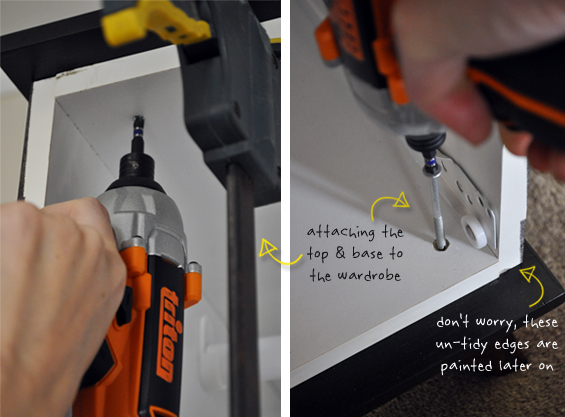
To attach the new top to the wardrobe I first smothered the panel with liquid nails, clamped it in place as best I could, drilled some small pilot holes then screwed it down from the inside of the wardrobe.
Before attaching the base to the wardrobe, the new feet (see below) were connected first. The wardrobe was then lifted on top and maneuvered into position. Once again I then drilled some pilot holes and screwed the base on from inside the wardrobe. To give the base added strength extra long screws were also drilled through each foot.
Note: I originally planned to use white paint to create a modern Scandi look (which is super popular at the moment) though something about it just didn’t gel. Black simply worked better with the rich wood tones, tying-in beautifully with the darker hexagons and creating a more resolved finish. I was also tempted by the idea of navy blue, which I think could have looked really beautiful, though for the sake of the charity auction I wanted to keep things neutral to appeal to more buyers.

Now, I will admit, we went kinda fancy with our feet. Saying that, it wasn’t difficult, it just wasn’t the fastest and easiest option. I know many of you probably don’t want the hassle of making your own feet (which is understandable – I fought the idea for a few weeks!). As an alternative you can buy quite reasonably priced ready to attach ones. If you would like to have a go at making your own, like I mentioned, it’s really not that hard and is super affordable – plus you can create something completely custom!
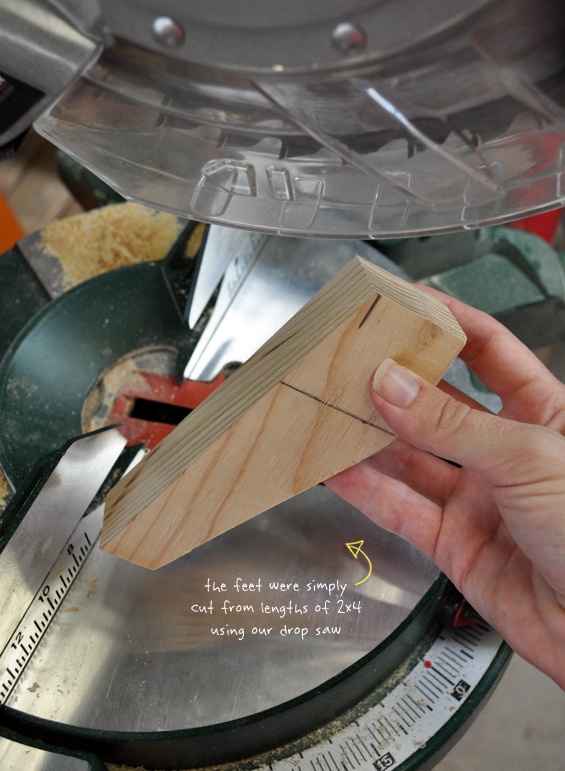
I started by working out the general shape I wanted then cutting four identical feet from cheap framing pine (commonly known as 2×4) using our drop saw.
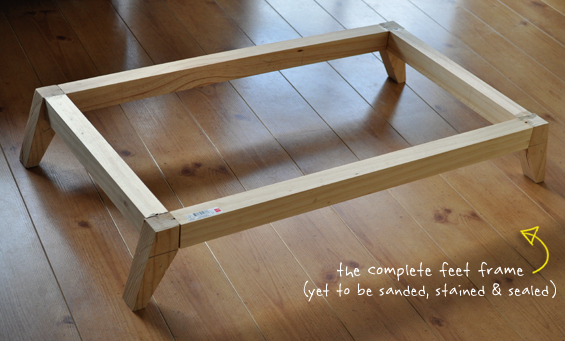
I then cut some lengths of pine to form a connecting frame (two long lengths for the front and rear, and two shorter lengths for the sides). Next I biscuit joined (if you don’t have a biscuit joiner you could screw and dowel) the feet to the long lengths of pine (sorry, I didn’t get a pic of this though you can imagine the two longer lengths of pine with feet at either end – refer to the below pic of the finished frame for a visual) and clamped them in place.
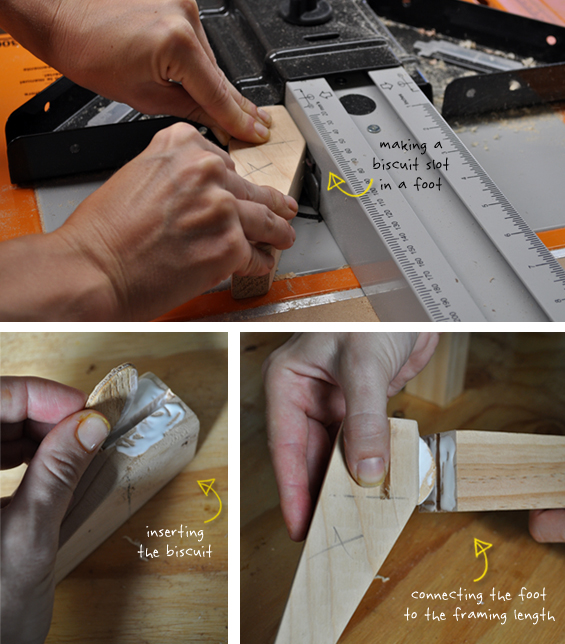
Once set, they were then biscuit joined to the shorter lengths of pine to form the complete frame.
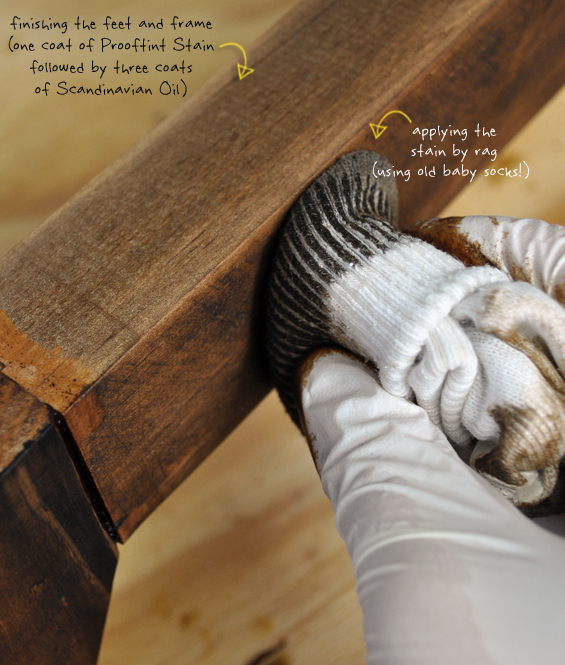
Once set, I gave the entire thing a really good sand before staining it (Feast Watson Prooftint in Oak) and sealing it (three coats of Feast Watson Scandinavian Oil).
It was then attached to the new base panel with glue and screws before being connected to the wardrobe (see above).
Note: This wardrobe is HEAVY and it was really important that the new feet were structurally capable, especially given they are angled so have outward force. I was tempted to forgo the joinery step and simply glue and screw everything directly to the base though this wouldn’t have provided the bracing strength needed. For a more lightweight item of furniture you could get away with it though.

My initial inspiration for this project came from a hexagonal garden screen I saw in a hardware store one day. Don’t ask me how I went from metal fretwork screen to timber mosaic wardrobe though it somehow set the wheels in motion.
Of course, this process is essentially parquetry which is a century old technique. I like to think of it more as wood tiling – at least that’s how it felt – and the design possibilities are almost endless!
Note: I did play around with some other shapes and patterns though decided to stick with my original hexagonal design because based on some research I did apparently it’s quite unique (parquetry-wise) and is also bang on trend at the moment. I’d like to experiment with different patterns and more rustic tones in the future.
I wanted this to be an appealing DIY. The type of project that really inspires others to have a go. I figured that hand-cutting a gazillion little shapes wasn’t that appealing so I went about sourcing some ready-made ones (you could fabricate your own from sheets of ply or veneer – especially if your design is quite simple). I assumed that affordable wooden shapes would be easy to find…ah, not so much. These things are pricey! After loads of research my only option was buying in bulk from China. Fortunately, I actually needed a bulk amount. I obtained 2mm thick x 80mm wide raw ply hexagons from this Alibaba seller at 12 cents a piece – bargain. I ordered 500 and used around 350. I found this seller really great to deal with and they can create custom shapes at custom sizes. Ah, the possibilities! I already have another idea brewing!
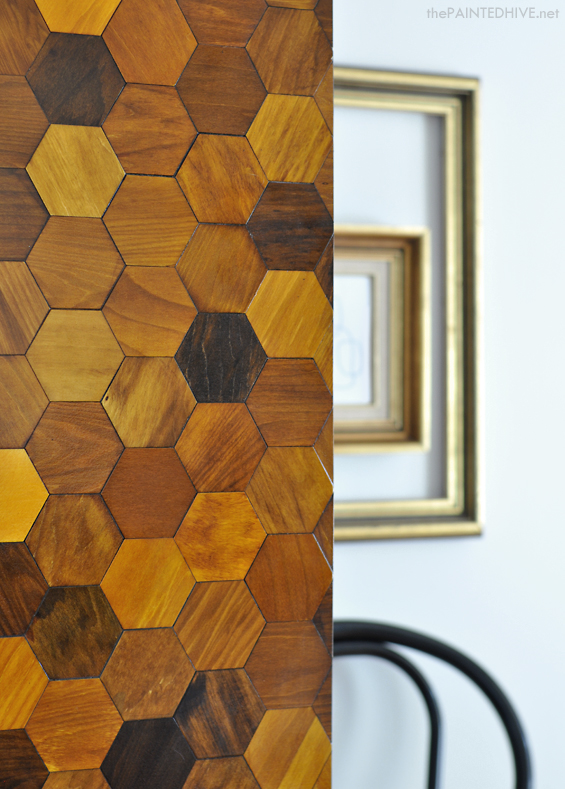
From the beginning my vision for the cladding was a multi-toned mosaic in warm honey tones, reflecting the honeycomb nature of the pattern (by sheer co-incidence it ties in nicely with my blog theme too!). I only used two different stains (Feast Watson Prooftint in Golden Teak and Feast Watson Prooftint in Oak) along with a colour reducer (Feast Watson Prooftint Colour Reducer) yet I created numerous shades by mixing different quantities together and applying either generously or sparingly. I hand-stained each hexagon, dipping my brush from colour to colour and coating each shape to achieve random tones. It sounds very tedious though was surprisingly quick and quite therapeutic!

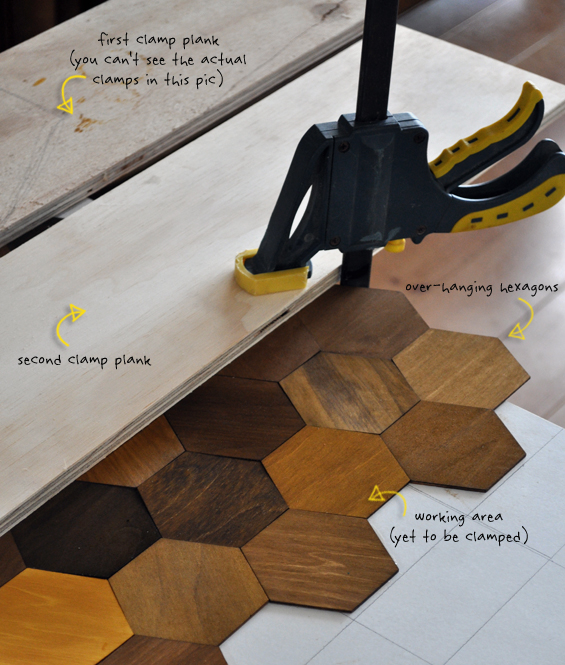
Once all of my hexagons were stained it was time to get “tiling”! I started with a wardrobe door. First I drew a rough grid on the door (just to provide a general guide) then after some careful contemplation I began gluing the hexagons down. I started center bottom and after some trial and error, worked out the best method was to brush some glue on the rear of a hexagon, stick it down then move on to the next one. Clamping is crucial as the thin ply warps due to the moisture in the glue. My system was to complete a small portion, clamp it, work on the next section whilst the glue set (around 20 minutes) then move the clamp up. For greater efficiency, I clamped two areas at a time, using two narrow planks of wood and four clamps (two clamps per plank). This allowed me to work continuously until the door was complete!
I then repeated the process with the other door and the drawers.
Note: Prior to attaching any hexagons, it was imperative to first work out where they would join in the middle, where they would meet at the base (with the drawers) and what type of over-hang there would be at the sides and top. This didn’t need to be super precise (I eventually just had to go for it because my brain starting hurting and Christmas was coming!) though it was beneficial to get a good idea of how they would “fit” to avoid the need for any unsightly slivers or obvious mis-matching.
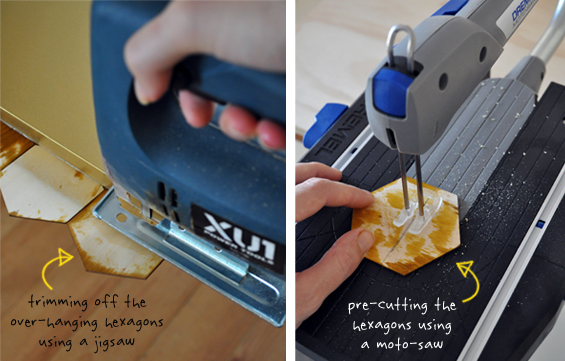
Due to the nature of the hexagonal pattern, there is quite a bit of over-hang. I experimented with two methods of dealing with this; 1) gluing full hexagons on then trimming away any excess with a jigsaw, and 2) pre-cutting the hexagons to fit using my Moto-Saw. I found both methods to be effective though they each had their pros and cons. Using full hexagons was best for areas where only a small portion required trimming off, though I did find that even with careful cutting the jigsaw vibrations caused some minor chipping. Pre-cutting was best when only a small portion of the hexagon was required, though I did need to ensure there was still a minor over-hang which could be sanded flush. If I had to choose just one method, I would go with pre-cutting. It sounds laborious, though it wasn’t that bad plus I was able to use the off-cuts I created as I worked.
Once the doors and drawers were completely clad and any over-hang was roughly trimmed, I used a sanding block to sand all of the edges flush (you could use a powered sander).
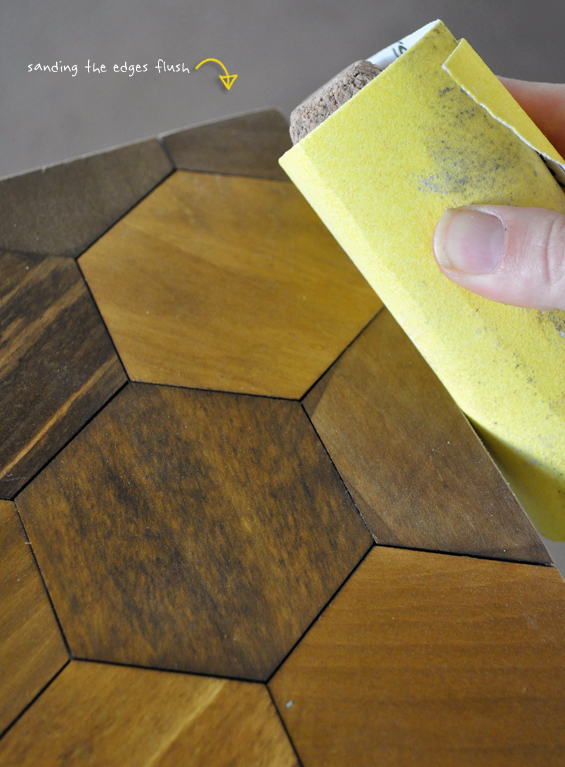
I was concerned this would be difficult and that the hexagons wouldn’t appear straight (one of the reasons I chose not to do this on a tabletop), though the thin ply is incredibly soft and easy to sand so it was actually really simple to achieve perfect lines (tabletop here I come!).
To finish, I sealed the hexagons (around six coats of Feast Watson Scandinavian Oil).

This not only provided a beautiful natural lustre though also worked to meld the hexagons by filling any minor gaps. It’s kinda like the grout of this weird wood tiling world…kinda.

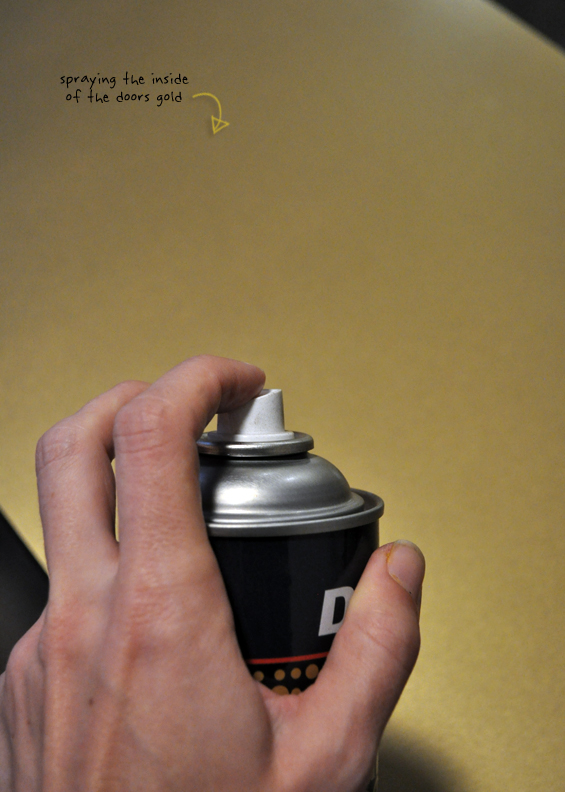
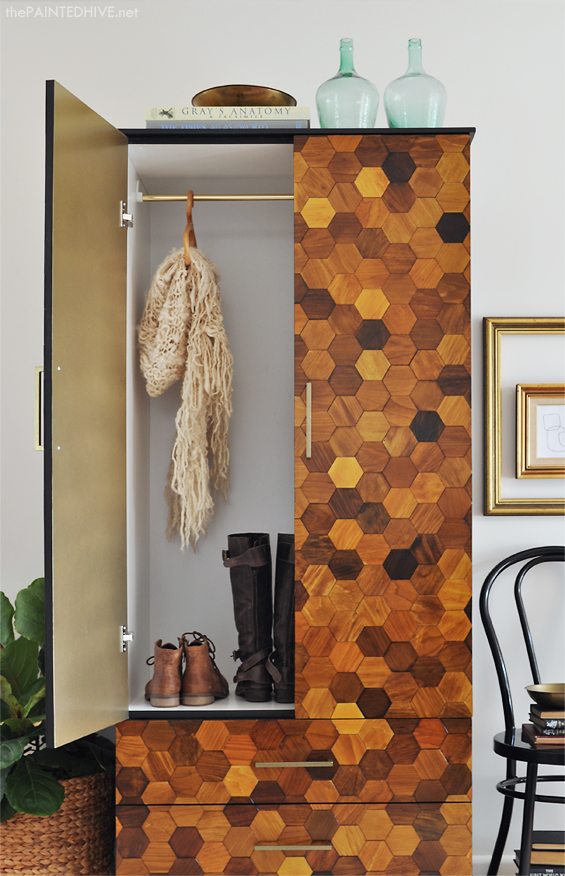
To complete the overall look, I added a glamorous pop of gold to the rear of the doors with some spray paint (Dulux Duramax Bright Finish in Gold) and replaced the existing hanging rod with a brass one (see pic below) to co-ordinate.
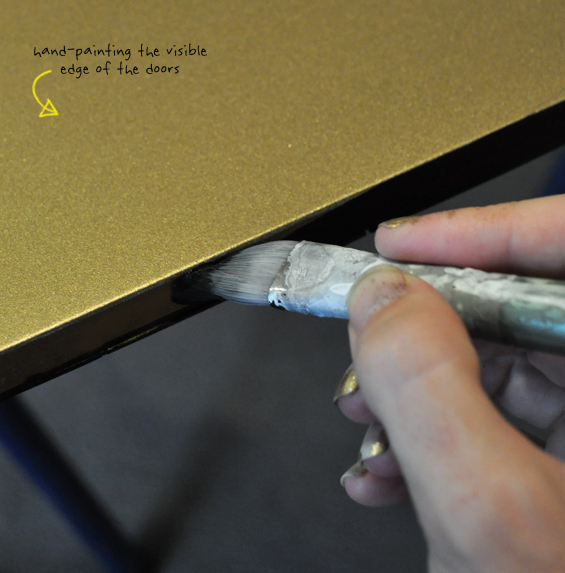
I also used some black craft paint to finish the visible sides of the doors and drawers along with the front-facing edge of the wardrobe frame (to tie-in with the body of the wardrobe).
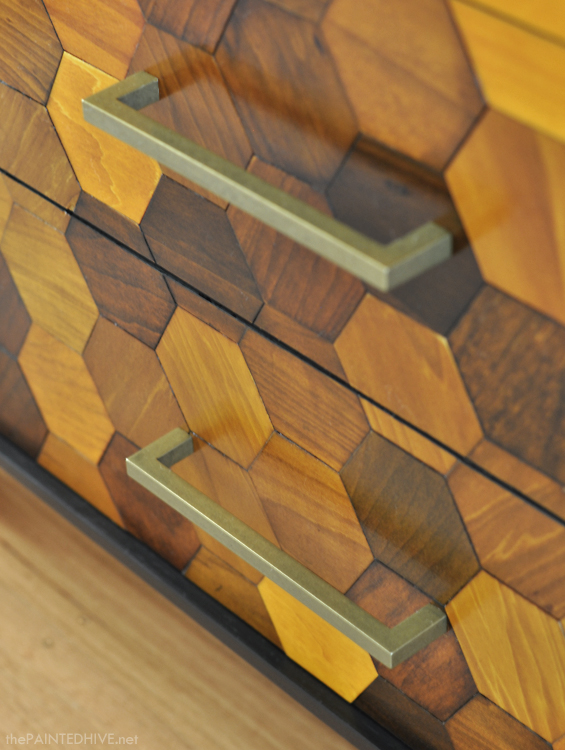
The handles gave me grief! From the beginning I envisioned simple brass bar pulls though I couldn’t find them anywhere in Australia! And I looked EVERYWHERE! I couldn’t even find what I wanted within my budget on eBay, Alibaba, AliExpress, IndiaMart, Etsy and numerous other international sites. Having handles dipped was going to be way too pricey so I almost resigned myself to buying some chrome ones and spray painting them (a solution I wasn’t thrilled with given this item would be on-sold and the chance of the paint chipping was high). As a last resort I decided to turn to the US. I knew they would have the handles I was after (you guys have everything :-) though from past experience I wasn’t confident about the affordability of shipping. Fortunately, I happened to come across an online store which was not only willing to ship cheaply via USPS though also had the handles on sale – yay! If you’re interested I found them here ($8 each on sale). I initially wanted longer ones in blingy polished brass though am really happy with the look of these.
Originally, the doors were out of alignment. I was a bit concerned that when I re-hung them I wouldn’t be able to get them level. Thankfully, the recessed hinges are adjustable so I could square them up perfectly. This is something to keep in mind when looking at second-hand furniture. Mis-aligned doors can be off-putting though if the hinges are adjustable they probably just need a bit of tweaking.
Aaaaaaand, that’s how you turn a melamine piece of furniture on its head!
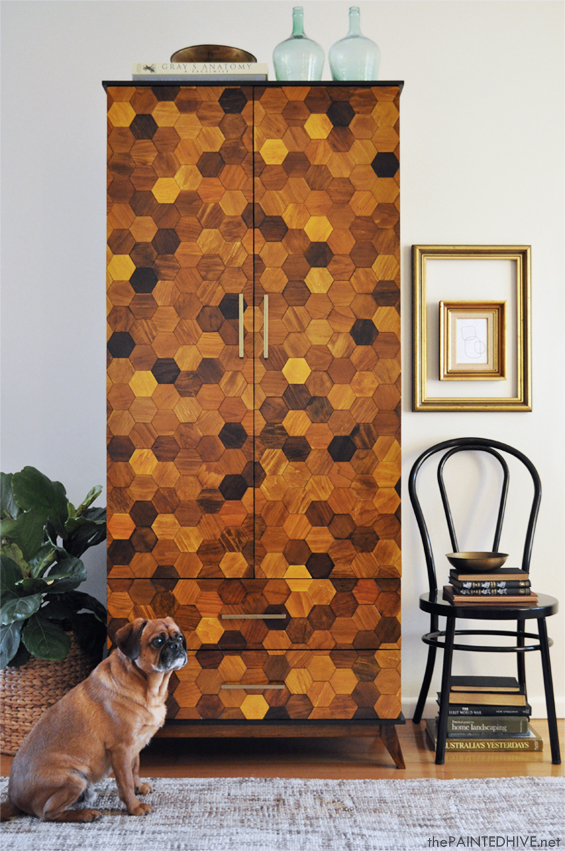
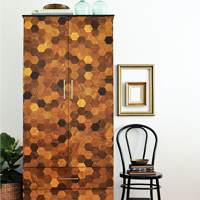
I love all the random grain directions. I’m also really happy with the way the sprinkle of both extra light and dark hexagons gives the pattern added definition. That was my plan though I had no idea it was actually going to work!

All up this project cost me around $200. I know that’s not super cheap though I also happen to know that this exact wardrobe, in its before state, retails for $300 new! So, for $300 you can have a generic wardrobe from the furniture store OR for $200 you can pick up a second-hand one and – with some elbow grease and imagination – have something completely unique.
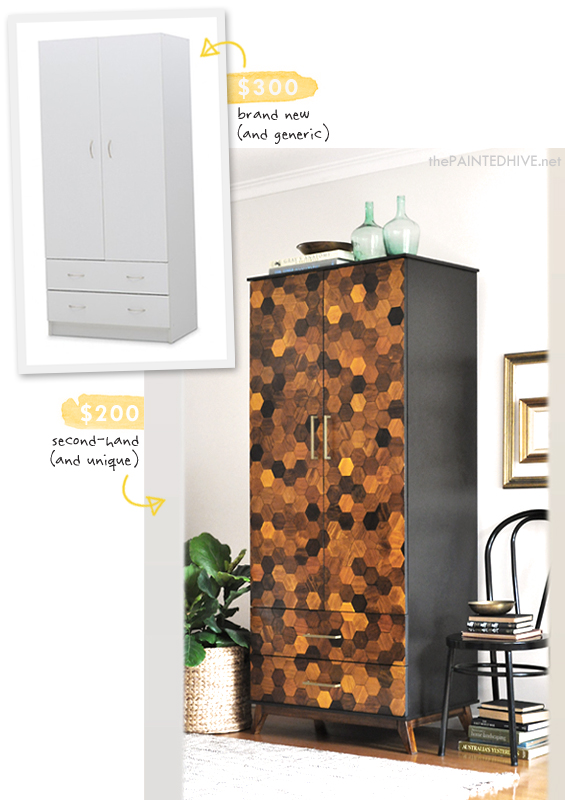
I think I know which one I prefer.
The photos really don’t do this baby justice. On the day I did the shoot it was really dark and gloomy so getting a nice bright shot was tricky.
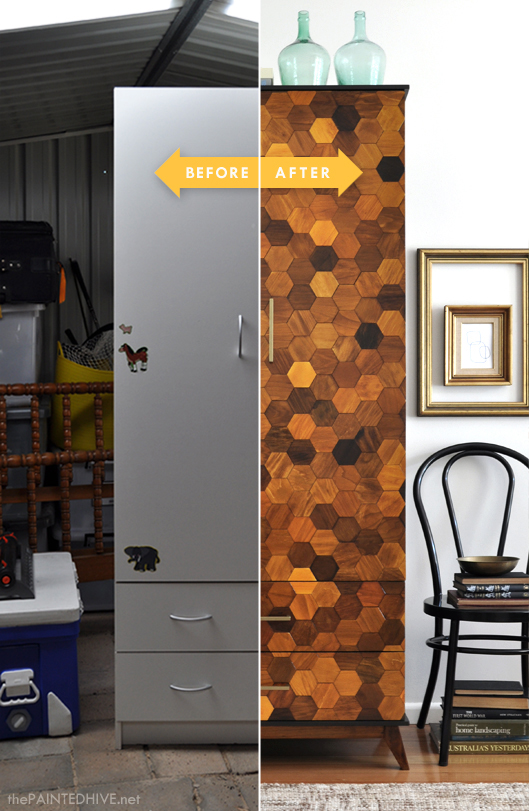
Here are the before and afters…
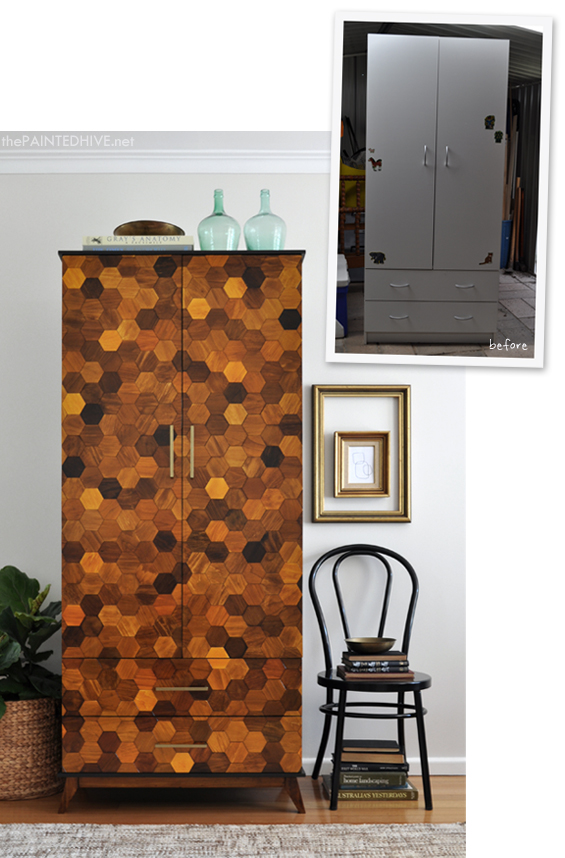
![]()
I hope you guys like it! That said, I do know what some of you are probably thinking; “Why bother doing all that with a cheap ugly flat pack?”. Allow me to explain…
I wanted this to be a BIG transformation. Sure, I could have started with a nice timber piece, though my thinking was, why completely transform something that’s already nice? Nice things don’t need complete overhauls, they just need a little love. Also, nice timber pieces aren’t that plentiful or affordable. Sure, you might get lucky though I know for a fact that cheap ugly flat packs are EVERYWHERE and I was on a tight budget and dead-line for this project. I think using something ubiquitous makes this project much more “real” and replicable. The wardobe is strong and sturdy and isn’t about to fall apart.
I also know that some of you are probably thinking; “For that amount of work why not just build the wardrobe from scratch?”. Again, allow me to explain…
Essentially, this was a glue and screw project. I’m good at those. It’s also the type of cosmetic DIY which I think most inspires my readers. If I built the wardrobe from scratch, I still would have had to “tile” it. Constructing it just would have cost a lot more money and taken a lot more time, not to mention stress (joinery isn’t my strong suit). On top of that, of course the whole idea behind this campaign is to demonstrate how old furniture can be re-loved. As a massive bonus I also got to save it from land-fill – yay!
I’m happy to admit I did go to extra lengths to create something special here as this piece will be auctioned off for charity. Not only did it have to look proper, it actually had to be proper (I don’t want the legs breaking off in two months time!). As far as furniture make-overs go, this was a somewhat involved one, though nothing about it was difficult. The hardest aspect was actually all the figuring out, sourcing and troubleshooting due to the fact I was totally making things up as I went along! Hopefully my tutorial can save you some of the ‘figuring out’ though if found some of my processes a bit full-on, feel free to compromise away. I have mentioned simpler alternatives where possible. You don’t need to go to the same extreme to create an amazing parquet piece that you can feel proud of.
If anything, through this project I simply hope to encourage others to cock their head further, skew their lip harder and look that little bit longer at that seemingly “beyond help” piece of furniture. With a little ingenuity and some elbow grease you can affordably transform almost anything into something truly awesome!
![]()
Remember, along with the pieces of the other awesome designers involved with this campaign (be sure to check out their amazing before and afters here), this unique wardrobe is being sold for charity, so if you love it (or know someone else who would) be sure to stay tuned! The eBay auctions kick-off on July 8 and Ill be sure to post again once they go live. In addition, I’m excited to let you know that Feast Watson will be covering shipping costs Australia wide! How awesome is that? Of course, if you’re located outside Australia you are more than welcome to arrange your own freight.
C’mon guys, let’s share this around socially and work up some hype for the Salvos!
![]()
STYLING PROPS
Metal Bentwood Chair Early Settler
Seaglass Demijohns Target
Fiddle Leaf Fig Basket Spotlight


I have to say this transformation and your last ones are probably the two best remakes I have ever seen online. I think because of exactly the reasons you stated above. You took things that are easily located as thrift items and made them art. This is just amazing! wow!
I’m with you. the best re-dos I’ve ever seen. I subscribed just to make sure I didn’t miss the final reveal, but I’m hooked.
Thank you so much Teresa :)
Wow, thank you so much Janet. That is such a lovely thing to say :)
This piece is so beautiful and unique! I wish that I had the creativity (and the space) to transform things like this. We all have owned a piece of particle board furniture at some point and it’s so nice to see what it can turn into. I’m in love!
Thanks Gabrielle. I’m sure you’re more than capable :) That said, my tutorial is here to help anyone who feels they lack that innate creativity. If you’re short on space you can always start with something smaller.
This is absolutely amazing!!! I love what you did to transform this cabinet. A work of art–absolutely!
Thanks so much Kristine :)
AMAZING! INSPIRING! BOLD! INNOVATIVE! GORGEOUS! UNIQUE! BRILLIANT! WOW! TY! XXOO!
He, he. Thank you :)
That is simply amazing! And gorgeous. Your creativity, not to mention DIY skills, are incredible. I admire your work! Thank you for the inspiration.
So inspiring! Thank you for sharing your talents. The cabinet is just gorgeous!
What a fantastic, innovative way to go with this piece. I just love the front and think it looks spectacular.
I’m absolutely inspired and amazed at the transformation. That is sure to make top dollar for the salvos! Big congratulations.
An absolutely gorgeous labor of love! Brilliant!
Will you stop downplaying this project?
“It’s not too cheap as a project”, “it’s a flat pack”, “essentially it’s just (<- implied) glue and screw".
REALLY?!
This is an amazingly wow upgrade. With fantastic detail and a LOT of hard work involved. It looks and is unique and stunning and a conversation piece if I ever saw one. A piece like that, even on melamine, would easily sell for over 1k american bucks (not the horny ones).
You took a fugly, basic, melamine…garbage and turned it into a stunning mid-century inspired piece of art.
And I will pin this.
He, he. Thank you so much :)
I never respond to these posts but I just had to comment.. The painted hive…..Applaud yourself. You are amazing. Your site, skill, visual sense, ability, verbal communications in carefully explaining the steps to follow, helpful details on how to, what to do, what not to do, where to go to find parts and pieces, sharing your concern for the environment, sharing your thoughts on the challenge, openly sharing your emotional state, and sharing and showing the finished product are all well above the average DiY er. Not to mention that you took your time and care and money to donate this work of art to a charitable cause! AND, that you are environmentally conscious, and shared environmental concerns to be considered as well! So you shared skillfully, healthy emotionally, practically, environmentally, openly, positively, encouragingly!
This piece is absolutely beautiful, and it would sell in the U.S. in a fundraiser auction for well above 1,ooo plus. At least!!! Bidding wars. If I bid on this in an auction and got it for a 1,00 bucks, I’d be psyched! In a store if this was selling for 2,500. in the Bay Area, no one would even flinch at that price.
P.S. I agree with Two Plus Cute~ It does seem that some of your sharing comes across as a downplay. Your aspirations and finished projects are very high end, and you should make no apologies or excuses for that. Be proud of your work , know that, and own that you are excellent!!! It makes the buyer more confident in their purchase of your work as well. Bravo to you, and much luck with al your projects !!! I pinned your work. Best to you J
Hi Joni. Thank you so much. What an absolutely lovely comment. Yes, it’s true that I like to remain somewhat modest, which I guess may come across as meager, though I honestly believe that anyone can have a go at, and be successful with, my projects. It’s why I share :)
SWOON!! This is gorgeous —where did you get those precut hexagons? I’m in LURVE!
Thanks Lydia :) There is a link in the post under the “Parquetry” section. I did heaps of research and spent heaps of time sourcing the shapes. They are relatively easy to find though can be really expensive (okay if you only need a few, though price prohibitive when you need a lot like I did!). I ended up buying mine through Alibaba (in case you don’t know, Alibaba is a China-based online wholesale market-place). The seller I dealt with was really good and they can laser-cut custom shapes at custom sizes which is what I requested.
Have a great day.
x
Oh Kristine! You clever woman you! You’ve beaten your last Feast Watson effort (and I absolutely LOVED that one!). Once again I would say that your project was hands down the best (and in no way am I meaning to pull down the efforts of the other participants, as they were really great too), but yours is way out of the box and so imaginative! Talk about taking something useful, pedestrian and rather ugly and turning it into something stylish and beautiful. Well done! I’m drooling!
Thank you so much Sandy. That’s a lovely thing to say :)
Just absolutely jaw-dropping!! You clever thing you!! Absolutely love the parquetry concept. Amazing!
Thank you Karen. A lovely compliment coming from you :)
Fabulous!!!! ..and the best do-over in the group
xx
This transformation is absolutely stunning!!! I am amazed at what you accomplished. You turned this generic (ugly) armoire into something that is simply breathtaking. Thank you for sharing your final product, and your tutorial information. I love it!!!
Thanks so much Catherine :) Glad you like it.
Oh Kristine, I thought last year’s effort was an absolute stunner but this is beyond amazing!! You are so creative and clever all rolled into one to make this come to life. Fantastic job!! And thanks for sharing how you did it too.
Thank you so much Kelly :)
Oh my goodness!!! This is my first visit to your blog, and I am so impressed!! I can’t wait to look around and check out your other projects! Such an amazing transformation. It makes me want to go out and find a thrift store buy so I can get moving on something for my house!
Thanks so much Leah :)
What an amazing transformation!! I love the variation in colors for all of the hexagons. Great job!
Wow Kristine… you’ve done it again!! I simply love the honeycomb effect paired with the black… it has a wonderful almost Art Deco feel about. What a ‘Feast’ for the eyes… (pardon the pun). Thanks for the inspiration. :)
Ha, ha. Thanks Nikki.
I hadn’t noticed the nod to Art Deco though I think you’re right.
You are an ARTIST. Your contribution to the Re-love project is in a league of it’s own so much so that if I was one of those big name designers I would be embarrassed. It is always a delight to receive an email from your blog knowing that I am in store for major inspiration. That song “Amazing” by Alex Lloyd should be your theme song. X
Wow. This is so beautiful and incredibly unique. Fantastic job! Thank you so much for sharing.
Thanks Carrie :)
This is GORGEOUS! I’m so inspired!
Oh yay! That was my goal :)
Absolutely take my breath away Gorgeous. Fantastc transformation.
Speechless. You’ve outdone yourself this time. I love everything about it!
WOW!!! You did it again!!!! This is another most amazing makeover. Besides the finished piece I love how serious you take the challenge and how passionate you are about turning something ugly into a unique and gorgeous piece of furniture.
Thank you so much Julia. It’s lovely reading your words :)
Gorgeous, amazing work, well done!
How much for the pug ?
He goes free to the winning bidder. May or may not dig up garden beds, eat poo and shed hair like a Yetti.
Lol
I saw this on Instagram earlier today. You have outdone yourself. Thinking sideways… I love it! I’m a big believer in re-loving something; I’m just not as creative as you. But you inspire me to think sideways so thank you for that. Good luck in the charity auction. This is such a win-win all around. Are you tempted to keep it???? I know I would be.
Thanks Brenda. Fortunately, I have no-where for this to live, plus it doesn’t really gel with my decor, so I’m less sad about letting it go than I was last year’s flat files. It is still kinda like giving one of my children away though :)
So glad to have helped inspire you!
This looks AMAZING! Loving that it now looks like art – worth all the work. I hope it goes well!
Thanks so much Ashlea :)
You are amazing. I am super handy myself so am not easily impressed, but you impress me. I love your ideas. I’m going to check out this seller. I wonder if they can do a bunch of Moroccan stars for me. I can’t wait to see what other ideas you are brewing from things they can make.
Thanks Janet. Ha, ha. I’m flattered then :)
So funny you should mention Moroccan stars. One of my other ideas was using a series of elongated triangles to form “stars” of different stains. It would have looked spectacular though I was on a tight deadline and didn’t really have the time to re-jig my original idea. Plus it would have been a lot more figuring out in terms of pattern and colour. It’s on my “TO DO” list!
Wow, such a mind blowingly awesome transformation. I’ll be suprised if this piece doesn’t fetch top dollar, its stunning!!! This has totally inspired me to rethink the extra storage pieces I need to acquire, I won’t be avoiding the flat pack, or melamine again.
Oh yay! Totally what I was hoping to achieve Lisa; some sideways thinking. Thanks for sharing.
I really hope the auction goes well. You never know with eBay though I’d hate to have egg on my face :)
This is AMAZING! New to your blog, and just think this is brilliant. Well done!
Thanks so much Ashlea :)
Darling as always, you’re simply the best.
I just have to say, this is beautiful! I absolutely love the colors and shapes of the ply. Great piece!
Thank you Susan :)
Oh my goodness… calling that a transformation is an UNDERSTATEMENT. It’s like a phoenix rising from the ashes! The before and after is so different it’s almost like comparing apples and oranges. I’m stunned and in love and basically rambling because it’s too gorgeous for words.
He, he. Thanks Pug :)
Wow. Incredible. Stunning. Absolutely beautiful and inspiring. I can’t say enough about how gorgeous this is!
Wow, thanks Hayley :)
This is my first time visiting your website and I’m amazed. Let me add my congratulations on a job well done. I especially like that you took special care in the details because it was for charity. Mission accomplished – based on the comments, I’d say you inspired quite a few of us. Good luck with the auction.
WOW! You are very talented…and incredibly patient! It looks beautiful.
Thanks Maureen. It did require some patience though essentially was just like tiling. Once I worked out the best process I actually found it quite relaxing.
Have a lovely weekend.
:)
HOLY CRAP. this is amazing. WOW. i have no words to express my awe!
He, he. Thank you Cassie :)
wow! I am completely impressed. What a labor of love, you are extremely talented! Love the legs!
Thanks so much Gwen :)
Holy cow! You are a mad genius! I say that with utter, jaw dropping appreciation. This beauty is simply stunning. Great job :)
Thank you so much LZ :)
A stunning transformation! I love the fact you have taken something so ordinary and transformed it into something beautiful. The simple details you have included like the new base and top are really clever, they redefine the unit and I love the gold and black tie ins. So clever :) I’m not a wood work expert at all but think this idea could translate to paper decoupage providing the base unit is fairly tidy. Thanks for sharing.
Thanks so much Helen. Love how you’re thinking up alternatives. I really wanted this to be the kind of project that simply planted fresh ideas and lent itself to adaptation.
Kristine
x
wow wowsa! Having done a custom cut wood herringbone top on card catalog, I know all too well how much work went into this absolutely stunning piece!! Seriously, outstanding. I didn’t even know those hexagon things existed. They’re real wood? Do they offer other species or sizes or shapes?? Im sorry, did you mention the seller?? you have given me so many ideas!
Thanks Beth :)
Yes, they’re real wood though as far as I know they’re only available in poplar ply (from this seller anyway). I guess you could search around for laser cut veneer shapes from alternate suppliers if you’re after something different though they could get pricey. For something smallish though cost isn’t as much of a factor.
This seller was happy to create custom shapes at custom sizes for me! There is a link to their Alibaba store in the post under the “Parquetry” section.
The ideas I have now too! Will probably never get around to realising them though :(
Kristine
x
mind blow! what an incredible transformation!!! the mind just reels with the possibilities now…thanks so much for the inspiration:) ps. super cute pooch!
Thanks Heather :) I’m so encouraged by all the comments I’m getting about how this project has sparked so many new ideas – yay! Can’t wait to see them come to life!
Stunning purely stunning!
HOLY SHNIKEYS!!!!!!!!!!!! My jaw is dropped and my heart is beating out of my throat – I may have even wet myself! This thing – this this this has to be my most favorite found object upcycled project ever. I love you. Marry me and we’ll live in a design forward bliss! Never mind…my husband just reminded me that I’m taken. Great job!
He, he. Best comment ever! Thanks sooooo much Suz :)
Spectacular results. You are amazingly talented! How long did it take to do?
Thanks Wai. It’s hard to say how long it took. The actual doing was the easy part! Most of my time was spent designing and planning then figuring out the best way to go about everything once I did get started! All up it took around a month on and off. Knowing what I know now, if I’d worked steadily (without killing myself), I may have been able to get it done in around two weeks. There’s lots of wait time between processes.
Kristine
Holy moly, this is absolutely stunning! I can’t believe what this started as. It just goes to show that major creativity, hard work, and talent can transform anything into something beautiful. You have me scheming up some new projects with plywood shapes. I can’t say it enough. – AMAZING!
Thanks so much Jenny :)
O H M Y L O R D Y!!! Yes, they were the words to come out of my mouth when I saw this baby at 4am this morning….. This repurposed, hexie gem is beautiful You should be so proud of yourself for making something amazing.
I’m a new and converted ‘hivette’. Love your work. :)
I’ve never left a comment on any site…ever; that shows you just how impressed I am with your transformation. WOW and LOVE are two words that come to mind when I saw your blog. Thank you for the links to the sites where you ordered your hexagon plywood shapes. I don’t have a piece in mind to redo, but one of these days, I will find a perfect redo piece and your site will guide me. Thank you!!
WOW and LOVE are also the two words that came to mind when I read your lovely comment Nicole! Thank you so much for choosing to leave you first ever comment here :) I’m flattered and humbled my project has helped inspire you.
Kristine