
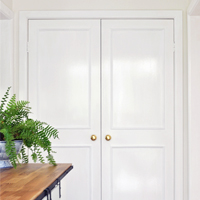
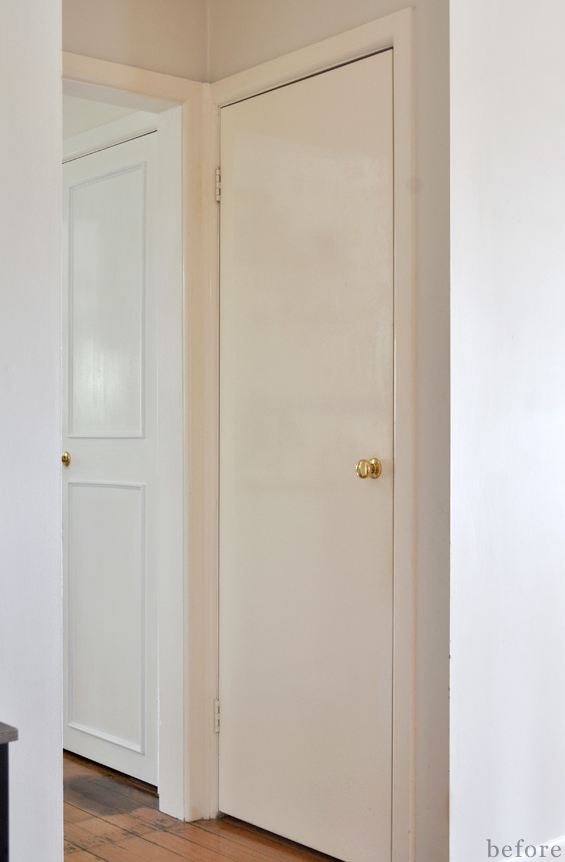
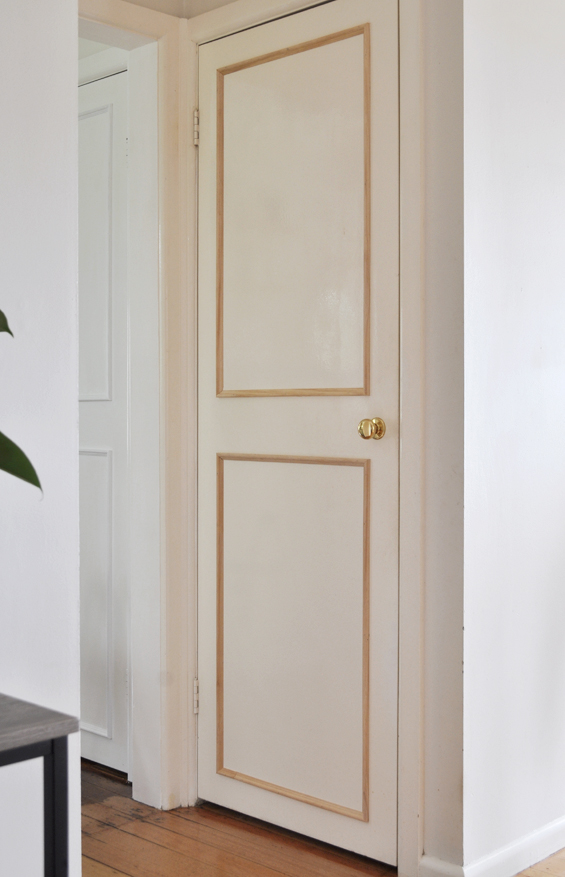
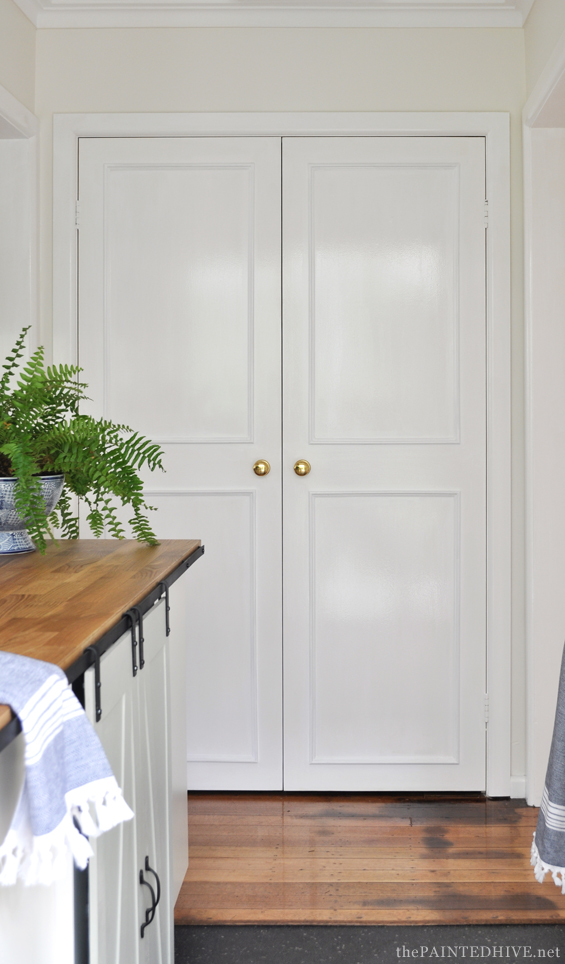
The “new” doors were one of the most commented on and asked about elements in the laundry room makeover.
And, subtle as their redo was, they really did deserve the attention!
Although I was hopeful dressing them up with a bit of trim would inject fresh character, I was genuinely surprised by the impact they actually have in the space. They were even the first thing my husband commented on when he saw the refreshed room; “Gee, doesn’t this moulding make a difference?”.
“Why, yes it does!”.
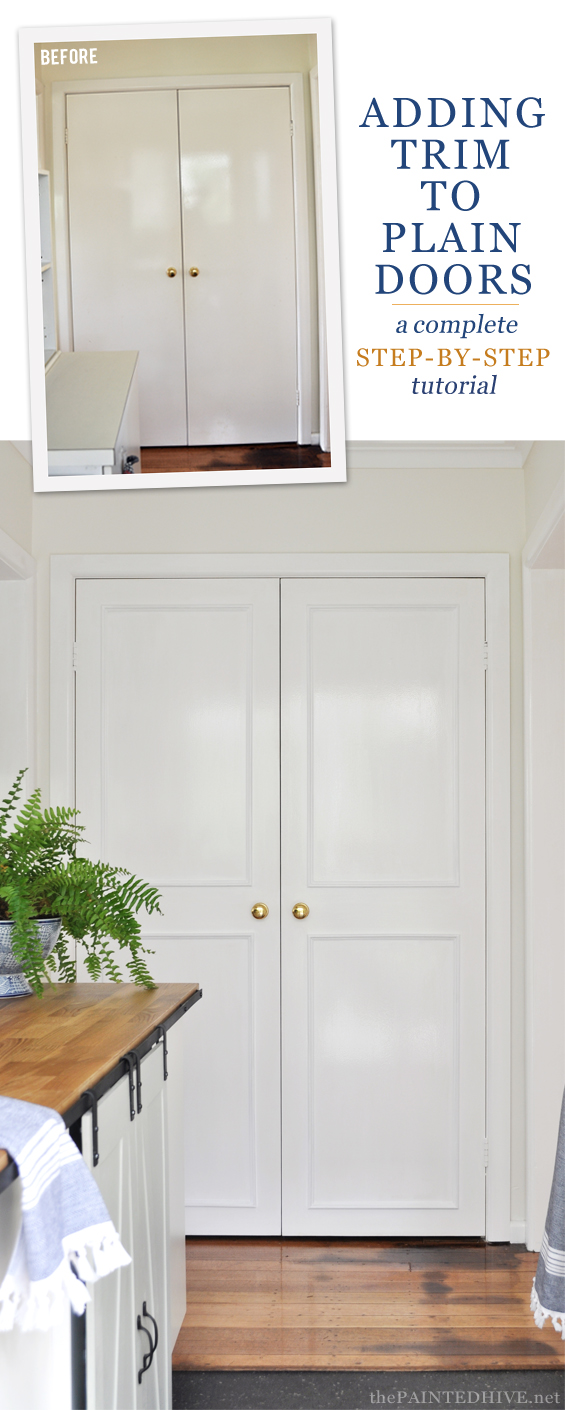
Great news is, it was a simple, affordable and relatively speedy project anyone can have a go at.
YOU WILL NEED…
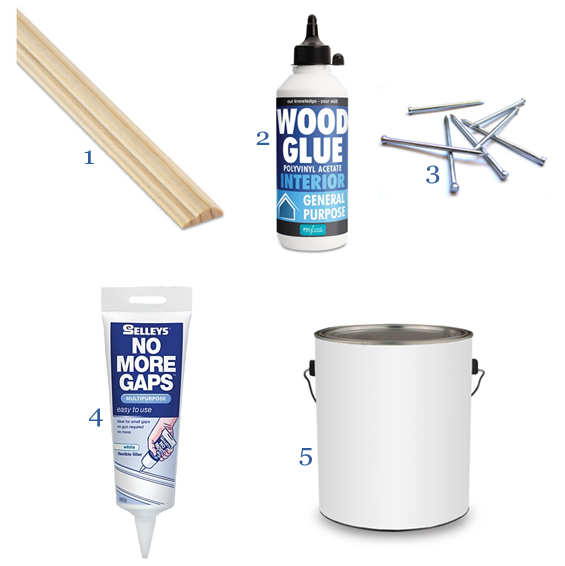
1 MOULDING/TRIM
I used 18mm/3/4″ pine moulding though you can use whatever you like. If you’re planning on painting it, then you can even opt for a cheaper material, such as MDF or PVC – if you can find it in the profile you like. Before you purchase your moulding, check the lengths for straightness and any imperfections. Some pieces can be quite warped or have cracks, dents and knot holes.
2 WOOD GLUE
Any strong wood glue is fine. I used PVA. Glue isn’t essential though does help provide a more secure and consistent bond.
3 FINISHING NAILS
These are simply fine nails with small bullet heads designed to sink into wood. They leave no surface sign of the nail itself though sometimes produce a little hole which requires filling. I used nails which were only around 5mm/.2″ longer then the depth of my moulding. You can use glue alone though the nails make the project speedier (as they provide instant grip) and help with creating a certain bond.
4 FILLER
To patch any gaps, cracks or holes prior to painting. I used Selley’s ‘No More Gaps’ because that’s what I found in the shed.
5 PAINT
I used bright white in a semi-gloss finish to co-ordinate with the near-by doors and architraves. Of course, you can use whatever you like.
ALONG WITH…
MITRE SAW/HAND SAW & MITER BOX
PENCIL
TAPE MEASURE/RULER
SPIRIT LEVEL
MASKING TAPE
HAMMER
SANDPAPER
![]()
For the purpose of this tutorial, I’m attaching the trim to a door in an adjoining room (as I didn’t take progress pics when I completed the doors in the laundry room).
For clarity, I’ll outline my exact process though keep in mind there are heaps of different moulding styles and application methods you could choose to use instead.
![]()
STEP 1 Determine the placement and dimensions of your moulding.
Measure your door, along with the handle position, then roughly draw it down on paper, including all of the dimensions.
Here’s mine…

NOT TO SCALE
Note: Check your door for squareness. Measure horizontally across both the top and bottom. Measure vertically along both the left and right sides. If you notice any major discrepancy, be sure to account for it when you’re working out the dimensions for your moulding or it may look a bit askew.
Next, establish where you’d like your moulding to be positioned. You can place it wherever you feel it will look best. It doesn’t need to be centered or symmetrical and you can use three or four or five or more “panels” – just keep in mind the more complex you make the design the more complex you make the measurements, plus there is then also more cutting involved. If you’re not confident visualising your design, use some masking tape (or a pencil) to mark out the approximate placement on the door first. Once you’re happy, measure where the moulding needs to sit on the door.
Add your moulding to the drawing of the door and use all of the measurements you’ve taken to work out the lengths for each piece of moulding.
Here’s my finished drawing…
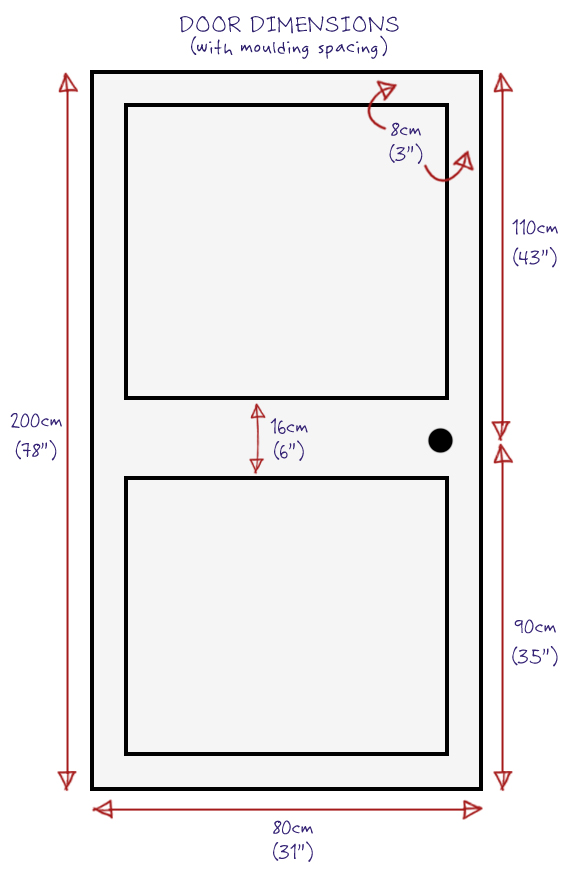
NOT TO SCALE
So, based on my measurements, all of my horizontal mouldings need to be 64cm/25″ (80cm/31″ minus 16cm/6″). My vertical mouldings vary due to the fact the door handle isn’t centered. The upper verticals need to be 94cm/37″ (110cm/43″ minus 16cm/6″). The lower verticals need to be 74cm/29″ (90cm/35″ minus 16cm/6″).
STEP 2 Trim moulding to length.
With all of the dimensions determined, it’s time to break out the saw!
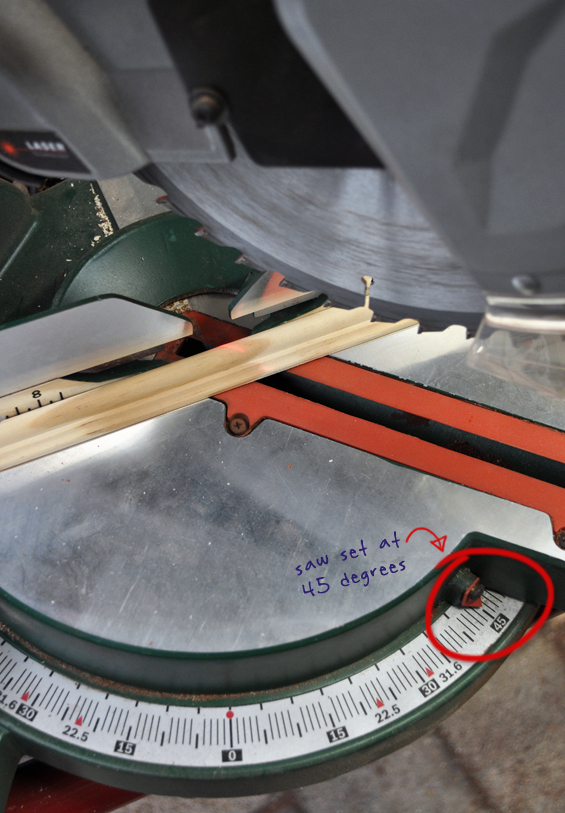
The moulding needs to be mitered (trimmed on a 45 degree angle). For this you can use a power miter saw or simply a miter box and hand saw.
First, trim one tip off your length of moulding at 45 degrees to give you a starting point.
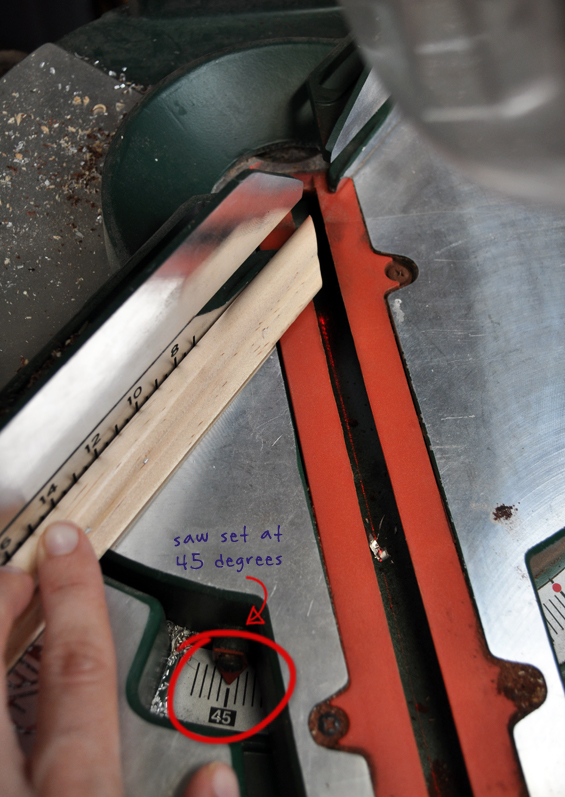
Note: If your moulding has a stepped profile, like mine, pay attention to the direction it needs to sit on the door to ensure you are mitering it the right way. Don’t ask me why I know to double check this!
Next, from the longest point, measure out your required length and place a mark on the moulding where your next cut needs to be made.
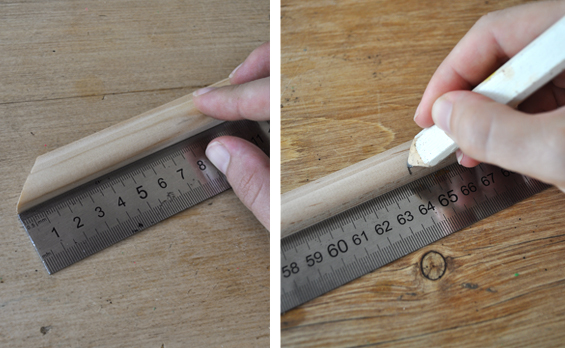
Note: Because my moulding is so narrow, I didn’t bother drawing a guide line. I simply marked it with a dash. If your moulding is particularly wide, for greater accuracy you may want to use a combination square to draw a 45 degree trim line to follow.
Remember, the length for your moulding is from longest point to longest point.
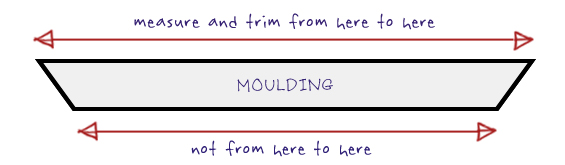
Finally, using the opposite miter to that of the first cut, trim your moulding to size.
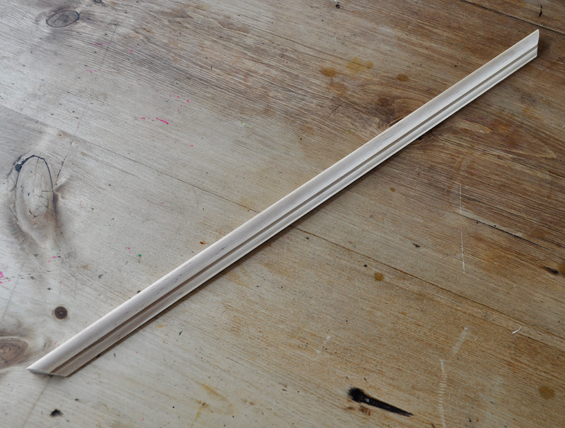
Here’s what a finished piece should look like…
Obviously, you want your piece of moulding to be accurately cut first go. However, if you’re not feeling super confident, err on the side of caution and go a tad bigger. You can always make another small cut if required. You can’t, however, add length if you happen to trim the moulding too short! And remember to account for the blade width.
Repeat this process until all of your pieces of moulding are cut to size. Check them for accuracy as you go.
To finish, if necessary, lightly sand the cut ends, being careful not to round the moulding too much.
Tip: Be mindful of the order in which you cut your pieces to best manage wastage. For example, rather than cut three 55cm/21″ pieces from a 2 meter/78″ length of moulding (thus resulting in 35cm/15″ of offcut), cut one 55cm/21″ piece and two 68cm/26″ pieces (resulting in just 9cm/5″ of offcut). Of course, these dimensions are just exemplary. It’s up to you to work out the best use of your moulding lengths based on your particular dimensions.
Tip: If you happen to run just short, you can piece together two offcuts to make up one whole piece. Simply cut them straight in the center then miter each end at the required length. When you attach them to the door, butt them neatly together and fill any gaps with caulk prior to painting.
STEP 3 Attach moulding to door.
Start with the top-most horizontal piece.
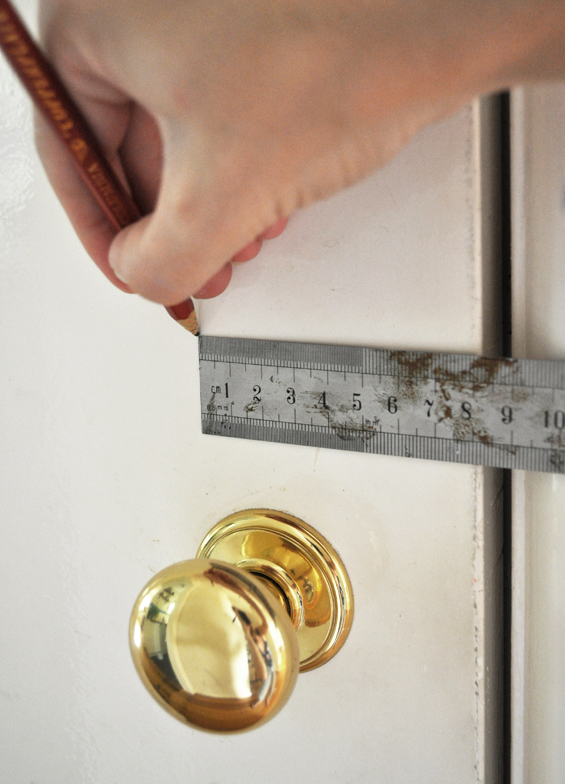
Based on your previously determined placement, measure down from the top and in from the edge of your door (8cm/3″ in my case) then mark that point with a pencil.
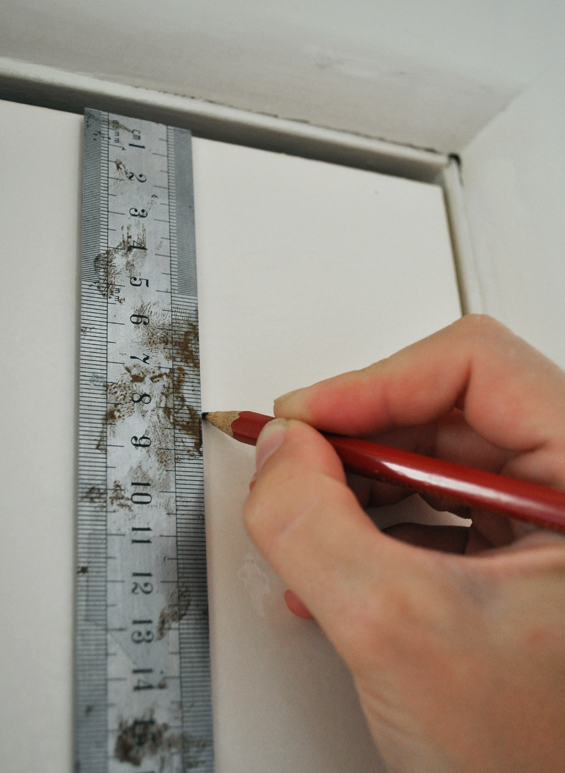
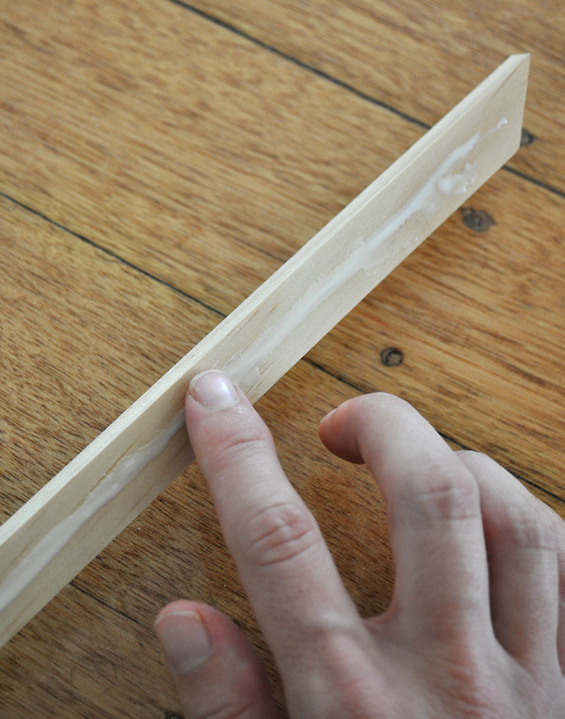
Excuse my filthy ruler! #liquidnailsisreallythatsticky
Tip: If you’re planning on adding the same moulding to multiple doors of the same size, make a template so you don’t need to measure each time.
Smear the rear of your moulding with a sparing amount of wood glue.
Line up your length of moulding with your mark, use a spirit level to help gauge its straightness, then tape it securely in position (at this point you can also measure to double check the position is 100% accurate, especially if your door is hanging a tad crooked like mine).
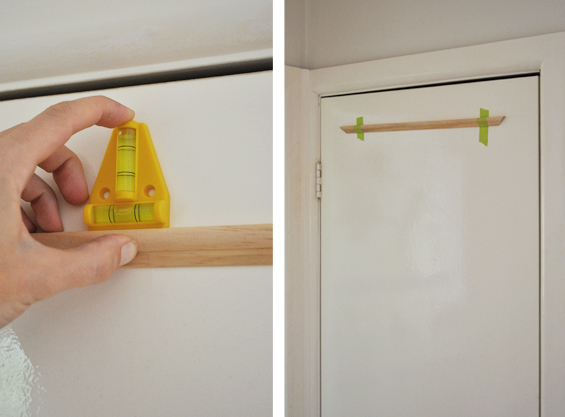
The piece of moulding looks a little wonky in the above pic, though it’s just the angle of the photo.
Hammer in three – five finishing nails along the length of the moulding then remove the tape. If necessary, wipe away excess glue and use a punch to countersink any proud nail heads.
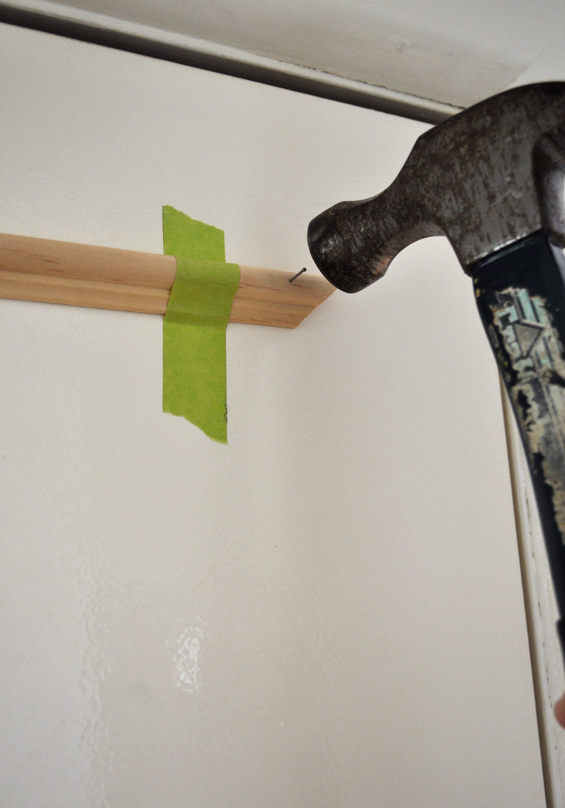
Tip: I find it’s best to hammer in the central nail first. This allows you to swivel or manipulate the moulding if it happens to shift out of position.
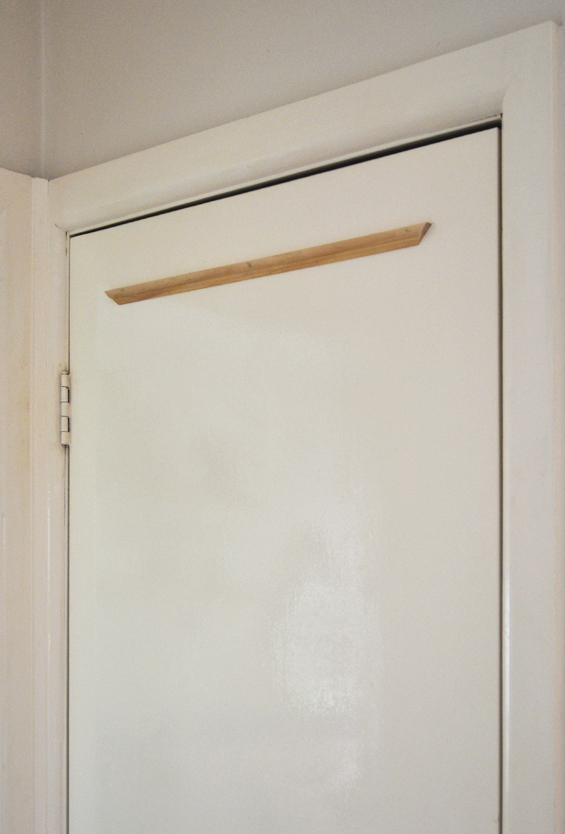
One piece down!
With the first length now attached, you can use it as an “anchor” to easily complete your moulding.
First, at the approximate place the lower piece of moulding will sit, measure in from both edges of the door and mark with a pencil (again, 8cm/3″ in my case).
Smear the remaining three pieces of moulding with glue.
Next, starting with a vertical length, position it on the door using your pencil mark as a guide. Tape it in place temporarily.
Repeat with the second vertical length.
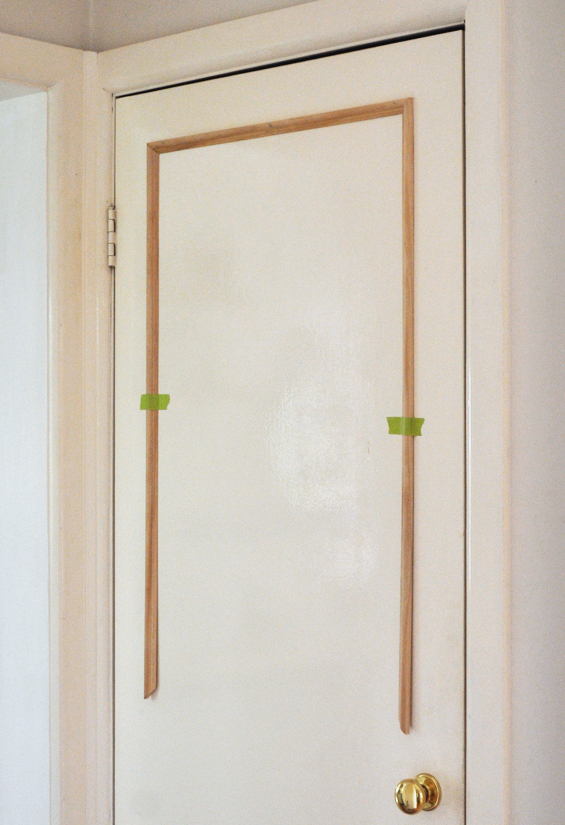
Again, it looks a little wonky, though it’s just the angle of the pic.
Finally, add the lower horizontal length. Make any small adjustments as required (use a spirit level or ruler if needed), then tape each piece securely in position.
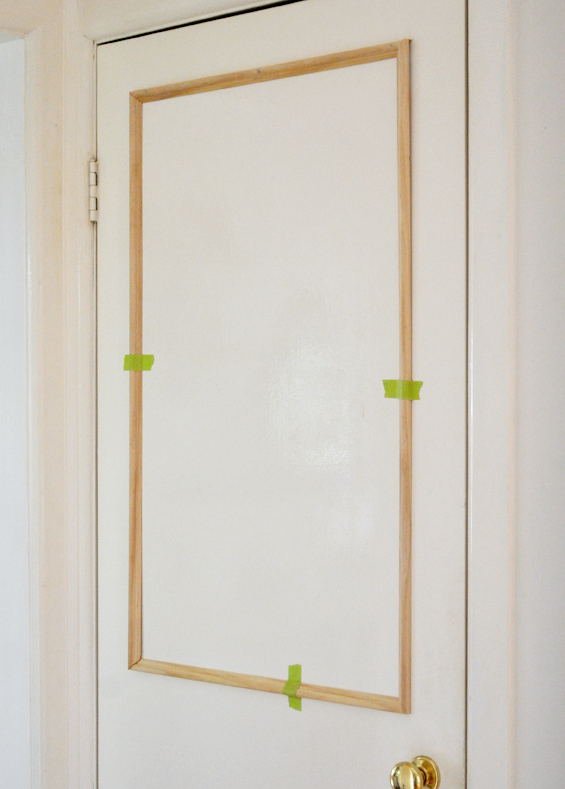
Nail each piece of moulding to the door then remove the tape. If required, clean-up excess glue and countersink any nail heads.
Add the second “panel” using the same method as the first.
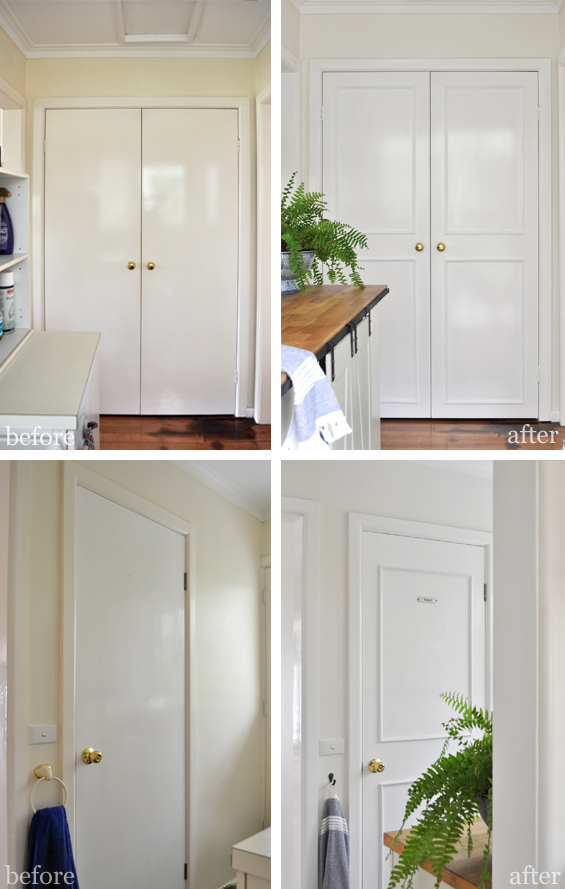
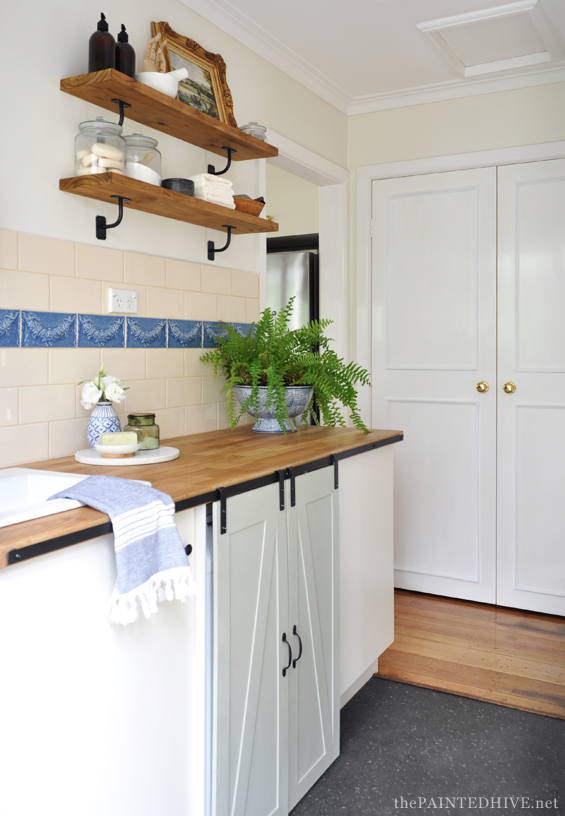
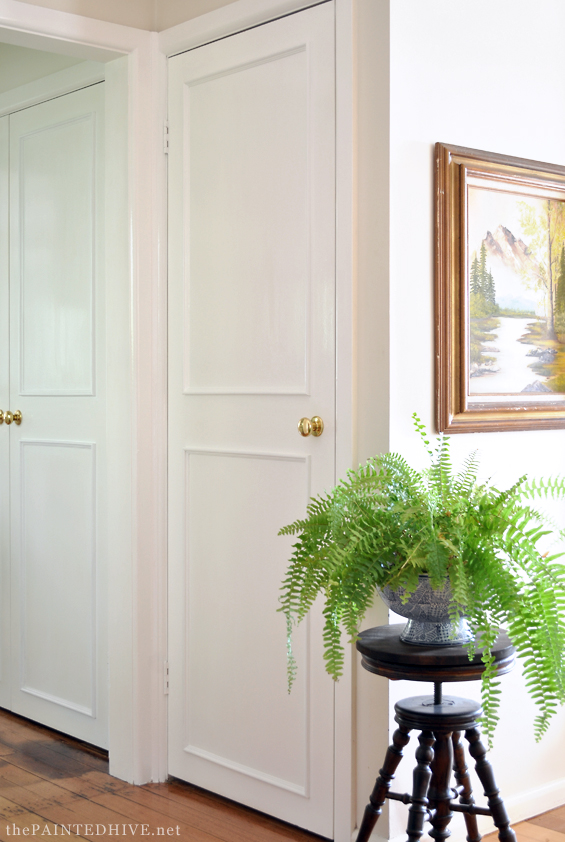
You can glimpse the finished laundry room double doors in the above pic on the left.
Note: You could use wood glue alone and forgo the nails. You would just need to leave the tape in place until it dries completely. Conversely, you could use nails alone and forgo the glue. I like to use both because the nails provide instant and certain grip and the glue helps with a more secure and consistent bond. It’s really up to you.
STEP 4 Caulk and paint.
Once your door moulding is complete, fill any gaps or nail head holes with caulk, allow to dry then paint as desired.

As mentioned in the ‘Supplies’ section, I freshened my door up with a few coats of bright white in a semi-gloss finish to co-ordinate with the near-by doors and architraves. Another easy and popular option is to use a spray painting company to spray your entire house to match: walls, window frames, and interior and exterior doors.
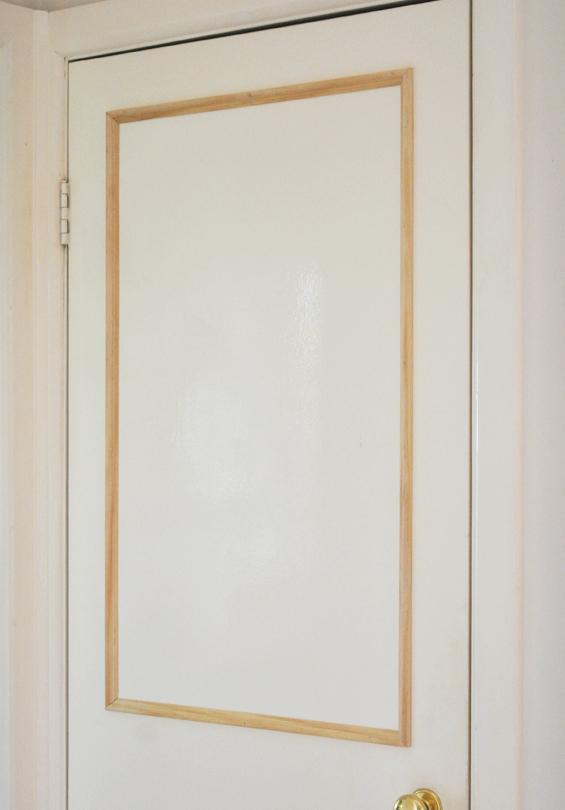
STEP 5 Done!
There is just something so satisfying about dressing-up a boring door with some trim!
And for only $14 per door, and around an hour of time, it’s sooooo totally worth it.
The amount of character the moulding adds is amazing. It really gives the whole room, not just the doors themselves, a huge personality boost. Love it!
Anyhoo, I hope my ridiculously OTT tutorial encourages a few of you to give it a go too :)
Sorry it took me a while to get this how-to together. I wanted to make the post as thorough and clear as possible.
I’ll be back as soon as I can to share the tutorial for the little barn doors!
![]()
You can find the laundry room refresh and all of the related projects here.


I know I say this all the time though you write the absolute best posts and tutorials!!!! People who feel confident can take what they need from your posts and all the rest of us (lol) can follow your each and every word! Thank you so much for the time and effort you put in. Love this DIY!
Thank you! Great information and images, you are a star!
They look great so I’m going to give it a go.
Absolutely awesome idea. Love the doors with the trim added and appreciate your instructions.
xxx
They look fabulous and great tutorial too.
Thanks so much :)
Fantastic! such a simple improvement but yet what a great result. TY for the tutorial.
Thanks so much Bonnie :)
I second Yammi’s post! Thanks for what you do. :)
Thanks as always Deb :)
I’ve been wanting to do this for years but just keep procrastinating. Thanks for including a time estimate. Maybe I’ll move this improvement up the to do list and actually get it done.
For the record I just keep pinning this little laundry room! I read every entry in that little contest and just don’t get it. This room is magical and so much better than any other entry. You were robbed….
Ha, ha. Thanks LaNell. I guess it’s subjective, plus some of the other contestants had huge followings to prompt votes. It would have been lovely to win, though, oh well. I’m just really glad my room refresh has helped inspire my readers. You should totally bump this project up your TO DO list. This is the first time I’ve done it and it was so achievable.
Im addicted to blogs and pintrest and everything home improvement so I’ve seen a lot but your tutorials are hands down, bar none the very best, particularly for people like me with little experience with power tools. Thank you so much for sharing and please don’t ever stop! We need you!!
LOL! Thank you so, so much. What a lovely compliment :)
I agree with LaNell, your laundry refresh runs rings around all the others. You turned it into a lovely little powder room leading onto a garden. There is no hint of the room’s utilitarian purpose. The others just cleaned, painted and added crappy cupboards, they still look like dull old crappy laundry rooms. Also the others have no sense of whimsy or fun, they are just BORING, yours is cute, fun and interesting.
Oh, you’re too sweet, and maybe just a tad biased, Maggielou :)
Of course my room was the best (insert sarcastic overtone here – LOL) though most of the other contestants brought something great too. Like I mentioned to LaNell, I’m just really pleased my room refresh has helped inspire MY readers, plus it was super fun to work/experiment on!
Isn’t it crazy how such simple things , like adding mounding , can make a world of difference?
Such an improvement Sam :)
I have also used photo frames (without glass and backing, obviously) to do the same thing, if you can find them in required size
I’ve heard of this being done before. Years ago I had an idea to try it on the side of a dresser too – never got around to it. A super easy cheat if you can find frames the right size.
My only reservation is the fact picture frames have a recess for the glass and artwork, so wouldn’t there be a slight gap on the inside of the frame where it doesn’t sit flush against the door? Did you have to insert a panel of plywood or MDF (or similar) into the frame to accommodate for the missing glass?
x
This is such an awesome makeover. It’s cheap (my favourite!) and the finished product looks really expensive! You are talking my language!
Thanks Kate :)
It is amazing how much of a difference the molding made! That simple project added much more than just character to the room, great job. I always admire projects like this but am afraid to attempt them myself, although you make it look fairly simple so I might just have to give it a try. Thanks for sharing.
I love this idea! What an easy and beautiful way to dress up those old panel doors that so many people have. Thank you so much for sharing your tutorial with The Creative Circle link party!
NICE presentation. Clear and concise, great photos. 🙆 I’llbeback!
Thanks so much Judy. I’ll be happy to have you back :)
Great post! I have a question. Do you do that on both sides of the door or just the side facing out?
Hi Kelli
I just did the outward facing sides though if you were adding trim to a bedroom or living area door you might like to do both sides.
Kristine
Love this post!
To check the door for squareness, take two diagonal measurements from opposite corners. (aka the hypotenuse) If the door is square the two measurements will be identical. i.e. It has four 90 degree corners.- There might be some merit to setting up (or buying) a picture frame jig in order to make 4 identical rectangles on a work bench or table. Then drill small pilot hoes in the frame for the nails and insert the nails so you can hold the frame and hammer the nails. Then mark the doors and mount the “picture frames” on the doors.
Your Door Trim tutorial is fantastic! After moving to an apartment my cupboard for crafts just doesn’t cut it and looks totally out of place but your tutorial makes me realize that it is possible to change the “plain Jane” cupboard into a cute addition to a bland room. Thank you so much!!!
You’re so welcome Carol. Thanks for the lovely comment :)
This tutorial is GREAT! Exactly the step by step guide I was looking for to update the interior doors of our new home!
Question: What paint color/brand did you use on the doors/trim AND the walls? I am also looking to go white on white, and can’t decide if I want to go bright white semigloss for the doors/trim and a warmer flat white on the walls, OR if I want to use the same color for both, just different finishes. Yours looks beautiful, so it might swag me one way over the other! :-)
Hi Meghan
Judging by how you’ve spelled ‘color’ I’m guessing you’re in the US? I’m in Australia so my brands probably don’t apply to you. In terms of your general question though, it’s really just a matter of personal choice. Either way will look nice. It just depends whether you want that level of subtle contrast between the tones.
Cheers
Oh these are just wonderful! What a different trim makes. The tutorial is great too, very detailed.
Thanks Bernadine. I’m glad you find it helpful :)
When you add moulding to a bathroom or bedroom door, do you add the moulding to both sides of the door? Love the way they turned out! Thanks
On all of the doors I have applied this treatment to, I have only ever done the ‘exterior’ side. Lazy? Maybe. Though it doesn’t bother me one bit :)
Can’t wait to do this to our interior doors! I’m wondering about the exact size of trim you used. Is the .7 for how far it sticks out? If so, how wide is the trim that you used? Thanks!
Hi Julia. The trim I used is around 3/4″ wide and 1/2″ deep. Cheers.
Thanks!
Thank you so much for this great tutorial. Where did you find that moulding?
All the ones I saw at Home Depot have straight angles and wouldn’t look good on doors. I love the roundness of yours. Thanks in advance.
Oops never mind, you’re in Australia! 😊
Very clear tutorial but, I have a question: How do you treat doors with different widths. I have a hallway with 3 doors between 28″ & 30″ and I used the same measurements for the distance in from the sides but…..I also have a linen closet in that hall that is only 18″ wide. If I use the same distance in from the sides (approx 5″), I’ll only have 8″ panels. I think it looks weird because after I apply the 1″ wide moulding, the panels would only be 6″ and that makes them look equal in width to the distance from the side edges (5″) of the door. Can I adjust how far in I place the moulding by trusting my vision?
Yep, I’d just eye the moulding placement on the narrower door (you can use blu-tac or removable putty to hold it in place if you’d like to get a really good idea of the position prior to attaching). There’s more to making it work in the context of a space with lots of different scaled doors than just relying on using the same depth from the outer edge – as clearly that could just end up looking plain wrong. As long as it gels overall, then it’s all good.
Great tutorial!
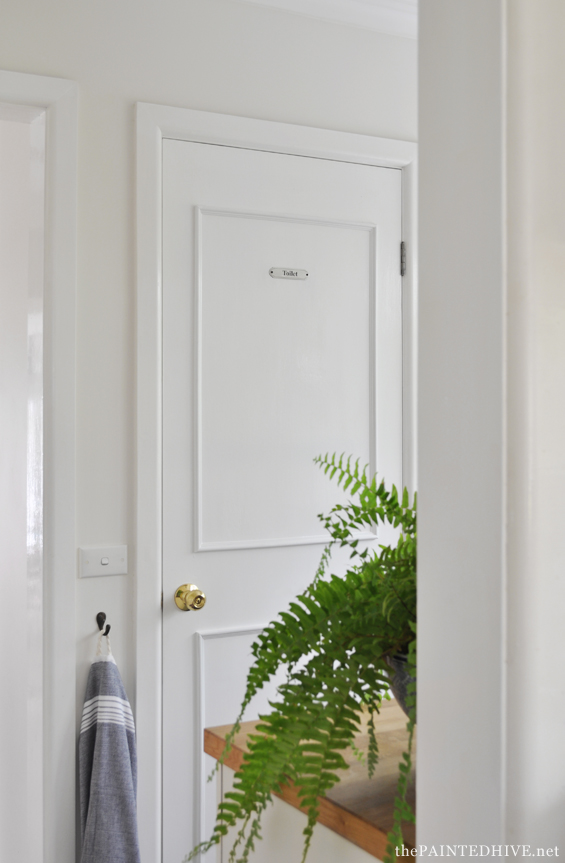
I’m also loving the little metal “Toilet” sign. Where can I buy that? I’ve been looking around online but they’re not as cute and quaint as yours!
Thanks so much. I’m pretty certain I found the sign on eBay. From memory I had to buy it out of the UK. If you search for “enamel toilet sign” you should find a few to choose from. Etsy or Amazon might be good places to look too.
This is the perfect web site for everyone who would like to find out about this topic.
You understand a whole lot its almost hard to argue with you (not that I
personally will need to…HaHa). You certainly put a fresh spin on a subject
which has been written about for a long time. Great stuff,
just excellent!
Great idea, bookmarked for future use.
Where did you get your molding from? Thanks
It’s a very common moulding profile. I just got it from my local hardware store.
Like!! Really appreciate you sharing this blog post.Thansk you!
Thank you! I’ve been wanting to add moulding to my doors forever! This is the best tutorial I’ve seen, and I now feel very confident I can follow these steps! Great tutorial!
Fantastic. Thanks for letting me know it helped you :)
Old post, but if the door is not square, how do you adjust for that? If the door isn’t level and you level for moulding will it look wonky?
If it’s just one door (i.e. not a pair like the cupboard doors I have shown) then I would align the moulding with the door. But I would definitely see if I could straighten the door first. Why is it unlevel? Can the hinges be adjusted or is the entire frame out?
Thanks for including a time estimate. It’s a big help to those planning to make a home makeover!