
If you follow me socially, you might have read that over the next week or two I’ve decided to focus on finally finishing my little girl’s bedroom!
It’s been 90% done for the past two years though for some reason I’ve been struggling to get it “complete-complete”.
If I’m honest, I’ve probably been putting-off sharing it here because; 1) it’s a tiny little space with some weird angles which makes it almost impossible to photograph, 2) I used a bold-ish pattern on the curtains (bold-ish patterns are not my strong suit) and ever since have been struggling to reconcile the best bedding combo, and 3) I have this problem with part-time perfectionism.
I know. I know. Those are crazy excuses, right? Which is exactly why I’ve decided to finally get it done already! Starting with the dull solid core door.
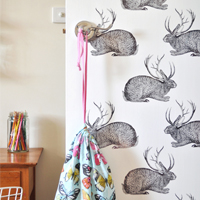
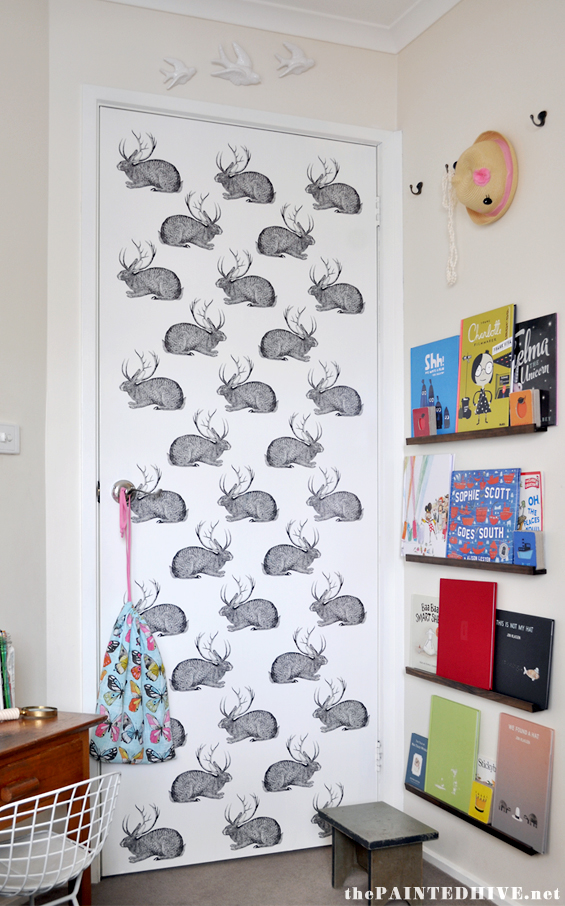
For a while now I’ve been wanting to jazz-up the rear of the door. Originally, I was simply going to paint it, or add some basic off-the-shelf decals (which would have been fine), though then I saw some gorgeous wallpaper which got me thinking.
The Legend of the Jackalope from Walls Need Love
My daughter adores animals, particularly bunnies, and surely there was a way to replicate the feel of this wallpaper without spending $140 (AUD) on the actual product. After all, I’m talking about decorating the rear of a door here. The least cashola I can spend, the better, right?
Anyhoo, here’s what I decided to do…
Although I’ve used a door for my particular project, of course you could also use a larger area (such as a wall or ceiling) or a smaller area (such as an artist’s canvas or piece of furniture). You could even attach these DIY decals to decorator items, such as glassware or ceramics. Additionally, I decided to DIY my decals because I wanted to create something super affordable that was also completely custom – plus, I just like experimenting with, and sharing, new ideas. A few different options I considered which you could possible employ instead were; using a rubber stamp, using actual decal paper, using paper decoupage, using a professional service to print and die-cut my stickers for me, using a stencil, using an image transfer method. All that said, I like my method and would certainly do it again :)
YOU WILL NEED…
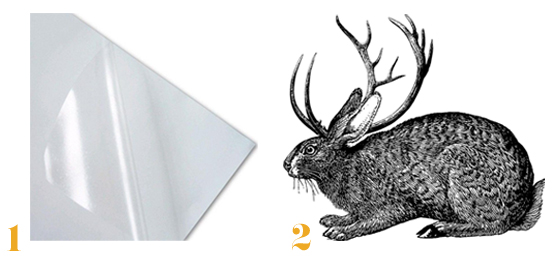
1 CLEAR STICKER PAPER
This stuff comes in inkjet or laser (to suit your particular printer) and sometimes might be labelled gloss or matte. It also comes in super affordable or crazily expensive so shop around to make sure you get a good deal. I found mine here on eBay for around 60 cents per sheet. I’ve seen others for as much as $2.50 per sheet.
2 IMAGE TO PRINT
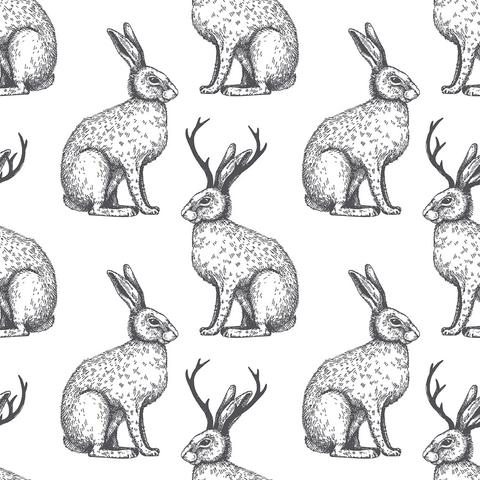
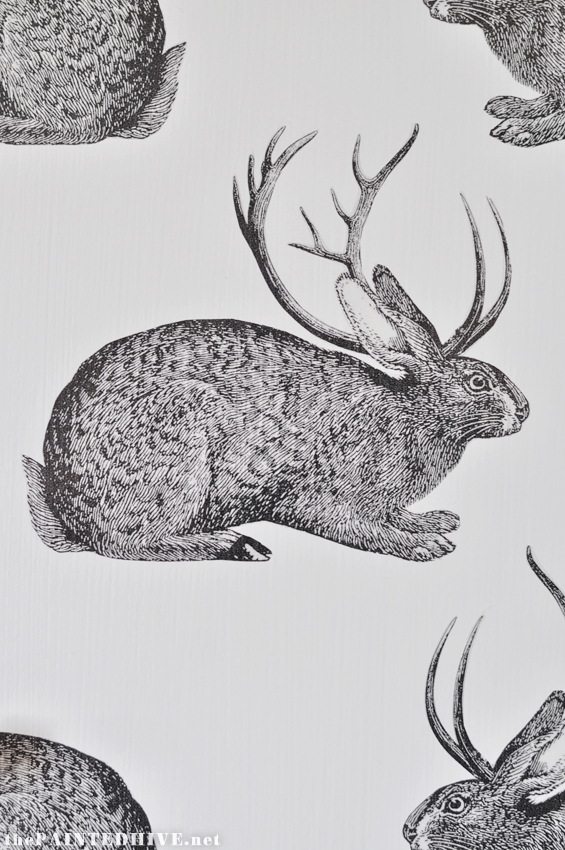
Obviously, this can be anything you want. I found several different downloadable bunny illustrations on Etsy then my daughter chose her favourite. Of course she picked the most intricate one! I’m not gonna lie, trimming around the antlers was kinda painful, and if I was going to do this project again I’d choose something simpler. That said, it was completely do-able for the small-ish area I covered. If you plan to cover a large area I would definitely suggest using an image which is easy to trim around – it will just make the project feel like less of a chore.
You can find the jackalope I used here on Etsy for just $3.
ALONG WITH…
PRINTER
SCISSORS
RULER/TAPE MEASURE/SPIRIT LEVEL
PENCIL
CLOTH
ERASER
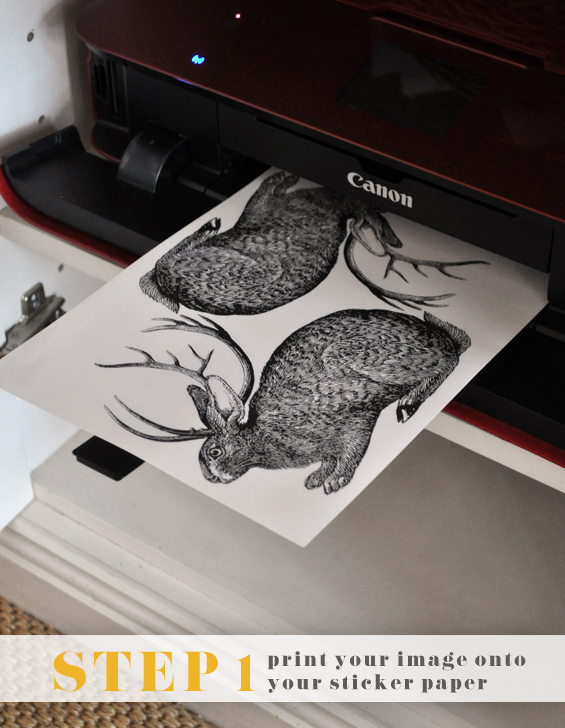
STEP 1 Print your image onto your sticker paper.
First, decide what size you’d like your decals to be then re-scale, duplicate (if needed) and arrange your image to fit nicely on a standard A4/Letter sized sheet of paper. I used Photoshop for this though you could just as easily do it in Word. Next, print onto your clear sticker paper as per the supplied directions. As I wanted my bunnies to face both left and right on the door, I mirrored the printing as required.
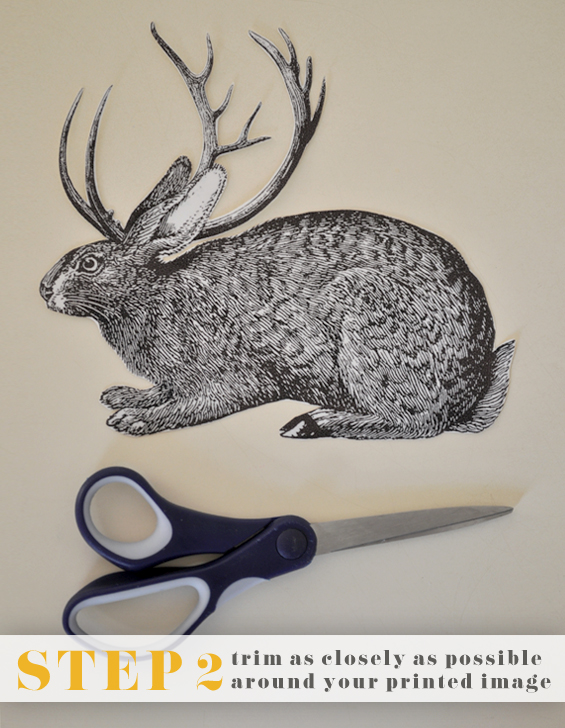
STEP 2 Trim as closely as possible around your printed image.
Using a nice sharp pair of scissors, trim around your image. The idea is to have no discernible border. Yes, I realise the clear sticker paper is transparent and pretty much invisible, however for best results you still want as little border as possible. Like I mentioned earlier, cutting around the antlers was somewhat tedious so when you’re selecting your image, bear in mind how easy it is to trim around, especially if you need to cut out a heap. All up, it probably took me almost two hours (on-and-off) to cut all of my jackalopes out.
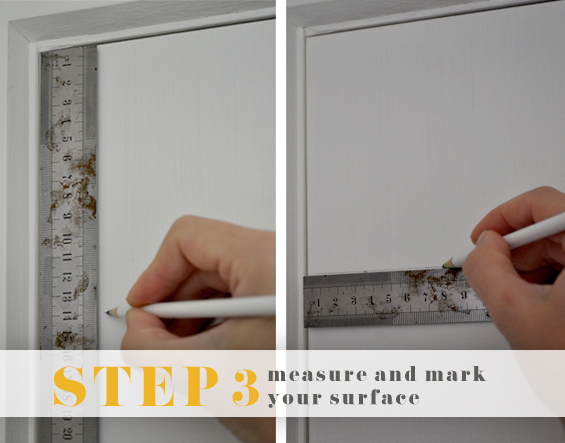
STEP 3 Measure and mark your surface.
You can be as thorough or casual as you like when it comes to working out your decal placement. I went with casual. Staring from the top of the door I simply measured down as required, drew a horizontal guideline (to ensure my row would be nice and straight), then went from there. For each subsequent row I drew a new horizontal guideline though aside from that I just eyed the placement of the decals.
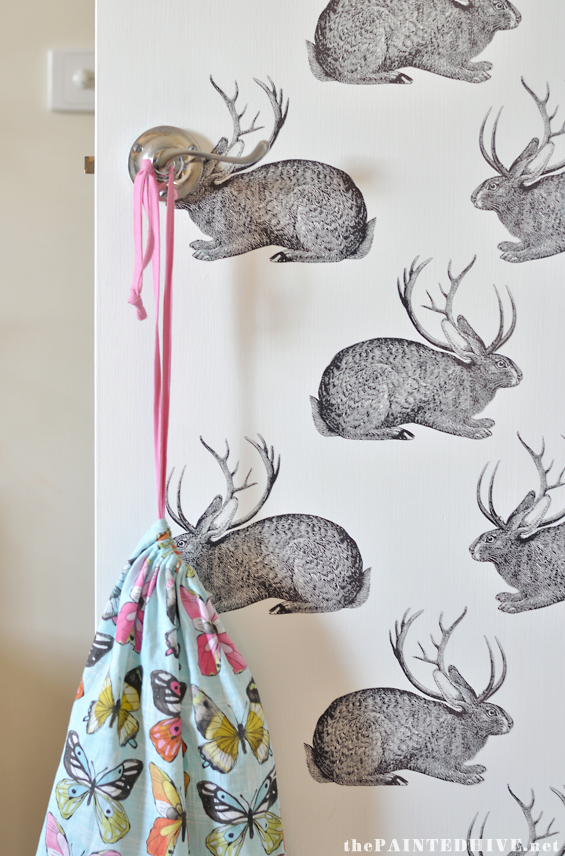
If you’d like to be more thorough, consider where the pattern will start and end (to help with symmetry and avoid cut-offs), and take into account any possible obstacles you might like to avoid – you may notice that I had to trim one of my decals to fit around the door handle though this was easy and I think it actually helps make the pattern look more integrated. For complete accuracy you can draw a grid or create a template to help with consistent spacing.
In other news, I really need to get a less filthy ruler to use for my tutorial pics!
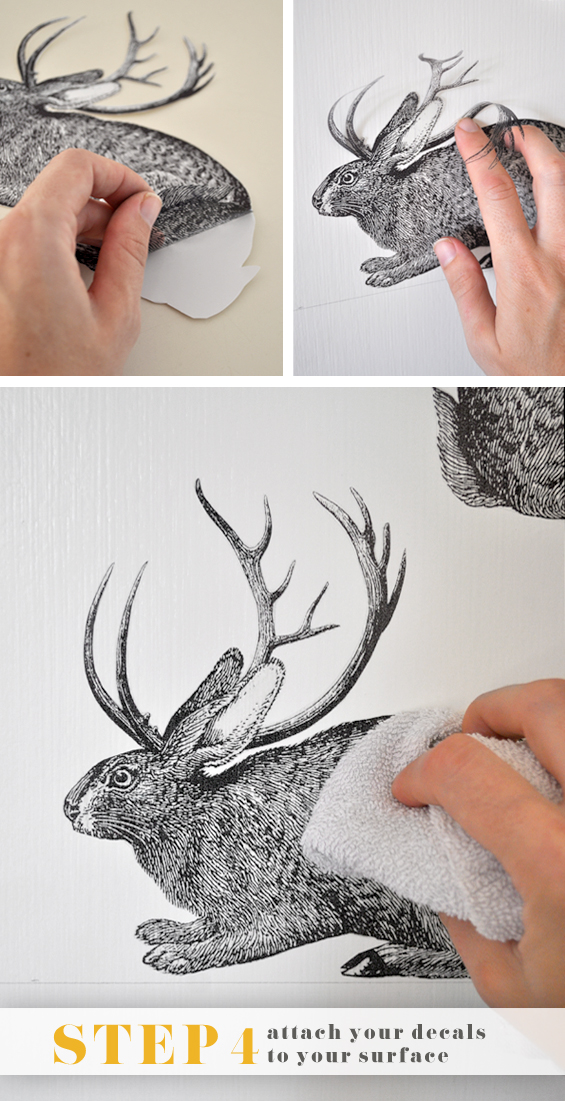
STEP 4 Attach your decals to your surface.
Using your markings as a guide, begin attaching your decals as desired. Simply peel off the backing paper, hold your decal in place, press it down with your fingers then smooth it on firmly using a clean cloth (try to avoid rubbing with your hands as any oil or moisture from your skin may smudge the fresh ink). This was super easy. The sticker paper I used was repositionable and didn’t stick to itself. Try to attach the decals a few millimeters away from any pencil lines – this will just make it easier to erase them in the next step.
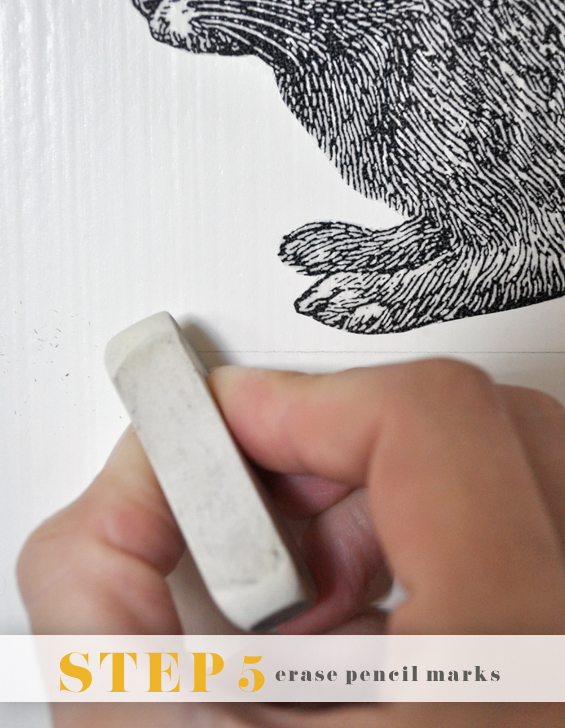
STEP 5 Erase pencil marks.
With all of the decals in place, use an eraser to remove any pencil marks.
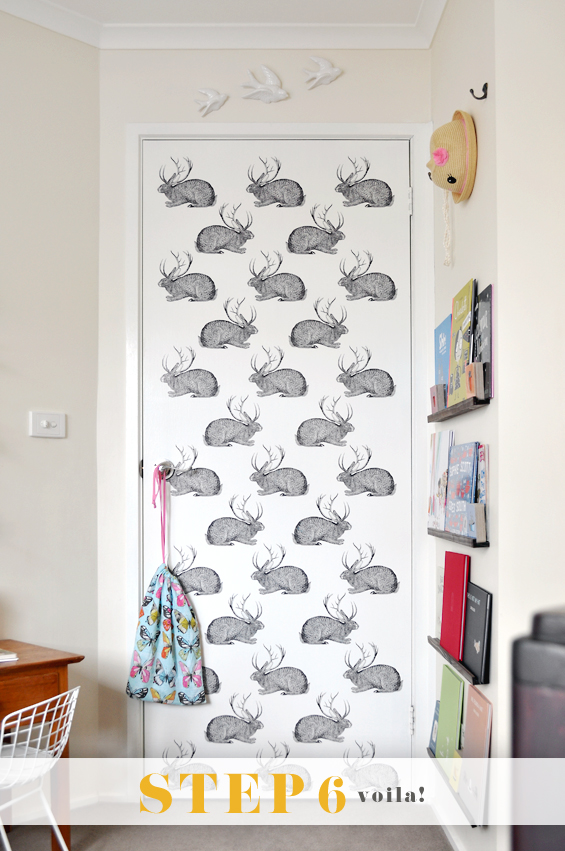
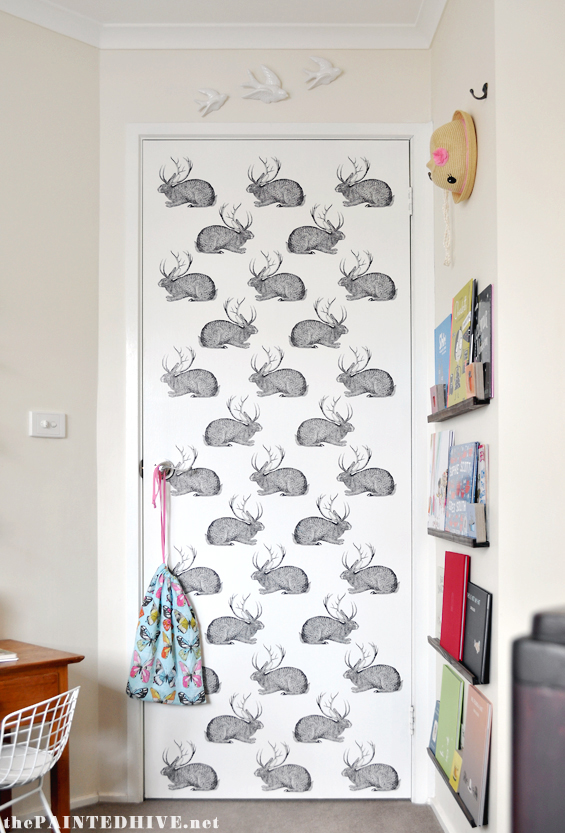
STEP 6 Voila!
I’m so thrilled with the way this turned out! I was conscious they might look like just a bunch of stickers though they actually look like legit decals!
I think the success lies in the attention when trimming so do try and take your time.
Yes, it’s a pretty full-on design though that’s why I used the rear of the door. It’s a fun, bold pop that’s discreetly enough positioned so as not to overwhelm the little room.
I considered sealing the stickers, to protect the ink and integrate them into the door, though decided against it as the ink seems well and truly set and they are perfectly adhered. I guess if I do happen to notice any problems I can always seal them at a later stage.
Note: If you do intend to seal your decals, I would recommend spraying with a clear acrylic sealer first. This will protect the ink (especially if you used an inkjet printer), providing a barrier of sorts to prevent ink “pick-up” (and subsequent running or smearing) when you brush over the decals with your clear acrylic sealer.
I also considered adding a few half decals to make the pattern look a bit more continuous, like wallpaper, though in the end I didn’t think it was needed – and, if I’m honest, I couldn’t face the thought of having to cut around any more antlers!
I’m not certain if these decals will damage the paint when it comes time to remove them in the future. I did do a test and the decal I removed came off cleanly though that was after it’d only been attached for a few days. Based on the type of adhesive they appear to have I would assume they should be fine though regardless I don’t think it’s anything to worry about. Let’s face it, when it’s finally time to remove them the surface will surely be due for a fresh coat of paint anyways!
All up this project cost me around $16. That includes the sticker paper, printer ink and the graphic I purchased. This means each decal totalled less than 50 cents! Not bad for a serious punch of pattern that my daughter absolutely adores!
Hope you like it and can use this idea somewhere in your own home :)
![]()
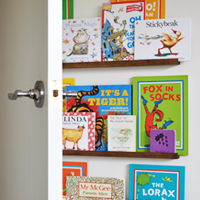
Catch-up on all of the design ideas and previous projects from Charlotte’s room here.


You never cease to inspire and impress Kristine. Another wonderful and original project. Beatifully explained and presented. NEVER STOP BLOGGING!!!!
Couldn’t say it better, Renee! You are amazing Kristine! I am always so excited when I see a post from you because I know it’s going to be something fabulous!!!
Aw, you’re too sweet Suzy. Thanks so, so much!
Wow! This is a very good idea!
I am always more apt to spend time rather than money to get a project done, especially when it comes to my house. Money is tight and time is more abundant for me.
This tutorial has so many fun applications. You could use it for so many fun things!
Thanks Randi. I was so happy with the way it turned out :)
Very sweet!!!!!!!!!!!
Thanks so much :)
I love it. My son has panel doors and i think I could go something different but similar . I’m starting in his room, but am intimidated so hopefully will get started this summer.
Go for it! It’s an easy and affordable project and there’s nothing permanent about it so just have some fun!
I am sure that this space is stunning despite it’s weird angels! I love using decals for my home decorating; they add such a fun flair, they are fairly simple to do, and they are usually cost efficient. Great job, looking forward to seeing more of the room!
Thanks Charlotte. Yes, so easy and effective!
You are a clever little bunny….I would love a Mum like you!
You are a blessing to us all…always go first to The Painted Hive when I see it on my site…
Aw, thanks so much Kaye :)
What a great project! Love that she didn’t pick an “Easter bunny” kind of bunny. Jackolopes rule! ;)
LOL, yes, she’s not really a cutesy Easter Bunny kinda kid. Glad she chose this one…even despite the fiddly antlers!
That is just amazing! I really don’t know how you figure out all these wonderful decorating tricks!! This is such a very lovely element.
LOL, thanks Sherylee. Unlike most sensible people I tend to come up with weird ideas then actually try them. Sometimes they work, sometimes the don’t.
:)
Love it love it!!!!! I love how your brain works!!! It’s so inspiring! Really gets my brain a rollin’! Thanks! ❤️🐰🐰
Thanks Janel :)
What a great idea. And so much better than having tacky and bright cartoon murals on the wall!
Such a lovely guide ;)
Very cool
I love the idea!
really nice painting love it.
What a pleasant change from cartoon characters!
Did you happen to remove these from the walls yet? Curious about if they’d do any damage or if renter friendly.
Hi Sierra. Yes, I removed them a little while back. They were attached to a door though, not walls, so the underlying paint was semi-gloss, not matt or satin as most walls are. This may have had a bearing on the ease of their removal as I didn’t have one single issue.
Love this DIY idea! Using clear sticker paper for custom wall decals is such a creative and budget-friendly solution. Thanks for the step-by-step guide—it’s perfect for personalizing any space!