
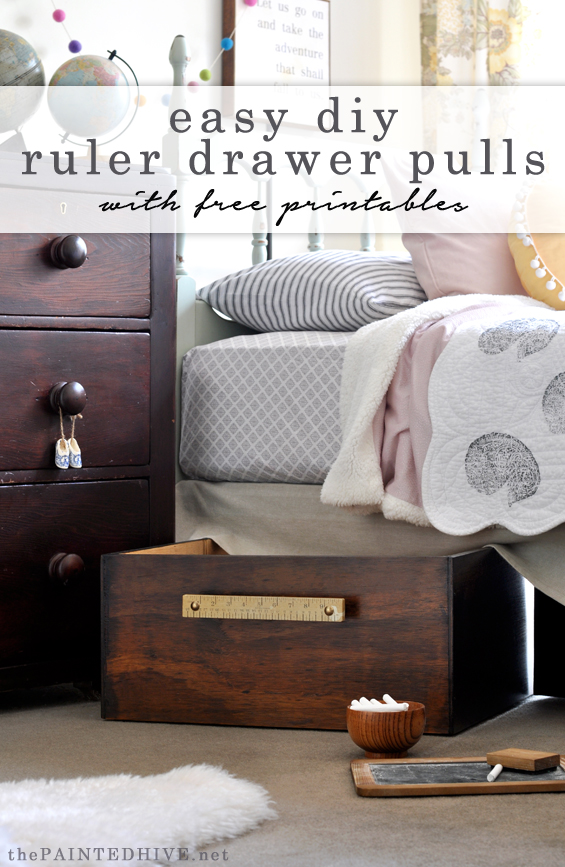
I’ve been meaning to add handles to Charlotte’s under-bed toy boxes for a while now.
At first I was going to use some simple metal pulls.
Though that seemed a little bit boring.
Then I was going to DIY some leather strap handles.
Though that felt a tad too mature.
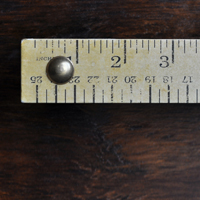
Then I was going to re-purpose some old wooden folding rulers.
Though the brown of the rulers would have been lost against the brown of the toy boxes.
Then I had an idea. This is it…
I’m sure some of you will wonder why I didn’t just use real vintage rulers. For a different project I probably could have, and may do in the future, though in this case I have a few reasons; 1) as mentioned briefly above, most vintage rulers have a natural wood finish which would have been lost against the brown of the toy boxes, 2) if I had painted some wooden rulers a lighter colour I would also have painted over their markings which kinda goes against the point, 3) vintage rulers can be expensive – and these drawers are under a bed most of the time!, 4) due to the size and weight of my toy boxes I would have needed to brace the rulers with something to make them more sturdy, 5) I tried to find some nice-looking new white rulers which I could “age” myself though they were all really expensive and too flimsy, and 6) finally, I just thought this would be a fun and original project to try and share…plus I got to create something completely custom for a great price and in no time at all!
YOU WILL NEED…
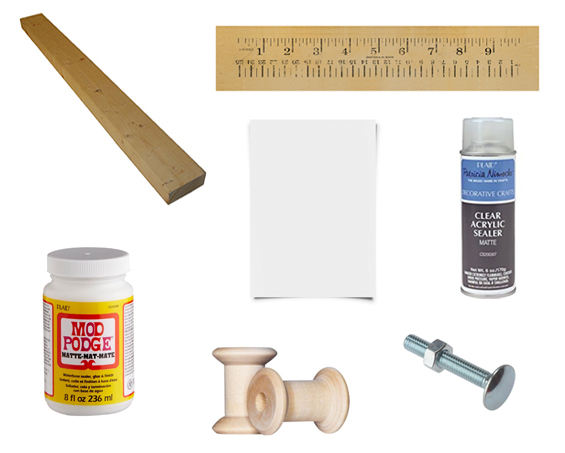
LENGTH OF WOOD
I used a scrap piece of trim I already had. It was 34mm (1.3″) wide x 10mm (.4″) deep. Of course you can use anything appropriately sized.
Note: See below for further information about how the dimensions of your length of wood may impact on using the ruler graphic I have provided.
RULER GRAPHIC
I made this from scratch in Photoshop. You can make your own too or simply use mine. For your convenience, I have created four different ruler graphics in two different lengths and widths. Simply choose the one which best suits your needs. There is a download button towards the end of this post.
Note: Depending on the dimensions of the length of wood you select, you may need to make some slight adjustments to my ruler graphic in order to get it to fit nicely. You can do this by opening my file in an image editing program (such as Photoshop) or a desktop publishing program (such as Word) and altering the scale as required. Of course, this might mean the ruler dimensions are no longer accurate though they’re only be used for cosmetic purposes anyway.
PAPER
Regular copy paper is fine.
CLEAR ACRYLIC SPRAY SEALER
To seal the printer ink.
DECOUPAGE MEDIUM/GLUE
I used Mod Podge because that’s what I had in the cupboard.
SEALER
I simply used the decoupage medium (Mod Podge) again which I diluted slightly with water. Saves having to buy or use a new product. You can use any clear sealer, or, like me, you can simply use your decoupage medium/glue. I prefer to use a brush-on-sealer, rather than a spray, because I feel it provides better coverage, especially for any paper edges or joins.
SPACERS
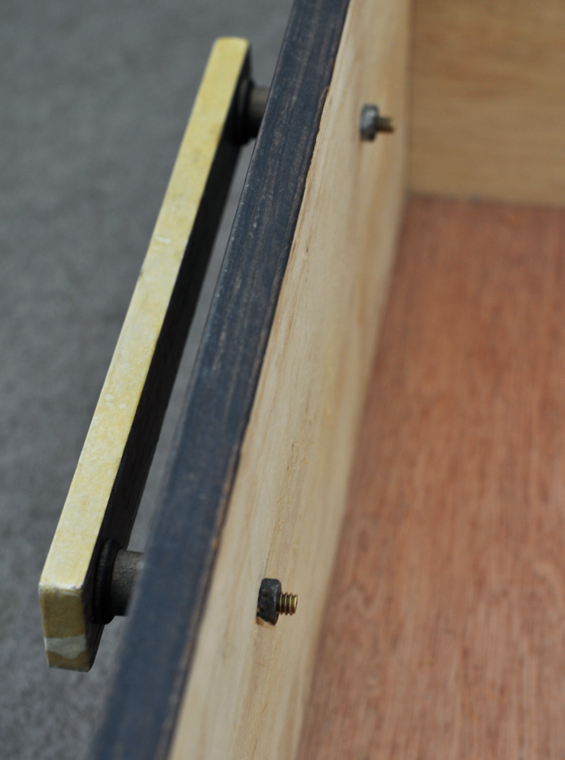
To provide the “arms” of the handle. You can use whatever you like, as long as the proportions are right. Plastic beads, rubber stoppers, wooden dowels, toothpaste caps! I used some sweet little cotton spools which I found here on Etsy.
FASTENERS (SCREWS/BOLTS)
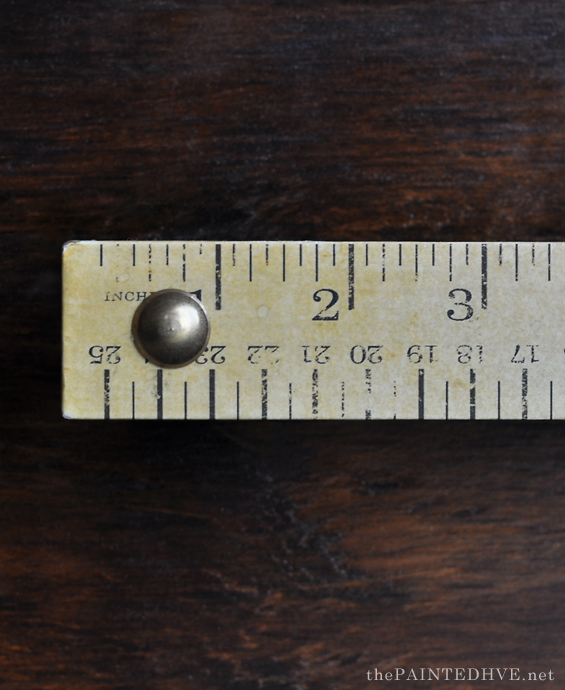
To attach the handle to your item. Again, you can use whatever you like. I sourced some fancy brass carriage bolts because they have neat dome heads which provide a nice professional-looking finish (I didn’t want standard heads with visible screwdriver indentations). You can use regular bolts and conceal the heads with screw caps for a similar look. Or you can use decorative nuts.
Note: I spent ages hunting for pretty screws or nuts for this project. Here in Australia you’re very unlikely to find attractive/decorative fasteners at the hardware store! If you’re happy with a slightly industrial look then you can use standard screws or bolts. If, like me, you’d like a more refined finish then you will probably need to source something online.
ALONG WITH…
SAW
SANDPAPER
PRINTER
SCISSORS
PAINT BRUSH
DRILL
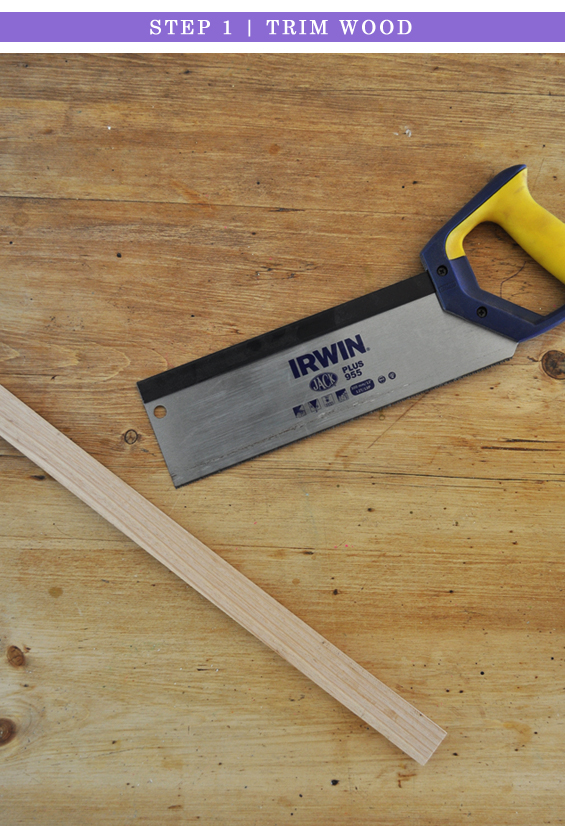
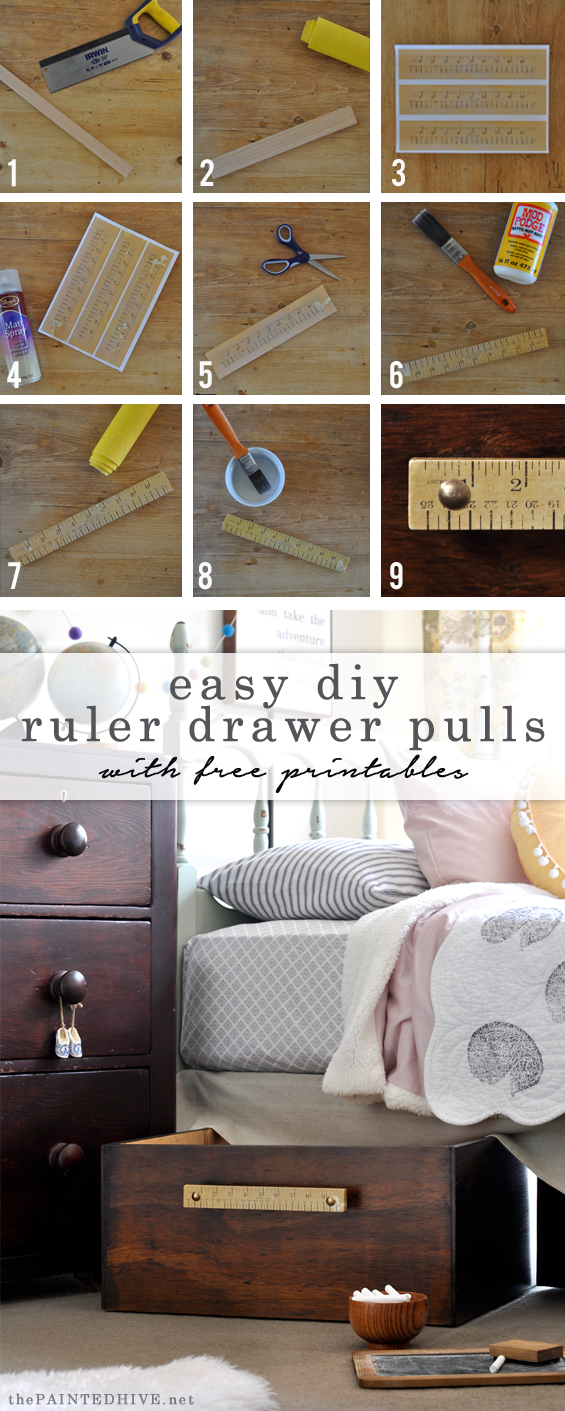
STEP 1 Trim wood.
Decide how long you’d like your handle to be then trim your wood to length (if you’re using one of my ruler graphics ensure you cut the wood to fit). As my toy boxes are quite substantial I made my pulls relatively long at around 26cm (10″). To trim the wood I simply mounted it in a vice then cut it using a handsaw. It was really quick and easy. Of course, you could also use a drop saw.
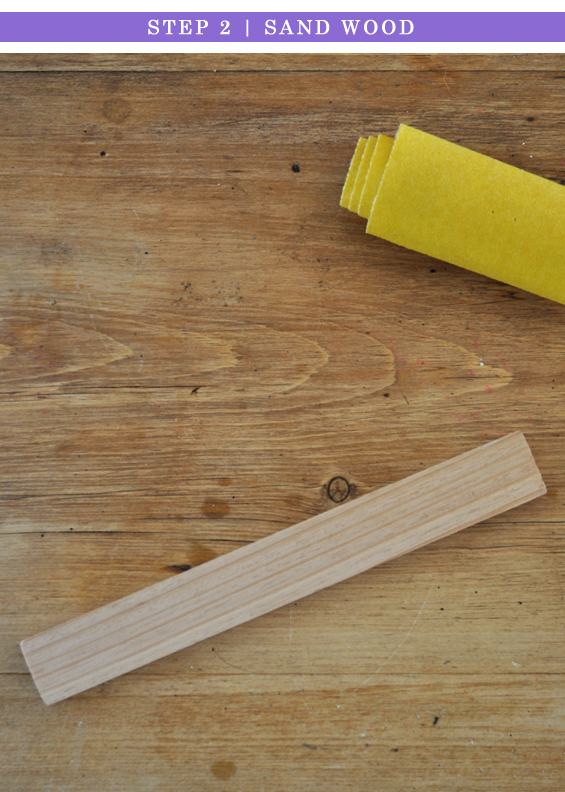
STEP 2 Sand wood.
If necessary, give your piece of wood a good sand to smooth any roughness and remove splinters. I also rounded my corners and edges slightly to give the appearance of wear.

STEP 3 Print graphic.
Print the ruler graphic onto regular copy paper. I just used my domestic inkjet printer.
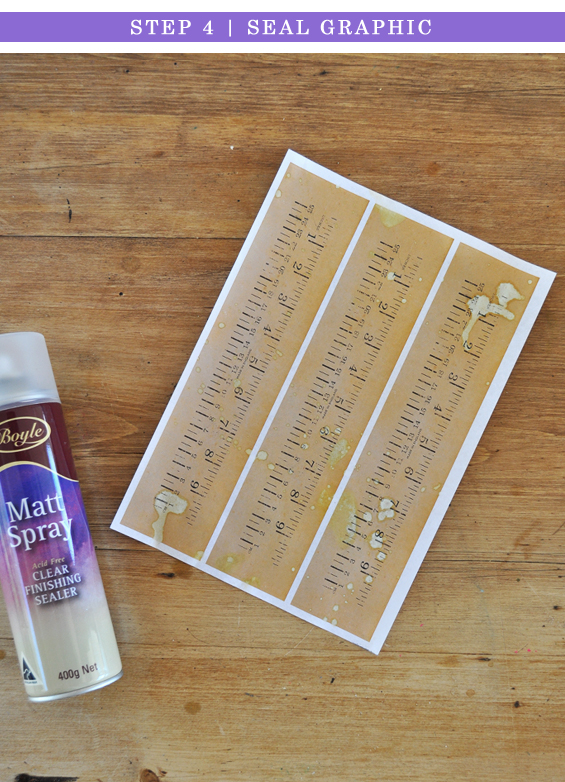
STEP 4 Seal graphic.
Mist the printed graphic with a few light coats of clear sealer then allow to dry. This simply protects the ink and saves it from bleeding or running too much when it becomes damp during steps 6 and 8.
Note: Did you notice the extra “wear” on my graphic in this pic. To add character and make the rulers look a bit more distressed, I splashed them randomly with some water prior to sealing them. This is entirely optional.

STEP 5 Cut out graphic.
Neatly trim around the ruler image.
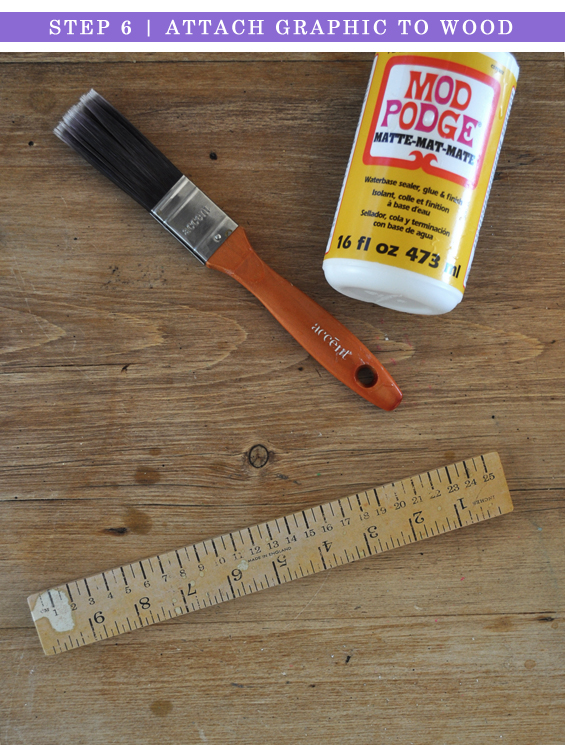
STEP 6 Attach graphic to wood.
There are a few different ways to go about decoupaging the ruler onto the wood though I’ve outlined my process below…
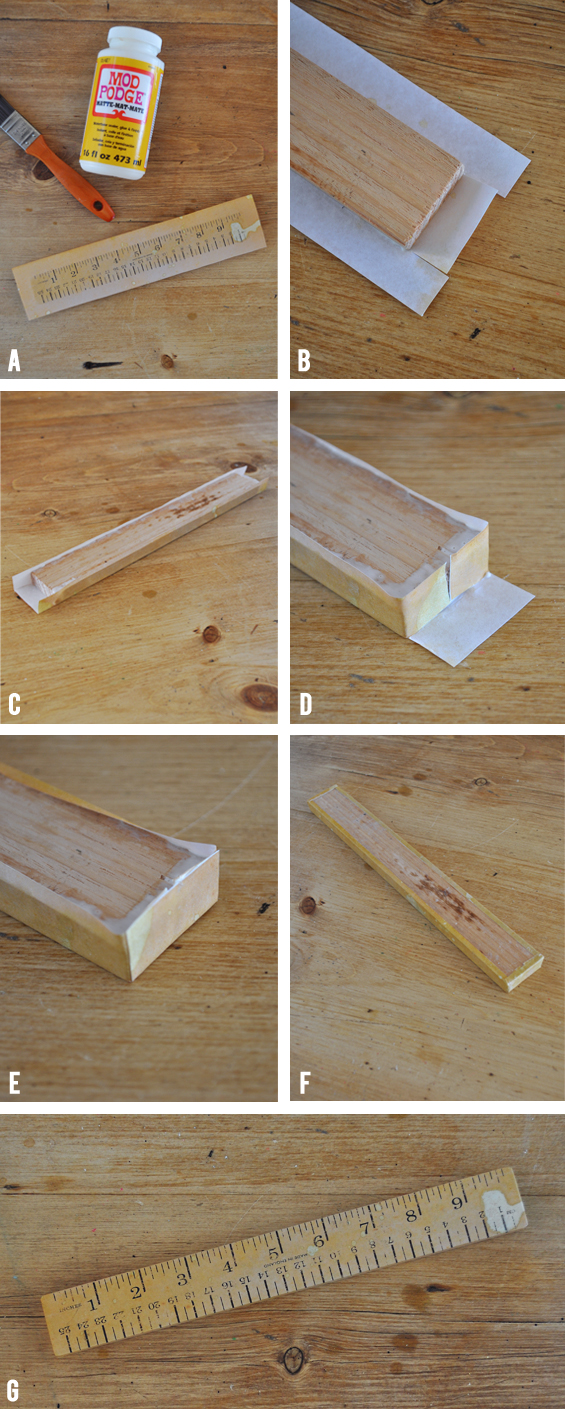
A Brush some glue onto the face of the wood, position the graphic in place then smooth it down.
B Flip the piece of wood over and make a straight cut at each corner.
C Brush some glue along each long length, fold up the sides and press them into place.
D Brush some glue along one end and fold both side flaps in. Repeat at the other end.
E Brush some glue on top of the folded-in side flaps and fold the final flap up. Press everything down firmly.
F Apply more glue as required then fold and press the remaining paper down as needed, wrapping it around and smoothing the corners.
G Done!
Don’t worry if things look a bit messy or unprofessional at this stage. As the glue dries any bubbles should dissipate and other imperfections (such as folds, joins or crinkles) will be addressed in the following few steps.
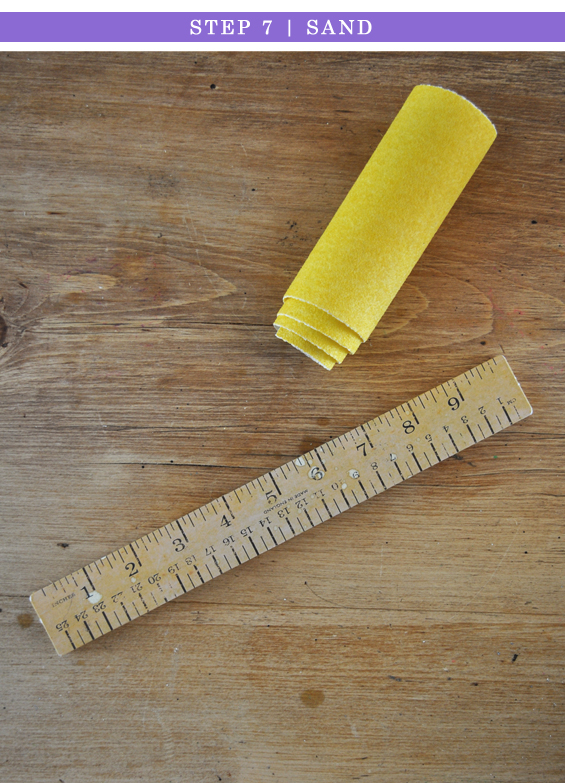
STEP 7 Sand.
Once the glue is completely dry, to disguise any paper joins, creases or bumps, carefully sand as needed. I used fine grit paper to distress the corners and edges slightly.
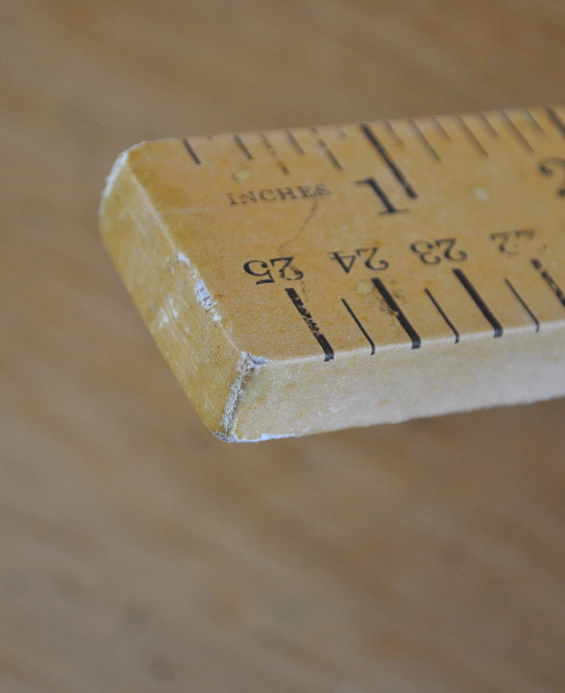
Although it won’t be seen I also sanded the excess paper from the rear of the pull for a nice, neat finish. Don’t worry if things look a little rough and rugged at this stage. And don’t be too concerned about any flecks of white paper or areas of wood peeking through. The sealing process will help bring everything together (and remember, we’re going for a rustic, vintage feel anyways).
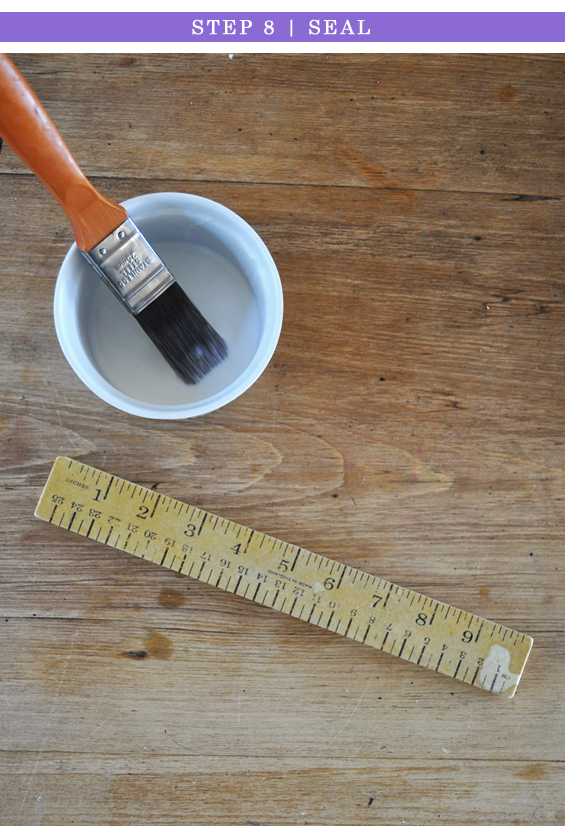
STEP 8 Seal.
Finish the pull with a few generous coats of clear sealer, ensuring you get good coverage on the corners and edges. The sealer not only provides protection though also helps meld everything together for a nice finish.
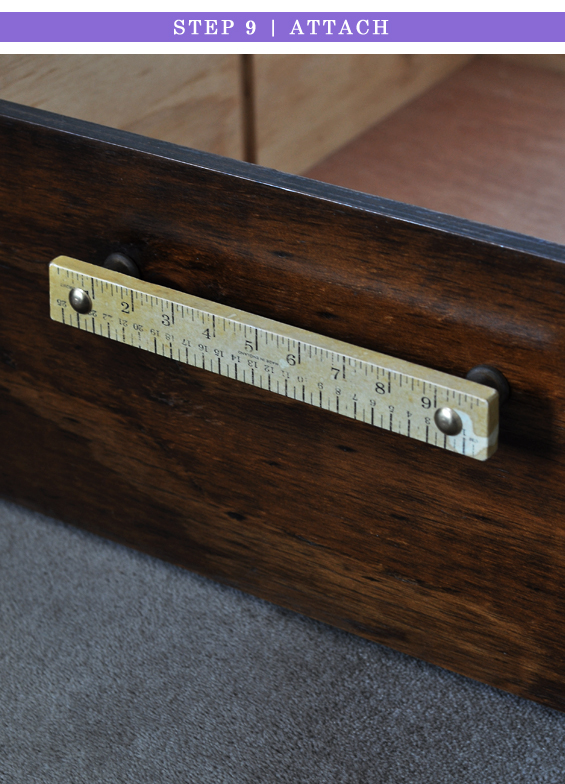
STEP 9 Attach.
Using your chosen spacers and fasteners attach the pull to your item. As mentioned above, I used cotton spools as my spacers (which I stained to co-ordinate with my toy boxes) and brass carriage bolts.

To attach the handle to my toy box I simply drilled two holes through the face of the pull then drilled matching holes through the toy box. I threaded the ruler and spools onto the bolts, passed the bolts through the holes in the toy box then secured everything at the rear with some nuts.
I probably could have used some washers too…meh. Or trimmed the bolts to exact length…also meh. Maybe I’ll do that tomorrow (#yeahsure).
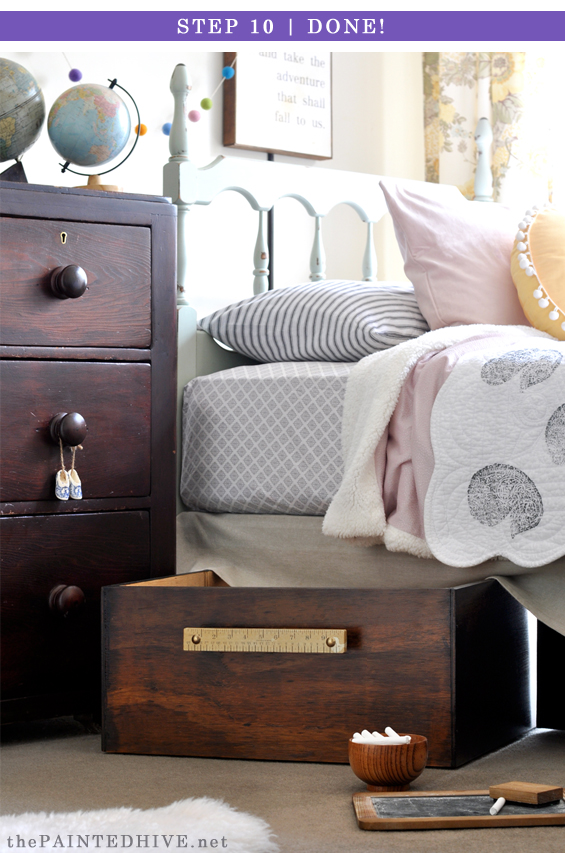
STEP 10 Done!
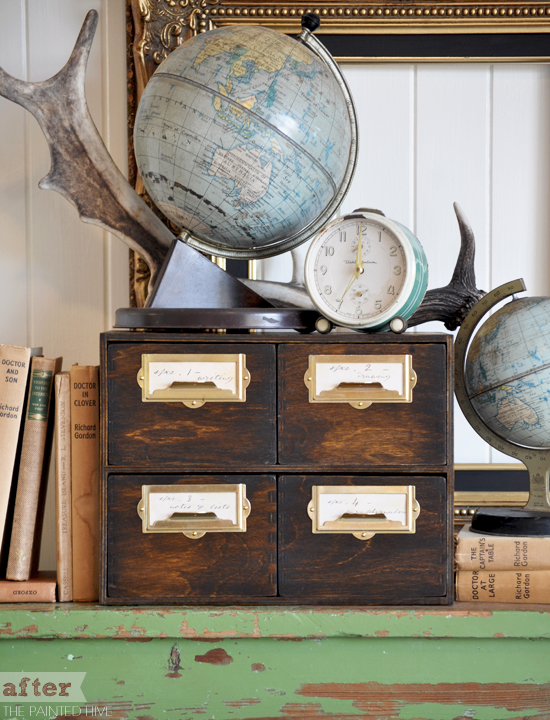
This was a complete experiment of a project and I’m absolutely loving the way these pulls turned out. Yay!
Charlotte actually has three under-bed toy boxes in total, and all of them got these new handles, though it was too tricky to get a decent pic of more than one (sorry about that, her room is just too tiny!).
The pulls look a little small in the above pic though they’re merely dwarfed by the scale of the toy box. Being almost full ruler length they’re actually quite substantial.
I love all the “vintage” goodness they resonate!
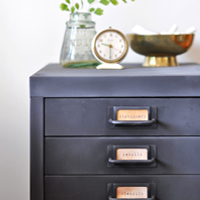
Although I’ve used them on toy boxes, they would look cute anywhere – especially in a row on a dresser! They’re quick and easy to make and only cost a few dollars each.
Download your free printable ruler graphics below.
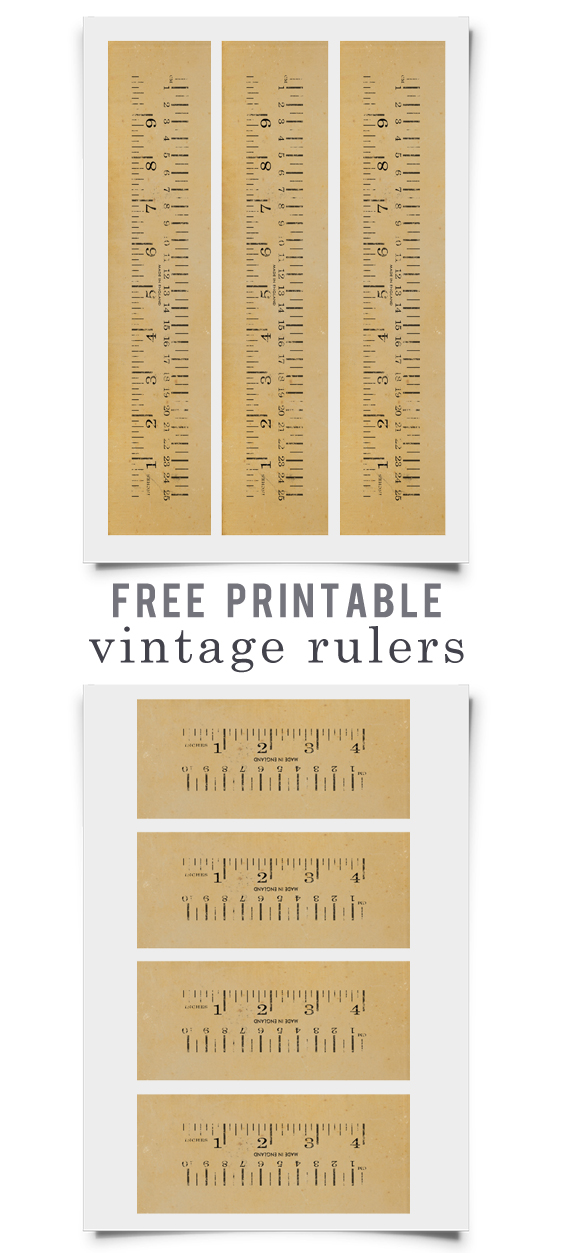

Note: The measurements given in the file names are based on the dimensions of the rulers themselves – not the extended backgrounds. If you’re unsure, do a test print first to ensure you trim your wood accurately.
I so hope this inspires a few of you to give it a go!
![]()
If you’d like to save this project for later, feel free to pin the image below.


So, so cute! I just love your brain :-)
Thank you for this idea and the free printables. I have a dresser this would be lovely on.
Lovely! I’m pinning this for when we do our daughter’s room. Some acorn nuts would cover the end of the machine bolts and prevent any scratches on toys and small hands, and you wouldn’t have to cut the ends off the bolts.
Thanks Kelsey. I’ll have to see if any of the dome nuts we have in the shed are the right thread for the bolts.
:)
I love the toy box idea and the pulls! The only thing I would do differently is to add some small wheels to the boxes. But I realize there may not be enough room under the bed to clear. Love the graphic! Hoping to use this pull idea in my “place to create.”
Thanks Patricia. There are actually hidden rollers under the boxes. I wanted them to be concealed so that the boxes looked nice and neat when tucked under the bed. You can see more about how we made the boxes here: https://thepaintedhive.net/2015/06/diy-custom-underbed-storage-boxes/.
Kristine
Oh those are just gorgeous! You are so inventive! They would be great for my craft room too!
Yes, super cute in a craft room!
Cute idea! I’d even like them as drawer pulls on a dresser!
Totally, I think I mentioned that in the post. How sweet would they look in a row on a dresser?
Sweet as can be!!! Your mind is so creative!!!
Waw It’s sooo chic I believed it’s real old ruler!😍 xxx Erika
Thanks Erika :)
You are just amazing! I would never have thought to do a complete DIY. They look perfect!.
Gorgeous. I love the look! Thanks for sharing.
Any decoration or embellishment with numbers or rulers are the best and you have taken this over the top I love how you “distressed” the ruler drawer pulls which creates an “authentic” look. Just darling … and would look so cute as desk drawer pulls … I can’t wait to get started. As always thank you for sharing your creative energy with us ~ truly appreciate and enjoy them [I pinned this to Pinterest …]
PS: When working with decoupage and even on hand painted furniture, I use fine grit steel wool [usually 000) for surface “clean up.” Steel wool doesn’t scratch the surface like sandpaper, and works out the uneven edges and diminishes air bubbles. Too, it adds a nice matte finish..
Thanks Melinda. Yes, I often use steel wool to “silken” wooden furniture however decoupage isn’t my usual thing so thanks for the tip :)
Great idea- thanks for sharing! I just know this will be a perfect finish for some project in the future.
I love this idea Kristine! They look fantastic! The printable aspect opens up a world of unique possibilities. Thanks for sharing and for the downloads – much appreciated 😊
Love the look you achieved with these. I reckon normal screws could work if they were painted to blend in. Like black. Did you make the toy boxes yourself?
Yep, Jane. We made them a few years back. I didn’t do a full tutorial though there is a link to my post about them at the top of this page.
I actually bought some dome head screws I was considering painting black and using though I decided to be a bit more fancy! You’re right, they could absolutely work if you don’t mind that slightly industrial feel.
Cute and functionable – a Painted Hive hallmark. :) I loved the pin you created! Went straight to my Pinterest board. Thanks for all you do.
Thanks Deb :)
Once again….brilliant!!! Someone already said it, but I love how your brain works too!! Thanks for sharing!
Ha, ha. Thanks Janel :)
Love, love, love!!! Thank you so much!
shar
Thanks :)
Loved the project, I love how rustic it looks. Looks pretty easy to make too, and I need some drawers to organize my stuff haha
Well, Kristine, you’ve done it again! I have an old laminate table I wanted to resurface to use in our undercover outdoor area. I loved the look of old yard rulers but dismissed the idea quickly because of the cost. This is a brilliant solution and a bigger print at Officeworks would give me the longer lengths I need for the table.
Fabulous job, as ever.
Thanks Robyn. That sounds like an interesting use of my ruler graphics. Let me know how it all turns out!
Whaaat, those aren’t cut yardsticks? What a great idea! They make such fun drawer pulls and I have just the project in the queue these would be perfect for. Pinned to share and refer back to. If I make them I’ll be sure to credit and link back to your post.
Thanks Marie :)
This is such an incredible idea. So creative! I love the end result. I’m definitely going to make some of these for my dresser and nightstand. Thank you for the tutorial!!
You’re so welcome Bethany. Glad you like them :)
How cute is this! I am definitely going to keep this in mind and will give you credit for coming up with it Pinned.
Thanks so much :)
I am from Brazil and I enjoy your blog very much! I like these colorful little balls hanged on the wall close to your bed. What is this properly? Did you do it?
Hi Paula
That is a felt ball garland. They are easy to make though I was lazy and bought mine from eBay. If you search online I’m sure you will find the ready-made garlands or the felt balls to make your own.
Kristine
Such a fun idea and great tutorial! Thanks for sharing at Vintage Charm–pinned!
What a cool handle idea. I love them they go great with the dark wood and really add interest.
Thanks Claire :)
I love what you have done here! More importantly, I could really do with some drawers to get rid of all my clutter in my office!
Such a cute idea! I am saving so I can try it out in my sons room!
This is awesome, I would love to try this,you are so talented!!
Aw, too sweet. Thanks Freda :)
Love this, thank you! :)
very nice and very good idear