
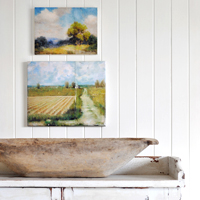
I know many of you have been waiting for this landscape art tutorial since seeing the canvas ‘painting’ I shared a few weeks back…
This was one of those projects I’ve been meaning to try for years.
I think quite a few of you thought I had painted it myself and that I had some kind of ‘instant-artist’ trick to share. Truth is, whilst I do enjoy drawing and painting, I struggle to find the time nowadays so this was merely a cheat that anyone can try with ease.
I originally saw this basic idea on one of those kids’ art shows (obviously, with not quite so sophisticated an outcome!) however the general concept got my brain cogs turning.
So, when finding lovely and affordable landscape art for Riley’s bedroom gallery turned out to be much harder than I had first thought, it seemed the perfect excuse to give this project a go.
And, I could not be happier with how it turned out!
Of course, there’s no real substitute for genuine art – and I’m not trying to imply this is comparable – though it is a fun, easy and affordable little DIY that can look great.
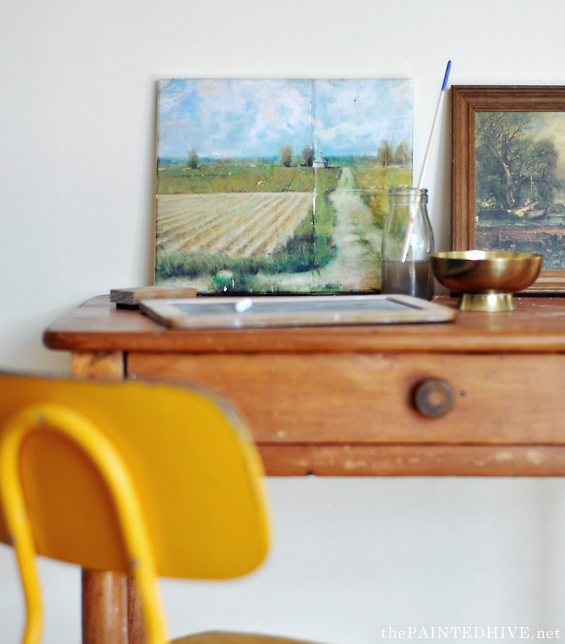
YOU WILL NEED…
GRAPHIC
You can use whatever you like as long as it’s the right approximate size and isn’t copyright protected.
There are heaps of free public domain images available online. Just have a search around and make sure that whatever you choose is large enough for printing purposes (you can read a bit more about how graphic size effects printing here).
Although I’ve used a landscape, any subject matter would work – portraits would be cool!
Some good resources for landscape art include Flickr, Wiki Art and several of the sites I have listed in my Free Printables Directory, among many, many, many more!
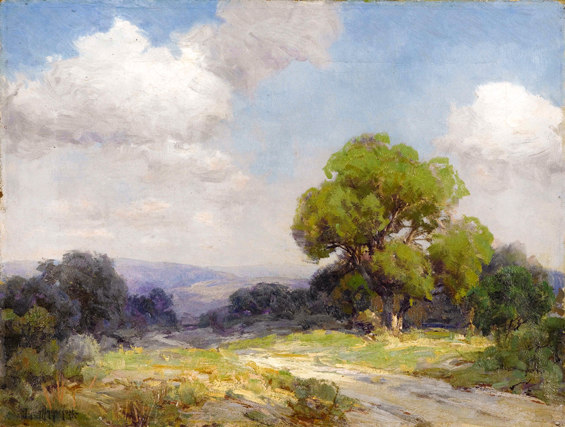
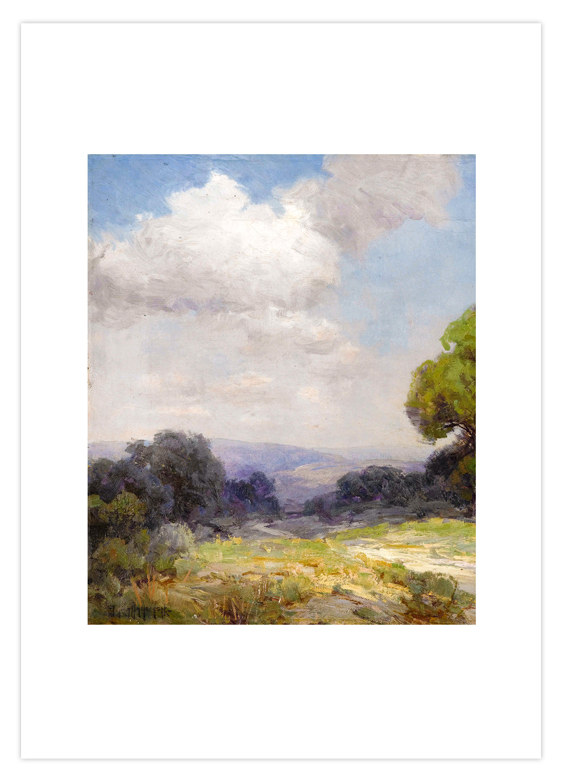
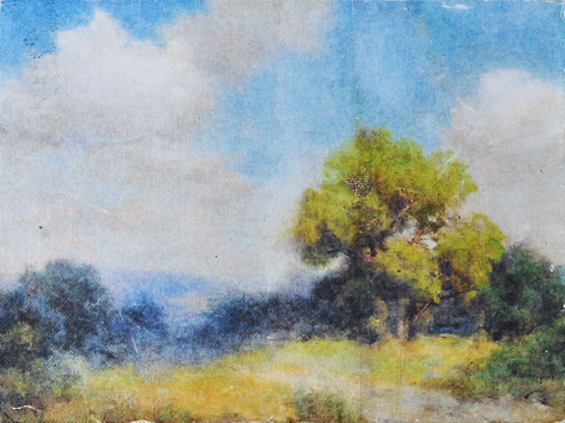
For this tutorial I have used an antique landscape painting which I found here. The graphic I used for my original canvas (as shown at the very top of the post) can be found here.
PRINTER
You can use an inkjet or laser printer. I just used my domestic inkjet printer.
WHITE TISSUE PAPER
Tissue paper is used in place of regular paper as it creates a really lovely vintage look and allows the canvas texture to show through. I used a large sheet of tissue paper which I simply cut down.
MASKING/PAINTER’S TAPE
I just used regular painter’s tape.
CANVAS
I used a small 20cm x 30cm/8″x 12″ canvas I found at a local dollar store for just $3.
GLUE
You can use any glue suitable for paper. I used Mod Podge because that’s what I had in the cupboard.
SANDPAPER
Regular medium grit sandpaper is fine.
THE PROCESS…
STEP 1 Size your graphic to fit your canvas
I used Photoshop to size my graphic though you can use any image editing/desktop publishing program you like. GIMP is a great free alternative to Photoshop and you can find my full tutorial for sizing images using both Photoshop and GIMP here.
For the purpose of this tutorial I’m using a canvas which is slightly larger than a standard A4/letter sized sheet of paper so I can demonstrate how to separate the graphic for printing (assuming most people have a standard A4/letter sized printer at home) and how to connect it again when attaching it to the canvas.
Of course, if you have a large format printer or a canvas smaller than a standard A4/letter sized sheet of paper then you won’t need to worry about separating your graphic.
To begin I created a document slightly larger (by around 5cm/2″) than the face of my canvas, pasted my graphic on top then re-scaled it to fit nicely.
Note: For best results you want your graphic to cover the face of your canvas only, with a smidgen of overhang. I tried fully wrapping the sides of the canvas though thought it made the painting look fake.
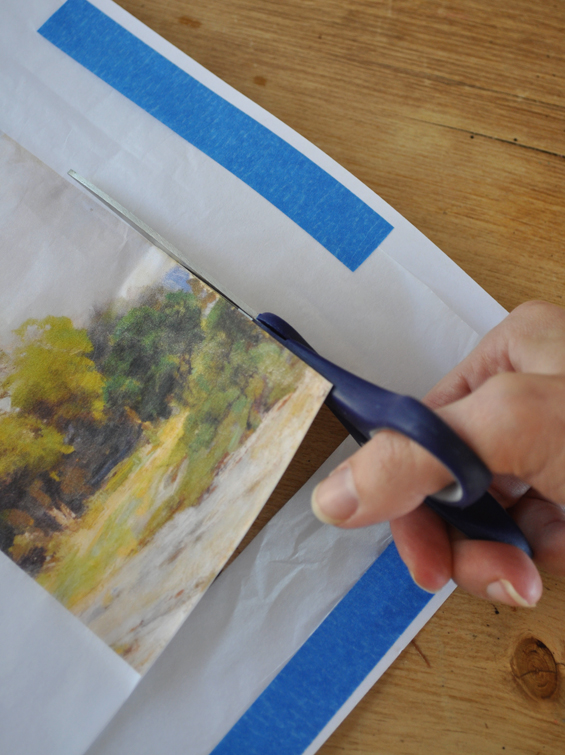
Next, I created a new document at A4/letter size and pasted the re-sized graphic on top. Of course, the graphic was too large so I cut a section off then re-positioned the remaining graphic centrally in the document before saving it.
Tip: I deliberately didn’t cut my graphic right in the center so if there was a visible join line it would be slightly off-set and less obvious.
Finally, I deleted the existing portion of the graphic, pasted in the section I had previously cut off and centered it on the document before saving it.
What I’m left with are two A4/letter sized documents, each containing a different segment of the graphic which, when combined, will make up one complete image.

STEP 2 Print your graphic
Cut your tissue paper to around the same size as your printer paper then tack both sheets together using masking tape. I find it works best to trim the tissue paper slightly smaller than the printer paper so that it can be securely tacked to the front of the paper. Obviously, just ensure it is still large enough for your graphic.
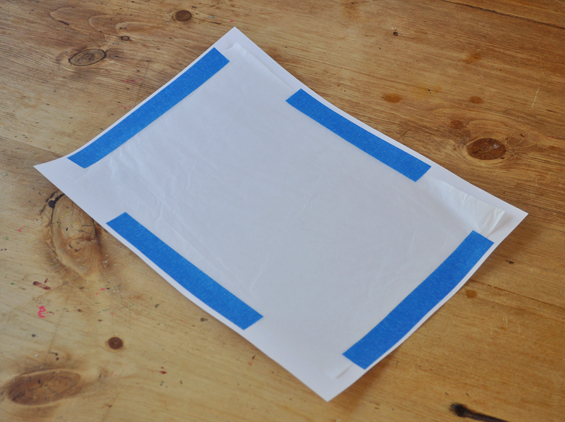
Tip: Ensure the tissue paper is as smooth and taut as possible to avoid ink smudges caused by movement.
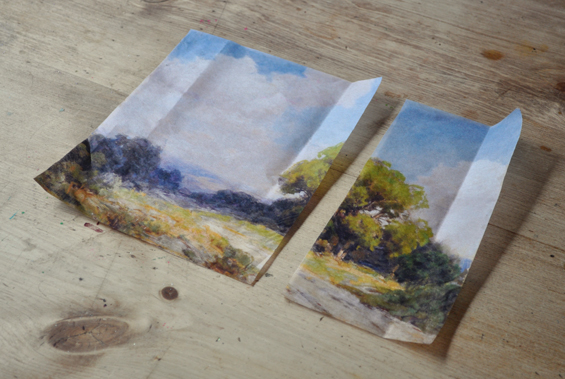
Print your graphic onto the tissue paper.
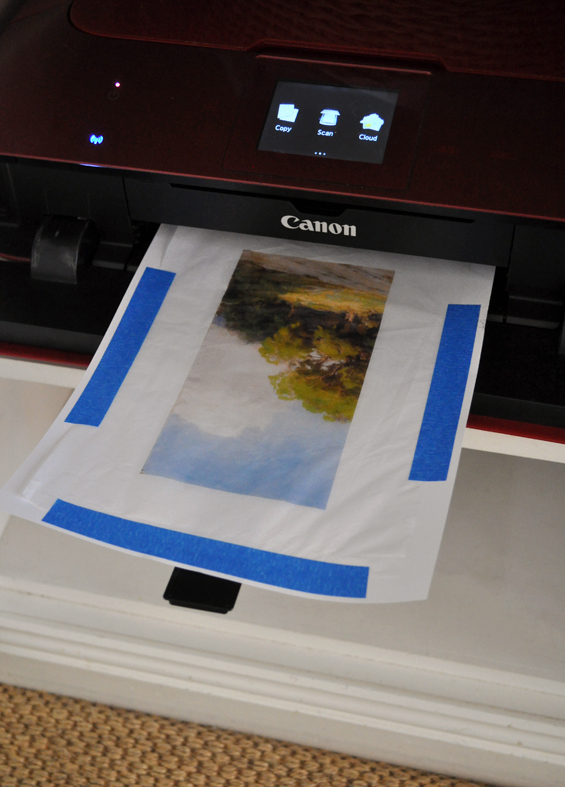
Trim neatly around the printed image.
Repeat with the second half of the graphic. You will have two segments of tissue paper which, once combined, will make up your image.
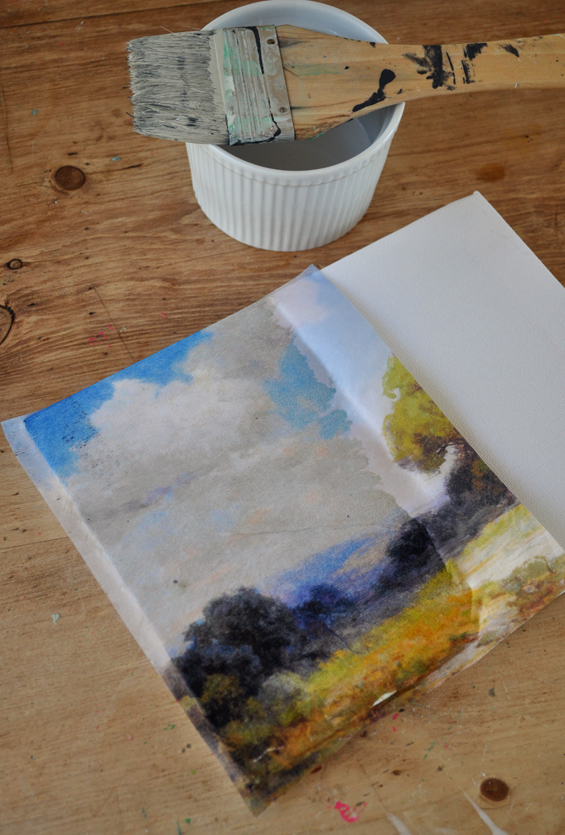
STEP 3 Attach your print to the canvas
There are two ways you can go about this. Both have their pros and cons…
A) This is the “eye” method. Apply some diluted glue to your canvas then simply eye the placement of your prints. This is quick though can also be tricky and imprecise. The tissue paper is quite flimsy so tends to bow and wave and once you hit the glue it’s really difficult to re-position the paper if you happen to be off-center or crooked as it deteriorates quickly on contact with moisture.
B) This is the “dry run” method. Lay your prints in place on the canvas and hold them in position with some light weights (you can use anything which isn’t overly large and will keep the paper in place). Lift one edge of a print then coat the canvas beneath with some diluted glue before pressing the tissue paper back down. Remove the weight and adhere the remaining portion of the print. Repeat with the second portion of the image. This method is a tad more lengthy though affords greater precision.
Either way, attaching the prints is a somewhat messy and fiddly process. You just need to play around until you get a good feel for it…and you can not expect or aim for perfection! There will inevitably be some creases and bubbles, some rips and tears and probably some ink run. Simply press down any creases and bubbles with your fingers until they ‘meld’ into the canvas and try to embrace imperfections as enhancing the vintage feel of the artwork. I love them!
Note: I tried using both neat and diluted glue. I found that a ratio of around 70 glue/30 water worked well. Neat glue can cause extra creases and is just harder to work with in general. Watery glue can over-saturate things causing the paper to tear easily and the ink to smear which adversely effects the crispness of the print.
Once the print is fully attached to the face of the canvas, fold down any over-hang and adhere it to the sides of the canvas. Don’t worry about the obvious line where the print ends. We’ll deal with that in the following step.
Note: You could try lightly spraying your tissue paper prints with some clear sealer prior to attaching them to the canvas. This should help seal the ink and prevent the possibility of excess smearing.
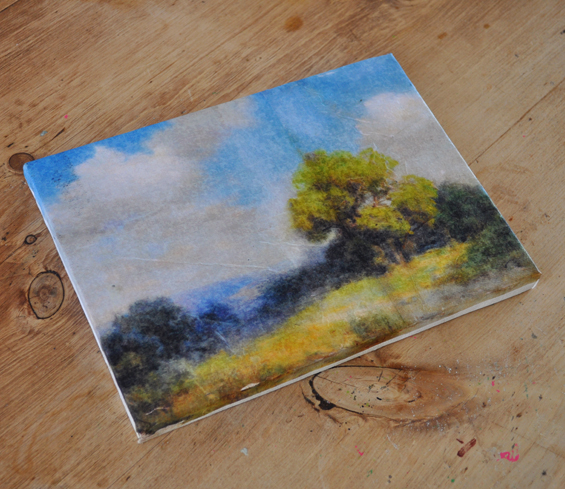
STEP 4 Sand the edges
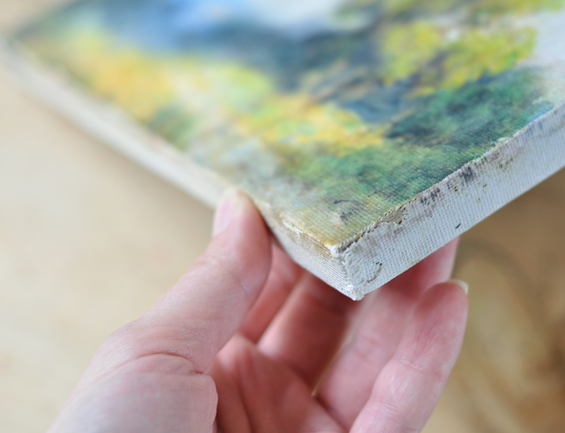
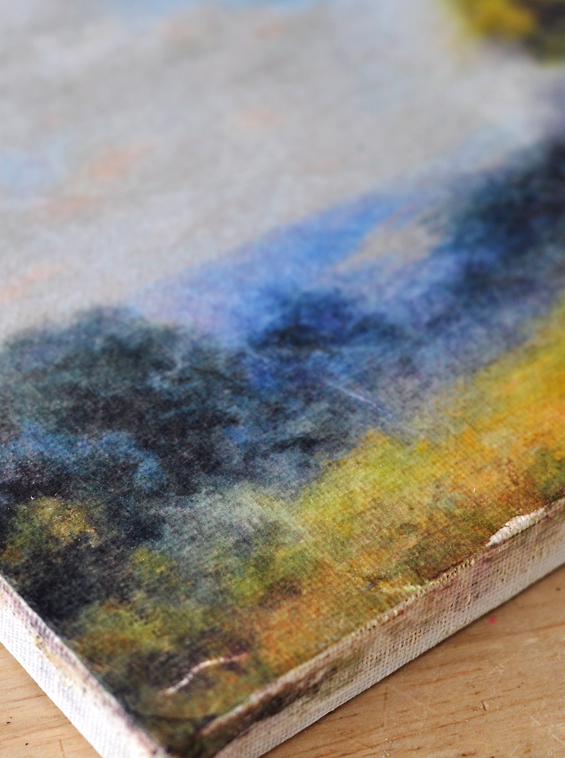
Once the glue is completely dry, sand the edges of the canvas to soften any obvious lines where the print ends and to create the impression of some wear.
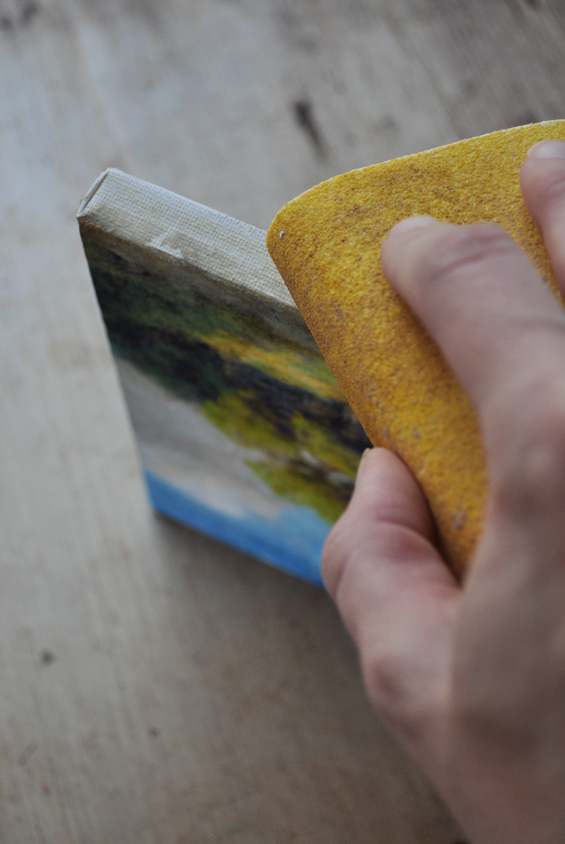
If you find it difficult you can dampen the tissue paper with some water. Don’t worry about leaving remnants of the print behind – you actually want some residue to provide a bit of character (genuine paintings on canvas often have paint around the edges).
You can sand as lightly or heavily as you like. I even chose to distress the corners of the canvas fabric itself.
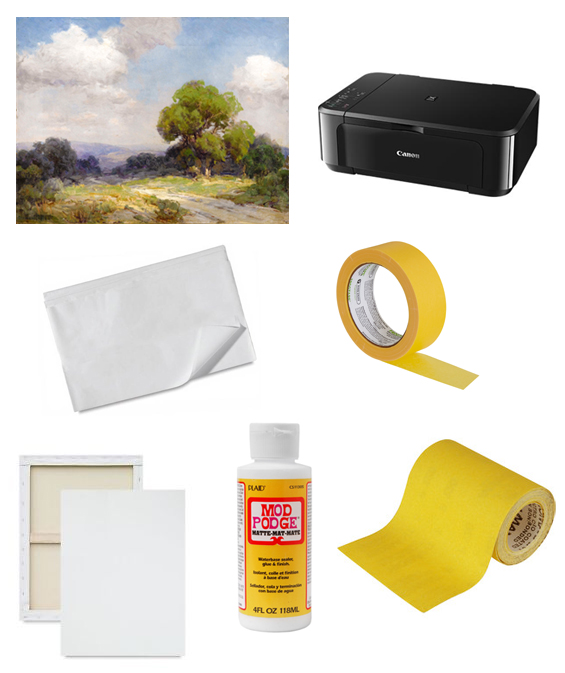
Doesn’t it look like a genuine old painting?
I know this worn style isn’t for everyone though I’m sure those of us who find it appealing can appreciate it.
You may even want to sand some areas of the face of the canvas to create an even more aged feel.
STEP 5 Done!
I am SO in love with the way this turned out!
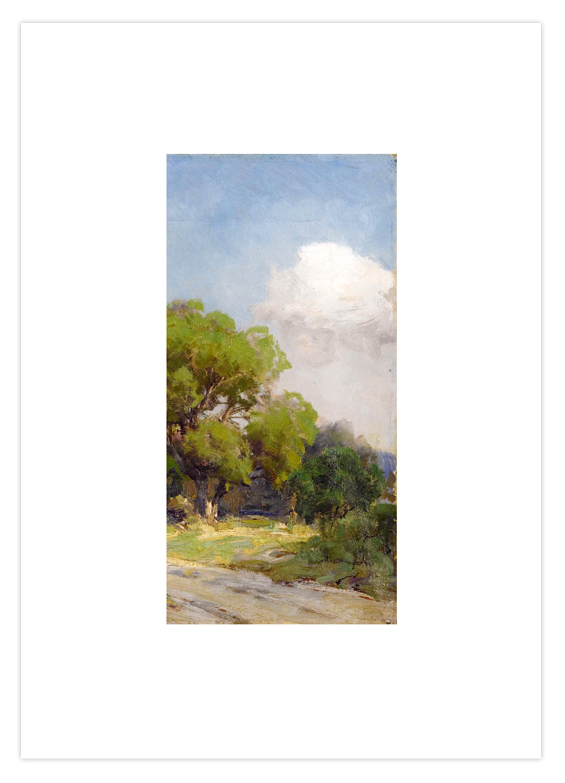
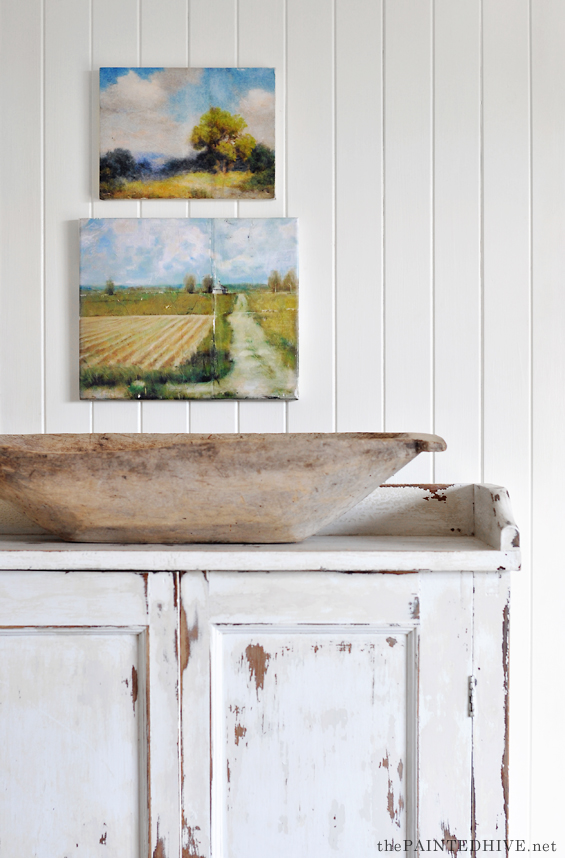
Here are close-ups of the actual finished pieces…
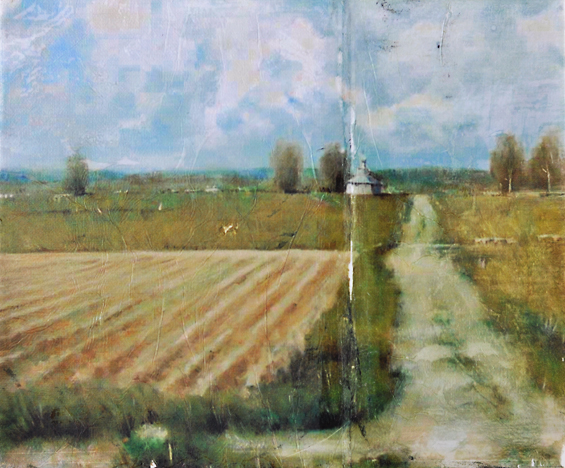
The resulting artworks are quaint, and charming, and unpretentious, and just feel good. And they cost under $10 each!
I especially love the way the canvas texture peeks through the tissue paper.
I tried to get a shot of the join though it’s so inconspicuous you can barely make it out.

Of course, this project is not intended to produce flawless looking results. There will likely be some wrinkles in the tissue paper, little white canvas patches here and there, perhaps some black printer ink residue, and, of course, a join line where the prints meet. Remember, these “faults” are all intentional, working together to bolster the vintage feel this technique is designed to produce. I like to imagine these canvases have been stored in an artist’s shed for years and years, their imperfections a testament to their old age.
I hope you like them and it helps inspire you. I know I’m feeling slightly addicted!
![]()


Thanks so much for this. I have been waiting to see and am not disapointed. So easy and so cool! You do the best stuff.
They look wonderful! Really warms up the wall. As always thanks for the details/steps broken out for those of us who would flounder without them. ;)
Thanks Deb. And you’re so welcome :)
Wow I love it Kristine. Thank you for all the details on creating these masterpieces!! : )
Thanks Julie :)
Love the look! I would like to try it with some old family photos. Did you sand the line on the one canvas to get the “worn” look? Also, I was curious as to how much the inks run into each other when applying the mod podge to an inkjet print???? I have a picture of old school house with my gr-Grandfather’s class our front, and also one of my Grandfather’s garage & gas station he owned and ran for almost 50 years. My son would like enlargements made to hang in his ManCave. This would make a wonderful gift for a Christmas present if I can pull it off.
Thanks much for the inspiration!
That would be such a cool idea :-)
Hmmm, if you’re planning on making quite big enlargements of the photos, I’m not sure this is the best technique. Printing companies will generally only use their range of stock papers which will likely not include tissue paper. So, unless you have a large format printer, you will need to print yourself using a standard small printer. This will mean having to connect several sheets of paper to create the one large image which might end up looking a bit patchwork-y (unless, of course, you like the sound of that!).
I might suggest looking into having the enlargements professionally printed straight onto canvas, or even just regular paper. You could then stretch the canvas yourself over a frame, place in a frame or maybe even attach dowels top and bottom to create a wall chart style hanging (kinda like what I did here: https://thepaintedhive.net/2013/11/christmas-advent-calendar-wall-chart-full-tutorial-with-free-printables/).
Of course, if you are only planning on enlarging the photos a little bit, then you could certainly try this technique.
Oh, and to answer your question, yep, I sanded some areas on the face of the larger canvas to create an extra worn look.
Have fun with it whatever you do. Sounds like a great project!
Oh also, yes, the ink does smudge a little bit which causes some detail to be lost. If you have access to a laser printer then it might work better (I don’t have one). Otherwise, you could try sealing the ink with some spray acrylic prior to attaching the prints to the canvas.
great project! Now I wish I had more old paintings around to practice on
Before I start a painting, I usually add a thinned, brown “base” color first, to mimic the look of linen. I think it might be fun to try for an even more antique feel!
Yes, that could work nicely :)
You can sometimes even buy stretched burlap or linen too.
Love the imperfections! Great idea of using old photos with this technique!
This is such a sweet technique. Thanks for the inspiration!
Thanks Verda. Glad you like it :)
How clever! thanks you so much!
Looks amazing!
I love the way these look and the technique seems amazing, although may be too much for my limited computer skills! You should make some and sell them! I’d be a customer,
who is the artist for the artwork? I love it!
Hi Kesha
They are from different artists. There are links in the post to the sources where I found them under the ‘You Will Need’ section :)
Cheers
Love this technique and can’t’ wait to try it. There’s a bunch of paintings I love in WikiArt but I can’t work out how to download them – any tips? Many thanks!
Just had a quick look. Seems like there’s no direct download. I’m guessing you need to use the old method of selecting the largest file size (and/or enlarging to full size), right clicking then selecting ‘save as’ to save to your computer. Will let you know if I work out another method :)
Many thanks – I’ll give that a shot! cheers.
continuously i used to read smaller content which also clear their motive, and that is also
happening with this paragraph which I am reading at this time.
Who would have thought that its result was pretty amazing? I’d love to have that also in my living room someday.
very cool. now i wonder how many people sell that kind of artwork as real lol
I know this tutorial is old, but I thought I’d a little hack that has helped me out. If using an ink jet printer to print your artwork, there’s an easy way to stop of the ink from smearing. Once the ink on the printed tissue paper is dry, try spraying it with “Workable Fixative” by Krylon. I’ve used this technique many times and it stops most, if not all, of the ink from smearing. You may need to use two coats of the fixative, making sure the 1st layer is dry before spraying on your 2nd coat. I’ve used this technique many times to print out my own decoupage papers. The fixative dries pretty quickly. Be sure to work in a well ventilated area. Hope this helps!
Thanks. Yes, I do mention this as a tip in Step 3, although I didn’t specify a particular product. I haven’t used Workable Fixative but will try it next time. Thanks again.
I just LOVE the look of this!