
If you caught my last post, you may have read that a “custom” bathroom vanity was included in the extension build contract, so we assumed we could request pretty much whatever we liked (within reason of course). My initial plan was to go with solid timber, so we could then choose to stain or paint it as desired.
However, we’ve since come to learn that there are a few limitations, mainly due to the fact the builder uses a cabinet-making company which focuses on producing vinyl wrapped MDF. There goes my solid timber idea!
Of course, we always had the option of forgoing the contractual inclusion and buying or commissioning something ourselves, though my parents weren’t fussed about making the most of what the builder had offered. And the fact is, we were never looking for some kind of amazing showpiece. We just wanted the vanity to be quite simple and classic. Plus, sticking with the vinyl wrap option is likely to be much more economical!
Also, if I’m honest, I don’t have a huge problem with vinyl wrapped MDF. It’s super common, durable and low-maintenance. The only real issue is that it does somewhat limit our choice of finishes, which is a bit of a shame.
So, not knowing exactly what our options were, mum and I visited the cabinet-making company a few days ago to look at swatches of the available finishes, and also see the range of door profiles.
We knew from the start we wanted shaker style cabinetry, and are currently tossing-up between these doors…
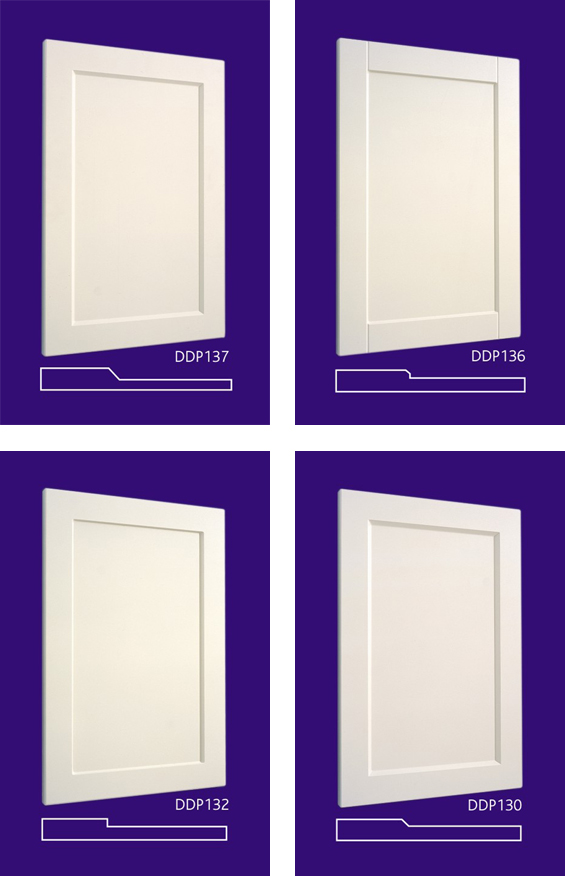
Do you have a favourite?
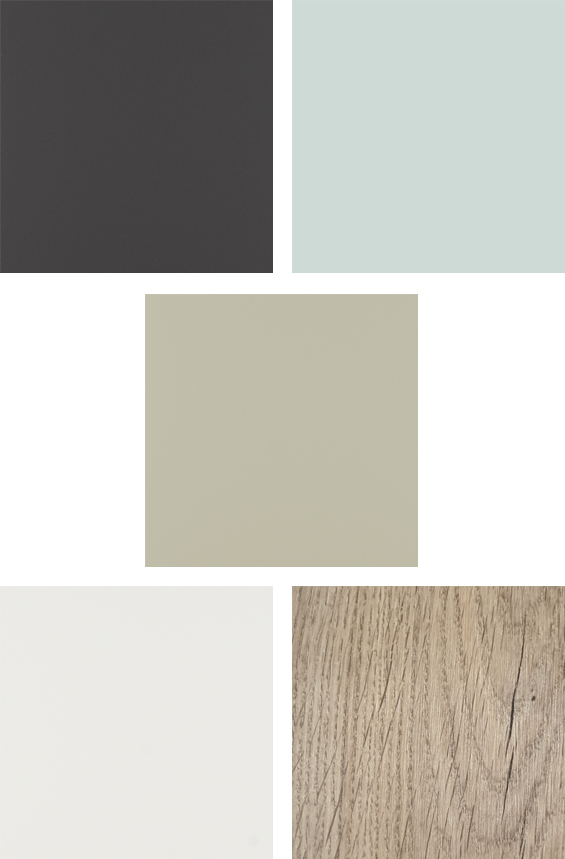
As for the finish, we didn’t want anything glossy, and mum was keen on charcoal, duck egg, taupe, white or a nice wood-grain.
If you’ve been following along you may have seen that in my previous renderings I’ve included deep green (which I adore but my parents aren’t fans of) and rustic mid-toned timber (which everyone seems to like). However both of these finishes aren’t included in the vinyl selection offered by the cabinet-making company.
In fact, the choice was pretty limited. Aside from white, which came in about one million variations, there was only really one decent option in each of our chosen colours. So, here’s what we’re working with…
And here they are in place in my rendering…
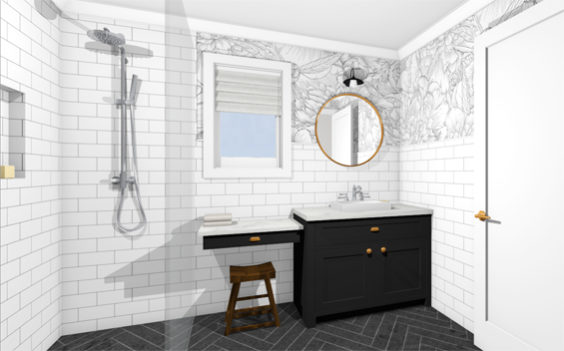
Personally, I like them all and there is really no right or wrong. It just comes down to personal preference. Still, we needed to make a decision (’cause I reckon it would just look weird having one panel of each!). So, here’s how we narrowed things down…
CHARCOAL | I love the depth and pop of dark cabinetry, though here with the floor it just felt a little too much. Generally, I like dark cabinets when they’re a stand-alone feature. Plus, it’s not an overly bright room so the charcoal won’t help lighten things up.
DUCK EGG | This is really lovely. I’m just a bit concerned that the pastel tint will define the vibe of the room (it’s a little bit coastal/vintage/feminine), and limit the potential to change the general feel in the future. It will also somewhat dictate the wallpaper we can choose.
TAUPE | Nice, warm and neutral. It’s nothing amazing though it’s totally inoffensive, yet a tad more interesting than white, and I do really like it.
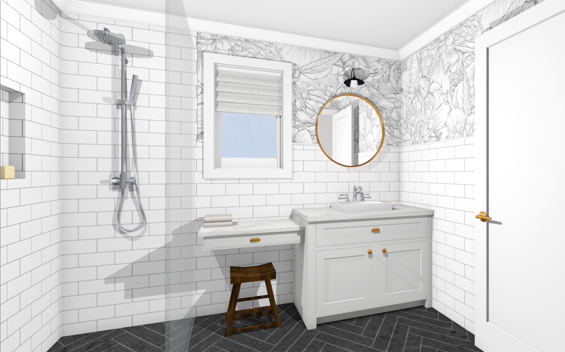
WHITE | You can’t really go wrong with white, but sometimes it can just feel a little ‘blah’. Don’t ya think? Still, a definite classic option which can be dressed-up if needed.
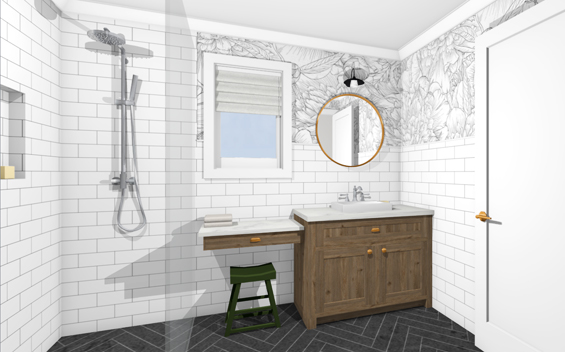
WOOD GRAIN | We’ve been leaning toward timber from the start, as a way of injecting some warmth and texture into the space, so this option did have a bit of an advantage. My main concern is that this is faux timber and whilst it looks and feels (it’s textured) great on the swatch, we haven’t actually seen it used over a large surface in real life – and faux finishes can be so risky! Considering this, I left the decision up to mum (that way I can’t be blamed if it looks crap!) and she was willing to take the gamble! Fingers majorly crossed!
So, it’s wood grain for the win!
The top will be Caesarstone (as specified by the builder) and we’ve already narrowed that down to 40mm/1.5″ Frosty Carrina, which has gentle ivory tones and subtle powdery veins.
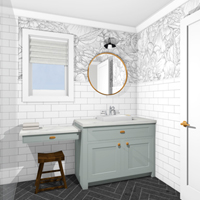
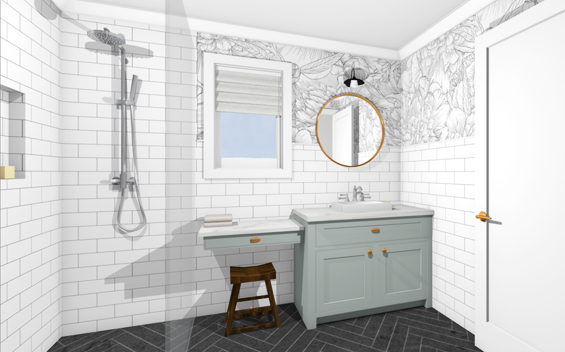
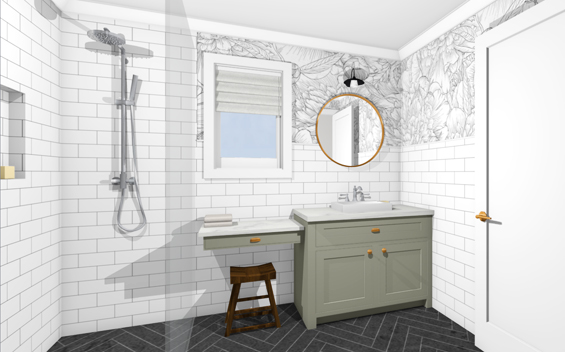
We’re still refining the overall design of the cabinet, but it will more or less be along the lines as previously shown – a faux upper drawer to conceal the basin and plumbing and a two door cabinet below with a recessed sunken make-up bench to the left.
Not sure if the bench can be floating at this stage. If not, we’ll need to add a panel to support it which is really no biggie.
Here are a few inspo images I found which incorporate similar-ish vanities…
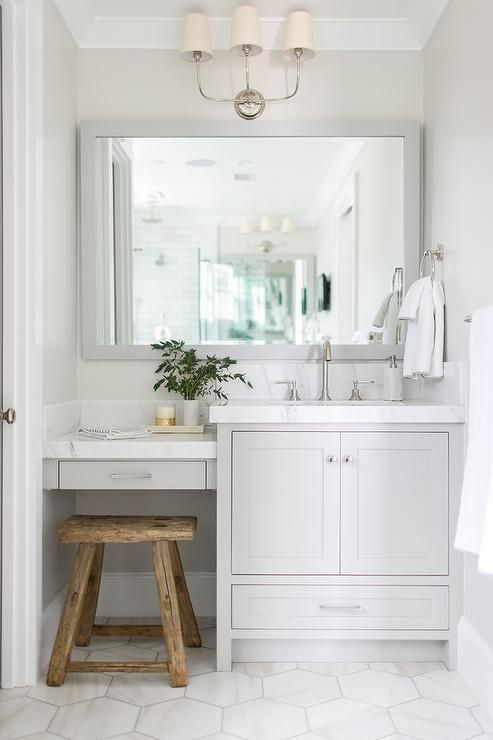
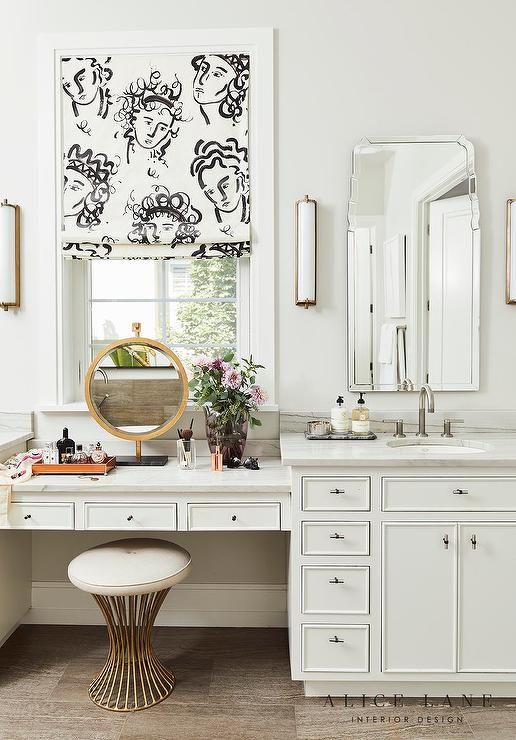

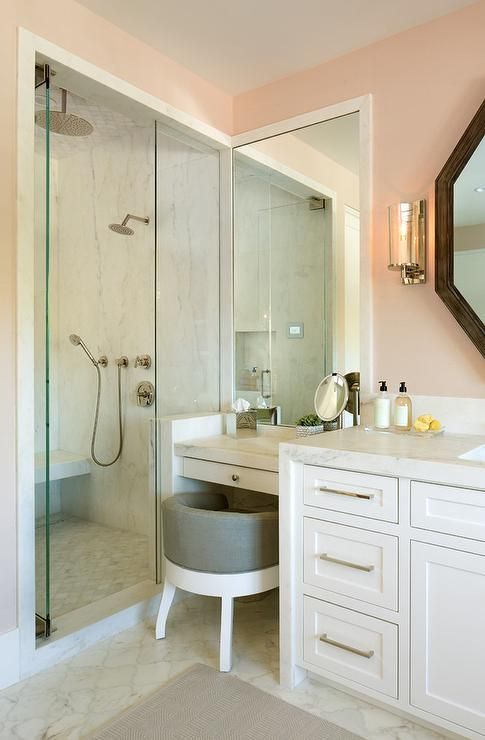
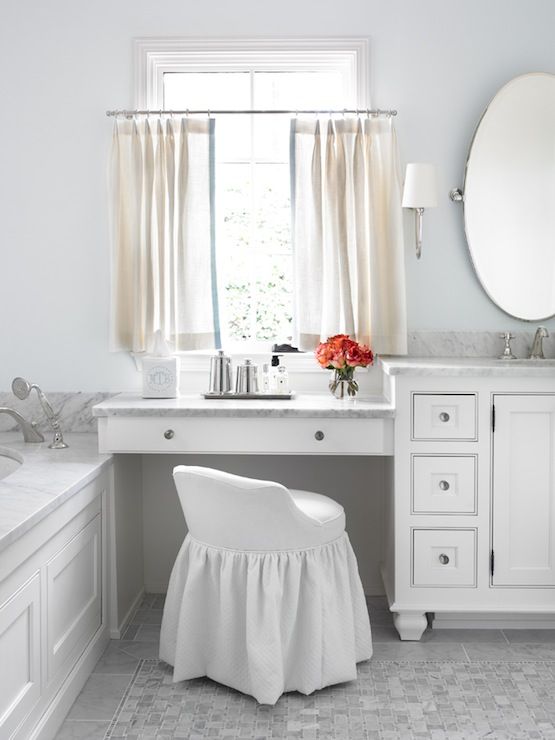
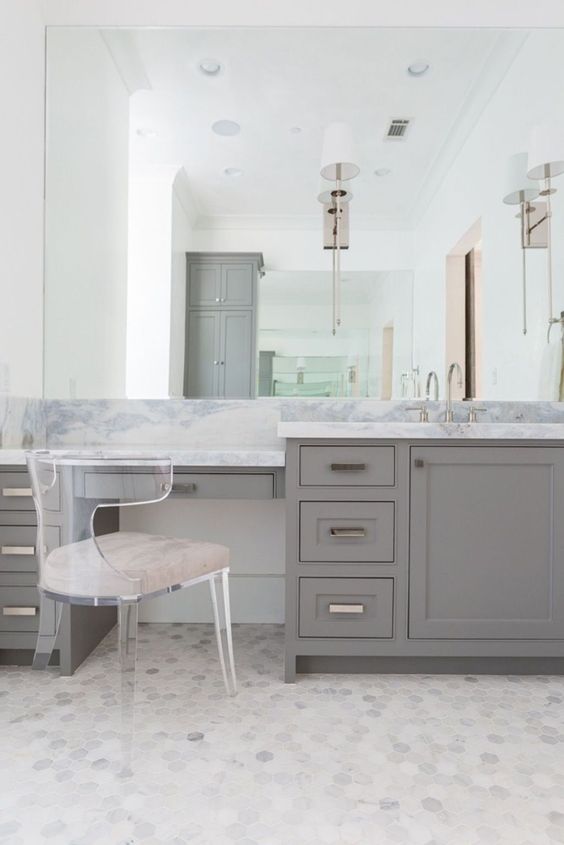
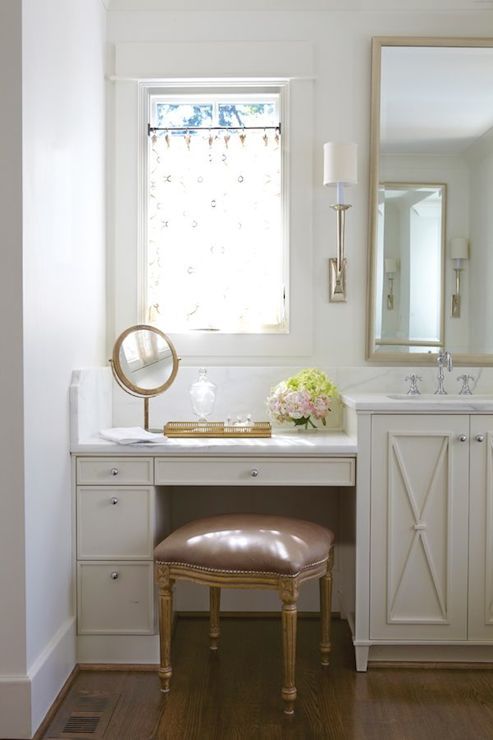
Not sure on the hardware yet. I do love the idea of brass however we’ll wait and see as the room comes together.
![]()
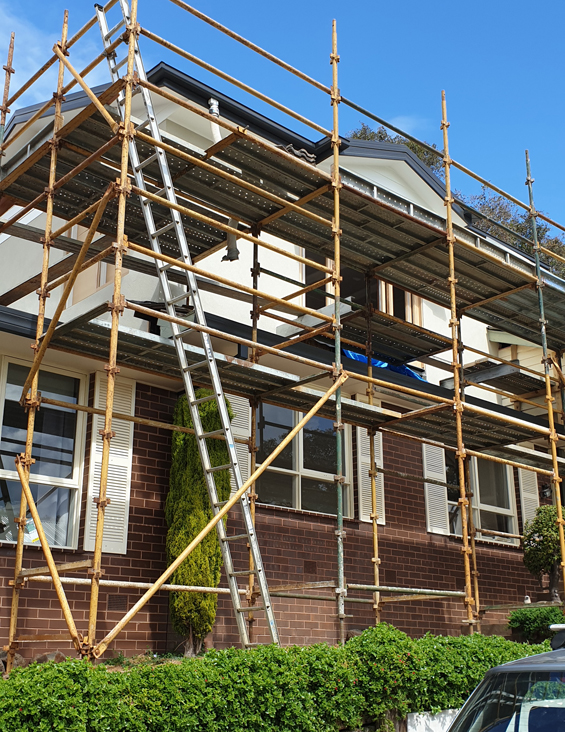
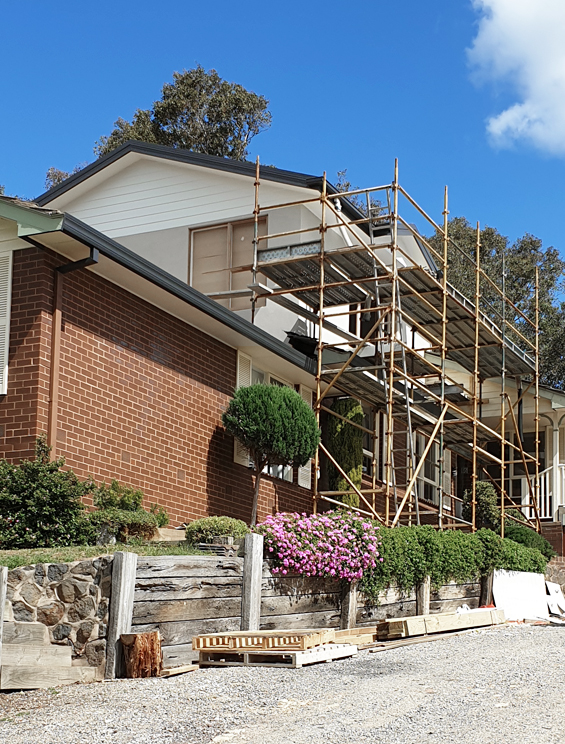
In other extension news, we’re almost at lock-up!
The final coat of render went on the exterior a few days ago and after some (okay, lots of) self-doubt, I absolutely LOVE the colour (Dulux White Duck). Sorry, it’s a bit hard to see here through all the scaff and with the sun shining on it.
Likewise, I’m also loving the weatherboards and eaves (Dulux Snowy Mountains Half) which dad has finished. The earthy white of Snowy Mountains Half works beautifully with the greige tint of White Duck, and the roof and gutters (Colorbond Monument) provide the perfect bold contrast.
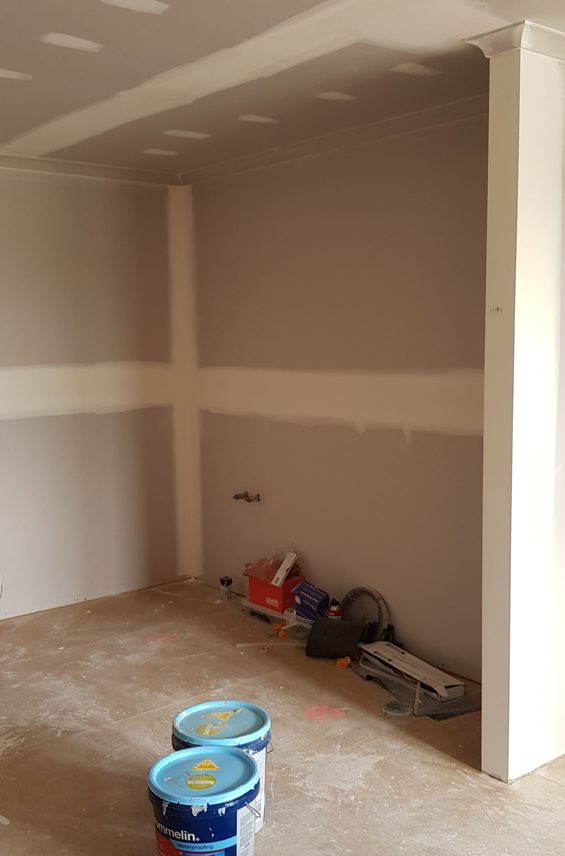
Inside, the plaster is up and the waterproofing is done!
Here’s the kitchenette (it’s a little dark because the windows are still sheeted up).
And here’s the bathroom.
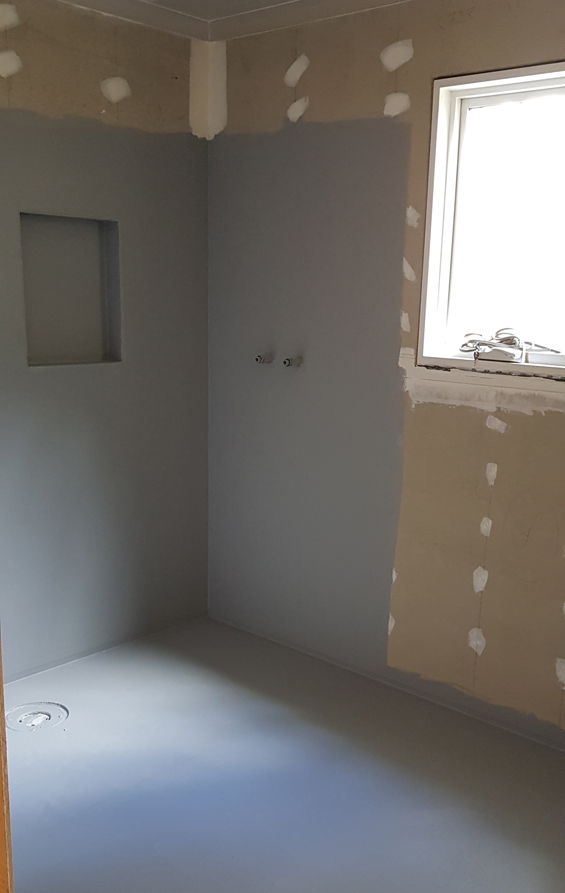
The glaziers will be installing the window glass tomorrow, and next week the tilers start!
Then onto the staircase and flooring – among other things!
Will be sure to share each stage as we go!
![]()


It’s coming together so well. Loving following along.
Thanks Diana :)
This is so exciting!
Can’t wait to see it come together!
Charcoal for me!
It is nice!
This is looking great. I like all of the colour choices – I think that the timber with the pop of emerald green looks lovely. Really enjoying watching the progress!
Thanks Leslie :)
What is the wood grain called? It looks very similar to our kitchen bench.
We have DDP137 profile doors and while I wanted traditional shaker profile mine don’t get as dirty and are easy to wipe clean.
We’re leaning toward 137 or 136 I think.
Although it might look similar, I doubt the wood grain is the same as your benchtop as this one is actually quite textured and better suited to vertical surfaces I imagine. It’s by Gislaved and is called Sebastian Oak.
What do you have? I couldn’t find any information about Sebastian Oak online. Couldn’t even locate a digital sample. The image in the blog post is a photo I took of the card from the swatch book. Was really hoping to be able to view it used on a larger scale. As things stand we’re kinda going in blind!
We have Egger Natural Halifax Oak. Ours is textured too. I can’t post a picture unfortunately.
Wow, that is really beautiful. Is it laminate though, not vinyl? The company we are using only provides vinyl wrap. That is so lovely.
Hello. One advantage of the wood-grain finish is that it won’t warp as would “real” wood do. I think it’s a great choice. The charcoal one is nice too. My vanity is in a dark wood-grain from Ikea and I added a small stool made out of real wood. Both add warmth to the room tiled with greige tiles. Our stool may be used as a small table for holding towels or to sit on.
Anyway, you and your parents have great taste!
Thanks so much. Fingers crossed it turns out looking as nice as it does on the little swatch!
There are good reasons to be wary of anything involving MDF. When wet, it can literally dissolve. I made the mistake of using an interior door (MDF core faced with luan) on a garage side entrance..After a few years, the bottom edge turned to mush. I saw a used bathroom vanity at Habitat that looked passable on the outside, but the interior bottom shelf had disintegrated due to a leak. (It was not vinyl clad.) As long as the vinyl cladding provides protection, it should be okay. I know it’s going to be a beautiful bathroom.
Yes, thanks for that. I’m aware that most composite timber materials don’t do well with water. These panels are all fully sealed and come with a 12 year replacement warranty so there shouldn’t be any issues. My kitchen cabinets (installed by previous owners) are laminated chipboard which don’t have sealed bottom edges so they have swelled and chipped, especially under the sink.
Looking forward to seeing it come together.
I liked #136 and am always drawn to Duck Egg blue paint. My favorite is the first one of your inspiration photos. I find after (waaay too many) years of re-dos that sconces that are on the sides of a mirror are so much better/friendlier than any over-the-mirror lights, which are always so harsh. I’m looking forward to the seeing more photos as it progresses..
Thanks Vikki. Yes, I agree about the sconces. Having them flanking the mirror was in our original plan though we only have 1 meter/3′ between the wall and window and we just felt that it would have made everything look a bit squished. There will be a ceiling light too, and of course the natural light from the window.
I love the blue and grey but also I liked a kitchen with a darker toned vinyl wrap years ago (about 2004) yikes! with a shaker profile and although the chocolate tone of it is probably dated now the actual doors looked nice and not overly pretend wood. you would think the technology has improved by now too. I think it had quite limited type “grain” which kept it from looking too fake and in a small dose in a vanity the repetion in wood grain you sometimes see would be limited. – so even better. It is hard to imagine without even a door sample, so I can appreciate it feels like it is a bit of a gamble.
Your kitchen and older cabintery probably didnt have to be made from moisture resistant MDF. – age dependant; The building codes more recently require a different type of melamine in the carcasses that should be more immune to water damage and swelling. Vinyl wrap is quite durable. I think it is also becoming more popular again as I saw a recent article where Neale Whittaker had used it in his kitchen ;-)
Yes, my kitchen is over 25 years old! The cabinetry core is particle board and, like I said, the base edges weren’t ever sealed which seems to have caused the issue. To be honest, I’m so over it I don’t even care anymore as the whole thing needs to be ripped out! The worse it gets the more justification I have to replace it! LOL!
Stunning Writing!! Keep up the good work.
I like the taupe color vanity. I just painted my lower cabinets in the kitchen a taupe/linen and I really like it. The color is warm, neutral, doesn’t show a lot of dirt and it warms up the kitchen. I think it would be pretty in a mostly white bath.
I love your design work and so enjoy reading your blog. Thanks for sharing it with us. One idea to consider is making sure that the electrical outlet by the bathroom sink is located on the side by the floating bench, so that a person can sit there and use a hair dryer or a straightener without the cord running across the sink.
Thanks so much. We have actually positioned an outlet inside the vanity so it’s not visible. Should be pretty easy to access from the vanity itself and the make-up bench.
Why can I not see the name of the white paint you chose for the bathroom cabinets? It looks like an off white taupy color. Please let know the name.
The white shown in this post wasn’t a specific colour. I was just representing the kind of colours we were looking at using. In the end we chose wood grain for the vanity.
What software do you use for your rendering?
It’s Chief Architect software.