Update: Check out my complete distressed coffee table tutorial here.
I’ll be the first to admit I’ve been a very, very bad blogger of late (tist, tist to me).
And whilst I wouldn’t be surprised if due to my month long hiatus there’s no-one still around here to actually be reading this right now, just in case there is, I’d like to beg forgiveness (pretty please?).
Thing is, I’ve now got just a few weeks of ‘real’ full-time work left before I begin TWELVE WHOLE WEEKS of leave prior to the baby bundle coming along and boy is my decorating ‘to-do’ list chockers!
Soooo, this means once the un-fun stuff finally starts to slow down I promise to make it all up to you. And for those who thought I’d dropped clear off the face of the earth I just wanna clarify that my intention is to keep blogging as long as I have something interesting enough to share.*
(*Disclaimer: Level of interest may be subject to reader’s enthusiasm for interior decoration :-)
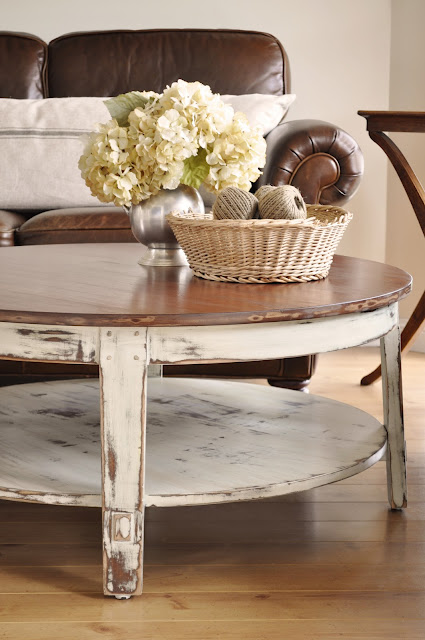
Anyways, to begin my attempt at redemption I thought I’d share a coffee table makeover.
You may remember how I wrote about our new living room sofas and some associated impending updates. Well, I was originally looking for something a bit out-of-the-box and industrial in style for the coffee table though when I spotted this gem on eBay for just $25 I couldn’t say no.

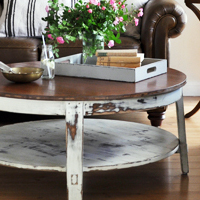
Given the unorthodox shape of our living room I’d always liked the idea of something round and when I put this table in place (aside from everything being all too ‘brown’) it was just right.

A mini makeover to create some character and break-up the ‘blahness’ was all it needed so I painted the base white before heavily distressing it (by hand using a sanding block) then glazing and sealing it in one step (using a mixture of acrylic sealer and burnt umber craft paint).
The top was sanded back to raw (using an orbital sander), scuffed up just a little bit with a prick punch, hammer and heavy steel chain then stained walnut before being sealed with one coat of danish oil. Over time the danish oil will mellow and leave a lovely natural soft lustre.




Kristine I had wondered where you were! I came here the other day thinking maybe there was something wrong with my email delivery. Glad to know you were just on a break. Love the round coffee table…be nice for baby with no sharp edges :)
Just yesterday I too was thinking I hadn’t seen a post recently. Congrats on your new impending arrival/addition to the family. I’m not pregnant, but you’re putting me to shame with tackling your to-do list. I know I still look forward to your new posts.
I love the round one. It adds an extra oomph to the room.
Oh I love how it looks right now!
Very nice job;)
Lovely greetings…
Please enter my giveaway;)
http://pudel-design.blogspot.com/2011/02/my-first-giveaway-ever.html
ewh!…Nice coffeetable…the shelf is so great for stuff!
So excited that you are having a baby!
Wow there’s no comparison. The new one wins hands down! The old one looked too large for the space… then you paired it with that new brown leather – yummy!
Michelle
New England Style
Love the table makeover…looks great!
I LOVE the way your coffee table turned out! Looks great!
Im torn between the old and the new, i LOVE them bothe!…..Bonnie
I love it, you did a really nice job! Aaand you’re cooking up a baby?!
congrats too.
Wonderful job on the table!!
I LOVE this table! In fact I saw it featured at P&P and kept scrolling back up to look some more then I found your link over at the painted hive and had to come check it out! I just got new sofas nearly identical to yours and have been wanting a round table. This would just complete my set!
Ooops! I meant to say I found your link at BTPF!
This comment has been removed by the author.
Oh wow! It looks great! I like the drawing of the lay out. Definitely the round seems to work better for flow.
BTW, the legs of the previous coffee table are delicious!
Yanet of 3 SKBs
I love the coffee table. It turned out really beautiful. I’ve been thinking about a round table for our very squarish room. Thanks for the inspritaion.
P.S. I gotta Tweet about this project.
Terrific transformation! Love the paint finish, and the shape. And for $25? Score! Thanks for sharing.
Now that’s what I’m talkin bout.
Your new table is awesome!! So shabby chic!
I love the makeover.. the table itself looks amazing.. and fits in perfectly with your lounge.. great job! take care, Maryann
Love how the table turned out. I found you at My Romantic Home, I have a party on Wednesday and would love it you would participate. http://typeadecorating.blogspot.com/ Thanks Tammy
It looks amazing- I love the round table in your space! :)
Fab job… and I love your new couches.
Just wait ’til that baby is out and about – somersaulting off chairs behind you as you blog and spilling your paint while you DIY… Oh joy!
bloody best table makeover I have seen… ever!!! Wow!
LOVE what you did! Great job and thanks for sharing how you did it :-)
Loving it!
You have a good “After” eye! I was looking and looking at the eBay “Before” photo and didn’t see much past the dark wood. You did an excellent job with your vision and completeing the transformation!
no worries! Life definitely has a way of getting IN the WAY, and blogging has come second (or fifth, or 100th) in line. Love this transformation! -diane
http://www.sweeteuropeandreams.com
Love the table! Can’t wait to see nursery updates! :)
Ok, I am soooo loving that table redo. Fabulous job!
Linda
Hi Kristine, so very glad you are back..we have missed you. Loving the new sofas and table. I guess your counting down until you can finally take a break..enjoy it while you can! XOX
Oh, I really like your new table! It’s perfectly shaped for your layout and goes great with your new couch. And your redo took it from ho-hum to aweSOME!
Midge
this table is great and I love a lot of distressing. It turned out super
I love it! I’m going to try the Danish stuff! I did a coffee table you’ll have to check out my blog!
Take care and God bless! Welcome back to blogger world!
Hi, Kristine! I do believe you will always post something I will enjoy! Love your new table! It turned out beautifully!
aH-mazing! Guess who has a round coffee table that is in need of makeover desperately and you have provided just the inspiration needed! Thank you so much!! Have a fabulous weekend!
That is a fantastic makeover!! Looks like a Costco Table that you transformed into a true antique. You are so talented!
What a beautiful transformation. I just found you at Centsational Girl. The new table looks great and the round is perfect for the spot!
Marianne :)
I have fallen in love with the new one too! I’m trying to find a round coffee table for my living room also. I absolutely love what you did with yours. So pretty!!!
I adore everything about this! I’ve been thinking about brown leather, and I LOVE the coffee table. And the art. All of it, really. :)
What a beautiful makeover!! I love everything about your table, including the little arrangement on top…mine isn’t as nice to begin with but it will be getting a similar makeover asap now :) Gorgeous pics.
I “knocked off” your lovely coffee table here: http://redhenhome.blogspot.com/2012/01/painted-hive-coffee-table.html
Someday I hope to do the same with your gorgeous map coffee table…I love it!
It looks amazing and the new sofa is to die for! All the best with the new arrival. Cheers SpecialK XoXo
I picked up a little coffee table today from the local thrift shop and am planning to do something similar to this! Thanks for the inspiration!
What a great ebay find! I love the distressed legs, seriously considering this for my coffee table makeover! Excellent job!
I wanted to stop by and let you know that I’m featuring it on Friday’s Fabulous Furniture Finds today! If you have a minute please stop by and check it out!
http://chase-thestar.blogspot.com/2012/05/fridays-fabulous-furniture-finds-4.html
Blessings! Barbara @ Chase the Star
I just found your blog! I did a google image search for DIY round coffee table and the image from this post came up. I’m actually looking to used a low round table for my daughters playroom. . . I got sucked into your blog. Love all of your furniture makeovers! So inspirational. I’ll be back!
Just discovered your blog and I’m thrilled to find there are people out there just like me lol. Keep up the good work.
Hi, can you tell me the mixture of the Acrylic Sealer and the Burnt Umber craft paint? How much did you use of each and what were the product names? I purchased an old desk and took the top off so I could have just the drawers and then I’m going to build my own top and fit it in my closet. I have already painted and distressed the drawers and it looks GREAT but I would like to “finish it off”. I hope to post a pic to you when I’m through. Thanks for the help :)
Hi Mary
From memory I used Cabots acrylic sealer and Jo Sonja craft paint. I mixed around 1/4 teaspoon craft paint into half a cup of sealer though you can always experiment with the quantities until you get it right. You can test it on a painted scrap of timber.
Good luck. I’d love to see a pic of the finished desk. It sounds cool.
:-)
Love this! What was your sealer/paint ratio on the white paint?
Hi Amanda
I used just a dash of burnt umber paint in my acrylic sealer. Maybe 90 sealer/10 paint. Though if you find this is too light just add some more gradually until you get the tint you’re after.
Kristine