Update: Check out my complete distressed coffee table tutorial here.
I’ll be the first to admit I’ve been a very, very bad blogger of late (tist, tist to me).
And whilst I wouldn’t be surprised if due to my month long hiatus there’s no-one still around here to actually be reading this right now, just in case there is, I’d like to beg forgiveness (pretty please?).
Thing is, I’ve now got just a few weeks of ‘real’ full-time work left before I begin TWELVE WHOLE WEEKS of leave prior to the baby bundle coming along and boy is my decorating ‘to-do’ list chockers!
Soooo, this means once the un-fun stuff finally starts to slow down I promise to make it all up to you. And for those who thought I’d dropped clear off the face of the earth I just wanna clarify that my intention is to keep blogging as long as I have something interesting enough to share.*
(*Disclaimer: Level of interest may be subject to reader’s enthusiasm for interior decoration :-)
Anyways, to begin my attempt at redemption I thought I’d share a coffee table makeover.
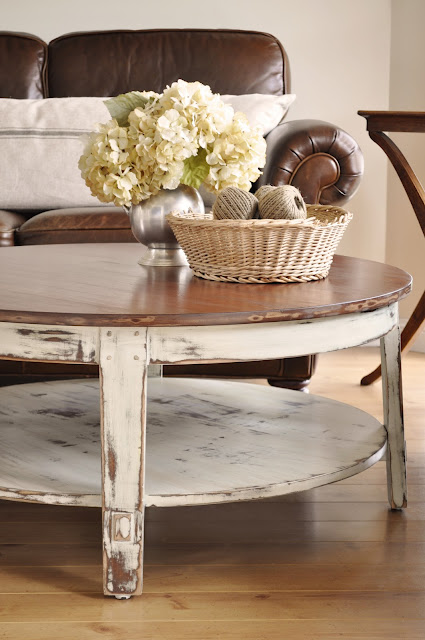
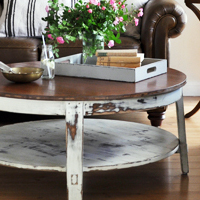
You may remember how I wrote about our new living room sofas and some associated impending updates. Well, I was originally looking for something a bit out-of-the-box and industrial in style for the coffee table though when I spotted this gem on eBay for just $25 I couldn’t say no.

Given the unorthodox shape of our living room I’d always liked the idea of something round and when I put this table in place (aside from everything being all too ‘brown’) it was just right.

A mini makeover to create some character and break-up the ‘blahness’ was all it needed so I painted the base white before heavily distressing it (by hand using a sanding block) then glazing and sealing it in one step (using a mixture of acrylic sealer and burnt umber craft paint).
The top was sanded back to raw (using an orbital sander), scuffed up just a little bit with a prick punch, hammer and heavy steel chain then stained walnut before being sealed with one coat of danish oil. Over time the danish oil will mellow and leave a lovely natural soft lustre.




What kind of white paint did you use for this project? Acrylic? Oil? Latex?
Thanks! Jim Bongalis
Hi Jim
I just used standard acrylic wall paint.
Kristine
H! I stumbled onto your blog and really like it. I’m new to all this refinishing stuff and I’m having a little trouble understanding all the different terms and products. yikes.
I have an old ethan allen chair that i’d love to something similar to (as your coffee table). What is the difference between (and when do you use what) a wax, seal and a glaze??
Hi Janice
When you say you’d like to do something similar to your chair (as my coffee table), do you mean the table top (stained and sealed) or the table base (painted, distressed and glazed)?
Kristine
The table base!
Hi Janice
Depending on the use of your furniture (ie. high traffic/decorative), what paint you use to finish it and the level of protection you want it to have, a seal coat may not always be necessary.
Essentially, sealers are transparent or tinted top coats designed to protect and/or enhance the finish of a piece of furniture.
There are many variations of a basic glaze, wax and sealer though in general when used over paint:
Glaze – a slow drying, tinted liquid sealer which creates a subtle antiqued effect with some sheen.
Wax – a transparent or tinted paste which creates a subtle lustre. Needs semi-frequent re-application.
Sealer – a hard-wearing transparent liquid sealer which can have a glossy or satin finish. Can yellow over time.
Deciding on a top coat, or none at all, is pretty project specific. Lately I have been finishing most of my furniture with reasonable quality low sheen acrylic wall paint which I generally don’t seal at all (when you think about it, we don’t seal our walls, do we). And most of my furniture is distressed or vintage so I don’t worry too much about little chips and scratches here and there. I finished my coffee table base with a glaze because I wanted to give the painted finish a bit more depth of colour and a slightly aged appearance.
Clear waxes are great for creating an almost invisible protective finish over paint. Tinted waxes create a soft antiqued effect.
Poly sealers are great over darker colours, particularly if you want a glossy sheen. I generally wouldn’t recommend them for light colours as they do yellow over time (you may be able to find a non-yellowing one if you ask around).
Sorry this information is a bit general though there are so many factors to consider – the topic really deserves a whole blog post!
If you have a specific question please don’t hesitate to ask and I’ll do my best to help :-)
Kristine
Thank you so much. This is very helpful. I think i’ll try the glaze on my chair. I have a frame I’m working on too, so maybe i’ll play around with the wax on that one. I understand wax isn’t great in high traffic areas and since i have an almost 4 year old and almost 1 year old, something hanging on the wall might be safest. ha! Thanks again.
oh i do have another questions when you have a minute. So..when i’m sanding i notice you can see scuffs around the actual part being sanded. In other words, you can see where i sanded but didn’t apply as much pressure. Is that something that just happens? Does it sort of get “buffed out” with the glaze or other finish you put on? You don’t notice it unless the areas are in the right light…
Hi again Janice
Are you referring to sanding the paint during the distressing process? If so, I think I know what you mean – the paint is more matte and slightly duller where the abrasion hasn’t completely penetrated down to the timber. This is just something that happens though as a distressed finish is purposely imperfect these inconsistencies should not be detrimental to the end result, adversely they should actually enhance it. Regardless, scuff marks do tend to ‘blend in’ more once a glaze is applied.
Kristine
great! thanks again!
goodness! Another question! after sanding, the paint is a little peely in spots. are there any tricks or solutions for that? Does glaze smooth them out?
The glaze will smooth peeling paint to some extent though to remove it completely try giving it a gentle polish with some fine steel wool first. Steel wool is awesome for a super silky finish.
I would love to find a table like this. Do you know the height?
Hi Lacie
It’s around 45cm (standard coffee table height).
Kristine
Your table is absolutely stunning. I have a similar one without the bottom shelf, so I am going to give it a go. Thank-you for the tutorial!
Merry Christmas millana
Awesome Millana. I bet it will look lovely :-)
Merry Christmas!
What kind of paint did you use? And what is the ratio of acrylic sealer & craft paint (oil based?)? Love it!
Hi Renia
The white is simply a standard acrylic wall paint. For the sealer I started with a few drops of acrylic craft paint in around 3/4 cup acrylic sealer. I tested the colour then added more craft paint as required until I was happy with the depth of tint. Of course, it depends on the size of your piece as to how much acrylic sealer you will require.
Hope this helps.
Beautiful! What kind of white paint did you use?
I found your tutorial, I’m good! Can’t wait to try this. Thank you.
This is such a good idea Kristine. You’ve inspired me to try a bit of DIY on my coffee table.
What paint did you use to paint the base? Latex? Flat vs eggshell vs semi gloss? I want to improve a table I have. Thx
From memory it was just regular low-sheen acrylic wall paint but I sealed it with a glaze which consisted of clear water-based poly and a smidgen of burnt umber craft paint.