

Some of you may remember, a little while back I posted a tutorial for DIY waterslide decals.
Among other things, I mentioned how awesome they are for creating custom embellishments without the need for any fancy-pants equipment. Yep, waterslide decal paper is a truly fab product, though as great as it is, there is one drawback – although it’s somewhat tough it’s not especially durable. So, whilst it’s perfect for ornamental purposes, it’s not ideal for more practical applications…until now that is!
Magic decal coating paper is a product designed to be used in conjunction with standard decal paper to make the finished transfers super durable – yes, even dishwasher resistant!
If you’re already familiar with magic decal coating paper then please excuse my tardy excitement, though for everyone else who is just getting to the party now too, feel free to start throwing the streamers!
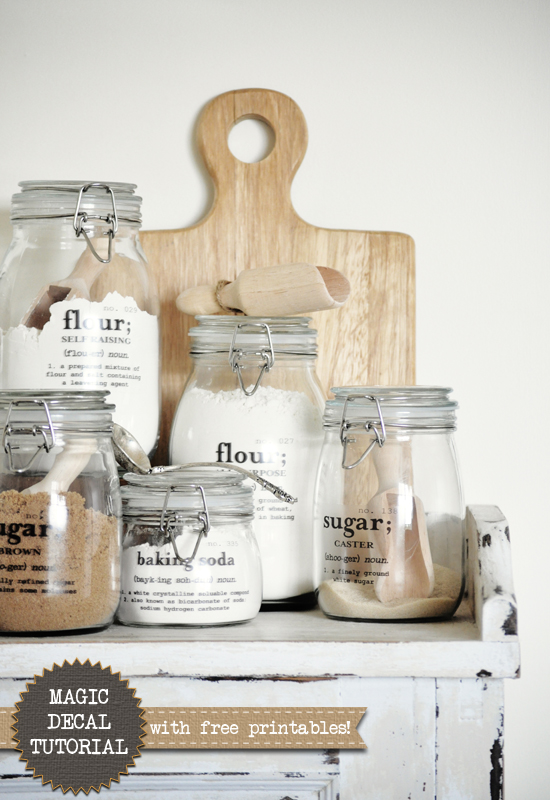
My recently acquired assortment of SLOM jars from IKEA were awaiting some DIY craftiness and seemed the perfect candidates for my first magic decal experiment.
As there may be several brands of magic decal coating paper out there, each with slightly differing application requirements, for clarity in this tutorial I will specifically pertain to the particular product I used which I attained from here. The paper seems a little pricey though you can create several decals from one sheet so in reality the individual decals are actually quite inexpensive.
The paper I received came with three sheets of waterslide decal paper (distinguished by a blue watermark on the back) which you print your image onto, and three accompanying sheets of the magic coating paper (distinguished by attached translucent protective paper).
GATHER YOUR SUPPLIES
1 Image to transfer.
Use anything you like. I made up my canister labels in Photoshop though a standard publishing program would be fine too. I wanted them to be a bit different and quite typographic so decided to style them based on dictionary definitions (my artwork is attached as a free printable if you would like to use them – see the ‘At a Glance’ section at the end of the post to view and download!).
2 Printer.
You can use either a laser or an inkjet printer. The decal paper comes in two varieties, designed specifically for the type of printer you plan to use. Just make sure to purchase the right paper for you. I used an inkjet printer.
3 Decal paper (blue watermark on back).
Decal paper comes in clear or white. I’m using the clear paper because I want a transparent background around my image.
4 Magic paper (attached translucent protective paper).
5 Laminator.
Basic laminators can be bought for around $15 from most office supply and department stores.
6 Scissors.
7 Water.
8 Soft cloth.
9 Item to embellish.
As already mentioned, I’m using my plain SLOM jars from IKEA.
10 Microwave, oven or hairdryer.
THE PROCESS
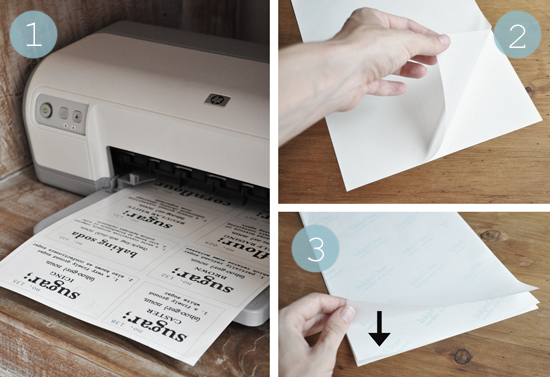
1 Print your image onto the glossy side of your decal paper (DO NOT mirror your image). Allow to dry thoroughly. I created my canister labels in Photoshop and have attached them below as a free printable (see the ‘At a Glance’ section at the end of the post to view and download!).
2 Separate the translucent protective paper from the magic paper. Do not throw the translucent paper away.
3 Place the magic paper gloss side up on your table. Lay the decal paper printed side down on top of the magic paper. Place the translucent protective paper gloss side down on top of the decal paper (the translucent paper is designed to act as a protective barrier of sorts between the decal paper and laminator heat).
Note: As my image took up the entire sheet of decal paper I did not need to trim around it first. If you are working with a smaller image you may wish to cut roughly around it with scissors.
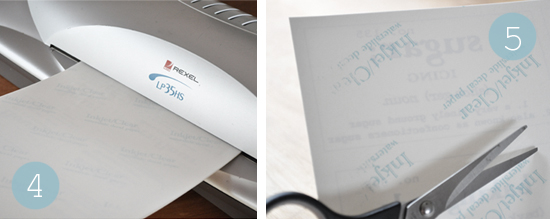
4 Laminate your stack of three papers on low speed and at low temperature.
Note: Laminating pouches are not needed. Laminating is performed to fuse the decal paper and magic coating together. Basic laminators can be bought for around $15 from most office supply and department stores.
5 Discard the translucent paper. Your decal paper and magic paper should now be fused together. Trim closely around your image – you can see it quite easily through the paper if you hold it up to the light.
Note: By nature, waterslide decals have a very fine, slightly translucent carrier film. On close inspection this will be visible on completed transfers. As my image is text alone with no border I experimented with techniques and found the neatest finish to be a nice even box (trying to mimic the outline of the text just looked messy). If your image has a distinct border then trim approximately 2mm all the way around it (leaving a small buffer ensures you get a good seal).
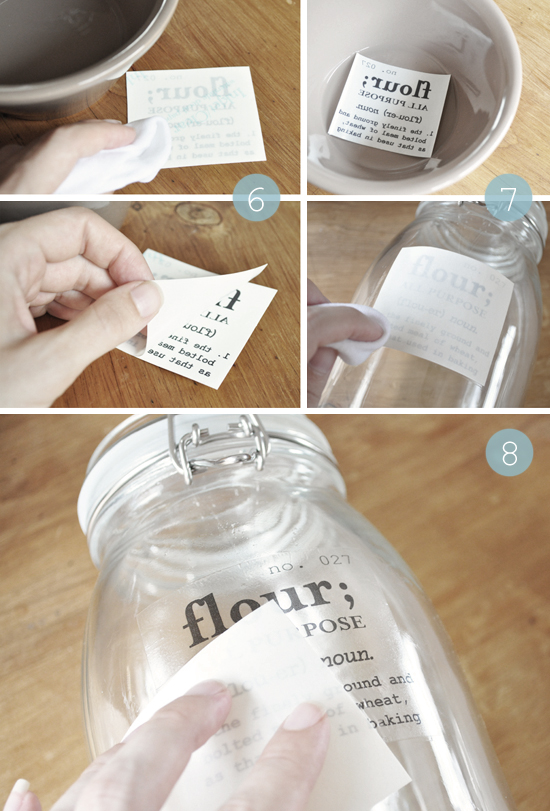
6 Dampen the back of the decal paper (watermarked side) with a cloth until it becomes translucent. Wait around 15 seconds then gently peel the paper away completely.
Important: Ensure you remove the watermarked decal paper only at this stage.
7 Immerse the decal in a shallow dish of water to dampen the other side then position it, image side down, on your item, smoothing it down with your fingers and a slightly damp cloth to remove excess water.
8 Carefully slide off the backing paper and manipulate the decal into its exact position then continue to smooth it until it is water and air bubble free.
9 Finally, set the decal by either:
Baking in an electric oven for 8 minutes at 150 degrees celsius.
Cooking in a microwave for 5 minutes on low.
Blowing with a hairdryer for 5 – 10 minutes.

Although I was hesitant, I did find the courage to run these babies through the dishwasher (twice, just to be certain) and they didn’t show any signs of distress. I was honestly AMAZED! Of course, given I have only had them for a few days I can hardly vouch for their longevity so advise hand washing for frequent use.
As I mentioned, there is a very faint translucent background (which is the case with waterslide decals) though once the canisters are filled it’s barely noticeable. You could choose to use basic clear stickers in place of decals. Just be mindful they will not be as durable and their border and background will be more visible.
I am super stoked with how these turned out – absolutely love! Don’t forget to download your complimentary printable sheets of labels below!
If you’d prefer the labels without the work you can now buy them in easy ready-to-apply format from my little on-line store here.
And excitingly, along with the PDF file, you can also now download the free editable PSD version of my labels below!
Finally, the SLOM range of jars has since been discontinued. KORKEN is IKEA’S new alternative though similar clip-top jars can be found in lots of discount/dollar stores.
SOURCES
Jars (Ikea)
Decal Paper with Magic Coating Paper (Australia – eBay)
Decal Paper with Magic Coating Paper (USA – Robin’s Eggcetera)
Decal Paper with Magic Coating Paper (UK – Crafty Computer Paper)
Wooden Scoops (eBay)
CREDITS
Fonts: Courier New, Another Typewriter, Mrs Eaves Bold
FREE DOWNLOAD
Click here to view and download the printable PDF
Click here to download the editable PSD (for Photoshop users)
Republication, reproduction or redistribution in any form is forbidden.


Kristine,
I came across this blog and am anxious to start doing this to my jars! I looked at your links to the websites where you purchased the magic decal coating paper, I was just confused as to exactly what you purchased because there seems to be several different types listed on both sites. Some are laser, inkjet, etc. I’m unfamiliar with this, and don’t want to purchase the wrong thing! Would you mind telling me exactly which paper you purchased? Thanks so much!
Kristin
Hi Kristin
I have an inkjet printer so I used the clear inkjet decal paper which comes complete with the magic coating paper. If you have a laser printer, select the laser paper. Just be certain that you choose the clear paper as it is also available in white.
Hope this helps.
We stumbled over here different page and thought I should check things out.
I like what I see so i am just following you.
Look forward to finding out about your web page repeatedly.
Hi, I don’t know if you could tell me the font sizes you used for the lettering. I’ve been trying all night to recreate your lettering (on Microsoft word) and it just doesn’t look quite right. Thank you in advance!!
Hi Aimee
I wish I could though unfortunately due to resolution variables font sizes between Photoshop and Word are rarely interchangeable. I bet you’re just being overly critical of yourself though. I’m sure your lettering looks totally great.
Kristine
Hi! I just wish to offer you a big thumbs up for the great
information you have got right here on this post. I am returning to your website for
more soon.
My husband and I are celebrating 30 years of marriage this summer and I wanted to make some special wine glasses for our guests. With my limited budget this is such a great idea! I have found wine glasses at a second hand store for a lot less than a department store and with purchasing the decal paper and magic paper I will have unique gifts for my guests! Thank you so much for posting this. I am so appreciative of all you very clever crafting people out there!
Great Shelly – that will be so special and all the better for being hand-made with love!
Just be sure to let your guests know the glasses should be carefully hand-washed. You could attach a pretty care card. Although the paper is dishwasher resistant it is not dishwasher proof.
Enjoy your 30th anniversary!
I printed these with a LaserJet printer onto clear contact paper and they worked beautifully!!! They were the perfect finishing touch for my new pantry canisters. Thank you for the free download!
Cool! Contact paper or clear sticker paper is a great alternative.
Hi Kristine
Decal paper (blue watermark on back), do you know which paper this should be?
If I look for Decal paper translation it appears as “calcomania”, but that translation is very general.
Does it have another name?
Rosina
Hi Rosina
The only thing I can think of is maybe adding “waterslide” to the front (so “waterslide decal paper”).
Hope this might help.
I love how crafty people are so UNselfish! Thank you!
Does this look familiar? http://nostalgiecat.blogspot.co.uk/2014/07/diy-jar-labels.html
Shame she didn’t find it necessary to name you as inspiration, especially as it’s obviously a (bad) one to one copy….
Slom jars are no longer available. What other jars would you recommend?
Hi Rita
IKEA have a new alternative named KORKEN though clip lidded jars can be found in heaps of places (try a Google search and you should come across plenty).
Kristine
Hi i love these !!
Is there any chance I could pay you to make them for me ?
They are very clever !!
Thanks Sarah. I actually got so many requests for just that after first posting this project that I did start selling them! You can purchase them directly from my little online store here.
Kristine
Can you do a YouTube tutorial?!
Sorry, I’m not really set up to do proper video tutorials (don’t have decent enough equipment) and I don’t want to make a really crappy one. The process is pretty straight-forward and most feedback I get is about how easy it is. Is there something confusing you?
I love these and have labeled some of my jars. I would like to customize some but don’t have Adobe Photoshop. Could you tell me what font is used so that I may try to recreate them in Microsoft Publisher?
Hi Laurie
The fonts (with links) are listed at the end of the post. If you don’t have Photoshop you can still edit the PSD file in GIMP (which is a free Photoshop like program).
Kristine
Does this also work if you print using a laser printer?
Yep, the paper comes in either laser or inkjet. You just need to purchase the right one. I actually think laser would be better though I don’t have a laser printer.
so you have the ready to go labels on easy. once i receive them, what is left to do so that i could transfer them onto the jars?
Hi Shelby
You can read everything you need to know about purchasing the ready to apply labels here.
Kristine
Hello,
I LOVE this idea, thank you so much for sharing. I’m just curious, the fonts you referenced above, which font did you use for which line of the decal?
Courier New
Another Typewriter
Mrs Eaves Bold
Also, do you have a font size recommendation for the labels you made?
i would like to make some additional labels for other jars I have and would love for them to match!
Thanks!
Lisa
Hi Lisa
Number: Courier New – 16pt
Title & Sub-Title: Mrs Eaves Bold – 60pt/20pt
Phonetic: Another Typewriter – 16pt
Definition: Courier New (Bold) – 14pt
Recommending particular font sizes can be a bit tricky because they can vary from program to program depending on set resolution. Also, I did reduce the font size of some of the longer titles to ensure they weren’t too wide for the jars. The font sizes listed above are what I used – for the most part – for my labels which I created in a 300 DPI Photoshop document. Just have a play around when you create yours until you’re happy with the look and size.
Hope this helps!
Kristine
This is so helpful as I have to make some for all the different teas we have…wow this site is amazing.
In steps 3, 4, and 5 you say to laminate the three papers, but step 5 says to discard the translucent paper. Wouldn’t it be a part of the laminate pack at this point?
Hi Angie
It does sound a little confusing though is much more straightforward when you’re actually doing it.
In step 3 I also mention (in brackets) that the translucent paper is designed to act as a protective barrier of sorts between the heat of the laminator and the decal paper. It, along with the back of the decal paper it is laid on, does not “melt” during lamination so it has nothing to bond with.
That said, I was merely following the manufacturer’s instructions and have since laminated hundreds of sheets without the translucent paper. I don’t think it’s actually needed.
Kristine
This is such a cute idea!! Thank you for posting!
We have recently switched to all glass storage containers, found Hobby Lobby is a great source and when they have them on sale for 50%off they are super cheap. Been thinking about chalk paint but really like how yours look. going to order the stuff and have some fun…
Love your decals. I have gone to all glass containers and have been looking for ways to label them. Yours are the best. So excited to start. Will order the sheet now. So excited for that wow look for all my containers. Need to make some custom ones as we have lots of loose teas in jars. My kitchen will really look organized when I am finished
If I don’t have the Magic Paper, and I only have pouches for my laminater, should I use the clear sealer? Can I separate the laminate pouches? I want to try this on my own before I cave and order from you. I love this idea! You should add spice jars!!
Christy, don’t use laminate pouches! The idea of the lamination is to fuse the magic paper to the decal paper. Lamination pouches will not work!
If you have waterslide decal paper but no magic coating, spray your printed decals with clear sealer before getting them wet.
I have been meaning to create some spice labels since I first posted this! I even started designing them. I should get onto that!
So excited…just ordered my waterslide paper and magic coating paper…can hardly wait to do my canisters. $1.50 per sheet and that includes the waterslide paper and magic coating paper…such a deal.
Great Denese! That does sound like an amazing deal.
Can I ask where you found your paper? One of the suppliers I had listed in my post appears to have stopped selling it and I’d love to include a new source for my readers.
I hope the project turns out fantastically for you! If you’d like to share some photos once you get them all complete feel free to email me (thepaintedhive@gmail.com) – I’d love to see!
When I click on the link for the Mrs Eaves Bold font it takes me to the page for the font, but when I click on the little gray download button to the right it just opens another window. How do you download the font? Thanks for the inspiration.
Hmmm, it looks like that download has been disabled. You could try here instead: http://www.fontsner.com/font/MrsEavesBold_Bold-64594.html. I have not personally used this particular download. Otherwise, try Googling around to find something similar.
Kristine
Hello! I absolutely love these labels. I bought a laminator and magic paper just to make these:) However, I am having difficulty opening the editable labels. Is there any way you could point me in the right direction? I’m really excited to make these:) Thanks for sharing!
Hi Kacie. Thanks!
Before I get into a long reply, can I first ask which program you are trying to open the file with? Or is that the problem – you don’t know which program to use?
Do you remember what size jars you used for each? I want to make one for flour, white sugar, brown sugar, powdered sugar, baking soda, and baking powder. What do you suggest?
Hi Alison. The Slom jars I used are no longer available though similar jars can be found elsewhere. I guess the sizes of your jars should be dictated by the quantities you buy and use. The labels aren’t overly huge so can comfortably fit a myriad of sizes. I don’t remember the liquid capacity of my jars though the approx. sizes are: 4″ x 4″ (small), 6″ x 4″ (medium), 9″ x 6″ (large). Cheers.
Hello- I am talking about the sticker decals for the jars. I need a few that are not already provided. Thanks!
Okay, I realised you meant the canister label file, though I wasn’t sure what problem you were having exactly which is why I was wondering which program you were attempting to open the file with. The editable file is for Photoshop. It will not open in just any program. If you don’t have Photoshop, you can also open it using GIMP. Otherwise, you can create similar labels from scratch using a basic desktop publisher, like Word. Hope this helps. Let me know if you still have trouble.