

One day I’m sure I’ll attempt a proper BIG upholstery project.
Ya know…an armchair, a settee, a sofa. I mean, really, with a piece of cheap second-hand furniture and some bargain fabric there’s really not too much to lose (possibly bar my sanity) though for now I find the idea kinda definitely daunting.
Proper BIG upholstery projects require certain traits and skills; patience, sewing, the proficient use of scissors and possibly even some mathematics (gulp – none of my strong suits).
So, whilst one day I’m sure I’ll attempt a proper BIG upholstery project, for now I’m happy sticking with the smaller, non-nervous break-down inducing variety…ottomans, benches, bed heads and dining chairs.
Over the past few years I’ve refurbished a small wedding party’s worth of dining chairs, most of them with drop-in seats, and whilst they can be a little fiddly they are by far one of the least complicated of all upholstery jobs – relatively fast, easy and budget-friendly, plus the results are always rewarding.
This tutorial details how to upholster a drop-in seat from scratch however if your seat base is still in good nic, you may simply need to recover one instead. If so, just follow my instructions beginning at step 7.
SUPPLIES…

1 Chair with a drop-in seat.
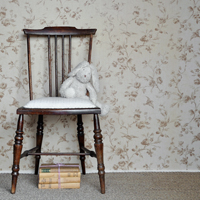
Now, I don’t want to insult anyone’s intelligence, though just in case someone is unsure, a drop-in seat (also sometimes referred to as a slip seat or loose seat) is a fully insertable and removable seat frame which rests within (or is sometimes screwed into) a chair’s frame.
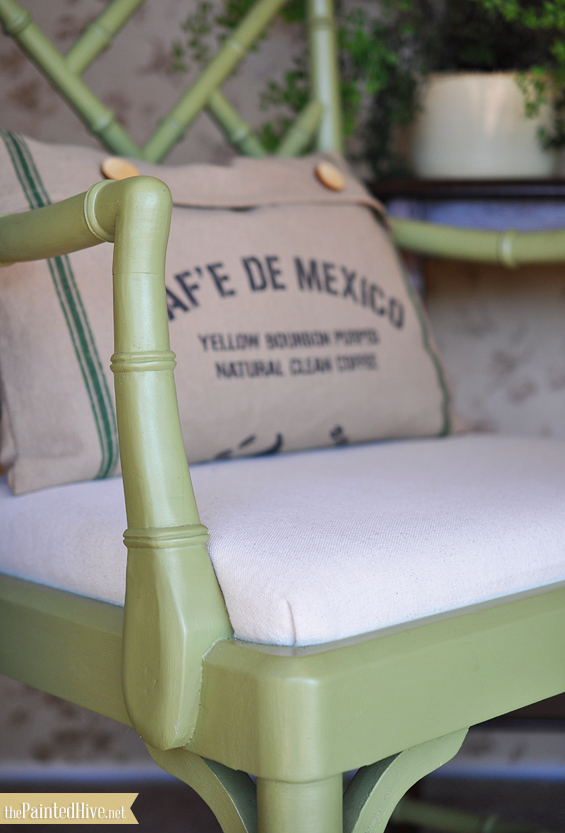
For this tutorial I used the style of chair I always thought was just a fantasy for me – a gorgeous faux bamboo Chippendale armchair (more details on my chair to follow in an upcoming post!).
2 Jute webbing (or similar).
I used 5cm (2″) wide webbing.
3 Small upholstery tacks.
I used 1cm (3/8″) long tacks.
4 Hessian (burlap) fabric.
5 Foam.
Use something relatively thick and reasonably dense.
I used 6cm (2″) thick high density foam.
6 Wadding (batting/dacron).
7 Cover fabric.
Of course, you can choose the best upholstery fabric for your particular project. The beauty of a drop-in seat is that it can be easily removed and re-covered, which is awesome if you ever want a fast, fresh change (or if one day your husband decides to spill an entire glass of green cordial on it!). So, there’s no real need to agonise over your initial fabric choice. Thicker, fibrous fabrics with some stretch are easier to work with and more forgiving in terms of appearance though due to their bulk they can sometime be a little tricky to corner neatly.
I wanted a simple, natural look so I used a piece of inexpensive drop cloth.
8 Calico (muslin).
EQUIPMENT…

1 Scissors.
2 Tack hammer.
You can use an ordinary hammer. A tack hammer just makes things a little easier.
3 Web strainer/stretcher (optional).
You can use your strength alone in lieu of a stretching tool though in my experience the webbing won’t be quite as taut (and you will most probably have sore hands and arms the next day!).
4 Staple gun.
5 Electric knife (optional).
You don’t have to have an electric knife though I’ve found it is by far the easiest way to cut foam.
PROCESS…
STEP 1 Remove your seat frame from the chair and, if necessary, completely strip any existing upholstery then place the seat frame right side up on a sturdy work surface.
STEP 2 Cut strips of jute webbing which are approximately 20cm (8″) longer than the widest part of your seat frame. The number of strips required will depend on the size of your frame. To determine how many strips of webbing you need it’s best to lay the strips over the frame in approximate position to gauge their coverage and placement. I used seven strips to cover mine (three horizontally, four vertically).
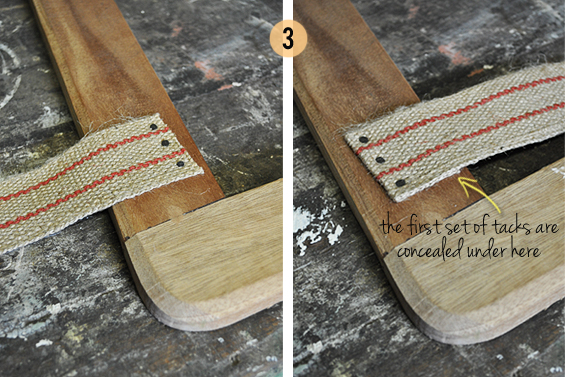
STEP 3 Take your first strip and position it with just the end on the seat frame and the excess to the side then hammer in three tacks (as shown). Fold the strip back over itself and secure it with a further three tacks (as shown).
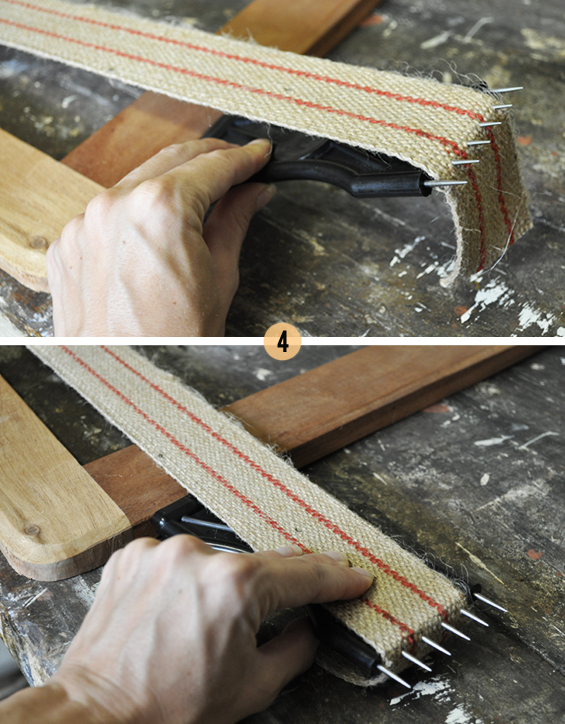
STEP 4 Butt your strainer up against the adjacent side of the frame parallel with the tacked on strip, pull the strip across the frame and ‘fork’ it with the strainer prongs (as shown) then lever the strainer down, stretching the webbing so it is straight and very taut (as shown). It may take a few goes to get the webbing ‘forked’ at the right length so when you lever it down it’s not too tight or too loose. If you don’t have a web strainer you can simply pull the strip as hard as you can with your bare hands though in my experience the resulting webbing will not be as taut.
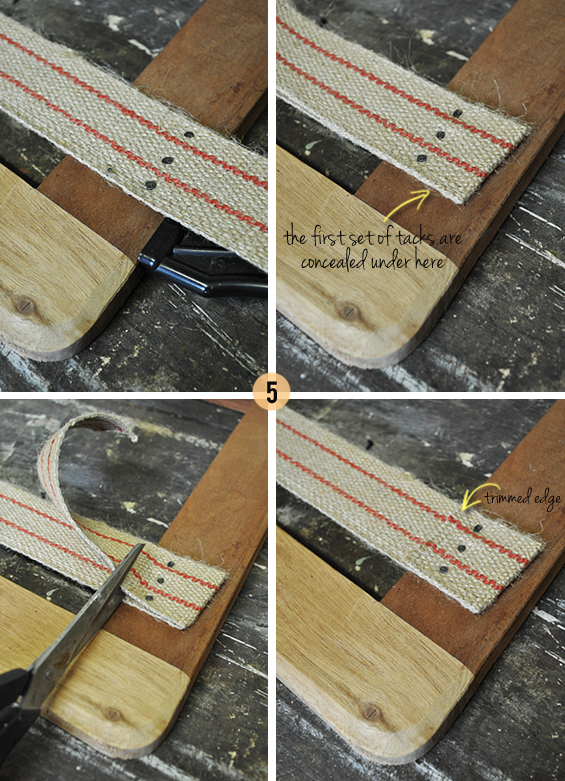
STEP 5 With the strainer still in place, hammer three tacks into the stretched webbing (as shown) then release the strainer, ‘unfork’ the webbing, and fold the strip back over itself and secure it with a further three tacks (as shown). Trim off any excess webbing.

STEP 6 Repeat with your remaining strips until you have covered your entire seat frame (as shown).
STEP 7 Cut a piece of hessian (burlap) slightly larger than your seat, fold the raw edges under then staple it to the top of your frame (over the webbing).
STEP 8 Cut your foam so it is slightly larger than your chair frame (to do this, place the seat frame on top of the foam, trace an outline around it then cut it with an electric knife). Cut your wadding (batting/dacron) so it is just large enough to cover the foam then trim the corners off (too much wadding can result in the sides of your seat being overly bulky which may prevent it from fitting neatly back inside your chair frame so do take care to ensure any excess wadding is removed). Cut your cover fabric so it is large enough to be easily wrapped all the way around the frame.
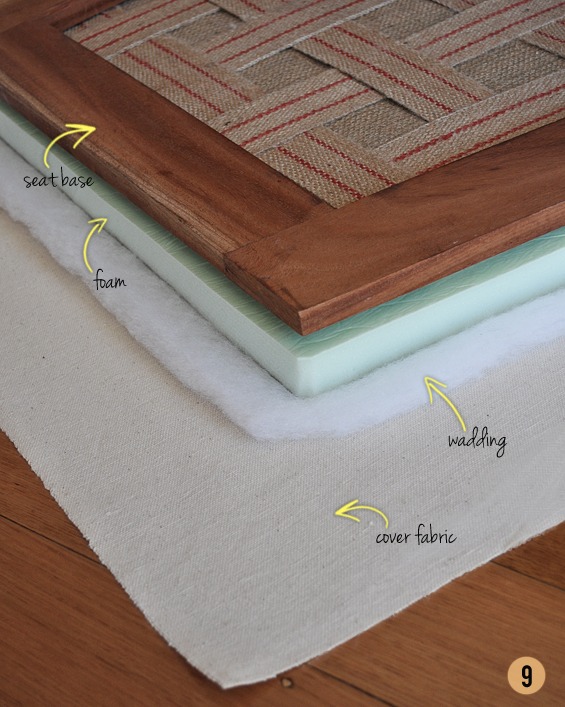
STEP 9 Iron any creases from your cover fabric then stack your layers on a flat, solid surface, right side down (as shown).
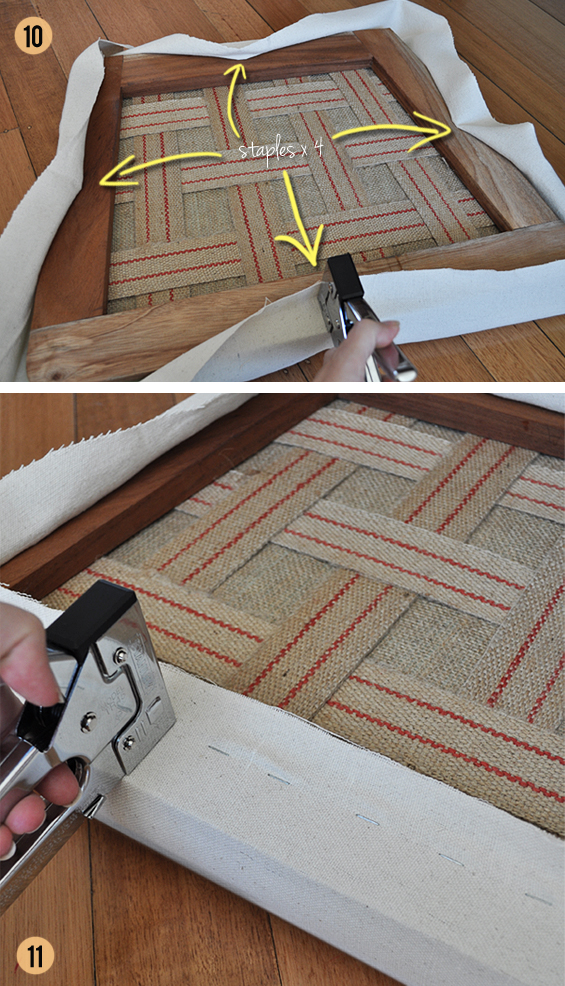
STEP 10 Beginning at the top, wrap some fabric around the frame and secure it in the centre with a staple. Do the same with the bottom, pulling the fabric reasonably tightly so it is straight and taut. Finish by stapling the sides (so you have four staples in place – as shown).
STEP 11 Beginning with the top again, stretch some fabric evenly down and towards one corner (I find it works best to pull a large amount of fabric at once by gripping it between your palm and fingers rather than simply pinching a small amount between two fingers alone), then working from the centre out (in the direction of the corner you are pulling the fabric towards), staple it in place. Stop stapling around 10cm (3″) from the corner then repeat with the other side of the top until your fabric is secured across the entire width of the top (excepting the corners as mentioned). Continue with the bottom, then each side, until the fabric is attached to your whole frame (again, corners excepted). You may find you need to remove and reattach staples from time to time if your fabric appears too tight, loose or rippled. Occasionally look at the top side of your seat to ensure everything is neat, straight and firm. You may also need to thin some areas of wadding if it seems too thick.
STEP 12 The corners. Basically, there are three common corner finishes. Determining which one is right for your project will depend on a few factors (fabric weight, seat height, frame shape) along with your preference in terms of appearance.
I created a mock seat (with a foam off-cut and old chopping board!) to help demonstrate the pleated techniques as clearly as possible…
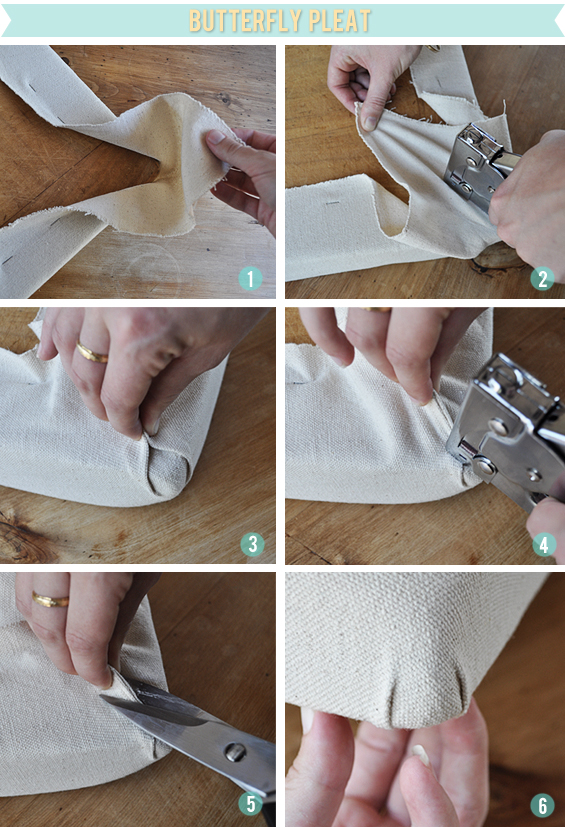
This technique creates a smooth, rounded corner with two visible side pleats. It’s perhaps the most common corner finish amongst DIY’ers.
1 This photo shows the excess fabric at the corner. I don’t mind working with a reasonably substantial amount though you can trim some off if you think you have too much.
2 Pull the fabric from the centre of the corner diagonally across the seat base then staple it in place.
3 Fold in both sides of the remaining fabric to create two even pleats. Sometimes I like to use a blunt butterknife to push and smooth any loose or rippled fabric into the pleats.
4 Holding the pleats in position, staple them in place.
5 Trim off the excess fabric.
6 Inspect the top of your seat. Attach additional staples if any areas require tautening. You should have a nice, tidy visible butterfly pleat.
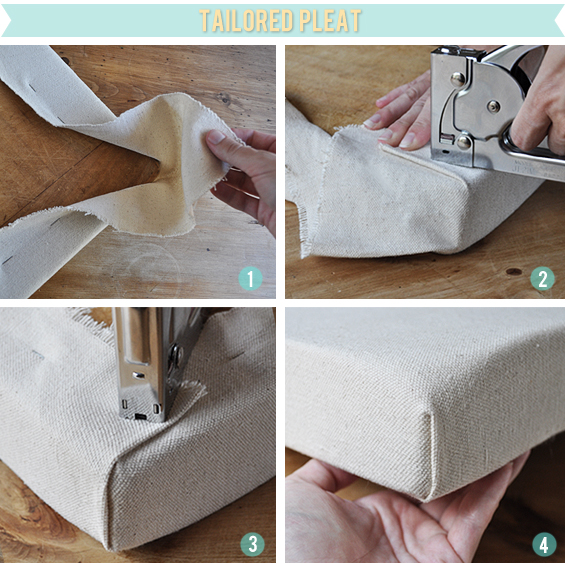
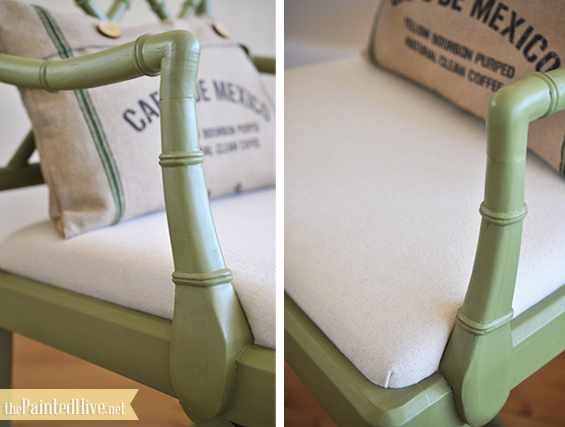
This technique creates a neat, angular corner with one visible box-like pleat. It’s my preferred corner finish and the one I used for this project.
1 This photo shows the excess fabric at the corner. I don’t mind working with a reasonably substantial amount though you can trim some off if you think you have too much.
2 Flatten out one side of the fabric, then, in line with the seat frame, tuck under enough of the excess to create a neat, straight pleat on the seat’s base. Staple it in place.
3 Fold up the remaining fabric from the other side of the corner, again tucking under enough of the excess to keep it in line with the seat edge to create a neat, straight pleat on the seat’s side. Staple it in place. Sometimes I like to use a blunt butterknife to push and smooth any loose or rippled fabric into the pleats.
4 Inspect the top of your seat. Attach additional staples if any areas require tautening then trim off the excess fabric as required. You should have a nice, tidy visible tailored pleat.
![]()
This technique creates a flat, rounded corner with no (or very minimal) visible pleats. Whether or not you are able to achieve this type of finish will depend on the height of your seat (padding) and the amount of excess fabric you have at the corners. Some upholsterers consider this the ‘proper’ way to finish corners though I reckon whatever looks good is proper enough. To achieve pleat-free corners, whilst stapling the fabric to the frame, you need to stretch it as tightly as possible towards the corners. This results in less visible excess fabric at the corners which helps eliminate the need for gathering.
Note: Corners can be tricky little munchkins. In my experience, unless you’re pretty much a practised professional upholsterer, there’s no fail-proof process – they all seem to be a little different and just take patience and persistence. Some people might say I’m a tad fussy though each corner usually takes me a few minutes of confused fiddling to get ‘just right’. So take your time and try not to swear (or do swear if there are no little kids around and it will make you feel better :-) And remember, the entire base of the seat will be hidden from view along with part of the lower outer edge (which will be concealed by the cavity lip once it’s in the chair frame) so although you do want as neat a finish as possible some minor gathers towards the bottom of the seat are no real biggie (besides, have you ever looked at the base of a professionally upholstered chair? Chances are it wasn’t perfect).
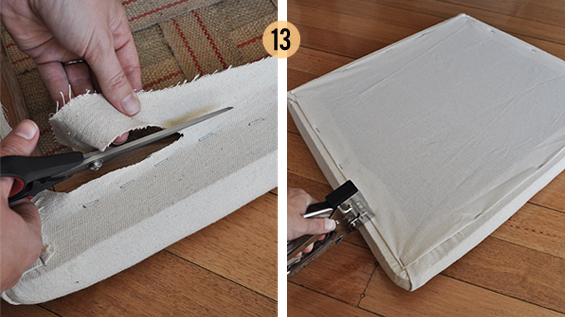
STEP 13 Trim off any excess fabric then cut a piece of calico (muslin) so it is slightly larger than your frame, fold the raw edges under and affix it to the bottom of your seat with staples. This acts as a dust cover and provides a nice, neat finish.
STEP 14 Done! Insert your complete seat frame inside your chair then plant your caboose upon it!
A few things to note…
:: This tutorial details how to upholster a drop-in seat from scratch however if your seat base is still in good nic, you may simply need to recover it instead. If so, just follow my instructions beginning at step 7.
:: Some drop-in seats use a solid panel of ply (or similar) in lieu of webbing. This is fine though I find it’s not quite as cushy.
:: Before inserting your seat back inside your chair you may want to scotch guard the fabric first to help repel future stains.
:: If your seat is designed to be screwed into your chair take care during the upholstery process to keep the screw holes clear of fabric, tacks and staples – lord knows, I learned this one the hard way!
![]()
PS I don’t mean to be stingy by not showing the finished chair in its entirety. My intention is to write a dedicated post about the chair makeover as a whole which I’ll try and publish some time next week…oh, and a tutorial for the simple faux grain-sack pillow you can glimpse in the photos too :-)


What a great tutorial! I have a chair that needs this treatment, but I haven’t known what to do. Thanks for the great tips.
Yay! This is so easy to understand I know I could do it. Pinning it for later use!
Thank you so much for sharing this. I love the shade of green on the chair.
LOVE your tutorial. Thanks for being so detailed about the corners. I just finished upholstering a headboard this weekend and had to fiddle with the corners quite a bit. I didn’t know the terms butterfly pleat or tailored pleat corners, but those were the ones I was going back and forth between. My favorite is the tailored pleat too :)
Thanks soooooo much for this. I have had a set of dining chairs sitting in my basement for over two years because I had no idea what to do with them…until now!
Also, can’t wait to see the posts about the chair and pillow :)
What an awesome tutorial. I really appreciate the time and effort you clearly put into writing all of your posts and the generosity with which you share all that you do.
LOVE your blog.
Treagan
You are amazing. Seriously, it’s like you have a whole team of experts working on your posts.
I love the green on the chair.
Oh, and your seat upholstery is just so neat and straight. I think I need to practice more!
Can’t fot the pillow tutorial!:) So pretty!
This is an awesome post! I especially love the tools you explained. Wow. Makes all the difference. I will be referring to this often, I’m certain.
Have a great week!
Kelley~
This is a great post and has motivated me to tackle my own set of six chairs. Thank you and love your blog, bec
I have covered many chairs in my time and the corners can still cause me problems. A fantastic tutorial. Can’t wait to try some of those techniques. Thanks!
Isn’t it funny. No matter how many corners I fold and tuck and pull and staple they never really seem to get any easier!
Reallly super this tutorial, many thanks
Wonderful tutorial! I now need to go out and find a chair to reupholster!
Oh thank you!!!! I’m showing this to the Mr.! We have two chairs in that shed that are just waiting for this revamp :)
kristine,
thank you, thank you, thank you for this tutorial. i have had an old oak diningroom chair with this exact style seat and didn’t know how to “cover” it. it came with its bare bones, so i didn’t have an example of what it was suppose to look like. you have made it SO very simple plus i have most of the supplies already on hand. must get that web stretcher and tack hammer to get started!
will be pinning this so that i have a go to for instructions once i’m ready to tackle this project.
Hi Judi
I remember being completely perplexed by bare-boned chairs too which is the exact reason I wrote this tutorial.
So glad it has shed some light for you :-)
Great tutorial..I have never had to do the webbing before so this will really help when I need to tackle this kind of project. Come link up to Centerpiece Wed and share this post.
Karin
Thanks for the invite Karin. I linked up :-)
Terrific tutorial on replacing the upholstery of a seat. I am pinning this for future use. Thanks!
Well done.! I like that you did it the hard way, with the upholstery webbing. I am keeping this on my upholstery board just to have for future reference.
Great job – Love the pillow
Thanks so much for the great tutorial.It was very detailed and clear. I don’t have a chair yet, but will keep this when the time comes. Saw this @ Transformation Thursday.
Bev
what a super tutorial!! you did a beautiful job!!
This is a fantastic project, and a really well written tutorial. If you can take on this type of upholstery project, then you can easily do a large chair. I love the way the chair turned out. Looks completely professional. Pinning this. Thank you so much for sharing. -K
Thanks Karen!
I’m still kinda scared of how long a large chair might take me, especially as I have no spare space in my house to ‘hide’ it if I procrastinate – which is likely :-)
One day…
Kristine you make it look so simple! Much easier to follow and far more professional looking than many presenters on Lifestyle programs. Thankyou for the tutorial. Jennie
Thanks so much Jennie. That’s really sweet of you to say :-)
This is great. Thanks so much. I love to restore pieces of furniture and have upholstered a few things. This is a good tutorial.
http://www.facebook.com/irestorestuff
Thanks Sharon.
Just visited your Facebook page. You have some really lovely pieces :-)
This was the best tutorial I have seen, I wish I had found your site earlier. It would have made my project easier. Of course in true fashion I didn’t start off on a basic chair. I have to attempt a chair for the advanced class. Check it out on my blog.
Reuzeit Emporium Blog
Reuzeit Emporium
Hi Linda
Just popped over and e-visited you!
That was an ambitious and stunning chair redo for sure.
Thank you so much for this!! I love old chairs and am quite lame in this!!! It was just perfect for me!
Robin
Wow. Oh, you did great!! Looks fabulous. What a super tutorial also! Do come and join our linky party and link it up! You can find the party from our homepage, http://www.finecraftguild.com Hope to see you there!
Hi Kristine, wanted to let you know that we featured your beautiful chair at The Inspiration Gallery. Thank you so much for sharing with us…xo http://www.craftberrybush.com/2013/02/the-inspiration-gallery-features_9.html
Wow I am so impressed! What a fantastic transformation. Thanks so much for the tutorial!
This is a fantastic tutorial! And I love your chair!
Thanks!
Christine
Such a great tutorial…featuring it on tickled pink!
Yay, thanks so much Holly!
Hi Kristine! I love your chair so much. That shade of green is perfect. Do you mind sharing what color it is?
Hi Brandi
Thanks!
It’s a Dulux colour caller Field Maple.
Kristine
PS Sorry all of your comments need to be moderated. I was getting a heap of spam from a user calling themselves “Brand” so I put the word on my comment moderation list which means it also picks up on your name too unfortunately.
This is the chair of my dreams! I have been looking for a pair of these for about 10 months now, but I can’t find any in my budget. :-(
You did such a great job! I’m going to have t redouble my efforts.
p.s. Can’t wait to hear the details about your chair.
Thanks Gayle. I’ll try and get that post up later this week :-)
I have been surfing online more than 4 hours today, yet I never found any
interesting article like yours. It’s pretty worth enough for me. In my view, if all site owners and bloggers made good content as you did, the net will be a lot more useful than ever before.
Excellent tutorial and love your site, lots of good ideas, thanks !
Perfect! Have been looking for the perfect tutorial to recover and pad my antique chairs and this is exactly what I needed to know. Thanks!
Hello!
I just wanted to say “thank you!” for such a great tutorial! I am just beginning my first upholstered chair seat project. I did not know where to start! I love all of the detailed photos you shared here.
I might be able to do this, thanks to YOU! :D
Thanks so much for taking the time to let me know that my tutorial might help you out Kathi :-)
Your suggestion of horse hair, coir, and cotton flock appears to be exactly what the padding is, and I finally found a source for the felt cover. Thanks very much.
Just wanted to thank you for this post – I’ve turned to it 4 times with various stools and chairs I’ve upholstered and even though I’m finding it second nature now, I still turn to it to keep focused :) I really enjoy the way you keep things simple and doable :)
Awesome! Thank you so much for taking the time to let me know Alyson :-)
Hi Kristine,
First of all thank you for a wonderful tutorial with such great pictures. I’m about to start creating a children’s chair line. I’ve toyed with the idea for months on what I’ll upholster them with (cuz i’m starting with two samples to test my market)…..and then i’ve toyed with hiring an upholsterer vs learning the trade. I bought a recent book on how to upholster and it was great. However, the more I learned (and by reading your post too), I’m wondering if I just have my sub create wood (ply)chair inserts, upholster those and skip the webbing? The chair pad area is about a 12″ x 14″….very tiny. So, what your thoughts? If it’s just a childs chair and just for a child or looking good in a room, then would you just do the wood pad upholstered? (the frames even at my cost are $$, so I want to keep my investment as low as possible , so I don’t price them too high once done). Would really appreciate your advice . thanks again!
This is exactly the tutorial I’ve been looking for! But where did the wood frame come from that you used as the base? I don’t see it in the picture of the chair… the chairs I want to repair have a thin piece of plywood as the base and you’re right, they are not comfortable! So I think I need to make a new wood frame to attach the jute and hessian to? Do you have advice? Thank you!
Hi Ron
The drop-in frame did come with the chair. It’s hard to see in the before pic though the actual chair frame is only around 1cm deep. The additional width you can see is actually the drop-in. Sorry, I’m not the best carpenter so can’t really offer advice about making a drop-in frame though without seeing a pic of the chairs it’s also hard to offer alternative suggestions. Feel free to email me some photos if you’d like (thepaintedhive@gmail.com).
Kristine
Thanks for your tutorial. I have just finished my first of six chairs and your instructions were far more clear than the two upholstery books I have.
G’day Kristine – any suggestions for fitting the covering to an inside 90 degree recess in a drop in seat around the rear dining chair legs? It can be done – my mind’s just blank.
Hi Derek
So sorry it has taken me a few days to reply. Your mind has probably “un-blanked” itself by now!
If what I’m picturing based on your description is accurate, it’s not something I’ve personally ever had to do. That said, if you’re still having trouble feel free to email me some pics and we can discuss further (thepaintedhive@gmail.com).
Cheers
A drop-in seat, fits between two dining chair rear legs, overhangs at sides? The word dart came to mind. A pleat in the fabric sounds better – if I can make it work. Tricky – like life.
Just wish to say your article is as surprising.
The clearness in your post is just spectacular and that i can assume you are knowledgeable
on this subject. Well along with your permission allow me to seize your feed to keep up to date with drawing close post.
Thank you one million and please continue the enjoyable work.
Excellent blog post. I certainly love this website.
Keep writing!
I looked at several books and online tutorials on recovering chair seats and this is, by far, the very best and produces the most finished result. I asked a carpenter to make two hardwood seat frames and he used a soft wood instead, so they would not hold my staples (I used a manual heavy duty gun.) The soft wood just let go of the staples with pressure. I took the soft wood chair seats to an upholsterer in an undustrial park and he fixed the problem with scrap marine webbing – it made a taut base and he stapled it with a hydraulic stapler it in a way that kept the staples in. I still had very little invested in the chair seats at this point. (I will try to use this heavy-duty green stretch marine webbing from now on – makes a much more comfortable seat.) I used a high-density foam from a foam store and dacron batting and covered it all with heavy-duty polyester ultrasuede that has a fabric backing – bought a remnant – very thick and heavy, used on high end sofas. I spent about $125 on six chairs but they are comfortable and expensive looking and will last as long as I need them. The chairs are blond Chinese Chippendale, the suede is almomst the same color as the wood and they look better than new. Thank you for your great help!!!!!
Thanks so much for letting me know. The chairs sound great and I bet they feel and look even better for having done some of the work yourself!
Than you! Excellent tutorial. I’ve been wanting to recover the upholstered drop in covers on my storage/ottomans, but was intimidated by the process–especially getting the corners correct. Thanks to your excellent instructions I’ll be tackling (and hopefully finishing!) this project today.
Fantastic! Thanks for letting me know my tutorial helped encourage you.
I hope it worked out Colleen. Those corners can be fiddly. How did you go?
You did a great job! They look wonderful, and I love the look and colors of the whole area – thank you so much for sharing. You have inspired me to do the same to my dining room chairs, they are sadly in need!