
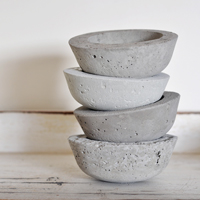
Do you guys remember when I shared some pics of this simple concrete vessel I made a few months back…
Well, I received quite a few requests for a tutorial so have spent the past few weeks perfecting my process (and learning more than I will ever need to know about concrete!) so I can share a thorough ‘how to’ with you all.
Anyhoo, let’s get to it.
![]()

CEMENT
See below for further info.
WATER
Impurities in water can effect the strength, appearance, curing time and durability of concrete so using regular drinking water is recommended.
AGGREGATES (OPTIONAL)
Basically, an aggregate is any granular material, such as sand, gravel, rocks, pebbles, vermiculite, perlite, peat moss and so on, which contribute to the overall mass of your concrete. Aggregates can effect your concrete by; increasing the strength, modifying the structure, altering the texture, changing the colour and reducing the weight.
You may want to add perlite or vermiculite if you’re creating a particularly large planter as it will help reduce the overall weight. You may want to add gravel or peat moss if you’d like to create a rustic planter with lots of texture and some colour variation. It’s really just a matter of experimenting until you find which aggregates, if any, you like.
![]()
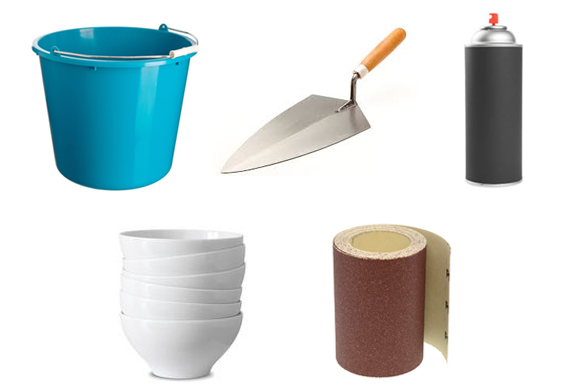
BUCKET OR CONTAINER
Just something to mix your cement in. You could even mix it directly in your mould – though that can be a bit fiddly.
MIXING IMPLEMENT
I used a trowel and a wooden spoon. You could just use your hands (be sure to wear gloves) or even a stirrer drill attachment if you’re super fancy.
LUBRICANT
Anything which will provide a bit of slip is fine. I used cooking oil spray, though you could use vaseline or a purpose mould release spray.
MOULDS
You need two nesting vessels to form your mould. You can use whatever you like; tupperware containers, plastic bottles, cardboard boxes, old tins, metal baking dishes, and so on.
For this tutorial I actually used a cheap ceramic bowl (for the outer mould) and a little plastic ramekin (for the inner mould) because they created the exact form I was after (plus I was on a deadline when I made my initial planters so didn’t have time to shop around).
I realise using something ceramic as a mould is a bit unorthodox due its inflexible, breakable nature, though it worked incredibly well for me. I was able to release my concrete planter with a few simple bangs and have been able to re-use the same mould over and over again! I think I’ve made about twelve little vessels now using the exact same ceramic bowl!
When selecting your moulds, be sure to keep their shape in mind to ensure you can easily release your concrete. Of course, if the top tapers in or has an interior lip, make sure you’re willing and able to completely destroy the mould to release your planter. Also, make sure that your inner mould allows for thick enough walls. To avoid fragility, your planter need to be around 15mm/.5″ thick.
SANDPAPER OR FILE
Just to help smooth any rough or bumpy bits if desired.
![]()
There are heaps of different cements out there so choosing the right one can be confusing. Although I don’t consider myself any kind of expert, I did a fair bit of research and experimented with a few different varieties so thought it was worth sharing what I learned.
It’s important to first note that whilst straight cement comes in many different varieties there are also products which contain a blend of cement and other substances.
Straight cement may be found in General Purpose (also known as Portland Grey), White or Off-White, Rapid Set, Extra Strength, and so on. Cement is a fine powder which hardens when combined with water. Although it is rarely used alone, it is the active ingredient in many construction mixes.
Cement blends may include Concrete Mix (a combination of cement, sand and gravel), Mortar Mix (a combination of cement, sand and lime) or simply Sand & Cement Mix.
Cement is rarely used alone because it lacks inherent strength. For construction purposes this poses a major problem, however for little crafty projects such as this, cement alone is ample strong enough. Particularly if it’s properly cured (more on that in Step 5 below).
So, which straight cement or cement blend should you use?
For this project anything should work. However the process and results may vary.
Straight cement produces a relatively smooth and even finish. Concrete Mix is full of grunge and texture (due to the size of some of the included aggregate Concrete Mix may not be suitable for small projects though). Mortar Mix is slightly grainy and a bit softer.
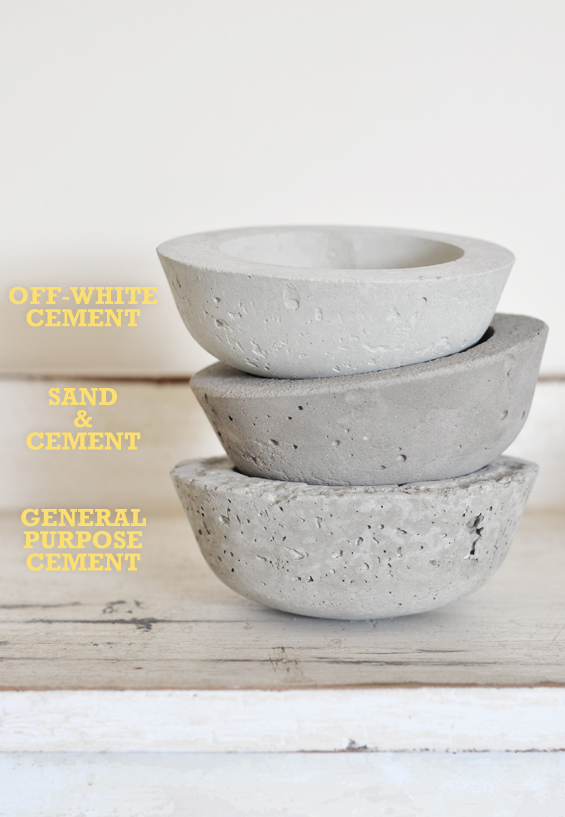
I trialed three different products; General Purpose Cement (Portland Grey), Rapid Set Sand & Cement, and Off-White Cement (Portland Off-White). Here’s what I found…
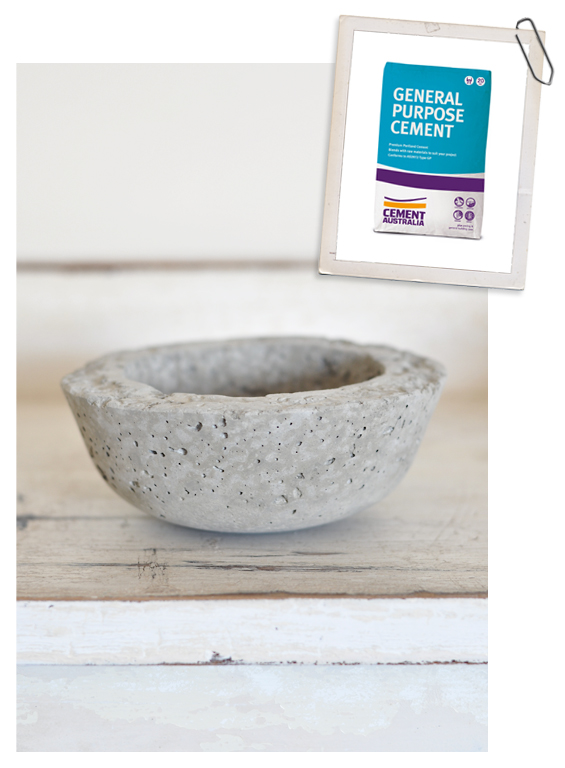
GENERAL PURPOSE CEMENT (PORTLAND GREY)
Unfortunately, the bag I bought had been moisture effected. As soon as I opened it I noticed lots of little lumps. I actually thought I had accidentally bought Concrete Mix! I didn’t want to buy a whole new bag and luckily the lumps were all small (gravel-like in size), so I decided to use it anyway. And it actually worked really well! The cement lumps did not break down during the mixing process as I thought they might, though instead acted as an aggregate of sorts to provide texture and strength. Obviously, as a result of the cement lumps my planter has a bit more grunge than one made from normal cement might have, though you can easily reproduce the look by adding gravel or pebbles.
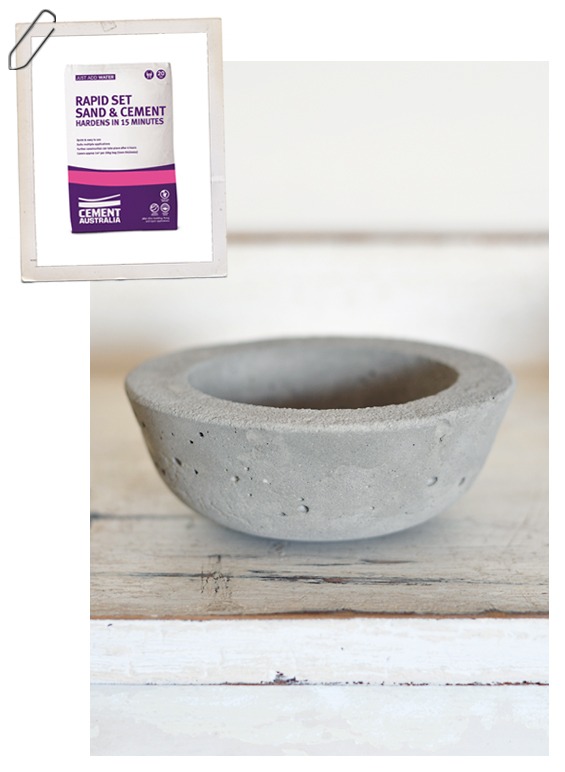
RAPID SET SAND & CEMENT
I was so excited when I read the front of this cement packet and noted that it should harden in 15 minutes! Sadly though, that did not happen. No matter what consistency I tried, it took hours for it to even partially set, and even then it still felt a little “soft” and quite grainy, almost like grout or mortar. It’s almost like the sand to cement ratio was a little off. The best explanation I can come up with is that the cement was old and had expired. You see, cement has a somewhat limited life span (opened or not). The resulting planters are quite even in colour though still have some nice imperfections and an appealing grungy appearance.
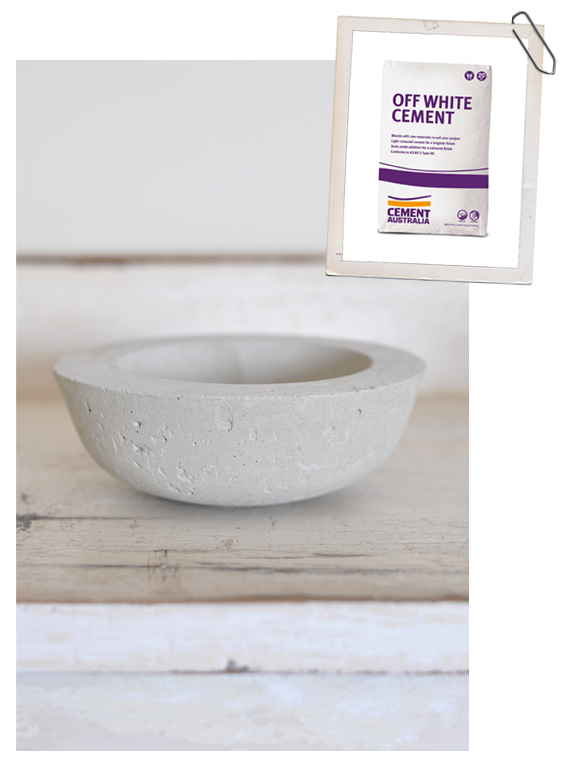
OFF-WHITE CEMENT (PORTLAND OFF-WHITE)
Third time lucky! This cement wasn’t moisture effected, wasn’t expired, and acted just like it was supposed to! The colour is a lovely soft warm white with a subtle green undertone. The finish is relatively smooth with just a few small-ish air pockets, however with the introduction of some aggregates the surface imperfections could be increased. I noticed that the exposed top dried shiny – weird, though easy enough to sand back to matte. Whilst the finish is a little more even and refined than I wanted, I do really like the overall look of this particular cement.
Note: ‘Portland’ is not a brand name, rather it is the generic title of the most common type of cement.
If for some reason you experience problems with your planters, don’t give up or blame yourself…blame the cement – LOL! I’ve had a few failures which I now attribute to my cement being expired. Probably because I bought small bags which had likely been sitting on the shelf in the hardware store for too long. If your concrete fails to set properly, cracks or crumbles with ease, or just seems a bit wrong, maybe try a new bag of cement.
![]()
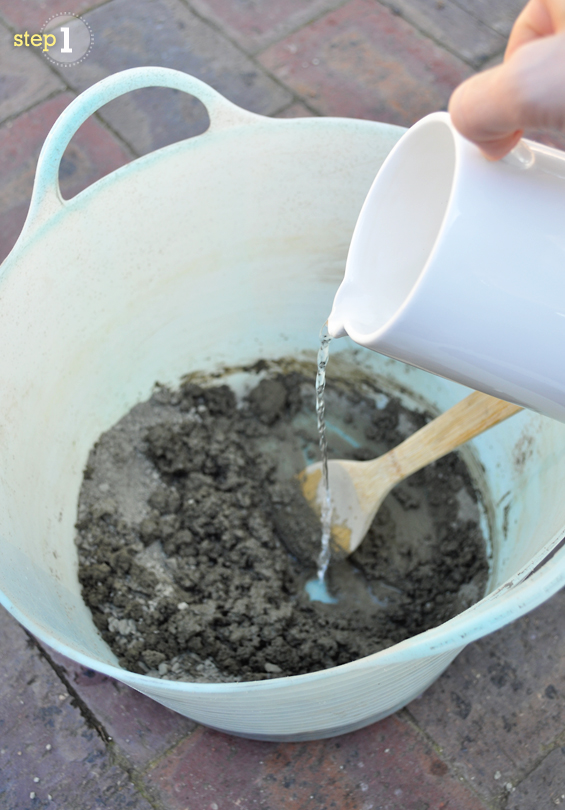
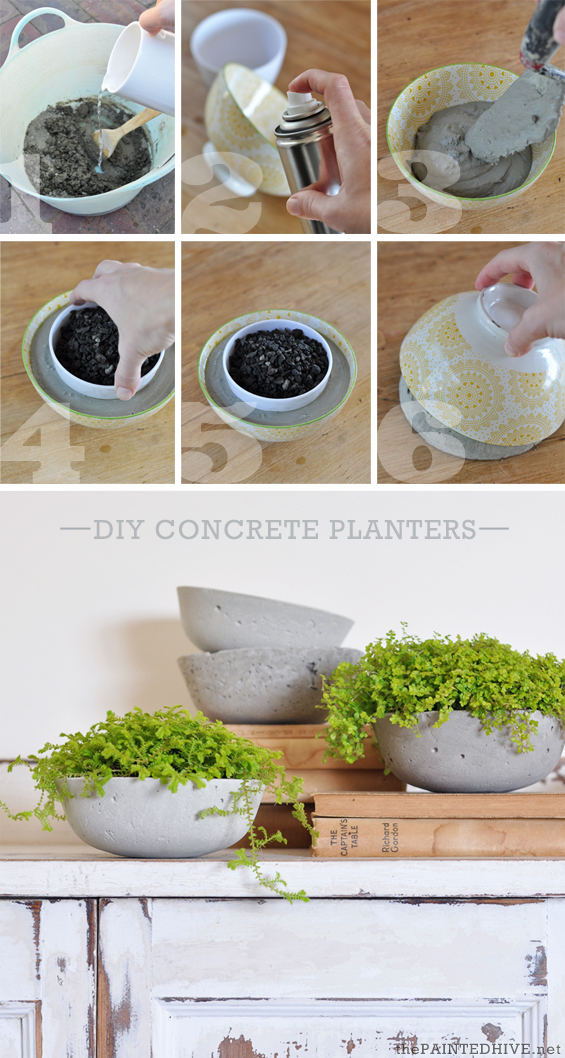
STEP 1 Mix cement with water.
Based on the amount of concrete you need, place a scoop or two (or three or four) of cement in your container then gradually add water, stirring as you go. It’s really easy – just like making icing! If you add too much water, simply correct by introducing more cement. You’re after a work-able, toothpaste-like consistency. Too much water and your concrete will be weak and prone to shrinkage and cracks. Too little water and your concrete won’t bind well, resulting in crumbling.
If you’re using aggregates, add them to your dry cement and combine well prior to incorporating any water. As this concrete doesn’t need to be structural, you don’t need to worry too much about exact proportions. Just add a handful or two until you’re happy with the mix.
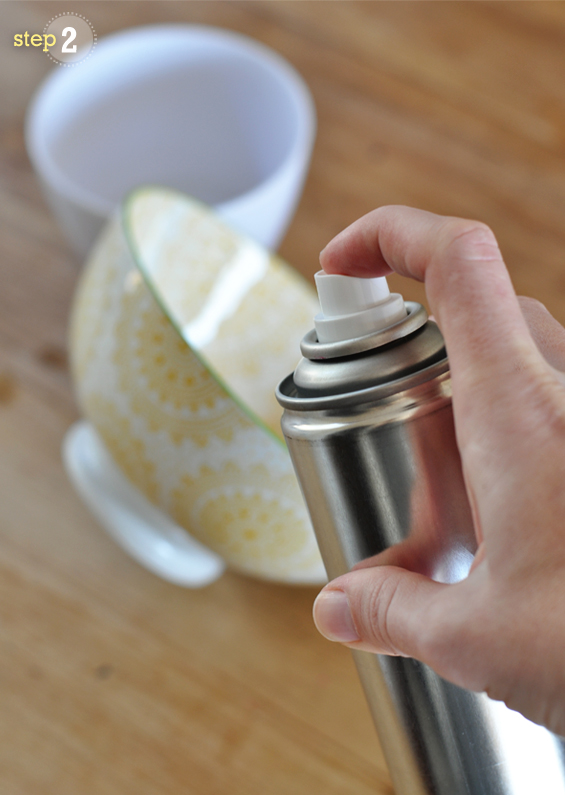
STEP 2 Lubricate your moulds.
Thoroughly coat the contact surfaces of your moulds with your chosen lubricant. As mentioned above, I used cooking oil spray though you can use anything which will create some slip.
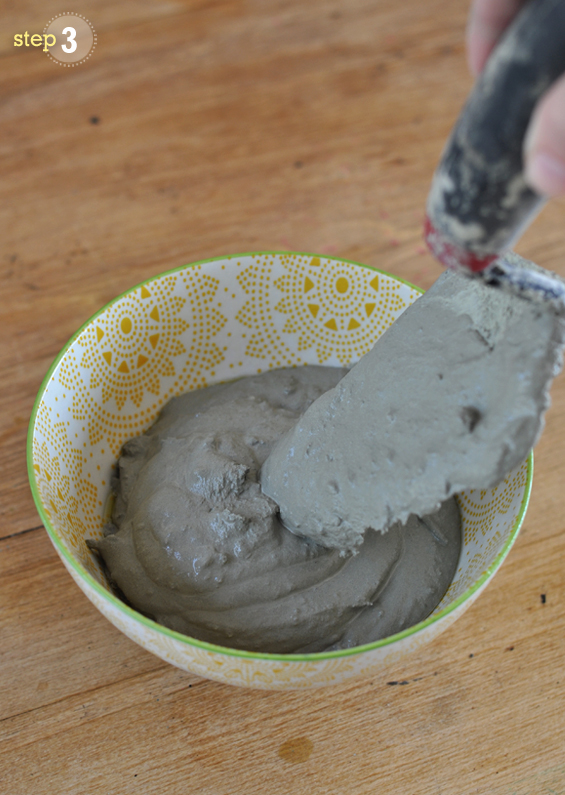
STEP 3 Fill your outer mould with cement mixture.
Fill the mould ensuring you allow enough space for your inner mould to take-up some of the volume.
Tip: Before adding any cement mixture to your mould, first check the depth your inner mould needs to sit at by hovering it at your desired height and taking note of where it sits in conjunction with the rim of your outer mould. This will help ensure your base isn’t too thin or too thick.
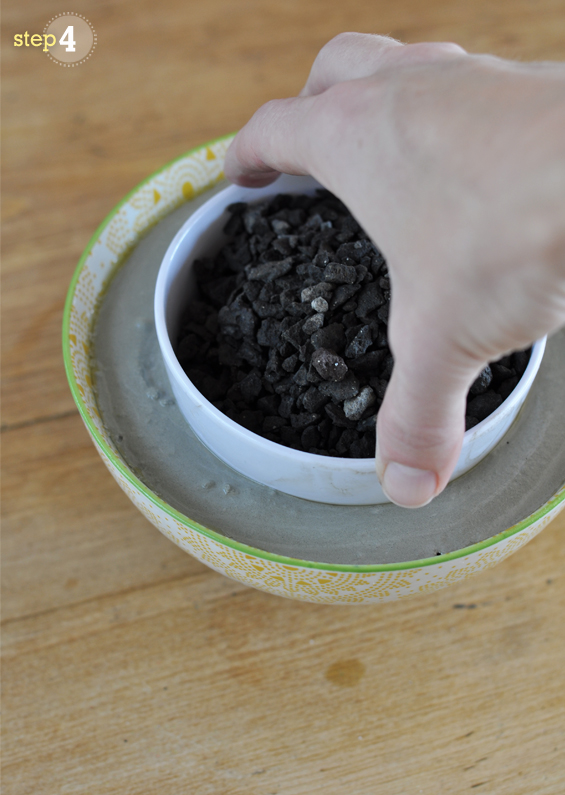
STEP 4 Press your inner mould into the cement mixture.
Push the inner mould down into the concrete, trying to keep it as level and central as possible. Make sure you don’t push it down too far – you need the base of your planter to be around 15mm/.5″ thick. If there is too much or too little concrete in your mould, simply add or remove some.
The inner mould will want to float up, so weigh it down by filling it with sand or rocks or anchoring it with some masking tape.
Note: In order to remove your moulds with ease, ensure your inner mould sits proud enough of the cement mixture so that you can get a good grip on it. Also, if you are using an inflexible outer mould like me, ensure the cement mixture sits just below the top so it has room to “drop down” when you bang it out.
Tip: If you want aesthetic air pockets in your planter, avoid vibrating (patting, tapping, shaking or banging) your cement mixture down too much.
Tip: You can even-up the top of your planter once you release it from the mould, though if you want to create a perfectly smooth and level top from the get-go, trim a disk of cardboard to fit then press it firmly onto the exposed concrete.
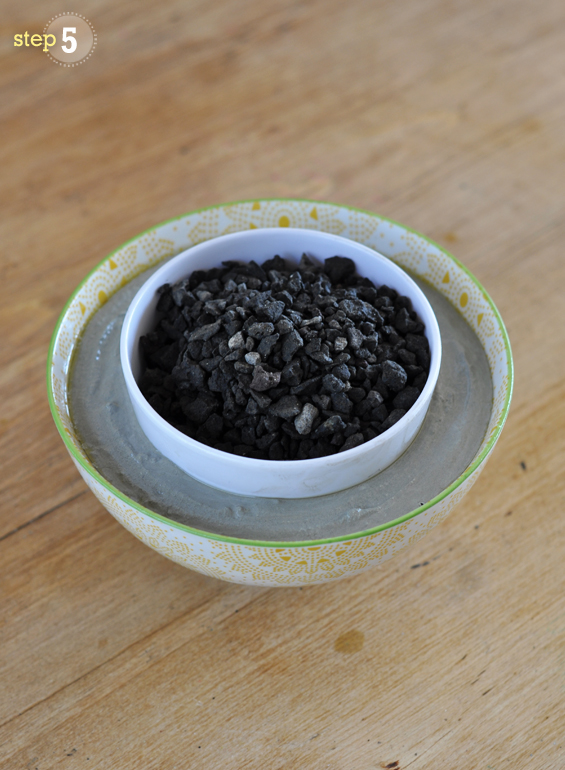
STEP 5 Leave to cure for around 24 hours.
Place your mould in a protected area to cure overnight.
Note: For optimal results, it’s recommended to cure your cement over seven days whilst keeping it moist. You can do this by wrapping it in a plastic bag and leaving it somewhere cool.
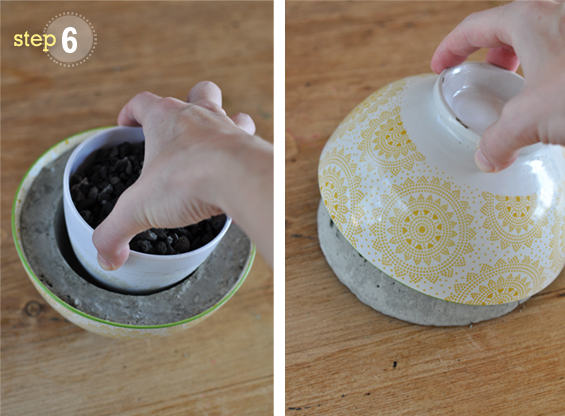
STEP 6 Release from mould.
Remove the inner mould first. Depending on what you’ve used, it may take a bit of persuasion though shouldn’t be too hard to dislodge. I simply gave mine a few wiggles to release the seal then it pulled out with ease. If you’re struggling to get a good grip, use some pliers. Next, release the planter from the outer mould. Again, your method for removal will be dictated by the type of mould you’ve used. I merely dropped my bowl on a table a couple of times and the planter plopped straight out.
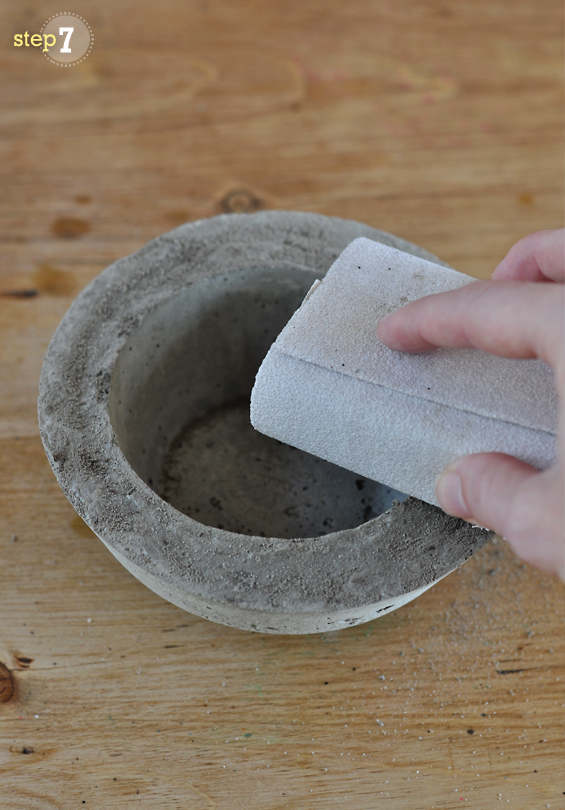
STEP 7 Sand or file any rough areas if desired.
I find that the tops can look a little bumpy and crude so I like to even them out with some sandpaper. I just think it makes the planters look a little more “finished”. Of course, if you like the rustic effect, you can simply leave it.
Note: Concrete is porous so any moisture will likely seep through and dampen the base of your planter. Protect any underlying surfaces by attaching small felt or rubber pads to its base. You may even want to coat the interior with a water-proof sealer, like silicone. In addition, be mindful that the lime content of cement can be harmful to certain plants so you may even want to consider lining the planter with some tough plastic to ensure there is a barrier between the cement and any soil.
Tip: In addition to coating the interior of your planter, you can also paint the exterior with a clear sealer to give it a slightly smoother feel and a hint of sheen.
Tip: If you intend to use your planter to house plants which require drainage, you can use a masonry bit to drill a hole or holes in the base.
FINAL NOTES
SAFETY
Be sure to read and follow any safety directions as specified by the manufacturer as cement can be hazardous to health.
DISPOSAL
Allow any left-over wet cement to harden before breaking it up and disposing in your general household trash.
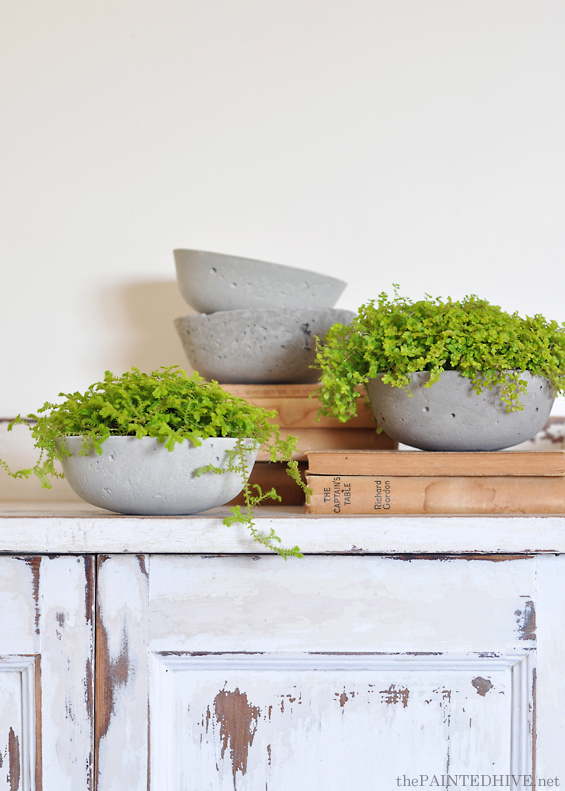
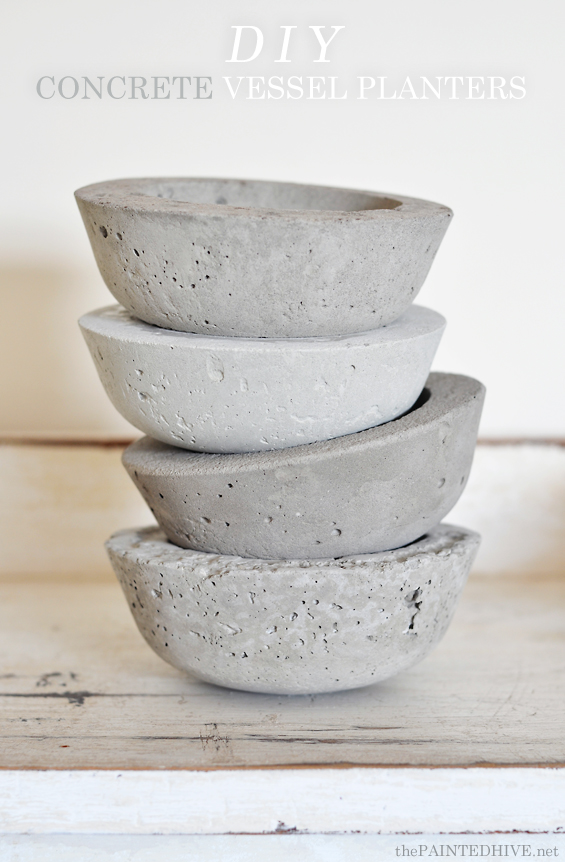
And there you have it! Super easy, affordable and kinda addictive!
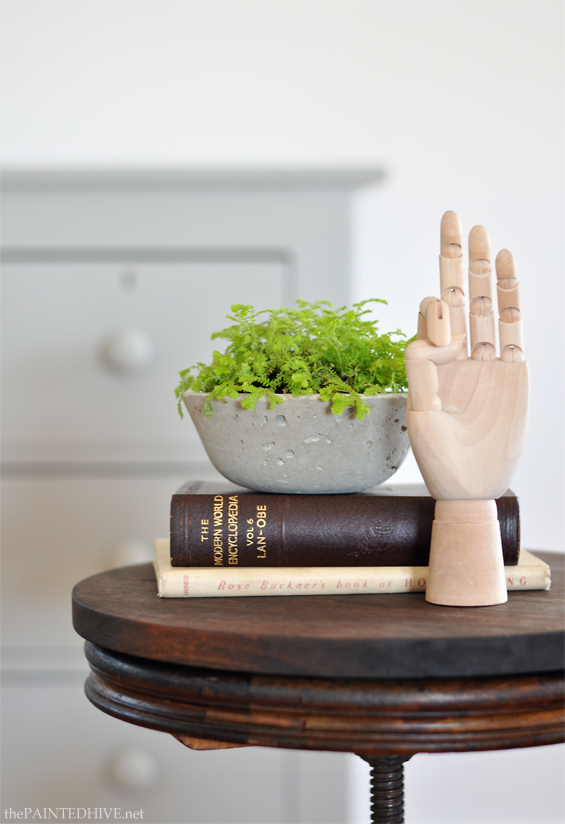
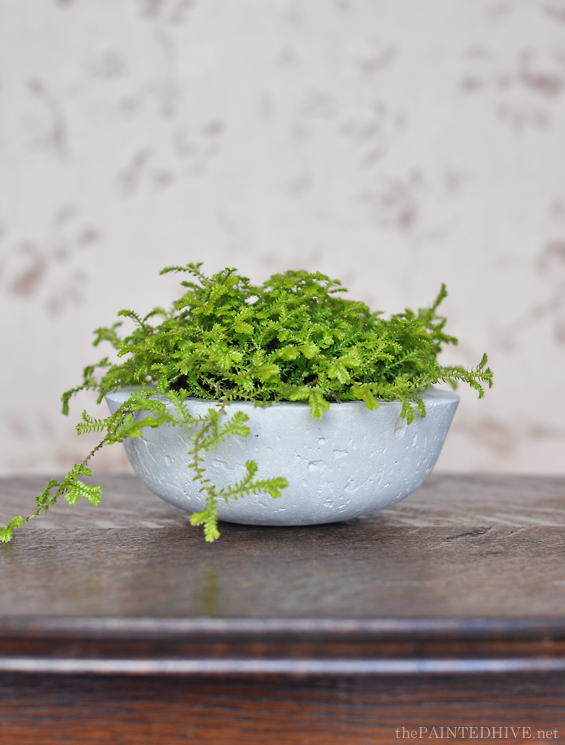
In case anyone is wondering the plants are Baby’s Tears (Soleirolia Soleirolii) and Golden Club Moss (Selaginella).

Although I’ve filled my vessels with cascading plants, you can use these cute little bowls in many ways, from catching jewellery on your night stand to keys in your entryway. Plus, they make awesome hand-made gifts!
I guess if you’ve read all this, you’ve probably worked out that my “DIY Concrete Vessel Planters” aren’t actually concrete at all! Technically, they aren’t cement either as the definition of cement is “a powdery substance”. Maybe I could call them “set cement”? Either way, concrete just sounds better and saves from confusion!
Hope this crazy, over-the-top, way too in-depth tutorial encourages a few of you to give this a go.
![]()
Thought I would put together this little ‘cheat sheet’ too…


Hi Kristina,
They look great! Very cute! Just one thing, though, regarding growing plants in concrete pots…. Each plant species has a very specific acidity-alkalinity range it will grow in, so you need to be aware, the lime content of the concrete will leach into the soil, and plant’s root zone. If, for instance, you grew plants which preferred a more acidic range in the soil, they would die when grown in concrete pots. Even more lime-loving plants would possibly struggle until the pots were well-aged and the lime had leached out a bit. You can get around this problem by lining the pots with black plastic or rubber. Just make sure you puncture some drainage holes in it, at the base. You could try painting the inside of the pot with a bituminous compound, but it always fails eventually.
Hope this helps you and your readers, as the idea and the pots do look great!
Cheers, Liz.
And here I was thinking I had thought of everything! LOL! Thanks so much for the additional info.
x
Would painting the concrete pots solve the acid issue as well?
Good question. To be honest, I’m not sure. Might depend on the type of paint as to whether it would form a barrier against leaching chemicals.
Thank you so very much for the in depth over the top tutorial. Your the best!
Ha, ha. Thanks Daniela :)
Was discussing home made concrete pots with a customer just a couple of days ago as concrete accessories are all the trend this season here in NZ.. I recalled the Hypertufa pots of the 90’s……how timely your post showed up and it’s so info packed.
Ive put a link to your blog on my store Facebook page. Country Matters, Winton, NZ.
Keep up the good work….love your decor style….I refer a lot of customers.. Your effortless comfy style is so doable without breaking the bank and is more appealing than the chain store look.
Thanks so much Gillian. Your super lovely comment has made me smile :)
I love these Kristina, great project and they turned out so adorable. I’m still on the look out for a set of little drawers like the ones you painted in a rustic, vintage green a while back. Love your creative ideas:-)
Thanks so much Marie. These make awesome gifts too.
I hope you find some drawers soon. I know they’re about, though they can be tricky to find!
You explain it very well. Thank you. I have to try :).
Emilia
Thanks so much. Glad you’ve found it helpful :)
Just gotta say how much I appreciate the work you put in to your tutorials. They are extremely helpful when trying something “new”. You have EVERY base covered. Thanks! :)
Thanks so much Deb. That actually really means a lot because I do spend heaps of time on making sure they are thorough and clear. Probably why my posts aren’t that frequent – LOL!
I love how simple these are to make, but add so much character to a home, really cool! Thanks so much for linking up with us at the to Grandma’s House we go link party! Pinned!
I love the simple design of your vessel planters! It is also really helpful to see what kind of cement you used to get the different results – thanks a lot for this inspirational post! :)
Thanks so much. Love your DIY geo pendants :)
I know you probably meant these to be used indoors but they’re so pretty I would love to paint them a pretty colour and use them outside as well! They’d be so lovely outside a front door or surrounding a garden shed to liven it up a bit, great job!
If you put a cork in bottom center before you push in bowl, it makes a natural drainhole.
That’s a great idea for plants which require well-drained soil. Thanks for the tip Marian :)
Thank you this was perfect, exactly what I needed. I feel confident to get on and try this
Awesome Rhona!
Hermoso trabajo y excelente explicaciones! Con gusto trataré de hacerlas con sus consejos.
Te envío un cálido abrazo señora artesana.
Sandra, from Argentina
Finally!!! After months of trying to find so many answers to so many questions I had about making such things, I stumble across your amazingly in depth tutorial, which has answered every one of my questions. You really have covered all the bases and I am so appreciative of that. Many others write with the assumption that there is already an understanding of many pointers, whereas you have broken it all down in to a perfectly detailed description, including every bit of useful info possible. THANK YOU so very much. I can finally get on with the fun, creative part now. I will definitely be pointing others in your direction. Thanks again and have a super weekend!
Thanks so much for letting me know you appreciate my tutorial Karl. I’m glad it’s helped you :)
Love your tutorial! I made a few planters from Portland cement
Without adding any aggregates…I removed from mounds after 24
Hours and then they sat in my dining room for at least a week until I finally put some succulents
I them and hung them in my window in some macrame hangers…the next morning I woke to find 5 out of 6 of them had large cracks down the side…not sure if it was from being hung in the window while it froze outside overnight or from putting the soil inside… or maybe not curing for the recommenders 7 days with moisture or not adding sand to the mix…I think I’ll try curin longer and adding sand…do you have any insight?
Hi Rebecca
Sorry, I can’t really say why it happened though cracks in concrete are pretty common-place. Given it occurred after potting the plants, maybe it was due to moisture in the soil? You might like to try sealing the interior of the planters before filling them next time. You can use anything which will create a film as long as it won’t leach into the soil and kill any plants.
Cheers
Hi Kristina.
To reduce the alcalinity of your pots once they’ve cured completely simply drop them in a large tub of water for a few days, the longer the better, but remember to keep refreshing it on a daily basis.
Thanks for the helpful tip :)
I have been looking everywhere to find out how to make these!! Thank you so much very informative I’ve subscribed to your site too! Can’t wait to make a start ! Just one question they look great as they are, but if you want to could you add a bit of colour or would the concrete soak it up?
I’m so happy to have found you lol
Regards Krissie
Hi Krissie. You can certainly add colour! You can do this by adding a pigment to the actual concrete mix or by finishing them with paint :)
So glad you found my site and thanks for subscribing!
Hi, hoping to make some vases (leaving a drinking glass in the middle of an orange juice carton Mold) looking for quite a polished but urban finish. Looks like you’ve trailed a few different concrete and cement mixes. Do you think cement alone would be strong enough?
Really appreciate your thoughts :)
Hi Ben
Yes, cement alone is strong enough to hold its own form though is definitely more brittle and prone to cracking and breaking. If you’re extra careful with it, it should be fine.
Cheers
Thanks for coming back to me.. I’ve made a small pot as a tester before I make the vases.. it’s going off now.. fingers crossed!
Let me know how it goes :)
Hi, Kristine, I’ve been researching these concrete vases for a long time, but everybody makes it look so difficult to make. Found your page on Pinterest and already made my first one yesterday, looks good! Thanks for making it simple, loved the tutorial! Will follow you from Rio de Janeiro, Brasil!
Love your tutorial. Very nicely done! I wonder if there are guidelines for how THICK the walls of the vessel should be? How thin could I make them and still have integrity of the materials? I’m getting ready to try my first journey into CEMENT! :). thanks for any advice!
Hello!
Can you tell me where you purchased your cement? Thank you! :-)
Just from my local hardware store :)
Love this idea! How would I make a drainage hole at the bottom to prevent root rot?
Depending on what type of items you use as your moulds you can create a hole and insert an object, like a dowel or straw, prior to filling with the wet concrete. Otherwise, it’s not difficult to drill a hole through the concrete once it’s set.
Ty for post ….. for lighter mix I 50/50 concrete and peat moss…. much lighter and porous feel
Artisan Concrete Mix (from Buddy Rhodes, $19 for 10 pounds), plus the little packet of Water Reducer that comes with it
Hello,
I just made my first cement pot tonight in a similqr manner. I was looking for information on curing without any luck. If you can pls help me with the method… Do I keep on putting water to the mould (with the top weight on) everyday for seven days? Or take out the whole mould then submerge in water?
Imin Melbourne Australia. The temperature gets cold at noght and 13 degrees celcius to 17 degrees in the morning.
Waiting for your reply anxiously.
Thanks
Hi Nishat. I’m in Melbourne too. You shouldn’t need to keep it damp. Because it’s cool this time of year it won’t dry too quickly (which is often what causes weakness and cracking). If you’re worried you can spritz it from time to time with an atomiser/spray bottle though it should be fine. Kristine.
Hello Kristine,
Thank you so much for your reply. I just used plain white cement (Dingo Brand). Reading few forums, I got so panicked, I coated one big plt with another layer of sand and cement mix the next morning. I just let the smal ones as it is.
After 16 hrs, it felt dry (plain cement mixture one). How many days should I wait to use it ? As in completely dry. And within the wait period should I keep on spraying inside and outside everyday?
Thanks again
❤❤
Hi again
I never placed mine in plastic bags or kept them damp and they set fine, though the successful curing can depend on lots of circumstances I guess. I’m impatient so as soon as mine felt fully dry I turned them out. You can wait seven days if you’d prefer. Given it’s quite cool I don’t think spraying all the time is needed though it wouldn’t hurt.
Kristine
x
Also, do I hv to keep in a plastic bag or spraying everyday and keeping it outside in pargola should be fine?
Lastly, after 24 hrs, should I take it outside of the mold to cure it? Or cure it as it is?
Thanks