
This is part two in a three post series covering the transformation of bi-folds into barn doors. You can read the first post here.
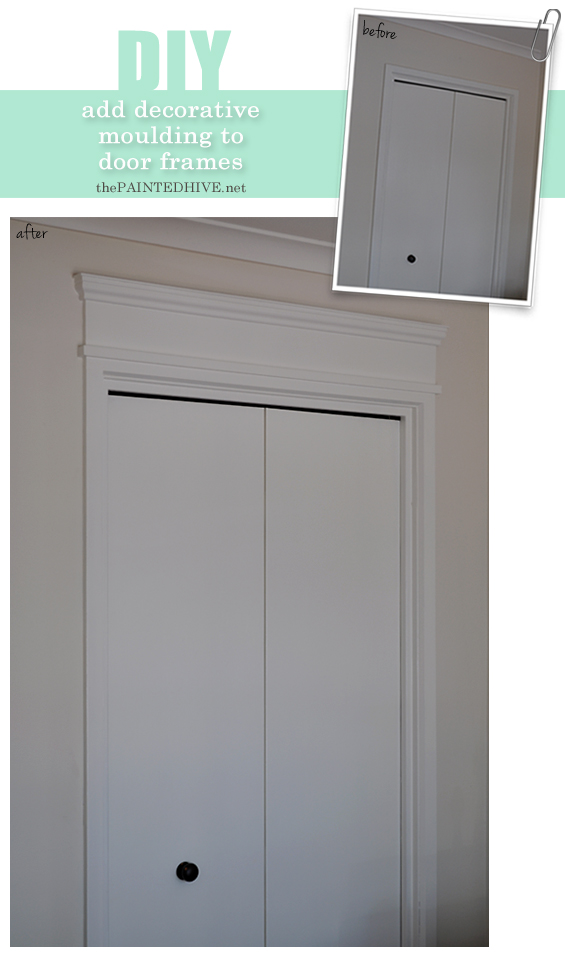
When I was hunting down inspiration for the transformation of Charlotte’s bi-fold doors, I came across an old photo on a woodworking forum of some interior doors with decorative head trim. I know ornamental architraves aren’t exactly a new concept, though for whatever reason this particular picture really caught my eye and made me wonder about the possibility of incorporating something similar (sorry I can’t share the photo – I never bookmarked the site and can’t find it again!).
So I took some measurements and rendered up a rough preliminary concept…
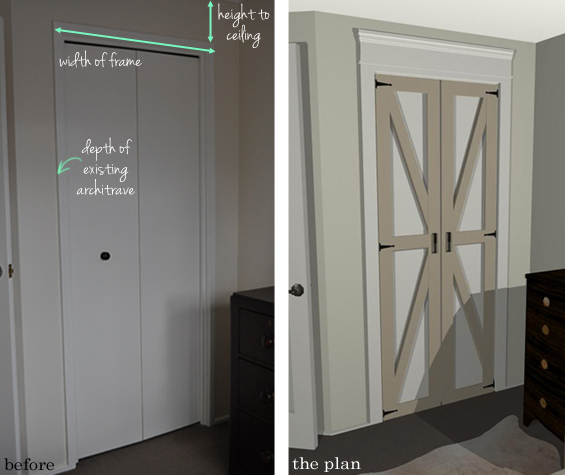
…then headed into Masters to see what I could find for my project.
Despite feeling that at any moment I am going to be mistaken for lost, intercepted by some well-meaning store assistant and promptly escorted to the nearest ‘decorator’ item, I always peruse the timber department when I’m at the hardware store. Being a budget-concious, cosmetic-focused home improver, many of my DIY projects rely on timber trims, panels and mouldings. Much of the time I struggle to find just what I’m after, especially when it comes to mouldings, though fortunately it didn’t take me long to track down exactly what I needed at Masters.
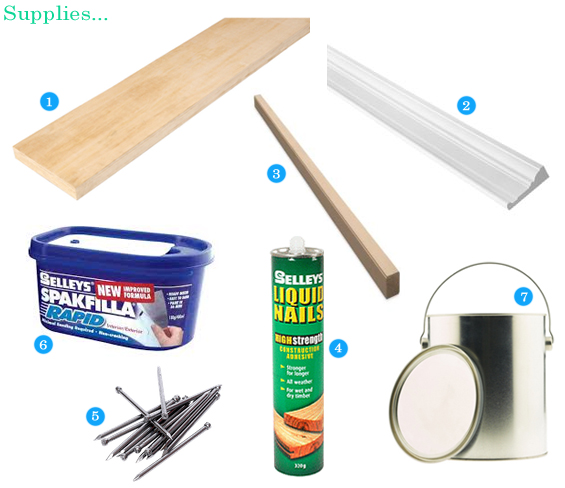
1 Timber plank (to give height to the existing frame and act as a base for the moulding). I used a piece of Poplar DAR which was 12mm deep (the same depth as my existing frame) x 140mm high. This piece will abut the top of the existing door frame to give a seamless illusion of more height so obviously it needs to have the same depth as the existing door frame.
2 Timber moulding (to provide the decorative crown). I used a piece of primed MDF arch moulding.
3 Timber trim (to hide the join where the new plank and existing door frame meet). I used a simple piece of rectangular pine DAR (Dressed All Round).
4 Liquid nails.
6 Spak.
7 Paint. I used an all-in-one primer for the base coat and the left-over paint we had from originally painting our architrave for the top coat.
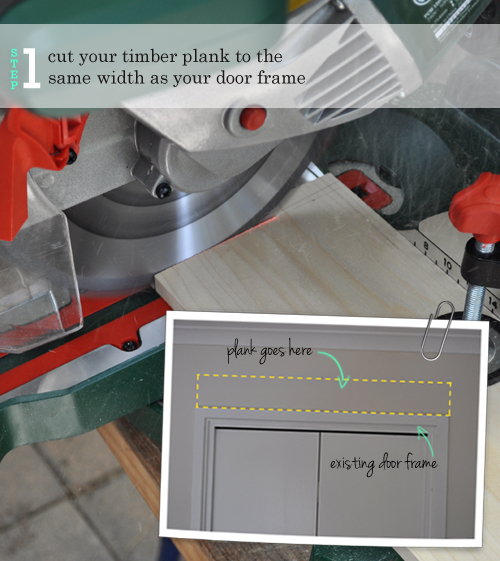
STEP 1 Cut your timber plank to the same width as your door frame.
Measure the width of your door frame then cut your timber plank to match (see inset pic). Remember, this piece of wood will be positioned directly above the door and the idea is for it to adjoin the existing frame seamlessly. Of course you can use any kind of saw though I was lucky to test out my new sliding mitre saw and it was AWESOME! Lightly sand the cut to smooth any roughness if needed.
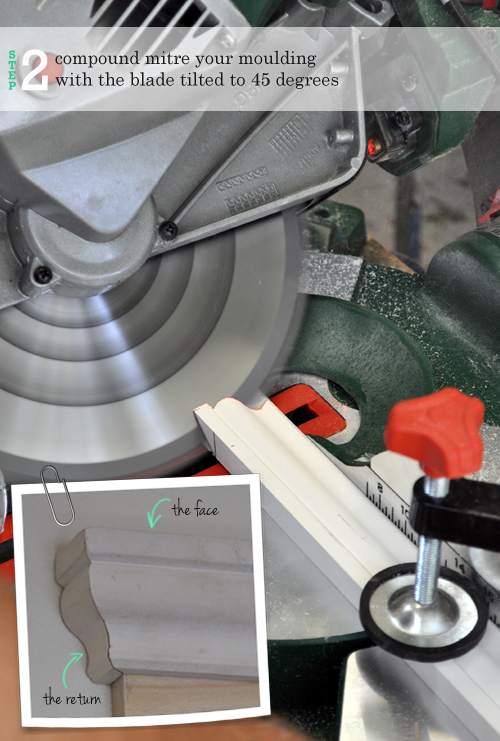
STEP 2 Compound mitre your moulding with the blade tilted to 45 degrees.
This is kinda tricky to explain and much easier to understand when you’re actually doing it! You want to create two compound mitred corners, where the timber wraps seamlessly around the corner. To do this, you need to use a mitre saw with the blade tilted to 45 degrees (you can see in the above photograph how the blade is tilted – not straight as in Step 1). First, cut each end of your face moulding keeping in mind that the finished length of the inside edge (the short side) needs to match that of your plank (from Step 1), not the outside edge (the long side). Confused yet? Like I said, much easier to understand in practice! Next, still using the saw at 45 degrees, cut two return pieces which will form the ends. These return pieces will have one flat cut (where they abut the wall) and one mitred cut (where they join the face moulding – refer to the inset pic).
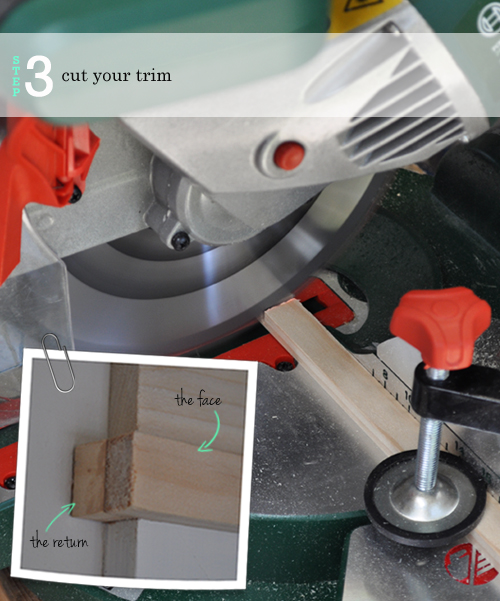
STEP 3 Cut your trim.
If you are using a square or rectangular piece of trim (like I am) there is no need to mitre it. Simply cut a face length to overhang your door frame on each end by the depth of your trim (for example, my door frame is 900mm wide and my trim was 12mm deep, so I cut it to 924mm). Then cut two small return pieces to fit between it and the wall (refer to inset pic). Sand any rough edges.
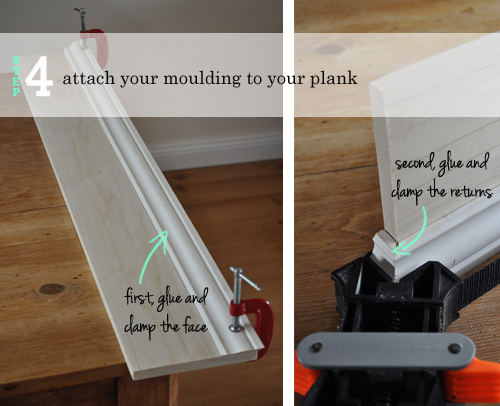
STEP 4 Attach your moulding to your plank.
Attach the face moulding first. Run a squiggly bead of liquid nails along its length, position it on your plank then carefully clamp it down (I used G clamps). You may want to use blocks or pads to prevent the clamp feet from damaging your moulding. Wipe away any excess glue with a dry cloth. Allow to set.
To attach the returns, apply a sparing amount of liquid nails, position them in place then clamp (I used a picture frame clamp though as the return pieces are only small you could simply use tape to hold them in place until set).
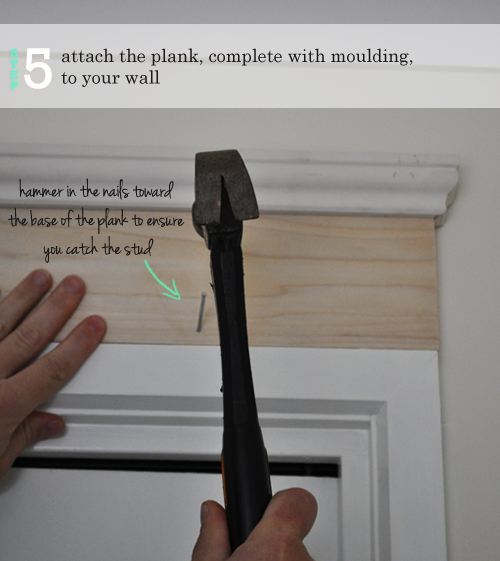
STEP 5 Attach the plank, complete with moulding, to your wall.
Hold your plank in position above the door frame and hammer in at least three long finishing nails. There should be a structural stud running along the top of the door frame so hammer the nails in toward the base of the plank to ensure you catch the stud. If needed, use a punch to recess the nail heads. You could forgo nails and simply glue the plank in place if desired.
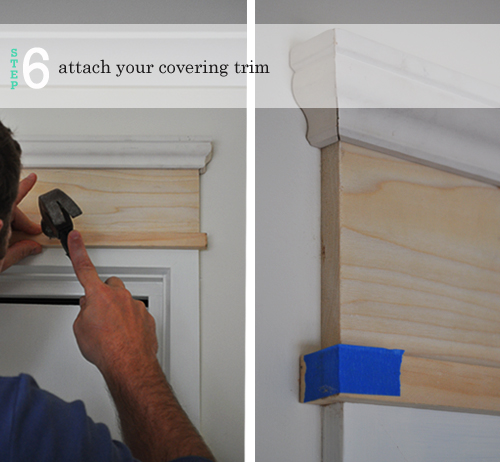
STEP 6 Attach your covering trim.
First, attach the face trim. Hold it in position over the join where the existing door frame meets the plank then either glue or nail it in place. My trim is pretty chunky so I opted for nails. Glue would be better for fine trim. If using nails, obviously try and avoid the gap beneath the trim where the two pieces of timber meet.
Next, attach the return trim pieces with some liquid nails then use tape to hold them in place while the glue sets.
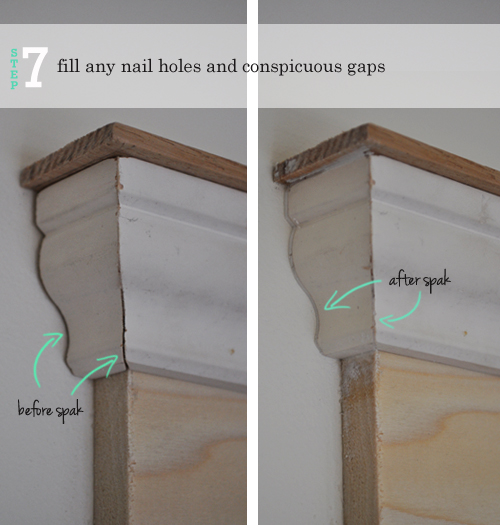
STEP 7 Fill any nail holes and conspicuous gaps.
Use some spak to conceal the nail holes and fill any noticeable gaps. I like to keep a damp rag and sharp implement on hand to keep things neat as I go. Once the spak is dry, sand lightly.
You can see in the above pic that I have also added a thin piece of trim to the top of the moulding. Of course this isn’t a necessity, I just felt it needed a little cap to finish it off. I simply cut a piece of timber to fit then glued it on.
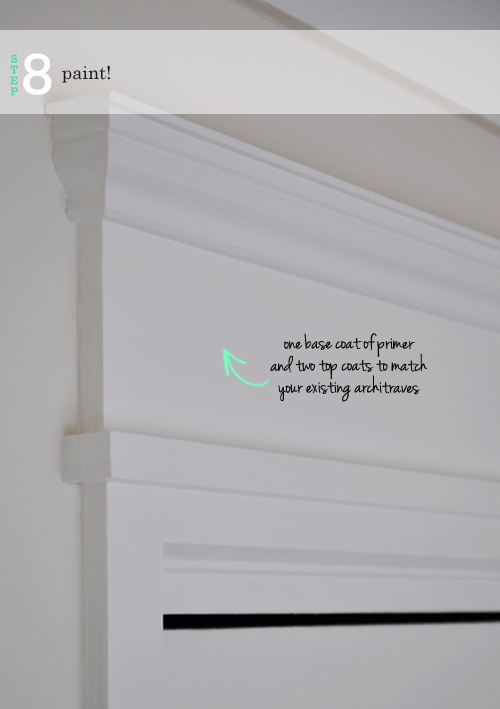
STEP 8 Paint!
I applied one coat of prep and finished with two coats of white gloss acrylic (to match my existing architraves). Ahhh, the magic of paint!
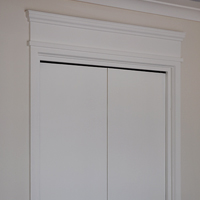
Fini! Remember, this is only phase one of the door transformation so please try and ignore the visible gap at the top of the door, oh, and also maybe the fact it is a kinda ugly bi-fold with one lost-looking black nipple of a handle (that will all be changing soon)!
Now, here are some of those side-by-side before and afters I adore so much…
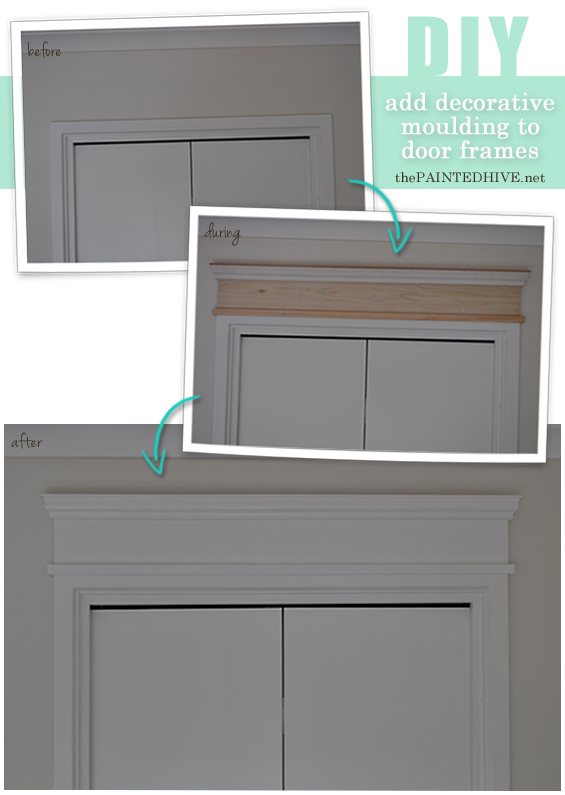
I’ve gotta admit I am pretty stoked, and a tad surprised, with just how well this turned out. The virtual rendering was drawn-up on a whim to give a basic visual representation of the idea with no real ambition to actually replicate it though by chance it has turned out almost exactly the same! Freaky.
Now, onto stage two; the barn door cladding! Hmmm, wish me luck :-)
![]()
![]()

![]()
![]()
![]()
This is part two in a three post series sponsored by Masters Home Improvement.
You can read part one here. All opinions expressed are my own.
![]()


This is awesome; you’re so clever.
It was a bit of a fluke really Julie :-) Though it was easy and relatively fast so now I’m walking around looking at all my un-dressed door and window frames (willpower – must finish Charlotte’s room first!).
Wow what a difference, I love how trim can make something look so elegant.
So true Lisa. I had no idea how this was actually going to turn out though it was so easy and effective it’s given me ideas about all the plain architraves in my whole house – dangerous :-)
Good work
Love it. Can’t wait to see how the doors turn out. Your directions are awesome!
Thanks Georgie. I try really hard to make my tutorials as clear and thorough as possible. Glad you liked it :-)
You’ve got some serious looking tools! The most I can manage is a drill and a hammer. The end result looks amazing. Found a green frog luxuriating in my lawn this morning after a little rain. I put his portrait on my Libby’s Lifestyle Facebook page. I think you’d like him. I think it’s a him?!
Just checked ‘him’ out. What a sweetie! I was so excited when I spotted my first wild green tree frog on a visit to Cairns a few years back. Love them.
Your so clever, I can’t wait to see the final pictures. I always add more to my husbands to do list, after your posts. Keeps me dreaming. Thank you darling.
Great upgrade! It looks awesome :)
This is a great idea and tutorial. The end result looks fab!
Thanks Erin :)
WOW what a difference! they look fantastic. Lisa xo
Wowsers! I love this. It adds so much character and beefs it up too.
“Beefs it up” is so apt Andrea :-) I thought the trim was gonna be a bit too chunky though I love the body it gives.
This is so cool. I would never have thought decorative architraves were something I could have in my very plain standard builder house though you have given me hope that I can…and even more, that I can actually do it myself! Thank you!!!
I must admit, I have struggled to find the types of trims and mouldings I read so much about in the American blogs, though here you are showing me that they DO exist here in Oz. I had almost given up. Can’t wait to try this. Masters, here I come!
Your blog was one of the first I found to serve as inspiration for redecorating my living room. I love all of your ideas.
Thanks Cheryl. Let me know how your living room goes :-) Starting a new room makeover is always so exciting.
What a great idea! And it looks awesome! It’s amazing what some embellishment can do to what you already have. I’m featuring this at my link party tonight and pinning!
Thanks so much Alexis :-)
Thanks for posting so nice and mind blowing post
I had a similar idea for boring tops of closet bifold doors. I hated how they always looked unfinished. Thank you for all of your wonderful instructions!!! Much appreciated!
You’re welcome Therese. It’s an affordable way to add some custom detail.
:-)
This molding over the door looks really incredible! Thanks for sharing all the details. Julie
Ok, I think I am going to try it! Your directions and pictures are fabulous for this visual learner! Thanks for sharing and I will be sure to link you when I get it all done!
Great!
Thanks so much – I was looking for ideas to beef up my garage door trim and your directions and look are the best!
This is great. Can you please tell me the dimensions of the arch moulding? Thanks!
Sure Jodi. It’s 42mm high x 32mm deep.
:)
great ideas, how about a outside door to a storage
Excellent article! I searched quite a long time to locate an online article which actually focussed on retaining the existing builder grade door casement/trim (which is still in very good condition so I didn’t feel it should be replaced). This worked perfectly for my budget upgrade achieving a great farmhouse trim appeal! Love your work!
Thanks. So glad it helped you.