
Every now and again I receive questions about past projects.
It’s always a lovely surprise though also a tad embarrassing to be reminded that people still read my older stuff. I mean, don’t get me wrong, I am proud of my humble beginnings and grateful for the path my callow bloggy pavers have laid, though am still bashfully aware of just how far I’ve come (and yes, I’m also aware that in a few years time I’ll probably look back at my current posts and think they’re crappy too).
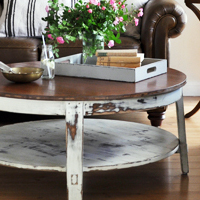
Anyhoo, one of the most asked about projects from the past is my distressed coffee table makeover (from way back in 2011).
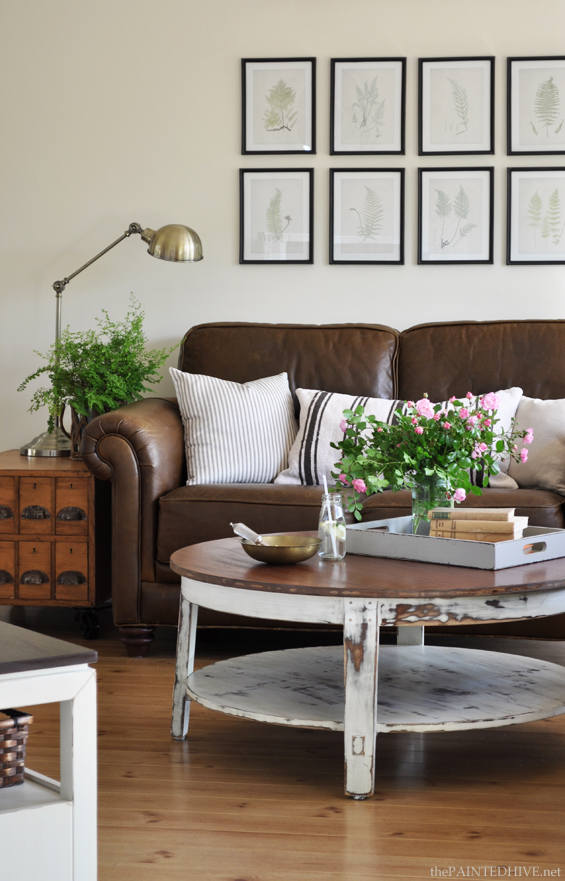
Photo from my living room mini makeover 2012.
After a slew of recent questions (I guess the old post must have been freshly featured somewhere?), I re-visited the article myself and was, let’s just say, a little underwhelmed.
No wonder I kept getting so many questions. Where were the step by step instructions, detailed explanations and accompanying images I love including today? Nowhere, that’s where! :-(
So, given the apparent ambiguity of the original post I thought I owed everyone (and myself) a more complete tutorial.
Just in case you’re new here and are wondering, I originally picked this table up from eBay for around $25. It was in great condition and certainly nice enough as is though I personally felt it lacked a bit of character.
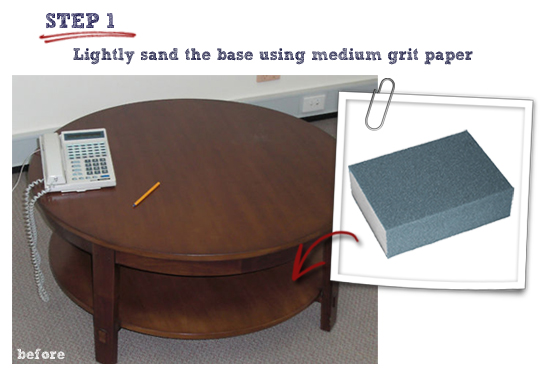
1 Lightly sand the base using medium grit paper.
Because I planned to paint and distress the base I wasn’t too fussed about the preparatory sanding being thorough. In fact, I didn’t want it to be too thorough because it was important the paint could be distressed easily for a more authentic look. I simply wanted to create a bit of scuff to lightly grip some of the paint.
Maybe at this stage I should also apologise for the crap before shot. Another oversight from my early blogging days. It’s taken straight from the eBay listing and, no, the pen and phone were not included – false advertising or what?
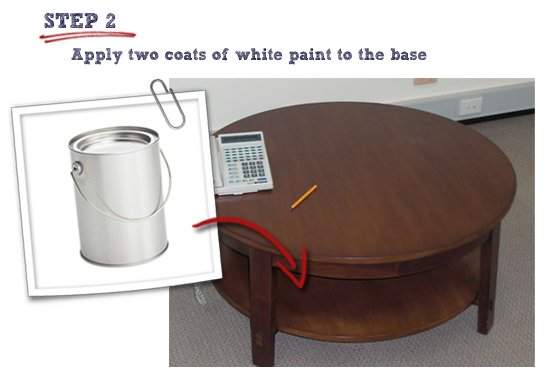
2 Apply two coats of white paint to the base.
After cleaning away any sanding residue, I applied two coats (with drying time between, of course) of standard acrylic wall paint using a brush. You could use pretty much any paint though where distressing is concerned some do produce better results than others. In my experience low sheen, water based paints are great (of course there are also “speciality paints” – such as chalk and milk paint). I find glossy or oil based paints can be a bit ‘tacky’ which makes distressing trickier. Another reason I tend to use standard acrylic wall paint is because I often get it for super cheap (mis-tints) or even free (from hazardous waste depots). I didn’t apply any primer because, again, I wasn’t too fussed about the paint adhering perfectly.
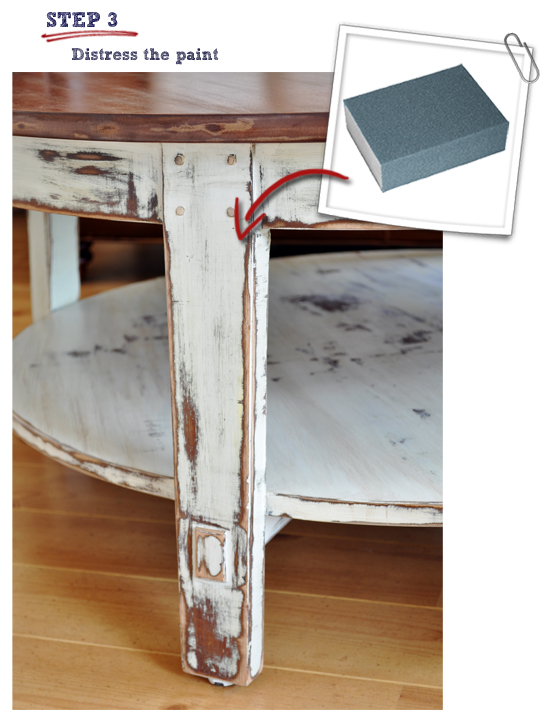
3 Distress the paint.
Once the paint was thoroughly dry I distressed it heavily by hand using a sanding block and a combination of sandpapers with varying grits (basically, I used rough paper for heavy distressing and fine paper for more subtle distressing). You could use a palm sander (I generally do) though for whatever reason I just distressed this one by hand (palm sanders can leave small scrolly squiggles – which may or may not bother you – due to the vibrations). I completed the sanding with an all-over rub of steel wool for a smooth and silky finish.
This process takes a bit of time and elbow grease and, although practise and technique can help, it’s pretty much just an ‘anything goes’ task. Play with sanding directions and depths, inspecting your progress from time to time, until you have achieved the look you’re after. From memory I also used a belt sander on the table shelf to make distressing the large, flat area quicker and easier.
Because my table was a naturally light coloured timber which had already been coated with a dark brown stain, my distressing revealed two tones of wood. This multi-tonal look makes for a really beautiful layered effect. If you’re starting with a piece that is light in colour and want the “layered” look, if at all possible, I do recommend staining it first.
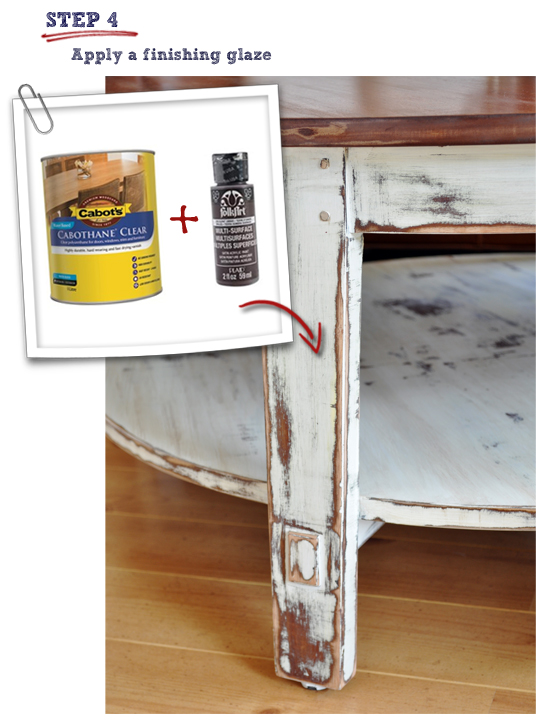
4 Apply a finishing glaze.
I’m not really of the opinion that top coats are always needed and am not sure if this is something I would bother with any more. At the time I think I was experimenting more than anything. I simply combined some brown craft paint with some clear acrylic sealer (around 1 part paint to 9 parts sealer) then applied it liberally with a rag before wiping it away again with another slightly damp rag. This created a subtle all-over sepia effect and a very soft sheen along with protecting and ‘finishing’ the finish (make sense?).
Just keep in mind that most clear sealers will yellow to some extent over time (some more so than others). If, like me, you’ don’t mind a bit of warmth in your whites, then this probably won’t bother you though if you’d prefer to keep them crisp ask for a non-yellowing sealer.
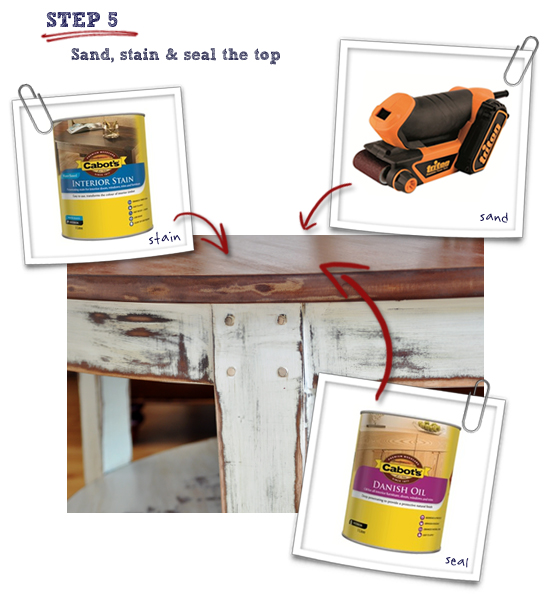
5 Sand, stain and seal the top.
It’s hard to tell from the before photo though the table top was simply stained veneer and for my personal taste was just a little too perfect – bordering on fake looking – and had a slight pink tone.
I sanded it back to raw, being careful not to go too far and reveal the composite board beneath the veneer, using a belt sander then distressed it slightly using a combination of hard, heavy and pointy implements (a hammer, steel chain, and prick punch). I then stained it a deep walnut colour and sealed it with one coat of danish oil. Sorry if you’re a regular visitor here and are sick to death of hearing about my love for danish oil, though for any new readers it’s my absolute fave timber sealer and totally awesome!
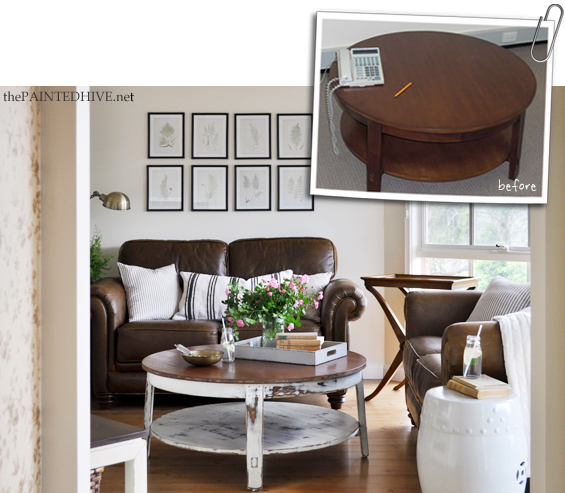
What was originally a rather plain table is now perfectly at home in my cottagey style living room. But more than that I feel its sense of personality actual injects further “life” into the space.
I’m planning to re-visit a few of my other more popular posts from the past in the hope of making my project processes a little more clear, detailed, and ultimately, achievable. I’ve also been working on getting Charlotte’s bedroom finished along with helping my parents with another room makeover at their place so, although I know at the mo’ I could probably be out-blgged by a glacier, I promise there are fresh projects in the works.
![]()


Had to laugh when I saw this. I was one of those people who had previously pestered you with questions about your table so this is really great and don’t worry about your glacial pace. I wait for your posts and am always thrilled to see one and am sure you will have more time once your little ones are a bit older.
xx
this table turned out so beautiful. one of my favorites for sure.
This is gorgeous. Love it.
Thank you Trish :-)
Perhaps you could be out blogged by a glacier but EVERY post on your blog is awesome; quality takes time. :)
Thank you Julie. That made me smile.
Love this! Maybe I will try something like this for my next project.
Thanks for the inspiration!
http://www.endlesshouseaffair.com
Always thankful for directions of any type! Because in my mind it is always more complicated than it is. I love a round coffee table and especially one with a shelf on the bottom! Even though it is 3-4 years old it is stil a great piece!
Thanks Sherry. If only I could figure out a way of writing the tutorials before I actually do the projects – that would save me lots of brain-storming and mistakes! I don’t think it really works like that though ;-)
As always, a great post! Love the transformation.
Thanks Etta.
You make this look so easy! Love it ;). Very pretty..
Thanks Amy.
Tutorials do have a tendency to make things look a bit easier (and quicker) than they really are though if anything I hope I made it look do-able :-)
Hi!
Love this. Really love your leather sofas though…where did you get those??
Thanks!!
Thanks Jenna. They are around three years old now and are discontinued :-(
Just to let you know though, they are from Plush Sofas. Not sure where you’re based. It’s an Australian store.
I used your blog as a guide to finishing my coffee table and it turned out BEAUTIFUL! I am absolutely in love with danish oil now. Everything gets a little danish oil now!! LOL
Thank you!
He, he. Sounds like you’ve caught my danish oil disease!
Great job with this! It really looks like a new table! I’m excited to begin doing this to my coffee table and possibly my 2 living room end tables too. :]
Oh great Holly! So glad to have helped inspire.
I have to say this is my favourite piece since I’ve been following you!
Thanks again Eliza. I think this coffee table is lots of people’s fave :)
Hi Kristine,
I’ve got a few nested tables i’ve been thinking of distressing but i always thought I had to go back to bare wood (i.e. remove every bit of top coat) to be able to paint over it and it not bleed through. Can’t wait to have a go now with my 3 tables.
Thanks
Hi Aliyyah
In my experience you def do not have to go right back. It’s true that some stains may bleed through paint though tannin bleed can also occur from completely bare wood – there’s no fail safe. If you’re a bit concerned, use a stain blocking primer first. I personally wouldn’t worry about it, especially as you’re planning to distress the tables. I actually prefer painting over stain when I plan to distress a piece as it provides a multi-tonal look once sanded back.
Cheers
I love this, in fact I’m in the process of refinishing a coffee table now. I have one quick question… Is it okay to use the Danish oil on stained wood? I only ask because the back of the container says “use on dry wood from which all previous coatings have been removed”
I use Danish Oil over stained wood all the time. I assume by coatings they mean finishes, such as varnish and polyurethane. You should be fine.