
You guys!
I was totally overwhelmed by the response to my laundry room makeover. Thank you all so, so much for the sweet comments, and for your votes! Although I’m not sure I can compete with some of the other super talented and popular contenders, it’s been heartening to see my numbers grow and I might still have a chance. You guys are the best!
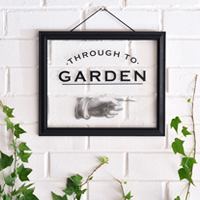
Now, as promised, I’m back to start sharing more details about some of the DIY projects in the space and thought I’d begin with one of the most asked about elements – the glass door decal.
This was a really easy and affordable project which packs a heap of vintage punch.
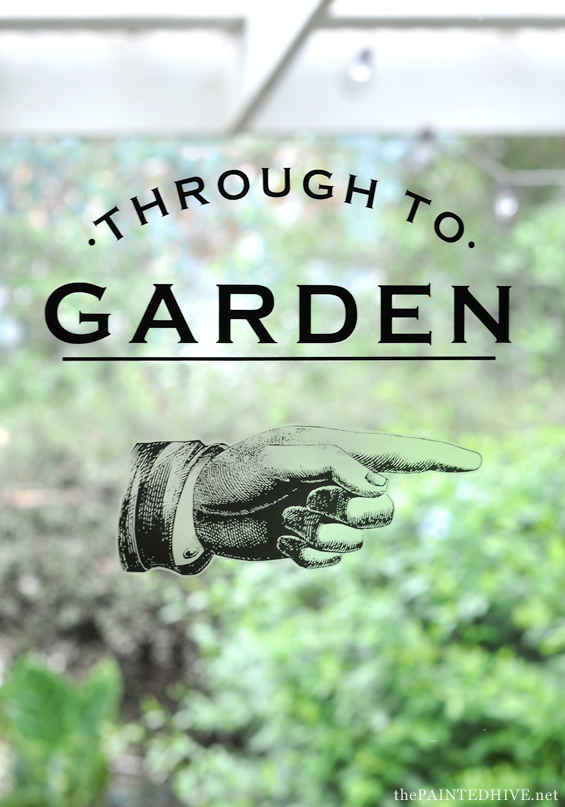
I’ve been wanting to embellish a glass door for a while now so deciding to add a decal was a no-brainer. Settling on the graphic, however, was a little more tricky. I went back and forth between lots of ideas though kept coming back to a “beer garden” type feel. I almost wanted it to look like the door had been salvaged from an old hotel or something and just happened to suit its new home.
Anyhoo, here’s how I did it…
![]()
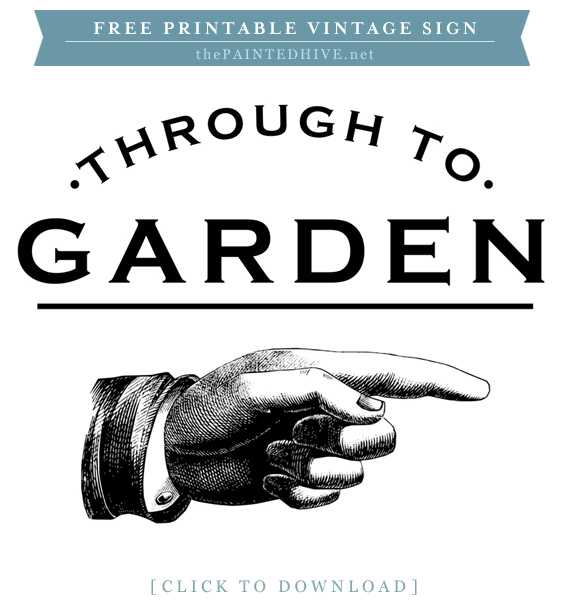
You can find my graphic as a free download at the end of this post.
I used Photoshop however you can use almost any word processing or image editing program you like (please refer to my note below for some info about possible restrictions). The font I used is Copperplate Gothic Bold and I found the directional hand on a free clip art site. If my graphic isn’t right for you, and you’re not sure about designing your own, you can also search online for a free or premium digital one to use.
Note: Not all image types and file formats are supported by all vinyl cutting machines. ‘Raster‘ images (such as JPG, PNG and GIF) may not perform as well as ‘Vector‘ images (such as SVG, EPS and DRW). If you intend to use your own desktop vinyl cutter check the options first. If you plan to engage the services of a professional, inquire about what is accepted and/or whether they can help if needed. If you find you have a graphic which doesn’t comply, it may be able to be made compatible through the use of conversion software. I have offered a few different versions of my free printable to (hopefully!) cover all bases.
![]()
Due to the nature of my particular design, I needed (well, wanted) to use two forms of decal; a vinyl decal (for the text portion – including the dots and underscore) and a waterslide decal (for the hand). I decided to use a vinyl decal for the text portion because it’s crisp and clean and has no carrier film. I used a waterslide decal for the hand because the image was too intricate to be cut from vinyl, plus it would have been almost impossible to “weed” out neatly.
CREATING THE VINYL DECAL (FOR THE TEXT COMPONENT)
If you have a domestic vinyl cutting machine (like a Cricut or Silhouette) you can simply use that. As I don’t have a machine I enlisted Vivid Wall Decals to cut the vinyl on my behalf. Custom vinyl cutting is a very common and super affordable service. My decal cost just $8.
CREATING THE WATERSLIDE DECAL (FOR THE HAND ILLUSTRATION)
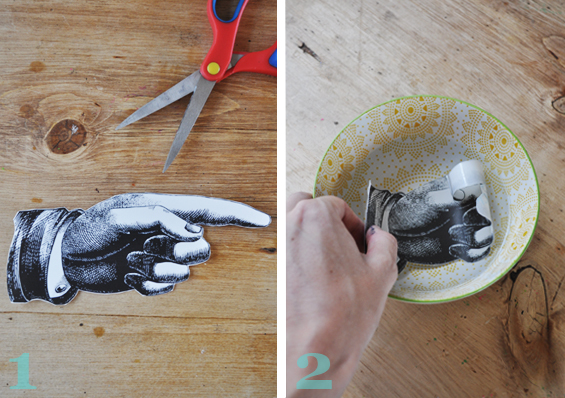
Creating the waterslide decal is pretty easy. You just need a sheet of waterslide decal paper and a printer. Waterslide decal paper can be found online or in some craft/hobby stores. Be sure to purchase the “clear” paper in either “inkjet” or “laser” to suit your particular printer. Here’s how to make the decal…

1 Print onto the smooth side of the waterslide decal paper and allow the ink to completely set (around 30 minutes).
2 Depending on the brand of waterslide decal paper you use, you will probably also need to seal the decal. For this, you can either mist with a few light coats of clear sealer OR laminate with some magic coating paper (find my tutorial about using magic coating paper here). As this decal is being used purely for decorative purposes, spray sealer should provide ample protection.
Note: I’ve never personally used it, however I believe Lazertran waterslide decal paper does not require sealing.
3 That’s it!
![]()
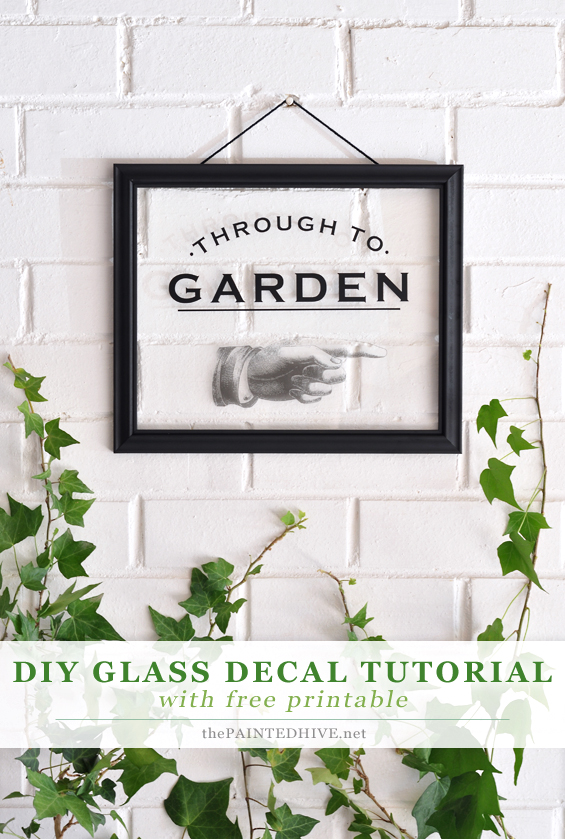
Because I didn’t stop to take notes and photos when I applied my decal to the door, for the purpose of this tutorial, I’m using picture frame glass (which is also a cute alternative if you don’t have a door or window to apply the decal to).
APPLYING THE VINYL DECAL
If you purchase your decal from a supplier, they will include full instructions. If you have your own cutting machine, you’re probably an application pro already!
Vinyl decals generally come in three layers; backing liner (to conceal the sticky surface of the adhesive sheet), vinyl decal (the actual graphic), adhesive sheet (to help with the accurate placement of the decal). The process is pretty straightforward…
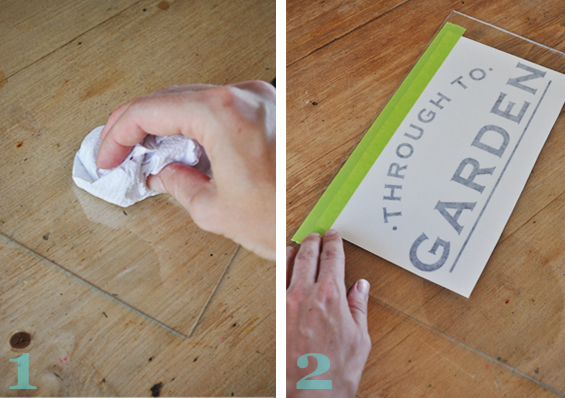
1 Ensure your surface is clean.
2 Fix the decal in position by running a length of masking tape, to act as a hinge, along the top edge.
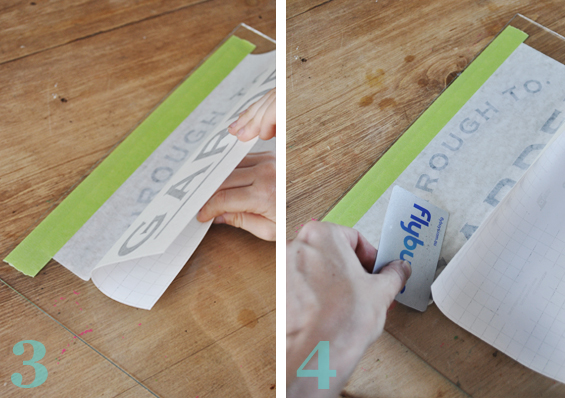
3 Hinge the decal out and peel the backing liner down a few inches (shout out to my little daughter for being my hand model here – I told her we were making a sign to a Troll’s garden dance party!).
4 Continue peeling back the liner, a little at a time, and smoothing on the adhesive sheet with a credit card as you go.
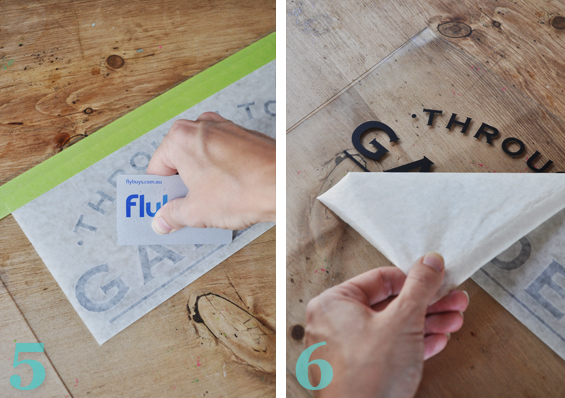
5 Once the backing liner is completely removed, the adhesive sheet should be fully affixed. Smooth over the underlying vinyl decal with the credit card, ensuring it is well adhered.
6 Remove the masking tape and gradually peel back the adhesive sheet, keeping it on a tight angle to the surface. The vinyl decal should remain affixed. You can rub with a credit card as you go if needed.
7 That’s it!
APPLYING THE WATERSLIDE DECAL
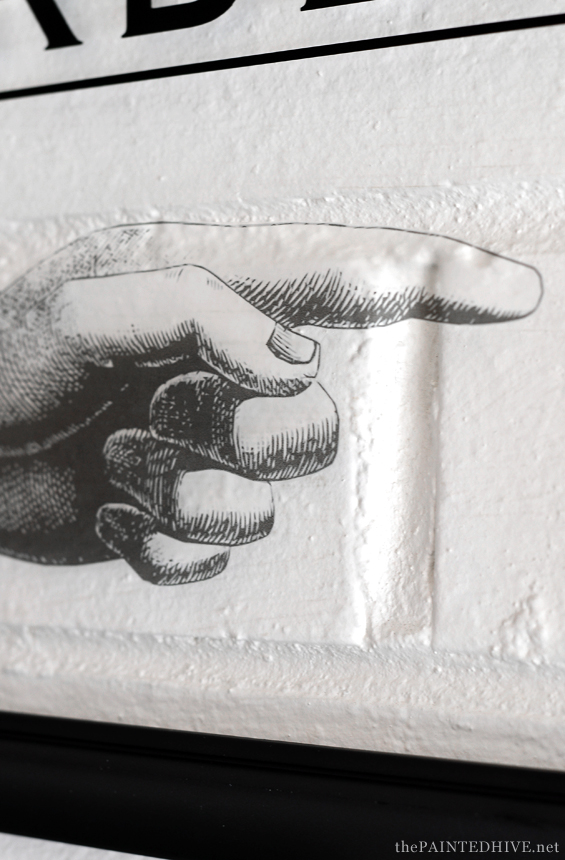
Unlike vinyl decals, which are silhouette cut, waterslide decals have a carrier film which results in a slightly translucent background. On opaque objects the film becomes almost invisible though I wasn’t sure how it would look on the glass with the light shining through it. Although it does have a slightly frosted appearance, it actually works really well, almost like the hand has skin. Applying the decal is super simple…
1 Cut as neatly and closely as possible around the image.
2 Immerse in lukewarm water for 30 – 60 seconds until the paper layer begins to release (the decal will probably curl though don’t worry about that). Leave the paper attached at this stage.
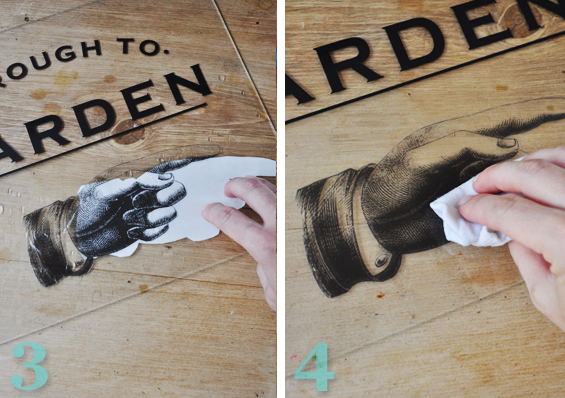
3 Position the decal as desired, with the paper layer on the underside, then gently slide the paper out. This can be fiddly and the decal will probably move around and might crease a little though it can be easily repositioned and flattened whilst still wet.
4 Use a soft damp cloth or small rubber squeegee to smooth out any air bubbles and creases, working from the center out.
5 That’s it!
![]()
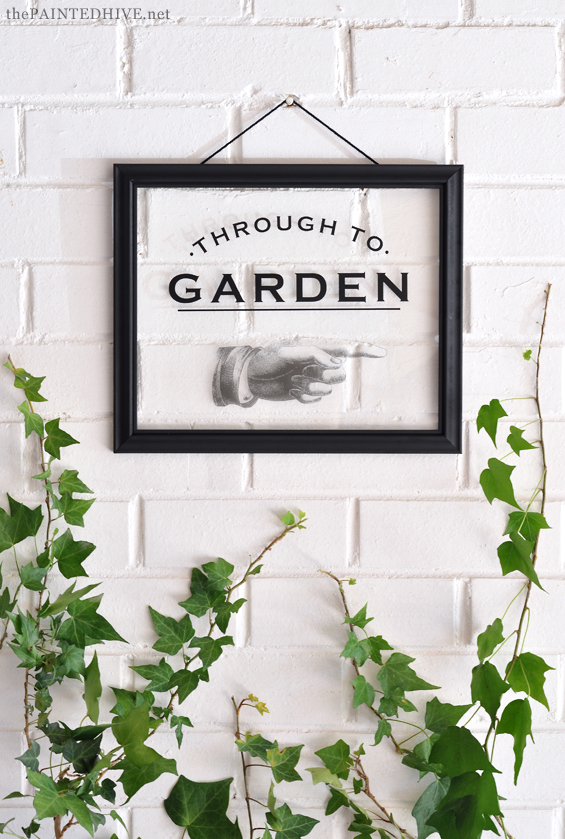
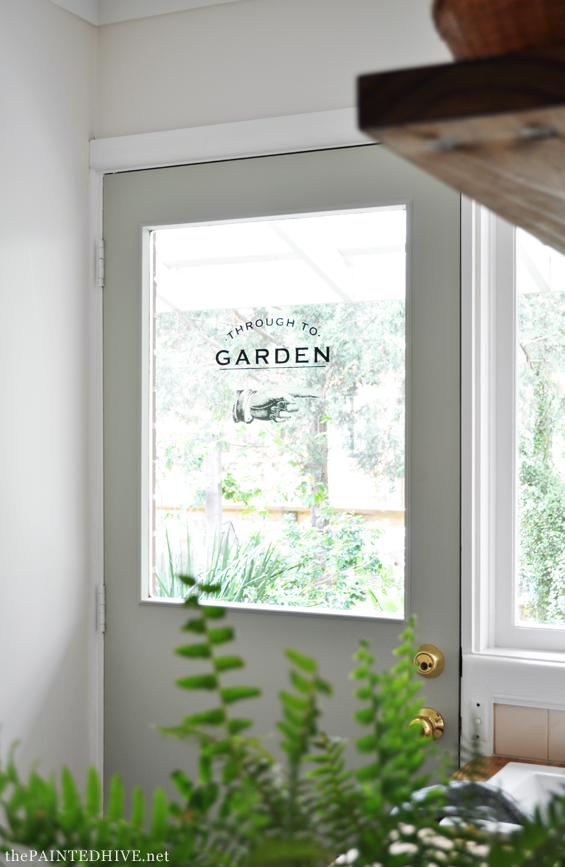
The picture frame turned out really cute though I adore the amount of charm the decal lends the door.
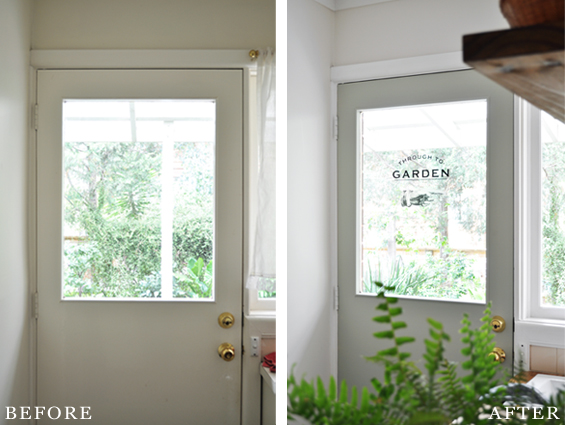
The new paint colour on the door is “Green Result” by British Paints.
Especially with all the greenery behind it.
Mum and I kept standing back and saying “Wow, that actually looks really, really cool!”. I think we stared at it for about ten minutes! Ha, ha.
The vinyl decal is deeper in colour and a tad sharper than the waterslide decal though they still work really well together.
And, in case you’re worried, the glass door even looks charming from the backside too…
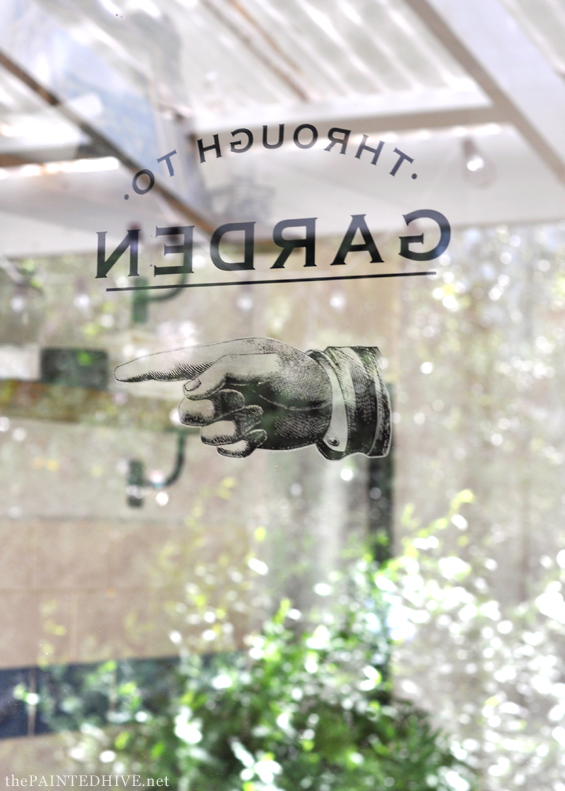
Although it is tricky to photograph!
You can download your free printable below.
Note: I’ve created a folder complete with PDF, JPG and EPS files, including left and right versions of the hand. Choose the right file for your intended use.
If you don’t have an appropriate glass door or window, you can apply the decal to almost any smooth surface using the same method I’ve described above. Or, you can do as I have for the tutorial and use the glass in a picture frame. Another option is to simply print the graphic onto regular paper and pop it into a frame, or create your own custom sign (I have a tutorial for that here). The possibilities are almost endless.
Have fun!
![]()
Free for personal non-commercial use only.


This is so inspiring. Thanks for posting.
I’ve said this before, though you have the best ideas and your tutorials are shmick girl. I love this and really love the way you used the picture frame glass. Greta idea for those of us without a windowed door.
K: Shazam! Great idea and excellent tute! You make it all so logical and do-able.
I want to put something on my slider to keep a few people from trying to walk through the glass in the first few days after I clean it! (No joke!)
Just have to find the right decal.
Now, the question is, have you actually had to clean yours? Any danger of destroying the artwork when cleaning?
btw: I see from the photos that you have practically my back “porch” roof outside your door! They are kissin’ cousins!
If you have any ideas to share on how to keep the corrugated panels clean–or clean them–I’m all eyes. Mine load up with pine needles and junk every fall. Expensive to have all those pine trees taken down!!!! And not about to climb on the “roof.”
Also, your laundry room is terrific and your mom must be one handy gall, like you. Well done. You get all my votes.
I gush! Drat. Still……
All the best, M
Hi Mary
To answer your first question…yes, the door has been cleaned and I also wiped over the picture frame glass several times prior to photographing it. The decals on both items are still as good as new and are showing no signs of distress due to having been cleaned. That said, I would still suggest being somewhat gentle. You don’t want to use any particularly harsh chemicals which could seep under or through the decals and weaken the adhesive or damage the ink. You also want to avoid being too vigorous or using anything abrasive which could scratch or lift the corners of the decals.
Now, onto the porch roof…sorry, though I’m not sure I can be of much help with keeping the corrugations clean. This is actually my parent’s house and they are surrounded by tall eucalypts which no doubt drop their leaves and create a mess. I’ll ask mum and dad what they generally do though I think a ladder and broom are probably involved!
Oh my word, this is such a fabulous idea. I love it.
Thanks Marty :)
I’m very excited to try this one out – albeit on a slider door. I’ve never heard of the waterslide decals, but will definitely be looking into it. I don’t own a cutting machine and can’t justify the expense as yet (much to my chagrin). As always, the tute is great. :) Cheers!
Thanks so much Deb. Glad you like the tute and I really appreciate that you took the time to comment on it. I put a lot of time and thought into them so it’s really lovely to know they are appreciated.
I am sooooo tempted to bite the bullet and get a cutting machine now. Although it is super easy and affordable to engage the services of a pro it would be nice to have one on hand.
I think a decal would work just as well on a sliding glass door. Have fun!
x
You are simply the BEST! Great design and always willing to share your expertise. Always makes my morning when I see a post from you! Off to vote….again!
LOL! Too kind Suzy :) Thank you so much. Little comments like this always make my day.
Thanks also for your votes. Not sure I can catch the big bloggers in the lead though it’s so humbling to know my readers have helped get me right up there. You guys are the BEST!
Wow! That came out great. Thanks for sharing the pdf. I’m definitely going to use this for my tea room which sits right by our garden.
Jeanine
Oh great Jeanine. If you like the way it turns out be sure to send me a pic. I’d love to see :)
Love that you and your daughter made a sign for a troll garden! It does look wonderful on the door – and the sign!
Thanks so much Sherylee. I hope you’re well :)
Well done! It looks amazing. It makes me want to go out and sorce a glass door now.
You totally should Jane. They have amazing potential :)
Thanks for the decal tutorial. Unfortunately the JPEG versions only showed the two right handed decals even though one said left. Anyway you can resend the JPEG left version. Thanks again. Great work!
LOL, what a loser – ha, ha. I thought I got confused somewhere along the line while I was setting up that folder! Have amended it now. Thanks for letting me know :)
Thanks.
This looks wonderful. This is a great idea for the sliding glass doors. Have you ever tried to walk through a closed one? I did because I didn’t realize it was closed. If the door had this I would have known. Pinned.
Ha, ha. I’ve never done it (well, not that I can recall) though I’ve seen plenty of pets and kids walk into sliding glass doors! Yes, this is a great way to give the glass some presence. I’m actually thinking about making a series of these free printables. Do you have any text suggestions?
I like it. Great idea
THIS IS AMAZING, I LOVE IT.
Hi Kristine,
Please excuse my lame question, but when you say “As I don’t have a machine I enlisted Vivid Wall Decals to cut the vinyl on my behalf.” Did you send them your artwork and they printed it on vinyl? If so what type of file did you send them? My daughter has a sliding glass laundry door to their outside, and I’d love to do this with her. I think it would look so good on their door!
Many thanks,
Cheryl
Hi Cheryl
The vinyl cutter I used needed a vector file so I saved my image as an EPS (from Photoshop). It dropped the dots and underscore though I had already shared a JPG image of the design I was after so the vinyl cutter knew what I wanted and added these back in for me.
If you don’t have the means to create a vector file, I’m sure there are vinyl cutters who will be happy to make a basic file for you. Some probably also have conversion software. I would suggest simply making your graphic using whatever program you have available to you then forwarding it on to a few cutters and asking if they can work with it.
Kristine
Thanks Kristine. Much appreciated.
This might be a silly question…
What is the benefit of creating a text decal AND a waterslide image rather than just creating a decal OR waterslide of the whole thing, text and hand?
I love your door so much!
Ha, ha. Not a silly question at all.
I actually spoke about this in the post though it’s easy to miss. Here’s my explanation…
“Due to the nature of my particular design, I needed (well, wanted) to use two forms of decal; a vinyl decal (for the text portion – including the dots and underscore) and a waterslide decal (for the hand). I decided to use a vinyl decal for the text portion because it’s crisp and clean and has no carrier film. I used a waterslide decal for the hand because the image was too intricate to be cut from vinyl, plus it would have been almost impossible to “weed” out neatly.”
Cheers :)
Great idea- and it came out so well. Like you and your mum, I couldn’t help going back to the picture of the door and staring at it! I’m hoping to do something to my courtyard doors but think I’ll use some decorative borders or corner elements, so they look the same on both sides of the door- inside and out. I was going to try the laser print/ transfer to sticky book covering method but the one you ordered seems so much bolder, I might have to give that a go. Thanks for the inspo xx
That sounds great Louise. Yes, professional vinyl decals look great and are super affordable. Glad to have helped inspire you :)
Can you see the edge of the clear waterslide paper around the text?
As mentioned in the post, the text portion of the graphic is a vinyl decal, not a waterslide decal.
Cheers
Do you know if two waterslide decal can be apply one over the other, in order to get a stronger color result in a transperent background?
I guess it’s possible though aligning them perfectly may be tricky.