At the moment, amongst other things, I’m working on a totally new room makeover at my hive.
It’s a little space I’ve not shared previously. I can’t wait for the final reveal though with a little pair of hands constantly clutching at my pant legs (with an accompanying unresistable “pick-me-up” whine), let’s just say progress hasn’t exactly been fast, so as with pretty much everything else nowadays, I’m not holding my breath ’til it’s done.
Anyhoo, part of the makeover involves some new shelving and to pretty them up, whilst adding some handy knick-knack storage, I wanted some cute old mini card file drawers. They are relatively plentiful (if you have patience and know where to look – eBay, oldware stores, etc.) though in many cases buying some requires a deep pocket reach and, if you know me, you’d know I’m just a bit adverse to that kinda thing. So, rather than cash, I thought I’d spend some creative energy instead and concoct my own.
I started with this cute set of Moppe drawers from IKEA (for whatever reason I could only find them easily on the UK website so excuse the link).
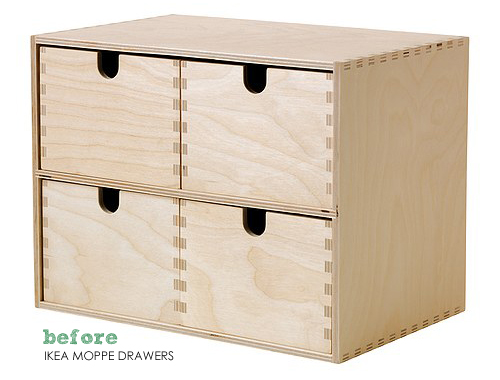
I’m sure you’ve all seen them before – they’ve been the victim of many a good (and maybe a few unfortunate) hacks.
And these brass plated card holder pulls I found on eBay, plus some timber stain and sealer.

I did consider painting or ageing the brass though I’m planning on using some gold accents in the room so decided to leave it as is. I’m glad I did ’cause I do really like the end result.
Because I was planning on using the pulls to open the drawers, I no longer wanted the visible finger cut-outs.
Easy solution….just turn the drawers around. I know, duh right?
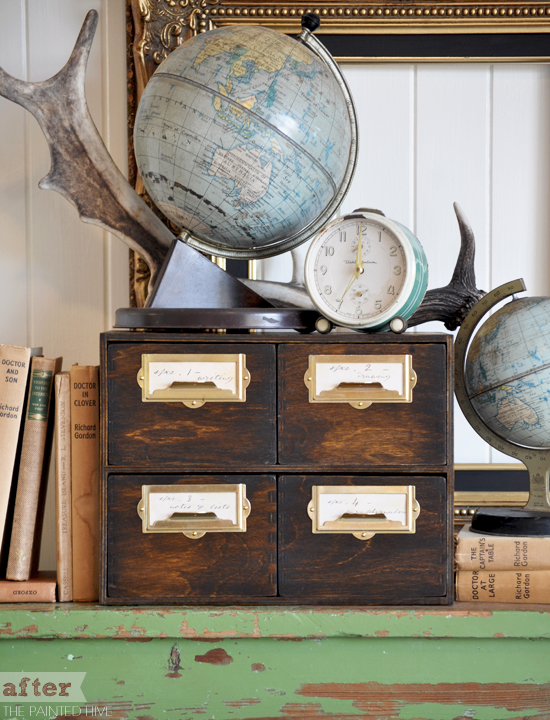
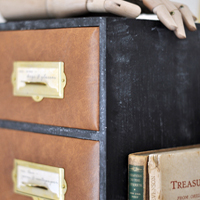
I began by giving the corners of the drawers themselves a reasonably heavy sand to round them off a bit. It’s just a small detail and by no means necessary though as you can see in the ‘after’ pics it does soften the perfection of the unit and imparts the illusion of some wear.
Next I applied two coats of timber stain (I used dark teak because that’s what I found in the shed :-)
To add a soft lustre and enhance the richness of the stain I then applied three coats of danish oil. If you’ve not used danish oil before, I highly recommend it. As mentioned, it imparts a soft sheen, enriches colour and nourishes the timber. It goes on like water and, in my experience, dries perfectly every time – unlike some sealers it is virtually fool-proof.
Once the oil was dry, I attached my pulls, banging in the nails with my customary the-kitchen-meat-mallet-is-closer-than-the-real-hammer hammer (which turned out to be convenient in more ways than one thanks to its you-can’t-possibly-miss-a-nail-with massive head). For something a bit different, I aligned the pulls towards the top of each drawer. Do I like it? I’m not really sure though I think it’s growing on me. Besides, it’s a pretty easy task to relocate them if I ever feel compelled – which I probably wont.
The nails which affix the pulls will inevitably poke through the rear of the drawer fronts so if this bothers you simply file them flush or trim them down prior.


The visible dove-tails are perfect for helping enhance the illusion of a true vintage piece.
To finish I designed some simple antique style tabs for the card holders.
Sure, I coulda just hand written them and tea-stained the paper, though I decided to exercise my current love of digital graphics and instead Photoshoped ’em up using a handwritten script font and a distressed background texture.

I was pleasantly surprised with how authentic they actually look.
For your convenience I have included my graphics as free printables (see the bottom of the post)! They will fit perfectly inside the 9cm x 4.5cm (3 1/4″ x 1 11/16″) pull slots.

I was a bit sceptical at how this project would turn out though it’s a heap better than I thought…so yay!
Small Drawers (IKEA Moppe $16.00)
Card Holder Pull Handles (eBay $2.95)
Timber Stain (Feast Watson Dark Teak)
Timber Sealer (Cabots Danish Oil)




WOW! Very impressive, looks authentic!
Dear!
Yesterday I bought the ikea drawers and right now I ordered the brass plated card holder to change them in the same way you did. I love it!!!!
Thanks for the idea!
Oh great! Thanks for letting me know Emanuela. Have fun with the project. It’s an easy yet super effective one.
:)
Turn the drawers around!! Brilliant tip! Was trying to put paper on mine but the cut out around them was not coming out well. Gonna turn them especially as they look so much better without the cut outs – classier.
Thanks for this tip.
Glad to have helped Ann :)
Just turn the drawers around! Brilliant, why didn’t I think of that?!
Ha, ha. It’s easy to miss Abby :)
Hi, wonderful hack!
is it possibile to know which is the handwritten script font?
Thank you
Sure Elena. As mentioned at the end of the post, it is Dreamer Script.
x
Hi!!! I love the project! I actually have the same ikea piece sitting in my basement! I would like to work on it, but I’m having trouble finding the timber stain. Do you know what is the equivalent in the US?
Thanks!!!
Hi Ayelet. You could use any penetrating timber stain. Water or oil based in whichever colour you prefer. Some people suggest that if you use a water-based stain you should finish with a water-based sealer (and vice-versa with oil-based) though I don’t always follow that rule. A few popular stains I know of in the US are Rust-Oleum Ultimate Wood Stain, Minwax Wood Finish and Cabot Oil-Modifier Interior Stain (which stains and seals in one step). Hope this helps :)
I love your work! ALL of it. Thanks for the easy hack. I must try this. KEEP UP the fabulous job!!
Thanks so, so much :)
O.K. I know this is 2017, but Hello! I just happen to have some moppedrawer drawers! I’m staining as I type this. Would love to turn the drawers around but noticed wood filler pieces on the backs which look weird when stained. So I will have to use the keyhole sides. Next set I’ll carefully check the Backs before buying. Ikea store coming soon to our area. Yayyyyyyy. START THE CAR!!!!