

You were probably expecting to see the suite extension bathroom reveal this week, but sorry, something unexpected happened I needed to share first (the bathroom will be coming up super soon!).
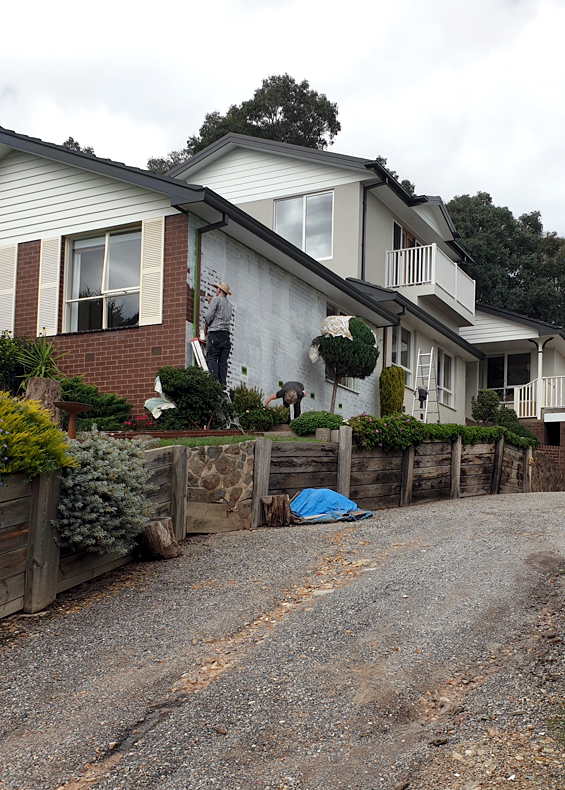
With everyone being stuck at home, and thanks to a streak of perfect painting weather, my parents abruptly decided it was time to apply “rendering” to their whole house!

Altering the original brown brick was always part of their reno plan, and after some initial talks regarding hiring professional spray painters to do the job, they went ahead and did it all by themselves – with awesome results!
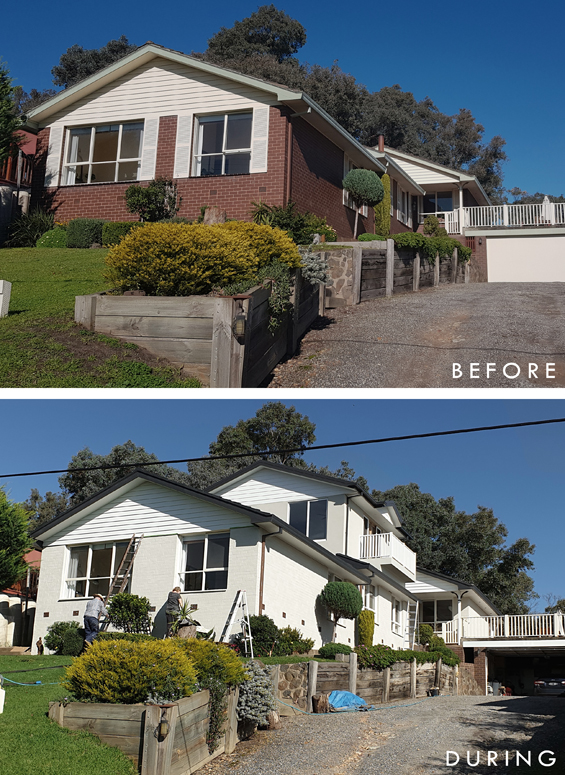
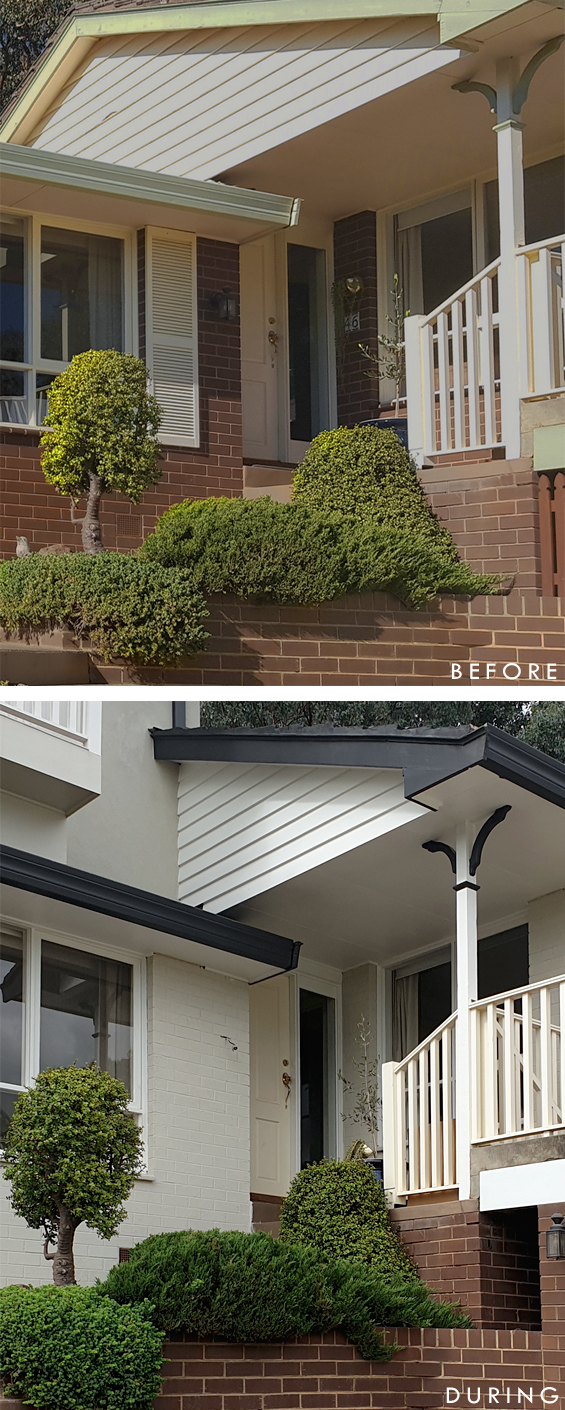
Of course, the exterior is still far from finished so you need to use your imagination to some extent, but the difference is already striking!
I realise that in comparison to the brown brick the new off-white appears somewhat stark and bare, though keep in mind we will be adding some decorative elements to warm things up, provide further contrast and soften the overall look.
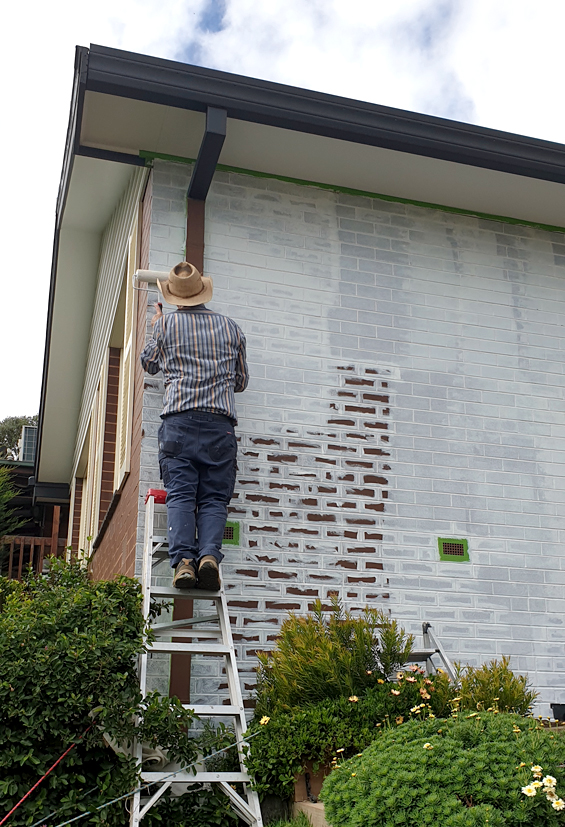
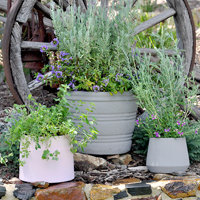
They used Dulux Texture ‘Medium Cover’ (the same paint we used, and loved, on the flip house facade). Here you can see the finish it provides…
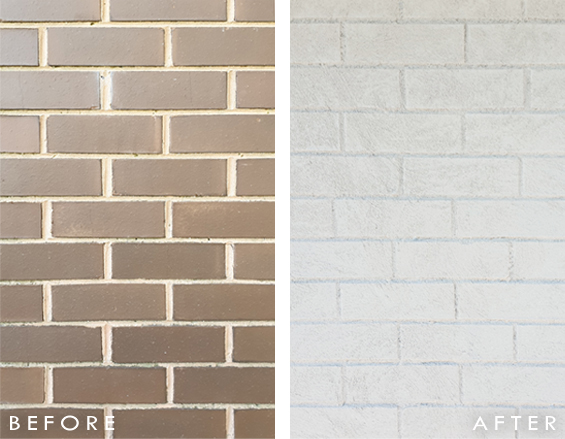
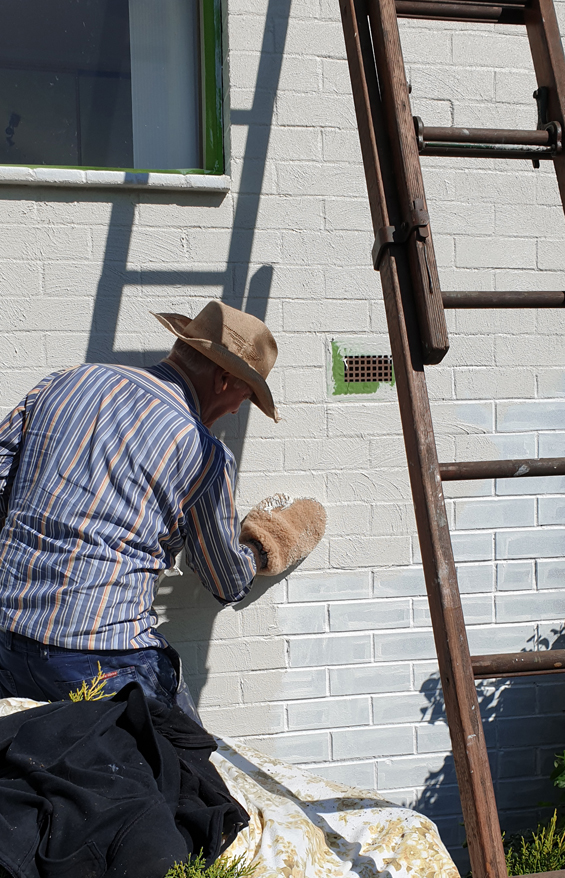
For those of you who aren’t familiar with the product, it has a thick render-like consistency and is applied with a mitt to give a rustic bagged effect, which leaves the brick pattern discernible. It’s not a look for everyone, but I personally adore it!

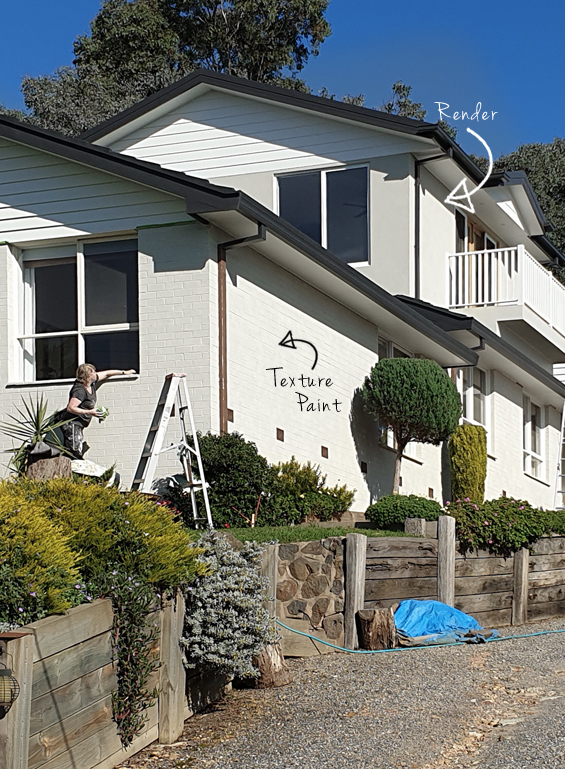
They went with the same colour as their new extension render, Dulux ‘White Duck’, and although the finishes are different (the extension being somewhat smooth), the house looks beautifully consistent. If anything, having the slight variation in texture actually adds interest and character.
You can see from my digital swatches above just how tonally different White Duck actually presents in reality, so this is a perfect lesson in trialling your colours where they will be used! It’s fair to say that even after testing as we did I still had quite a few sleepless nights imagining the colour as custard yellow, cold concrete or boring beige. And whilst in comparison to the stark white undercoat it does appear quite creamy-brown, in reality it has a gentle green undertone and I couldn’t be happier with it! This portion of the house is north-west facing so gets a strong punch of bright light which on sunny days would make anything whiter look blindingly harsh.
As you can imagine, this was a BIG job though my parents managed to knock it over in just four days – which I reckon is pretty impressive!
It took two tubs of undercoat and 4 tubs of texture paint which totalled $900.
Not bad considering they enquired about having it professionally done and the cheapest quote was $5,200!
I won’t go into all the steps as my parents basically followed the instructional video, though here are a few tips:
:: Tape up well (trust me, although taping is time-consuming it will save your sanity) and ensure you remove any tape before the paint is completely dry. This stuff sets like glue so unless you remove the tape prior it simply tears and becomes a real pain to get off.
:: If you have any glazed bricks, they will need to be acid etched or grinded back for the paint to properly adhere. My parents had shiny sill bricks which my dad grinded back.
:: The instructional video uses two coats of paint, though depending on the coverage you get and look you’re after, you may find you only need to apply one. Both here, and at the flip house, we used only one coat and found it ample.
As mentioned, the facade is clearly still a work in progress which needs quite a bit of work before completion. This includes relatively basic jobs, like finishing the painting, building new shutters and choosing exterior light fittings, to more complex projects, like replacing the retaining wall, adding a pergola over the balcony and having the driveway made. Plus about a million other things in between! Slowly but surely it’s all coming together though!
I hope this provides some inspiration! Please let me know what you think – I’m sure my parents would love to hear your opinions :)
![]()
Catch up on all of the other suite extension posts HERE.


Wow, amazing work. It looks so good. They were very brave to tackle this but I bet they are super happy with themselves.
I think, more than anything, they were surprised at what they managed to achieve in just four days! They are so inspiring!
I think the thing that surprised me the most was how much greener the yard looks now! When I looked back and forth between the photos, the plants, trees and grass were equally green – but they really pop against that new color, don’t they, now? Also I love the shutter-less look that’s there, too. Do you think they’re going to leave those off now? :) Anyhow, fabulous job! And what a good way to get your steps in (and save money) during Quarantine!
Thanks Elayne. Yes, we spoke about the shutters and when I asked whether they were sure they really wanted them back, they were totally adamant. I guess after nearly forty years they have just grown used to them. Plus my mum has always loved shutters. But we will be going with something a bit different.
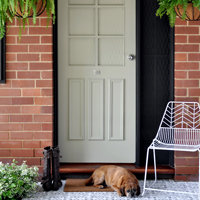
i think it would look extra special with a brightly coloured front door :)
Yes, still lots to do and a new front door colour is definitely on the list! Mum isn’t a huge fan of bright colours, but she does adore blues. The yellow cream will surely be going :)
Wow! Your parents are amazing! it looks great so far :)
Thanks so much :)
Fantastic look, well done on all that hard work xx
Thanks Rosalie :)
Not stark….stunning!! It’s really updated the whole facade of their home. Love the contrast to the dark colour of the guttering. Is that Colorbond Monument?
Job well done!!
Yes, Monument roof, gutters and fascia.
Thanks so much :)
Looks great! Any idea how this holds up to the elements? Will it have to be redone often?
I did our house with this paint 12 years ago and it still looks great!
Thanks, that’s good to know. It does seem extra durable. Just like render really :)
This looks amazing! What a great job. I really love how the lighter colour makes the landscaping stand out as well.
Thanks Leslie. I didn’t even really notice that until it was pointed out :)
Loving it!
Thanks :)
Long time reader here that has loved all your projects and transformations over the years. Your parents are fabulous to take on this project and be so involved with you on the physical tasks! It’s their home, and so can do whatever they like, but as an architecture buff, I would suggest not to add any shutters back on the house. The original natural brick facade was traditional and the shutters were expected at the time, even though they didn’t fit the size or style of the windows. The transformation now is of a much more sleek and modern appearance and shutters would just add clutter to the clean lines of the house. Plus, they still wouldn’t fit the windows. There are many other accessories that could enhance, rather than detract from the new vibe. There is a designer and color expert that recently answered a readers question on shutters for their home and Maria Killam outlined what my studies have also taught me – but did so much better than I could. Have you done a photoshop mock up of all the added things you plan to do to the exterior? Perhaps do one w/ everything but the shutters and take some more time before adding them back on. I hope I haven’t given offense by my saying this, as none was intended. Looking forward to the rest of the reveal.
Hi Nancy
No offence taken at all. I’ve actually read that blog article by Maria Killam before, and know that some people have strong opinions about the rights and wrongs of shutters – LOL!
As I mentioned, I did raise the idea of leaving them off with my parents though they were totally adamant and will not be changing their minds. Mum actually has very traditional taste, and also likes cottage style homes, and wants to add that character into the building.
To be honest, I personally don’t hate the idea of installing some new ones. I know the whole window size issue, and that some people can’t stand decorative shutters but I don’t have a problem with them myself. It’s funny actually, one of my favourite designers, Lauren Liess, was basically attacked over her shutters a little while ago. She has traditional folding shutters, so although they are fully functional and as wide as her windows, when they are open and folded under they appear to be small in comparison.
She had people commenting on her IG post about how wrong her “fake” shutters looked. Of course, they’re not fake at all and I actually really like the way the proportions work on her house.
We will probably be going with something in a similar style and colour to her shutters – natural timber with a ‘z’ design. They will tone in with a traditional timber pergola my parents are planning to install over the balcony above the garage.
I do plan to PS some different options for the shutters onto some images though I really can’t see my parents deciding not to put any back up :)
Your parents are amazing! Well done!
Thanks :)
Wow! Only 4 days! They must be in great shape! And I am sure they were perfectionist workers since it is their own home! How inspiring. Hopefully when we retire my husband and I could paint our house, but who knows, we will be in our late 60s. Ours is only a single story on flat ground though.
You can totally do it! My parents are both in their mid 60’s. “Move it or lose it” is one of their mottos :)
Well done, all of you! It’s a stunning makeover.
Bravo, Dad. Bravo, Mum. You’ve done a fabulous job with your home and with your fabulous daughter.
Well I can see where you get your work ethic from Kristine.
Huge congratulations to them both for their effort and the finished look. I Love It
Sarah in Scotland
Thanks so much Sarah :)
I love it! Kuddo’s to Mom and Dad on having the gumption to dig in and tackle such a big job! They did a fantastic job and I love the colors that they chose for their home. Adds just a little warmth to the white and black trim. And in just four days! Amazing!
Thanks Renee :)
Even though COVID-19 is having devastating effects in parts of the world I firmly believe that every cloud has a silver lining and this is one of them. (Another is that I’m able to spend heaps of time in the garden now that my social life is nonexistent.) What a fabulous result; your parents should be so pleased with themselves. No wonder their daughter has the confidence to tackle the amazing projects she wows us with. :) It would have been interesting to get a real estate valuation before and after the rendering to see how much value has been added to the house.
Thanks Julie. Yes, we did have the house assessed late last year though that was prior to the extension as well. Still, will be interesting to hear the new valuation once all of the work is complete.
I thought the cost of the paint was ridiculous until you mentioned how much it would cost to have someone else do the painting. Kuddo’s to you parents for taken on such a backbreaking project. I looks “good” as it still looks kinda stark and I can’t get my imagination to kick in and visualized the end result. Anyway, even if it can “see” it, I always look forward to the end results. As long as mom and dad love it that’s all that matters. It’s a great privilege to be included in your projects.
Yes, I’ve noticed from following many US and Canadian based bloggers that our paint is SUPER expensive in comparison. Though, this particular paint is even more expensive because it’s essentially like render/stucco. 10 litres/2.5 gallons is $140 AUD!
I was aware that in the photos it looked a little bland which is why I mentioned that in my blog post, but in reality it’s actually not so stark and looks clean and contemporary. Still, we will be adding timber shutters and other elements to warm things up and soften the overall appearance. Can’t wait to share the proper afters. I’m sure you will understand my vision then.
Thanks Pat :)
It looks fabulous!! Painting my brick white has been on my dream list for years! They did an amazing job. It looks so nice!! Definitely inspiring!
Thanks Marcie :)
We are looking at using this paint to do something very similar but I’m worried that the mortar joints between the bricks might be too deep, they are up to about 10mm. I see in one of the photos it looks like primer was brushed in between, did you have a similar surface?
Hi Dom
The last house we used this paint on had 10mm deep mortar and it covered fine, though it did eat up quite a bit of extra paint. The primer isn’t necessary (it’s recommended for extra porous or textured surfaces) but we used it anyway just to provide a good base. Not really sure if it helped or not.
There are a few links in my post to the previous house and a Dulux tutorial which will give you more info.
Kristine
I am a newbie to your blog (wish I had found you sooner!) I am blown away with your parents tackling such a huge endeavor by themselves! I love the entire house and the front entrance is lovely. Is this stuff really messy? I am waffling back and forth about painting my fireplace in my house and don’t want to just paint but do something with more texture. Do you think this product would work inside?
Thanks Cecilia. Yes, it is a bit messy though you can always put some drop cloths down to protect from over-splatter! It can definitely be used inside and would provide a great looking finish.
Is this a mineral type paint? I love how it turned out.
Thanks. All I know is that it’s a water-based acrylic paint. Pretty certain it would be openly advertised as being mineral-based if that was the case.
Wow. The transformation was very good. I need one suggestion from your side that I like darker shades more than which color combination will go well with my house which looks sober as well as lovely.
Good job, I love it.
Beautiful house exterior
Were the window sill bricks painted using the textured painted too?
Hi Michelle
Yes, this is actually mentioned in the post though it’s easy to miss:
“If you have any glazed bricks, they will need to be acid etched or grinded back for the paint to properly adhere. My parents had shiny sill bricks which my dad grinded back.”
Cheers
Kristine
This is really beautiful, thanks for sharing.
I’m really impressed by your work. I really like the way you painted the house. It looks great! I am very happy with the way it turned out and I have no complaints at all about anything that you did.
This looks so great! I love the white duck colour on the bricks. What colour did they use on the weatherboards under the roof? Is that snowy mountains? Thank you :-)
Hi Vanessa. I’m glad you like it. Yes, the weatherboard are Snowy Mountains Half :)