
Firstly, thanks so much to everyone for all the baby well wishes – you guys are just too sweet :-)
Now, on to some decorating stuff!!!
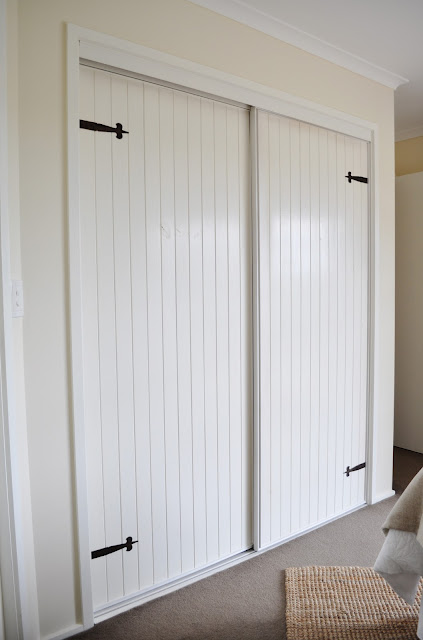
I wanted to finally share the little face-lift I gave my master bedroom built-in robe.
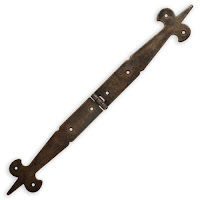
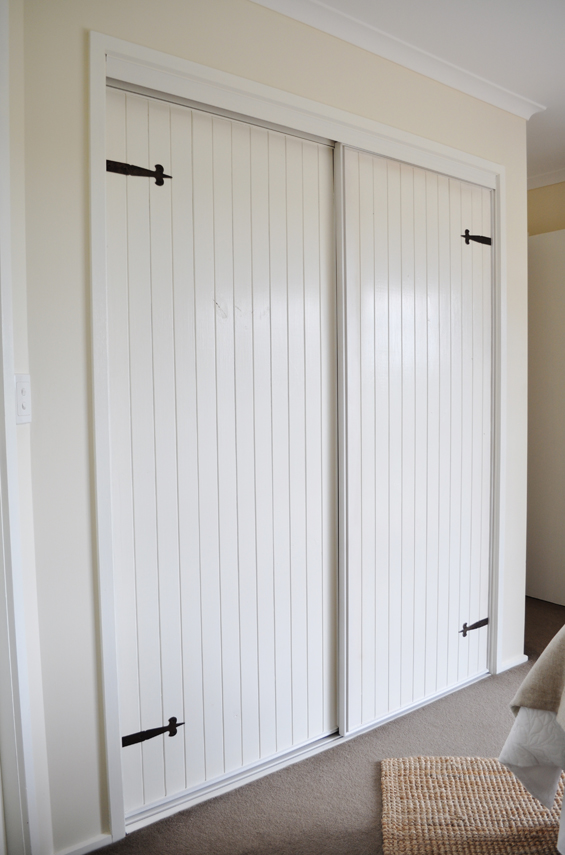
Remember how a little while ago I put out an S.O.S for some dummy strap hinges like this….

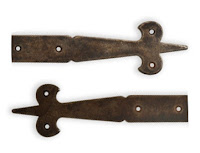
Well, despite a tonne of friendly offers and advice from you guys (THANK YOU!) that particular style still managed to elude me here in Australia so I ended up with two of these instead….
If you’re interested I found them here on eBay.
Because I didn’t actually need the hinge function I simply cut them off with a hacksaw to create these plain individual straps.
So, here’s the built-in before….
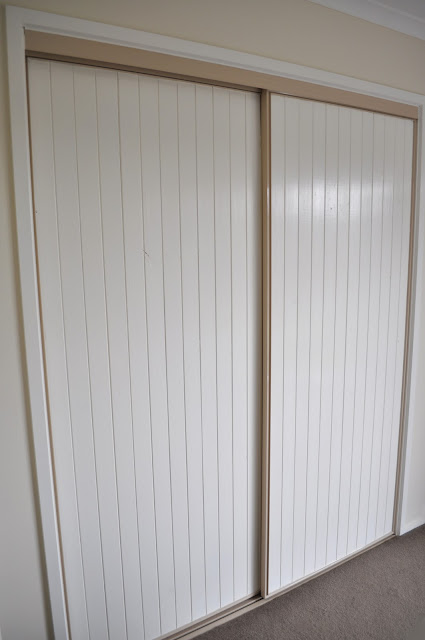
Ewww, right?
Well that’s actually after I already painted the knotty orange pine infills pure white.
I had initial thoughts about replacing the doors completely though because I’m all about easy budget makeovers I decided it was best to try and make the most of what I already had.
Soooo, with a minimal amount of work and cashola here’s the robe now….
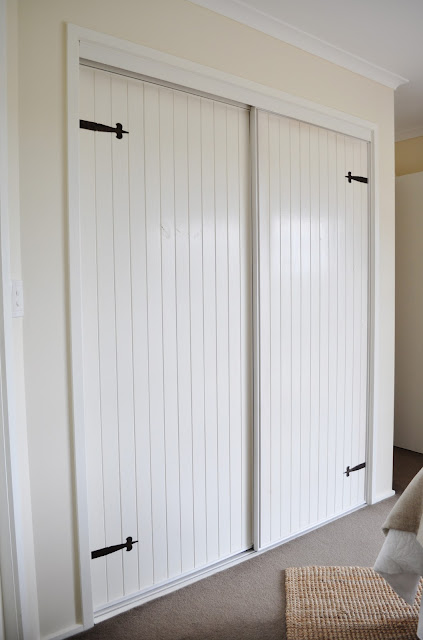
It’s a subtle change though certainly more in-sync with the rest of my master bedroom.
All I did was remove the doors, bottom rail and fascia (which simply unscrewed), took them outside then spray painted all the beige enamel white. Once dry I attached my four hinge straps then reassembled everything again inside.
I was a bit concerned the new white paint might scratch or chip off the metal frame though it dried rock hard and around one month on it’s still in perfect nic.


Wanna know how the painted metal has held up one year on?
Click here to read my ‘wearability’ report.


wow, a simple yet beautiful update! Now that door looks intentional and cohesive. I love it! :)
This comment has been removed by the author.
Great simple addition that adds to the overall decor. Details make all the difference!! Great job
Beautiful!!!!
Nice touch!
What a clever idea to add these details. It’s like night and day. Great job!
Patti
quick updates are my favorite! it really makes a difference!
hello lovely.
i’m a new follower. completely addicted to your master bedroom. and impatient to see what nursery design you come up with.
congratulations on the little one coming soon!!! most exciting time of your life, i’m sure. :)
i can’t believe the difference in the closet doors with such a simple little change-a-roo.
love it!
xo-
amanda
http://www.perfectimperfection13.blogspot.com
OH! I love that! I was the one who told you I got mine at eBay! (probably more than just myself told you that) But it really adds character to the doors. My hinges are still sitting in my garage. I have to first build my house before I can show you my end result. Oh well!
I love it! They really make the doors!
I remember your S.O.S. {I replied with US links…oops} and every time I would see these hinges I was thinking, I wonder if she ever found any and when is she going to show us what she did with them! Woohoo, it looks awesome. Great idea and a great look. Love it.
seriously amazing what a little hardware can do! they look awesome!
love the after.
sometimes the finished look is in the details and you hit the nail on the head with this one. Great that your little detail was budget friendly.
it looks so good!
Wow congratulations ..I somehow missed the baby news…no wonder you have been MIA…the doors look fabulous..so quick and simple…who would have thought. Great to have you back ~ Kym X
Your dorrs look fabulous, it’s amazing what a simple change can do.
Love them!!
x
I love it when such a simple change makes such a dramatic impact! The color AND the hinges. Great idea!
Aren’t you clever! Such a simple idea but it makes such a positive difference!
Soooo much better- It looks great! Wonderful, actually! hugs- Diana
WOW! What a difference. Your one smart lady! Love it!
You clever girl, you! Love the transformation! Sweet and simple!
xoxo laurie
It is amazing that 4 pieces of metal can have SO much impact! Brilliant!
It’s amazing what a difference that is! Nice one :)
Love what you’ve done here..what a difference that makes!!
Deborah xo
So Simple and what a transformation. Love it!
Cheryl
http://www.paintedstudio.blogspot.com
Are you kidding me? Such a simple solution and it makes a world of difference. Well done!
What a great Idea…!! I love!!
I linked this to my “doors” project post today, I think it’s awesome!
great details! the littlest things make all the difference!
We did something like this in our {soon to be} boys’ room:
http://www.fieldstonehilldesign.com/2011/01/renovation-boys-room-floor-solution.html
– {darlene}
such a great and simple change! super smart!
Wow! Fabulous transformation! Seems like a simple change, but what a huge difference the paint and hinges have made. :)
Wow! What an amazing difference. Good job!
Nicely done!!!
Hi Kristine, It’s been a while, so I’m dropping by to say ‘Hello’ and hope you are well. Looking forward to what you have planned next for your home! Cheers!
Wow, love it!
What an incredible idea. You did such a great job with the sliding doors. Now I wish, I had sliding doors in my bedroom to do the same treatment. My only sliding doors are in the entryway and they are mirror doors with brass edging…they look really bad. I am thinking of painting out the brass in black and adding horizontal black bars to give it a Japanese shoji screen effect…
You have inspired me!!! Thank you!
You are my lost and found! I found you months ago when I discovered decor and design blogs, lost you, and found you again. Just in time to find out what you wanted the gate hinges for! What an amazing and easy transformation.
Your newest follower,
Camille
How brilliant.
We need to do this to ours…desperately! Just a question. When you say you removed the bottom rail, fascia and doors…was is the fascia exactly? Is it the metal sides and top bits? Sorry…I’m an absolute novice which it comes to these terms. Tried googling it, but just got more confused! Cheers.
Hi Amanda
The fascia is just the piece of metal at the top which runs the length of the robe and hides the top tracks. If you look at my before pics you will notice it is beige. In the after photos it is white.
Hope this helps :)
Kristine
I am delighted to see your before and after pictures as I am searching for a way to update the triple sliding door mirrors with brass fascia, track and edges that are the closet doors in my master bedroom (circa 1975!) Were your doors originally mirrors? If so, how did you get the wainscott looking wood attached to the mirror – I think you said it was knotty pine? What kind of paint did you use for the metal trim? I am hoping to paint the metal trim white and then do some kind of mutins or wood to make the mirrors look more like french doors. THANKS!
Hi Lydia
I think my door in-fills were originally vinyl wrap though the previous home owners replaced them with raw pine panelling (which I later painted). My understanding is that most sliding door frames can come apart so any existing inserts may be replaced so if you would prefer timber in-fills you should be able to add them, or clad a thin version over the existing mirror, however if I was you I think I would keep the mirrors.
Like you, my parents have triple sliding door mirrors with brass surrounds in their master bedroom and I have been trying to convince them to paint the brass and add timber moulding to create the look of French doors (great minds!). I think it can look awesome!
I have sent you an email with some inspiration pics.
The paint is just standard gloss enamel spray paint. I used a brand called ‘Squirts’ though any good quality paint should be fine. It has held up amazingly well. Not one single chip or scratch.
Kristine
brilliant!!! I brilliant over mirrored ones I bet, yes.
Can I ask if you removed the door frames (the door panel surround) to paint them and if you used a spray paint?
Hi Cherie
If I understand your question correctly, no, I didn’t remove the metal frame. I painted the door panels with a brush then spray painted the metal surround. Technically, the paint is not the same colour (as the spray paint is simply an off-the-shelf colour and the door paint was left over from our architraves) though you honestly can’t tell.
Kristine
Do you have a blog entry on how you applied the wainscoting? We have a broken mirrored door and I would love to do this! Thanks.
Hi Laura
Sorry, the doors were like this when we bought the house (well, they were knotty orange pine and I painted them white). If your door frames are similar to mine you should be able to take them apart and insert new panels then reassemble them.
Sorry I can’t help more.
We absolutely love your blog and find many of your post’s to be exactly what I’m looking for.
Do you offer guest writers to write content for you?
I wouldn’t mind composing a post or elaborating on a few of the subjects
you write regarding here. Again, awesome website!
Thanks so much though unfortunately I don’t publish guest content.
Cheers
Did you attach the wainscoting to the mirrored doors? We have mirrored closet doors in our bedroom and are looking for update them without replacing the whole thing. I thought paint would like terrible and then I thought wallpaper would not stick to them. So found your pin and was wondering did you attach it to the mirrored doors? If so did you glue it? Thanks for your help, I love how they turned out for you.
Hi Paula
The doors were already paneled when we bought the house (orange-toned pine which I painted white) though I think they may have been mirrored originally and that the previous home-owners replaced it. You can take the door frames apart to remove and replace any existing infills. If I was you though, I would keep the mirrors and look into adding some sort of decorative moulding to create the look of an industrial grid or french window. Do a few Google image searchers for “french mirrored closet doors” or “mirrored closet door makeover”. You might like what you see!
Kristine
Where were you able to find wainscoting that was vertical? I have only been able to find horizontal – then we would have seams…
Hmm, really? You should be able to find sheets of vertical paneling in any hardware store.