
PART I: UNDERSTANDING & EDITING FREE PRINTABLES
This is post one in a three part series.
Post two covers setting up images for at home printing.
Post three covers setting up images for professional printing.
I think my love for DIY wall art was inherited. Or, at least, subconsciously imposed.
Mum was always filling frames with images from last year’s discounted calendars, out-of-print illustrative books, picturesque postcards, sheets of decorative gift wrap and pretty greeting cards. There was even a whole section in the broom cupboard dedicated to storing her collection.
Now, however, with the emergence of freely available images online, there’s no need to make space on the closet shelf. With little more than a flex of your index finger you can simply download free printables straight to your computer!
I’ve always been a big believer in the visual power of well considered wall décor though sadly many “off-the-shelf” options come with prohibitively hefty price tags. That’s why I’m such a huge advocate for free printables. They offer AMAZING possibilities to budget concious decorators and make adorning your walls with awesome yet thrifty prints easier than ever.
Or do they?
Sometimes understanding and customising images for print can be confusing, time-consuming and down-right frustrating.
That’s why I decided to write this guide. Having used free printables pretty extensively over the years, I finally feel confident enough in my understanding of them to share what I hope is helpful, and maybe even empowering, information!
![]()
The information contained within this article is based on my personal knowledge and experience. I am not, nor do I claim to be, any kind of expert. For clarity, I have attempted to keep explanations simple with links to further reading where applicable for those who are interested. Also, to be all-encompassing, where examples are provided I have used two separate programs; Photoshop (CS4 – awesome though expensive – the program I’m lucky to have and typically use) and GIMP (2.8 – a Photoshop-like program that is available for download by anyone for FREE!).
![]()
UNDERSTANDING QUALITY & SIZE
Quality is determined by resolution. Resolution is measured in PPI (Pixels Per Inch). The more pixels per inch, the greater amount of detail. Naturally, this translates into better quality prints. Too low a resolution can result in discernible pixelation. Too high a resolution is often superfluous.
In general terms, the standard for printing is 300 PPI, though anything from 180 PPI to 600 PPI is commonly used. On occasion, lower or higher resolutions may also produce acceptable results (examples below). You will probably find that most free printables are not technically true ‘printables’ at all. Many are simply digital images designed for screen display, though actually possess low resolution, small physical dimensions and/or quite poor print quality.
Further reading about resolution:
Spoon Graphics: Image Resolution in Print Design
99 Designs: PPI v DPI
About: Resolution
A quick and easy way to discover the size properties of a specific printable image to determine if it is right for your purposes, is to first download the image then open it in an image/graphic editing program (such as Photoshop or GIMP) and locate the size properties.
Photoshop: Image>Image Size
GIMP: Image>Canvas Size
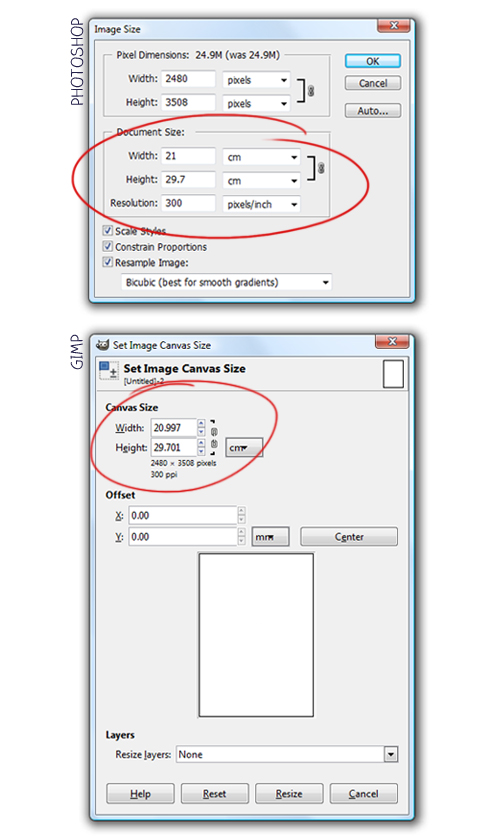
Take note of the resolution, along with the width and height (in physical dimensions, not in digital pixels). The examples above show the default settings for a standard A4/letter sized document: you can see that the resolution is 300 PPI and the dimensions are around 21cm x 29cm (8.5″ x 11″) – the perfect size and quality for printing at home using a domestic desktop printer.
To get a visual idea of the relative size and a rough representation of the print quality, you can also choose to view the image at print size.
Photoshop: View>Print Size (due to monitor variables, Photoshop may not always display Print Size accurately. If when measured with a ruler the dimensions of the document differ from those indicated in the Document Size settings, here is a great tutorial for rectifying the issue).
GIMP: View>Zoom 100% – ensure Dot for Dot is unchecked (due to monitor variables, GIMP may not always display Print Size accurately. Ensure your monitor resolution is correctly set in Edit>Preferences>Display).
So, what if your image has undesirable properties, such as low resolution or small physical dimensions? Can the resolution be increased? Can the size be enlarged? Might it look okay as is?
EDITING QUALITY & SIZE
In terms of visual quality, there are many factors which can influence the acceptability of a printed image. The most important one being personal preference. As such, there is no blanket approach to customising documents and contrary to ‘properness’ there are no minimum standards to abide by (or essential enhancement procedures to employ). Trust me, I’ve broken nearly every rule, often with super pleasing results!
Don’t be afraid to play with resolution, scale and proportions or optimising techniques. If you’re ever unsure how an image might look, isolate a small area (ideally one with some fine detail – such as text) and print a test patch first. Remember, wall art is always viewed from a slight distance so don’t let some minor pixelation, noise or blur upon very close inspection deter you. Also, keep in mind that many free printables are vintage in nature, and the essence of their appeal comes from their imperfect charm. This provides some visual ‘wiggle room’ where quality is concerned.
Just as you shouldn’t automatically discount low resolution, don’t instantly trust high resolution. The poor print quality of some free printables may belie their high resolution values. If an image has been poorly digitised (improperly scanned, edited and/or formatted – particularly, recklessly enlarged or distorted) then resampled (had a subsequent high resolution value applied in order to increase pixel density in an attempt to minimise pixelation), the image will lack quality. Resampling alters the image data by either introducing pixels or discarding pixels. Some degradation is inevitable. Again, if ever in doubt, print a test patch first.
Sure, you could always use your photo software or a simple desktop publishing program for editing and printing purposes, though results may be undesirable, customisation can be restricted and eventually you will probably meet some frustrating constraints, which is why I recommend using a purpose program.
Here are the image size adjustment boxes in both Photoshop and GIMP…
Photoshop: Image>Image Size

1 Pixel Dimensions: The number of digital pixels along the width & height.
I don’t pay too much attention to these values and never manually change them. If Resample Image is checked they will automatically reconfigure when the Document Size (Width, Height or Resolution) is changed.
2 Document Size: The physical dimensions of the printed image.
For me, the Width and Height are the single most important values when editing art printables. You can adjust the values together (check Constrain Proportions) to maintain the aspect ratio or separately (uncheck Constrain Proportions) to distort the image. With Resample Image checked the Pixel Dimensions will automatically adjust in order to maintain fixed Resolution. With Resample Image unchecked the Resolution will automatically adjust in order to maintain fixed Pixel Dimensions.
3 Resolution: The number of pixels per inch (PPI).
As already mentioned, the Resolution helps determine print quality. 300 PPI is the generally accepted standard. If Resample Image is checked the Pixel Dimensions will automatically adjust in line with the Resolution change. If Resample Image is unchecked the Width and Height will automatically adjust in line with the Resolution change.
4 Constrain Proportions: Retain or distort the aspect ratio.
With Constrain Proportions unchecked you can distort the image by adjusting the dimensions separately.
5 Resample Image: Increase or decrease the image data (add or deduct pixels).
With Resample Image unchecked you can not change the Pixel Dimensions so the Document Size (Width, Height and Resolution) is constrained – changing the Resolution automatically changes the Width and Height, and vice versa. With Resample Image checked, any change you make in the Document Size settings will automatically alter the Pixel Dimensions. A decrease in size forces pixel reduction. An increase in size forces pixel introduction. As mentioned above, resampling an image will always cause some form of degradation. The amount of degradation is dependant on the level of alteration.
6 Interpolation: How the program renders new pixels based on neighbouring pixels.
There are several options to choose from. Select the method which best suits your needs.
Further reading about editing quality and size in Photoshop:
Photoshop Essentials: Difference Between Image Resizing and Resampling
Adobe: Image Size and Resolution
Photoshop Essentials: How to Resize Images
GIMP: Image>Scale Image and Image>Print Size
GIMP has two separate dialogue boxes for editing size.
Scale Image alters pixel density. Print Size constrains pixel density.
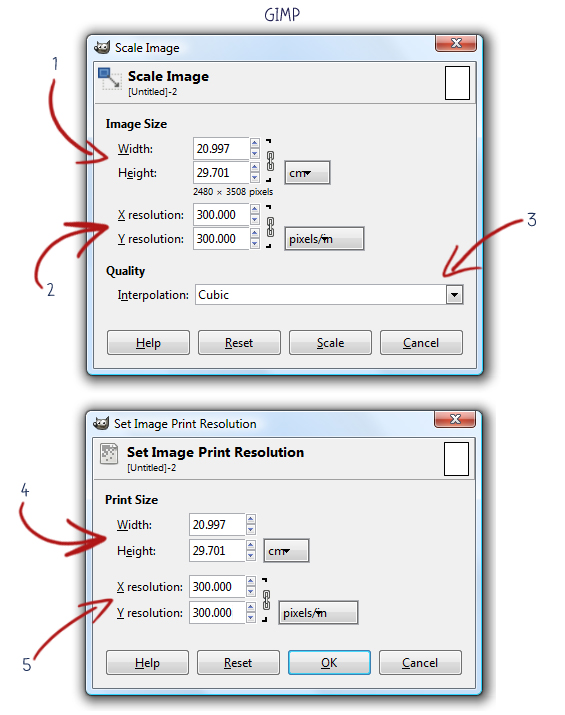
1 Image Size: The physical dimensions of the printed image (note pixel dimensions are specified beneath).
If you alter the Image Size the pixel dimensions will automatically adjust in order to maintain fixed Resolution. New pixels are introduced or existing pixels are deducted (the image is resampled).
2 Resolution: The number of pixels per inch (PPI).
In the Scale Image dialogue box, if you alter the Resolution the physical dimensions automatically adjust to maintain pixel dimensions. You can go on to resample the image (change pixel dimensions) by subsequently altering the physical size.
3 Interpolation: How the program renders new pixels based on neighbouring pixels.
There are a few options to choose from. Select the method which best suits your needs.
4 Print Size: The physical dimensions of the printed image.
If you change the Print Size dimensions, the Resolution will automatically adjust in order to retain fixed pixel density. You can not resample the image (pixel information can not be added or deducted).
5 Resolution: The number of pixels per inch (PPI).
In the Print Size dialogue box, if you change the Resolution, the Print Size will automatically adjust in order to retain pixel density.
Further reading about editing quality and size in GIMP:
GIMP: Scale Image
GIMP: Print Size
GIMP Guru: Upsampling
Once you have resized or resampled an image to suit your needs, if desired or required, there are additional techniques (some might say ‘tricks’) you can use to enhance quality. You might also choose to further customise (edit colours, add a border, include text, crop) or ‘tidy-up’ the image. Options are almost infinite. Just be mindful that whilst editing programs are pretty awesome they are not magical.
There are thousands of great online tutorials detailing editing and enhancing resized images. Use your search engine to discover some that are right for you.
To better understand customising size and quality on a practical level, let’s look at some real examples…
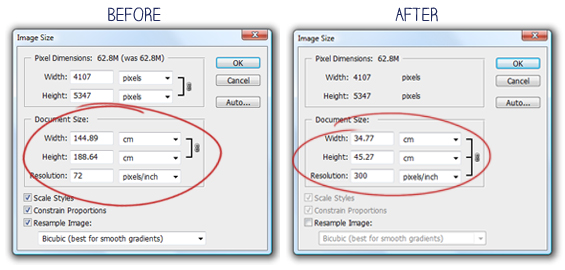
EXAMPLE I: LOW RESOLUTION/LARGE SCALE
Image source: Botanicus (La Botanique de JJ Rousseau – Plate 43)
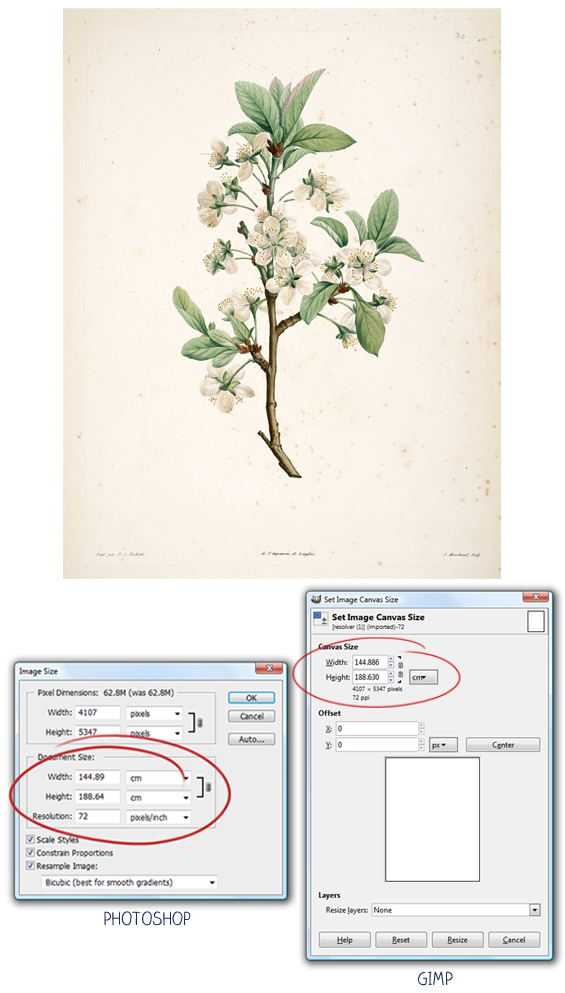
Image properties…
Physical Dimensions: 144cm x 188cm (57″ x 74″)
Resolution: 72 PPI
Pixel Density: 4107 x 5347
Using this image as is…
What an awesome statement this HUGE (almost 2 meter high!) vintage botanical would make! Although the resolution is relatively low at 72 PPI, the sheer scale and imperfect vintage nature means that some pixelation (visible upon quite close inspection – from around 40cm/15″ away) shouldn’t detract from the overall appearance or impact – even fine detail, like text, should be legible. You could print this image at home in sections then piece it together, though to save the trouble (and ink!), having it professionally printed would be best (even then it would probably need to be printed in at least two sections). Note that some professional printers require a minimum document resolution and may not accept a 72 PPI image (in this case, you could simply resample the image to increase the resolution).
Optimising this image for print…
Although this image has two major potential print flaws (low resolution, massive scale) it is actually quite easy to optimise.
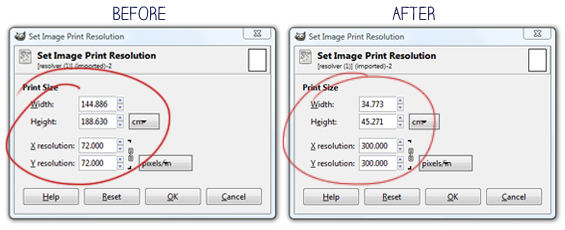
Photoshop: In the Image Size dialogue box, uncheck Resample Image then change the Resolution value from 72 to 300. You will notice that the Width and Height automatically decrease in line with this change though the Pixel Dimensions remain constant. Click OK.
GIMP: In the Print Size dialogue box, change the Resolution from 72 to 300. You will notice that the Width and Height automatically decrease in line with this change. Click OK.
At 34cm x 45cm (13.3″ x 17.7″) the image is still larger than a standard A4/letter sized piece of paper. You can make any further edits as required.
EXAMPLE II: HIGH RESOLUTION/SMALL SCALE
Image source: The Graphics Fairy (Beautiful Antique Sail Boat Image)
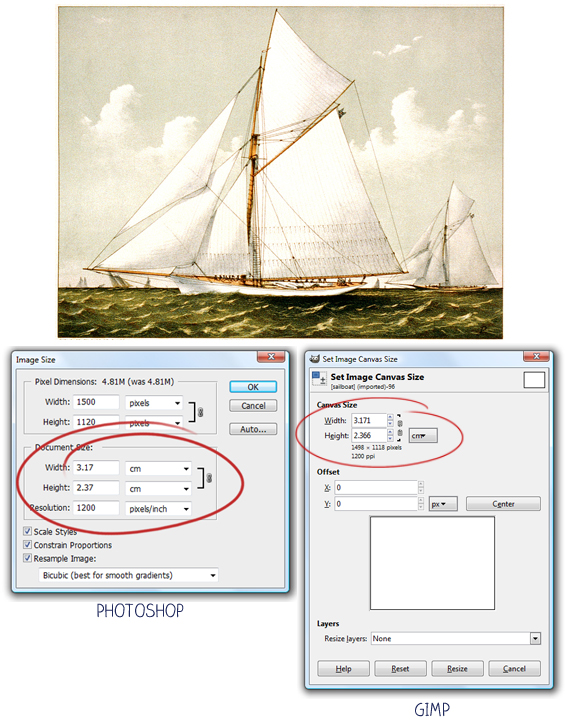
Properties…
Physical Dimensions: 3cm x 2cm (1.2″ x 0.9″)
Resolution: 1200 PPI
Pixel Density: 1500 x 1120
Using this image as is…
At just 3cm x 2cm you would need to up-scale this printable for practical use (unless, for some weird reason, you need an illegitimate postal stamp). Also, the massively high resolution is superfluous as a maximum of 300 PPI should be more than sufficient.
Optimising this image for print…
As with Example 1, this image also has two major potential flaws (tiny scale, massive resolution). Fortunately, again, it is an easy fix.
Photoshop: In the Image Size dialogue box, uncheck Resample Image and lower the Resolution to 300. You will notice that the Width and Height automatically increase in line with this change though the Pixel Dimensions remain constant. Click OK.
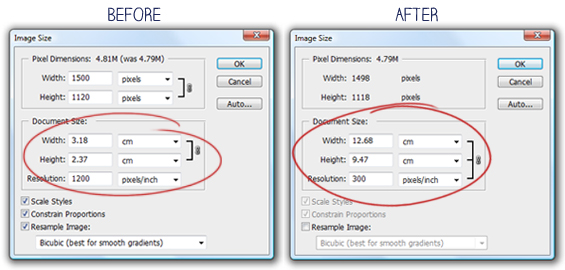
GIMP: In the Print Size dialogue box, lower the resolution to 300. You will notice that the Width and Height automatically increase in line with this change. Click OK.
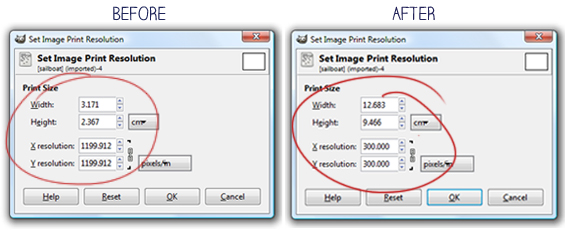
At 12cm x 9cm (4.9″ x 3.7″) the image is still relatively small. Fortunately, it has a lovely vintage look which is forgiving in terms of print quality. So, play around with lower resolutions (even as low as 72 PPI which makes the size quite big at 52cm x 39cm/20″ x 15″) or even try resampling the image (introducing new pixels) to increase the size whilst maintaining a good resolution. Just remember, whilst editing programs are pretty good they’re not magical. You can, and should, print a small test patch to check the appearance prior to committing to a complete print.
EXAMPLE III: LOW RESOLUTION/SMALL SCALE
Image source: The Vintage Moth (Vintage Paper Doll)
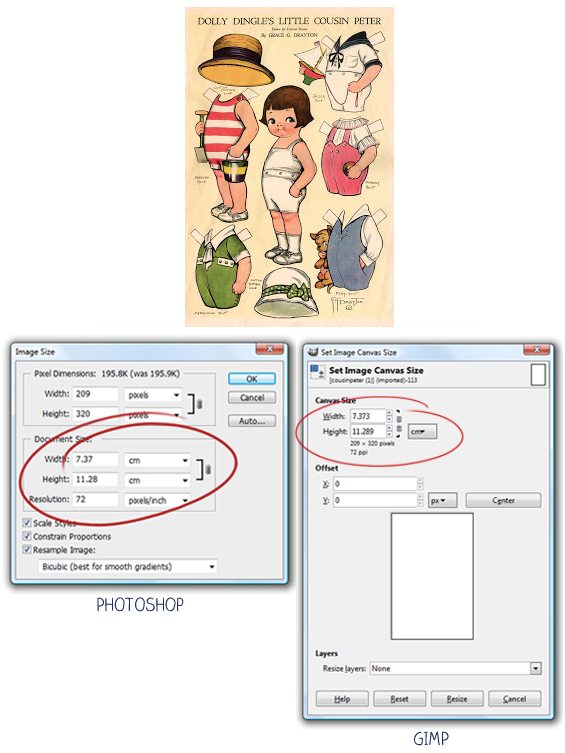
Properties…
Physical Dimensions: 7cm x 11cm (2.8″ x 4.4″)
Resolution: 72 PPI
Pixel Density: 209 x 320
Using this image as is…
With both a low resolution and a relatively small print size, this image would present quite poorly printed as is. The detailed nature of the image would amplify this lack of quality as even minor pixelation would render the small text illegible.
Note: For the purpose of this example, I deliberately neglected to enlarge this image prior to downloading it. If you really love this image, a larger scale version is available (link above).
Optimising this image for print…
Some images just aren’t made for printing. ‘Poor resolution’ plus ‘small scale’ plus ‘detailed subject matter’ (such as text) usually equals ‘beyond help’. Unlike the preceding examples, there is no simple fix for this image. Without resampling the image (which, remember, would result in some quality loss), increasing the resolution would reduce the already small print size and increasing the print size would reduce the already poor resolution. So, what can we do? In this case resampling, and then applying a few tricks, is the only real option. Here is a simple example:
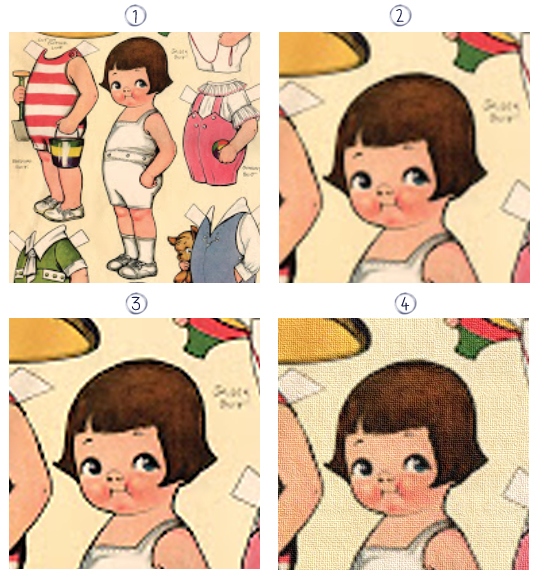
1 Original image.
Much too small for the detailed nature of the subject. You can just make out some pixelation and can clearly see that the text is tiny and illegible.
2 Image resampled to increase the size (height upscaled from 11cm to 25cm).
The scale is now better though there is discernible blur and pixelation.
3 Image resampled to increase the resolution (from 72 PPI to 300 PPI).
It’s a subtle change which upon printing will soften some of the pixelation.
4 Illegible text removed and a canvas texture applied.
I edited out the text (new text could be added) and applied a canvas texture to help disguise the poor quality. Obviously this look isn’t for everyone though it would work well made into a wall chart.
This is just one very basic example of working with a poor quality image. There are numerous tools and techniques to play with – have fun!
THIRD PARTY IMAGE ENLARGERS
You might also like to try some of the free tools and premium programs designed specifically for producing quality enlargements:
Re-shade
Image Enlarger
SmillaEnlarger
Perfect Resize
HOW BIG A ROLE DOES YOUR PRINTER & PAPER PLAY?
Of course, your printer (along with any chosen print properties) plus the type of paper you’re printing onto, are also factors in determining the visual quality of your prints. For best results, choose the best quality settings and use good photo paper. Today, basic domestic printers (from as little as $30) can produce great results. Good domestic printers (from around $150 for a photo quality inkjet) can produce excellent results. In general, inkjets are favoured over lasers for producing photo and art prints at home.
Further reading about printer quality:
Scan Tips: Colour Printing
About: Understanding Printer Resolution
PC World: Laser v Inkjet
ePhotozine: Common Printer Myths Explained
PRINTING AT HOME v PRINTING PROFESSIONALLY
Quality wise, professional printing will almost always trump at home printing. That said, at home printing can produce results which are more than sufficient. As mentioned above, most modern domestic printers are excellent (I have a new Canon MJ7160, a premium inkjet printer, which is fantastic – $187 from Officeworks).
If an image is sized A4 or smaller, I will usually print it at home onto photo paper. Having a reasonably good desktop printer means it’s fast, easy and convenient to produce high quality prints for those spontaneous I-need-it-now projects or simple one-offs.
For large scale images, those that are extra special, or for multiple prints at once, I prefer to use a professional print shop (I personally like the Officeworks online service).
Price wise, believe it or not, professional printing is usually more economical. Desktop printer ink is one of the most expensive liquids in the world – crazy!
PURCHASING DIGITAL ART
Whilst my focus is on the use of free printables, you can also buy very affordable digital images, many of which have already been enhanced and perfectly sized for optimal print quality. There are many good sources for premium downloadable art online. Try searching Google or Etsy for “Downloadable Art” or “Printable Digital Images” (or similar).
Remember, along with downloading free printables and purchasing premium printables, you can also create your very own by scanning book illustrations, vintage photographs, old maps, etc.
![]()
If you’re unsure where to begin your search for free printables, or simply want a comprehensive guide, check out some of the resources below. I spend waaaay too long hunting down awesome sites which offer amazing free printable so please take advantage of my (slightly) obsessive quest!

WIKIMEDIA COMMONS
A huge range of public domain images available for free use.

BIODIVERSITY HERITAGE LIBRARY
For a huge range of beautiful large-scale scientific flora and fauna illustrations. The Biodiversity Heritage Library also house many of their images on their Flickr stream.

BIBLIODYSSEY
For thousands of gorgeous vintage images, many of them at high resolution (so able to be enlarged). BibliOdyssey's images are all neatly stored in Peacay's Flickr stream.

NEW YORK PUBLIC LIBRARY DIGITAL GALLERY
For thousands (upon thousands) of freely accessible images. The library has recently reviewed some of its policies and now all 'out of copyright' images can be downloaded at full resolution.

THE GRAPHICS FAIRY
For a huge range of beautiful vintage graphics. Many at large-scale or in high resolution. Visit the search page to browse by category.

THE VINTAGE MOTH
For hundreds of antique and vintage graphics.

AGRICULTURAL RESEARCH SERVICE
For over three hundred lovely scientific historic pear watercolours. Images are low resolution though fine for standard certificate sized frames and matting. Links are displayed in a text-based table. To view thumbnails instead click the link at the top of the table.

AUDUBON SOCIETY
For free large-scale images of Audubon's stunning bird illustrations. If needed, please visit my blog post here for step-by-step download instructions.

AWESOME ART
For hundreds of premium, large-scale digitised artworks. Although not free, this site offers some amazing high resolution images at affordable prices. Be sure to check out the Vintage Illustrated Posters and the 'Birds of America' museum quality illustrations.

BOTANICUS
For thousands of downloadable large-scale botanical illustrations. This site is a vast digital library of historic botanical literature so much of the content is text. To find images, open a book and scroll to 'Plate' or 'Illustration' in the 'Pages' list. To download an image click the straight arrow icon in the navigation tab.

DAVID RUMSEY MAP COLLECTION
For a huge collection of maps scanned at very high resolution. Registration is required to export maps at their full size (which is often larger than two meters). Search for maps via this category page.

MAP HISTORY
For links to databases carrying thousands of digitised historic maps. Start your search in the 'Images of Early Maps' link (in the left sidebar).

OLD MAPS OF PARIS
For a lovely collection of copyright free antique maps of Paris. Some large scale.

PLANT ILLUSTRATIONS
For a massive selection of easy to browse large scale scientific plant illustrations. If needed, check out my blog post here for navigation and download instructions.

PHOTOSHOP ROADMAP
For forty lovely antique maps. A small donation is requested to download all maps at full resolution.

INTERNET ARCHIVE
For an extensive online library featuring millions of digitised books. All pages are scanned and offered in large scale. Zoom in to maximum size before saving any images to your computer.

RIJKS STUDIO MUSEUM
For a huge selection of beautiful, large-scale, museum-quality artworks.
To download images you need to create an account.
![]()
A WORD ABOUT COPYRIGHT
Of course, not all images on the net are free for the taking. If permission is not specified, you’re best to avoid use (or contact the owner – where possible).
![]()
I know this is kinda a full-on post, though I really wanted to be as comprehensive and explanatory as possible to (hopefully!) arm you with all the knowledge, confidence and prowess you might need to tap into the amazing possibilities free printables offer budget-conscious decorators. And, if you were perhaps completely oblivious to the existence of free printables, maybe this post has even been a little bit enlightening!
If you still feel a little overwhelmed, confused or daunted, feel free to ask any questions – I’m always happy to try and help :-)
Also, remember, this is post one in a three part series. Post two (setting-up printables for at-home printing) can be found here. Post three (setting-up large-scale printables for professional printing) is coming soon.
![]()
RELATED POSTS
 Christmas Advent Calendar Wall Chart (full tutorial with free printables!)
 Free Art Printables: Customising For At Home Printing (a complete tutorial)
 Free Art Printables: Finding, Setting-Up & Printing Large-Scale Images
 Create Your Own FREE Art Paintings (from photographs)!
 DIY Quote Art…and free printable sign!


THANK YOU for this awesome information. I am currently in the process of designing a gallery wall using free printables for my living room and this will be extremely helpful. Thanks again! and I look forward to the rest of the series.
Oh, you’re welcome Kelley :)
I will definitely try and get the next post up asap then. It will detail how I usually go about customising free printables for perfect framing.
I’ve always wondered how to use those numbers to my advantage!? And thanks for the great resources for graphics too! :)
Thanks for the comment Anita. I was soooo confused when I first started trying to understand optimising free printables so I really hope this post helps everyone.
Oh my gosh, THANK YOU for this wonderful post. I just can’t stretch my budget to Photoshop but there are few tutorials for GIMP so I haven’t yet ventured into printing out the fabulous free printables I have found so far. You are a legend for taking so much time to do this when you have a couple of littlies to share your life with too :-)
I’m so glad it might help you Julie. I downloaded GIMP specifically to write this post and as a free program it seems really great.
Have fun!
That is very helpful information as I have downloaded things and the image was shocking so next time I will be referring to your post. It is very detailed and I’m sure will help lots of people. Thanks for putting the time and effort into this detailed (1 of 3) post. You deserve a drink now I think! Regards Kathy A, Brisbane, Australia
Thanks Kathy. I might wait until at least 5pm to have that drink :)
Great post. It is so refreshing to see a post on a blog with quality information. I feel the quality of DIY blogs from places like the US are slipping with their weekly schedules of output. You blog always only has quality posts.
You and Ana White keep me hoping for a return of quality posts
Thanks so much Js. I put A LOT of time and effort into my posts so it is really lovely to hear they are appreciated.
I guess that’s one perk to being an ‘improper’ blogger (as I like to call myself) – I don’t adhere to a particular publishing schedule which gives me the luxury of taking my time with posts.
To be put into a similar category as Ana White is kinda crazy though :-) She is AMAZING!
This is fantastic! I pinned this first article and will pin others as well. When I have some time, I’m going to follow your instructions for my own home artwork. When I blog about it, I plan to give you credit! I’m happy to have found your blog.
Thanks Ellen. So glad to have helped you by sharing my info :-)
ooo ooo ooo!!! Where is the cow painting from? Would love him! :-) LIZ
Hi Liz
Isn’t he adorable? I found him on Wiki Commons: http://commons.wikimedia.org/wiki/File:Friedrich_Voltz_Ochse.jpg
The full resolution download is around 16 x 11 inches, though only 72 DPI. If needed, refer to my info in the above post for tips on increasing the quality :-)
Kristine
Dear Painted Hive,
I just wanted to thank you for this amazing resource you put together! I feel like its my lucky day! I greatly appreciate you taking the time to explain and dig and share your resources!
What a treasure you are! Thank you so much!
Joy,
Ally
Thanks so much Ally. It’s great having a platform to share my finds from and lovely knowing the information is helpful :)
Thanks so much for a wonderful comprehensive post – I love it! Inspiration, instruction and information on resources – all much appreciated. Thank you for sharing :)
You’re welcome Cherie. Glad it was helpful.
Where can I find the print of the Magnolia tree?! Love it!!
Hi Micah
I’ve seen it in a few places though here it is available for free download from The Graphics Fairy :)
https://thegraphicsfairy.com/vintage-magnolia-flower-printable/
Cheers
Where can I find the image of the blue butterflies on the right below the “free art printables” banner? Thanks :)
Sorry, I have no idea. This post is from a few years back and I simply used some images I found online.
tq so much
Thank you so much for the information regarding resolution & print size. I have never understood this much trying to use it when printing. I hope it helps me and besides the pictures, you provided I have had a very productive time visiting your blog/site from the Pinterest site.
Thanks Sandra. I’m glad it helped you. I really appreciate you taking the time to leave a comment and let me know :)
Whenever I open an image in gimp, with a PPI of 300, the dimensions are always around 5″x3″..could that mean I’m downloading it wrong? By the way, it’s really cool to see you still responding to this comment thread!!
Hmmm, that could be the issue. Can you maybe send me a link to something you’re trying to use and having trouble with and I will take a look.
It appears that the images that were small were all from the same source, Graphics Fairy. Do you find many of those images to be small? I tried with some of the images you used in the tutorials and the dimensions matched yours. You’re so kind to reply and for sharing your wonderful expertise, thank you!