
You know when you have a design idea, though the details are all a bit hazy and there are way too many options to consider, so you go to the hardware store in hopes a magical product will jump out and make the style decision for you?
That’s pretty much what happened with these shelves.
I knew I wanted open shelves on the wall in my parent’s laundry room, however I didn’t have a clear vision of what they should look like. Nor, given the tight time-frame of the room makeover, did I have my usual luxury of spending days (or even weeks!) coming to a decision.
Enter my “just-choose-something-already” trip to the hardware store.
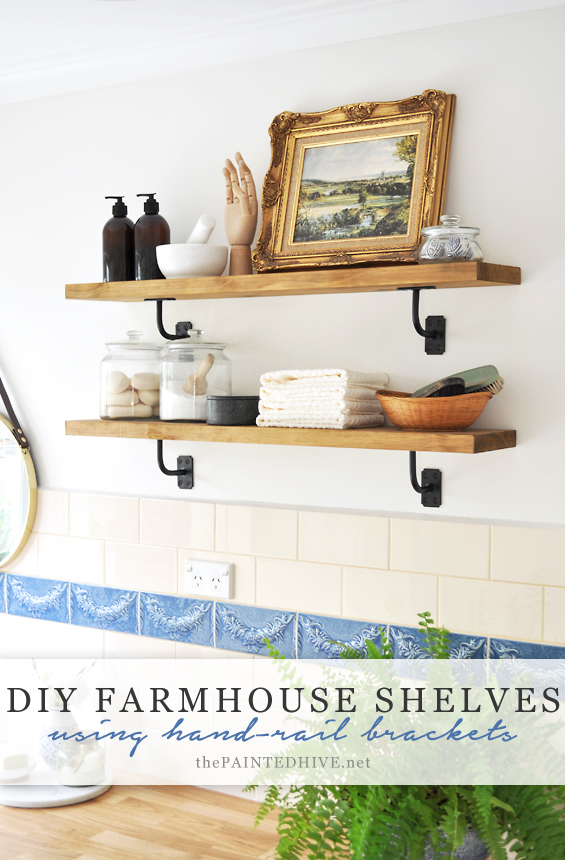
These were the brackets which first caught my eye as I was perusing the (rather dull, if I’m honest) offerings.
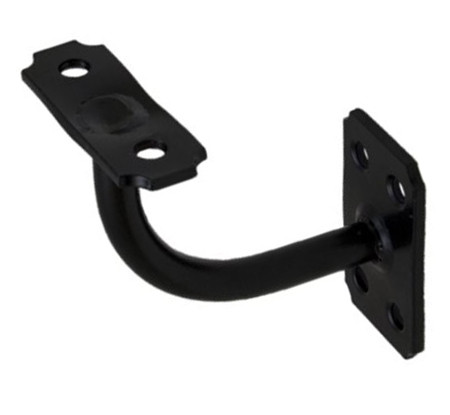
They are actually hand-rail brackets – and rather pragmatic ones at that. Still, I liked their somewhat crude industrial form and the fact they weren’t traditional shelf brackets – they felt unique. I also thought they would tie-in nicely with the barn door hardware I was planning for the room. And, as a bonus, they were only $8 each!
If you like the idea of using hand-rail brackets yourself, turns out they are actually quite prolific and come in lots of styles and finishes…not to mention price-points! Here’s just a small selection I found during a quick online search…

Note: Some handrail brackets are set on a slight angle. Ensure the ones you choose are at 90 degrees.
Aren’t the ones with the separate “U” clasps cute?
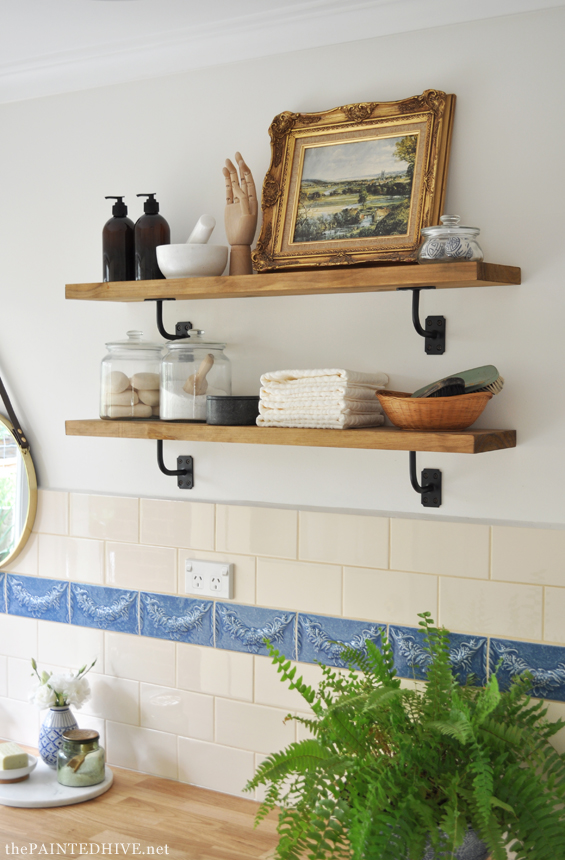
To compliment the brackets, and reference the new butcher-block style counter, I decided on simple timber shelves.
Initially, I was loving the idea of reclaimed wood though whilst at the hardware store I just happened upon the perfect pine plank for only $14. To make the shelves I simply cut it down as required then stained both lengths to co-ordinate with the counter (I used Feast Watson ‘Old Baltic’ which I already had on hand).
Now, I never intended to share a full “how-to” for the installation of the shelves. I mean, it’s really not that interesting and is a pretty straight-forward DIY. That said, I do remember the last time I attempted to install shelves (#disaster #iblamescreamingchildren #Ialsoblamemysister), so here’s my basic process…
1 Determine approximately where you need your brackets to go then check the wall for any studs. If possible, adjust the placement slightly so that at least one bracket per shelf is in a stud. If installing into a stud isn’t an option for you, ensure you use appropriate plaster/drywall plugs to secure the brackets safely.
2 Once you have gauged the bracket placement, install one bracket, ensuring it is straight and level. Next, use a spirit level to determine the accurate placement of the second bracket. Whilst the bracket is in perfect position, accurately mark the screw points on the wall with a pencil or drill bit. If you’re fortunate enough to have a second person around, it can make things easier.
3 Once the second bracket is installed, place the shelf on top then mark the screw points from the underside with a pencil. Remove the shelf to drill the pilot holes then reposition and attach with screws.
Tip: If your screws aren’t the same colour/material as your brackets, once installed colour the heads with a permanent marker to match. That’s exactly what I did!
Tip: As with any hardware which requires multiple screws, I don’t like to fully tighten the screws until they are all in place. I find this just provides some wriggle room for getting the hardware and screw head positions properly aligned.
I realise that’s a pretty blunt summary, though let me know if you have any questions :)
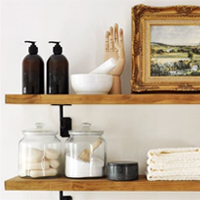
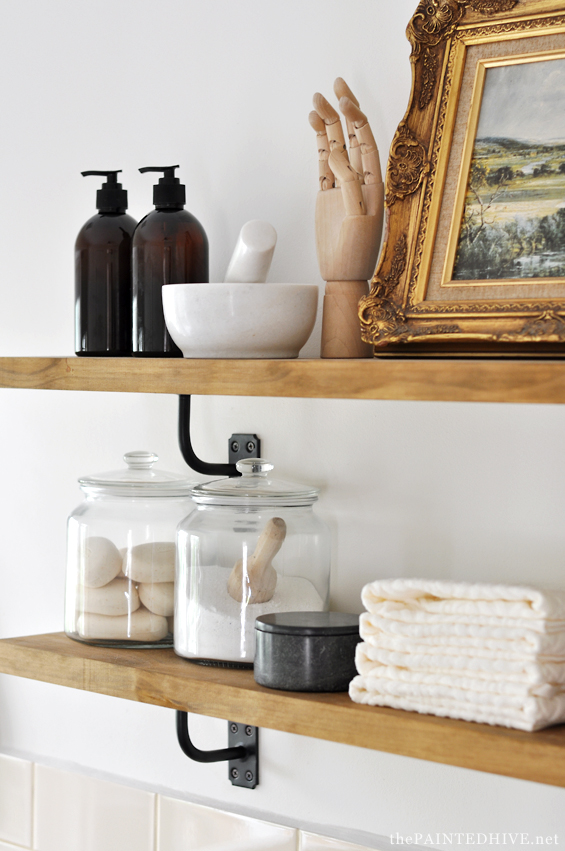
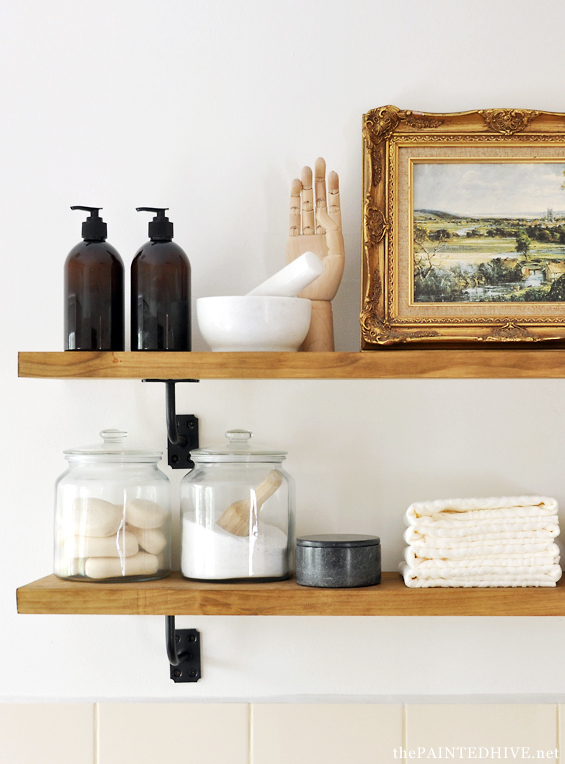
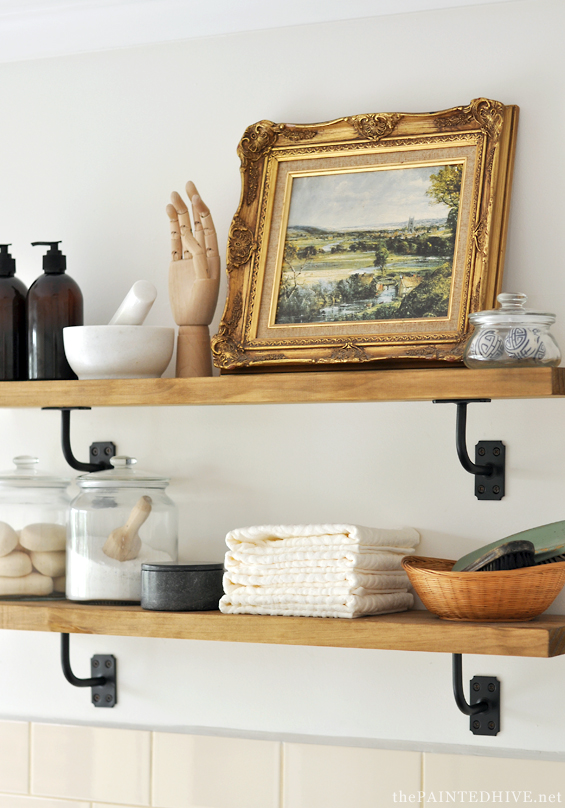
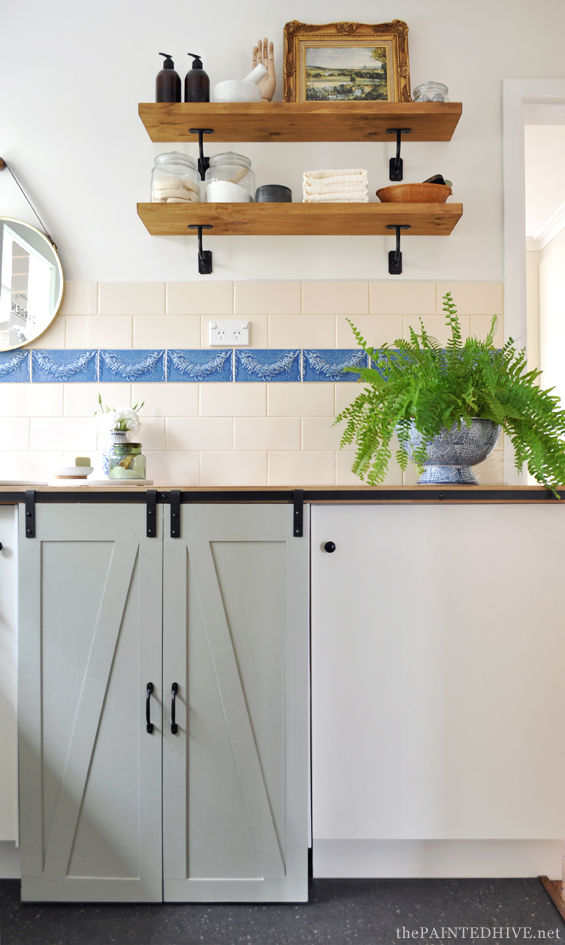
To style the shelves I used a selection of pretty, budget-friendly laundry/powder room-ish accessories.
Glass Jars (Ikea)
Wooden Hand (eBay)
Hand Towels (H&M)
Mortar & Pestle, Marble Canister, Lotion Bottles (Kmart)
Everything Else (Thrifted)
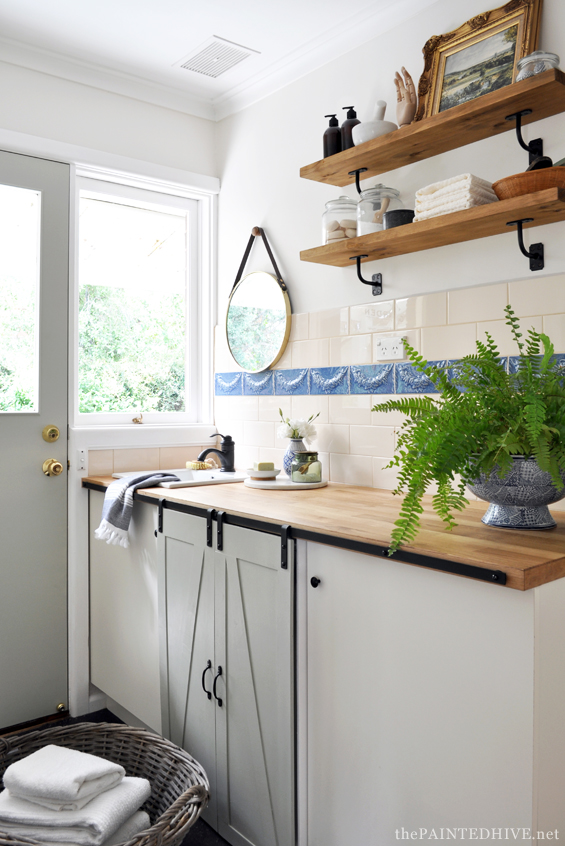
So, for just over $20 per shelf, and less than an hour of my time, I managed to create a really cool focal point. Yay to that!
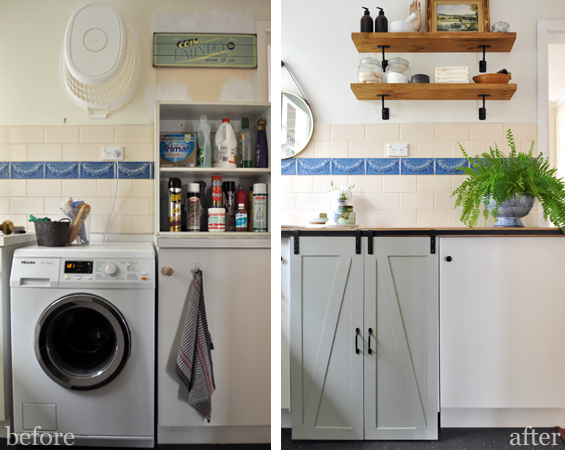
See the entire laundry room makeover here.
![]()
PS I didn’t win the laundry refresh contest though thanks to your votes I came in a respectable fourth place, plus my parent’s have a “new” laundry room they absolutely love, so in many ways I did win really! Thanks so, so much to everyone who took the time to vote for me.
PPS For those of you have been following me for a while, you might be interested to hear that my eldest started school yesterday! Do you remember when I was decorating her nursery? That was just last week, wasn’t it?


Just lovely. Thanks for the follow-up to the laundry makeover. I was curious about these shelves and they are beautiful and seem easy to make.
Gorgeous and perfectly styled as always. You are so clever.
Aw, thank you!
:)
I can’t believe you didn’t win that contest. Yours was by far the most inventive and transformative. Love your attitude to it though.
Great post and I love the shelves. Thanks for the links to the other brackets too.
Oh My God…has the time flown that fast that she’s now off to school!!?? Where have those years gone for goodness sake?
The laundry is fab and I love the brackets Kristine. I want to put up some shelves in my sewing room and will be heading to Bunnings to get some. Thanks for all the great tips. Wonderful as usual.
xx
PS… isn’t KMart great lately?
Thanks so much Lesley.
Yep, how is it that Charlotte is five years older though I haven’t had a single birthday? ;)
Glad you like the shelves and will be using the brackets. I thought they were a great find. Have fun!
HA! Birthdays. What are they?
LOL!
Oh My Goodness!!! My eldest also started school yesterday and that is actually how I stumbled onto your blog, baby room ideas!!
Laundry looks awesome!
Cheers Cat
LOL! Too funny. What an awesome coincidence. How are you finding it? I thought it was going to be a big adjustment (for everyone involved!) though it’s actually felt like more of a flow-through.
Glad you found me :)
I loved everything about this makeover, including the original tile. These little shelves are perfect. I’m fixated on the brackets but alas they can’t be found in the US and I’m unwilling to pay AU$80 each on ebay! If I keep saying “what I can find at my local hardware store is good enough” I may start to believe, but I doubt it. In the mean time I’ll just keep coming back to your blog and feasting on your lovely laundry room. Thanks for sharing the details.
Hi LaNell,
I found a good variety of brackets on Amazon.com, if that helps. :)
Thanks Deb. Yep, just had a quick look. Didn’t see any exactly the same as mine though lots of similar ones.
So disappointing Amazon doesn’t offer shipping on all of their products to Australia. They have some cool stuff at great prices!
Thanks so much LaNell. I’m sure you can re-create a similar look using comparable brackets. It’s easy to get caught-up on doing things “exactly” though often the alternatives can be just as good…maybe even better!
If you’re set on the exact brackets I used, I can ship them over to you? Not sure how much postage will be. Maybe $20 – $30 AUD? I can find out if you’d like?
Kristine
x
I love your unique take on the shelf brackets and the sliding barn door for cabinets. You are so clever!!!!
Aw, thank you so much Frani :)
Love the shelves and your laundry room make over!! I would love to make some of these for myself. I was wondering how thick the wood is that you used??
Thanks Cathy. The pine is 30mm/1.3″ thick. I chose it because I wanted the shelves to look similar to the counter top. Cheers.
Hand rail brackets?! Genius. Especially from a quick hardware store run! Love the unique. Charlotte is NOT five years old! Sheesh, we’ve been friends who’ve never met each other for a good while now. ;)
Ha, ha. Yep, she will be six in June and Riley is almost four! I still think of him as my little toddler!
As lovely as it is to be able to connect with so many people from all over the world through my blog, nothing would beat meeting some of my long-term friends in person :)
I was convinced that you would win, your’s was the best IMO. You always think outside the box Kristine! Charlotte off to school already, how time flies. Love these shelves and handrails. I always get so excited when you share your make overs on the blog, and you reveal your sources. And KMart, how amazing are their stuff now. And you made me look at the Reject Shop again after some of your earlier reveals.
Thanks so much Etta. It’s really, really lovely to read that my make-overs are actually helping inspire others so directly. Yay! That’s what I love so much about blogging!
Kristine
PS Yes, Kmart is rocking it at the mo’!
Thanks for the instructions for the awesome shelves Kristine. You so deserved to win the competition; your re-do was much better than any of the others but well done for being so gracious in defeat. :) Whenever my kids passed an important milestone like getting their licence or leaving home (I am much older than you) I always tried to look on the positive side that it meant they had the privilege of growing up to be able to do those things. Not all kids get that opportunity.
Thanks so much Julie. Yes, that’s a great way to look at things. It is a privilege.
I wish you would have won the refresh- your make over if the laundry was tops!!
Next time!!
Thanks so much Theresa :)
I absolutely love these types of shelves! I find them to be so versatile, you can put so many different home decor accessories mixed with some functional pieces and you’ve got a great focal point. Also great tip on coloring the screws to match the hardware! Thanks for the share and great job re-doing the laundry room, I definitely got some laundry room inspiration from this post.
Hi Kristine, a random question, but what screws did you use on the on the brackets? I have bought them as my daughter needs a shelf in her ensuite (tiny vanity) and I had some recycled Oregon to use for the shelves and these brackets are perfect for that project. They seem to need rather large screws!!
Hi Cheryl
Hmmm, I don’t recall the screws being overly large. From memory I used approx. 8G 50mm ones.
Just take a bracket with you to the hardware store and test some screws in the holes. You want “countersunk” (or similar) heads which will nestle into the bevelled cavities in the brackets. Try to avoid anything “domed”. If you need plaster plugs too, remember to make sure they are compatible with the screws you choose.
Kristine
Thanks Kristine. I was testing screws on it yesterday, just seemed to be needing bigger and bigger screws, the 8G ones were loose in the hole! Ended up leaving it, but I’ll go back and take my time. Appreciate the reply Kristine.
Cheryl
Thank you so much for sharing these Kristine on the Creative Circle link party! I just love them, so your my feature of the week. :) Have a great day!
Oh wow, thank so much :)
I just discovered your blog after you were featured on the Creative Gallery at The Tale of an Ugly House! I enjoyed checking out your blog and am now following you on Instagram, too!
Thanks so much Lanita :)
Hey! How sturdy are these guys? They seem like if you don’t attach them to the wall in the back they might cave in. I want to try them out though :)
LOL, yes, I thought that might be the case too though they are super sturdy. I even did an experiment while I was at the hardware store with the brackets and a piece of pine because I couldn’t imagine how the shelves would stay level. To my surprise they worked perfectly and are incredibly solid and straight.
Kristine
I love this blog! I’m getting so many great ideas from it! My husband and I are building our own house in the mountains of Colorado, follow our journey on our blog, http://www.skiddinginbroadside.com. Thanks!
Hi,
I have been wanting to do some shelves like this in my kitchen. Finding brackets has been easy, but I have been struggling to find timber shelves to put on them in the size and thickness I want, These look perfect! You say they were a simple pine plank from the hardware store, but I have not been abke to find anything just like them. What exactly are they, and where were they from? (Love this laundry, by the way!).
Thanks Louise. Happy to try and help. Where abouts are you located? Only asking because I often get product questions from my US based readers who don’t realise I’m in Australia.
:)
Hi again. Thanks for replying. Sorry, I should have said, I am in Australia. (One of the reasons I particularly enjoy your blog – it is not full of things from the US that I can’t get!)
Okay, well I just found my plank of wood at my local Mitre 10 store. I simply walked around the timber section until I found what I wanted. There were actually a few different widths and thicknesses to choose from. I can’t remember how long mine was (maybe 2 meters – of course, they will cut it down for you if it’s one of their really long lengths) though it’s 30mm thick x 150mm wide approx. Hope this helps.
:)
Thank you so much! That is very helpful. I have been looking for shelves approximately 30mm thick with no luck. This may be the answer. Off to Mitre 10 I go! I appreciate your help.
I absolutely love these shelves! I just came across them on pinterest, and think the hand-rail brackets are such a great idea! I am wondering how deep your shelves are? I didn’t see it in the post, but I’m wondering if they are too big if the wood would tend to topple forward? THanks
Hi Angie
Sorry for the late reply. The shelves are around 15cm – 20cm deep from memory and are completely stable. I thought this might be an issue too and even did a little experiment at the hardware store before I bought everything. I think even deeper shelves would be fine as the brackets seem to anchor them really securely.
Cheers
Hello!
I love these shelves and your styling as always is gorgeous. Can I ask where did you find the scoop? Thank you!
Thanks. I’ve had the scoops for years. Found them at a warehouse clearance kinda store one day. You can get similar on eBay/Etsy/Amazon. Just be careful with the size as lots of them are very small.:)
Wonderful wall makeover!