Well, hello there!
Remember me?
Sorry I disappeared for a few weeks.
I know it probably seems like I was doing little more than enjoying the summer sun, however, amidst sipping rosé and splashing in the ocean waves (which, let’s face it, are obligatory tasks), some serious decorating has actually been going on!
Just prior to Christmas I was asked to participate in a room refresh competition for Angi. Although I wasn’t super keen about “contending” (#insecure), it sounded like a fun project and was a great motivator.
I had around five days and just $500 to transform a laundry room from blah to beautiful – this was my kinda challenge (well, minus the tight time-frame…I think we all know how awesome I am with tight time-frames!).
Given my laundry room is in need of much more than a mere “refresh”, I decided to recruit my parent’s space. Not only did their room have more potential, though enlisting a second party meant I also got a free labourer – thanks mum! Nothing like having a grateful lackey to do all the boring jobs. Ha, ha!
I’ve been hanging out to share this project and am so excited it’s finally go time!
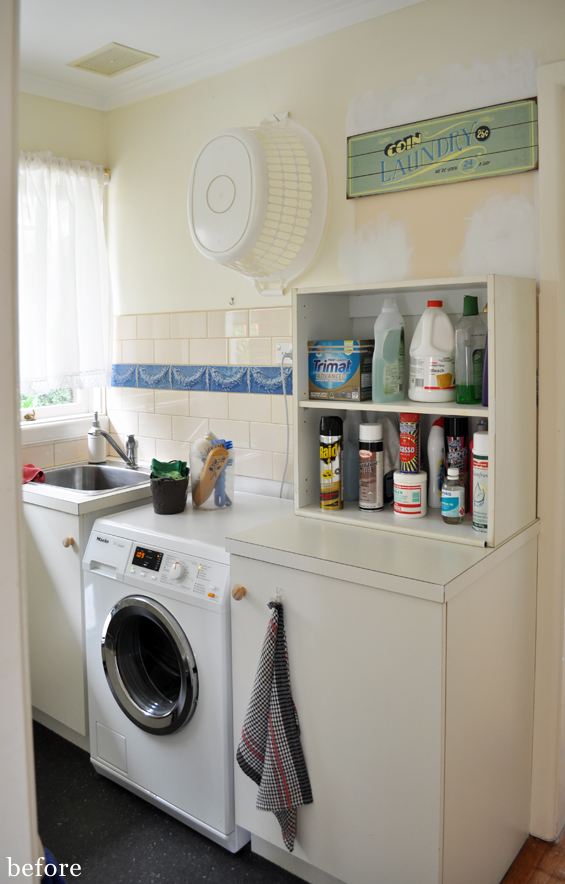
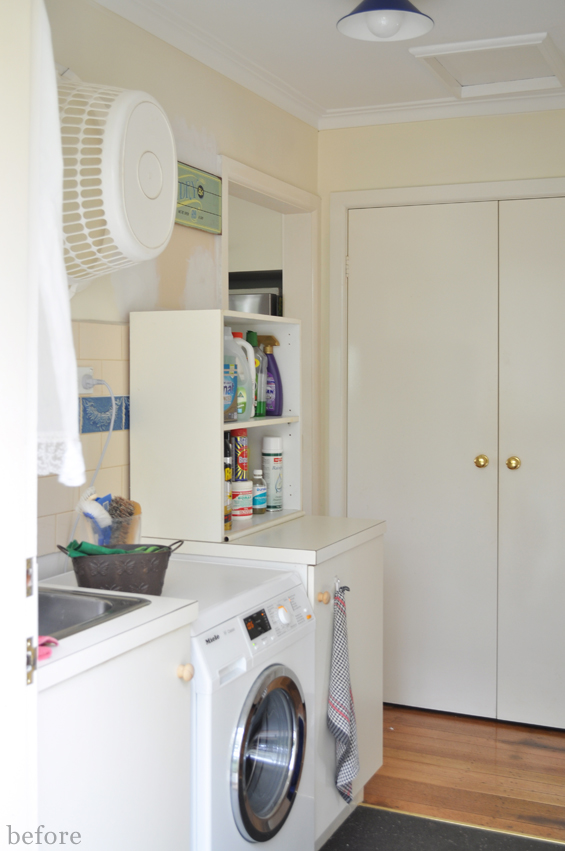
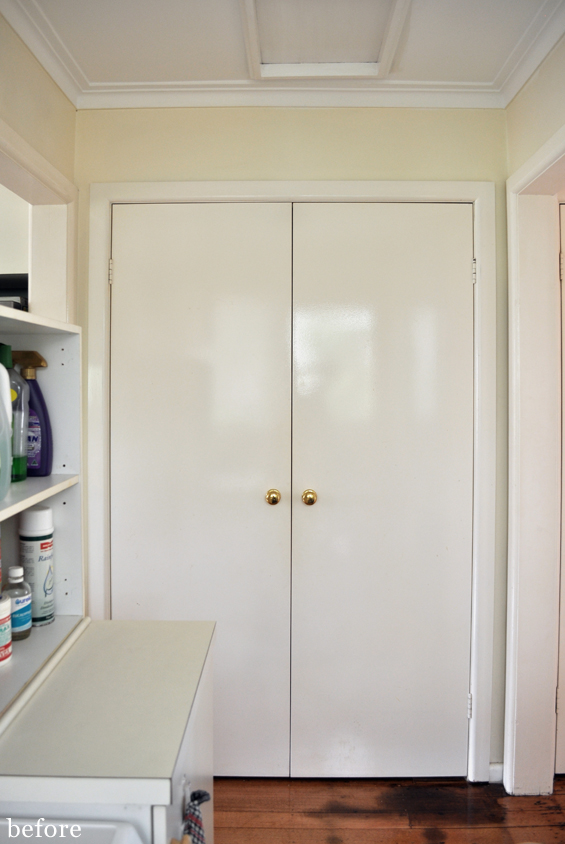
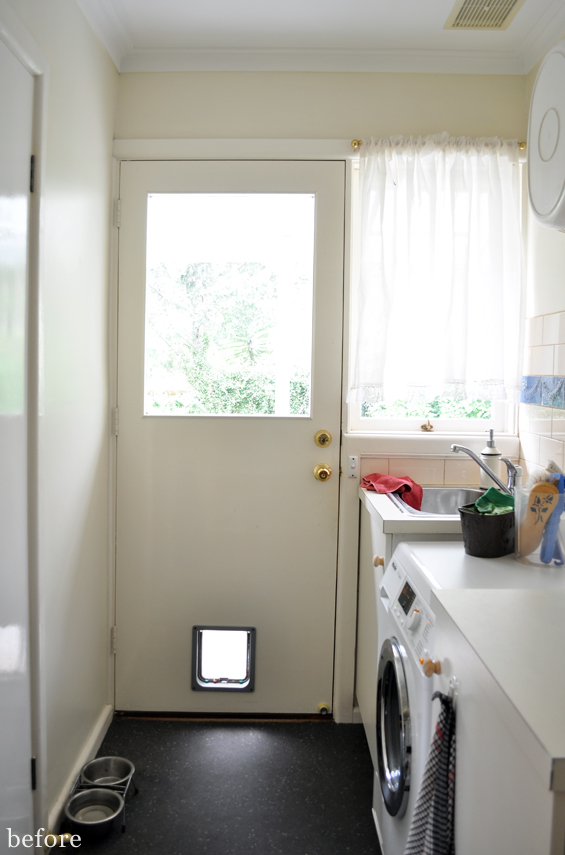
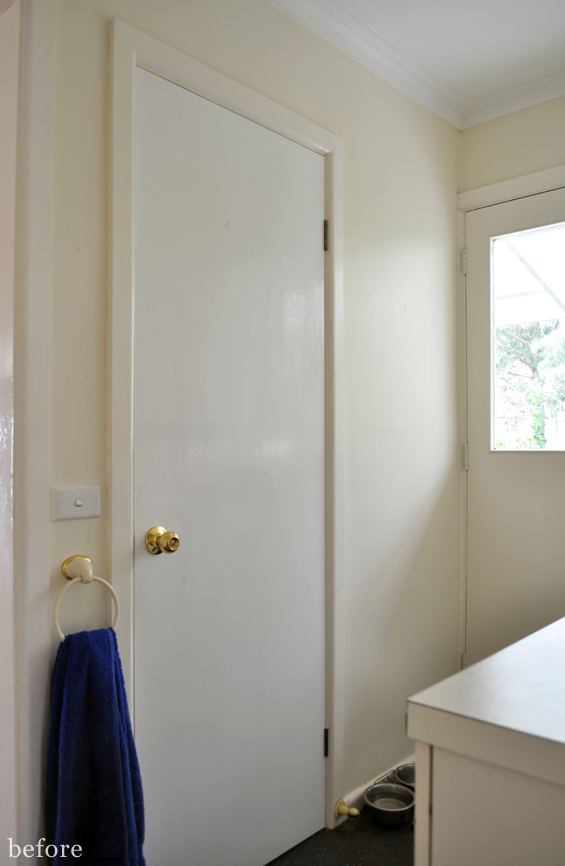
Here’s what I started with…
Utilitarian much? Thing is though, it needn’t have been. There is ample cupboard space available to house all of the unattractive necessities.
And, aside from the fact it’s clearly a functioning laundry room, it also acts as a powder room of sorts to service the adjacent water closet. This means it’s often used by guests. The real kicker however is that this space is off a main hallway in the house and is completely open! Yep, with no dedicated door (or even doorway!) this laundry room isn’t even it’s own “room” at all.
So, given the time-frame and budget (plus my weird need to dodge avoidable mess and work!) the plan was simple…prettify this space by making the most of as much as possible.
Given the go-go-go of it all, I didn’t really have a chance to stop and share progress posts as I went. Instead, I’ll be back soon with some tutorials and source lists. In the meantime, you can read a bit more about my ideas and processes over on Angie’s List.
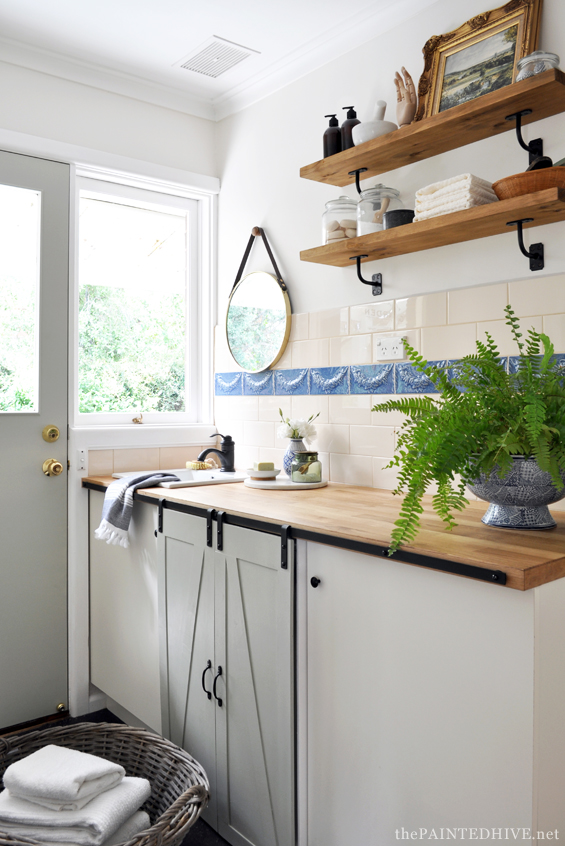
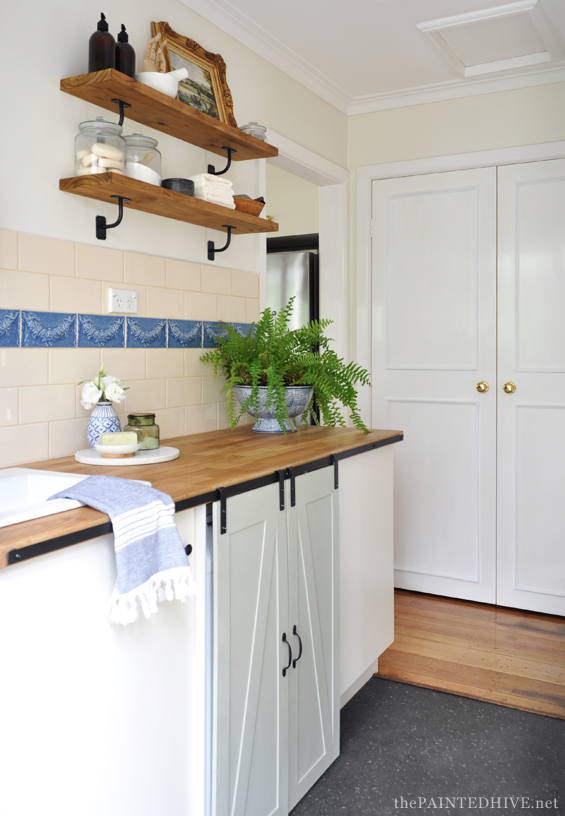
Anyhoo, here’s the room now…
Just a tad more appealing!
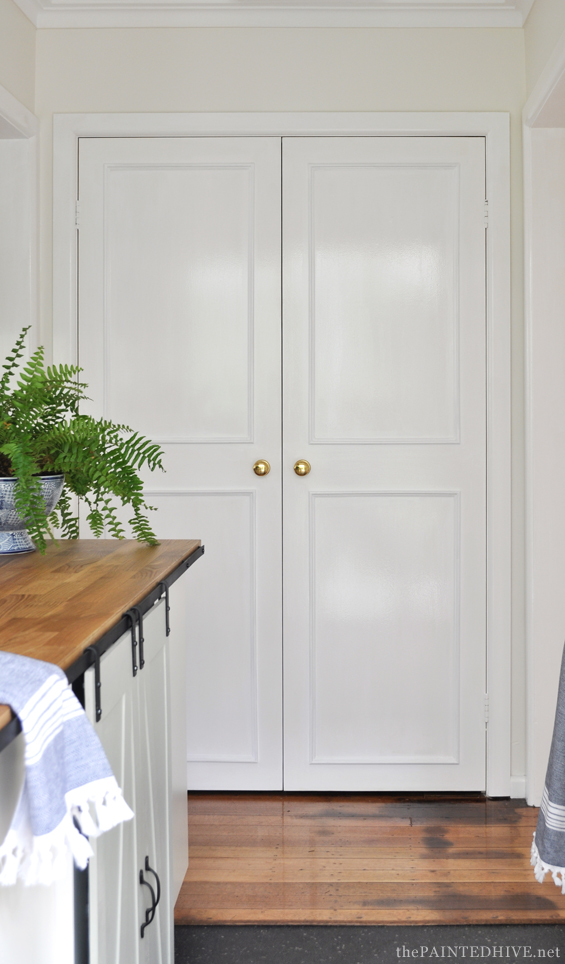
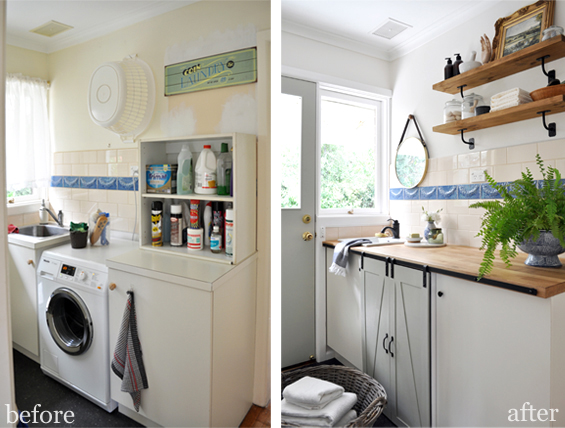
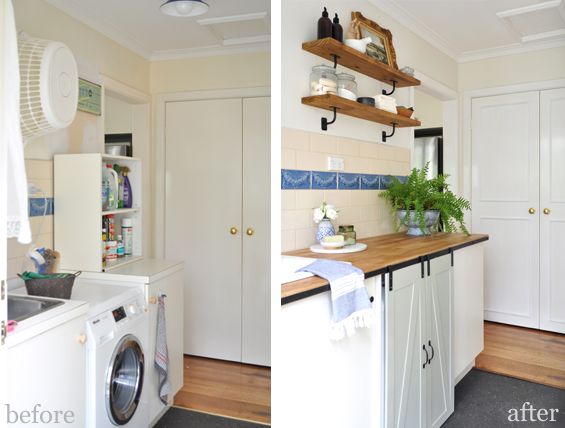
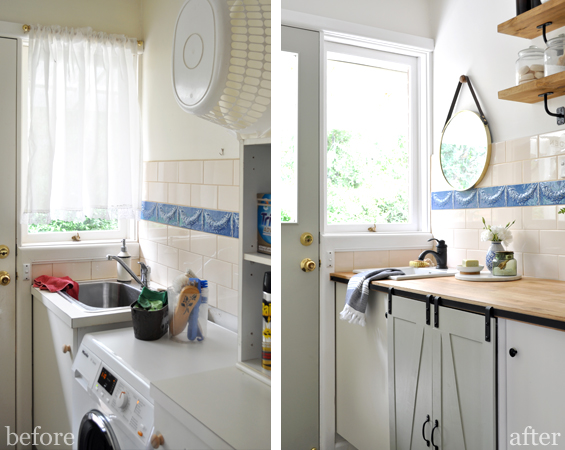
It can be tempting to throw the baby out with the bathwater, though as you can see, I kept the cabinets, tiles and flooring and dragged them all out of the past with some fresh and thoughtful “accompaniments”. Breathing new life into the existing elements in a room is one of my favourite ways to redecorate.
I’m so, so proud of the way this space came together. Mum and I did all of the work ourselves and chuckled from time-to-time about our new careers in plumbing and carpentry!
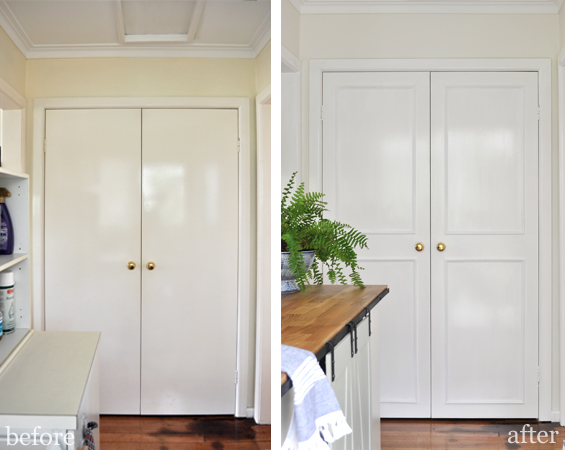
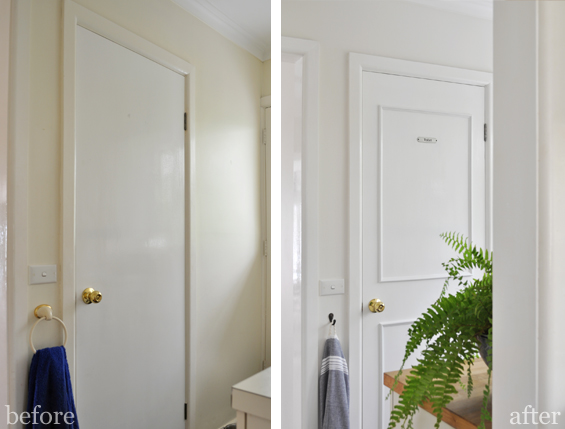
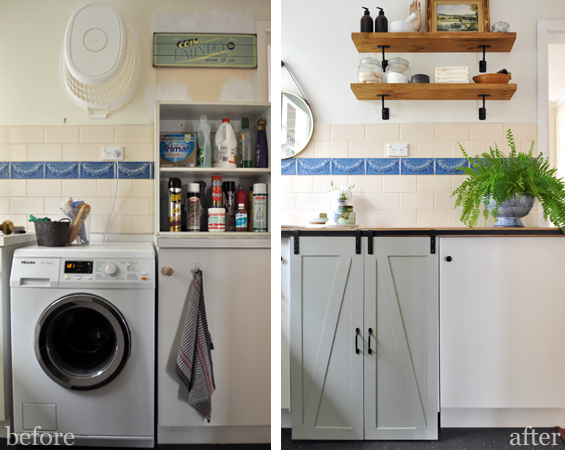
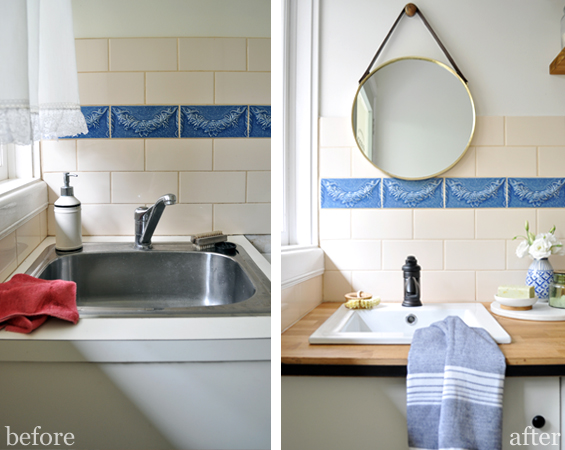
Here are a few side-by-side before and afters for comparison’s sake…
Like I mentioned earlier, I didn’t participate in this campaign for the competition aspect, though I am up against nine other talented, and popular, bloggers. To save me from looking like a total loser, if you like what I’ve created, I wouldn’t hate it if you have time to stop by and give me a vote (it’s just one click, well, technically two).
VOTING HAS NOW CLOSED
I know this isn’t a spectacular transformation though it was a fast and fun budget-friendly one. I really hope you like it and that it helps inspire.
UPDATE
Find tutorials and further information about all of the elements in the space here or by clicking one of the below projects.


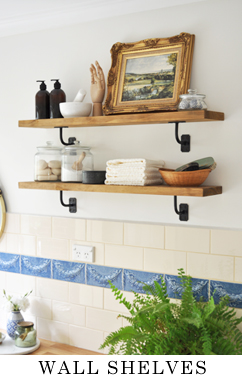
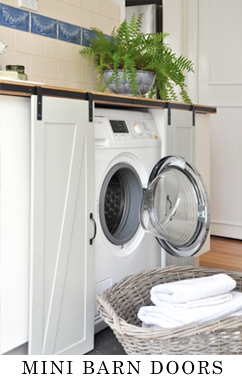



Just voted! I think it IS spectacular. Anyone can “renovate” a room, or house, by ripping out everything ans starting from scracth. Working with what is already there is what takes the real talent and you’re amazing at that. Very inspiring and beautifully done. The shelves and barn doors are so cool!!!
Aw, thanks so much Lorraine :)
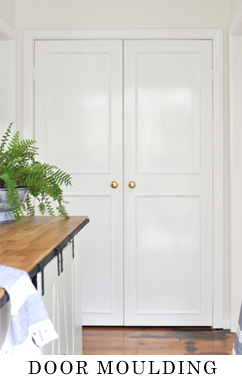
i wholeheartedly agree with Lorraine! It is spectacular, you deserve to win! I was scrolling up and down the before and after photos and the effect of the mouldings on the doors is amazing! You are so creative and talented!
Thanks so much :)
You needent have been scrolling up and down. I included a side-by-side image (albeit smaller). I think the fresh paint does help some however the mouldings did make a bigger difference than I expected.
Thanks again.
Okay, I can not wait for the upcoming posts because I see some seriously cool stuff here. You have outdone yourself. Just voted!
Thank you so much Renee :)
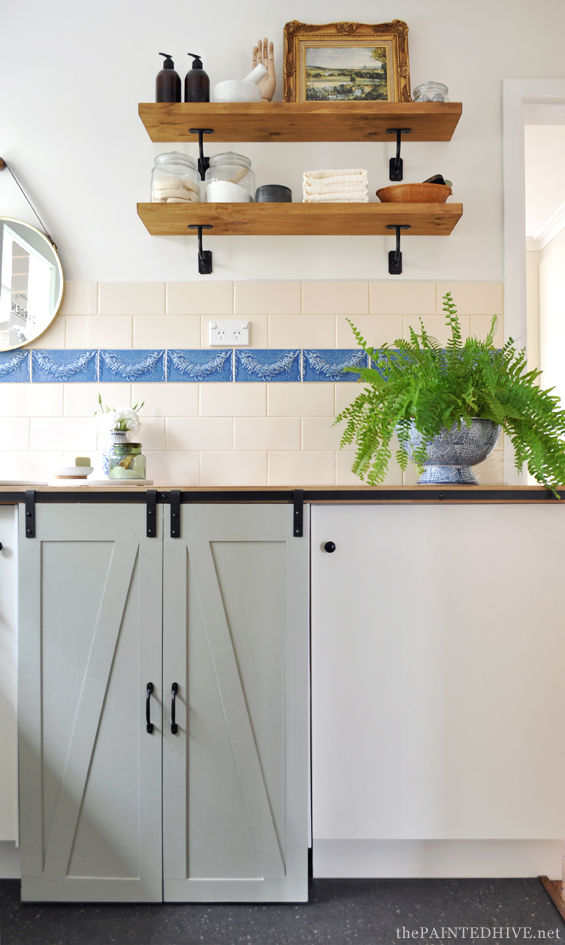
looks great — I especially like your sliding doors. (I checked out the contest, and you’re sure to win!)
Thanks so much Mary Ann. The barn doors are one of my fave elements too!
Just voted….you did an amazing job!
Thanks so, so much Jan :)
Wonderful job! I voted and I don’t see how anyone else could win either! Good luck!
Thanks Patricia. Some of the other makeovers are lovely too and, well, it’s not all about how good the room refresh is. A few of the other DIY’ers have a much stronger social media following than I do. Oh well, we’ll see :) Thanks for your vote.
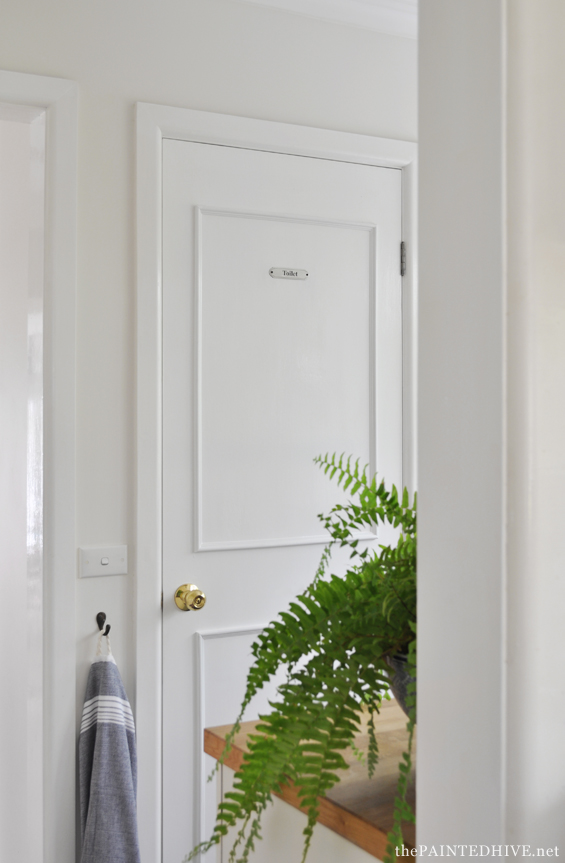
That is stunning! I especially love the door mouldings. It all looks beautiful.
Thanks Sherylee. They make a difference, don’t they?
Love love the door moldings and the shelf brackets! I’m hoping I can find something similar in the US. You’re sure to win!
Thanks LaNell. Don’t the mouldings make a difference? And so affordable and easy!
I’m sure you’ll be able to find some similar brackets. Just Google “handrail brackets”. I found heaps online. And remember, if they’re not the right colour you can always spraypaint them :)
I know you’re not the competitive type, me neither, but no one came close! Beautiful job and kudos to you and your mom for a fantastic transformation!
Aw, thanks Suzy :)
Oh. My. Gosh! Where to begin – the counter top? -the barn doors? – the shelf brackets? – the new sink and faucet? – the molding on the doors? – the cute, cute, cute! toilet sign? or maybe the glass door decal?!!! Everything is perfect. You have raised your already high bar up, again, missy. I don’t know if you could surpass this just because of the pure genius involved in keeping the bones (tell your mum, LOVE that tile) and tweaking what is there to create such a “looks like it’s always been this way” room. The people voting for the “rip it out and start over” blogger are missing the point, I must say. Of course, I could be prejudiced… ;)
LOL! I think you might be just a tad prejudice Deb! Ha, ha.
Thank you so much for your lovely words and support. You always make me smile :)
I just voted– I love how this turned out!! I LOVE the glass door decal AND the added detail on the doors. Did you use pre-made frames? Guess I have to wait for the tutorials to come! Thanks for sharing– its inspiration and motivation to tackle my laundry area..
Thanks Alisa. Yep, I’ll share all of the details in my upcoming posts though just to let you know I trimmed the moulding myself. It was really easy.
The door trim!! Did anyone notice how a simple bit of trim made those doors like like heavier solid wood doors? The devil really is in the details and you really made that apparent with what you did with this little room. Clearly, the entire time during your design, you were thinking ‘what would look really pretty?’. Where did you find the hardware for the sliding doors? I’m in love! This is one of the most awesome room re-do’s I’ve ever seen! You got my vote!
Thanks so much Candyce. You are too sweet!
I was actually surprised at the difference the trim made, especially when everything was freshly painted white. So much nicer.
You’re right too, my mind was going a million miles an hours thinking about how to make the most of everything, though I didn’t want to over-do it. Sometimes more is less though it can be hard to stop!
I’ll share all the details about the barn doors soon though just to let you know the hardware is far from proper sliding barn door hardware! I had an idea in my head and just happened to find the perfect thing!
Thanks again for your lovely words :)
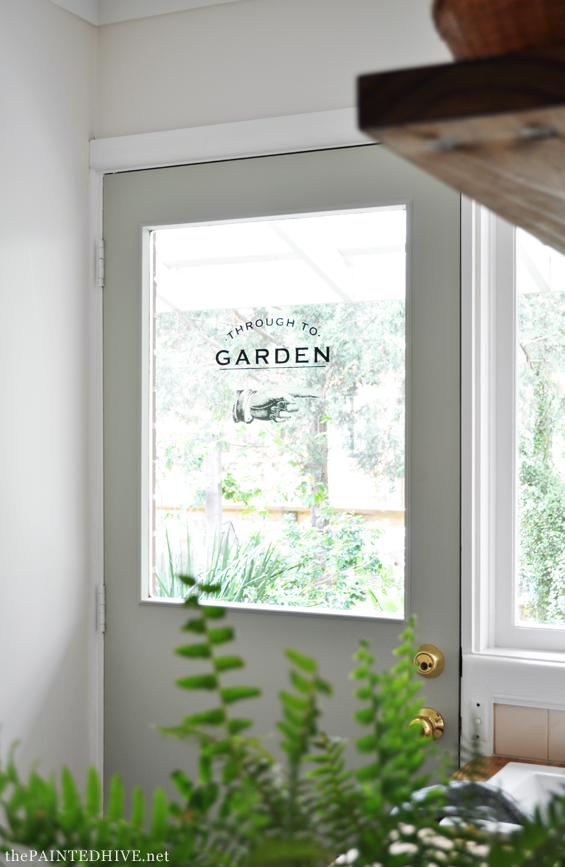
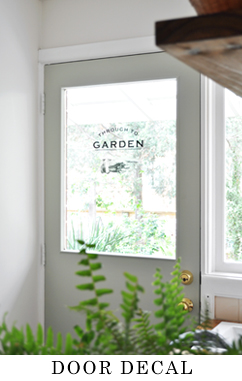
Where did you get the ” through to garden” decal on the back door? Love what you did to this space. It is so so charming!
Thanks Barb. I designed the window graphic myself and will share it as a free printable when I post the tutorial. It’s part vinyl (which I purchased – very affordable though) and part DIY waterslide decal.
:)
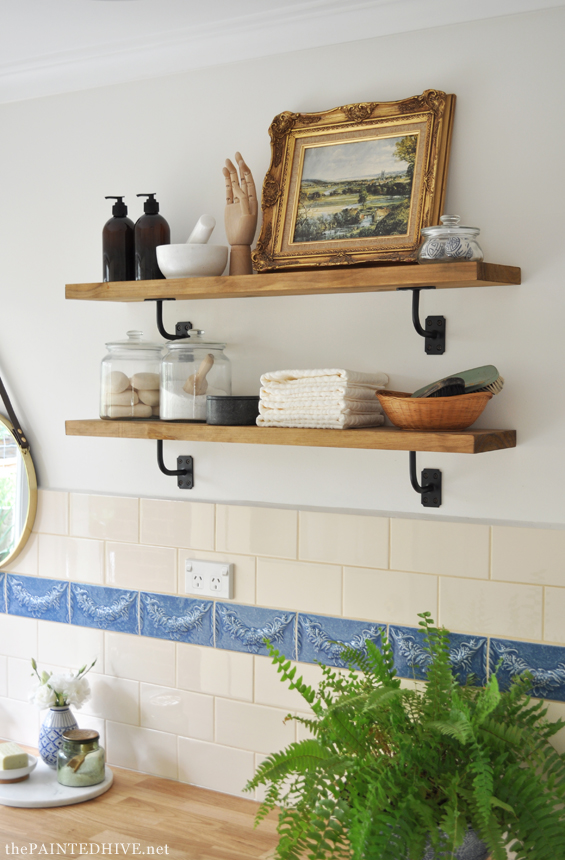
gosh i didn’t even notice the beautiful blue tile in the before, now it is front and center, the barn doors what an awesome touch, this laundry room looks way better than my living room ha ha xx
Ha, ha, thanks Chris. You’re right, the tiles are the star now. Before they just looked tired and dated. I actually wasn’t sure I could make them work though they add the perfect, and unique, finishing touch.
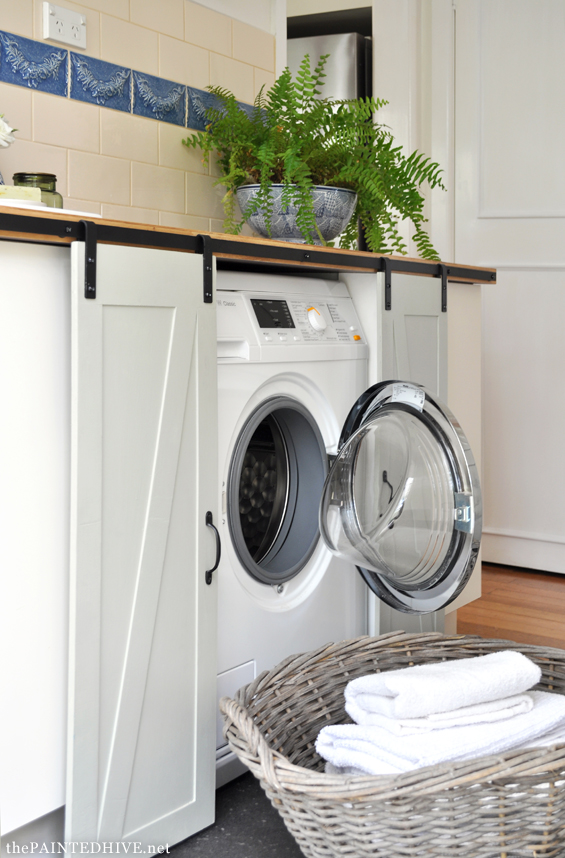
I looooove the barn doors over the appliances! That’s so clever. I’m going to be stealing that idea! ;)
Thanks so much Norma :)
Oh, and I voted for you. Good luck!
Just voted and you have this – you adn your mum have done an amazing transformation, you should so proud!
Thanks Bec. Super proud.
Not sure I’ve got the edge on some of the other contenders who have much larger social media followings than I do though I am really happy with what we created.
Great makeover!! I’ve voted. Go the Aussie!! I’d love if you could give more info on how you built the barn doors and the trim on the large doors. Also where you downloaded the lettering & decal from?
Sure Cheryl. I’ll cover all of that soon. Nothing was particularly hard. I designed the window graphic myself and will offer it as a free download when I post about it :)
I love it! Not only was it budget friendly but it’s earth friendly as well. I love the tiles and how you made them a unique focal point instead of getting what every one else has you have a wonderful unique look that’s fun and fresh because of the other changes. Given that it’s an o open room putting the barn doors on was genius! It’s a fun fresh space!
Thanks Lori.
Yes, so glad you mentioned that about the tiles. I was unsure if I could make them work though it just goes to show that with some fresh decor “off-trend” items can look unique and current.
Wow Kristine,
I love the Reno I can’t wait for your tutorial. My dark laundry is very similar to your mum’s layout except that my outside door is solid and the window is small, maybe I can convince hubby to replace the door with a glass panel door. I’ve voted so “Good luck!”.
Jennifer
Thanks so much Jennifer. I’m sure you could find a cheap second-hand door at a salvage yard or on a used-goods website.
:)
I’ve voted how could I not! Loved everything about the room, you are so talented! Lucky mum.
Thanks Robyn. Too kind :)
I voted! I love all of your changes you made to this space. Wonderful job Kristine!
Thanks so much Renee :)
I love this – the only thing I would have done that you didn’t – I would have painted all the tiles white. My fav thing is the stencil on the door – really hoping that you give a supplier for that at some stage.
Thanks Denise.
Yes, the tiles were tricky! I was worried they might not work with the new scheme though I actually love their uniqueness now. Mum loves blue so we kept the colour though all white could have worked too.
Glad you like the door decal. I designed it myself and will be offering the graphic as a free download when I post the tutorial. It’s made up of part vinyl decal (which I had made by an online store – it was super affordable though) and part DIY waterslide decal :)
You are such a magician ! I love these simple [of course I know they did not seem simple when you were doing them!] changes that made this such a cute space! Again…you nailed it and I voted!
Thanks lovely lady. Always so flattered to see a comment from you Sherry. Makes my day every time :)
This is fantastic! You saved the best parts of the room, and enhanced them! Your Reno is definitely the best of the bunch. Love how creative you are, and how you totally changed the space without major construction. So so glad you saved the tile- so sweet and adds personality!
Well done!
Thanks so much Theresa :)
Uh… OF COURSE I’d vote for this!!! What a makeover, and you’re my DIY Queen!!!! :)
Ha, ha. Thanks lovely :)
I still need to get my bedroom done by you! :)
Hey yeah, what happened there?
Voted twice! This is brilliant – well done Kristine! You are way too modest, I think this is fantastic and even more impressive when you know things have been done on a budget.
Aw, thank you so much Maya. You’re too sweet.
Voted! Any chance you could share the color stain you used for the shelves and also the color of the barn doors?
Thanks Billie. The stain is Old Baltic by Feast Watson. I’ll have to go and check the can for the paint colour – can’t remember! I’ll get back to you.
Argh, can’t find the paint can! Next time I’m at the hardware store I’ll have a look through the colour swatches and hope it jumps out at me. I can’t even remember the brand! If I ever work it out I’ll let you know.
:)
Found it! “Green Result” by British Paints.
Hi Kristine, this looks fabulous. You dcan finitely have a gift.
Hope you win.
Thanks so much Maureen :)
Wow, the room wasn’t bad before but it sure is gorgeous with all the wonderful changes. Thanks for linking up at #homemattersparty
Thanks Deborah. Yep, it had good bones – it was just tired and neglected. Thanks so much for hosting :)
Great job, love the barn door and agree with everyone above. I just wonder where the dryer is?
Hi Eva. Thanks. My mum doesn’t, and has never, had a clothes dryer. She uses her backyard clothesline and the warmth of the sun :)
Just voted for your fabulous room! Your attention to detail is wonderful. Loved everything you did.! Question for you…is there just one appliance in there? Is that a combo washer/dryer all in one? If so, just wondering how your mother likes it. I want to purchase new ones and considered stacking ones, but this brings in an entirely new option to consider.
Hi Kelly
Sorry, though I’m afraid I can’t help. This is just a washing machine and my mum has never had a dryer. Here in Australia we tend to hang our clothes outside in the sun and wind to dry.
Kristine
Gosh, #swooning. Wish I would have caught this post before the deadline, you would have gotten a high five from me! Looks spectacular, clean lines, love the barn doors and the beautiful countertop. The sliding barn door hardware does not look bulky, could I ask where you purchased it?
Keep up the fabulous posts, love from New Brunswick. Lola Rosa
Hi Lola
Thanks so much.
Yep, as these are small, light-weight doors I was after slim-line, clean hardware.
I actually found these hardware components in various sections in the hardware store and re-purposed them to suit my needs. All up the track and brackets cost me just $10!
I’ll share some more info when I post the full tutorial soon.
Kristine
x
The room looks great! You have given me some inspiration for my own laundry room. I always enjoy reading your blog and love your DYI projects, they are so unique and refreshing. I put my vote in for your laundry room.
Thanks so, so much Elaine :)
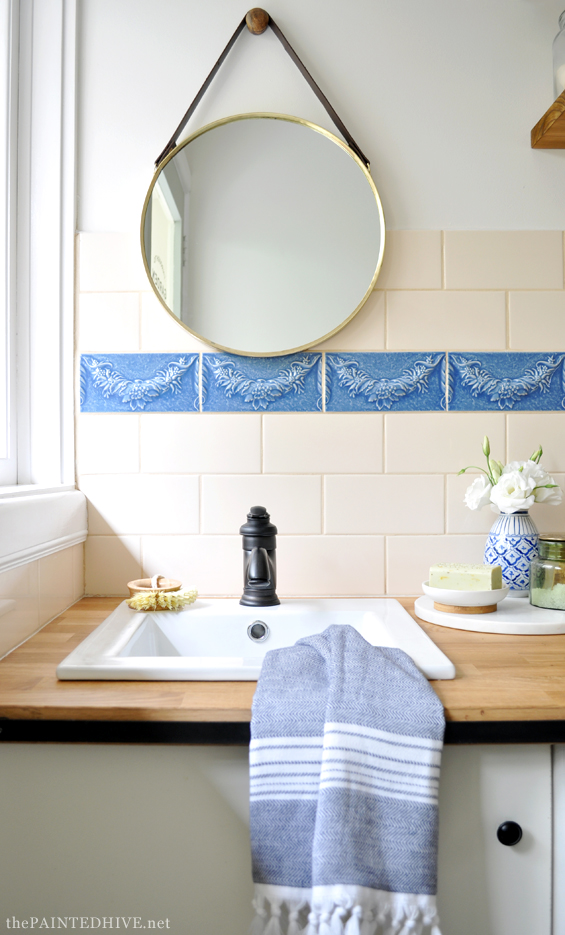
You’ve done it again Kristine! I must admit I am not a fan of black tap ware and I suspect it will date BUT I totally LOVE everything else about the makeover. You are a magician. If I had to pick a favourite aspect of the room I would say the shelves and I’m really looking forward to seeing a tutorial on them. You have no need to ever say sorry for disappearing for a while because you always reappear with something amazing and inspirational. Of course I voted for you and will try to remember to vote every day until Saturday. :)
Thanks so much Julie. You’re the best and are way too sweet!
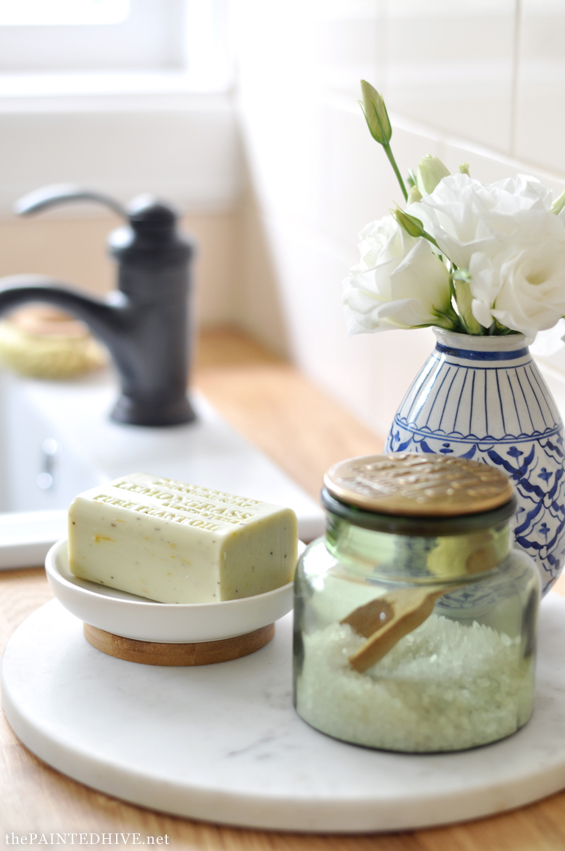
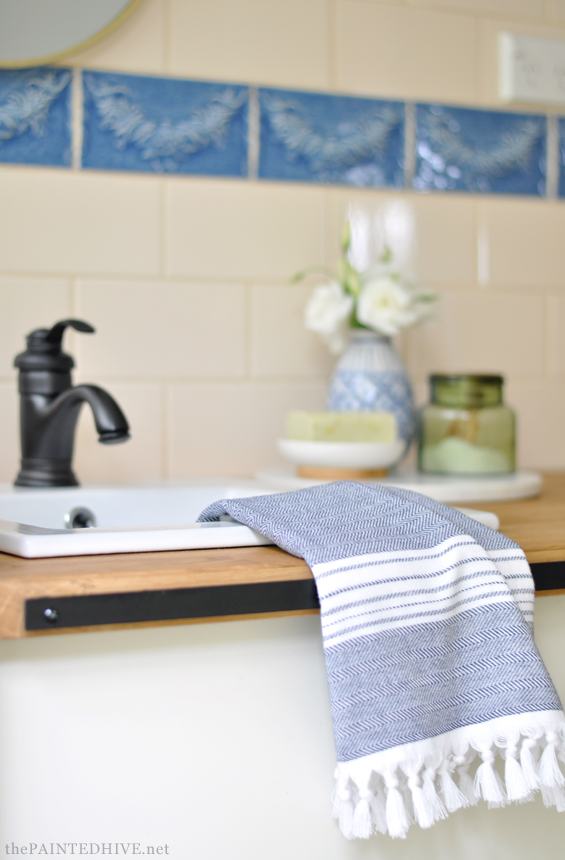
I totally agree with you about black tapware. This tap is actually bronze (it does look quite black in the pics though) so has hints of brown which I think make it a bit more classic and will hopefully help it transcend the current black trend.
I’m working on the follow-up posts and will try and get the shelves one up soon :)
Voted! And I love every aspect of your makeover. I have the worst laundry room. We have to walk sideways to get through it! So I doubt it will make any significant appearance in photos on my blog, but we could certainly make improvements. Good luck in the contest!
Thanks Jeanette. I won’t be sharing my own laundry room anytime soon either – this is my parent’s room. Mine may as well be a cupboard (and I kinda wish it was).
Wow, it’s amazing with that budget! I voted and will every day until it ends. Nicely done!
Thanks you so, so much Isabella :)
Just saw what you did and LOVE it! Going to go vote for you right now. You should be so proud of yourself. Great Job!
Thanks so much Pamela. I’m super proud. Mainly because I managed to finish a room redo in under one week and I usually take a whole year – ha, ha.
That space is beautiful, just beautiful. You are a talented designer! You are going to have friends and neighbors besieging you to make over their spaces as well!
Aw, thank you Sue :)
And I welcome any friends or neighbours. Makeovers are fun!
What a transformation! Love the shelves and hardware for them, Where did you find the shelf brackets?
Thanks Chris. I’ll be publishing a post all about the wall shelves tonight or tomorrow :) Just to let you know, they are actually handrail brackets I found at the hardware store.
Wow I love the transformation! So bright and beautiful!
Thanks so much Jessica :)
Really love it. It looks wonderful. My only issue is that for the ‘after’ pictures, the basket is sitting in the middle of the floor. Previously the plastic basket hung on the wall, but I assume the new one won’t be doing that. So where will it live normally? Not having a go at you, but I so often find websites/shows etc where they renovate the kitchen or laundry or something, but then don’t make it actually livable eg is there a place for the ironing board, or the vacuum, or whatever?
No problem at all, that’s a completely valid question Jo.
I touched on this very briefly in the article when I mentioned that there was actually ample cupboard space available to house all of the less-than-attractive necessities. We simply did a purge and proper organise.
The cupboard to the right of the machine holds the dirty wash and the spare laundry baskets (as only my parent’s live here they don’t generate a heap of dirty wash so we installed a central divider – dirty wash up top, spare baskets down below). The cupboard to the left of the machine holds the laundry-related cleaning chemicals, scrubbing brushes, etc.
The large double cupboard holds a heap of stuff, from craft supplies to tablecloths! It’s where we relocated the general cleaning supplies, buckets, cloths, etc.
You can’t really see it in any of the photos (just the hinges are visible in one of the before shots), though there is also a broom cupboard to the right of the double cupboard which holds the larger items, such as the vacuum cleaner and ironing board.
Anyhoo, I hope this helps clarify things for you. Just reading it back and now I’m jealous of all my parent’s storage space. I only have two skinny cupboards in my entire house!
Kristine
PS The basket on the floor in the after pics is just for styling purposes :)
Thanks for responding. Yes, lucky them for having great storage space (though, it always seems that no matter how much space you have, its so easy to fill it with ‘stuff’!)
My goodness, I love this makeover! It’s so beautiful and functional! Thanks for sharing this with us over on The Creative Circle Link Party! I’ll be featuring it on my blog! :)
Oh really? Wow! Thanks so, so much Iris :)
that is so dad gum great! Cute, practical, on trend and totally do-able, Love it!!!
Thanks so much Jill :)
Wow what a nice look. The white color really give an amazing look to the overall decor. It looks very classy and standard. The combination of white doors and wooden surface is killer. Thank you so much for suggesting some great things.
Hi Kristine, my Laundry layout here in Melbourne is the same and I plan to copy your make-over. Can you please share the sources for the wash basin and the tap?
Sure Etta. The basin is from Bunnings (https://www.bunnings.com.au/mondella-415-x-416-x-170mm-white-rococo-drop-in-vitreous-china-basin-1th_p4822089 – be aware that the front is actually scooped, it’s hard to tell in the pics and specs). The tap is from eBay (http://www.ebay.com.au/itm/231627880532?_trksid=p2057872.m2749.l2648&ssPageName=STRK%3AMEBIDX%3AIT). Hope this helps :)
Thank you! You should have won!
LOL! Thanks.
:)
You are so cool! I don’t think I have read a single thing like this before. So good to find another person with some original thoughts on this subject. Really.. many thanks for starting this up. This site is something that is needed on the internet, someone with a little originality!
It’s impressing that you can make even the laundry room look so great!I absolutely love it.
What an amazingly talented woman you are and thank you so much for sharing. I love the laundry makeover and would like to know where you sourced the tap and sink? They are truly lovely!
Hi Anna. I found the tap on eBay (search for ‘bronze mixer tap’ and you should find similar ones) and the sink is from Bunnings :)
I love the blue tiles- and idea where to find them? :)
Argh, so sorry. My mum installed them years and years ago. I have no idea where they’d be available now. Sorry I can’t help.