

So, my room reveals may have slowed down a touch, though they’re still coming!
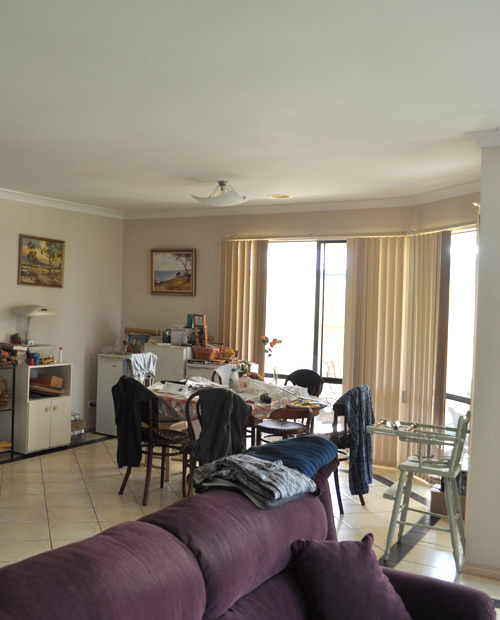
This is how the dining room looked a few months back…
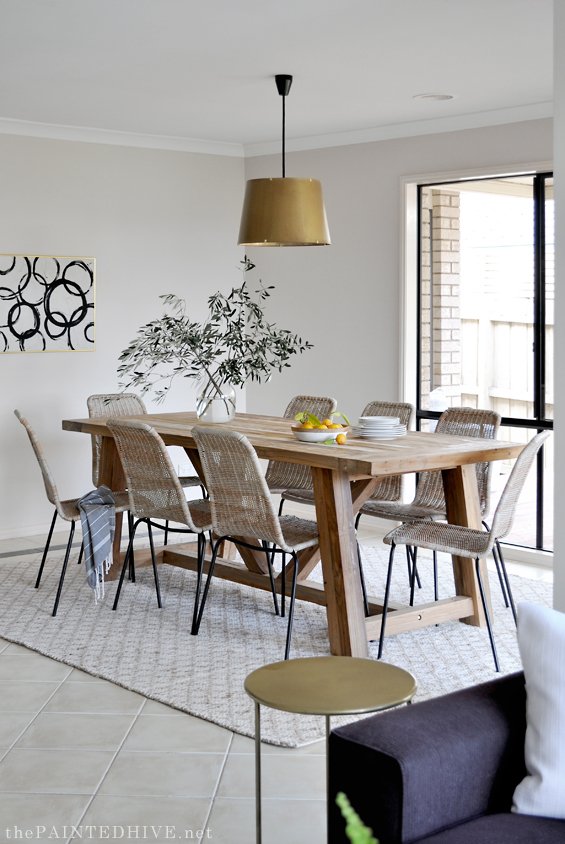
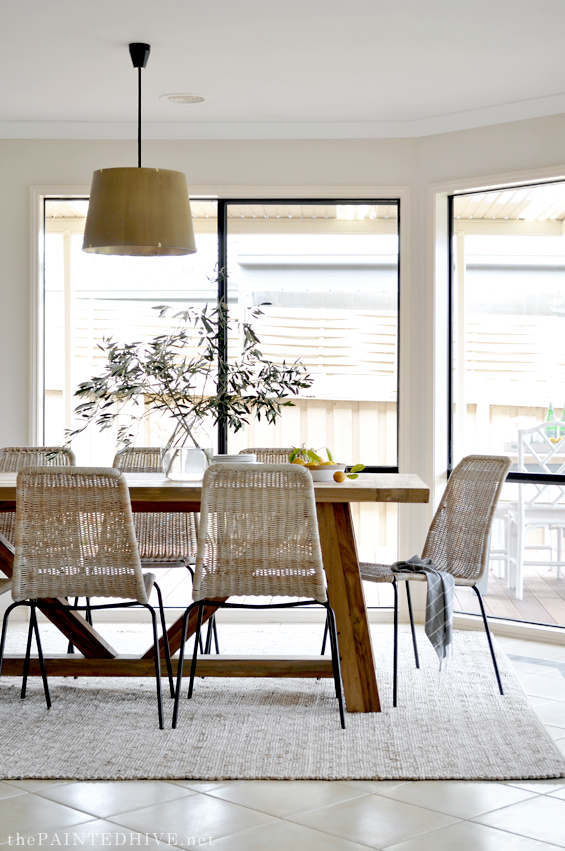
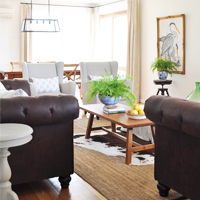
And here it is now…
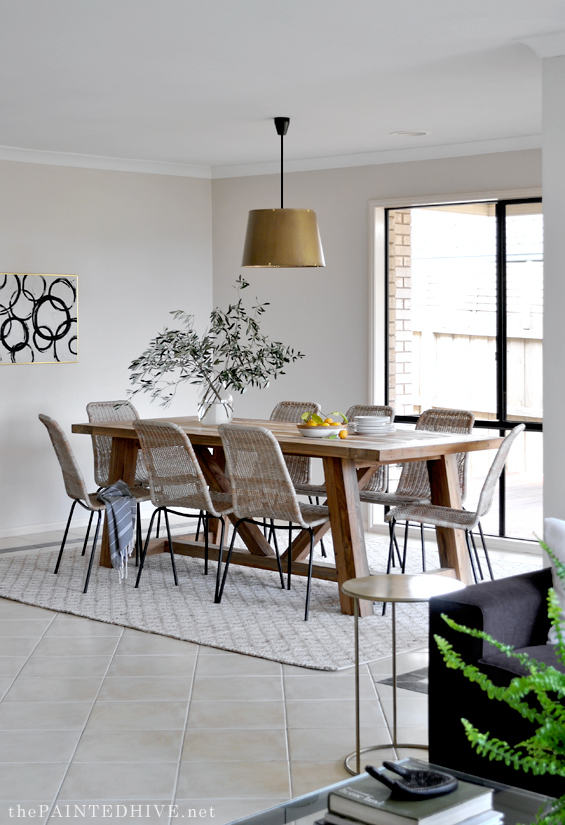
I absolutely love the feel of this space! It’s earthy and fresh, and a little bit rustic, and it ties in perfectly with the adjoining living room.

My initial plan for this space was to use cheap second-hand furniture, which would have sufficed, however I was incredibly lucky to be offered this amazing setting from Early Settler. How could I say no?
The dining table is absolutely gorgeous.
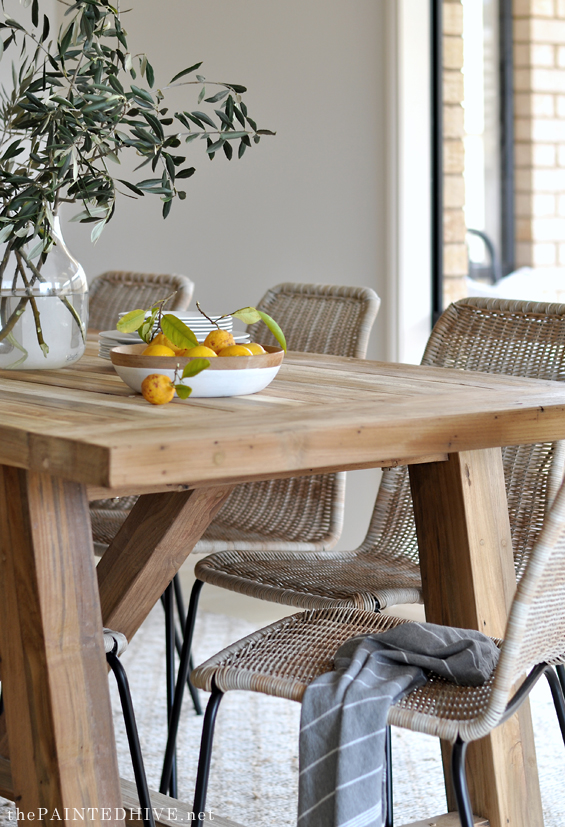
And the woven chairs have a relaxed sophistication which honestly makes you exhale.

To provide an anchor for the furniture, and help soften (and hide!) the floor tiles, this subtle rug works perfectly.
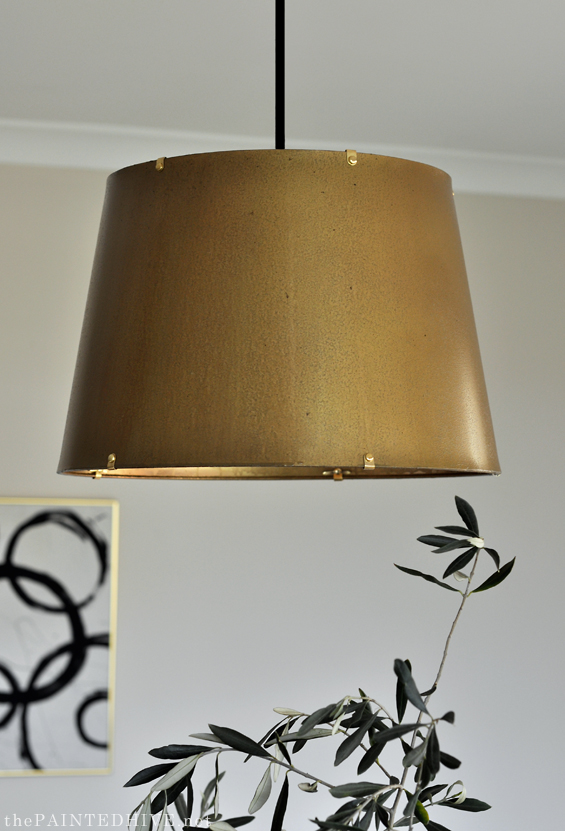
I was going to use a large basket pendant in here, though once the chairs were in place it felt like there was already enough wicker in the room.
Instead, I decided something metal would work well to add some interest and reference the other gold accents in the house, however I didn’t have the budget for a fancy brass fixture.
Enter this regular fabric shade I found at an Op Shop for $6.
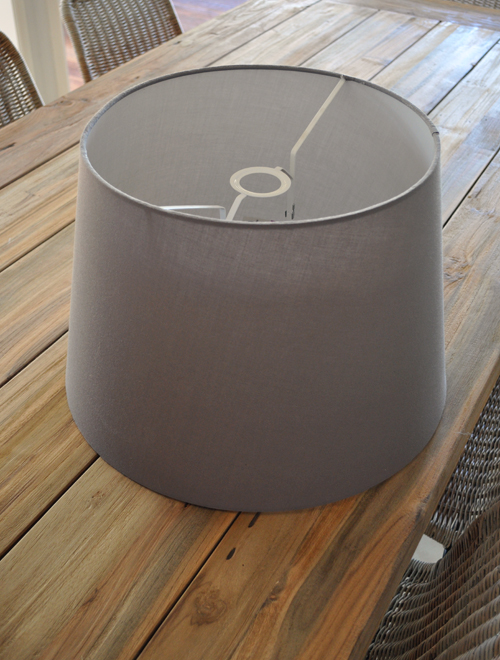
Making this look like brass was a total experiment.
I first removed the fabric (which is easier said than done – in hindsight I probably would have just left it attached) then spray painted the underlying styrene gold.
It looked okay, though a bit flat and dull, so I amped things up by applying a burnt umber glaze, which I stippled, drizzled and splattered on in a haphazard manner to create a bit of grunge, followed by a clear gloss sealer.
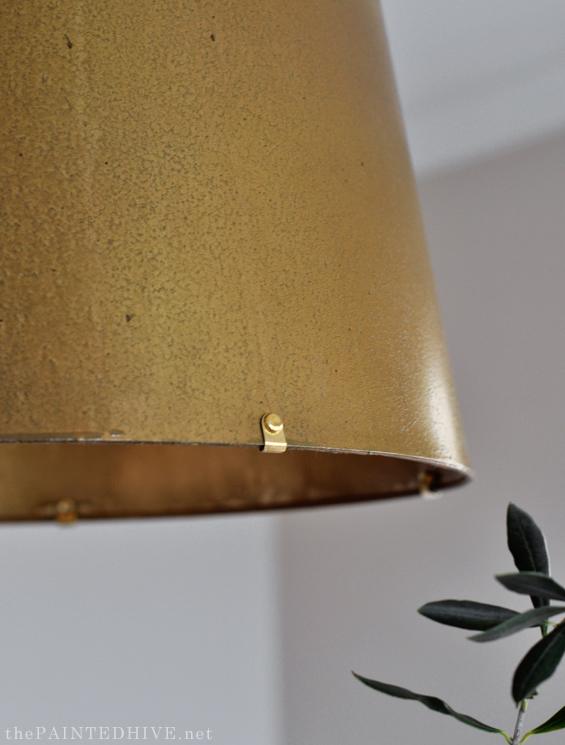
Now it was getting there, though things still felt a little bit plain. To create some interest, and help with the brass illusion, I decided some metal hardware was needed.
I had no idea what I was going to use, however after scouring the aisles at the hardware store I came away with some brass picture frame triangles and gold split pins.

They’re just right!
The shade is simply attached to a basic DIY suspension kit which is plugged into the existing batten fixture.
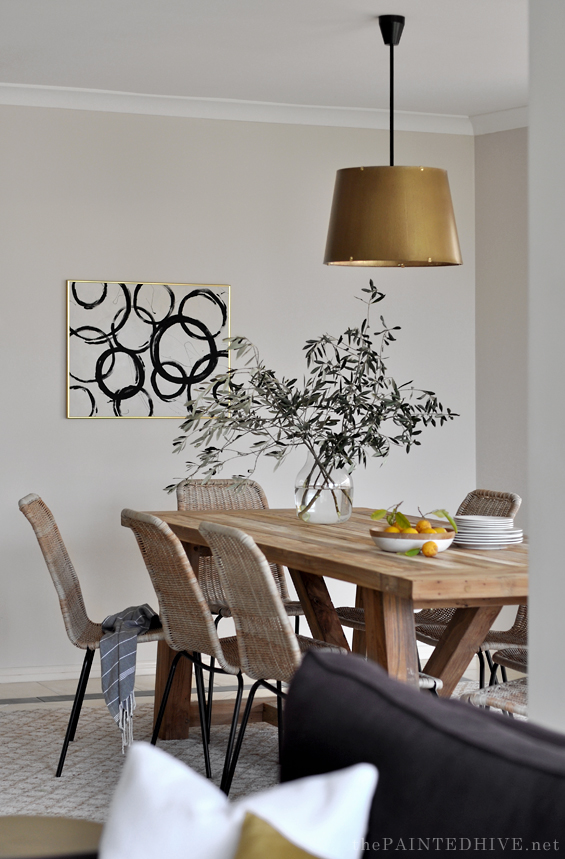
The artwork was a last minute addition.
Given there is already quite a lot of feature wall decor scattered throughout the house, I was going to leave this wall blank though it just felt a little too bland. So, I took some left-over white and black paint, plus this old gold frame I’ve had for ages, and created my very own super quick abstract.
Unfortunately I don’t have a close up pic however I’m really happy with it. I painted it outside on a windy day and the breeze occasionally caught the paint and made these random ribbony scrawls which turned out looking really intentional and cool.
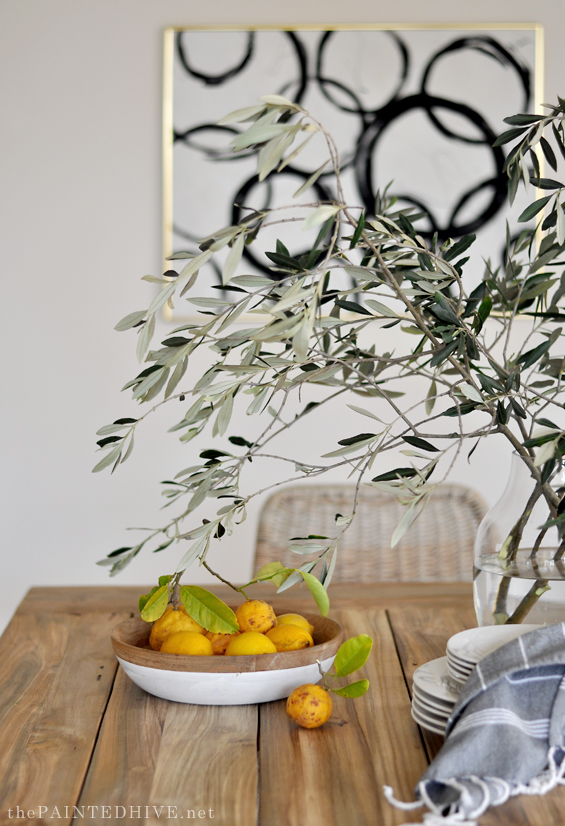
All of the decor are things we already owned. The glass vase and tea towel are still available at Kmart.
![]()
PRICE & SOURCE LIST
Dining Table | Highgate Dining Table from Early Settler | $990 on sale*
Dining Chairs | Cera Dining Chairs from Early Settler | $139 each*
Floor Rug | Kaya Diamond Border Woven Rug from Early Settler | $479*
Wall Art | DIY (using items we already owned) | $0
Light Fitting | DIY (using suspension kit and thrifted shade) | $30
Decor | Already Owned | $0
TOTAL $30
*We were super lucky to be gifted some items from Early Settler.
I’ve provided their costs however they are excluded from the total.
![]()
I know this makeover is pretty sweet and simple though I hope you like it :)
Now, just to update you on the status of the sale…the house has been on the market for just over two weeks now and there have been three strong offers! My friend is holding out for a bit more though interest has been high (especially considering the slow and flooded market) so hopefully there’ll be a ‘sold’ sticker across the board soon!
![]()
Find all of the previous flip house posts HERE.


That is amazingly gorgeous – again! Again, I can hardly believe it is the same room. I love how the lightshade looks, a beautiful feature. And you are very clever with the wall art. You are certainly a many-skilled person.
Thanks so much :)
Our taste in things is so simular – I wish I could have you over for coffee and get excited about it all! That table I have just ordered for my outdoor area. Love it! and you have made it work so well in your space!
Thanks so much Kahlie. It’s such an awesome table, indoor or out :)
The living room and dining room coordinate so well together. The flow from one room to the other is flawless. Just the right amount of wicker. I love the dining room chairs and how they go so well with the living room chairs. You have done such an excellent job on all the rooms. Enjoying your tour.
Thanks so much Olivia :)
Great work ! Who wouldn’t love to live in this space?
Thanks Anne.
I have been following this flip for a while, but this is the first time that I am commenting. Absolutely love everything so far that you have achieved with this flip. It is a highlight in the day when I see a e-mail come in from The Painted Hive. Everything else stops so that I read the e-mail first. Love-love-love what you do. Very inspirational
Greeting from Paarl, South Africa
Aw, too sweet. That’s so lovely of you to say. Thanks Amanda :)
You did it again! Everything is so beautiful. I really like how all the spaces fit together so well. The light I love the lIght- I never would have though the of taking the fabric off and painting it or of adding the triangles and pins. Brilliant, Nor surprise that there are offers coming in!
Thanks so much :)
Simply amazing once again!! Love it all!! great job!
Thanks!
Unbelievable!!!! In contrast to Amanda from South Africa I leave your email until last so the anticipation can build. :) You’re truly amazing.
Aw, thank you :)
What’s not to love? Gorgeous!
Fabulous. I love the clean lines and simplicity. Not surprised you have received offers.
What a soothing and relaxing room to have a meal. All the rooms show so far relate to each in a peaceful and calming way. I hope there is a tutorial for the pendant lamp cause it turned out great. And I’ll say it again, everything you’ve done downplays the tile floors. Great job!
Thanks so much Pat.
I didn’t document the pendant shade process (was just experimenting as I went) though I could re-create it if there is enough interest :)
Hello,
It looks wonderful! This may be my favorite room so far.
That table is a WINNER for sure. I love the room.
that lamp shade is amazing!
Excellent. The previous occupants wouldn’t recognize their own house.
WOW!! GORGEOUS…exactly what I expect from you: creative, refined and on the cheap!! That lamp shade! That art! The simple staging!! Did you clean the grout or do a grout filler??
Thanks Lydia. Just a good clean for the floor :)
Just beautiful!!! Love everything you have done and anyone would feel so relaxed in the spaces you design! Would you be able to share where the living room wicker/rattan chairs are from? Thank you!
Thank you. There is a direct link in the living room reveal post. They are from Early Settler :)
Bravo. The shade is genius.
I agree with Amanda…I get very excited when I see you in my email list..
Another great design and although I love everything about the space..that shade over the dining table is truly gorgeous.. Once again you knocked it out of the park..In a way I’ll be sad to see this house sold!!!! So now you need to get busy on your next project! I need my “Kristine” fix!🥰
Di
LOL! Thanks Di. Yes, plenty of projects in the works. My parents are about to extend their house and I will be designing for them :)
Loving that table. I appreciate how your mind works to find solutions! Beautiful!
Aw, thank you :)
That light is just pure Genius! Good job!
These chairs are exactly what I have been lookinfg for!!! Thank you for sharing.
Love the whole room, One of my favourites by you so far.
The feel in this room is incredibly relaxed. I just love it. What size is the table? I’m dining table shopping at the moment. I might have to use the expertise in our Facebook group for advice because I’m stuck. Help!
Thanks Sam. This table is 2200mm x 950mm. Although it’s quite large and can fit eight chairs (at a squeeze) it’s technically a six seater due to the shape of the frame and the bulkiness of the timber. It’s really gorgeous!
Feel free to ask for advice in the FB group :)
So relaxed and beautiful, it is following the lines of the other rooms. Beautiful again!
Love looking at your transformation, great idea with the light Shade!
Amazing choices! I love your light hack so much! I wish I could find a place to use it! I look forward to each room in the home tour!
Thanks so much :)
Wowie Wow Wow! That is all.
Somehow, you have made the dining room look larger! I guess clearing out everything else did the trick! It is so serene! Gorgeous as always!
Thanks :)
You are ON FIRE girl!
Looks so fresh and airy now! Love the subtle tones and those woven chairs are stunning. They add a touch of elegance and seem so refined. I’m sure it’s a pure pleasure to have dinner in this beautiful space.
I love the simplicity of no window treatments! As long as you don’t need the privacy I say leave them off!
Totally agree!
Hi Kristine, your light shade idea is awesome! I have never thought of that. Such a cheap soloution too.
Breath-taking one!! Keep up the Good work