
Surely I’m not the only one who struggles to find bed skirts?
They’re either too expensive (like $150 – $250!), too cheap (I find the affordable cotton ones tend to look almost see-through), too big, too small, too plain, too old-fashioned (multiple pleats and layered ruffles just aren’t my thing). And the quilted ones, which are relatively plentiful, don’t really float my boat (I can’t get over the fact that, to me, they look kinda like a doona which needs a cover).
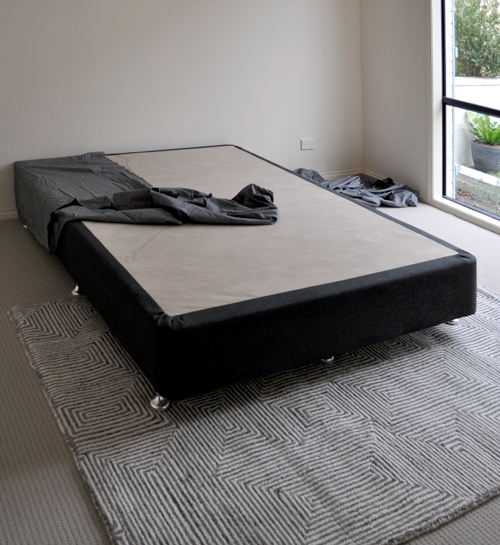
Anyhoo, creating a DIY bed skirt has been on my radar for a while and when we were left with this basic queen-size ensemble in the master bedroom at the flip house, it seemed like the perfect excuse to give it a go.
BEFORE
As with most projects from the flip house, time, ease and affordability were foremost in my mind. And when I came across some nice inexpensive curtain panels at Spotlight, I figured they’d work perfectly.
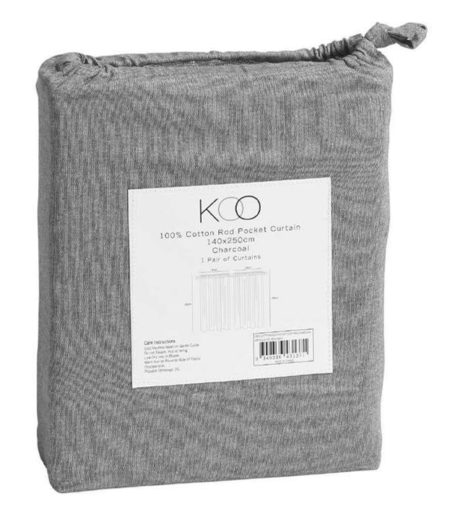
This pack comes with two large panels measuring 140cm x 250cm/55″ x 98″ each.
It was just $15 (on sale at half price)!
The bonus with using something like curtain panels is that they’re already hemmed. So no sewing (or even heat fusing) required! Plus, you’ll often find that buying the same amount of a comparable fabric off the bolt will be much more expensive – especially if you’re able to get the curtains on sale like I did.
Although this particular bed base wasn’t exactly hideous and could be used without a skirt, I personally like the tailored finish they provide.
BEFORE
![]()
DISCLAIMER
This project was done in a bit of a rush with little forethought and lots of “let’s get this thing done already”. Due to my lack of planning, I ended up using a portion from my second curtain panel for one side of the skirt, however have since worked out that with more prudent cutting I could probably have made do with using just one panel. It’s not a big deal because I did have two panels and they weren’t expensive (plus it gave me more wriggle room with my fabric), but still, it wasn’t exactly the most efficient method. So, for the sake of clarity – and making myself look more professional than I actually am – I’ve written this tutorial using hindsight.
Of course, how you go about making your own bed skirt will depend on the size of your bed base and the dimensions of your fabric. As already mentioned, I’m working with a queen-size bed base and my fabric is 140cm x 250cm/55″ x 98″.
![]()
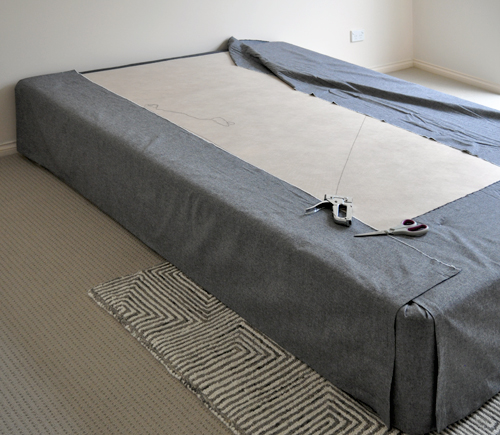
To begin, I trimmed my fabric pieces. You will need five in total. My curtain panel could be deconstructed like this.
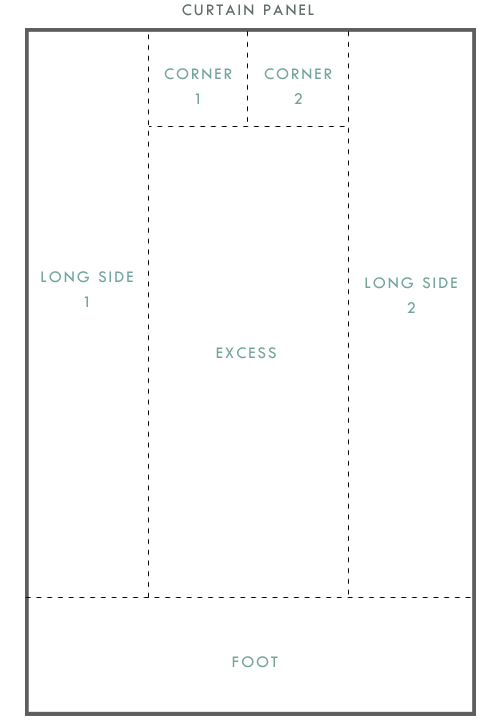
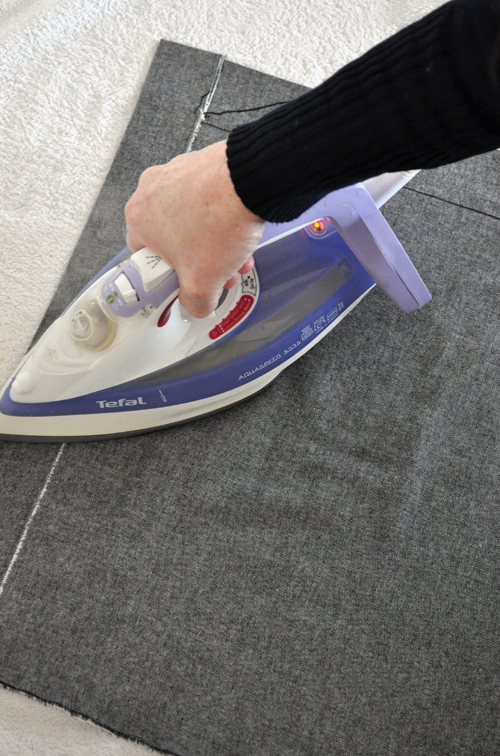
I started with a corner piece. You will notice that one side is hemmed (obviously, this will form the base) and the other three sides are raw. You don’t need to worry about the top (as that will be concealed by the mattress) however the other two sides will need to be turned under and ironed in place.
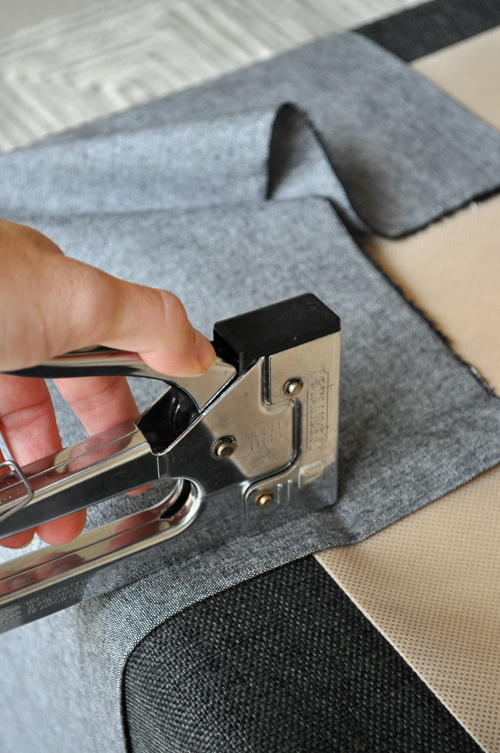
Once that was done, I positioned my piece on the bed base corner as desired, making sure it was almost skimming the floor at a nice consistent level.
When I was happy with its position, I stapled it in place (just two staples – one near each edge as shown). You’ll likely find there are solid and hollow areas in your bed base. Obviously, just make sure you’re stapling into the solid areas. Of course, if you want to be able to easily remove your skirt you could velcro, tape or tack it in place instead (but still, undoing a few staples isn’t difficult). Stapling was just quick and easy for my purposes, plus I figured lots of beds have fully upholstered bases anyway which aren’t designed to ever be removed.
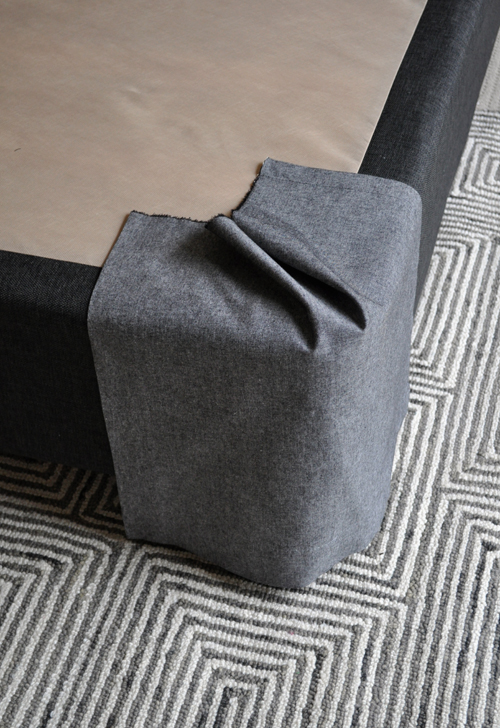
Next, I created a butterfly pleat in the center and stapled that in place.
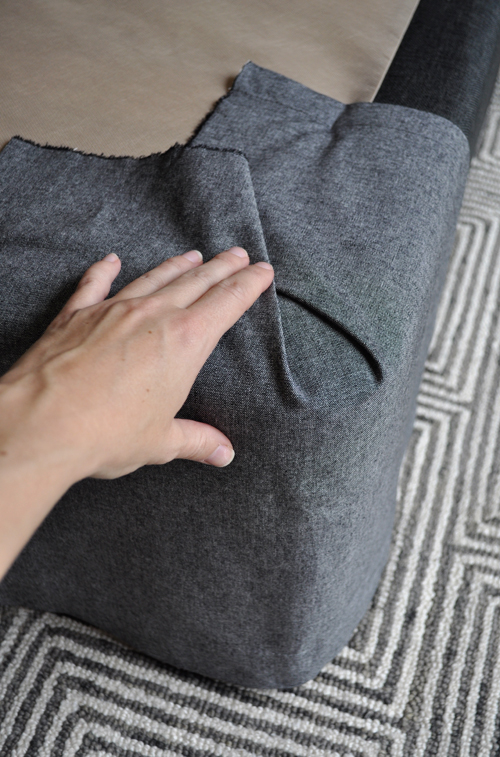
Although I’ve kept things relatively neat and tidy, the top of the bed base will be completely covered by the mattress and bedding so I wasn’t overly fussed. At one stage I was even tempted just to duct tape everything in place! Remember, this was done purely for staging. You can be as fastidious or messy as you like.
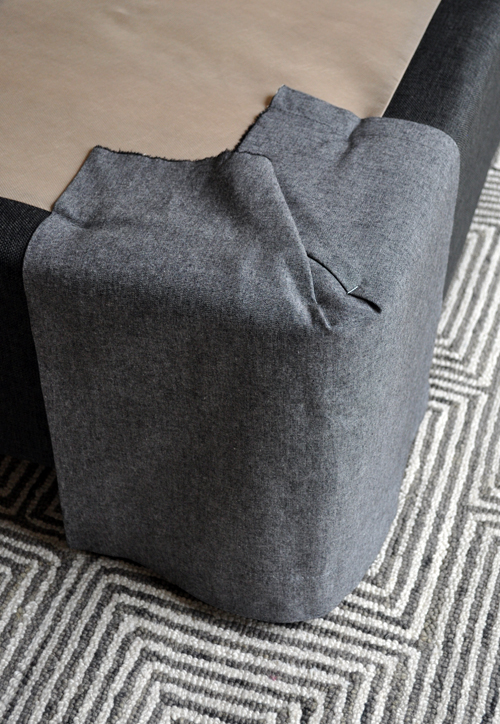
I then repeated the process for the other corner.
Done!
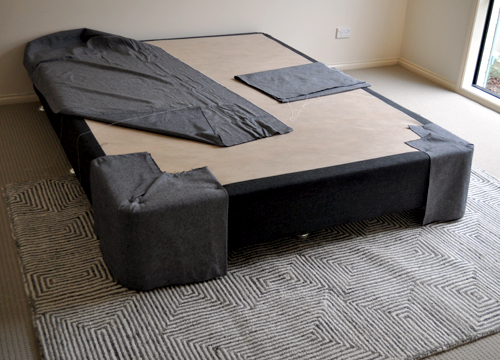
Next I moved onto the foot of the bed base. And here’s where I also fell in love with my curtain panel a bit…because, as per my diagram, it was the exact right width along its short side to fit perfectly across the foot!
I mean, if it hadn’t been the exact right width it wouldn’t have been a big deal (I just would have cut it down and ironed one end under) but it was a nice little win to have all three exposed sides hemmed.
Once I was happy with its position, I stapled it in place.

There’s no need to go crazy with the staples. You just need enough to keep it from shifting. I think I inserted one maybe every 30cm/12″ or so.
Now, onto the sides.
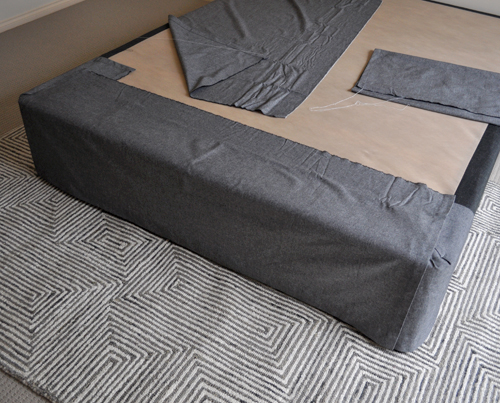
As per my diagram, each side piece is hemmed along one long side (which forms the base) and one short side. I decided to keep the hemmed short side near the foot of the bed and the raw short side at the head (because, obviously, the foot is in a more prominent location). Once I’d determined the right length for the piece (by simply laying it in place on the bed base), I turned under and ironed the raw side (just like I did with the raw side on the corner pieces).
Then I positioned it on the bed base and stapled it in place.
To finish, I repeated the process on the other side.
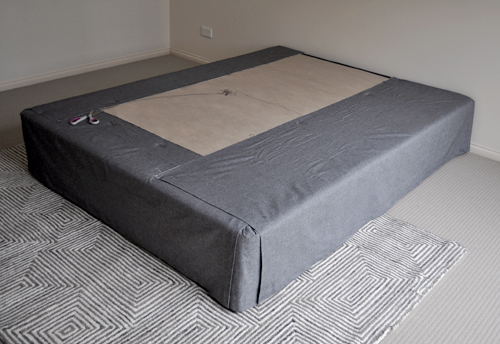
As you can see, I didn’t exactly cut all of my pieces to the same depth, though as already mentioned, I wasn’t fussed about things looking perfect where they were going to be hidden by the mattress. Still, if I’d had a bit more time (or was doing this project for my own home), I probably would have taken some care to keep things symmetrical and not use as much excess fabric.
Anyhoo, here’s how the corners look.
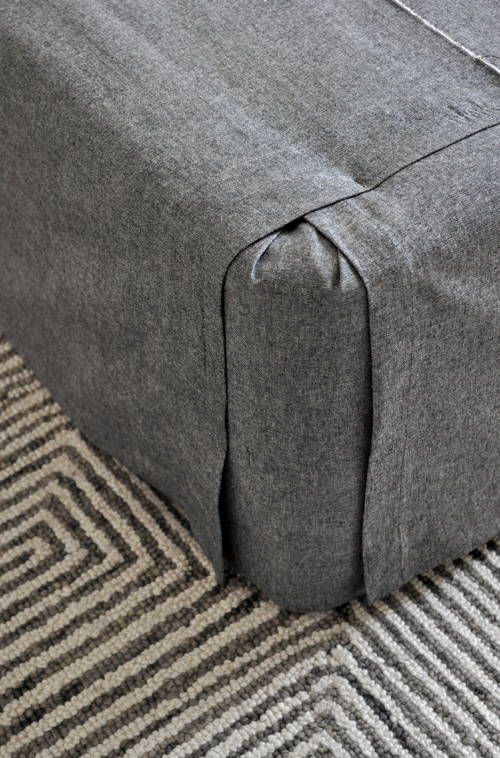
You could make the the pleat more ‘closed’ however due to the width of my curtain panel (which, remember, I used along the base), I worked with this. Plus, I actually quite like it.
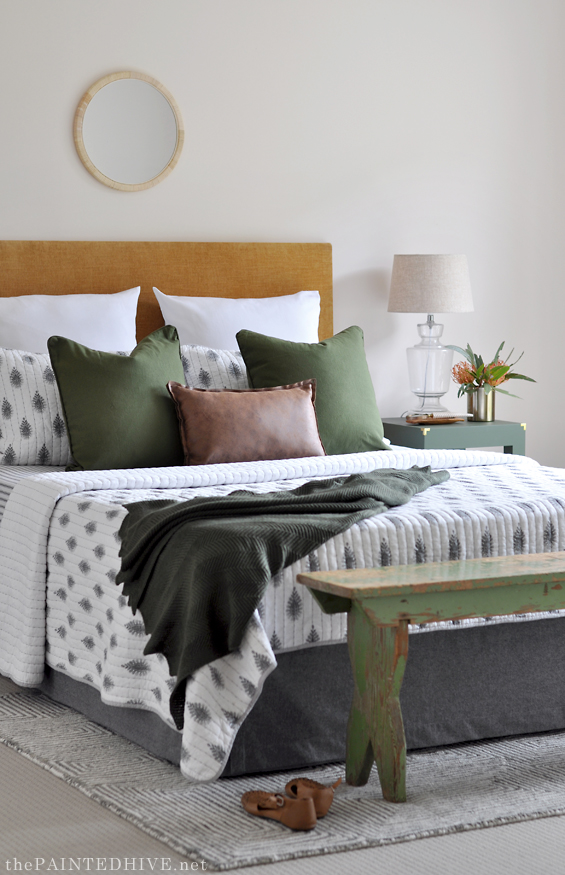
With the mattress on top you can see how everything comes together.
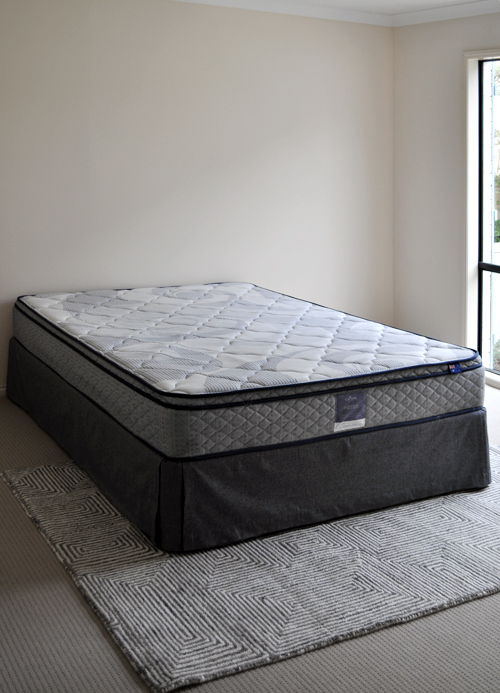
Such an easy and affordable ($8!) little project that looks super custom and professional.
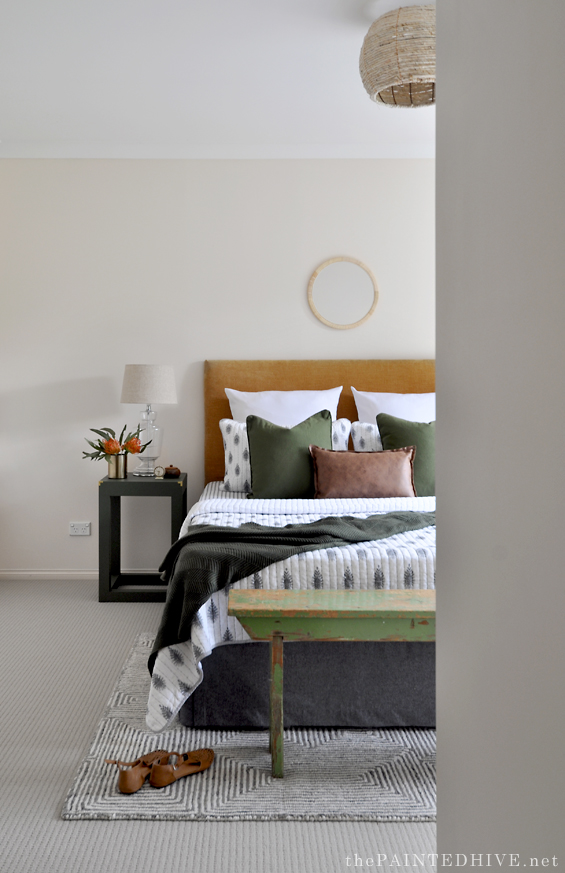
Sorry, it’s a bit hard to see it properly in these after pics. I didn’t take them specifically to highlight the bed skirt.
Hope this helps inspire :)
![]()
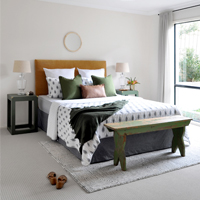
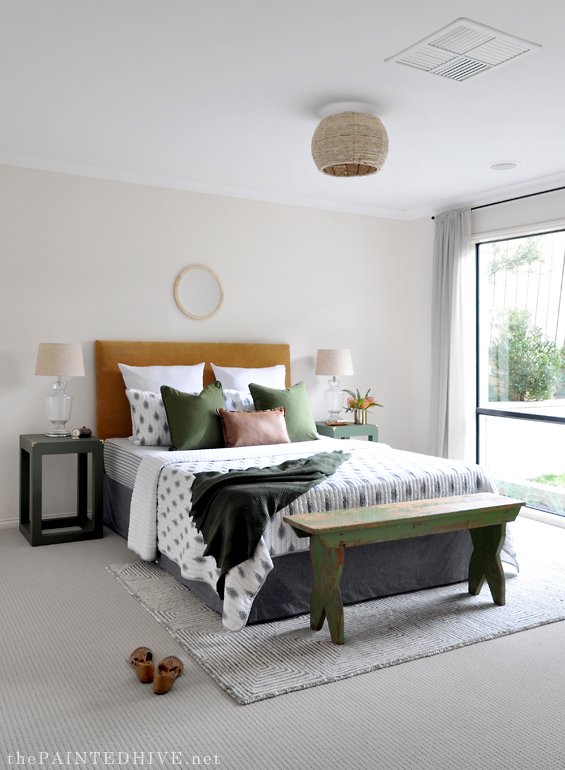
See the entire master bedroom makeover reveal HERE.


Okay, I haven’t commented throughout this flip house thing becasue I generally just sit back and watch but after seeing your tutorials and room reveals so far you really deserve my praise. SO much work and ingenuity has gone into this house. I think you are my DIY superhero.
Thanks so much :)
I love how you keep it real. “Let’s get this thing done already” is a mantra I can certainly relate to! The bed skirt looks mighty fine.
LOL, yep, that’s how I pretty much roll.
Thanks Sam :)
Thank you – this is my kind of project (can’t sew…) It looks AMAZING and seems pretty easy to do!
It’s super easy. This one was actually enjoyable it happened so quickly and smoothly!
Kristine,
You are knocking it out of the park! You have always been one of my favorite bloggers, but your work on the flip house is transformative, elegant, and thrifty. This has been so much fun to follow! I hope many great things come your way as a result!
Aw, thank you so much :)
That’s genius!!
LOL, not really, but thanks :)
What size is the bed? Great idea!
Thanks. It’s mentioned in the post though can be hard to see. It’s a queen :)
Wow!
That is so smart and creative of you! The end result looks so polished and magazine-ready. Thanks for all the great ideas–this is one of the best!
Thanks Vikki. Too sweet!
Cool! Your example looks beautiful. I am definitely going to try this. I’ve been using a fitted bed sheet to hide my box spring. I 100% agree with you on styles and costs of commercial bed skirts. I’m very inspired to try out your DIY technique. (Oh, and I had to look up the word “doona”. Ha ha…I only know “duvet” in the U.S.. Happy to learn a new word today!) Thanks Kristine. :)
LOL, yes, I’m so used to watching US TV shows and reading US blogs that I’ve starting using the US terminologies for lots of things. I know you guys say duvet, though to me it’s still a doona :)
BRILLIANT (tho’ not surprised :)!!!! This is just what I need for my bedframe and you read my mind! THANKS for yet another thorough tutorial! ;)
To clarify: You read my mind in terms of bed skirts! It’s had me on stuck, but not any more due to your brilliant idea! ;)
Any advice on the best way to measure the pieces, i.e. tools? ~ Thanks
Thanks Cynthia. Hmmm, I don’t think I measured anything Just kinda played with the fabric on the bed then cut it as needed.
Amazing quality bed linens can be found online at Nordstrom, Macys, Dillards. and Anthropologie. They all ship to Australia. For lesser quality try the real Target (not the Australian one) or Walmart. iIt was quite the shocker to move here and find almost no selection and to see the huge price margins Australian retailers impose on their customers.
Yes, things aren’t cheap here. I’m always envious of the products and prices I see on US blogs. Still, we do have quite a few quality options if you’re looking at over the $150 mark (which is the same kind of price point most of these stores are sitting around – I think the cheapest Nordstrom one was about $270). I just struggle to spend that much on some fabric going around the bottom of my bed! LOL.
Target has some really nice looking ones at great prices though I couldn’t figure out how to purchase. To register they wanted a valid US mobile phone number. Do you have items shipped here from Target US?
When you ironed the hems did they self stick?
No, they didn’t self stick, though they’re definitely not going anywhere. I wouldn’t just iron the the base hems, because they would likely fall down (that’s why I made sure all of the bases used the actual curtain hem), though the sides don’t have gravity working against them :)
You are pretty remarkable. I love all your projects!
Aw, thanks :)
Great idea – I wouldn’t have thought to do this but it is so simple and really finishes off the bed – thanks for the tutorial. I had to look up doona – love learning new words.
Thanks :)
Great Post!! Absolutely amazing.
You are awesome- not only do you have fabulous taste on a real budget like mine, you do splendid things like this bed skirt. I have nice leftover curtain panels from my last house that don’t work in this new house, and they will be perfect to replace the low budget bedskirt I have now. My husband will be so glad. He hates that ill fitting bedskirt!
Oh yay! Glad to have helped inspire. Have fun Becky!
I had a metallic frame but I was pretty amazed by what you’ve done. Great post!
Your view of shop bought bedskirts/valances is exactly what I’ve thought and what’s made me put up with nothing rather than having something I didn’t like. This is such a clever idea – I’m annoyed it didn’t even enter my head. I’ve dusted off my staple gun and I’m off to Spotlight today. Your taste is lovely and I am very happy to steal as many of your ideas as possible. Pls keep them coming – congrats! :)
Oh, glad to have helped inspire you :)
Very clever idea but the stapling isn’t very practical for those who need to wash their bed skirts now and then (I understand you’re flipping a house). I have cats and they like to go under the bed and the bed skirt need washing from time to time because they get cat fur on them but when I was cat free I still washed my bed skirts at least twice a year. They trap a surprising amount of dust even in the cleanest house.
You might want to pin the bed skirt to the soft part of the box base. Or maybe just tuck it under the mattress. However that won’t give you the straight look you want but I don’t mind it because it looks softer to have it look more loosely structured but that’s me.
Of course :) As with all DIY projects my particular technique may not be for everyone. That’s why I mentioned some less “fixed” attaching methods (such as velcro, tape or tacks) in my post. Still, it’s really not too difficult to pry off a handful of loose staples if you ever needed to remove the skirt for some reason. In my case though, like you mentioned, I was purely staging for sale, however I was also likening my skirt to any other fully upholstered item of furniture which doesn’t provide the avenue of removing its fabric cover for cleaning (perhaps because the bed base I was working with was already upholstered and the previous home owners never used a skirt). When you think about it, most upholstered fabric furniture items – sofas, armchairs, dining chairs, ottomans, beds, and even carpets and rugs – simply need to be cleaned in situ (unless they have removable covers), so I really didn’t think this skirt was super impractical or unorthodox. But, it does all come down to personal preference and I certainly never implied this was for everyone.
:)
Thank you for this tutorial! I did a similar thing on our king bed today out of a curtain from goodwill (for like $7 and $4 thread!)
You are a genius! I can’t wait to try this!! :)
Your post helped me a lot. Thanks!!!
WOW!!! I think I have found a solution for a bed skirt. Thank you!!!
It’s such an easy project. I actually just made two more for the recent house I finished staging. It took me less than 40 minutes to finish both!
Wow what a great idea! Are there measurements for each section? How wide are the panels? Thank you!!
Thanks Miya.
Well, measurements will depend on your particular bed size. I literally just trimmed as needed. My curtain panels were 140cm wide with a 250cm drop.
I was searching Pinterest for a “heavier/sturdier” bed skirt idea since most pre-made are so flimsy. That led me here and I now know what I’m going to do with my adjustable frame. Thank you!
I so appreciate you for sharing this post. Once I decided to make my own king size bed skirt I happened upon your website. I used a drop cloth that i picked up from the local hardware store and it worked beautifully, and with your method I didn’t have to fully remove the giant mattress. I am so proud I wish I could post a picture. Thank you, Kristine!
I’m so glad it helped you! I loved that project and have done it several times since.
Feel free to share a pic with me. I’d love to see! You can email me directly: kristine@thepaintedhive.net