
It had always been a dream of my husband’s to travel around Australia in a caravan. And whilst I can’t profess to having the same longing, it was an opportunity I definitely wanted to embrace.
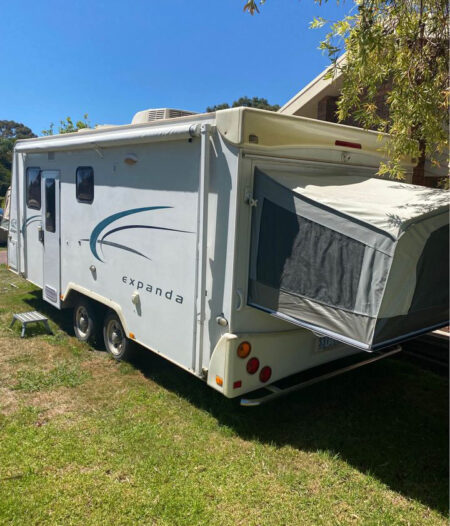
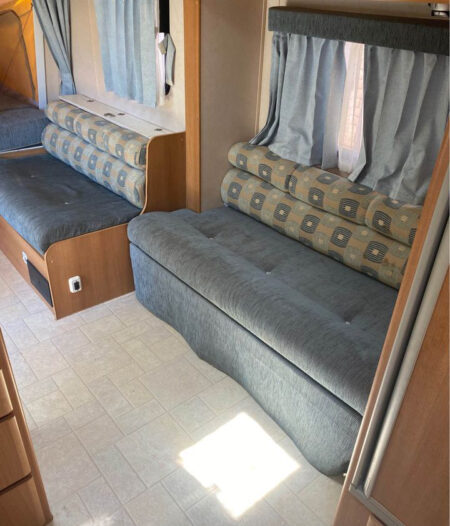
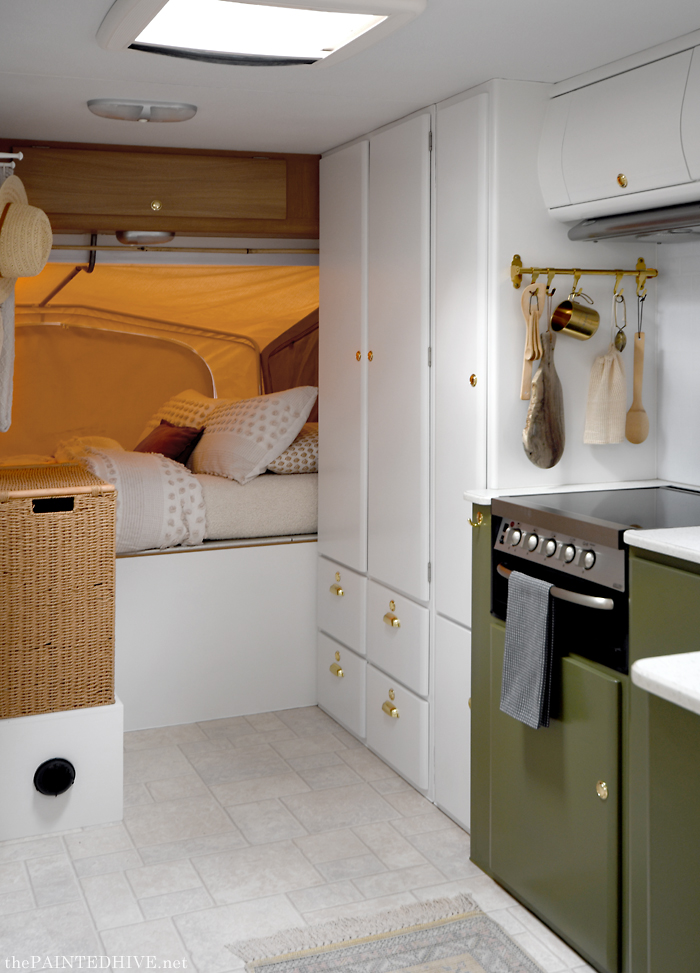
After lots of searching, we bought our ideal second-hand van in early 2022 – a 2008 Jayco Expanda. Whilst the interior looks quite large and is comfortably spacious with plenty of storage, at about 18′ it’s actually far from a huge van. Due to the beds being pop-outs which don’t consume space within the van itself, along with a nice slide-out lounge section, it offers the best of both worlds.
Photos from the sale listing.
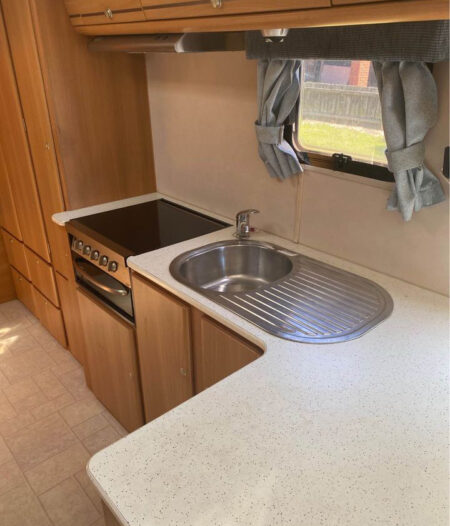


Although it was drab, dated and a little rough around some edges, I never had intentions of renovating it. Unlike a neglected vintage van which you could easily go to town on, our Jayco wasn’t very old or run down. It appeared to have been used sparingly and, in short, there was nothing actually “wrong” with it. I was a little worried that a reno might result in devaluation, or even worse, that I’d stuff something up!
It wasn’t until we’d had the van for almost a whole year (in which time we’d taken a couple of short trips) that I suddenly decided I was up to the makeover challenge. And more importantly, that I was actually excited about it!
Most of you will probably have noticed I’ve not shared much of our own home lately. I may have mentioned this briefly in the past, though we’ve been planning a big renovation and extension for the last few years. This has meant that the house, along with my ambition to undertake any home improvement projects, has been sitting in limbo until we’re ready to move forward (I’m sure once things kick off I’ll have lots to blog about!). As a result it’s been really hard to find creative motivation, so finally feeling inspired by the opportunity the van presented was surprisingly refreshing.
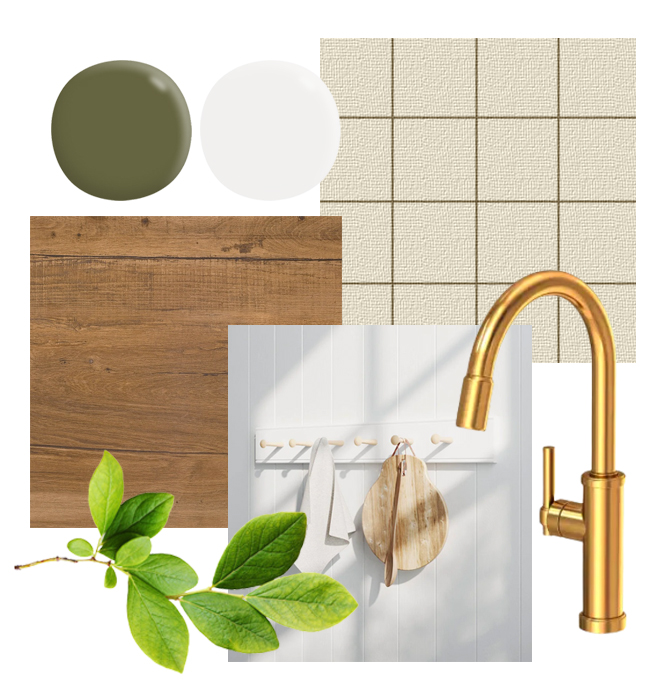
As with the majority of my projects, I wanted to make the most of things by focusing on a budget-friendly, cosmetic refresh. And rather unusually for me, I had a clear design vision from the start – a fresh white and deep olive palette with hints of brass, timber and warm earthy neutrals.
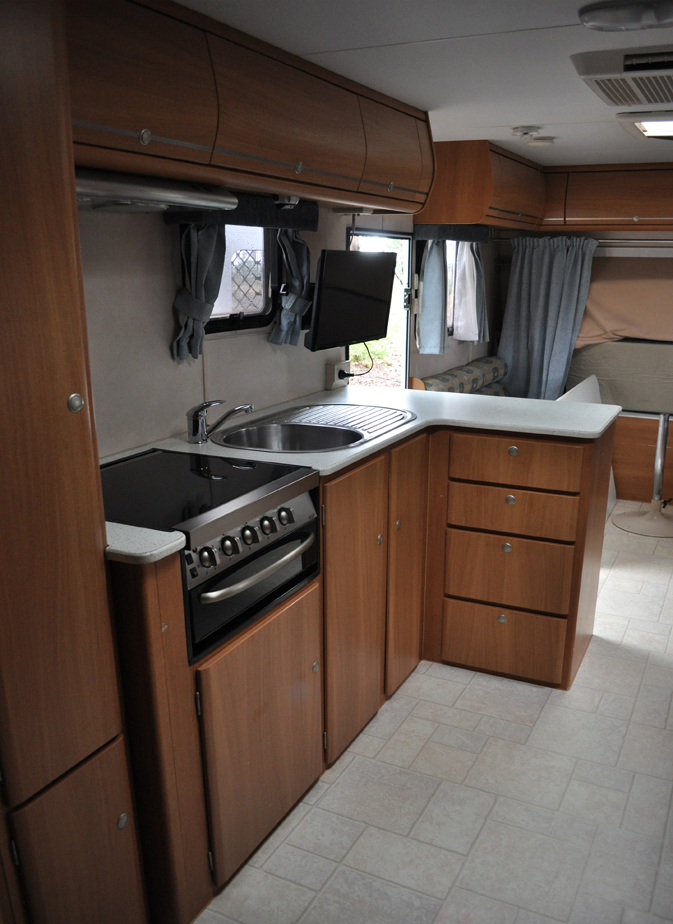
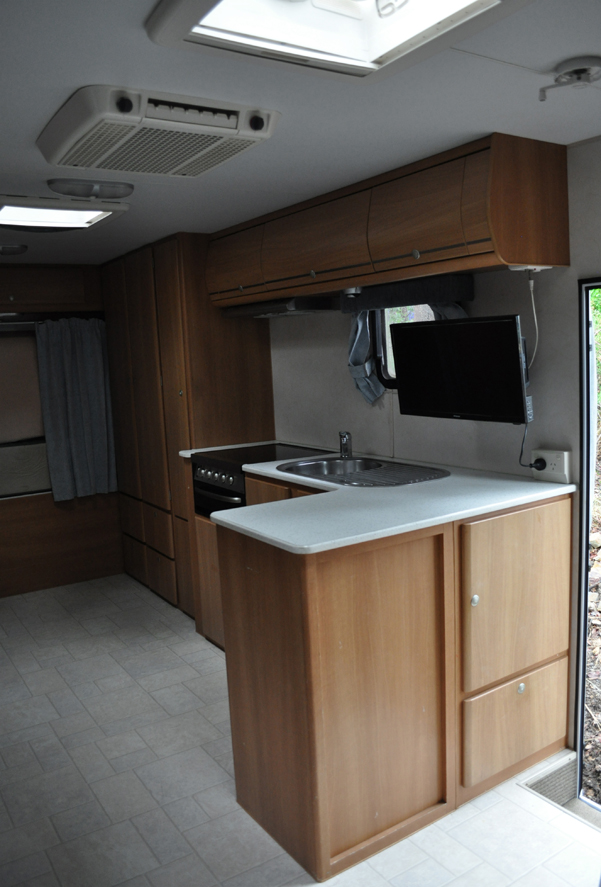
Of course, paint was going to be the major player as it was needed to help banish the sea of dull brown. And I’m not gonna lie, it was a super time-consuming and repetitive process I wanted to punch in the face on several occasions! Far from painting a house interior (which I’ve done plenty of times), it was incredibly fiddly and awkward with so much cutting in. Yes, I was meticulous and no doubt “over-engineered” each step, but it was worth it in the end. Things held up beautifully during our trip.
I used Dulux Aquanamel. The green is Glossy Olive and the white is Natural White.

If you’d like more info regarding the painting process, see below. Otherwise, simply skip forward.
Painting Process
- Remove doors and drawers. Detach hardware and brackets. Number items as needed to make reassembly smooth and easy.
- Repair any breakages or damage. Some areas of the laminate, particularly around the corners of the doors near the kitchen sink (water damage), had lifted so I simply glued it flush again (a far cry from the previous owner who had tried to reattach it with sticky tape!).
- Sand all surfaces relatively well with medium-coarse paper.
- Clean thoroughly with sugar soap and or/isopropyl alcohol.
- Apply ESP (Easy Surface Prep) or similar, to any plastic or metal areas. This provides better paint bond to materials with low adhesive properties.
- Apply one – two primer coats of Zinsser Bulls Eye I23, or similar high-quality product. Use a medium brush for cutting in and fiddly areas. Use a fine roller for larger flat areas. I also used a small craft brush for extra tricky areas. Sand lightly with fine paper between coats.
- Apply two – three top coats of Dulux Aquanamel, or similar high-quality product. Again, use an appropriate brush or roller depending on area and sand lightly with fine paper between coats. The green I used is Dulux Glossy Olive, the white I used is Dulux Natural White.
- Put everything back together again.
Our van is pretty big with LOTS of cabinets so I painted in sections so it didn’t feel too overwhelming, and also so I had space to work within the van itself (as we don’t have a garage or workshop).
I didn’t use painter’s tape because I personally don’t like it. I find a patient, steady hand produces the best results.
For the olive areas I used a grey tinted primer for better coverage.
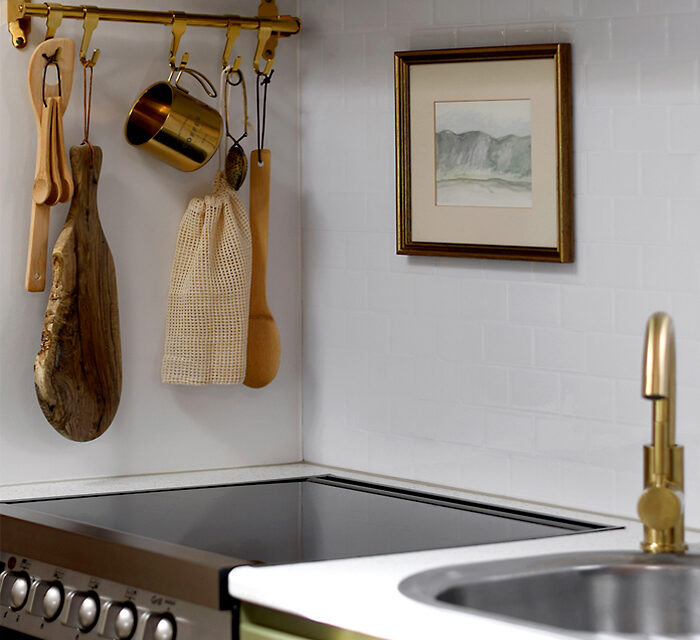
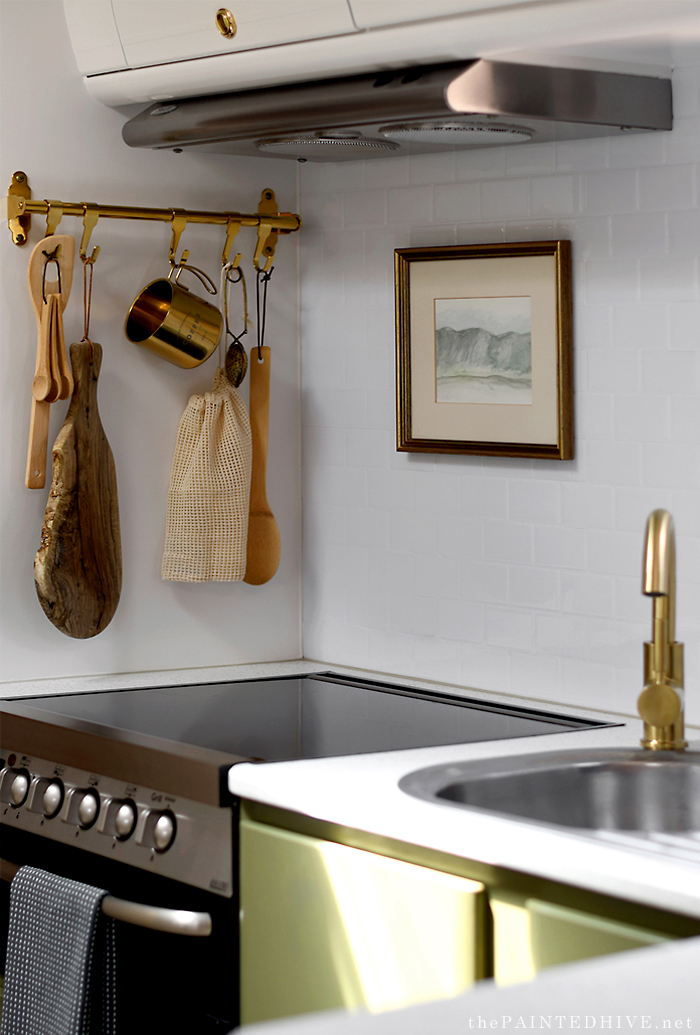
I changed all of the old chrome pop locks to gold ones (which I found on eBay). Though rather than replace the entire mechanism, as I figured the original Jayco ones would be better quality, I found it was easy enough to simply switch out the knobs and back plates.
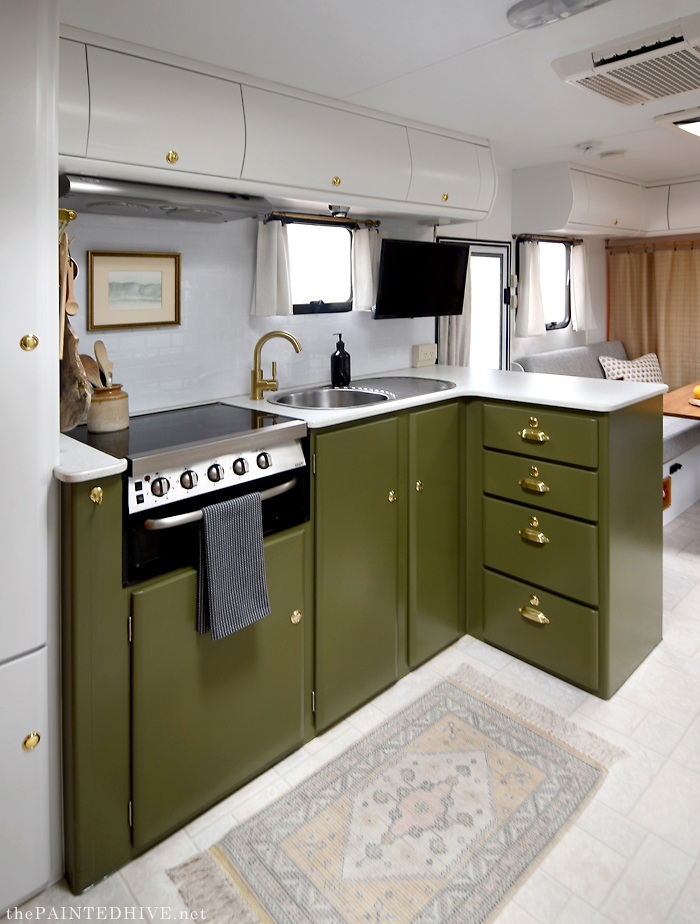
And for some extra interest I also added brass pull handles to the drawers (I found these on Etsy). Although this was initially a purely cosmetic decision, we found it actually made using the drawers much more functional – win, win!
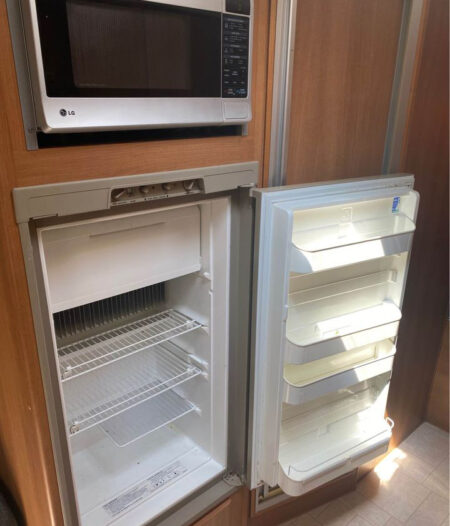
The fridge was one of the difficult areas.
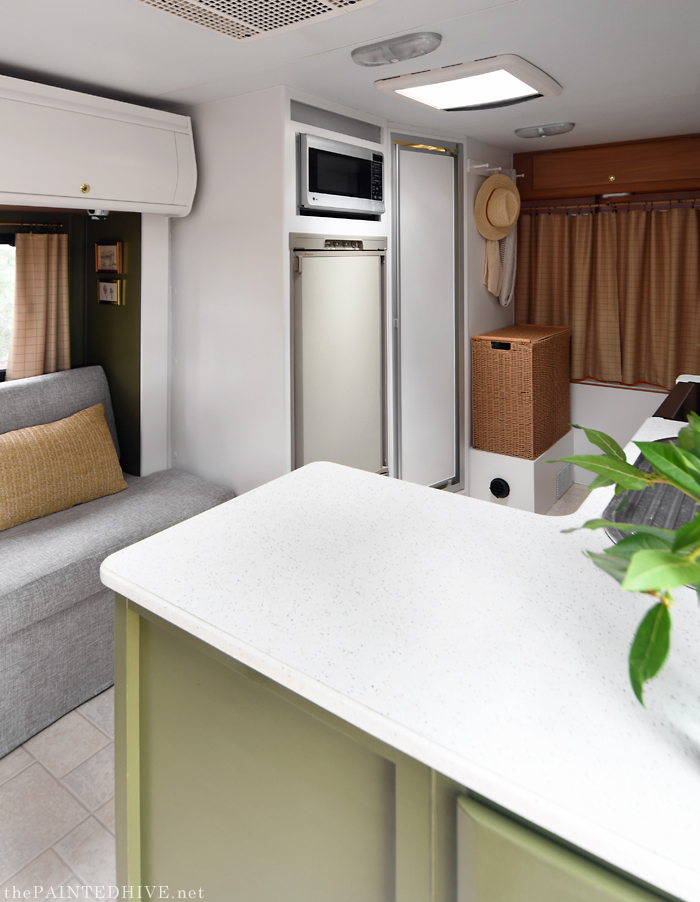
I never wanted to paint the taupe surround due to it having lots of working components, like the adjustment knobs and handle which get touched all the time, along with the setting information (plus it isn’t exactly an offensive colour). But I also didn’t want it to be a feature. Initially I painted the front panel white in hopes of making it blend with the other cabinetry, but it actually made the surround look more prominent. So I tried a colour we already had on hand (it’s actually the same colour as the kitchenette cabinets in my parent’s suite extension) which was close to that of the surround and worked perfectly to meld things together.
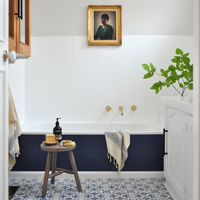
As you can see in the above photo, my husband also installed a diesel heater box to the right of the bathroom door. Apart from providing heat when we weren’t connected to power (such a lovely luxury!), it also created the perfect platform to house a laundry hamper (I found this double compartment one at Adairs and it was basically made to fit!). I also attached a simple shaker peg rail to the wall to hang items such as towels, jackets and hats so they weren’t sprawled all over the place!
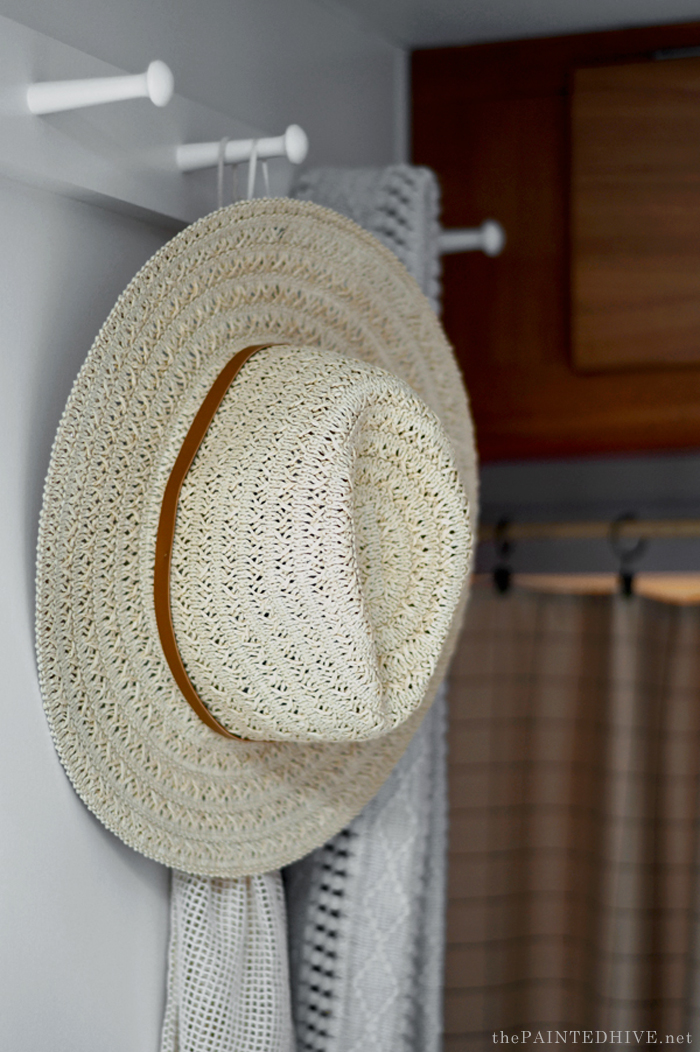
I made the shaker peg rail using the same method as this previous one. Though this time around I had to affix it to the wall with Liquid Nails because I couldn’t screw through the thin bathroom membrane, but it’s rock solid (I intentionally attached it before I started painting so it wasn’t merely glued to the surface paint).
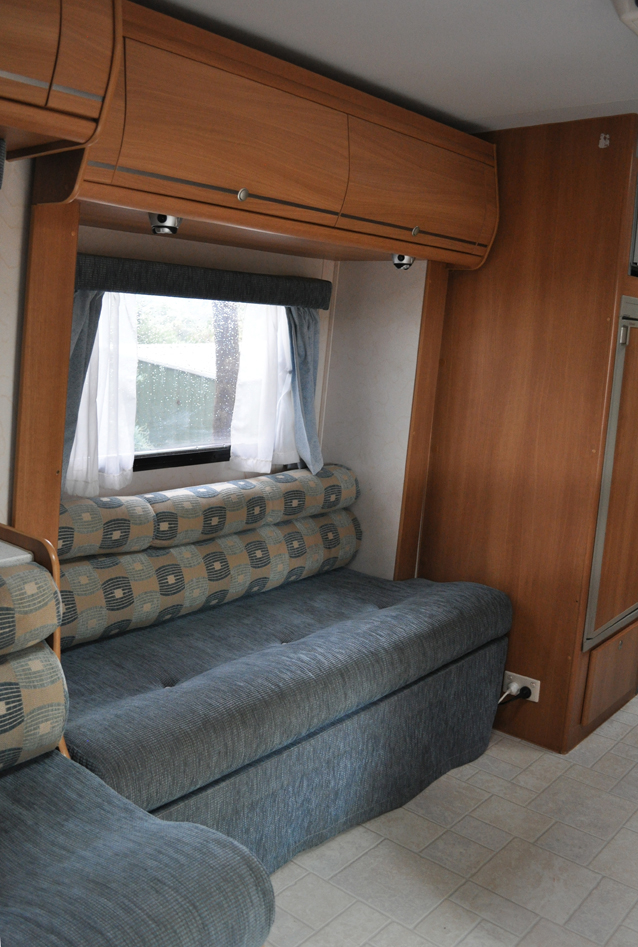
The new seat covers were the one aspect I ended up out-sourcing. Whilst I did consider making them myself, sewing is certainly not my DIY strong point (or, if I’m honest, something I even partially enjoy). And with the seats being such a major component in the van I was conscious of my potential sub-par efforts dragging down the overall appeal.
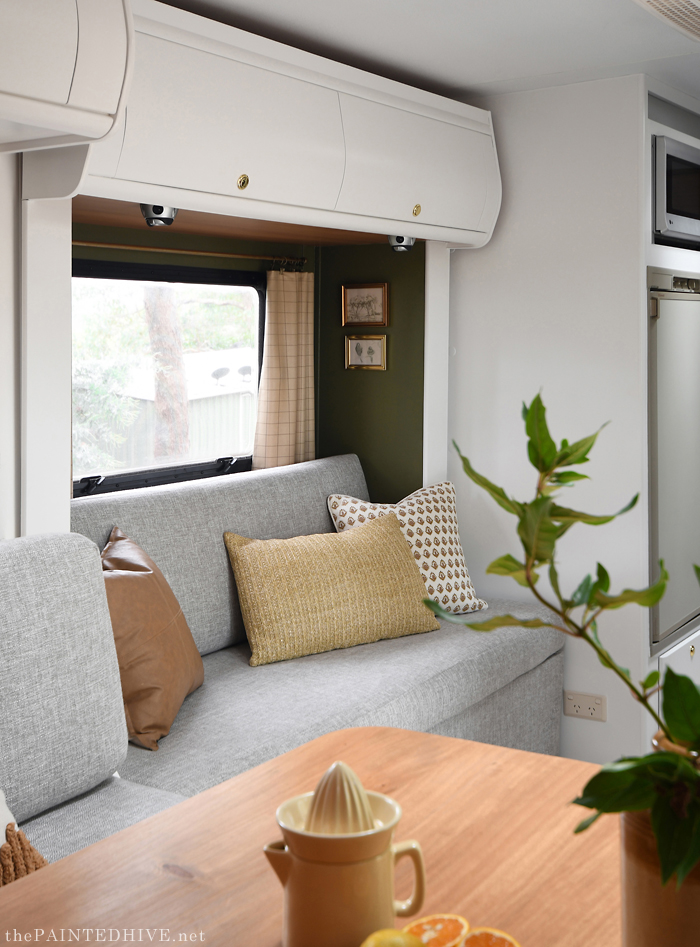
I knew engaging an upholstery company would be super expensive, so I found a hobbyist on Airtasker who was happy to do the job for $280. This included all six seat covers, made fully reversible and removable with concealed zips. She did a fantastic job!
I supplied the fabric, wadding and zips (which all came from Spotlight). I really wanted a slightly warmer toned fabric, something like a wheat or oatmeal, and whilst Spotlight did have some options they were all sold out at the three stores I visited! I contemplated higher end suppliers but they were way out of my price range as I needed around 12 meters worth. It was a slight compromise though I am still happy with the neutral stone shade I settled on.
In addition to having the covers made I also bought new foam for the back rests (as I didn’t like the original double rolled look) and I squared off the existing seat cushions by trimming down the front “humps” using an electric knife.
All up the new seating cost about $800 in total. Yes, it’s a lot but still pretty amazing for essentially three sofas.
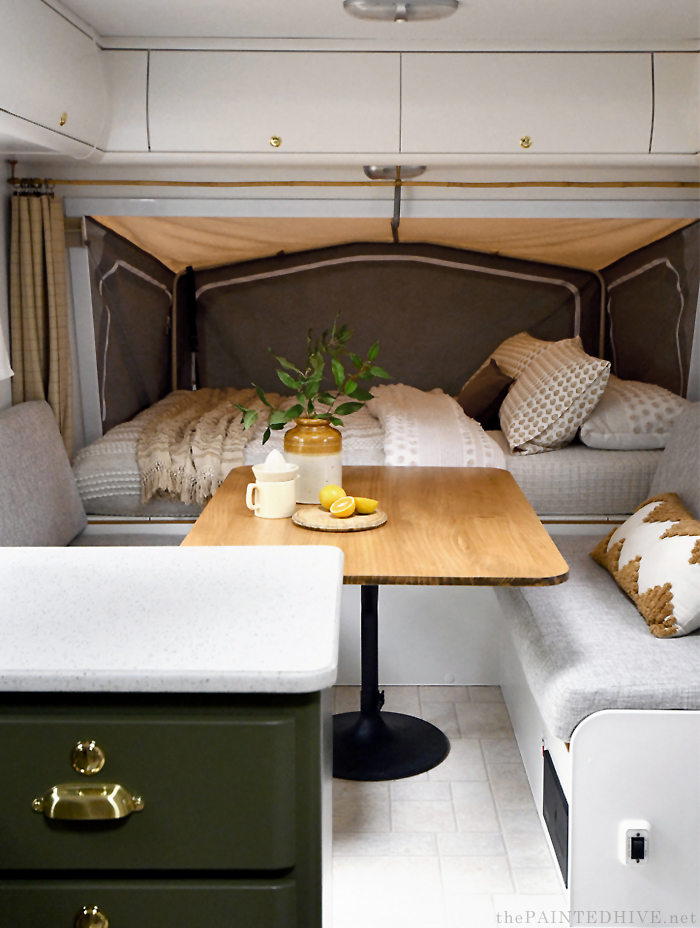
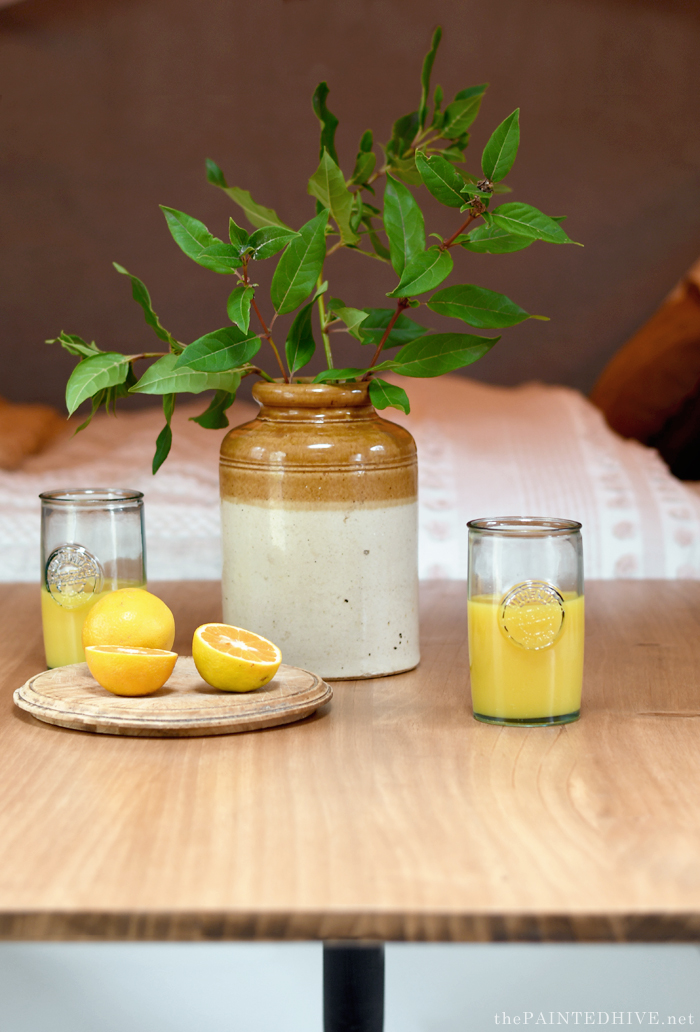
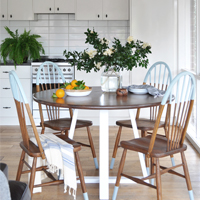
The original dining table isn’t shown in the before pics though the top was made from the same material as the kitchen bench. To reintroduce some warmth and earthiness (as I’d painted over most of the brown “wood”) I added a new timber table top which I simply cut down from a cheap pine table I bought on Marketplace.
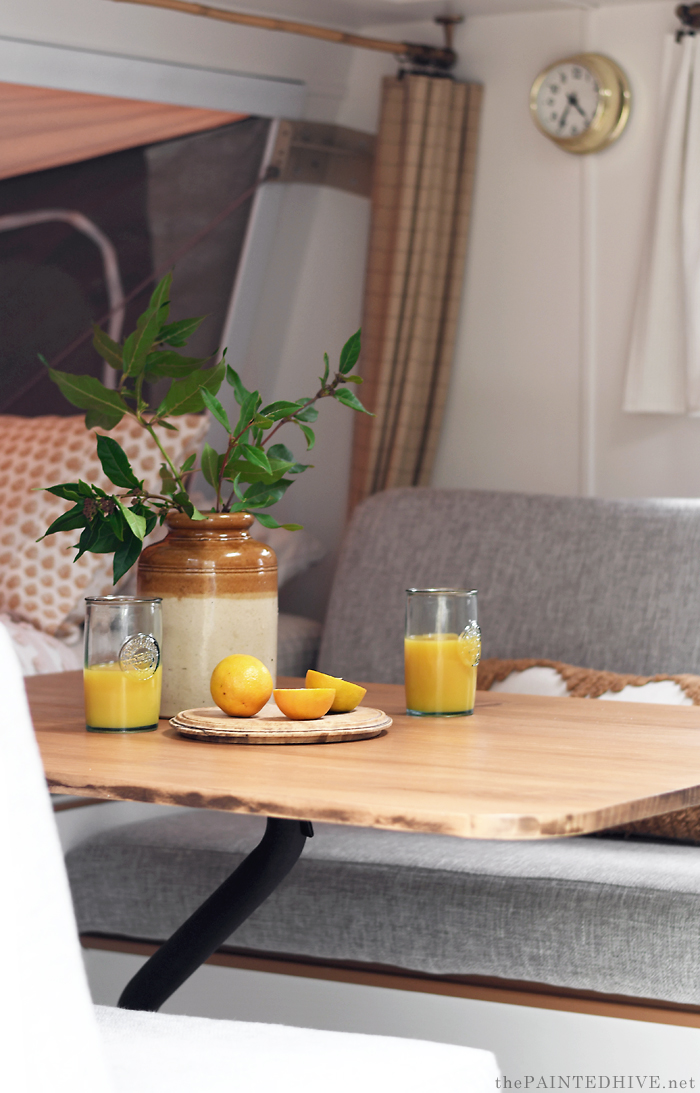
I left the edges a bit rustic to give it some extra character.
I also painted the base black (it was originally beige and chrome). I used chalkboard spray paint because I know from experience it has excellent adhesion, even to metal. Sure enough, even with me carelessly running the vacuum over it, there is still not one chip!
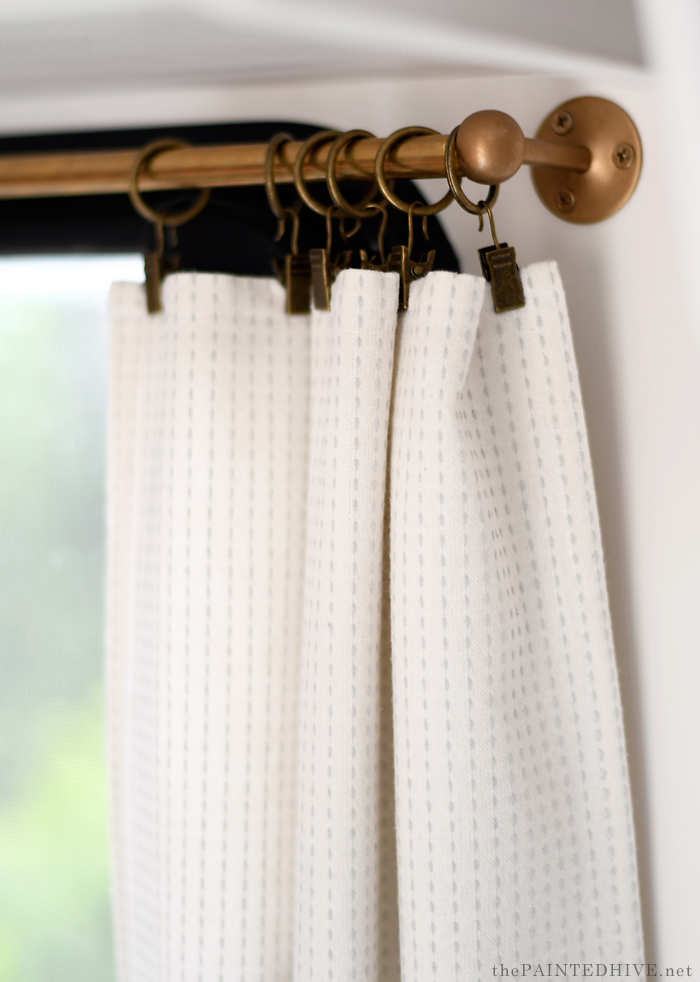
The white curtains are Kmart tea towels, which I lined with some linen to provide additional filtering properties (and so they can easily be reversed). It’s handy having small enough windows that tea towels can fit because they’re already hemmed and ready-to-go.
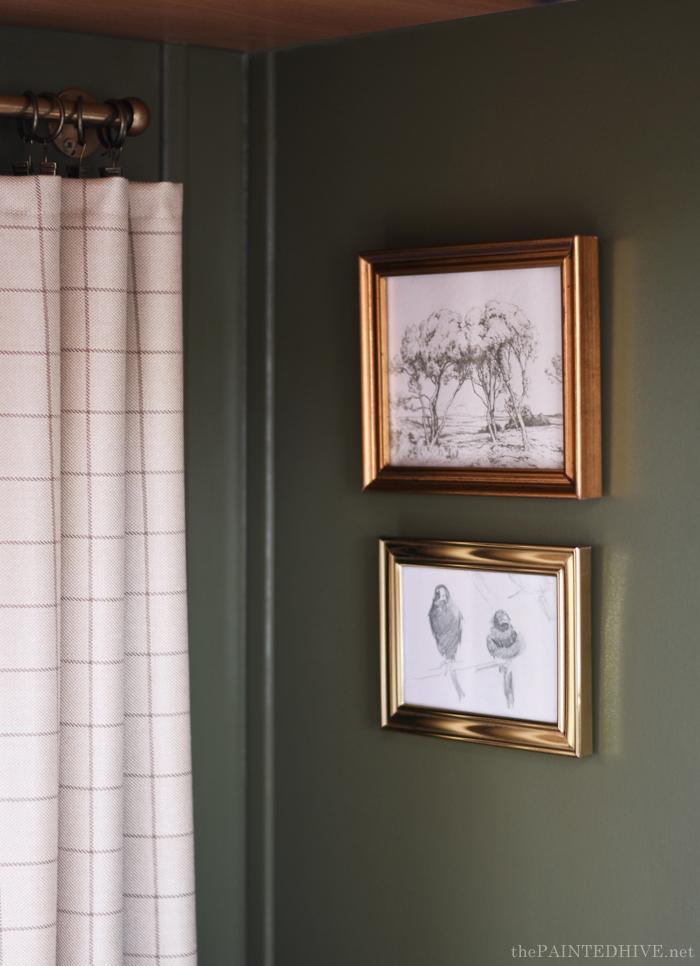
The caramel grid curtains are a beautiful fabric I found on clearance at Spotlight for $6 meter (reduced from $45 meter!). The fabric has a lovely soft fall and never looks wrinkly. I decided to use it for the curtains at each end (the beds) and also in the center (the slide out lounge section) to provide a linking element which spans the van and makes the scheme feel consistent throughout. I was a bit worried that using different curtain fabrics in such a small space might be overwhelming but it actually works super well.
I didn’t want to install standard curtain rods because the scale, in relation to the little windows, seemed off. Instead I used a 14mm/.05″ length of hollow brass bar from a metal manufacturer, which I cut to size using a hack saw for each window. I did contemplate lots of other options here (including timber dowel, plastic bar, steel rod, and even utensil bars and tea towel rails, and so on). In the end I couldn’t find anything affordable “off-the-shelf” with the right gold finish. Ordinarily I would rely on paint though was conscious that in this case it would likely wear due to the constant movement of the rings. Plus I do love the authentic lustre the real brass provides!
The privacy curtains for the beds have natural bamboo rods and I love the earthy feel they give.
All of the brackets are from AliExpress. These I did have to paint, as they were only available in raw steel or black, but I wasn’t too worried as they are simply static. I used Rub n Buff.
The rings and clips are also from AliExpress. I wanted to use this kind of clip system so the curtains are really easy to change if ever needed or wanted. They also have a nice casual feel which I think works well for a caravan.
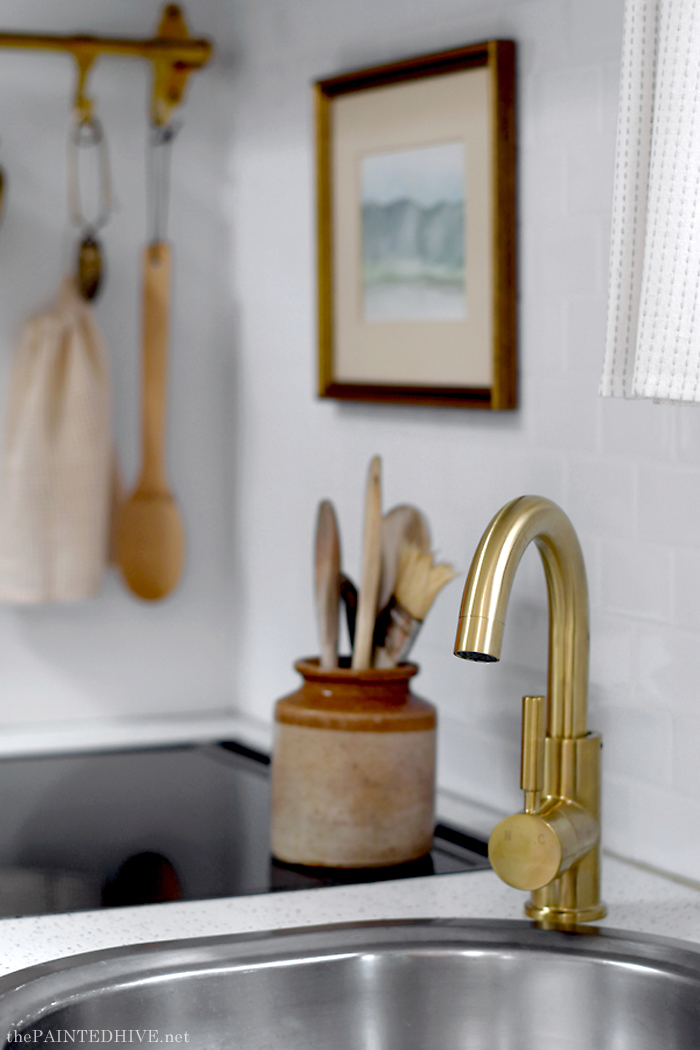
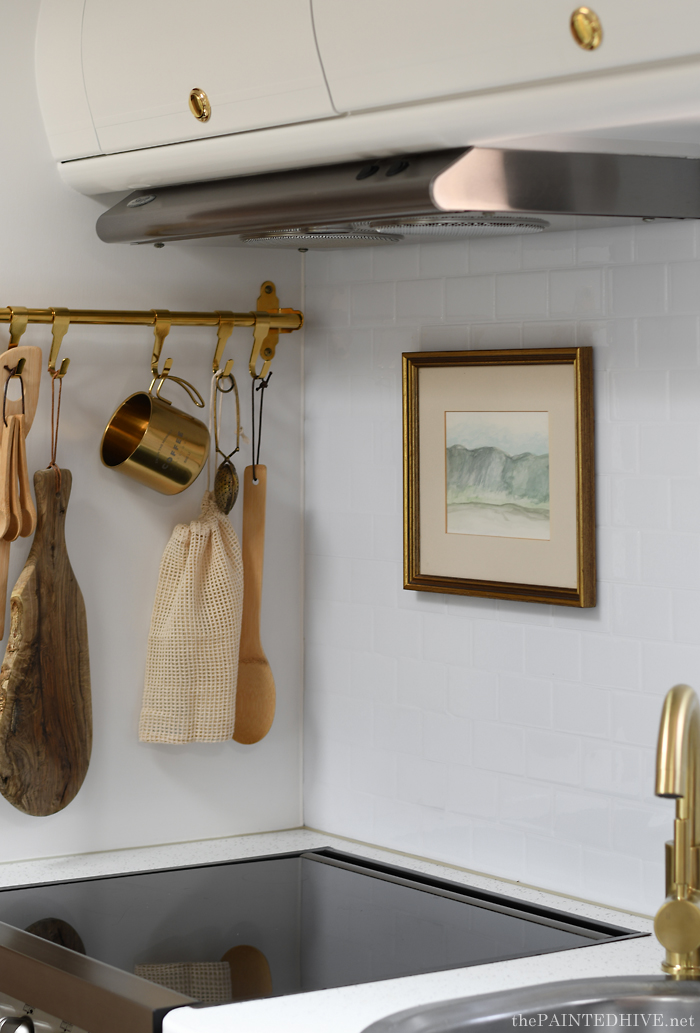
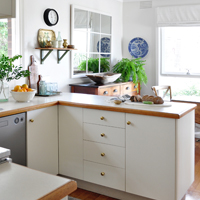
In the kitchen I added peel-and-stick backsplash tiles. These were simply from Kmart. Again, it was a pretty fiddly and time-consuming project though I got there in the end and it adds such a fresh feel.
I’ve heard some bad things regarding using peel-and-stick tiles in vans (apparently they tend to lift and/or bubble) though I applied these over 9 months ago and haven’t had any issues at all.
The kitchen tap was from AliExpress and the utensil bar is from IKEA (I had to trim it to fit but that was simple enough).
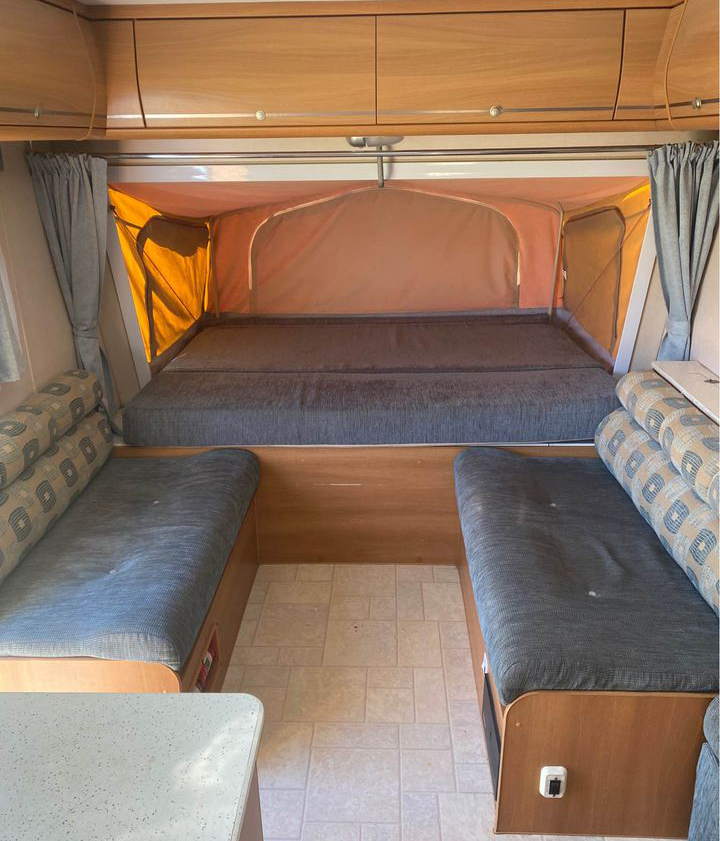
It’s not easy making the pop out bed sections look great. I mean, they are essentially canvas tents – and, sadly, not the pretty kind.
I did my best using a combination of bedding we already had on hand along with some new linen from Kmart and Target.
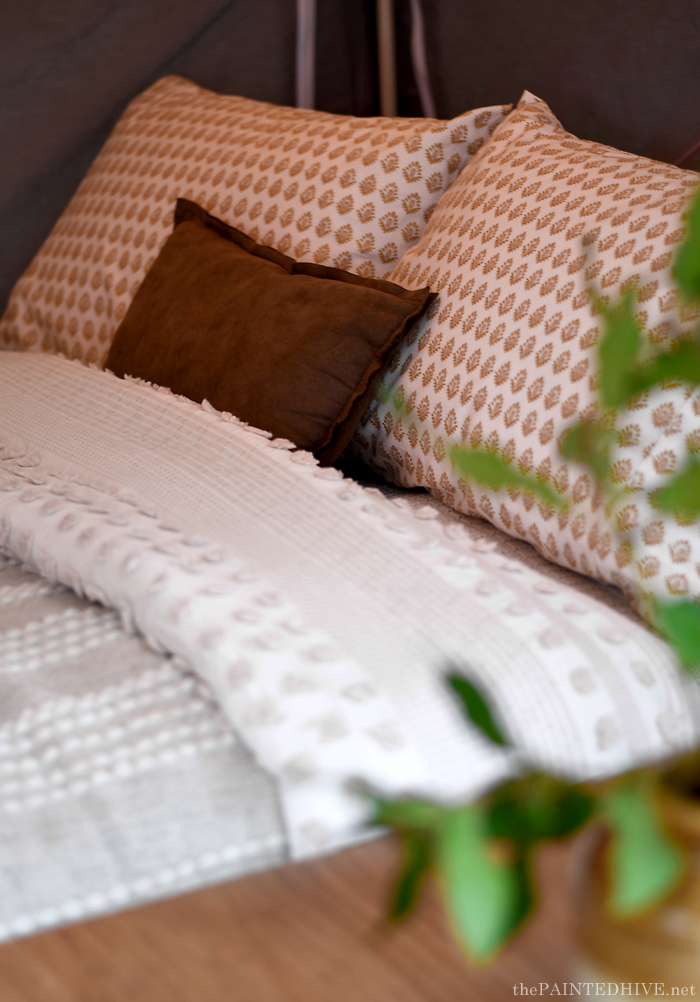
You might notice that the canvas sections are different at each end – the ‘dining bed’ has a grey back panel whilst the ‘kitchen bed’ has a cream back panel. We had to replace one of the ends and apparently the canvas company couldn’t make them match, but as you never really view them simultaneously it’s not been an issue.
My initial vision included a new patterned floor, and whilst I still might do it, I’m not hating the existing vinyl. Yes, it’s a bit more pink-toned than I’d like though the french-lay pattern is actually quite timeless…and fortuitously, currently on trend.
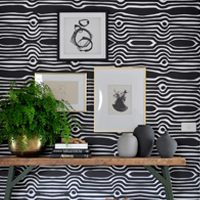
The wall art is all attached with Command Strips. We didn’t have one issue with any “un-sticking”, even through lots of humidity, heat and some very bumpy roads!
The frames are all thrifted. The watercolour over the stove was painted by my daughter.
The sketches are free downloads I simply printed at home. They are very basic but I wanted something that was almost like nothing, if that makes sense? I was planning to do some sketches myself though haven’t got around to it.
As touched on earlier in the post, there is a tiny bathroom (shower over toilet – the entry door is to the right of the fridge) though thankfully that was all white so we didn’t need to do anything in there. We also haven’t touched the exterior.
Before & After Images
CLICK TO EXPAND
I won’t go into too much detail about the trip itself at this stage aside to say we travelled for around three months and it was bloody amazing! As a very brief summary…we started in Melbourne (Victoria), toured the Eyre Peninsular (South Australia), crossed the Nullarbor Plain, explored the West Coast (which was freakin’ spectacular!), visited Karijini (which was freakin’ spectacular!), journeyed to Darwin (Northern Territory), meandered down the center through Alice Springs and Yulara (Uluru), then slowly headed back home to Melbourne.
If I’ve missed anything or you have questions, as always, don’t hesitate to ask.
xoxo


My, oh my! This is totally amazing. I’ve never seen anything like it. Love the new look!
Thanks. It’s not a traditional caravan makeover though it worked well for us.
I’m so glad to read your post, I’ve missed you! This is a beautiful restoration and what a fun way to travel and spend family time. Hope it brings you years of enjoyment!
Thanks Sara.
You did a great job!
It is an amazing transformation! So glad you are back to sending out newsletters. Your makeovers are so inspiring. Love the new colours of the caravan
Thanks so much Amanda.
Wow.
Just… wow. I love everything! The olive green is a great choice! And your daughter is very talented. Love her painting.
I have a thing for brown currently so really loving that in the bedding.
Thanks Anna. I’ve always wanted to do an olive green kitchen though haven’t been brave enough yet. A caravan provides the perfect space to experiment with bolder ideas.
Hello there,
this must be synchronicity, since I was wondering where you’d been.
Lovely to see this makeover. I have a love of caravan makeovers and the lifestyle that goes along with it.
You did a fantastic job. I will remember the painting the top a light colour and doing the bottom in that lovely shade of olive. Plus the golden openers give it a classy touch.
With friendly greetings from Augsburg, Bavaria, Germany
Thanks Susanne.
Ah, so beautiful! I just love the spaces that you make – they are so lovely, and thoughtful and welcoming.
And what a great painting that your daughter did- very talented!
Aw, thanks so much Leslie.
OhMyGosh Girl. WOW!!!! Makes me want to “get off the pot” and buy a camper myself! I glammed up my Gazebo (She-zebo), I’m sure I can do this. Well MAYBE not as beautifully as you, but you certainly are my inspiration!!! Thank you for your fabulous return.
Thanks Tracy. Yes, you can definitely do it! Such a rewarding project and so much fun to travel around in too!
It looks like a home! thank you for sharing the struggles, it’s so easy to give up. It looks fabulous and glad to hear you enjoyed traveling around for a few months. It daughter appears to be artistic too, lovely picture.
Very lovely! Never have thought to make the standard brown into a better color . Job well done and inspiring.
Thanks Marilyn :)
Wow, very sweet refresh of a tired caravan.Love the choice of color and fabric makes the interior bright and homey. And your road trip sounds amazing. What a privilege to be on the road for three months and see all the beautiful places (were everything can kill you). LOL It’s awesome to have you back!
Oh my word, this is amazing!
I live in Elkhart County, Indiana and Jayco is headquartered here and is a huge employer in this area. You should send this to them!
I love your blog, you are so creative. You certainly inspire me!
Doris
Aw, thanks Doris.
So glad to hear from you, I was just searching for your site. I thought I had somehow gotten unsubscribed to your posts. The redo looks amazing! And a 3 month get away sounds divine. So glad you’re back, missed you!
Thanks so much Tina. I’ve really missed blogging too! Yes, we were very lucky to be able to get away for three months and the privilege isn’t lost on us. Such great experiences and memories.
Yours is the only blog I read from start to finish! Makeover is so pretty, you have such great skill in putting colours together. Well done and thanks for sharing.
Aw, thanks so much Anna. That’s such a flattering thing to hear. I really appreciate it.
I might entertain the idea of a road trip if my caravan was that adorable. Great job!
Thank you Deborah.
I just love this make-over, every bit of it! Thank you for sharing it!
Thanks Robin. So glad you like it.
You’ve done an amazing job making over what is a typical Jayco “brown on brown” interior. I wish my previous Expanda had this colour makeover, it’s so inviting. Could I please ask where you sourced the new foam for the back rests as I am recovering my outdoor lounge and the dog has chewed up the back cushions over time! Good to see / hear you back blogging.
Thanks Kylie. The foam is from Clark Rubber. They have a selection of sizes and densities to choose from and will cut it to size. Because I only replaced the back cushions I didn’t need to go with the super dense and really expensive foam (which is generally reserved for seat cushions). Still, foam isn’t cheap and all my back cushions were around $230 from memory. Depending on the size you need, you may also be able to use something like a foam cot mattress etc. which you may find is a cheaper option. Cheers.
This is really pretty, well done! One small improvement to your website, if I may make a suggestion without offending, is that the font is a bit too hard to read in this grey scale. Can it be a bit bolder or something?
Thanks so much. No offence taken at all. Someone else actually mentioned this already. I will see if I can make the font darker.
What an incredible transformation! Your caravan makeover is truly inspiring, turning a functional space into a stylish and cozy home on wheels. The attention to detail, from the carefully chosen color palette to the thoughtful additions like the brass handles and bamboo rods, reflects your design vision and dedication to the project. The step-by-step painting process and creative solutions, such as the use of Kmart tea towels for curtains, demonstrate your resourcefulness. It’s evident that your passion and creativity have turned a simple caravan into a personalized haven. Cheers to many more amazing adventures in your beautifully renovated mobile home! 🚐✨
What a lovely thoughtful comment. Thanks so much Stella.
As always, it looks fabulous! You’ve really made a “home away from home” for yourselves while traveling!
Thanks Elayne.
Welcome back! Looks so fab! I’m currently fitting out a couple of (much smaller) camper vans and you’ve given me an idea for the curtains – I was not looking forward to spending $1200 on curtains for each van! Glad you had a fabulous trip.
SO Fantastic WOW. Changing the top cabinets to WHITE was genius for sure. I love everything about the changes you made. Especially the GREEN color.
Thanks Julie. I’ve always wanted to use a bold green on cabinetry and the van provided the perfect avenue :)
Hey Kristine!
Absolutely beautiful. I just purchased an Expander and looking to renovate.
Do you mind posting the eBay link to the new pop locks? Thanks so much!
I think it was these ones though there are lots of different sellers.
https://www.ebay.com.au/itm/234068086013?hash=item367f8b8cfd:g:RXUAAOSw9nZfiWGU
In the US they are called campers or motor homes. We had one growing up for cross country trips. Tight quarters.