
I must admit, when I posted about this impromptu room refresh last week and received lots of excited “Can’t wait to see!” messages, I felt a little worried.
Aside from the fact the budget was just meager, the room itself was quite nice and neutral to begin with. This meant there was no call for any particularly major changes so the transformation was never going to be super astounding (some of you may even struggle to spot the differences!). It might sound strange, though I find that the most striking makeovers tend to begin with the most hideous of spaces! I guess that makes sense given they offer so much scope for change.
Here, on the other hand, it’s all in the details. Well, mostly.
As mentioned in my previous post, this is my parent’s little kitchen.
After 25 years mum decided a freshen-up was in order so she took to it with a circular saw late one afternoon. True story.
She has plans to undertake a more extensive remodel in the next few years so this is just an interim solution.
I helped with a few minor decisions, a couple of little projects and the final styling, though overall this is mum’s project.
And she’s thrilled with the outcome! Although the changes are only subtle, they’ve had a big impact on how the space both feels and functions.

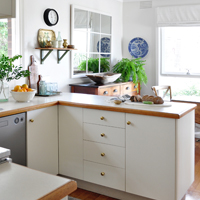
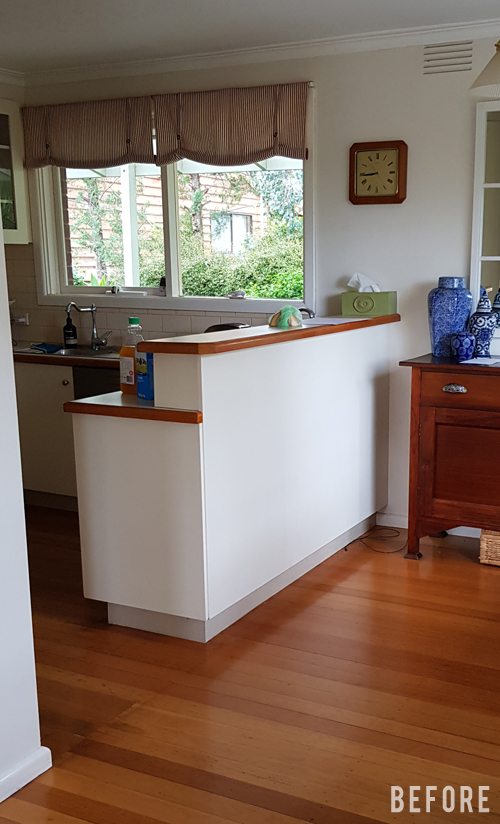
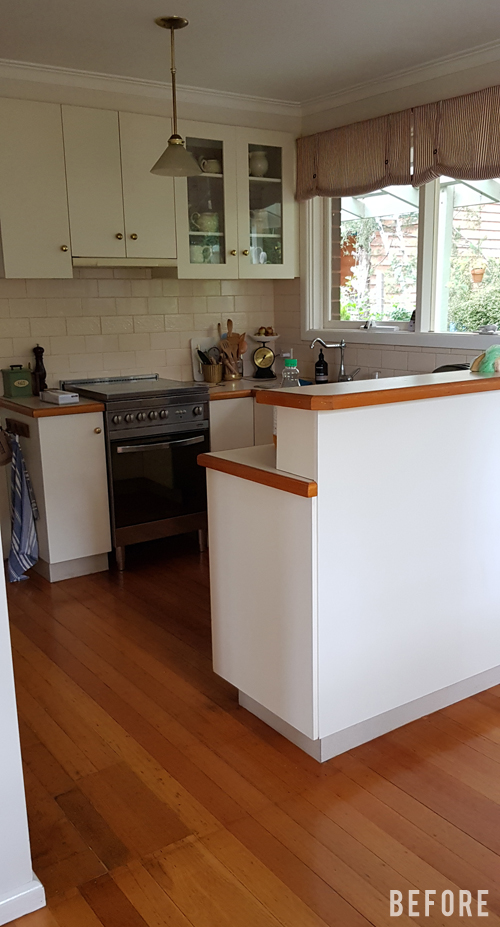
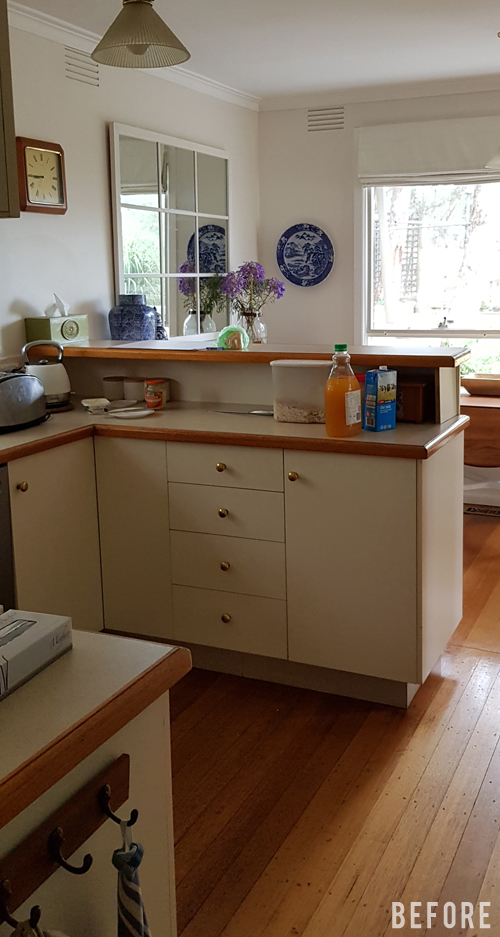
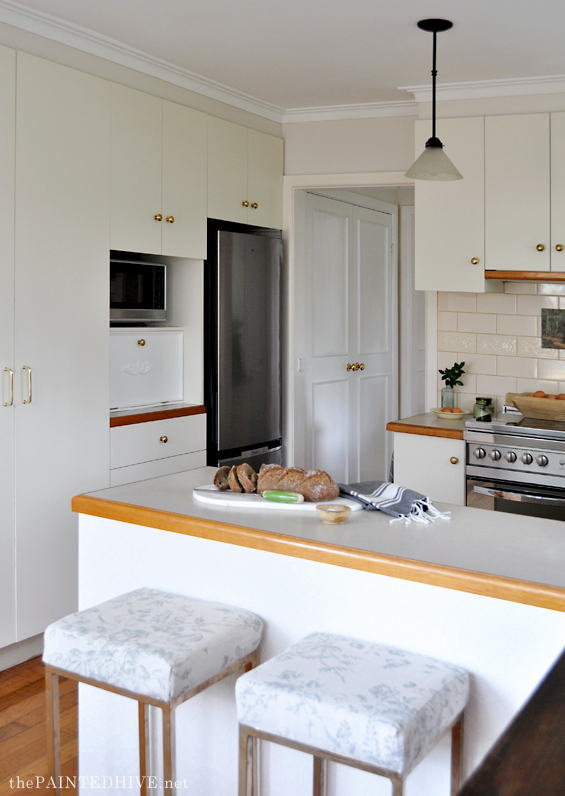
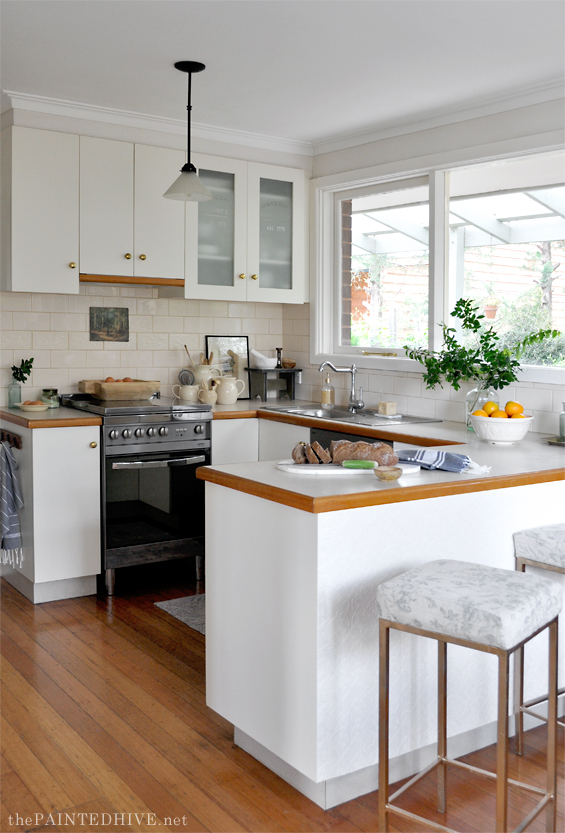
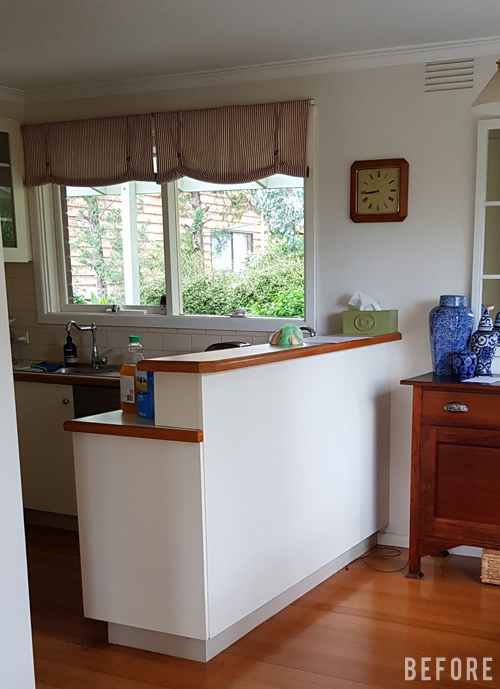
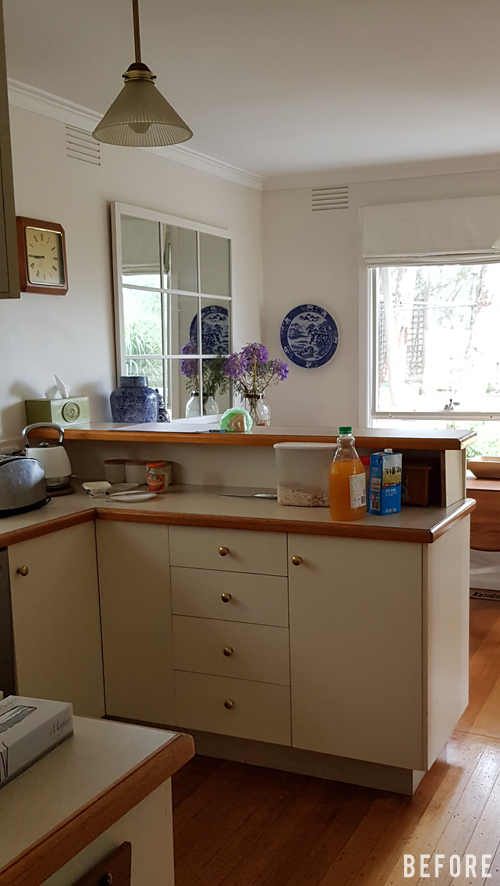
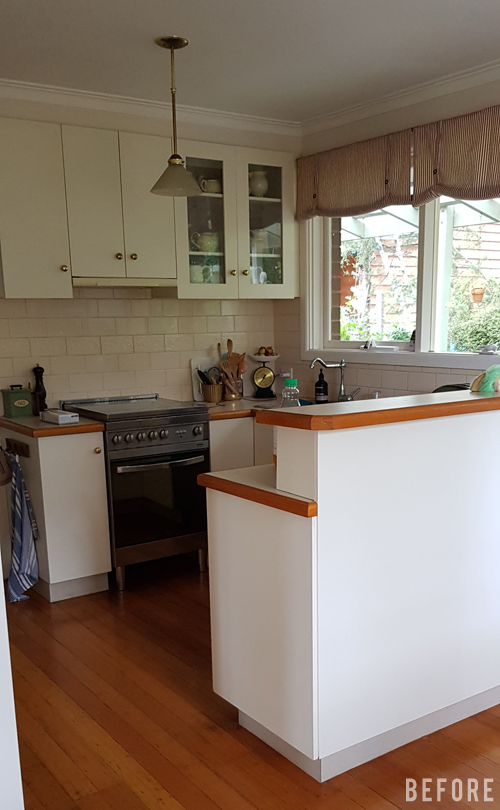
The big change (and where the circular saw comes in) is the re-imagined peninsula.
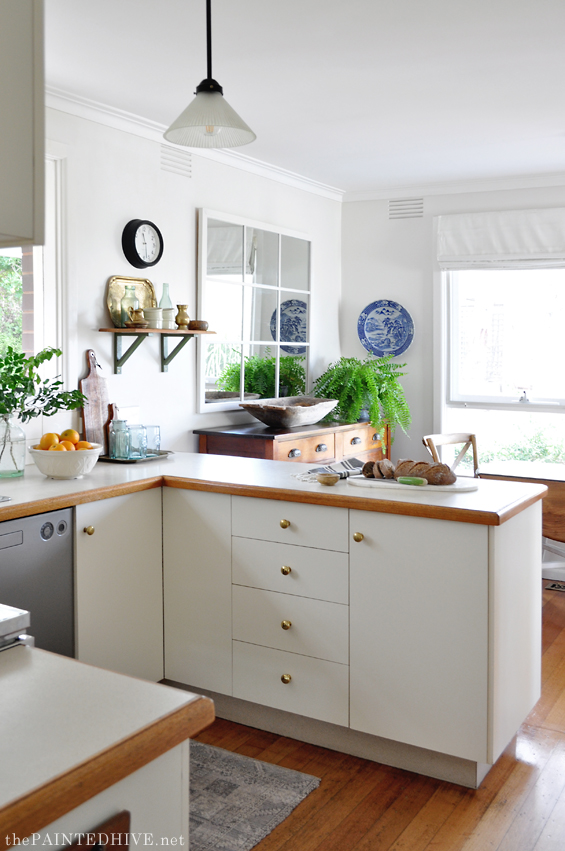
Where there was once a dated raised bar, obstructing sight-lines and further constricting the already tight kitchen, there is now a spanning benchtop which opens the kitchen up (from both sides) and invites people to gather. It’s hard to grasp the impact from the photos though it really is a game changer.
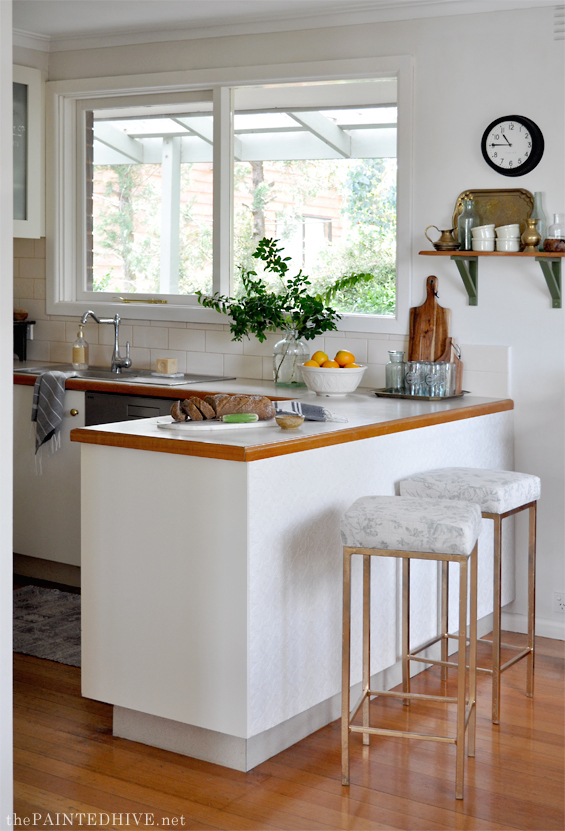
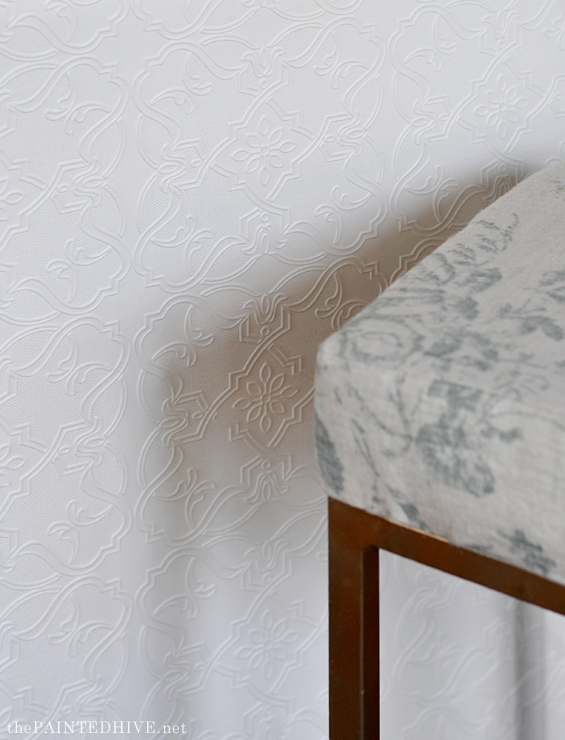
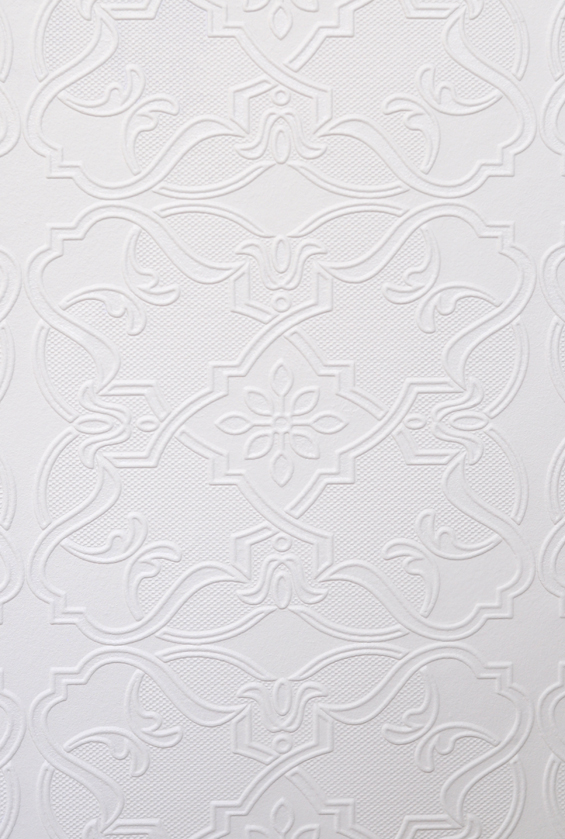
Due to the way the raised bar was originally constructed, mum worked out she could remove the entire panel, cut it down, then screw it back on again. She then carefully prized the timber moulding from the discarded bar and attached it to the existing benchtop to continue the trim line. To finish she covered the “new” panel with some paintable wallpaper (it’s Anaglypta ‘Waxwell’ which I bought a few years ago from eBay – she only used around 1/5 of the entire roll). Once painted the same colour as the walls (Dulux Antique White USA) it looks just like pressed tin!
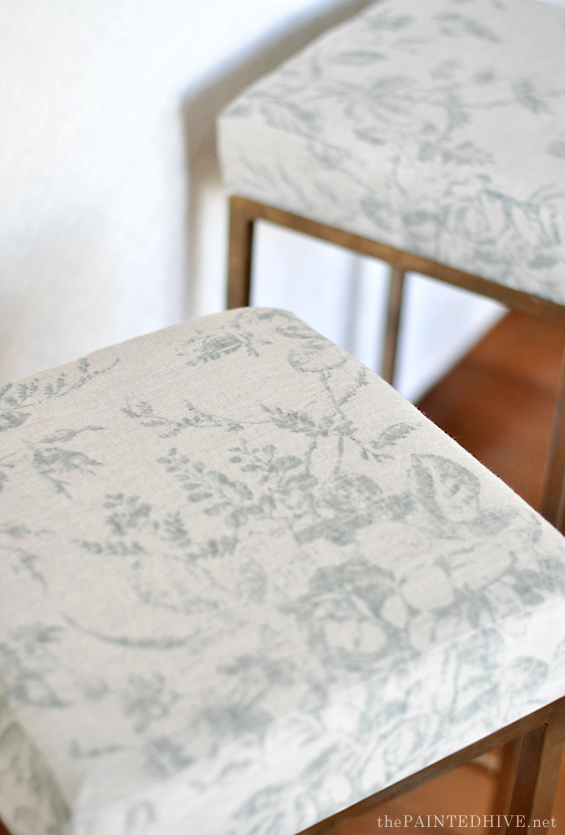
Although, like the previous raised bar, there is no over-hang on the new bench, it’s still a great little spot to sit. Mum had two old school stools in the shed so decided to renew them with some gold spray paint (Dulux Duramax Bright Finish in Bright Gold) and fresh upholstery.
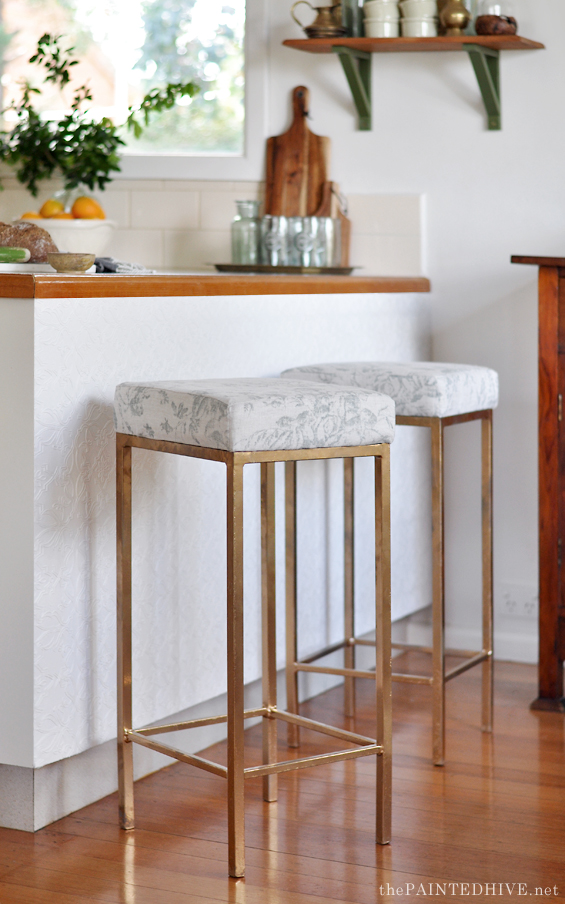
The metal legs were badly pitted so the spray job isn’t perfect though it does the trick.
For the seat she used thick foam from an old ottoman and sewed covers to give them a more tailored look. The fabric is actually a linen table runner from TK Maxx. I love the distressed feminine design.
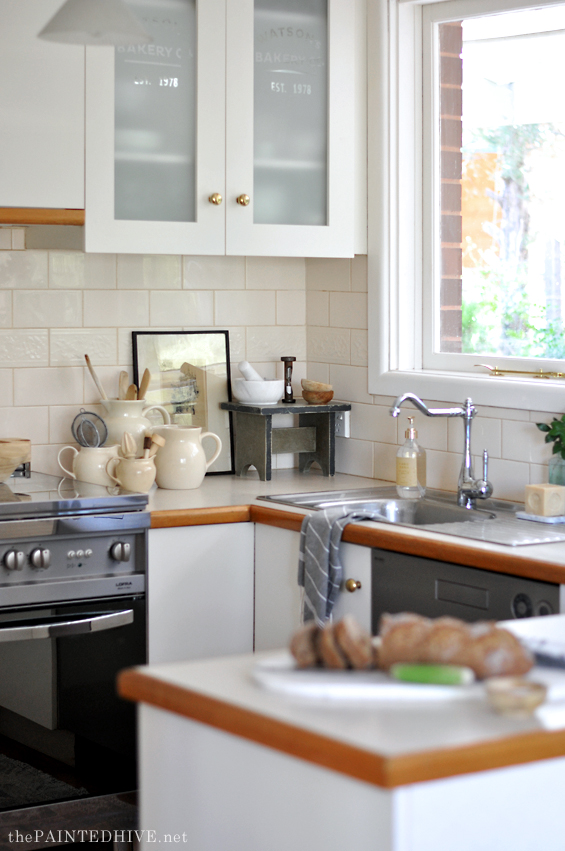
A subtle detail which is easy to miss is the change we made to the glass fronted overhead cabinet.
Mum decided she wanted to re-claim that cupboard, which had only ever been used purely for display purposes, as a space to house all of her regular crockery. Though she didn’t want to have to worry about keeping it neat all the time.
Our solution was a bit of an experiment.
At first we were merely going to frost the glass, though then decided to try adding a vintage style graphic. Almost like the glass had been reclaimed from an old store or something.
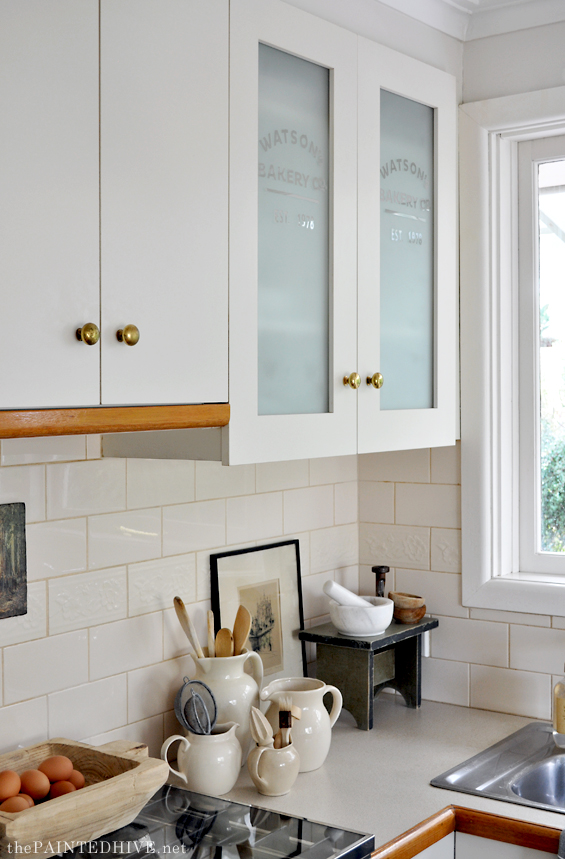
We cleaned the glass, attached basic alphabet stickers in a simple design (Watson’s Bakery Co. Est. 1978 – ‘Watson’ being my parents surname, ‘1978’ being the year they were married), taped off the door surrounds to protect them from any over-spray, then coated the glass with frosting spray paint (Dulux Duramax Frosted Glass Effect).
Once the paint was dry we carefully peeled the stickers off to reveal the design. I was skeptical though it actually looked pretty cool!
YOU CAN NOW FIND THE FULL TUTORIAL HERE
Like I mentioned, it’s just a subtle detail, and can only be properly seen on certain angles, though it adds a nice point of personalised difference. And the frosting works perfectly to conceal the contents as intended.
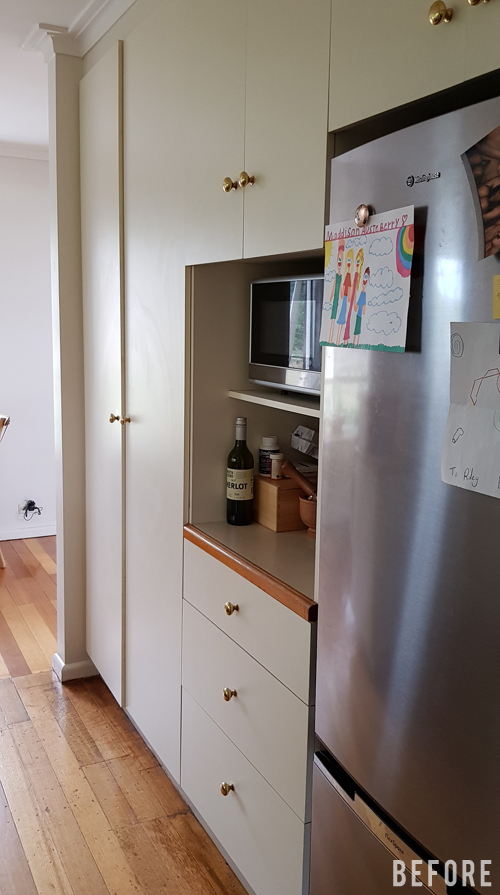
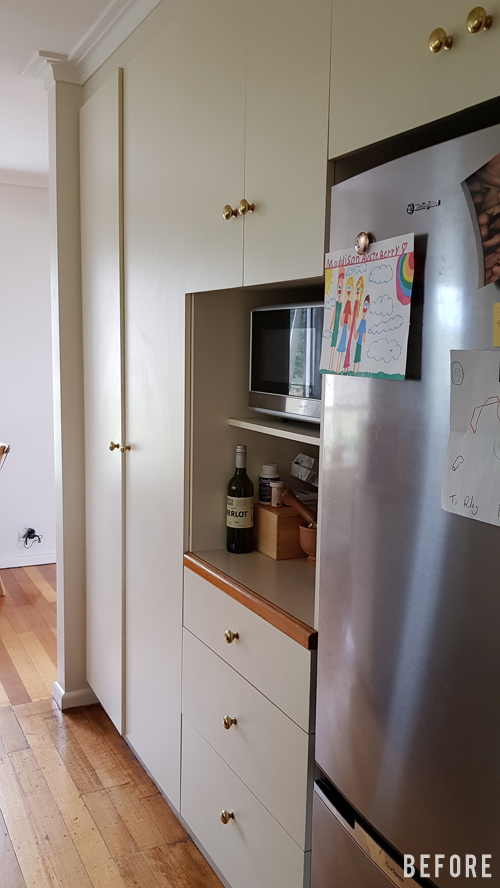
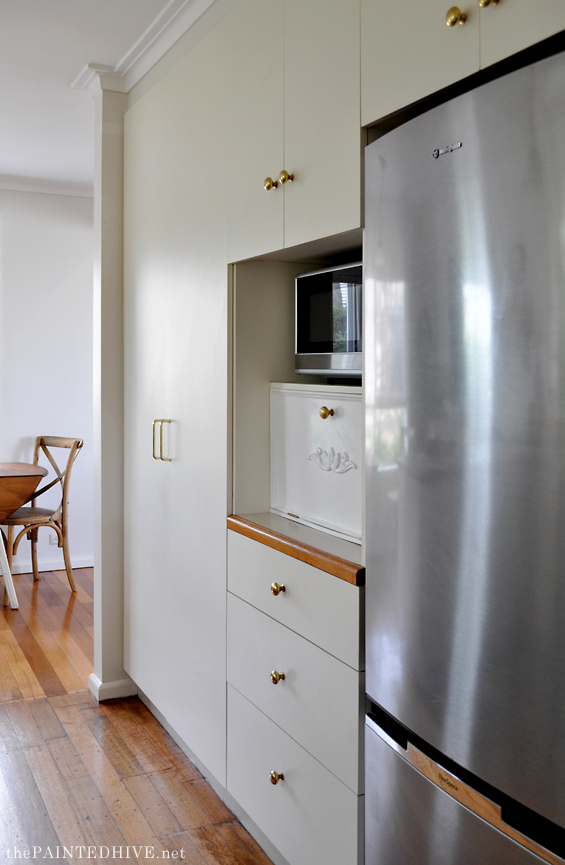
You can see the laundry cupboard I added trim to a few years back through the doorway.
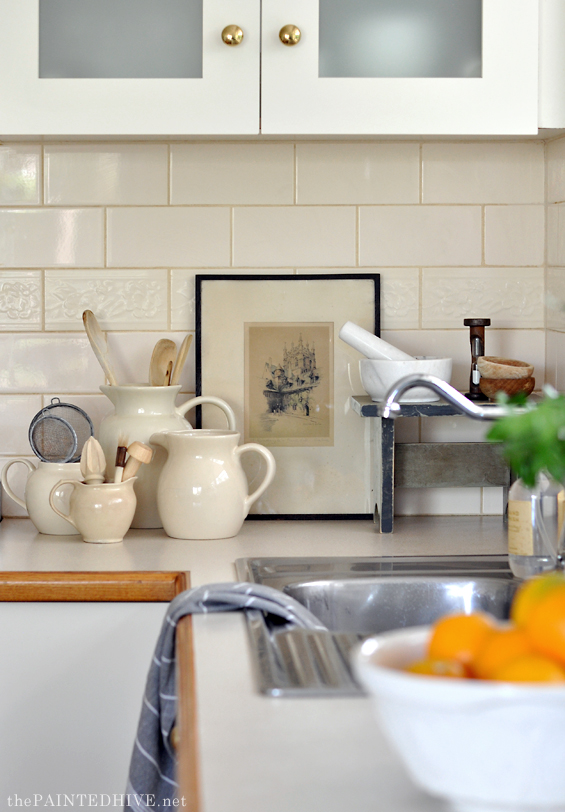
Along the ‘cabinet wall’ there was an open cubby (just below the microwave) which mum could never keep tidy. Dad built a basic cupboard front using scraps from the shed and hinged it from the bottom so it drops down like a bureau.
Not only does it work to now hide all the crap which accumulates there though mum uses it as a little work station to write shopping lists and pay bills.

It’s painted semi-gloss white to match the trim, rather than satin cream to match the cabinetry, though because it’s different I think it works.
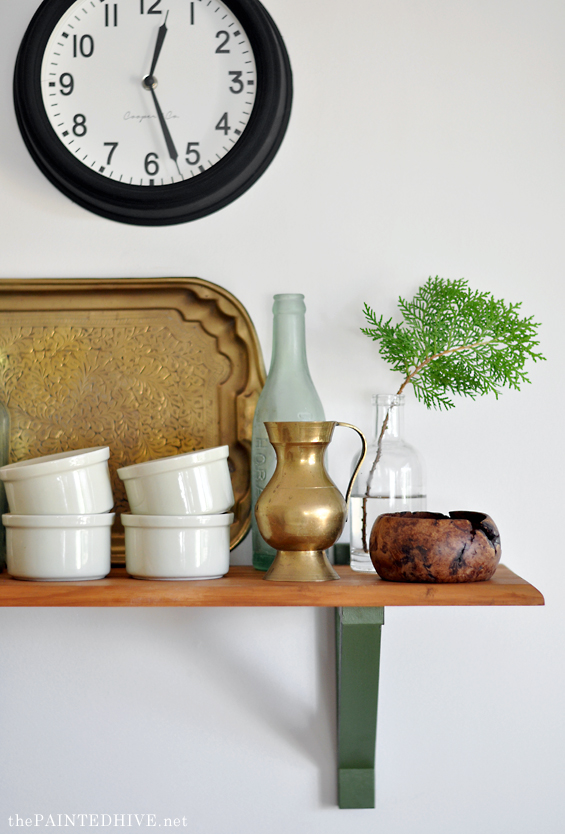
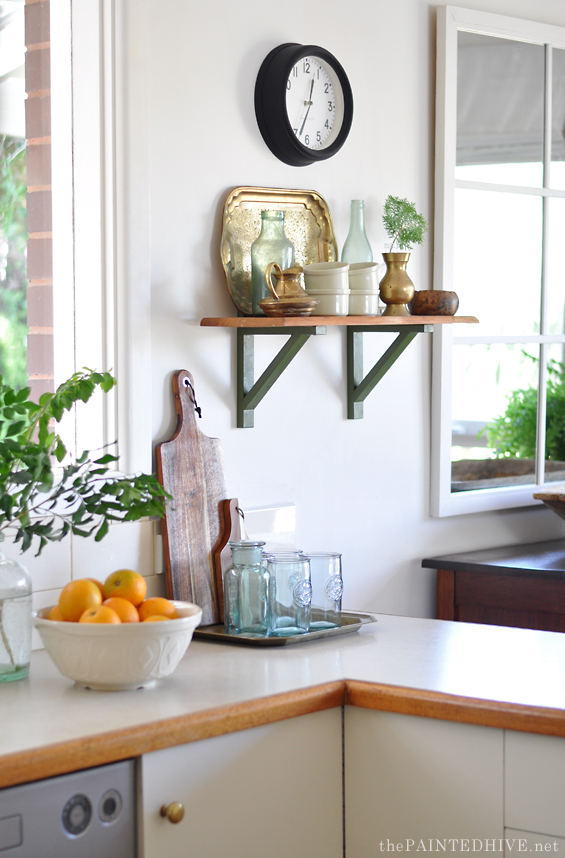
Removing the raised bar opened up more wall space above the bench, providing the opportunity to install a simple open shelf.
Open shelving is always a great solution in basic rooms which can benefit from having some pretty decor on display.
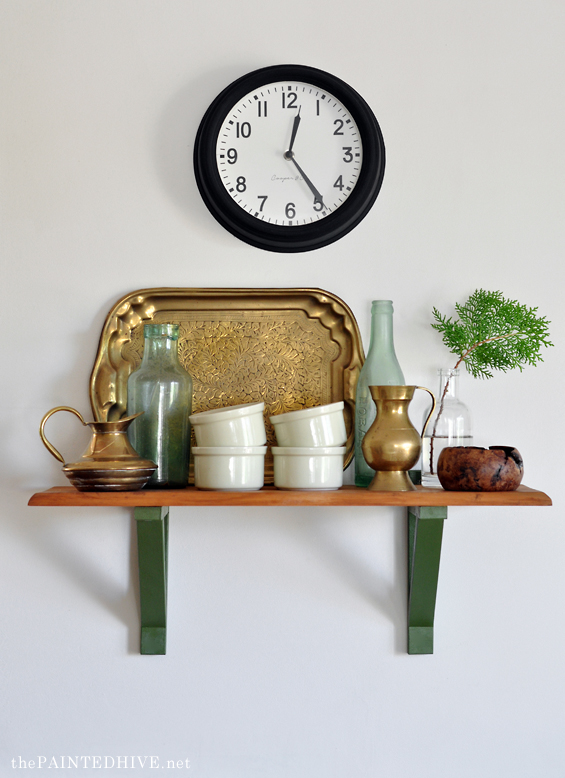
The brackets are the EKBY VALTER from IKEA which mum painted an earthy green and the shelf itself is a relic from my brother’s childhood bedroom.
A few other simple updates include…
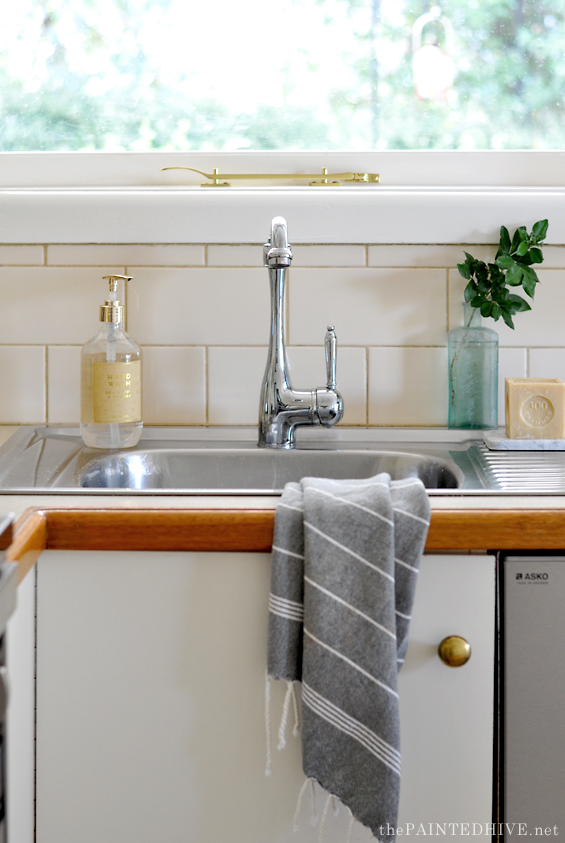
…switching out the generic window winder for a cute antique style brass latch. Mum found it at Bunnings.
…changing the pantry door hardware to more modern style gold pulls. These ones are from IKEA.
…removing the blinds. They were sweet though after twenty years it was time for a change. It’s nice having the windows free from any dressings though I think some colour and pattern would be nice here. Mum will probably put some new ones up in the future.
…painting the brass pendant black. I love brass and don’t mind when it’s a bit worn and weathered, though the pitting and tarnish really bothered mum so she hit with some black chalk paint she already had.
…replacing the range fan cover with a piece of timber trim. The original plastic cover was yellowed and just plain meh. Mum attached a left-over section of moulding from the old raised bar to better integrate it with the cabinetry.

These little changes don’t always translate well in photos however all add-up to make the room as a whole feel fresher, updated and more refined.
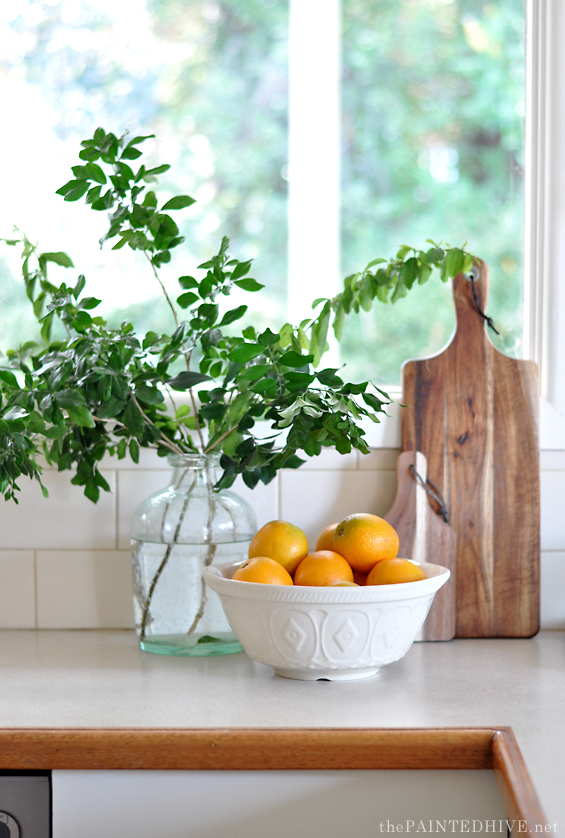
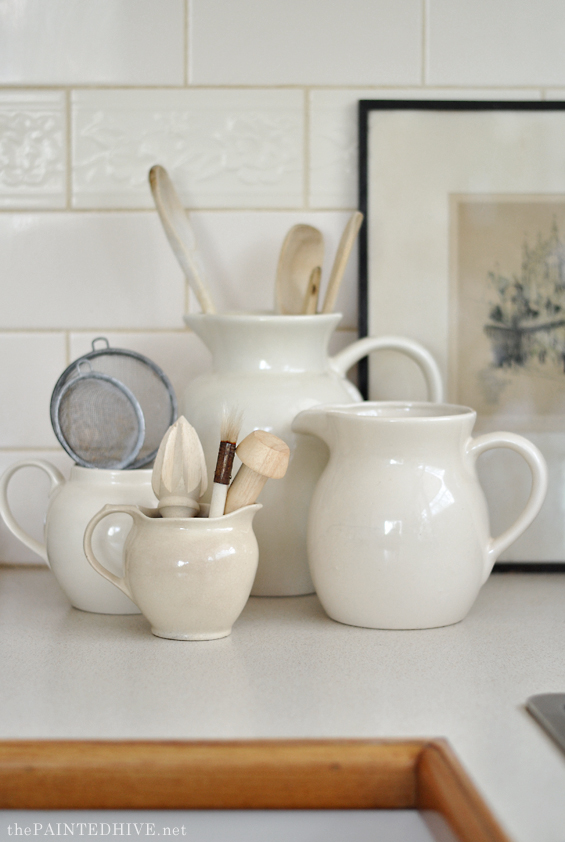
Of course, some pretty styling never hurts either.
I was careful to use only bits and pieces we already owned (most of which are inexpensive op shop and charity store finds). Bringing a room to life with accessories is probably my most favourite thing about interior decorating.
I’m sure there are those among you who may prefer the more old-fashioned charm of the ‘before’. That’s cool. I know it was never a terrible room however I think we can all relate to needing a change.
And I’m well aware there was sooooo much more we could have done to really change things up (adding trim to the cabinets, maybe painting the lowers a dramatic colour, switching out the hardware, altering the benchtop in some way, adding new lighting) however, like I mentioned, with so much of the original kitchen being nice and neutral it just didn’t feel warranted. Plus, remember, this is only a temporary fix.
The main thing is that mum released her creative tension and absolutely adores her “new” space.
Here are the comparison before and after pics…
As always, feel free to ask any questions.
I hope it helps inspire!
![]()


absolutely love it !! nice to be able to change something without “throwing out!” everything.
Thanks Vicki. Too true :)
This is fantastic and reflects real life! Most of us don’t have the budget or the time for the kitchen remodels we see on the internet. This refresh is doable and makes a difference and it’s these types of projects that inspire me instead of discourage me. Thank you for sharing and I’m sure your Mom loves the updates, they really brighten up a great space – Well done!
Thanks so much :)
I love this! I love seeing this kind of “room refresh” – it fits into a budget, it’s manageable in terms of time, uses what you already have and it can make you feel excited about a room that you got so used to seeing every day – and it looks great! While it was a beautiful kitchen before, taking out the raised bar really opens up that space and it feels brighter. It’s beautifully styled and the little details really make it. GREAT job to all!
Thank you :)
WOW! I can really see the changes in light! What a difference a few little things make. I love the bare window!
The changes are very obvious and I love it !! It takes extra creativeness to make small changes like you did and have it shine so. Great job to ALL
As always, fantastic job! It’s a great makeover. I love how the pendant light turned out. Before, I didn’t even notice it. Now it fits nicely. Well done on building the anticipation for the “after pictures” in yesterday’s email. I am always excited to get your emails because I love your work. I wasn’t expecting a “to be continued” ( ; Well played. So, worth the wait. Lucky mum!
Thanks so much :)
Posts like this are the reason your fans get excited when an email from The Painted Hive arrives in their inbox. You and your mum seriously rock!
Aw, thanks Julie :)
I Love seeing a room refresh like this where I can actually relate to the changes. That was sheer bravery to whack down the bar but the change in openness and style is immeasurable. I love the styling the cream crockery, the shelf with the rectangular brass tray, greenery.
How clever is your mum?!! Such a pretty updated kitchen. To me, that range hood trim made a huge difference, and I love the little shelf too.
I agree, I immediately noticed that trim detail in the “after” photos; so smart to tie it into the counters! This is so great- clever and cute!
Thank you ladies :)
Looks lovely! It’s inspiring to see what cab be had with so little money! I always 3njoy this sort of refresh. Most people, especially people like me with limited funds, I think appreciate just how much change can be made without breaking the bank. Kudos to your mum and her saw, and you and your “eye”!❤🐝
Thank you Deb :)
Your projects are The Best. Small changes with huge impact and so much sweet, sweet style. You and your mum are fabulous.
I’m on the hunt for some glass cabinets to frost.
Great job! I see where you get your great style.
You guys did not disappoint! A super doable, physical refresh that does way more mentally for the every day user. Just like a new cut and color when we start to feel a bit frumpy. Not many notice the change, but it can create such a lift in our own spirits. Well done, you talented gals!
Oh my gosh! They might have been minor changes but WOW what a transformation. The kitchen looks amazing.
LOVE!!! So wonderful to see such beautiful style. Perfectly “staged” and perfectly livable. Thank you so much for sharing your “make the most of what we have”! I am very impressed.
Thanks Suzy :)
So much better now! I love the subtle, yet refreshed look. This comes to show that you don’t need a fortune to have a ‘new’ look.
Fantastic update and love that your mom pulled out her chainsaw! What’s most important is that she loves her new space and it didn’t cost the moon. What a creative family you have! Dad included! It’s really a huge difference. I especially love the frosted cabinet. Just love it!
Thanks for sharing this project, it’s a great one. Kudos to you and your Mom for showing that a refresh can make a world of difference.
So much brighter and lighter! I absolutely love it and under $100 – who could ask for anything better! Your family definitely rocks the creative gene!!! Great job!
Love the changes that were completely possible with not a lot of work! I see where you get your designing talent, your mother must have always been doing different things and you took after her! Thanks for you great ideas, I love to read your blog!
Outstanding! Proof that a classic white kitchen is the way to go. For me anyway.
Yep, timeless and adaptable.
Well done! I’m sure the kitchen feels great and a realistic remodel we can all relate to. Frankly you had me at, “My mother took her circular saw…”! I have a few things I’d like to take a circular saw to!
We are changing our kitchen now. I was noticing your refrigerator and microwave. What brand are they? Thanks. Love reading your blog!
Thanks. The fridge is a Westinghouse and the microwave is a GVA.
I absolutely love it all. Such a great makeover.
Great makeover! It’s hard to believe that it was so inexpensive! It looks so much brighter and the space seems tremendously more usable. I love it!
A great refresh! Small things make large impact.
Fantastic new look! Taking the “bar” off and removing the valance created a whole new space. The other changes just enhanced it. I know how it can be when you get the niggle, and just need to go for it! It’s a great little space – bravo to both of you. :)
Job well done. Love the frosting on the glass door.
Keep doin’ what you do! Just goes to show us all that you don’t need to break the bank to have a warm and inviting space!
I knew with a $100 make over in Australia you cannot do much, and yet I am amazed as always at the transformation. I love this, a big difference and yet so affordable!
Now I have some idea where you get your vision and creativity from, Kristine! Great job, as always, at making remodeling and decorating affordable and pretty! Thank you so much to you and your mum!
Aw, thank you so much.
Great budget fix, and boy, how I would love to have that stove! The new decor fits in so well with what was already there! Great job!
Thanks so much. Yes, it’s a great stove. I wish I had one like it too!
I love the changes, it looks so open and lighter!!! And without spending a lot of money! Hurray for your Mom for pulling out the saw.
Thank you :)
“REV UP YOUR POWERSAW!” Wow…removing the bar and taking down the curtains made the biggest change. Love gold stools and all the styling. Mom did a great job.
Looks fantastic! Really clever and simple changes add up to a big difference. Love it!
thanks for putting the photos together I was scrolling back and forth. I love your design ideas. It’s amazing how little changes make a difference. I thought you had painted the cabinets more white because of how much more light is in the room. I think your mom’s kitchen has a lot of good bones. I love her subway tile and the layout is great. I do think removing that counter really opens up counter space too! I love your dads door. You have a crafty family, it looks great!
You rock Kristine! Just goes to show that it’s not about the money, we’ve all seen plenty of homes where money was no object yet they look like no-one lives in them. Well done girl, again! Love you work x
Love it! Great to see some low cost changes, easy to do with a great outcome!
All the changes are good, but in the interest of practicality, how can anyone sit at the counter without bumping their knees?
Yes, I mentioned this in the post. With no overhang it’s not exactly a “dining”counter. People just tend to gather there so the stools are merely in place to provide a little perch. Given the makeover is only temporary and we were using what was already in place it just didn’t make sense to replace the counters :)
Love the changes. Fresh, subtle and ‘doable’. Love that your mum had the saw out…..apple doesn’t fall far from the tree, huh?😉 Thanks for sharing
Thanks Cathy. Yep, no real secret where I get my DIY craziness from :)
Absolutely perfect!!!
What a difference, so bright and airy :-)
Love it. My kitchen has the same cabinetry and I have considered painting it. Now I am even more keen to do so.
I love It! It’s a great new look, so much brighter and fresher. R
Thanks Robyn :)
Your mum is brilliant! How brave of her to dismantle the counter. I love the changes she has made; they make a big difference.
I think this is amazing! I lack the kind of vision for these ‘tweaks’ that, I think, made a huge difference. My favorite changes are removing the window curtain and counter bar back. It all looks much brighter
What a difference! Little tweaks and changes make such a big difference. Very inspiring!
I love seeing what you, and now your mom, do on a limited budget. The kitchen is fantastic. Removing the thingy from the counter did wonders, as did adding that little bit of trim on the hood. And of course the little cupboard. Thank you for sharing. I feel bad you have to warn people to be kind! Others asked as well about your stove…what brand is that?
Thank you so much. The stove is a Lofra.
Fantastic improvement!!!. It just shows how much can be done without spending a lot!. I particularly like the extra light from removing the window coverings and removing the raised hutch over the peninsulas was brilliant. I suppose it would have cost too much to add a small overhang where you sit. Th pendant painted black and the new trim above the cooker all look as if they had always been there since some more recent remodel. All in all I was very impressed!
Thanks so much. Yes, as this is only a temporary update it just didn’t make enough sense to add an overhang to the bench as it would have meant replacing the entire counter.
Love it Kristin, you are so inspiring, thank you for sharing. Jen
Thanks so much :)